
3
Creating Azure App Service Web Apps
We’ve covered some good ground so far with hosting applications on Infrastructure as a Service (IaaS). We’re now going to step into Platform as a Service (PaaS) with Azure App Service. Developers that traditionally had web apps hosted on an Internet Information Services (IIS) server – even if it was a cloud-based VM with IaaS – are moving their applications so that they’re hosted on App Service, which brings even more benefits to this scenario than IaaS.
It’s important to understand that Azure App Service is more than just for hosting web apps, so we’ll start with an overview of App Service as a whole before turning our focus to web apps. We’ll also take what we learned about containers in the previous chapter and show how containers and App Service can work together to bring you even more value.
By the end of this chapter, you’ll have a solid understanding of Azure App Service. You’ll also understand how you can manage your web applications throughout their life cycle in the cloud, including configuring, scaling, and deploying changes in a controlled and non-disruptive way.
In this chapter, we will cover the following main topics:
- Exploring Azure App Service
- Configuring app settings and logging
- Scaling App Service apps
- Leveraging deployment slots
Technical requirements
The code files for this chapter can be downloaded from https://github.com/PacktPublishing/Developing-Solutions-for-Microsoft-Azure-AZ-204-Exam-Guide/tree/main/Chapter03
Code in Action videos for this chapter: https://bit.ly/3qPjR7R
Exploring Azure App Service
Azure App Service is an HTTP-based PaaS service on which you can host web applications, RESTful APIs, and mobile backends, as well as automate business processes with WebJobs. With App Service, you can develop in some of the most common languages, including .NET, Java, Node.js, and Python. With WebJobs, you can run background automation tasks using PowerShell scripts, Bash scripts, and more. With App Service being a PaaS service, you get a fully managed service, with infrastructure maintenance and patching managed by Azure, so you can focus on development activities.
If your app runs in a Docker container, you can host the container on App Service as well – you can even run multi-container applications with Docker Compose. As early as Chapter 1, Azure and Cloud Fundamentals, we alluded to App Service allowing you to scale – automatically or manually – with your application being able to be hosted anywhere within the global Azure infrastructure while providing high availability options.
In addition to the features covered in this chapter, App Service also provides the option for App Service Environments (ASEs), which provide a fully isolated environment for securely running apps when you need very high-scale, secure, isolated network access and high compute utilization.
From a compliance perspective, App Service is International Organization for Standardization (ISO), Payment Card Industry (PCI), and System and Organization Control (SOC)-compliant. A good resource on compliance and privacy is Microsoft Trust Center (https://www.microsoft.com/trust-center).
Azure Marketplace was mentioned in both previous chapters as a source for resource images. Application templates can also be found within the marketplace for things such as WordPress, among others. With the rich Azure ecosystem, there are many other integrations for convenience and security (including Visual Studio and Visual Studio Code integrations), the list of which is increasing all the time.
App Service also provides continuous integration and continuous deployment (CI/CD) capabilities by allowing you to connect your app to Azure DevOps, GitHub, Bitbucket, FTP, or a local Git repository. App Service can then automatically sync with code changes you make, based on the source control repository and branch you specify.
App Service is charged based on the compute resources you use. Those resources are determined by the App Service plan on which you run your applications. App Service apps always run in an App Service plan, so this seems like the logical point at which to introduce App Service plans.
App Service plans
If you’re familiar with the concept of a server farm or cluster, where a collection of powerful servers provide functionality beyond that of a single machine, App Service plans should make sense (in fact, the resource type for App Service plans is Microsoft.Web/serverfarms). As we just mentioned briefly, an App Service plan defines the compute resources web apps use. I use the plural context because – just like in a server farm – you can have multiple apps using the same pool of compute resources, which is defined by the App Service plan. App Service plans define which operating system to use, the region in which the resources are created, the number of VM instances (under the hood, VM instances are running, but this is PaaS, so they’re maintained for you), the size of those VMs, and the pricing tier.
As you might be used to by now, some pricing tiers will provide access to features that aren’t available in others. For example, the Free and Shared tiers run on the same VM as other App Service apps, including other customers’ apps, and are intended for testing and development scenarios. These tiers also allocate resource quotas for the VM, meaning you can’t scale out. All remaining tiers other than Isolated and IsolatedV2 have dedicated VMs on which your apps can run unless you specifically place the apps within the same App Service plan. The Isolated and IsolatedV2 tiers run on dedicated VMs, but they also run on dedicated Azure Virtual Networks (VNets), providing network and compute isolation, as well as the maximum scaling out capabilities. Azure Function apps also have the option to run in an App Service plan.
A common misunderstanding is that you need to have one App Service plan per App Service application. This is not always necessary (you can’t mix Windows and Linux apps within the same App Service plan, so you’d need multiple plans if you have that). Remember – an App Service plan defines a set of resources that can be used by one or more applications. If you have multiple applications that aren’t resource-intensive and you have compute to spare within an App Service plan, by all means, consider adding those applications to the same App Service plan. One way to think of an App Service plan is as the unit of scale for App Service applications. If your App Service plan has five VM instances, your application or applications will run across all five of those instances. If you configured your App Service plan with autoscaling, all the applications within that App Service plan will scale together based on those autoscale settings. Within the Azure portal, App Service plans are described as representing the collection of physical resources that are used to host your apps:

Figure 3.1 – The Azure portal description of App Service plans
We’ll explore the Azure portal experience of creating an App Service plan here since this will make it easier to illustrate the configuration options:
- Either navigate from https://portal.azure.com to Create a resource and select App Service plan or use the following URL to jump straight to it: https://portal.azure.com/#create/Microsoft.AppServicePlanCreate.
- Select your subscription from the Subscription dropdown and select an existing resource group from the Resource Group dropdown, if you have one that you’d like to use. Alternatively, select the option to create a new one.
- Enter the desired name for your App Service plan, select Windows for the Operating System option, and select your Region, as shown in the following screenshot:
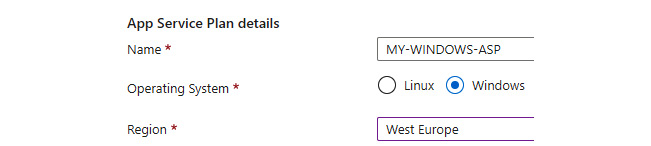
Figure 3.2 – App Service plan details within the Azure portal
- Click on the Change size link to be taken to a different kind of specification picker than you might be used to from other resource types. Look through the different tabs (Dev / Test, Production, and Isolated) while selecting different tiers and noticing the changes in hardware and features available for the different tiers. Also, notice that there is a See additional options link, which reveals further tiers that are available.
We’re going to be making use of staging slots and auto scale later in this chapter, so select the least expensive Production tier that provides these features. For me, that’s S1:
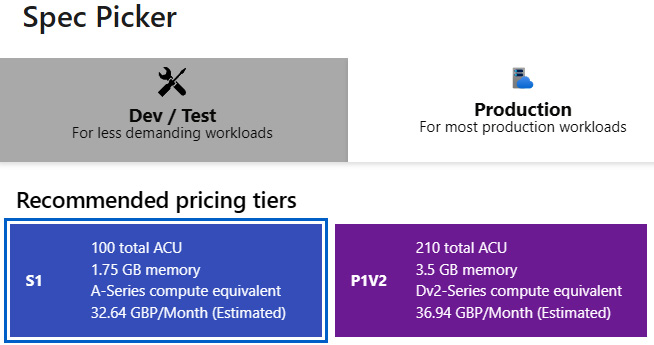
Figure 3.3 – App Service Spec Picker within the Azure portal
- Select Apply.
Notice that, depending on which tier you selected, the option to enable Zone redundancy is disabled, because that’s only available in higher tiers. Make a note of the SKU code, not the name. In this example, the SKU code is S1, not just Standard:

Figure 3.4 – SKU code showing in the Azure portal
- Click on Review + Create, but don’t select Create; instead, click on Download a template for automation to the right of the Create button. Look through the generated JSON ARM template, which should make sense now if it didn’t before you started this book. You could, in theory, take this ARM template and deploy it in the same ways we covered in the previous chapter. If you click on the Parameters tab, you’ll see that skuCode is listed, which is what we need.
- Close the template with the cross (X) toward the top-right of the current screen (not the one that closes the entire browser window!). Alternatively, you could scroll to the left to navigate to a previous screen.
- Click on Create to provision the new App Service plan. Once completed, go into your new App Service plan and look through the available settings. You will be able to see any apps running within the plan, storage use, networking settings, as well as horizontal and vertical scaling options.
- Open a terminal session, make sure you’re logged in, and set it to the right subscription.
- Create a Linux App Service plan using the following CLI command:
az appservice plan create -n "<plan name>" -g "<resource group>" –sku "<SKU code>" --is-linux
Alternatively, use the following PowerShell command:
New-AzAppServicePlan -Name "<plan name>" -ResourceGroupName "<resource group>" -Tier "<SKU code>" -Location "<region>" -Linux
While the CLI accepts but doesn’t require a location because it will inherit from the resource group, PowerShell requires the location to be specified.
Now that we’ve explored the App Service plans that provide the underlying compute resources for your apps, we can move on to App Service web apps and put these App Service plans to good use.
App Service web apps
Originally, App Service was only able to host web apps on Windows, but since 2017, App Service has been able to natively host web apps on Linux for supported application stacks. You can get a list of the available runtimes for Linux by using the following CLI command:
az webapp list-runtimes --linux -o tsv
The versions you see relate to the built-in container images that App Service uses behind the scenes. If your application requires a runtime that isn’t supported, you can deploy the web app with a custom container image. If you want to use your own custom containers, you can specify the image source from an ACR (which we’ll do shortly), Docker Hub, or another private registry.
Now, let’s create a basic web app using the Azure portal since – as with App Service plans – it’s easier to illustrate certain elements:
- Navigate to Create a resource in the portal and select Web App or go straight to the URL: https://portal.azure.com/#create/Microsoft.WebSite.
- Make sure you’ve got the correct subscription and resource group selected (or create a new one). Enter a globally unique web app name and select Code next to Publish.
Select the .NET runtime stack that matches the version we used in the containers demo in the previous chapter (it was .NET 6.0 at the time of writing), then select Linux for the Operating System option, along with your appropriate region. Notice that the Linux App Service plan has already been selected for you in the Linux Plan field and that you can’t select the Windows one, despite it being in the same subscription and region (the resource group doesn’t matter).
Although we’re using pre-created App Service plans, notice that you can create a new one at this point. If you were to use the az webapp up (don’t do it right now) CLI command, it would automatically create a new resource group, app service plan, and web app.
- Progress to the Deployment screen and set the Continuous deployment radio button to Enable. Just notice the options available to you and then toggle the radio button back to Disable. At the time of writing, the only option available is GitHub Actions, but you do get more options within the Deployment Center area of the app once created.
- Continue through the wizard and create the web app. Once completed, go to the resource.
- From the Overview blade, notice that App Service Plan is listed.
- Navigate to the Deployment Center area and view the Continuous Deployment (CI/CD) options that are available in addition to GitHub under the Source dropdown.
- Back to the Overview blade, select Browse to open the web app in your browser. You will be presented with the generic starter page:
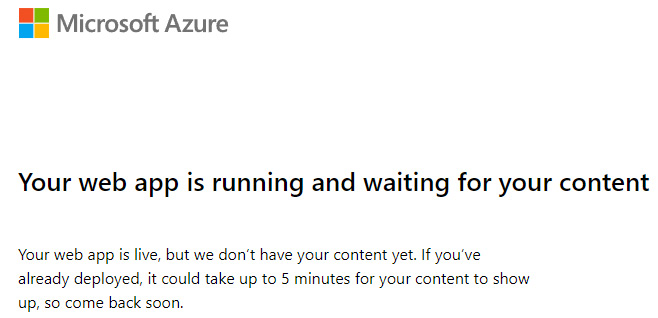
Figure 3.5 – Web app starter page content
- Create a Windows web app with the following CLI command:
az webapp create -n "<globally unique name>" -g "<resource group>" --plan "<name of the Windows App Service plan previously created>"
Alternatively, use the following PowerShell command:
New-AzWebApp -Name "<globally unique app name>" -ResourceGroupName "<resource group>" -AppServicePlan "<name of the Windows App Service plan previously created>"
A location isn’t required here since it will inherit from the App Service plan (App Service plans will only be available within the same subscription and region).
- Once created, open the resource and the Extensions blade, then browse the available extensions, which we referred to in the previous chapter.
With that, we’ve created some App Service plans and web apps. Now, let’s deploy some very basic code to one of our web apps:
- If you haven’t already cloned our code repository, do so now from an appropriate directory by using the following command from a terminal session:
git clone https://github.com/PacktPublishing/Developing-Solutions-for-Microsoft-Azure-AZ-204-Exam-Guide
Feel free to either work from the Chapter03�1-hello-world directory or create a new folder and copy the contents to it.
- Change the terminal directory to the correct directory.
- Deploy this basic static HTML application to the Windows web app and launch it in the default browser using the following CLI command:
az webapp up -n "<name of the Windows web app>" --html -b
Here, we added the -b (the short version of --launch-browser) argument to open the app in the default browser after launching, but you don’t need to. It just saves time because you should browse to it now anyway. Using the --html argument ignores any app detection and just deploys the code as a static HTML app.
- Make an arbitrary change to some of the contents of the index.html file and run the same CLI command to update and browse to your updated application.
- Optionally, to save on costs and keep things simple, go to the Azure portal and delete the Windows App Service and the Windows App Service plan with it.
We will only be using the Linux App Service for the rest of this chapter, so the Windows one is no longer required unless you want to compare the experience with Linux/containers as we go along.
That was about as simple as it can get. We’re not going to run through every different type of deployment (deploying using a Git repository, for example), but feel free to check out the Microsoft documentation on that, should you wish. We’ll talk about CI/CD toward the end of this book as well. For now, the last deployment method we will look at before moving on is custom containers.
We’re going to reuse the aspnetapp sample we downloaded in the previous chapter, create an ACR, store our container image there, and then use that to deploy the containerized application to our App Service. Let’s get started:
- Create a new folder for this exercise. I’ve called mine app-service-container.
- Copy the aspnetapp folder from the demo-v3 folder we cloned the sample container repository to:
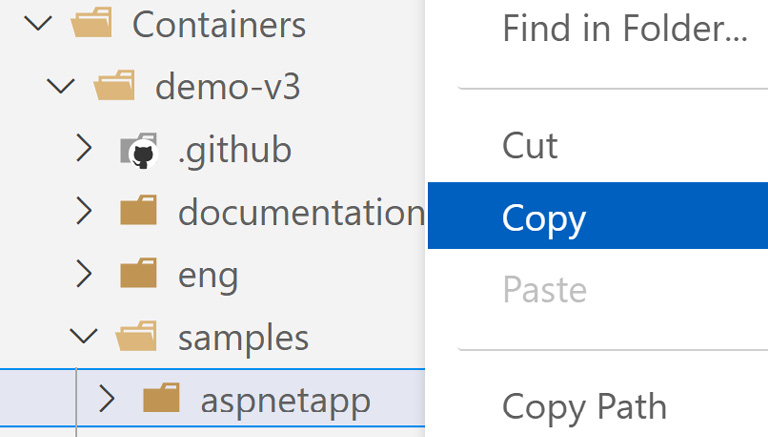
Figure 3.6 – Copying the aspnetapp folder within VS Code
- Paste it into the newly created folder. This will result in a structure similar to this:

Figure 3.7 – New folder structure with the copied aspnetapp folder in VS Code
- From a terminal session open at the app-service-containeraspnetapp directory, create a new ACR with the following CLI command:
az acr create -g "<resource group>" -n "<ACR name>" --sku "Basic"
- Enable the admin user with the following CLI command:
az acr update -n "<ACR name>" --admin-enabled true
- Copy the admin password or assign the value to a variable by using the following CLI command:
az acr credential show -n "<ACR name>" --query "passwords[0].value"
- Create a new container image from the Dockerfile using the ACR build task, giving it both a 1.0.0 tag and a latest tag using the following CLI command:
az acr build --image "chapter3:1.0.0" --image "chapter3:latest" --registry "<ACR name>" --file "Dockerfile" .
We used two tags to illustrate how you can version your images with semantic versioning while also making sure that the most recent version is tagged with the latest tag as well. A link to information on semantic versioning can be found in the Further reading section of this chapter.
- Update the Linux App Service so that it uses the container image with the following CLI command:
az webapp config container set -g "<resource group>" -n "<app-service>" -r "https://<ACR name>.azurecr.io" -i "<ACR name>.azurecr.io/chapter3:latest" -u "<ACR name>" -p "<password obtained from step 6>"
- Navigate to the Linux App Service within the Azure portal and view the Deployment Center area, which now shows the container configuration.
- Open the Configuration blade. You will see that a few DOCKER_ application settings have been added, which your App Service will use.
- Browse to your App Service URL in your browser. You will see that the same web app we ran within a container instance in the previous chapter is now running on App Service within a container.
At the moment, anybody with a browser and an internet connection could access your web app if they had the URL. Now, let’s learn how authentication and authorization work with App Service so that we can require users to authenticate before being able to view our shiny new containerized web app.
Authentication and authorization
Many web frameworks have authentication (signing users in) and authorization (providing access to those that should have access) features bundled with them, which could be used to handle our application’s authentication and authorization. You could even write tools to handle them if you’d like the most control. As you may imagine, the more you handle yourself, the more management you need to do. You should keep your security solution up-to-date with the latest updates, for example.
With App Service, you can make use of its built-in authentication and authorization capabilities so that users can sign in and use your app by writing minimal code (or none at all if the out-of-the-box features give you what you need). App Service uses federated identity, which means that a third-party identity provider – Google, for example – manages the user accounts and authentication flow, and App Service gets the resulting token for authorization.
Authentication and authorization module
Once you enable the authentication and authorization module (which we will shortly), all incoming HTTP requests will pass through it before being handled by your application. The module does several things for you:
- Authenticates users with the identity provider
- Validates, stores, and refreshes the tokens
- Manages the authenticated sessions
- Injects identity information into the request headers (which we’ll also look at shortly)
On Windows App Service apps, the module runs as a native IIS module in the same sandbox as your application code. On Linux and container apps, the module runs in a separate container, isolated from your code. Because the module doesn’t run in-process, there’s no direct integration with specific language frameworks, although the relevant information your app may need is passed through using request headers, making this a good time for the authentication flow to be explained.
Authentication flow
It’s important to understand, at least to some extent, what the authentication flow looks like with App Service, which is the same regardless of the identity provider, although different depending on whether or not you sign in with the provider’s SDK. With the provider’s SDK, the code handles the sign-in process and is often referred to as client flow; without the provider’s SDK, App Service handles the sign-in process and is often referred to as server flow. We’ll discuss some of the theory first, before checking it out in practice.
The first thing to know is that the different identity providers will have different sign-in endpoints. Here are the currently generally available (GA) identity providers and their respective sign-in endpoints:
- Microsoft Identity Platform: /.auth/login/aad
- Facebook: /.auth/login/facebook
- Google: /.auth/login/google
- Twitter: /.auth/login/twitter
- Any OpenID Connect provider: /.auth/login/<provider name>
The following diagram illustrates the different steps of the authentication flow, both using and not using the provider SDK:
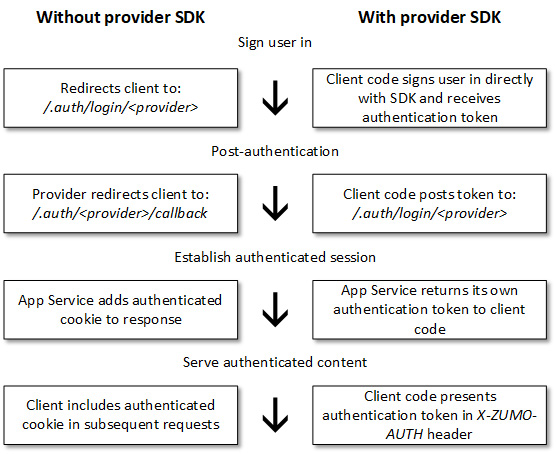
Figure 3.8 – Authentication flow steps
You can configure the behavior of App Service when incoming requests aren’t authenticated. If you allow unauthenticated requests, unauthenticated traffic gets deferred to your application, and authenticated traffic gets passed along by App Service with the authentication information in the HTTP headers. If you set App Service to require authentication, any unauthenticated traffic gets rejected without getting passed to your application. The rejection can be a redirect to /.auth/login/<provider> for whichever provider you choose. You can also configure the rejection to be a 401 or a 403 response for all requests.
Seeing the authentication flow and authorization behavior in action will help cement your understanding of the topic, so let’s configure our App Service to make use of the authentication and authorization module. We’re going to use the Azure portal for this exercise, as that will be easier to illustrate and understand. The exam doesn’t require you to know all the commands to set this up programmatically; you just need to have some understanding of the setup and behavior. We’ll also go into more detail in Chapter 7, Implementing User Authentication and Authorization:
- Open your App Service within the Azure portal and navigate to the Authentication blade.
- Select Add identity provider and notice the providers available (some are in preview at the time of writing, so they won’t be in the exam for a while, hence not being listed as providers in this book).
- From the provider list, select Microsoft. Take note of the available settings and how they relate to what we’ve just been discussing. Leave everything as default and progress to Permissions.
For simplicity, we’re going to create a new app registration because a detailed conversation about app registrations and service principles will come in Chapter 7, Implementing User Authentication and Authorization.
- Leave the permissions as default, but just know that this is where you can specify the permissions your app should request from users when they go through the authentication process. In this case, we just want to get information on the user’s claim so that we can identify them with rudimentary information. We’ll see this in action in a few steps.
- Select Add. You will see that your App Service has a new identity provider configured and that authentication is required to be able to access the app. Notice App (client) ID? We’ll see that referenced again shortly.
- Within the Configuration blade, notice there’s a new application setting for the provider authentication secret of the app registration we just created.
- Go over to Azure Active Directory and open App registrations. Find and open the app registration that we created (if you left the name as the default, it will be the same name as your App Service).
- Notice that Application (client) ID here is the same as we saw in the Authentication blade of the App Service. Then, navigate to the Branding & properties blade, noticing that Home page URL matches the URL of our App Service.
- Within the Authentication blade, notice that the redirect URI property for the application includes the /.auth/login/<provider>/callback pattern we just discussed, with Azure Active Directory (AAD) being the provider.
- Take a look at the API permissions and Expose an API blades. You’ll see the Microsoft Graph permission we were presented with when configuring authentication, as well as the user_impersonation API scope, which allows the application to access the app on behalf of the signed-in user.
- Open a new InPrivate/Incognito browser session, open the built-in developer tool (often, you can open it with F12 for most browsers by default), and navigate to the Network tab. I’m using Microsoft Edge (not the old Edge; Chromium Edge), so my references will relate to the Edge:
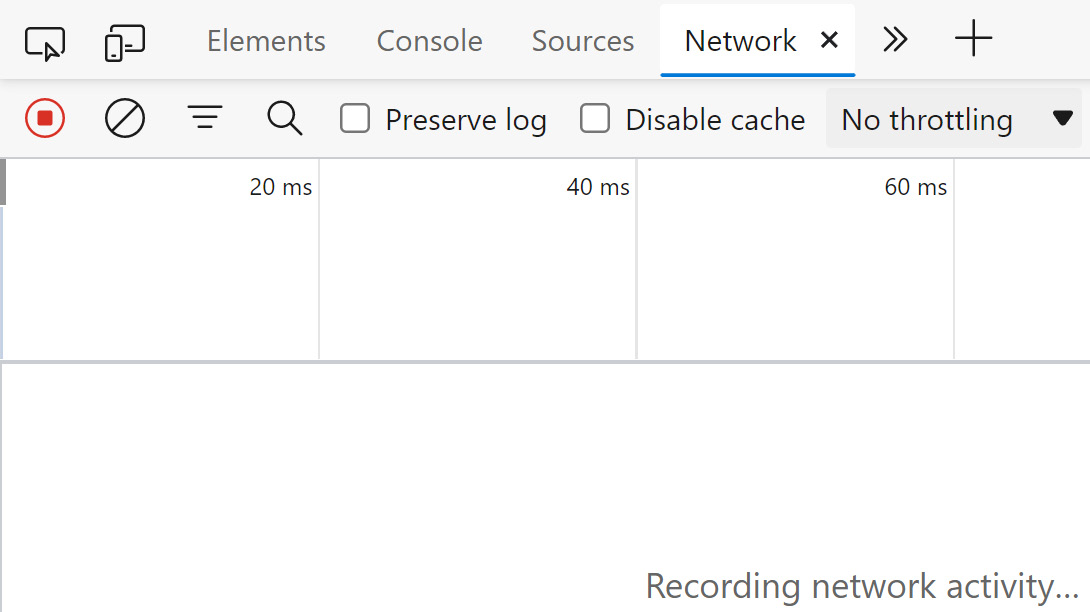
Figure 3.9 – In-browser developer tool’s Network tab
Although I’m referring to the in-browser developer tool, you’re more than welcome to use other tools if you wish.
- In this new browser session, browse to the URL of your web app (copy it from the Azure portal if you need to). You will be faced with the familiar Microsoft sign-in screen. Within the developer tools, select the entry that just lists the URL of your app, and you’ll see a 302 Found status code:
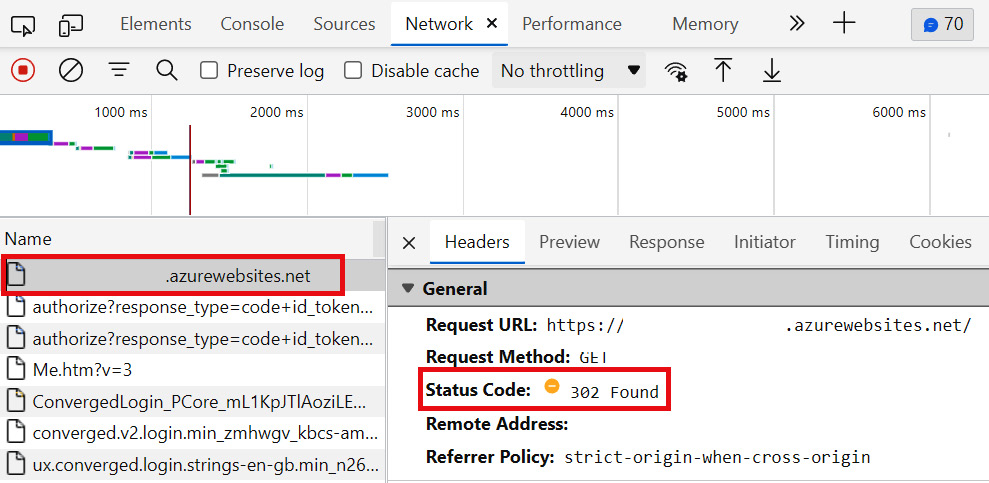
Figure 3.10 – In-browser developer tools showing a 302 status code
If you haven’t connected the dots yet, we can review the authentication settings for our app and see that we configured unauthenticated requests to receive an HTTP 302 Found response and redirect to the identity provider (Microsoft, in our example):
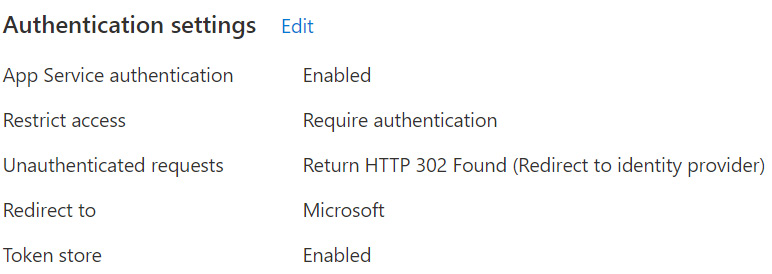
Figure 3.11 – Authentication settings summary showing the 302 status configuration
- Select one of entries with authorize? at the start. Notice that, on the Payload tab, redirect_uri and client_id are what we just saw in the app registration, telling the provider where to redirect once authentication is completed. Also, notice that the response it expects is an ID token:

Figure 3.12 – In-browser developer tool showing the redirect URI and client ID
At this point, you may want to clear the network log when you’re about to finish the sign-in process to start from a clean log when we sign in. You don’t have to, but it may make it easier to select entries when there are fewer.
- Sign in with your account. Notice that you have to consent to the permissions the app registration has configured, so accept them to proceed:
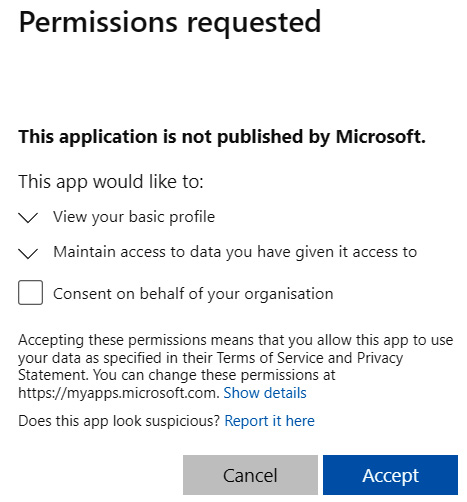
Figure 3.13 – Permissions requested by the app registration
- Select the callback entry and, from the Payload tab, copy the value of id_token (only copy the value, not the id_token wording or any other properties – which is easier to view parsed rather than source). The value should begin with ey. The format of this token is JSON Web Token (JWT).
- With the id_token value copied, open a new tab and browse to https://jwt.ms, then paste the id_token value you just copied.
On both the Decoded token and Claims tabs, any app-specific roles your account has assigned would look as follows:
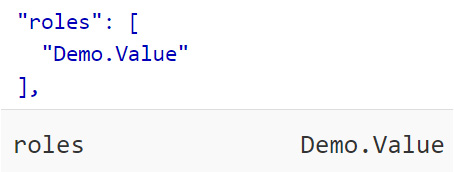
Figure 3.14 – Decoded token and claims entries showing assigned roles
- Go to the Cookies tab to see the AppServiceAuthSession cookie that was provided in the server’s response. Going to the Cookies tab for all subsequent network log entries will show that same authenticated cookie as a request cookie, which is in line with the authentication flow previously illustrated.
I hope that going into that extra bit of detail and showing the authentication flow in action helped your understanding more than simply telling you the steps. We’ll now move on to the final topic of our App Service exploration by briefly looking at some of the available networking features.
Networking features
Unless you’re using an ASE, which is the network-isolated SKU we mentioned earlier in this chapter, App Service deployments exist in a multitenant network. Because of this, we can’t connect our App Service directly to our network. Instead, there are networking features available to control inbound and outbound traffic and allow our App Service to connect to our network.
Outbound flows
First, let’s talk about outbound communication. App Service roles that host our workload are called workers; the roles that handle incoming requests are called frontends. The Free and Shared App Service plans’ SKUs use multitenant workers (that is, the same worker VMs will be running multiple customer workloads). Other SKUs will run on workers that are dedicated to a single App Service plan.
This leads us to a quick mention of worker VM types – the Free, Shared, Basic, Standard, and Premium SKUs all use the same type of worker VM. PremiumV2 uses a different VM type, while PremiumV3 uses another VM type again.
Why is this important? Because if you scale your App Service to an SKU that uses a different worker VM type, the outbound IP addresses of your App Service will change. Several IP addresses get used for outbound calls from your app, which you can see in the Azure portal by going to the Properties blade under the Outbound IP addresses heading. Alternatively, you can use the following CLI command to list them for your app:
az webapp show -g "<resource group>" -n "<app-service>" --query outboundIpAddresses -o tsv
If you wanted to get a list of all possible outbound IP addresses that your app could use, including whether you were to scale your app up to another SKU, check the Additional Outbound IP Addresses heading in the same portal location, or use the following CLI command:
az webapp show -g "<resource group>" -n "<app-service>" --query possibleOutboundIpAddresses -o tsv
To allow your app to make outbound calls to a specific TCP endpoint, you can use the Hybrid Connection feature. At a very high level, you would install a relay agent called Hybrid Connection Manager (HCM) on a Windows Server 2012 or newer machine within the network that you want to connect to, which could also be on-premises, so long as outbound traffic to Azure over port 443 is allowed. If you’re already aware of the Azure Relay feature, this is built on the Hybrid Connections capability of that feature, but this is specialized for App Service specifically, only supporting making outbound calls to a specific TCP host and port. Both the App Service and HCM make outbound calls to the Relay, providing your app with a TCP tunnel to a fixed host and port on the other side of the HCM. When a DNS request from your app matches that of a configured Hybrid Connection endpoint, the outbound TCP traffic gets redirected through the Hybrid Connection.
The other networking feature for outbound traffic is VNet integration. VNet integration allows your app to securely make outbound calls to resources in or through your Azure virtual network (VNet), but it doesn’t grant inbound access. If you connect VNets within the same regions, you need to have a dedicated subnet in the VNet that you’re integrating with. If you connect to VNets in other regions (or a classic VNet within the same region), you need a VNet gateway to be created in the target VNet.
Inbound flows
Unlike outbound IP addresses, each App Service will just have a single inbound IP address, as you may imagine. There are several features for handling inbound traffic, just as there are for outbound. If you configure your app with SSL, you can make use of the app-assigned address feature, which allows you to support any IP-based SSL needs you may have, as well as set up a dedicated IP address for your app that isn’t shared (if you delete the SSL binding, a new inbound IP address is assigned). Access restrictions allow you to filter inbound requests using a list of allow and deny rules, similar to how you would with a network security group (NSG). Finally, we have the private endpoint feature, which allows private and secure inbound connections to your app via Azure private link. This feature uses a private IP address from your VNet, which effectively brings the app into your VNet. This is popular when you only want inbound traffic to come from within your VNet.
There’s much more to Azure networking, but these are the headlines specific to Azure App Service. As you may imagine, there’s a lot more to learn about the features we’ve just discussed here. A link to App Service networking can be found in the Further reading section of this chapter, should you wish to dig deeper.
This ends our exploration of Azure App Service. Armed with this understanding, the remainder of this chapter should be a breeze in comparison. Now that we’ve gone into some depth regarding web apps, let’s look at some additional configuration options, as well as how to configure logging for our web app.
Configuring app settings and logging
It’s important to understand how to configure application settings and how your app makes of use them, which we will build on in the last section of this chapter. There are also various types of logging available with App Service, some of which are only available to Windows and can be stored and generated in different ways. So, let’s take a look.
Application settings
In the previous exercise, we navigated to the Configuration blade of our App Service to view an application configuration setting. We did the same thing in the previous chapter, without explaining the relevance of those settings in any detail. We’ll fill this gap now.
In App Service, application settings are passed as environment variables to your application at runtime. If you’re familiar with ASP.NET or ASP.NET Core and the appsettings.json or web.config files, these work in a similar way, but the App Service variables override the appsettings.json and web.config variables. You could have development settings in these files for connecting to local resources such as a local MySQL database, for example, but have production settings stored safely in App Service – they are always encrypted at rest and transmitted over an encrypted channel.
For Linux apps and custom containers (like ours), App Service uses the --env flag to pass the application settings to the container, which sets the environment variables on that container. Let’s check these settings out:
- Within the Azure portal, find and open your App Service app and navigate to the Configuration blade once more. Here, you will see some already existing application settings, most of which we’ve mentioned.
- Click on the Advanced edit button above the settings. This will bring up a JSON representation of the current application settings. This is where you can make additions or amendments in bulk, rather than making changes one by one.
- Add a new setting (don’t forget to add a comma after the last one, but before the closing square bracket). In my case, I’m calling it MY_CUSTOM_GREETING and giving it a value of Hello, World! (I’ve outdone myself this time, I know):
{
"name": "MY_CUSTOM_GREETING",
"value": "Hello, World!",
"slotSetting": false
}
Don’t worry, we’ll cover what slotSetting means later in this chapter. For now, don’t worry about it.
- Click OK and then Save at the top of the page.
- Check out the General settings tab and then the Path mappings tab to see what configuration settings we have available. The terminology within the Path mappings tab should be somewhat familiar from the previous chapter.
If we were in this same area with a Windows App Service app, we would also have a Default documents tab, which would allow us to define a prioritized list of documents to display when navigating to the root URL for the website. The first file in the list that matches is used.
- Browse to the URL of the web app to confirm nothing has changed. The container now has a new environment variable, but we’re not doing anything with it yet.
- From our previous aspnetapp example, open the aspnetappPagesIndex.cshtml file:
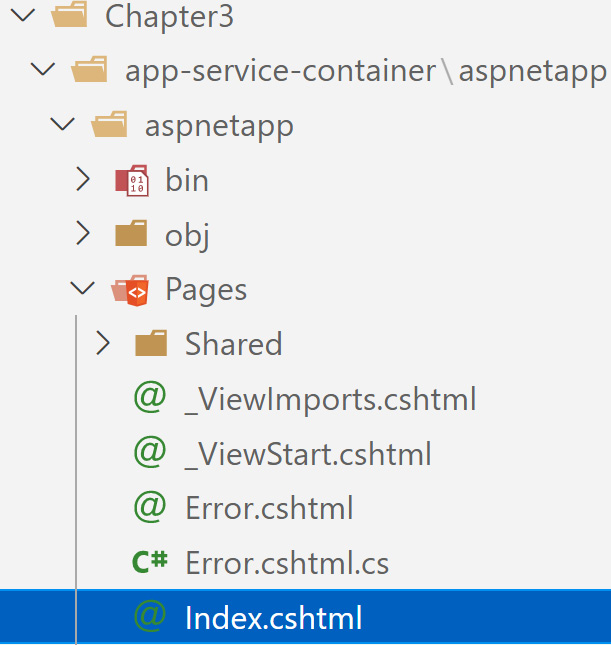
Figure 3.15 – The Index.cshtml file within VS Code
- Add some basic code to display the value of our newly created environment variable somewhere obvious, like how I’ve put the <h3>@(Environment.GetEnvironmentVariable("MY_CUSTOM_GREETING"))</h3> line beneath the main heading:

Figure 3.16 – h3 heading showing the new environment variable value
- Save the file and open a terminal session from the directory containing the Dockerfiles.
- Have the ACR build task update your ACR with a new version 1.1.0 container image for your app to use with the following command:
az acr build --image "chapter3:1.1.0" --image "chapter3:latest" --registry "<ACR name>" --file "Dockerfile" .
- As we configured the web app to use the latest tag from the ACR repository, we just need to restart the app for it to pick up our latest image. Either use the Restart button within the portal or use the following CLI command:
az webapp restart -g "<resource group>" -n "<app-service>"
- Browse to the URL for the web app (or refresh if it’s already open). You should now see that the application setting has indeed been passed to the container, which has been used by our code:

Figure 3.17 – Application setting value showing through application code
- Update your custom application setting with whatever value you want with the following CLI command:
az webapp config appsettings set -g "<resource group>" -n "<app-service>" --settings "MY_CUSTOM_GREETING=Oh, hello again!"
Give the App Service a few moments to restart, then refresh the website for the app and see that your new value has been implemented.
One final configuration you should be aware of is cross-origin resource sharing (CORS), which comes supported with RESTful APIs for App Service. At a high level, CORS-supported browsers prevent web pages from making requests for restricted resources to a different domain to that which served the web page. By default, cross-domain requests (Ajax requests, for example) are forbidden by something called the same-origin policy, which prevents malicious code from accessing sensitive data on another site. There may be times when you want sites from other domains to access your app (if your App Service hosts an API, for example). In this case, you can configure CORS to allow requests from one or more (or all) domains.
In terms of the flow, the browser will make what’s known as a pre-flight request to the app URL using an OPTIONS verb to determine whether they have permission to perform the action. This request will include headers detailing the origin and the request method (GET, PUT, and so on). The response will show what actions (if any) the app is willing to accept. Although our app isn’t an API, we can still use it to prove the most basic functionality:
- From the Azure portal, open your App Service and, within the Authentication blade, Edit the Authentication settings option, then set it to Disabled and Save. This will make the following steps easier to follow.
- Enable CORS on the App Service and ensure it only accepts cross-origin requests from a specific URL (it doesn’t need to exist; just pick any, even localhost) by going to the CORS blade and adding a domain to the Allowed Origins field (don’t check the box to request credentials). The same can be achieved with the following CLI command:
az webapp cors add -g "<resource group>" -n "<app-service>" --allowed-origins "http://somedomain.notreal"
- From a terminal session, execute the following cURL command, passing in the OPTIONS verb and checking whether a GET request from a domain other than what we allowed is permitted:
curl -v -X OPTIONS "https://<app-service>.azurewebsites.net" -H "Access-Control-Request-Method: GET" -H "Origin: http://someotherdomain.notreal"
Notice the lack of helpful information in the response other than the line that contains something similar to {"code":400,"message":"The origin 'http://someotherdomain.notreal' is not allowed."}.
- Check that GET requests from http://somedomain.notreal (or whatever domain you configured CORS with) are permitted with the following command:
curl -v -X OPTIONS "https://<app-service>.azurewebsites.net" -H "Access-Control-Request-Method: GET" -H "Origin: http://somedomain.notreal"
Notice that this time, the response includes the Access-Control-Allow-Origin: http://somedomain.notreal response header. This is enough to tell us that CORS is working without actually creating an API. API management will be covered in Chapter 11, Implementing API Management, so there’s no need to go through this at this point. In a real-world situation, the JavaScript client would send the pre-flight request using the OPTIONS verb (like we did with cURL) and the server would respond, telling the client what the server is willing to accept (if anything). If it is, the actual request would then be made.
If you’re wondering why we haven’t touched on the App Configuration feature, that’s because we will look at it in more detail in Chapter 8, Implementing Secure Cloud Solutions. For now, we can move on to the topic of logging.
Logging
There are various types of logging available within App Service – some are Windows-specific while others are available for both Windows and Linux:
- Windows only:
- Detailed error logging: When an application HTTP error code of 400 or greater occurs, App Service can store the .htm error pages that would get sent to the client browser within the App Service filesystem.
- Failed request tracing: Detailed tracing information on failed requests, including a trace of the IIS components used to process the request, is stored within the App Service filesystem.
- Web server logging: Raw HTTP request data is stored in the W3C extended log file format within the App Service filesystem or Azure Storage blobs.
- Windows and Linux:
- Application logging: Log messages that are generated by either the web framework being used or your application code directly (we will demonstrate this shortly) are stored within either the App Service filesystem (this is the only option available with Linux apps) or Azure Storage blobs.
- Deployment logging: Upon publishing content to an app, deployment logging occurs automatically with no configurable settings, which helps determine reasons for a deployment failing, stored within the App Service filesystem.
For logs stored within the App Service filesystem, you can access them via their direct URLs. For Windows apps, the URL for the diagnostic dump is https://<app-service>.scm.azurewebsites.net/api/dump. For Linux/container apps, the URL is https://<app-service>.scm.azurewebsites.net/api/logs/docker/zip. Within the portal, you can use Advanced Tools to access further information and the links just mentioned.
Let’s enable application logging in our app and have our code generate a log message to see this in action. We’ll start in the portal because that’s easier to show the options that are different between Linux and Windows apps:
- Within the Azure portal, open the App Service and click on the App Service logs blade.
- Turn Application logging on by setting the toggle to File System and clicking Save.
To illustrate the differences between Linux and Windows apps, this is what you’d see if you went to the same location from a Windows app:

Figure 3.18 – App Service logging options for a Windows App Service
- Open the same aspnetapp folder we’ve been working with in this chapter within VS Code.
- For the sake of simplicity, open the aspnetappaspnetappPagesIndex.cshtml.cs file and add the following line with whatever log text you want, within the OnGet() method:
_logger.LogInformation("This is my custom information level log message.");
Then, save the file.
- Use the ACR build task to push the update to your ACR with the following CLI command:
az acr build --image "chapter3:1.2.0" --image "chapter3:latest" --registry "<ACR name>" --file "Dockerfile" .
Then, restart the App Service however you wish (remember, we configured it to use the latest tag, so a restart is enough).
- Within the Azure portal, open the Log stream blade for the App Service. Then, on another browser tab, navigate to the URL of the App Service. You should see the new application log showing something similar to the following:
{"EventId":0,"LogLevel":"Information","Category":"aspnetapp.Pages.IndexModel","Message":"This is my custom information level log message.","State":{"Message":"This is my custom information level log message.","{OriginalFormat}":"This is my custom information level log message."}}
Now that we’ve got a good understanding of some key concepts of App Service and have run through some detailed topics and enabled logging, we’ll look at a topic that was very briefly touched on in Chapter 1, Azure and Cloud Fundamentals: scaling.
Scaling App Service apps
In Chapter 1, Azure and Cloud Fundamentals, we mentioned that the cloud offers elasticity so that it can scale and use as much capacity as you need when you need it. We specifically touched on scaling up (that is, vertical scaling) and scaling out (that is, horizontal scaling). Let’s jump into the portal once more and take a look:
- From within the Azure portal, open either your App Service or the App Service plan and open the Scale up blade. If you’re in the App Service, notice that it has (App Service plan) to point out that it’s the App Service plan controlling resources, as we discussed earlier in this chapter. Don’t change anything here; just notice that these options increase the total resources available – they don’t increase instances. A restart of the app would be required to scale up.
- Open the Scale out blade and notice that this is currently set to a manually set instance count. While this can be useful, what we want to demonstrate here is autoscale, so select the Custom autoscale option.
- Set the instance limits to a minimum of 1 and a maximum of 2 (it’s up to you, but this is the lowest cost while still being able to demonstrate this – you’re welcome to change the values but be aware of the cost).
- Leave Scale mode set to Scale based on a metric and click on the Add a rule link. Here, you can define the metric rules that control when the instance count should be increased or decreased, which is extremely valuable when the workload may vary unpredictably.
- Check out the options available but leave the settings as default for now. The graph on this screen helps identify when the rule would have been met based on the options you select. For example, if I change my metric threshold to be greater than 15% for CPU percentage, the graph will show that this rule would have been matched twice over the latest 10-minute timeframe (when the lines rise above the dashed line):
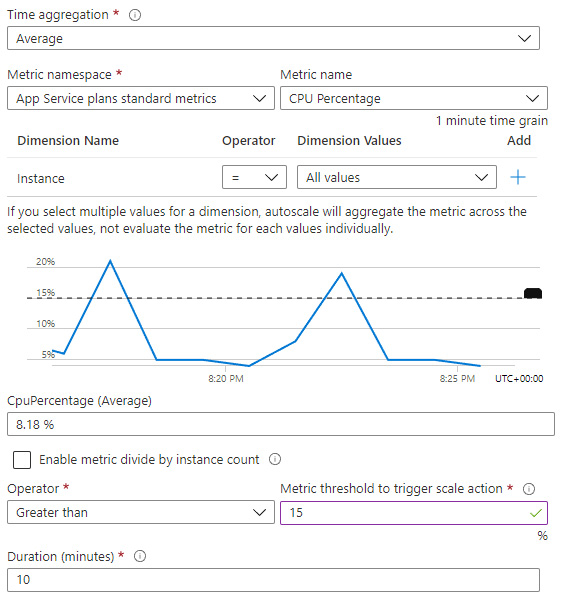
Figure 3.19 – Custom metric condition visual
- Click on Add. With this rule added, it’s usually desirable to add a rule to scale back down, so click on Add a rule and repeat this process, but this time, use a Less than or equal to operator, change the threshold figure to put some margin between the rules, and select Decrease count by. You should now have a scale-out rule increasing the instance count and a scale-in rule decreasing the instance count.
- Scroll to the bottom of the page and click on Add a scale condition. Notice that this time, you can set up date and time periods for the rule to apply, either scaling to a specific count during that period or based on a metric, as we did previously. The first condition we configured acts as a default, only executing if none of the other conditions are matched.
- Feel free to add and customize conditions and rules until you’re comfortable. Either save or discard. We won’t be forcing autoscale to kick in, but you’re welcome to by changing thresholds and sending a lot of traffic to the app, for example.
You can view any autoscale actions through the Run history tab, as well as via the App Service Activity Log. The following are a few quick points on scaling out when using autoscale outside of self-learning as we are:
- Consider the default instance count, as that will be used when metrics aren’t available for any reason.
- Make sure the maximum and minimum instance values are different and have a margin between them to ensure autoscaling can happen when you need it.
- Don’t forget to set scale-in rules as well as scale-out. Most of the time, you probably won’t want to scale out without being able to scale back in.
- Before scaling in, autoscale will estimate what the final state would be after it has scaled in. If the thresholds are too close to each other, autoscale may estimate that it would have to scale back out immediately after scaling in, and that would likely get stuck in a loop (known as “flapping”), so it will decide not to scale in at all to avoid this. Make sure there’s a margin between metrics to avoid this.
- A scale-out rule runs if any of the rules are met, whereas a scale-in rule runs only if all rules are met.
- When multiple scale-out rules are being evaluated, autoscale will evaluate the new capacity of each rule that gets triggered and choose the scale action that results in the greatest capacity of them, to ensure service availability.
- When there are no scale-out rules and only scale-in rules – providing all the rules have been triggered – autoscale chooses the scale action resulting in the greatest capacity of them, to ensure service availability.
One important point to remind you of is that since scaling rules are created on the App Service plan rather than the App Service (because, as we know, the App Service plan is responsible for the resources), if the App Service plan increases the instances, all of your App Services in that plan will run across that many instances, not just the App Service that caused the scaling.
So far, any impactful changes we’ve pushed to the App Service would cause the service to restart, which would lead to downtime. This is not desirable in most production environments. App Service has a powerful feature called deployment slots to allow you to test changes before they hit production, control how much traffic gets routed to each deployment slot, and then promote those changes to production with no downtime. Let’s wrap up this chapter by learning about deployment slots.
Leveraging deployment slots
The first thing to know about deployment slots is that they are live apps with hostnames, content, and configuration settings. In a common modern development workflow, you’d deploy code through whatever means to a non-production deployment slot (often called staging, although this could be any name and there may be multiple slots between that and production) to test and validate. From there, you may start increasing the percentage of traffic that gets routed to the staging slot or you may just swap the slots – whatever was in production goes to staging and whatever was in staging goes to production, with no downtime.
Because it is just a swap, if something unexpected does happen as a result, you can swap the slots back and everything would return to before the swap occurred. Several actions take place during a swap, including the routing rules changing once all the slots have warmed up. There’s a documentation link in the Further reading section of this chapter, should you wish to explore this further.
We spoke about application configuration settings earlier in this chapter, but we purposely didn’t address what the slotSetting meant. With each deployment slot being its own app, they can have their own application configuration as well. If a setting isn’t configured as a deployment slot setting, that setting will follow the app when it gets swapped. If the setting is configured as a deployment slot setting, the setting will always be applied to whichever app is in that specific slot. This is helpful when there are environment-specific settings; you can have the same code in staging and production, but the settings will change, depending on which deployment slot that code is running from.
Different App Service plan tiers have a different number of deployment slots available, so that could be a consideration when deciding on which tier to select or scale to. As with some other settings we’ve discussed, Windows apps have an additional setting that’s not available with Linux/container apps: auto-swap.
Under the Configuration blade of a Windows App Service, under the General settings tab, you’ll see the option to enable auto-swap when code is pushed to that slot. For example, if you enable this setting (again, only available on Windows App Service apps) on the staging slot, each time you deploy code to that slot, once everything is ready, App Service will automatically swap that slot with the slot you specify in the settings. Don’t be disheartened if you want something like that but you’re using Linux/container apps – CI/CD pipelines can do so much more than that, and we’ll go into some detail at the end of this book on this kind of automation.
For now, let’s see deployment slots in action:
- From the Azure portal, open the Configuration blade within your App Service and change the value of the custom application setting that was created previously, with some text referencing the production slot – I simply changed mine to Hello from the production app. Click Save.
- Go to the Deployment slots blade and click Add Slot. Enter the name of the staging deployment slot and choose to clone the settings from the default/production slot (indicated by having just the App Service name), which will copy all of the application settings to the staging slot.
You can also use the following CLI command:
az webapp deployment slot create -g "<resource group>" -n "<app-service>" -s "staging" --configuration-source "<app-service>"
Alternatively, you can use the following PowerShell command:
New-AzWebAppSlot -ResourceGroupName "<resource group>" -Name "<app-service>" -Slot "staging"
- Select the staging deployment slot and from within the Configuration blade, change the value of your custom application setting to mention staging rather than production. Conceptually, we have some different configurations between the staging and production slots, which we could have also replicated with different code.
- In another browser tab/window, browse to the production slot URL for the App Service – that is, https://<app-service>.azurewebsites.net – and confirm that the production text is there. Now, do the same with the staging URL – that is, https://<app-service>-staging.azurewebsites.net – and confirm that the staging text is there. Once confirmed, navigate back to the main/production URL so that you’re ready for the next step.
This shows how you could test changes in the staging slot/app before pushing it to production. The documentation also explains how you can use a query string in a link to the App Service, which users could use to opt into the staging/beta/preview app experience.
- From the main App Service (not the staging app), open the Deployment slots blade and notice that you can change the percentage of traffic that flows to each slot. This allows you to control the exposure of the staging slot before making the switch. Rather than using that right now, just click on Swap. Notice that you get to preview the changes that will be made, which will be the text changing in the custom application setting. Confirm this by clicking on Swap.
- Go back to the tab/window with the production site showing and periodically refresh the page. You should notice no downtime. At some point, the text will change from production to staging, showing that the staging slot was swapped with production and that your changes are now live in the production app.
- When you’re done with this exercise, feel free to clean up your resources by deleting the resource group containing all of the resources we created in this chapter.
If you wanted to, you could revert the changes by swapping the slots again. If our application setting was configured as a slot setting, we wouldn’t have noticed any changes because rather than following the app, the setting would have been stuck to the specific slot.
One final point to note is that although the default behavior is for all the slots of an App Service to share the same App Service plan, this can be changed by changing the App Service plan in each slot individually.
With that final point, we have come to the end of our exploration of App Service – congratulations! A lot of the concepts we’ve discovered here will help with the topics that will be covered throughout this book, as a lot of them will dive deeper or reference concepts we’ve already covered in some detail.
Summary
In this chapter, we dived into Azure App Service by looking at some fundamental features, such as App Service plans, as well as some basics of App Service web apps. We then delved into authentication and authorization, stepped through the authentication flow, and provided a summary of some networking features. Once our app was up and running, we went into some detail about configuration options and how application settings can be used by the application and are exposed as environment variables. We learned about the different types of built-in logging available with App Service and went through an exercise to have our application code log messages that App Service could process. Then, we learned how to automatically scale our App Service based on conditions and rules to make use of the elasticity that the cloud offers. Finally, we walked through how to make use of deployment slots to avoid downtime, control how changes are rolled out, and how to roll back changes, should this be required.
I hope that the topics and exercises we went through in this chapter have helped you understand the concepts that will be discussed later in this book. If you understand the fundamental concepts, you are much better prepared for the exam, which may contain some abstract questions that require this kind of understanding, rather than just example questions.
In the next chapter, we will introduce Azure Functions and what they do, while comparing with other services. We’ll also cover scaling. Then, we’ll start looking at developing Azure functions, triggers, and bindings, before moving on to developing stateful durable functions.
Questions
Answer the following questions to test your knowledge of this chapter:
- Can you have separate auto scale settings for each App Service within an App Service plan?
- With authentication enabled and not using the provider SDK, once a user has authenticated with the identity provider, which URL does the provider redirect the client to?
- Application logging can be enabled for both Windows and Linux App Service apps. True or false?
- The private endpoint feature of App Service can be used to prevent access to your application from outside of your specified VNet. True or false?
- Which networking feature can be configured to allow your application to make outbound calls to resources within your on-premises network?
Further reading
To learn more about the topics that were covered in this chapter, take a look at the following resources:
- Details on the networking features of App Service can be found here: https://docs.microsoft.com/azure/app-service/networking-features
- For more information on configuring deployment credentials, check out this page: https://docs.microsoft.com/azure/app-service/deploy-configure-credentials?tabs=cli
- Details on semantic versioning can be found here: https://semver.org/
- Further information on the networking features available to App Service can be found here: https://docs.microsoft.com/azure/app-service/networking-features
- You can find additional information on App Service deployment slots here: https://docs.microsoft.com/azure/app-service/deploy-staging-slots