
13
Developing Message-Based Solutions
From this chapter, you will learn how the messaging pattern can improve the reliability and availability of your solution in Azure. You will learn how to leverage the Azure Queue Storage and Azure Service Bus messaging services. You will be introduced to the publisher-subscriber concept and learn the difference between queues and topics. You will get to know how to provision, configure, and integrate messaging services with other Azure services, for instance, Azure App Service and Azure Functions. You also will be able to provision, connect, and manage the services from code. Furthermore, you will learn about the advantages and limitations of the respective services and be able to describe the scenarios where messaging services should be used instead of event-based services.
We’ll finish off this chapter with an introduction to DevOps. We’ll step away from the technical topics and discuss what DevOps actually means beyond being a frequently used buzzword, as well as some DevOps practices.
By the end of this chapter, you should understand better what role messaging solutions play in developing distributed systems running in Azure, and be familiar with services and SDKs that help you leverage the messaging services for your solution.
In this chapter, we will cover the following main areas:
- Understanding messaging patterns
- Exploring Azure Queue Storage
- Exploring Azure Service Bus
- Comparing Azure message-based services
- Discovering DevOps
Technical requirements
The code files for this chapter can be downloaded from https://github.com/PacktPublishing/Developing-Solutions-for-Microsoft-Azure-AZ-204-Exam-Guide/tree/main/Chapter13.
Code in Action videos for this chapter: https://bit.ly/3BybjaF.
Understanding messaging patterns
Messaging services are reliable services often used for communication across heterogeneous systems that might be disconnected from the networking. Messaging services were used for legacy Windows application synchronization, such as Microsoft Message Queuing (MSMQ). Nowadays, the services are involved in the building of Azure infrastructure in data centers.
Messaging protocols provide required communication between services through the messaging broker that guarantees the delivery and ordering of messages. The broker is responsible for persisting messages while the services is temporarily unavailable. Other patterns of leveraging messaging services are messaging orchestration, load balancing, and reactive programming.
For instance, let’s look at how provisioning resources on the Azure portal can be technically implemented by leveraging queues. When you provision resources from the Azure portal, the message with the task is sent to the queue to be picked up by the corresponding service. When the provision has started, you do not need to wait, and you can complete other activities on the portal. When the provision is complete, the corresponding service responds by dropping a message to the queue with the result of the provisioning process. The message is processed and the UI is updated. In the next section, we will examine these patterns closely.
The message broker and decoupling
The broker pattern has already been introduced in Chapter 12, Developing Event-Based Solutions. The broker pattern is implemented in the Azure Event Hubs and Event Grid services. In the pattern, we can define a producer (publisher) as a service that generates an event (message) with a command (task) to process. Then, the consumer (subscriber or handler) can pull the event (message) and process the command. The same pattern is implemented in the message-based technologies hosted in Azure.
For instance, Azure Queue Storage can be a broker for the communication of microservices running on the Kubernetes platform. The broker can help to decouple the producer and consumer of the messages. The messages are persisted by the producer in the queue and pulled by consumers to process. When the consumer finishes processing the message, the message is removed from the queue and the next message will be taken. One-way communication can be extended by the second queue where the consumer reports the result of processing to the producer. The following diagram represents two-way communication between the producer and consumer.
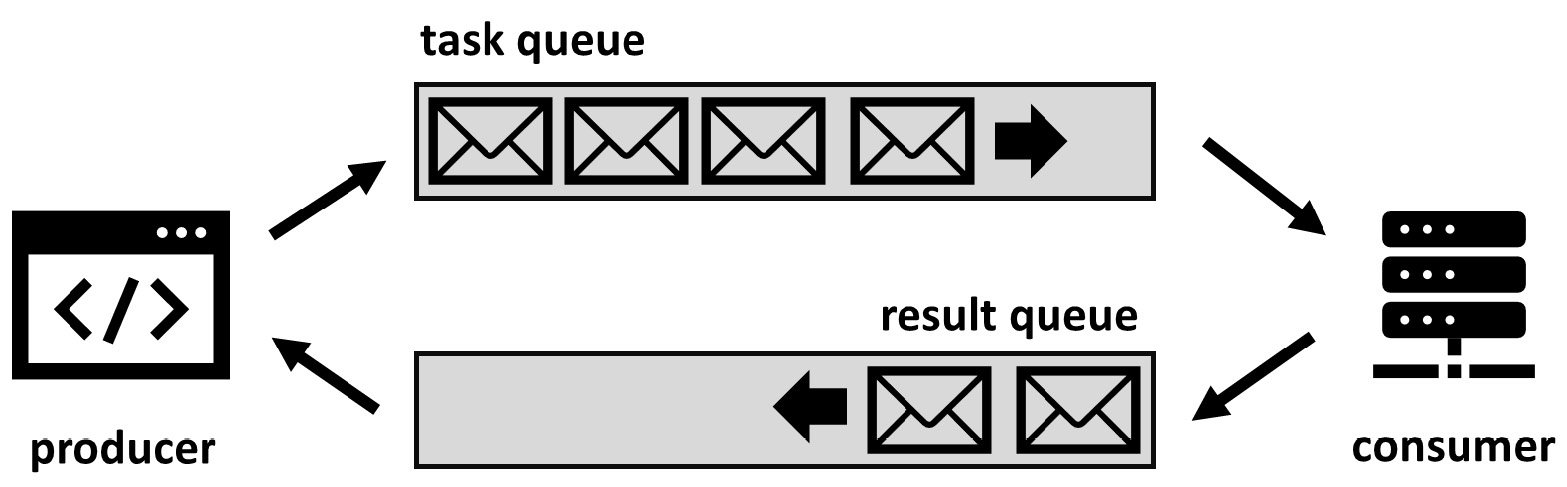
Figure 13.1 – Two-way communication with a message broker
The broker pattern schema here demonstrates one-to-one communication between the producer and consumer. Meanwhile, the producer can overload the consumer if the message requires significant time to process. This means that one-to-one communication between the producer and consumer should be converted to one-to-many, with many consumers picking messages one by one. This improvement introduces the load balancing pattern discussed in the next section.
Load balancing
Balancing the load is another useful function that helps the broker to scale the load. The number of messages depends on the publisher load. If the publisher implements a website that registers user requests at the peak of the load, it will produce a large number of messages. The consumer may spend the entirety of peak and off-peak hours processing the messages and this can delay processing. To solve these issues, the number of consumers can be increased manually or dynamically based on the number of messages in the queue.
By increasing the number of consumers picking up messages from the queue, we can speed up processing and constantly load all existing consumers. The publisher’s load pattern can vary during peak and off-peak hours. Meanwhile, scaled consumers will be loaded constantly when they have work to do (that is, when they have messages in the queue). It helps to utilize all the consumers and scale them in when all the messages are processed. The following schema demonstrates how the balancing of the load works.

Figure 13.2 – Load balancing and scaling consumers
From the balancing example, you learned that the number of consumers can be adjusted dynamically. Scaling consumers helps to dynamically manage the number of consumers and reduce costs.
For instance, if the frontend is hosted on Azure App Service, and configured for dynamic scaling by CPU performance, the backend can be scaled by the length of the queue. Depending on the number of messages, we can get the scaled-out or scaled-in number of consumers and save costs, instead of paying for each of them 24/7. The following section will explain how this pattern is leveraged in Azure services.
Competing consumers
The competing consumers pattern is a combination of the message broker pattern and load balancing pattern. This pattern is designed to enable multiple producers and multiple consumers to coordinate with each other and increase the high availability and throughput of the whole solution. This pattern is commonly used in microservices architecture when each of the services is represented by multiple containers running on different environments or nodes. If one of the consumers fails, another consumer can replace it and process messages. The scaling of the consumers and producers can be implemented dynamically. Whenever the length of the queue grows, the number of consumers increases to meet the required throughput. Whenever the length of the queue goes down, the number of consumers decreases to save costs.
The competing consumers pattern can also help when services are hosted on a PaaS or IaaS platform or a combination of both. Moreover, the competing consumers pattern can be implemented on-premises and in hybrid environments. The following schema demonstrates how the single messaging service can help balance the load and provide high availability in the cloud environment.
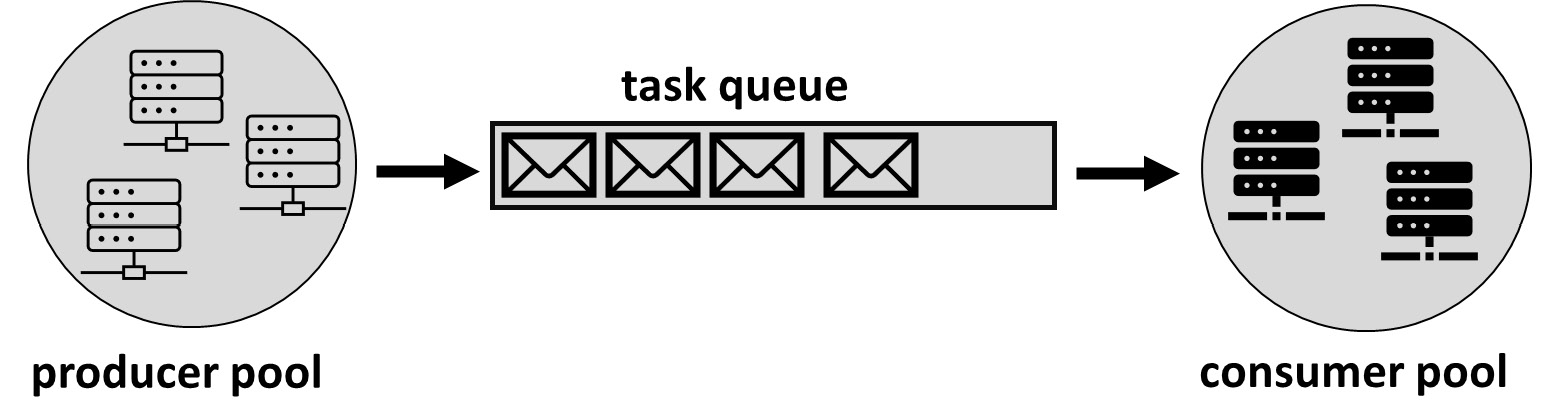
Figure 13.3 – Distributing the load between producers and consumers
When you implement the competing consumers pattern, you get the following benefits:
- Increases throughput with minimum effort that does not require code changes
- Improves the reliability of the solution because each of the services can be duplicated more than once
- Avoids complex configuration and message orchestration because the broker handles orchestration and supports out-of-the-box sequences
- Improves the scalability of the solution by increasing or decreasing the number of consumers and publishers depending on the load and queue length
- Saves costs by enabling dynamic scaling
- Monitors and manages messages manually by leveraging queue explorers
There are also some considerations you should make before you implement the pattern:
- Messages should contain self-sufficient data to avoid affecting external changes in the parameters or the task after they have been submitted.
- Message ordering is one of the functionalities provided out of the box, but you can change the order of processing by including the order ID in the task.
- Any exceptions during task processing can be handled by leveraging a “poison message” strategy. For instance, for three unsuccessful attempts made to process messages by different consumers, it should mark the messages as poison messages and move those messages to another queue (a dead-letter queue) for further processing.
- Retrying attempts should be used for pulling messages by consumers and pushing messages by publishers. The impact of potential connection loss can be eliminated by enabling retrying attempts.
In the next section, we are going to explore the services available in Azure to host queue services. It will provide the provision scripts and communication code, along with details about the configuration, security, and costs.
Exploring Azure Queue Storage
You have already learned a lot about Azure Storage from Chapter 6, Developing Solutions That Use Azure Blob Storage. The following paragraph will revise the topics you have already learned and also uncover new details about the queue service.
Azure Storage is one of the oldest services available in Azure, initially designed for storing files and blobs. Nowadays, Azure Storage supports additional services, such as Azure Table (a NoSQL database) and Azure Queue Storage (for simple messaging). Only the Standard storage tier supports these services and persists data in geographically separated regions. The service is based on Microsoft-managed infrastructure that is auto-scaled, on-demand, and recognized as serverless. All the hosted services on the Azure Storage platform support HTTPS RESTful interfaces for communication within Azure and on-premises solutions. Because of their high reliability, the services are commonly used within Azure solutions for logs and backup persistence. Another advantage of the service is the consumption-based pricing model. Charges are based on the capacity of the storage data and the number of transactions made.
Azure Queue Storage provides storage with queue mechanics that support a RESTful interface. The queue persists messages and the total capacity of these messages is close to petabytes. Meanwhile, the maximum size of the message is 64 KB. The queue serves as a simple queue that is commonly used as a list of tasks for consumers. To provision a new queue, you first need to provision a new Azure Storage account and select the availability option (local, zone, or region redundant), then create a new queue, and get a URL reference to use in REST requests.
From a security standpoint, storage accounts support encryption at rest and in transit using Microsoft-managed or customer-managed keys. Connections can be limited from public access by enabling a firewall and through connection to Azure VNets. Alternatively, SAS keys can be limited by a set of IP addresses. Managing services requires admin keys with full access. Meanwhile, permission for submitting and receiving messages can be limited for each of the publishers, also using SASs.
The cost of Azure Queue Storage depends on the chosen availability level, where local is the cheapest and geo-redundant is the most expensive. The cost is also based on the total capacity of storage consumed by the queue and the number of read-write operations. Extra costs can occur if the communication includes services outside of the selected queue region. Transfer charges will apply according to the respective transfer zones.
Simple queueing with Azure Queue Storage has many limitations, including forced first-in-first-out (FIFO), the inability to fetch messages by ID, a limited lease/lock duration, and the limited size of the batch to process messages. Another significant limit is only having 64 KB as the maximum size of the message. There are other difficulties you might find when you try to pull messages from the queue. You can receive only an approximate number of the messages because the messages may be locked or hidden, and removed from the queue only when successfully processed by the subscriber. Also, due to the locking technique, the messages can change in order. So, the reviser might skip the message because it is locked and then return to it since the consumer fails to delete the message after the holding lock.
Provisioning Azure Queue Storage
Before you move on to take a look at the code examples, let’s first find out how to provision Azure Queue Storage from the Azure CLI. The following script will build the locally-redundant storage, then enable the queue service by creating a new queue. This is a bash script and can be run from Cloud Shell or locally:
In the script, we will pull the admin keys for the connection made from the code in the next demo. You can also observe the queue from the Azure portal to find out more about its settings and content. For the best way to monitor messages, you can download Azure Storage Explorer (https://azure.microsoft.com/en-us/features/storage-explorer/) or leverage the Visual Studio extension, named Azure Storage (https://marketplace.visualstudio.com/items?itemName=ms-azuretools.vscode-azurestorage).
Messaging from the code
The next code example will demonstrate to you a simple messaging broker that enables your publisher to submit the message and pull the message from the consumer. Pay attention to the following methods of receiving messages:
- Receive and delete: This is the general approach to working with the queue. The receiver pulls the message or a batch of messages and starts to process the message. Then, when finished, it must explicitly delete the message. During the processing time, the message is locked or hidden and is not available to be received.
- Receive and update, then delete: The same approach as the previous one occurs but the server can set a manual lock or hidden time per message to process messages that require extra time. The message must be explicitly deleted when the processing is finished successfully to avoid returning messages to the queue to be processed twice.
- Peek: This method is useful for observing messages within the queue and usually receives a batch of messages to minimize overhead communication. You can peek at the messages to monitor the content of messages without generating a dequeuing message from the queue.
For running the code, you need to update Program.cs with the connection string retrieved from the previous script run. To successfully run the example, you first need to run the publisher to submit several messages in Azure Queue Storage, then observe the messages by using one of the tools. You then run the consumer and choose the receiving method. You also can monitor the count of the messages when you select one method or another. All three of the aforementioned approaches are implemented in the consumer available in the repo here:
The following classes were used for the submission and receipt of messages:
|
Class |
Description |
|
QueueClient |
The class is initialized with a connection string and represents the queue to submit and receive the messages. |
|
QueueProperties |
The class instance receives meta information from the queue, including maximum batch size and an approximate number of messages. |
|
QueueMessage |
This is a received message class that contains the message body, message ID, and metadata. It stays hidden in the queue and needs to be explicitly deleted. |
|
PeekedMessage |
A peeked message class that stays in the queue. |
Table 13.1 – C# SDK classes to operate with Azure Queue Storage
Azure Queue Storage is a simple messaging service that does not support enterprise features but it is extremely helpful for leveraging asynchronous communication between services. This service is the best choice if you need to minimize costs. However, the service does not provide duplicate removal or dead-letter queueing. The maximum size of 64 KB per message is also a significant limitation. In the next section, you will learn about the enterprise-grade service that helps you go beyond the limits of Azure Queue Storage.
Exploring Azure Service Bus
The orchestration of messages is a tough task that needs to be performed with high speed and consistency to suit the requirements of modern applications. Azure Service Bus is a service that runs on Azure PaaS to meet enterprise messaging requirements. In the following part of the chapter, you will become familiar with the features of Azure Service Bus and will be able to provision an instance for your solution. Then, you will learn how to leverage SDKs to get connected and submit and receive messages from topics and queues.
Before we cover the technical details of Azure Service Bus, let’s take a look at what kind of scenarios the enterprise messaging service should be used for:
- Message brokers: Just as with Azure Queue Storage, Service Bus supports all simple messaging mechanisms to guarantee the delivery and sequence of messages with a FIFO approach. Because Service Bus supports up to 1 MB of size, the message can be extended with a variety of metadata fields and transfer any type of data, including binary code.
- The transactional process: One of the most useful functions of enterprise messaging is that it supports transactions. A transaction can include receiving and submitting multiple messages in multiple queues and keeping them hidden from other receivers until the transaction is committed.
- Dynamic load balancing: The orchestration algorithm allows several consumers to receive messages from the queue and is dynamically scaled depending on the queue message length. It implements the competing consumers pattern that we introduced and explained earlier.
- Message broadcast: The topics can support one or many relationships between publishers and consumers. Topics can be helpful when the messaging service is required to engage in processing more than one service by processing a copy of the same message. Topics will be covered in detail in the Developing for Service Bus topics section.
- Relay communication: As mentioned previously, cloud services and hybrid applications can be safely connected without direct connection through the broker. For instance, the relay service can be set up in Azure to connect Azure Web Apps and on-premises SQL. Relays will be discussed in detail in the Exploring relays section.
As you can see, Azure Service Bus is quite a complicated service, and this is reflected in its price. Let’s get familiar with the pricing model before we recommend Azure Service Bus above other messaging services.
Pricing tiers
The feature set that you can use for your Azure Service Bus depends on the pricing tier. The following tiers are the available options:
- Basic: Only queue services available, no advanced services. The message size is limited to 256 KB. Incurs consumption-based charges per 1 MB of operations.
- Standard: Topics and queues are available with all advanced services except for redundancy and scale. The message size is limited to 256 KB. Consumption-based charges per 1 MB of operations.
- Premium: All advanced services, including geo-redundancy and horizontal scale by message units. The message size is limited to 1 MB (up to 100 MB in the preview feature of large messaging). Charges are made hourly per message unit.
Scaling
The horizontal scaling functionality is available on the Service Bus namespace level only within the Premium pricing tier. Up to 16 message units can be provisioned and scaled manually. Adding an extra message unit increases the total throughput of the namespace.
Another way to scale throughput is using engaged partitions. Depending on the partition key provided by the sender, messages will be hosted on the specific broker and storage will belong to it. An increasing number of brokers and storage will let Service Bus increase the total throughput by processing messages in parallel.
Connectivity
The publisher and subscriber should provide specific SAS keys (or policies) to be accepted by the server. Usually, the keys are implemented as part of the connection string provided with the code. There are namespace-level policies and topic-/queue-level policies that are limited by the exact topic/queue. The policy allows Listen, Send, and Manage activities accordingly and should be followed to the minimum privilege recommendations. Moreover, Azure Service Bus supports role-based access control (RBAC) assignment, which gives access control to users and service accounts to allow them to manage activity.
Advanced features
Before we get into provisioning your Azure Service Bus, let’s learn about the enterprise messaging features that are not available within the simple messaging service that Azure Queue Storage offers. Your feature requirements will help you choose between simple and enterprise messaging services:
- Message sessions: The session is the logical identifier of communication between the sender and the service hosting topics or queues. A session is supported by providing the session ID property to the sender who submits the message in the queue or topic. There are two possible patterns of seasoned connection: FIFO and request-response. The FIFO pattern guarantees the delivery of messages in the received order and provides the relation between messages. FIFO sessions suit a messaging broker scenario. However, the request-response pattern does not support sequences and is usually implemented using two single queues for request and response. The request should be matched to the response. The request-response sessions suit a relay scenario.
- Message deferral: This allows the receiver to engage in deferred retrieval of messages from the queue or topic. The receiver postpones message processing for later and keeps messages in the queue.
- Dead-letter queues (DLQs): These support special treatment for undelivered and poisoned messages by storing them in a separate logical queue for further processing. The special treatment is usually implemented by manual processing of the message by the operator.
- Deduplication: This feature automatically deletes duplicates of the messages submitted by the publisher as a result of any connectivity issue. The duplicates are determined by their unique message IDs.
- Transaction support: This allows the consumer to complete several operations within the scope of the transaction. Messages can be retrieved, processed, and submitted in another queue or topic within the same transaction. If the transaction is canceled, all changes in the transaction scope will be reverted. If the transaction is completed, the changes will be visible to other consumers.
- Auto-forward: This feature enables Service Bus to automatically forward the messages from the original queue to another queue or topic and removes the message from the originally received queue. The auto-forwarding can be configured only for the same namespace server.
- Idle auto-delete: The feature automatically deletes the queue after a period of inactivity. The minimum interval can be set to 5 minutes.
Many of the features listed here are turned off by default. You can enable them later when you create a new queue or topic in the Azure portal. In the next section, you will learn how to provision Service Bus.
Provisioning Azure Service Bus
Provisioning Service Bus consists of two steps. First, you need to provision a namespace. Second, you need to provide the exact topic or queue. When you provision a namespace, you will register the globally unique address that should be used for the connection. You also need to choose the price tier, with the option to upgrade it to a higher level later. The Premium tier supports message units to scale throughput.
The topic or queue can be provisioned when the namespace is ready. Then, you need to choose the quote for the total amount of messages (5 GB is the maximum), a maximum delivery count, the maximum duration of time to live, and the lock duration of messages that are being processed. A set of advanced features can be selected based on the price tier.
The following script will help you to leverage the Azure CLI to provision the Standard tier namespace with one queue and one topic. Access policies will be provisioned as well. These resources will be used later for the connection from the code and you need to copy the provided connection strings from the output. The script should be executed in Bash:
When provisioning is complete, you can find the resource on the portal and observe its settings. The single queue should be provisioned and available for configuration. In the next part, you will learn how to work with queues.
Developing for Service Bus queues
At the start of the chapter, we introduced the message broker pattern. This pattern is used for simple messaging scenarios to send, receive, and peek at messages. In the following sections, you will see snippets of how to use transactions, sessions, and DLQs. The code will use the queue we provisioned earlier (simple queues and advanced queues with session and DLQ support).
Submitting and receiving
These projects will demonstrate how to implement simple operations with messages, as the previous code examples demonstrated with Azure Queue Storage. First, you need to run a publisher project to generate several messages submitted in the queue. Then, you need to run a consumer project to receive the message. When you start the project, you will observe the count of messages. The following options are available for testing:
- Receive messages with the PeakLock option, which requires explicit completion of the recipient removing messages from the queue. The removal of the message will be performed after finishing the processing stage.
- Receive and delete messages with automatic deletion.
- List all messages from queues.
To run both projects, the code needs to be updated with a connection string at the top of Program.cs. The connection info was received from the previous provisioning script output:
Sessions
The following projects will leverage sessions that allow publishers and consumers to pull the messages that belong to specific sessions. The publisher and receiver should share the same session name to pump the messages through the Service Bus queue. The queue with advanced services will be leveraged to demonstrate session usage. First, you need to run a publisher project to submit several messages for two sessions in the queue. Then, you need to run a consumer project to receive the message by using the sessions. When you start the project, you will observe the message count. The following options are available for testing:
- Receiving a message from the next session – the sessions will be selected one by one. The code is also allowed to hardcode the exact session name.
- Listing all available messages for all sessions.
The code of Program.cs should be updated for both projects, with the connection string received from the previous provisioning script output:
Transactions and DLQs
The last code example will demonstrate how transactions and DLQs work with Service Bus. You need to run a publisher project first to generate several messages submitted in both queues. Each pair of messages will be sent in a transaction. Then, you need to run a consumer project to receive the messages. When you start the project, you will observe the message count in both queues, including the DLQ. The following options are available for testing:
- Operate messages within a transaction. The code will receive a message from the advanced queue and submit a message in the simple queue in a transaction. If the submission fails, the message will return to the advanced queue.
- Leveraging DLQ for poison messages. The code will try to process the message from the advanced queue and then fail with an exception. This message mimics a poison message and will be submitted to the DLQ.
- Receiving the messages from the DLQ. The code will pull messages from the DLQ to mimic special processing.
- Listing all messages from the queues. The code will peak all messages in batch but keep them in the queue for processing.
The following schema will help you understand the transaction flow and leveraging DLQ in the sample project.
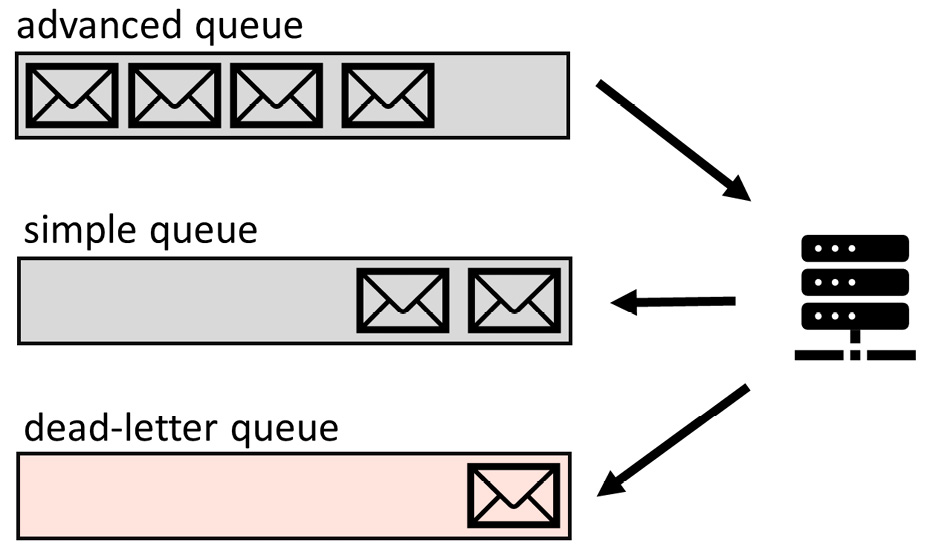
Figure 13.4 – A schema of transactional support and a DLQ
To run all projects from the following repo you need to update the code at the top of Program.cs with the connection string for the Azure Service Bus received from the previous provisioning script output:
Developing for Service Bus topics
In this example, you need to run two consumers that subscribe to the topic on Service Bus. The first consumer (hotel-booking) is responsible for hotel booking and the second consumer (flight-booking) is responsible for flight booking. Then, you need to start the publisher that will submit messages about all kinds of bookings on the topic. In the output of the consumers, you will see how they process the messages and what bookings are made. All three projects need to be run at the same time. The following schema will help you to understand the process.

Figure 13.5 – An illustration of a sample of working with topics
Before you run projects, the code needs to be updated with a connection string at the top of Program.cs. The connection info was received from the previous provisioning script output:
You should notice that we now use ServiceBusProcessor instead of ServiceBusReceiver, which was configured to work with the queue previously. Both of these objects can be leveraged for connection to queues and topics. The following table should help you to learn more about objects that are used in the code:
|
Class |
Description |
|
ServiceBusClient |
This class will help you to create a connected client configured with a SAS token. It also can be configured with options to support transactions. |
|
ServiceBusAdministrationClient |
This class exposes admin functionality, including the runtime properties with statistical information about a queue, for example, the number of messages in it. |
|
ServiceBusReceiver |
The receiver is created from the client class with configuration to a specific queue or topic. It also can be constructed with session support. |
|
ServiceBusSender |
The same as the receiver but used for sending messages and it does not require transaction configuration. The transaction label should be provided for each message. |
|
ServiceBusProcessor |
A processor class is allowed for subscription with delegates to two events: receiving new messages and errors. This class can be used to implement a reactive programming model. |
|
TransactionScope |
The transaction allows the submission and receipt of messages from different queues in the same transaction. The transaction can be manually committed or rolled back in the event of an error. |
Table 13.2 – Azure Service Bus SDK objects
In the next section of the chapter, the Azure Relay service will be introduced. The Relay service will implement continuous messages to pump from producer to consumer in order to connect different types of environments, including hybrid and multi-cloud.
Exploring relays
A relay is an Azure PaaS resource that helps you to expose the services running in private networks to the services running in public clouds, or in another private network. For example, Azure Relay can help you to connect the services in your hybrid solution (a website in the cloud connecting to an on-premises database, for example). The main advantage of Azure Relay is that it does not require any VPN connections to be set up or any firewall to be configured. All traffic can be encrypted via HTTPS or TCP sockets and transferred that way.
Azure Relay supports one-way communication with a request/response approach. Two-way (bi-directional) communication is also supported by Relay. It completely separates both services but allows the exchange of information between services. It does not buffer any packages; it simply forwards them from the sender to the recipient. The drawback of this model is that it requires all parties of communication to be online.
Currently, Azure Relay supports two main technologies:
- Hybrid Connections, based on WebSocket and allowing communication with heterogeneous environments. This technology comes from Microsoft BizTalk services.
- The WCF Relay service, based on legacy relay for the Windows Communication Foundation (WCF) protocol, which allows remote procedure calls.
Provisioning Relay is similar to provisioning Azure Service Bus. The namespace needs to be deployed first, then one or many Hybrid Connections or WCF Relays can be deployed next. The following code example will help you to provision Azure Relay and Hybrid Connections endpoints:
When you have completed provisioning Azure Relay, you can observe the instance from the Azure portal. The connection string provided in the output of the script should be used for the following projects. You can configure the server and client model to leverage one-way communication to transfer the messages from one application to another. You need to run both projects and hit the key on the client console application to see the message delivered on the server console:
You also can shut down the server and see an error appear from submitting a message from the client console. This error confirms that both the client and server must be online to pump the messages.
Comparing Azure message-based services
In Chapter 12, Developing Event-Based Solutions, you learned about the Event Hubs and Event Grid services. Now, we can contrast and compare them with the message-based solutions hosted in Azure. First, let’s talk about the similarities. The event-based and message-based solutions both leverage calls to public access endpoints. Both technologies can work as message brokers and transfer states for the synchronization of physically separate processes. Both services are enterprise-grade, hosted on Azure PaaS, and provide high availability and SLAs.
The difference between message-based services lies in the nature of the transferred data. With messages, a significant part of the data is self-defined and guarantees delivery and sequencing. However, events are small pieces of information and can be produced as a stream, with possible losses or changes made to sequences. Another difference is that event-based technologies are designed for the ingestion and processing of a large amount of data. Meanwhile, message-based technologies are focused on delivery and persistence. Surprisingly, one of Azure’s event-based technology services is quite close to message-based technology. Event Grid implements topics in a similar way to Service Bus and transfers a significant amount of data with its event-like messages.
In the following table, we are comparing different message-based and event-based services hosted in Azure. Learning the pros and cons of the services will help you to select one of the services over another:
|
Service |
Main Pattern |
Pros |
Cons |
|
Event Hubs |
Big data ingesting, streaming |
High scale, event-persisting, capturing events, low-cost. |
An event can be received only once. Complex order support with multiple partitions. Server-managed cursor. |
|
Event Grid |
Pub/sub, Reactive programming |
Consumption-based price. Integration with other services. Topic support. |
The events delivery sequence can be changed. |
|
Queue Storage |
Simple messaging |
Unlimited queue size. Pay-as-you-go. Serverless architecture with geo-redundancy. |
FIFO only. The small size of the messages. No advanced messaging. The delivery sequence can be changed. |
|
Service Bus |
Enterprise messaging |
Scalable service. Variety of advanced messaging services. Access management. |
Cost. 5 GB total message limit. |
|
Azure Relay |
Peer-to-peer communication |
The communication is performed through a public network and does not require expensive VPN connectivity. |
No message buffering. Both parties of communication must be online. |
Table 13.3 – Comparison of Azure event-based services
As you will notice from the table, the differences and similarities between message- and event-based services are significant.
This brings us to the end of the technical topics required for the AZ-204 exam.
Before we wrap up the content and tackle a mock exam, it’s worth addressing an important topic that is often misunderstood: DevOps.
Discovering DevOps
Too often, the word DevOps is passed around as a buzzword without an understanding of its meaning. Another unfortunate assumption is that you can simply tell a team of developers to do DevOps. Or, perhaps you can pay for a relevant training course or product, state that your company is now a DevOps company, and this will make it the case. This is all wrong.
Let’s start with defining DevOps before we go any further into the topic.
What is DevOps?
If you were to ask a group of 10 people to tell you what DevOps is, you’d most likely get 10 different answers (maybe more). Some of the definitions may include implementing infrastructure as code, feature flags, automation, smaller deployments, or Agile planning, among other things.
None of these is wrong per se because DevOps can involve all these practices and more, but DevOps itself is a fundamentally simple idea.
One of my favorite definitions of DevOps is that given by Microsoft’s Donovan Brown, which is DevOps is the union of people, process, and products to enable continuous delivery of value to your end users.
Let’s address each part of this definition in the following subsections.
People
The term DevOps is a compound of development and operations. Traditionally, development teams would develop software in a silo and eventually give the software to the operations team to deploy. Often, operations teams would then need to carry out a lot of manual testing, configuration, phased rollouts, and potential workarounds for any bugs found in production that weren’t discovered during development, among other follow-up tasks, which was a significant bottleneck.
Bringing development, operations, quality assurance, and other teams together as a multidisciplinary team with a shared definition of value and shared responsibility for the delivery pipeline has helped break down the silos. Imagine all of these disciplines coming together throughout the application life cycle. They all contribute to planning activities, concerns from operations can be voiced and addressed during development, and this ensures that testing happens in an environment that matches the state of the production environment, so that issues can be identified and addressed early. Any feedback or telemetry from production gets fed back to the development folks seamlessly on a regular basis.
DevOps isn’t just about having these cross-functional teams within a single team. Nor is it just about having a team that can own a feature from end-to-end across different development areas (UI, database, and so on). DevOps defines a mindset, culture, and philosophy of working collaboratively that spans the entire software development life cycle throughout the planning, building, deploying, and operating phases.
One final point to make on the people side is that the DevOps culture needs to have executive support to be successful. Having your development and operations teams living by DevOps practices while the rest of the business is working in a way that doesn’t support the DevOps culture is a recipe for failure.
Having the right teams and culture is a great start but it’s also important that these people are following and supported by processes that enable innovation and the continuous delivery of value.
Process
We don’t have enough space in this book to cover everything to do with DevOps, nor everything to do with DevOps processes. The key point here is that DevOps teams need to have and follow processes that support and enable the continuous delivery of value.
Legacy change advisory board processes and lengthy development milestones, which lack opportunities to gain frequent feedback by frequently deploying smaller iterations, are examples of processes that may act as bottlenecks to keeping your product relevant through continuous innovation.
While the people and process elements are key to succeeding with DevOps, there are also products that can help us align processes and better enable continuous planning, integration, deployment, and feedback.
Products
Various products exist that support the implementation of Agile and DevOps practices, such as Azure DevOps, GitHub, Jenkins, and many others.
Taking Azure DevOps as an example, which is one of the most complete single solutions on the market, the product might be used in a typical sprint (if you’re working in sprints as part of Scrum, a topic for which you can find a link with more information in the Further reading section of this chapter) for the following:
- Product backlog refinement, prioritization, and estimation
- Sprint planning, forecasting, velocity, burndown, and capacity management
- Work item assignment and tracking
- Source code repositories for storing source code, configuration, and infrastructure as code files
- Continuous integration and continuous deployment (CI/CD) pipelines to automate building, testing, and deploying into various environments in stages, with granular orchestration
This list is by no means exhaustive but highlights that there are products out there that lend themselves perfectly to a DevOps environment. It’s extremely important to understand that simply using a tool such as Azure DevOps doesn’t mean you’re working in a DevOps way.
Another important part of the definition is the word value.
Value
DevOps isn’t just about automating a pipeline so we can rapidly deploy software; it’s about delivering value. It’s also important that teams have a clear understanding of what their definition of value is.
If people have different ideas of what value means, that could create a conflict of interests within the team. If you all have the same goal in mind, you have a better chance of success. Sometimes teams will have a value statement for each period, aligning all members to the definition of value for that period, if appropriate.
It’s also important to notice that the term end users was carefully chosen.
End users
If you’re only delivering value within your development or pre-production environments and the value isn’t reaching your end users, something’s not right.
In this context, end users don’t need to be customers of your company, but perhaps whatever value you’re delivering is delivered to internal users. Perhaps you’re creating something that gets consumed by another team.
Often, the goal is to take the end-to-end process for delivering value – from planning to building, to deploying, to operating and monitoring – and shorten the cycle with smaller, more frequent deployments, each having a smaller risk surface area. This allows for frequent validated learning and feedback that can feed into the next planning session, and the cycle repeats continuously.
DevOps is such a huge topic that if we don’t stop going into the theory now, we might never stop! We’ll finish off this topic with an insight into some of the DevOps practices that we’ve seen success with over the years, some of which are mentioned in the AZ-400: Designing and Implementing Microsoft DevOps Solutions exam, should you wish to start exploring that after passing the AZ-204 exam.
DevOps practices
To keep this brief while still being insightful, I’ll list some typical stages of the application life cycle in order and detail some of the practices I’ve seen implemented that have helped companies with successful DevOps implementations. Everything listed can be achieved using many different tools, so a specific tool won’t be mentioned here:
- Pre-planning: During the execution of an iteration/sprint, which is a time-boxed period within which teams work to complete certain agreed tasks, a backlog of work items gets prioritized, and the items are refined further to ensure each work item contains enough detail and is ideally scoped well enough to be completed within a single period. Some teams will also estimate the level of effort, which helps with velocity and forecasting (if you do this, don’t estimate backlog items in hours. Use story points, effort, or something similar).
- Planning: With a well-defined and prioritized backlog, teams can come out of a planning session with an agreed granular set of work items to be completed during the upcoming period. Often, these work items will appear in a sprint/iteration backlog with some visual tracking of progress, such as a Kanban board, for example.
If the tool you use for collaboration has the capacity, you might choose to integrate the backlog or board into it, so that you have fewer tools to switch between.
- Building: Teams may have policies in place that require a certain branching strategy with branch protection policies. Developers might create a branch within their code repository that’s explicitly linked to the work item they’re addressing. When they’re ready to commit their code, they might pull the most recent version of code from the main branch first, to ensure they have the latest code, and then confirm that whatever they’re working on builds and passes all tests correctly.
Perhaps a CI pipeline will run on each commit to the feature branch, checking out the branch, running any automated prerequisite tasks, confirming that everything builds successfully, and running automated tests (which might have previously been slow and laborious manual tests). This can help identify issues early and rapidly before they become impactful.
A pull request may be required before any code can get pushed to the main branch. When the developer creates a pull request to merge their code changes to the main branch, a policy can run that automatically triggers a CI pipeline.
The CI pipeline could pre-merge their code changes with the main branch code, perform the same or similar CI automation as on the feature branch, and generate some ready-to-deploy artifacts. These artifacts could then be used by a CD pipeline to automate deployment to a development environment, which is automatically created using infrastructure as code to ensure that the development environment is consistent with that of production. This allows approvers of the pull request to test the changes, as well as seeing the code changes.
- Deploying: Once enough approvals have been obtained in the pull request from the relevant code owners, the pull request can be completed, and the code is merged with the main branch. Automation can clean up the feature branch if that’s an approach you want to take because it may no longer be required.
Upon merging with the main branch, a CI/CD pipeline runs all the same automation as before, perhaps with some additional automated testing, and the artifacts are published for inspection and use later. Everything can be deployed to a UAT environment using infrastructure as code and those published artifacts.
Once the automated UAT deployment has been confirmed as successful, approval can be obtained, triggering a deployment to production. Depending on the environment, this might make use of deployment slots, feature flags, or other deployment strategies. The artifacts that were deployed to the UAT environment need to be the same artifacts deployed into production; rebuilding artifacts can introduce additional risk.
Again, many collaboration tools can integrate with these processes, so you can use a single tool to see the progress of pipeline runs, and grant or reject approvals for pull requests and deployments, without the need to open another tool. With the right tooling, policies, and automation, teams can innovate rapidly without sacrificing quality or stability.
- Operating: By now, you will already be aware of some of the monitoring tools available to gain valuable insights into systems in Azure. With additional integrations, I’ve seen teams have useful alerts that trigger an interactive message in their collaboration tool of choice, prompting immediate attention when required, as well as potential automated work item creation for tracking, and ideally automated remediation where possible.
- Retrospectives: At the end of each period, it’s important to not only share what value has been delivered during that period but also to reflect on various aspects of that cycle, so learning points can be considered during the next cycle, encouraging continuous improvement. Again, collaboration tools have integrations that make this process easier.
Implementing Agile and DevOps practices into the software development life cycle as a continuous cyclical process has been proven to increase deployment frequency, reduce lead times for changes, decrease the mean time to recover, and reduce change failure rates significantly. You can explore these topics further, among others, should you wish to work toward the AZ-400 exam. For the purposes of the AZ-204 exam, however, we have concluded the topics we wanted to discuss.
Summary
Message-based services hosted in Azure implement asynchronous messaging and competing consumers patterns, which help to communicate between services in cloud-to-cloud and cloud-to-on-premises approaches. Messages always guarantee that the delivery and sequence of delivery are not changed. The message processing supports batches and transactions but is not ideal for high-performance loads. Meanwhile, the message queue publishers and subscribers can be horizontally scaled to process the messages at a higher speed.
For instance, Azure Queue Storage was introduced in this chapter. It enables you to save costs if your application does not need to leverage enterprise features. Furthermore, Service Bus offers a reliable, scalable, and adjustable service that provides you with enterprise-grade capabilities for a reasonable price. You learned the details about each of the services and learned how to communicate with both services via code. Now, in the exam, you can recommend the best service to meet the requirements of a given case study and leverage the best service for your company.
The final topic of this chapter was DevOps. Without delving too deep into the depths of the topic, we touched upon a few of the fundamental principles of DevOps and some DevOps practices.
You have successfully completed all the theory topics. In the next chapter, you can test your knowledge with mock exam questions, uncover knowledge gaps, and get closer to the real exam experience.
Questions
- Can we back up a message queue?
- Does Azure Queue Storage support transactions?
- When the messages from Azure Queue Storage are successfully processed, why do they need to be explicitly deleted?
- What is the maximum total size limit for the Azure Service Bus queue?
- Which Azure Service Bus tier supports geo-redundancy?
- What are DLQs used for?
Further reading
- To learn more about the competing consumers pattern, follow this link: https://docs.microsoft.com/en-us/azure/architecture/patterns/competing-consumers
- Asynchronous messaging is explained further at the following link: https://docs.microsoft.com/en-us/azure/architecture/guide/technology-choices/messaging
- A comparison of Event Hubs, Event Grid, Service Bus, and their features can be found at the following link: https://docs.microsoft.com/en-us/azure/event-grid/compare-messaging-services
- Compare Service Bus and Azure Queue Storage performance at the following link: https://docs.microsoft.com/en-us/azure/service-bus-messaging/service-bus-azure-and-service-bus-queues-compared-contrasted
- Advanced features of Azure Services Bus are introduced in the following document: https://docs.microsoft.com/en-us/azure/service-bus-messaging/advanced-features-overview
- Learn about retry implementation in SDKs at the following link: https://docs.microsoft.com/en-us/azure/architecture/best-practices/retry-service-specific#service-bus
- A useful article on DevOps culture can be found here: https://www.martinfowler.com/bliki/DevOpsCulture.html
- The Scrum guides documentation can be found here: https://scrumguides.org/index.html