
11
Implementing API Management
In this chapter, we will learn about the concept of web API services and their implementation in Azure. We will learn how to provision our internal web API service and document its interface with Swagger. We will also see how to provision and manage the powerful Azure API Management (APIM) service to govern our enterprise web APIs. APIM has many advantages and some limitations, and soon you will know about them.
The demo scripts provided in this chapter will help you provision APIM and connect your backend APIs to the service. In this chapter, we will learn how to configure security, caching, and throttling settings for APIM, and we will find out how to granularly configure each operation in our APIs with policies. In the last part of the chapter, we will be introduced to the policies syntax and learn how to use advanced policies to cache and throttle the requests to our APIs. Furthermore, we will also learn how APIM can help scale and protect modern web applications.
Everything related to APIM services will be discussed in this chapter. The following main topics are on the agenda:
- Understanding the role of web API services
- Discovering APIM services
- Connecting existing web APIs to APIM
- Exploring APIM configuration options
- Using advanced policies
Before jumping into APIM, let us find out what web API technology is and what benefits it provides for modern cloud development.
Technical requirements
The scripts provided in the chapter can be run in Azure Cloud Shell as well as executed locally. The Azure CLI and Visual Studio Code are ideal tools to execute the code and commands provided in the following repository:
Code in Action videos for this chapter: https://bit.ly/3BuvzKf
Understanding the role of web API services
What is a web API in the modern web application world? A web API is a well-known and widely used technology to transfer data through communication channels on the internet. Web APIs are usually implemented on servers as a group of endpoints and used for connections from a variety of clients. Endpoints support the Representational State Transfer (REST) interface, allowing the manipulation of data objects by using HTTP verbs (GET, POST, PUT, and DELETE). The data formats engaged in communication are commonly represented in JSON or XML format. Furthermore, the Open Data Protocol (OData) can be used to filter and summarize data chunks exposed by RESTful interfaces. Also, OData provides a bunch of guidelines and best practices for operating with REST interfaces. Following the guidelines is a plus for any application working with web APIs.
Historically, there was a huge demand for transferring data between applications and databases. Applications, including web servers and individual clients working on desktop or mobile platforms, experienced lag when communicating and retrieving data. The root cause was that old databases did not support scaling to serve the significant number of client connections. Moreover, direct TCP communication was not allowed to go through firewalls. Finally, web services were able to help with data transfer tasks because web service is easy to scale, supports caching, and is accessible by the HTTP(S) protocol allowed by firewalls. The first web services that hosted web interfaces were based on Simple Object Access Protocol (SOAP) and supported XML chunks of data sent back and forth through HTTP(S) communications.
SOAP web services still exist and are supported by Azure technologies. Later, the REST protocol replaced SOAP communication because of the difficulties of implementing SOAP and the challenges with authentication. REST is a lightweight protocol optimized to transfer data most effectively through HTTP(S) requests. Nowadays, the REST protocol is supported by a wide variety of services in the cloud. In conjunction with OData, the REST protocol has become well known and is highly adopted in cloud-based solutions.
The web API service that supports REST protocol communication is named the RESTful service and allows other applications to access data. A good web API service must be documented, versioned, stateless, and scalable. All those aspects are already implemented in the ASP.NET Core MVC template and supported by various tools for tests, including Visual Studio Code extensions and third-party test applications. Most programming languages support HTTP clients and requests to get connected and effectively use the REST protocol to consume data from web API services. In Azure, the Azure Resource Manager (ARM) service is hosted on a web API and supports a variety of clients that use REST requests for communication. For instance, REST calls are wrapped in C# SDKs, the Azure CLI, and Azure PowerShell. The Azure portal also communicates with ARM with the REST protocol.
Let’s take a look at how the ARM web API helps us to implement scale requirements. Recall that the ARM service is implemented as a web API and used for connection from the portal, automation services, SDKs, and other tools. The ARM web API is designed as a mid-tier service and can be scaled depending on the demand from the web UI (the Azure portal), automation tools (the Azure CLI or PowerShell), or SDKs (Fluent – https://docs.microsoft.com/en-us/dotnet/api/microsoft.azure.management.fluent.azure?view=azure-dotnet). Stateless services can be easily scaled and support the highest amount of connections that the backend can accept directly from the UI. The following diagram represents how the ARM web API is consumed by different types of clients:
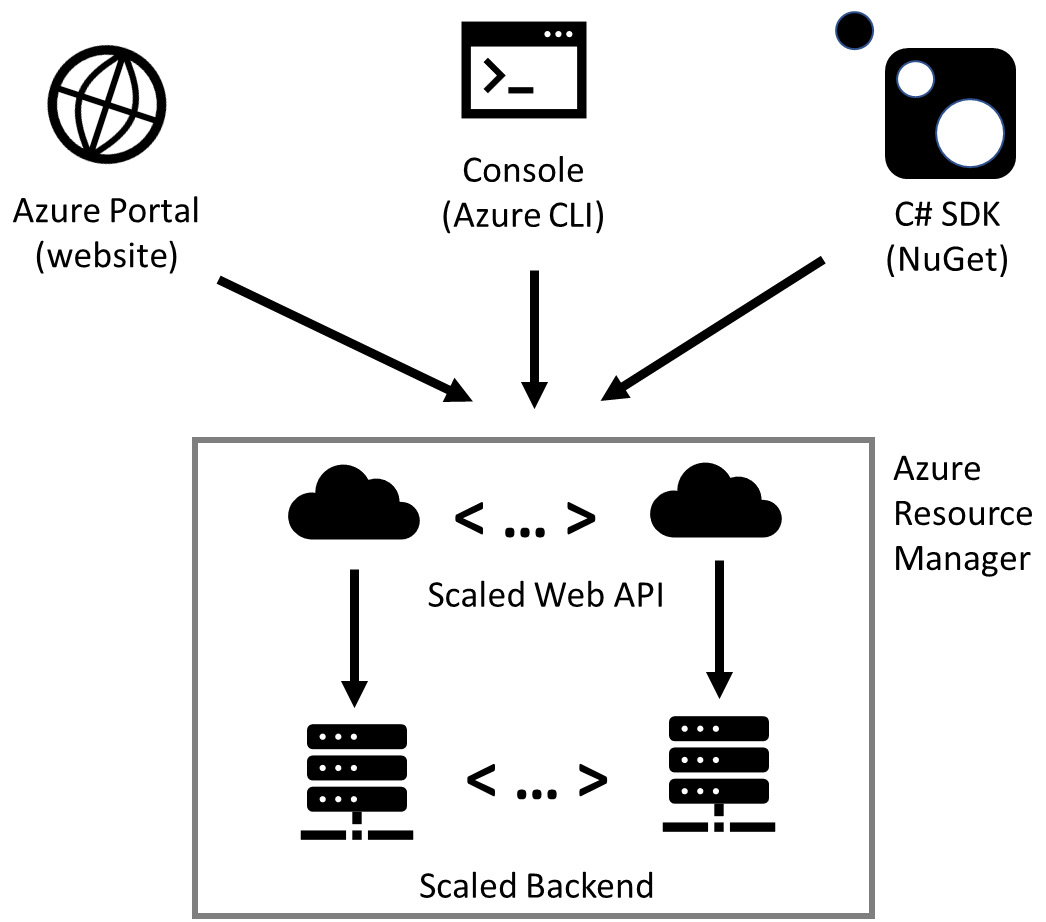
Figure 11.1 – ARM service architectural design
ARM is not the only example of a web API service used in Azure. Many other examples exist. Let’s take a look at the Azure Cognitive Services implementation, which uses APIM. The following architecture helps with understanding how APIM helps protect Azure Cognitive Services. The client app sends a request to analyze an image and provide its subscription key for authentication. APIM accepts the request and orchestrates the calls to the backend and billing service. Then, APIM returns the result of image recognition from the ML model to the client app:
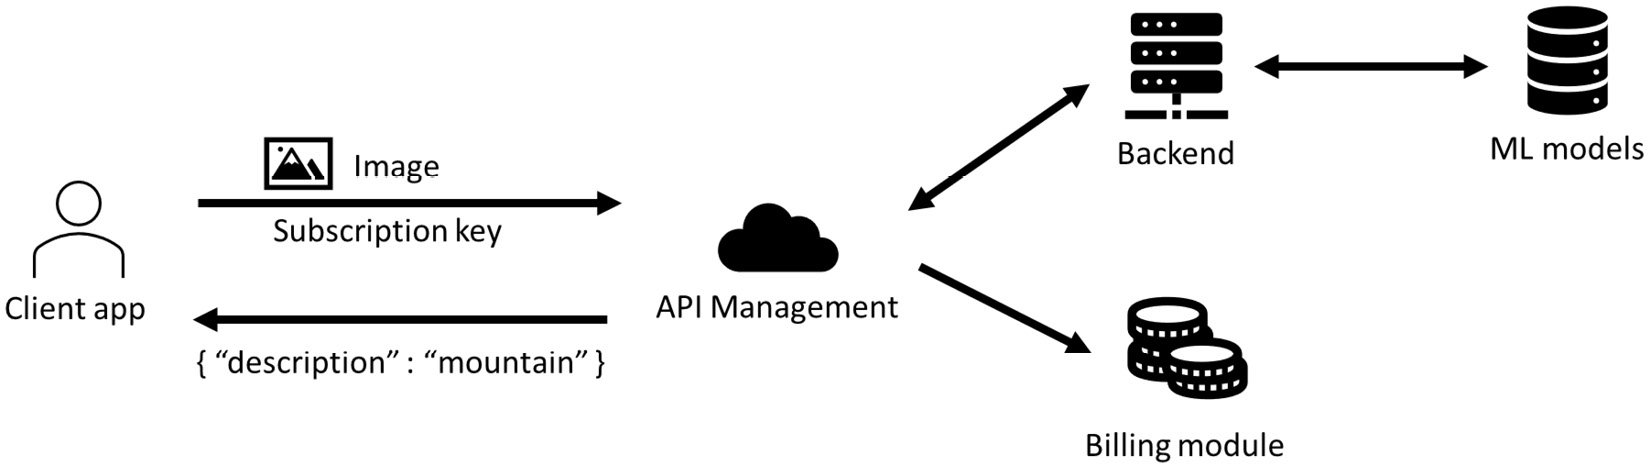
Figure 11.2 – Azure Cognitive Services architecture
You can visit the APIM console, which is represented as the APIM developer portal for Azure Cognitive Services, at https://westus.dev.cognitive.microsoft.com/docs/services/.
In the next parts of this chapter, we will discuss the advantages of APIM, which helps to protect and manage backend resources and expose a scalable web API out of the box.
Discovering APIM services
Previously, you learned how APIM is used internally in Azure to host Cognitive Services. Now, you’ll move on to learning the details of the APIM service and the advantages of using it on modern websites.
The biggest advantage of the APIM service is its various ways of configuration, including security management, products and subscription management, and advanced policy configuration, which incorporates sophisticated algorithms of caching and throttling in the communication between clients and your web APIs. From an architecture view, the APIM service is designed as a façade service to protect the web APIs exposed by your organization. APIM implements orchestration of the request-response logic and allows communicating with multiple backends in a single client request. Moreover, the APIM service provides a rich interface for enterprise customers who want to provide data services for integrations (weather forecasts, stock prices, real-time flight timetables, etc.).
APIM has a powerful subscription and product management interface that allows it to control API use and provide billing information for customers. Another interesting service for integration provided by APIM is the developer portal. This portal includes up-to-date documentation about exposed endpoints, requested parameters, and versions of APIs. The dev portal also includes a testing tool to call APIs and trace the response.
Are there any limitations of APIM? There are almost no limitations except for a lack of protection from cybersecurity attacks. The service should be used in conjunction with Web Applications Firewall (WAF) services such as Azure Front Door. Another pain point for APIM customers is the pricing model. Currently, we have several tiers available to provision APIM:
- The Developer tier, with no SLA and a single scalable unit. It provides 10 MB of cache.
- The Basic tier, with a 99.95% SLA. It is scalable horizontally to 2 units and provides 50 MB of cache.
- The Standard tier, with a 99.95% SLA. It is scalable up to 4 units and provides 1 GB of cache.
- The Premium tier, which is deployed in several regions and provides 99.99% SLA with 10 instances to scale and 5 GB of cache.
All these tiers are charged monthly independent of usage. Previously, customers complained about the lack of consumption-based price tiers, so now, Azure has released a consumption-based APIM with a limited feature set but an affordable price. The Consumption price tier is based on usage and allows only one instance to be deployed per subscription.
In the next sections, you will learn how to provision APIM and how to connect existing APIs to the service, as well as how to configure products and subscriptions.
Provisioning a web API
Before we start learning about APIM, let’s deploy a service exposed to web API operations to get the weather forecast. The following script will help you deploy an Azure web app to investigate the web API service and later connect it to your APIM. The following file should be executed in Bash to help you build and publish a website:
If the script has executed successfully, you should have an Azure web app provisioned and deployed with a demo weather service. The service might not respond to a direct call but should respond to you on the weather forecast endpoint. In the next section, you will learn how to generate documentation for your weather service and connect it to the new APIM instance.
Discovering OpenAPI documentation
Maintaining web API documentation is a recommended best practice. Back in the days when SOAP services were frequently encountered, documentation was provided as static documents in WSDL format. This static documentation had the main disadvantage that it was not up to date and often caused more confusion to developers than helped them to connect. Nowadays, enterprise organizations that want to consume your web API require up-to-date documentation of available endpoints and parameters. Good documentation also provides the request and response schemas expected by the web API and explains possible status codes returned by the servers. Status codes can flag specific cases, such as when incorrect parameters are provided (400), authentication is not completed (403), or the required item was not found in the database (404).
Documentation should be released depending on the interface version and must be up to date. Many frameworks can generate documentation based on the methods provided by the service (based on configuration attributes). One of the leaders of documentation and testing frameworks for web APIs is OpenAPI (aka Swagger). You can request the /swagger URL from your server to get the Swagger page that explains available methods, input parameters, and output schema.
On the Swagger page, you will see an operation named WeatherForecast, and if you click on it, you will see a button next to it named Try it out. By clicking on this button, the forecast will be generated and provided on a dark background output window.
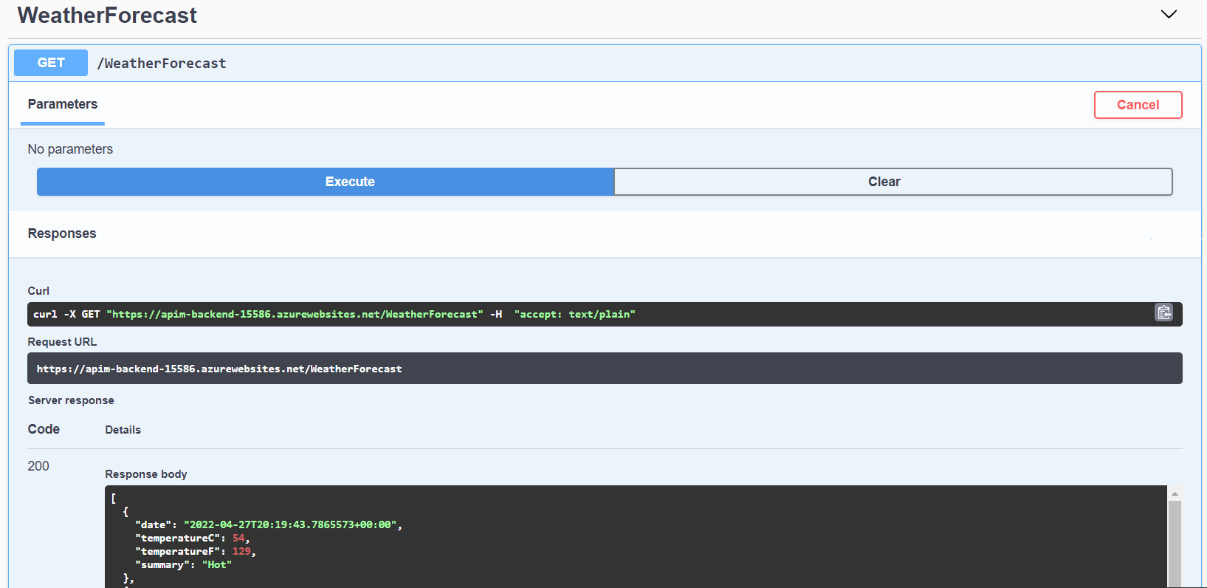
Figure 11.3 – Swagger interface with the weather forecast operation executed
Swagger is configured dynamically when the code is modified and provides descriptions with examples of input parameters and data schema. You do not need to waste time updating documentation manually because the documentation is generated on demand when requested from Swagger. The Swagger documentation is also generated for each available version of the API. Whenever you change the parameters or output schema or update endpoints, you should release a new version of the web API instead of changing the existing one. Meanwhile, the old versions should be accessible until the last customer migrates to the new version of your web API. Swagger also generates documentation based on the version. Let’s request documentation URL /swagger/v1/swagger.json for the web API provisioned earlier. From the URL, you can notice that the web API version 1 will be requested. You can find the documentation URL on the Swagger page under DemoCatalog.
Click on the link and observe the JSON documentation of the API service. It should contain a description of the service and only one operation in the previously mentioned path. The operation named /WeatherForecast contains a response description.
Example output is provided here:
{
  "openapi": "3.0.1",
  "info": {
    ...
  },
  "paths": {
    "/WeatherForecast": {
      "get": {
         "responses": {
          "200": {
            ...
          }
        }
      }
    }
  },
  "components": {
    "schemas": {
      ...
    }
  }
}
Copy the full URL address from the browser because you need this for the next script execution. In the next sections, you will use this OpenAPI documentation to import the service to APIM.
Provisioning APIM
To provision your APIM instance, you need to understand the workload patterns your clients will produce. For low-load patterns, the Consumption pricing tier works better than fixed tiers with the monthly load. Unfortunately, the Consumption tier does not support an internal cache, virtual network (VNet) integration, multi-region deployment, and self-hosted gateways for connection to the on-premises backend. Meanwhile, consumption-based tiers are optimal for proofs of concept and learning. You can start with consumption-based APIM and then upgrade it to a larger tier later when you need extra features or to scale performance.
Important Note
Provisioning the APIM instance might take about 40 minutes for all price tiers except the Consumption tier. Only one APIM instance per subscription is allowed with the Consumption tier.
When you provision an APIM instance from the Azure portal, you can specify the following settings to enable enterprise-grade features:
- A unique name for the resource, which can be used to register the FQDN and access web APIs. Later, you can register a custom domain for APIM.
- The organization name and the administrator’s email address. These are required fields for setting up the developer portal.
- A preferred location should be chosen, preferably in the same data center where you have backend resources deployed. Additional traffic charges can be applied to your subscription for cross-data center communication.
- Choose the pricing tier, either Consumption or Premium, depending on the loading pattern.
- You can enable Application Insights to monitor request rates and collect crash information.
- Scaling units are available for pricing tiers starting from Basic and implementing horizontal scale by increasing or decreasing the number of units that host the APIM service.
- Managed identities can be used for communication with Azure resources such as Key Vault, which requires authentication and authorization with RBAC.
- VNet integration enables an internal firewall for managing external connections. Connection through the endpoint is also supported.
- Protocol settings allow you to enable different versions of TLS protocol support for client and backend connections.
APIM features such as connecting existing backend APIs, product and subscription management, an authentication platform, and integration with Git, will be configured later and explained in the next part of the chapter. For now, execute the following script in Bash to provision APIM for your subscription:
The script generates the new APIM account and prints its name to the console. Please copy this name as you’ll need it for the next execution. In the next part of the chapter, you will connect a previously deployed Azure App Services to the APIM you just provisioned.
Connecting existing web APIs to APIM
One of the major configuration tasks for APIM is managing connected backend services. There are several ways to connect your existing web API as a backend to APIM. One way requires manually providing each endpoint with parameters. It’s a time-consuming process and only works for small APIs. There is another way to import documentation: from Swagger or from Web Application Description Language (WADL) and Web Services Description Language (WSDL) files. One more way of connecting is choosing an existing resource (e.g., Azure Functions, Logic Apps, or App Service) from an Azure subscription and APIM connects it automatically. In the next code snippets, you execute the Azure CLI script to connect existing services by providing OpenAPI documentation.
To execute the script, you need to update two values collected in previous script runs. First, you need to find the APIM instance name (the short name), and second, you need to provide the URL of the Swagger documentation from your weather API. This script will also connect several well-known services, and if it generates an error, it means the service is down and you can proceed with the next one:
https://github.com/PacktPublishing/Developing-Solutions-for-Microsoft-Azure-AZ-204-Exam-Guide/blob/main/Chapter11/03-connect/demo.azcli
After executing this script, you will have four services connected to the provisioned APIM:
- weather-api: A simple one-operation service that returns the weather forecast. You previously discovered this service through the Swagger interface.
- color-api: A RESTful service implementing the GET, POST, PUT, and DELETE operations on a list of colors. It is also able to retrieve a random color from the list.
- calc-api: A calculator service supporting only GET requests and providing addition, division, multiplication, and subtraction operations for integers.
- conference-api: An IT sessions catalog with an option to search by topic and session name.
These APIs provide a good opportunity to get used to the APIM interface to call and troubleshoot operations. If you choose one of the APIs, you will see a list of the available operations for the API. For example, if you choose color-api, select ApiRandomColor, and then click on the Test tab at the top, you will see the Send button, which allows you to call the operation and observe the output. It will look like the following:
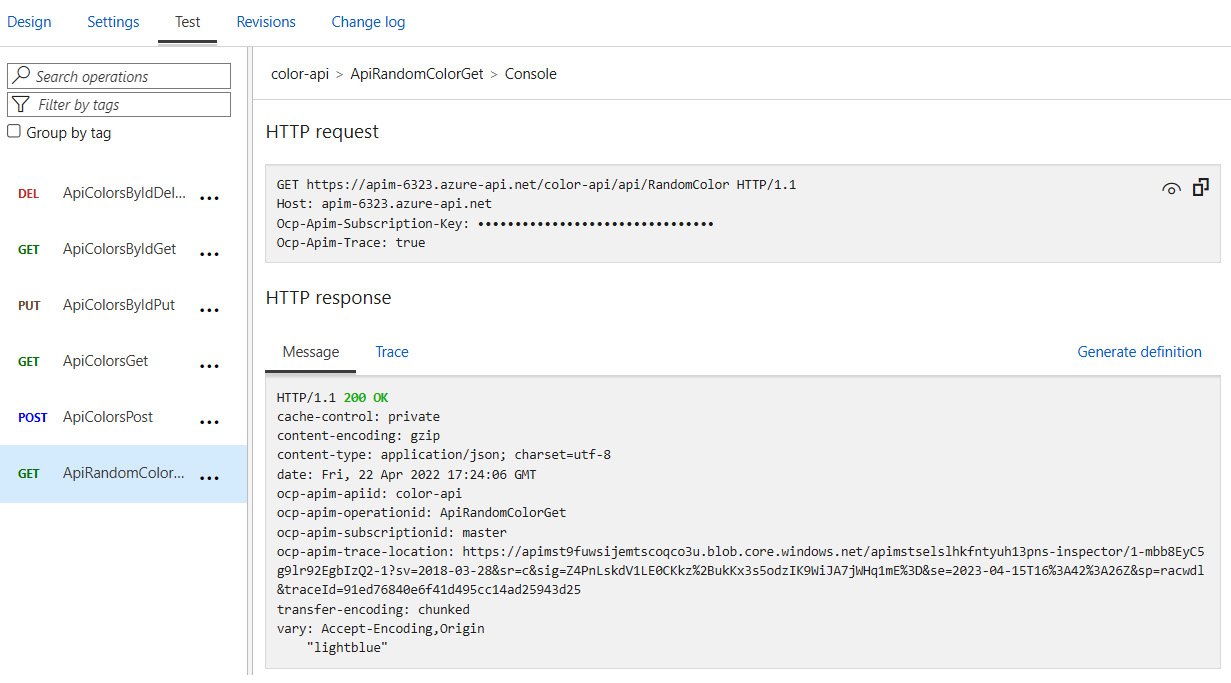
Figure 11.4 – Testing a connected API and observing the output
Products and subscriptions are other important configurations that are used to provide access to APIs. A few products were added during the previous script execution, and you can observe them on the APIM page in the Azure portal. In the next section, you will learn how to manage products, assign subscriptions, and distribute them between consumers. You will also learn about the configuration of APIM instances, which will help protect and improve the performance of your APIM and backend services.
Exploring APIM configuration options
Most of the configuration options are not available when you are provisioning APIM. When you finish deployment, advanced configuration options will be available for your APIM instance depending on the price tier you selected. Let’s take a look at some of the configuration features. Some of the features you can observe from the portal, but other features might not be available for the Consumption tier you deployed from the script.
Products and subscriptions
Several terms need to be explained before moving on. An API is a set of endpoints or operations available for calling by clients to receive data. A product is a set of APIs groped logically. A subscription is a key provided for a customer who wants to call APIs included in the product. Usually, a product is linked to one or more subscriptions. Customers can obtain more than one subscription.
For enterprises that provide access through a web API to a variety of databases (e.g., forecasts, price change history, or analytics), it is important to control and track the access to the services and bill their customers accordingly. On other occasions, customers who want to adopt the enterprise service hosted on the web API can request trial access. Other customers might use a free access subscription to get limited functionality for proof of concept projects. All those needs are met in APIM’s product and subscription management features. Companies that have deployed APIM can create several types of products:
- A free product, which can be accessed without a subscription. Those products should have the Requires subscription setting set to Off.
- A billable product is a product that requires a subscription to charge customers individually.
- A trial product is a product where subscriptions have limited access time during the trial period. APIM does not have handy settings to control the trial time, but in the access policies, you can verify the date when the subscription was created to control the length of the trial period.
A product is a logical group of APIs that are allowed to be used by client subscriptions. A new subscription can be generated at any time and assigned to the existing product. By adding a new API to the product, you are allowing access to all operations of the service. Alternatively, if you are building a free product, you can clone the registered API with a new name and delete the operation you do not want to share for free. You need to publish products to make them available for clients to call.
A subscription can identify the customer and link to the products that allowed access to the API. A subscription can be generated by the admin and shared with a customer or a customer can request it from the dev portal. A list of operations available as part of the product can also be obtained from the dev portal. A subscription is a number and letter combination that must be passed in an HTTP header named Ocp-Apim-Subscription-Key. A header should be provided for each request sent to the API’s operations unless the product or API does not request a subscription.
In the previous script, you provision APIM and add three APIs to the APIM: Color API, the Calculator API, and the Conference API. Now, you can observe them from the Azure portal.
Authentication
Access to the development portal could be provided for unauthenticated users and users with an account created on the APIM instance manually. The user’s email address and password are required to register the account. Alternatively, several identity providers can be used for the authentication process, including Azure Active Directory and Azure Active Directory B2C, a Microsoft account, Facebook, Twitter, and Google. You can also configure APIM to authorize developer accounts using the OAuth 2.0 and OpenID Connect protocols.
Authentication for API operation calls is implemented based on the subscription key related to the products. Meanwhile, additional authentication mechanisms can be implemented on advanced policy levels, such as verification of the request source (IP addresses) and certificate verification. More details about advanced policies will be provided in the Using advanced policies section of the chapter.
User accounts
From an APIM owner standpoint, the user account is a developer from an external organization who wants to adopt APIs. The APIM admin can create the user accounts manually, add them to the groups, and assign subscriptions to manage the visibility of the products for the user account. Several immutable system groups exist in APIM:
- The Administrators group, with full permissions to carry out operations on products and APIs. Azure subscription administrators are added to this group.
- The Developers group, with authenticated users who can test APIs based on the visibility of the products and request subscriptions. Developers can get access to documentation and monitor the usage of the services of their applications.
- The Guests group, for unauthenticated users who can observe APIs on the developer portal but cannot call them.
A custom group can also be created to manage a group of accounts manually. Admins can create a new account manually by providing a login and password or inviting users to create their accounts with self-service. The invite will be sent by email with a link to a registration page on the developer portal.
Networking
APIM can be connected to a VNet in Azure and on-premises. The API backend hosted on the network can be accessed by APIM securely and the backend should not be exposed for connection from the public internet. You can configure integration with an Azure VNet from the Azure portal to connect backends hosted on Azure VMs. If you are going to use Azure VMs, you must be aware of port requirements that allow APIM to monitor the state of the backend and use Load Balancer. You can also use private endpoints for connection to the Azure infrastructure. For connection to the resources, on-premises APIM needs to be integrated with a VNet that is connected to the on-premises network by site-to-site connectivity.
The dev portal
The dev portal is a website hosted on an APIM instance and is available for all pricing tiers except the Consumption tier. The dev portal allows clients who want to integrate with provided APIs to observe its documentation, test, and manage its subscriptions. The website pages are automatically generated and could be customized by the APIM owner. New products and APIs added will automatically appear on the portal when customers sign in.
Page customization includes editing layouts, menus, styles, widgets with text and media files, embedded HTML snippets, and inline frames. Custom logic on the pages is not supported out of the box but is available for customization from the portal code base on GitHub. Required updates could be requested as a pull request to merge with the managed portal logic or self-hosted on the client environment outside of APIM. This way of integration suits integration with a third-party system and provides a flexible way of customizing and implementing widgets with your logic.
Self-hosted gateways
Hybrid and multi-cloud companies need to run APIM instances in an isolated network. By deploying a self-hosted gateway, they can host a local APIM instance on-premises. The deployed gateway works as a proxy server and provides connectivity to registered Azure APIM resources for applications from the local environment. The self-hosted gateway is implemented as a Docker image. Then, it can be configured and managed from the Azure portal as a deployment with one or more nodes. Accounts are charged a fixed price per deployment, but their nodes run for free. If a company wants to provide access hosted on on-premises web API servers for an application running in Azure, it should consider using networking solutions such as a VPN or Azure Hybrid Connections.
External cache
The caching response is one of the most useful functionalities of APIM to protect backend APIs from hammering by client requests. Every client wants to get the most up-to-date data and will be able to call APIM often. The customer who owns the API could implement a throttling limit to prevent clients from calling the API often or implement caching logic to cache the frontend or backend output. The caching option is customer friendly and does not affect its functionality by throwing errors when the limit is exceeded.
APIM supports a built-in cache. The cache size depends on the price tier (10 MB for the Developer tier, 5 GB for the Premium tier). Often, the size of the built-in cache is not enough to support high-performance APIs. The workaround is using an external cache, for instance, Azure Cache for Redis.
If you connect an external cache instance to APIM, it will avoid cleaning up the cache memory during APIM updates, because the built-in cache is cleared when APIM restarts. You can also exceed the memory size of the cached output provided by the built-in cache. Moreover, you can use the external cache for the Consumption price tier, which does not support a built-in cache.
To adopt an external cache, the instance of the cache must be provisioned in Azure or on-premises. Then, the cache should be connected to the APIM instance by providing the connection string supported by StackExchange.Redis. When the cache instance is connected to APIM, the caching policies can be configured. In the next subsections, you will learn how to configure a caching policy and throttling limits.
Repository integration
APIM supports integration with a Git repository to persist configuration. This feature is especially valuable for companies that maintain advanced policies. The policy is that XML format configuration with inline code snippets must be versioned and persisted in source control. Moreover, the modification of the configuration, such as adding a new version of the API or modifying policies, can persist directly from the Git repo. Another advantage of configuring the Git repo for APIM is high availability. You can quickly restore the APIM configuration in the new instance in another region to replace a failed region.
Monitoring and troubleshooting
To monitor APIM calls, you can use Azure Monitor and Application Insights. Azure Monitor provides you with limited metrics to monitor and does not persist in the history of changes for more than a month. The main metrics recommended to be monitored are Capacity (displays the percentage of the resources in use and will let you know when your APIM requires an upgrade) and Requests (lets you know the current request rate for your APIM service). The metrics could be exported for persisting to the storage account and pulled to the Azure Log Analytics workspace to analyze.
The Application Insights service is explained in more detail in Chapter 10, Troubleshooting Solutions by Using Metrics and Log Data. It can offer the granular monitoring of individual requests and backend responses. The service can collect the exception output and monitor a variety of metrics, including dependencies on backend APIs.
The alerting service allows you to monitor the resource metric changes. For example, the execution time of the request, errors on the backend, restarts of the APIM instance, and so on. You can also be alerted to changes of custom requests configured in a Log Analytics workspace and events in activity logs, such as adding new subscriptions and publishing new products.
If you want to track the subscription, product, or API usage, the best option is to visit the Analytics page in the Monitoring section on the Azure portal. From the charts available on the page, you can monitor the frequency of the requests by subscription. You can also monitor operations, products, and subscription usage based on the time range and geography of the client. The information on the Analytics page could be used for the billing of clients.
Troubleshooting can be performed from the Azure portal by executing a request to the APIM operation. The Test functionality allows you to send a request to APIM and trace the flow on the Trace tab. The Backend, Inbound, Outbound, and On error tabs let you observe the output of each of the stages and traces of the inline code from the policy. The following screenshot shows you how to troubleshoot errors that might occur while calling the web API:
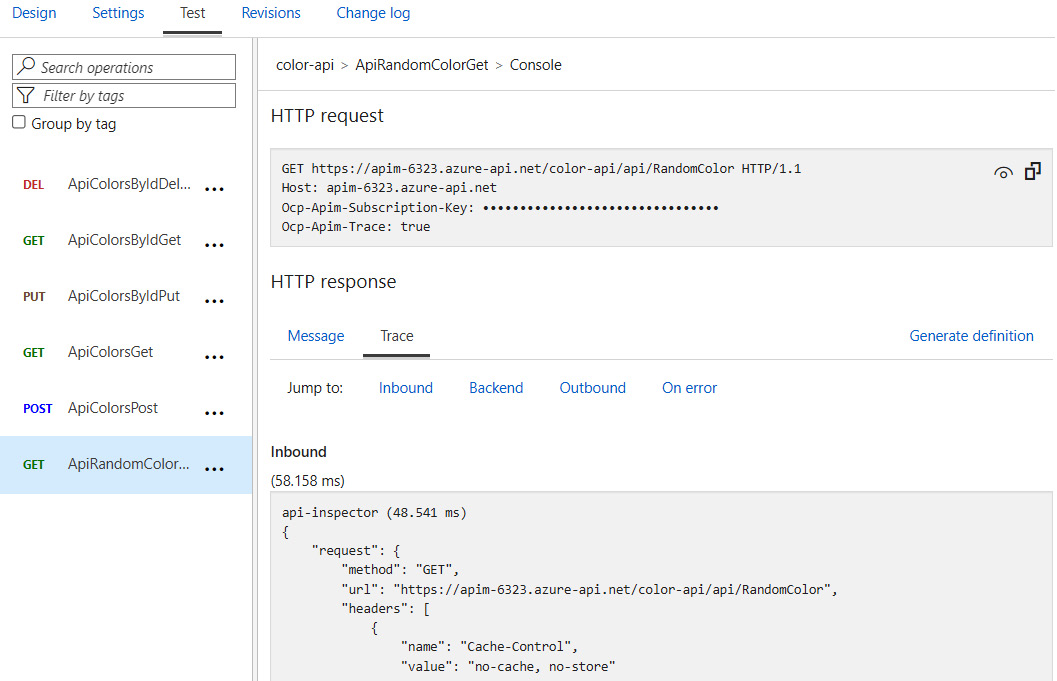
Figure 11.5 – Trace output for the operation of retrieving a random color from color-api
APIM policies are a powerful mechanism to granularly manage client activity. You already know about caching policies, throttling policies, and authentication policies, so you will now learn in detail how to use an advanced policy to protect your backend from overwhelming workloads.
Using advanced policies
The APIM policy is a powerful tool to manage many aspects of APIM communication. You can manage caching, header authentication, IP filtering, rewriting URLs, returning policies, converting output into a different format, and much more. A policy in APIM is provided as XML configuration applied for the operation it is specified for. You can also set up a global policy for APIs and refer to that policy in the exact policy for an operation, such as in the code when an inherited class can call the base class. This option allows you to minimize duplication of configuration and follow the Don’t Repeat Yourself (DRY) approach.
The policy consists of four sections: <inbound>, <backend>, <outbound>, and <on-error>. Each of the sections can be extended with custom settings. The global policy for APIs can be referenced in the particular operation policy by including the <base/> tag in the policy. You can exclude the execution of the base policy by removing the <base/> tag from the section. The following example demonstrates a different way to apply or exclude base policy execution for an API operation:

Figure 11.6 – Default operation policy with references to the base policy
The global policy can be edited when you select All operations on the list of all operations and then click on the </> icon next to the Policy text. If you open the policy editor, you will find many code snippets on the left and will be able to add the snippet to the policy and configure it. The validation of the policy will occur when you hit the Save button.
In the following section, we will provide some policies that you can copy and paste into the APIM instance you deployed previously to check what is returned to the client. All the following policy snippets should be provided inside of appropriate blocks, <inbound>, <backend>, <outbound>, and <on-error>. To minimize the length of the code, only the appropriate block will be provided in the examples.
Mocking API responses
You can mock any part of the API response, including the status code, HTTP headers, and response body. The response can be fully generated on APIM without access to the backend. This approach also decreases the load on the backend, simplifies authentication on the backend, and provides a meaningful status code for a variety of business logic events.
The following example allows you to generate a specific status code of 404 when a requested item is not found in the database. The status code table will let you choose the appropriate code:
<inbound>
    <base />
    <mock-response status-code="404" content-type="application/json" />
</inbound>
Alternatively, you can customize the response parameters directly from the APIM policy by using the <return-response> instruction. For example, you can also provide a specific HTTP status code by using <set-status>. You can also generate or override the value of the HTTP header with <set-header>, provided by the backend to hide the value from the client. The same approach can be used to access the backend service with some generated values (for example, authentication headers). In the same way, you can hardcode specific HTTP output by using <set-body>:
<inbound>
   <return-response>
      <set-status code="200" reason="Product found" />
      <set-header name="source" exists-action="override">
          <value>warehouse database</value>
      </set-header>
      <set-body>{"name":"#1 Product", "price": 500}</set-body>
   </return-response>
</inbound>
The preceding example demonstrates the static output generated on APIM without calling a backend service.
Caching an API response
To avoid overload of backend services, a variety of different caching policies can be applied to operations in APIM. You can persist, retrieve, and remove the cached content directly from a policy.
In the first part, you need to define what content will be returned from the cache. The rules need be provided in the <inbound> section and controlled by the <cache-lookup> instruction. You can persist the content based on specific query parameters; for example, output products per category should depend on the category ID and should be cached separately by the value of the category ID. In the same way, you can control cached content based on the HTTP header with <vary-by-header>. You can also cache content by developer (client) with <vary-by-developer> or per developer group, <vary-by-developer-groups>. You can also configure the cache instance (internal or external) and downstream. In the second part, you need to provide the persistence rules with <cache-store>:
<policies>
    <inbound>
        <cache-lookup vary-by-developer="false" vary-by-developer-groups="false" downstream-caching-type="public" must-revalidate="true">
            <vary-by-query-parameter>category</vary-by-query-parameter>
        </cache-lookup>
    </inbound>
    <outbound>
        <cache-store duration="60" />
    </outbound>
</policies>
Important note
When you test a caching policy on the Consumption pricing tier APIM, it is required to connect the external cache. Other pricing tiers will use the internal cache.
The preceding policy will perform caching based on the category query parameter and persist the output for 60 seconds.
Throttling requests
The workload provided by client applications increases when your API gets popular. Many enterprises face the need to upgrade the backend because the server cannot handle the increasing workloads. Thousands of mobile devices, web applications, and services can overheat your APIM if you do not throttle the requests. There are also many examples when the provider is limiting the number of requests by the subscriptions or products. For example, the Free tier in Azure Cognitive Services allows the processing of a few requests in a second and a limited number of requests per month.
The throttling functionality can be applied to an operation or the entire API with a global policy with the <rate-limit> instruction. You can provide the maximum number of calls with input parameters and a renewal period. With the counter-key parameter, you can throttle limits by any calculated values of the response, the IP address, for instance. To control calls for long periods, you can use the <quota-by-key> instruction with the same parameters as a rate limit instruction. The following example provides a rate limit of 1 call in 10 seconds with the limit set for the IP address of the caller:
<inbound>
   <rate-limit calls="1"
        renewal-period="10"
        counter-key="@(context.Request.IpAddress)" />
</inbound>
In the following examples, the quota is set up for a total of 1,000 calls and 100 kilobytes of bandwidth per month (2,629,800 seconds):
<inbound>
    <quota-by-key calls="1000"
          bandwidth="100"
          renewal-period="2629800"
          counter-key="@(context.Request.IpAddress)" />
</inbound>
The syntax used here that starts with the @ symbol is called a policy expression and it contains inline code. It will be explained in the next section.
Controlling flow
You already learned about examples of implementing policies that help control output and improve the performance of your APIs. Now, you will be introduced to flow controls and inline code examples that help you bring custom logic to APIM responses.
The following example describes the <choose> instruction, which needs to be set up with at least one <when> and one optional <otherwise> element:
<choose>
    <when condition="Boolean expression">
  <!— some policy statements applied if the expression is true -->
    </when>
    <otherwise>
  <!— some policy statements applied if none of the above expressions is true -->
    </otherwise>
</choose>
In the following example, <choose> is applied to the validation of client certificates. Pay attention to the inline code syntax, which follows C# syntax rules, and use full references to the .NET Framework objects:
<choose>
    <when condition="@(context.Request.Certificate == null || !context.Request.Certificate.Verify() || context.Request.Certificate.Issuer != "issuer" || context.Request.Certificate.SubjectName.Name != "expected-name")" >
        <return-response>
            <set-status code="403" reason="Invalid client certificate" />
        </return-response>
    </when>
</choose>
As you can see from the previous example, the configuration policy in conjunction with C# syntax is a powerful tool for granular customization of the policies available on APIM. Many other policies could be found from the drop-down list of the snippets available on the policy editor page. Detailed documentation for each policy and its parameters is provided in the Further reading section.
Summary
APIM is an important platform for enterprise customers who expose web API services to public clients. APIM is provisioned in Azure to protect a variety of backend services deployed as IaaS or PaaS or even on-premises. APIM is also an orchestrator service that implements orchestration of the backend requests, can combine several in one, caches the output, and manages throttling. The support of modern authentication algorithms allows the service to securely protect the backend and manage networking integration.
APIM exposes the developer portal, which helps clients to integrate, test, and monitor the consumption of the service. The variety of the pricing tiers allows deploying affordable instances and using consumption-based serverless instances for low-load scenarios. The APIM service is the perfect choice for companies that make money from selling historical data, forecasts, machine learning services, and many other services that communicate through public networks. Subscription and product configuration will allow companies to track the usage and generate billing for clients who call APIM. For instance, Microsoft hosts AI services (Azure Cognitive Services) on the APIM platform to let the clients connect to the services, manage subscriptions, and perform troubleshooting.
In the next chapter, you will learn about event processing and an event-based solution that is also built on top of web APIs and designed for big data ingestion, flow management, and IoT device streaming.
Questions
- What is the REST standard and what HTTP verbs are used in REST?
- Does APIM support horizontal scaling?
- What are three ways to connect existing web APIs from your Azure subscription to the APIM service?
- Are there any disadvantages to using a consumption-based pricing tier for APIM?
- What is the policy expression syntax based on?
Further reading
- Use the following link to check out the OpenAPI documentation: https://oai.github.io/Documentation/.
- You can learn more about managing and configuring the developer portal on APIM from the following link: https://docs.microsoft.com/en-us/azure/api-management/api-management-howto-developer-portal.
- Learn how to connect an external cache and provision Azure Cache for Redis in the following documentation: https://docs.microsoft.com/en-us/azure/api-management/api-management-howto-cache-external.
- A variety of examples of advanced policies can be found here: https://docs.microsoft.com/en-us/azure/api-management/api-management-advanced-policies.
- You can get extra hands-on experience with APIM from the following labs: https://azure.github.io/apim-lab/apim-lab/1-apimCreation/.
- You can read more about client authentication policies from the following link: https://docs.microsoft.com/en-us/azure/api-management/api-management-authentication-policies
- Disaster recovery options are discussed in the following article: https://docs.microsoft.com/en-us/azure/api-management/api-management-howto-disaster-recovery-backup-restore?tabs=powershell#what-is-not-backed-up