
Chapter 7: Character Design through Layer Parenting
In the previous chapter, we built an animated digital advertisement that targeted the native web and spent a lot of our energy focused on doing so through the use of Motion Tweens.
This chapter will focus on a newer animation technique for characters and any other complex jointed mechanisms known as Layer Parenting. We'll begin by exploring Advanced Layers mode and then examine how to design a hierarchical character rig by establishing parent-child relationships across multiple layers through the Layer Parenting workflow. We'll then delve into animation using Layer Parenting structures and learn how to add an additional flourish to our animation by adding audio and automated lip syncing.
After reading this chapter, you'll be able to do the following in Animate:
- Understand the benefits and potential drawbacks of using Advanced Layers mode
- Build a set of parent-child relationships across your layers through layer parenting
- Create character animation using layer parenting mechanisms
- Import audio files and configure a set of visemes for use with automated lip-syncing mechanisms
Technical Requirements
You will need the following software and hardware to complete this chapter:
- Adobe Animate 2022 (version 22.0 or above).
- Refer to the Animate system requirements page for hardware specifications: https://helpx.adobe.com/animate/system-requirements.html.
Working with Advanced Layers Mode
In this section, we'll have a look at Advanced Layers mode, how it differs from Basic Layers mode, and the benefits of using Advanced Layers mode within your Animate projects.
As we've seen in previous chapters, the use of layers in an Animate project allows us to organize artwork, animations, and other elements within the document. They also influence the stacking order of visible assets that appear on the stage. Layers keep things neat, tidy, and in their proper place.
If you want to animate through Layer Parenting mechanisms, you must be able to use Advanced Layers mode within your Animate document. This is a special document setting that is on by default when you're using the current version of the software and provides numerous advanced capabilities, such as Layer Parenting, Layer Depth, the use of Camera, Layer Filters, and Layer Effects.
We'll first have a look at the two different layer modes available in Animate and a couple of items you should be aware of when choosing one over the other.
Assessing Layer Mode Benefits and Gotchas
While Advanced Layers mode is now enabled by default with any new document you create, there may be projects where you would prefer to work in Basic Layers mode instead. Additionally, you should be aware that you are changing the fundamental structure of any document when you switch from one mode to another. These decisions will affect workflows and may invalidate any code that you may have written.
Let's provide a brief overview of the various layer modes and what they can be used for:
- Basic Layers: This could almost be thought of as a classic mode of working in Animate as it is basically how things have functioned for nearly 2 decades. When using this mode, you will not have access to certain newer workflows, such as Layer Parenting. Writing code that interacts with various symbol instances that are present on the stage, however, is a bit easier to accomplish.
- Advanced Layers: When using this mode, each layer will be transformed into a Movie Clip symbol, allowing for more advanced workflows, such as Layer Parenting, in addition to all the workflows available in Basic Layers mode. The biggest problem when using this mode is when you are also writing code that targets certain, specific symbol instances, as these instances may now be nested within an additional instance that's been created from the layer and named accordingly.
To illustrate the potential issues with code, consider the following Animate project:
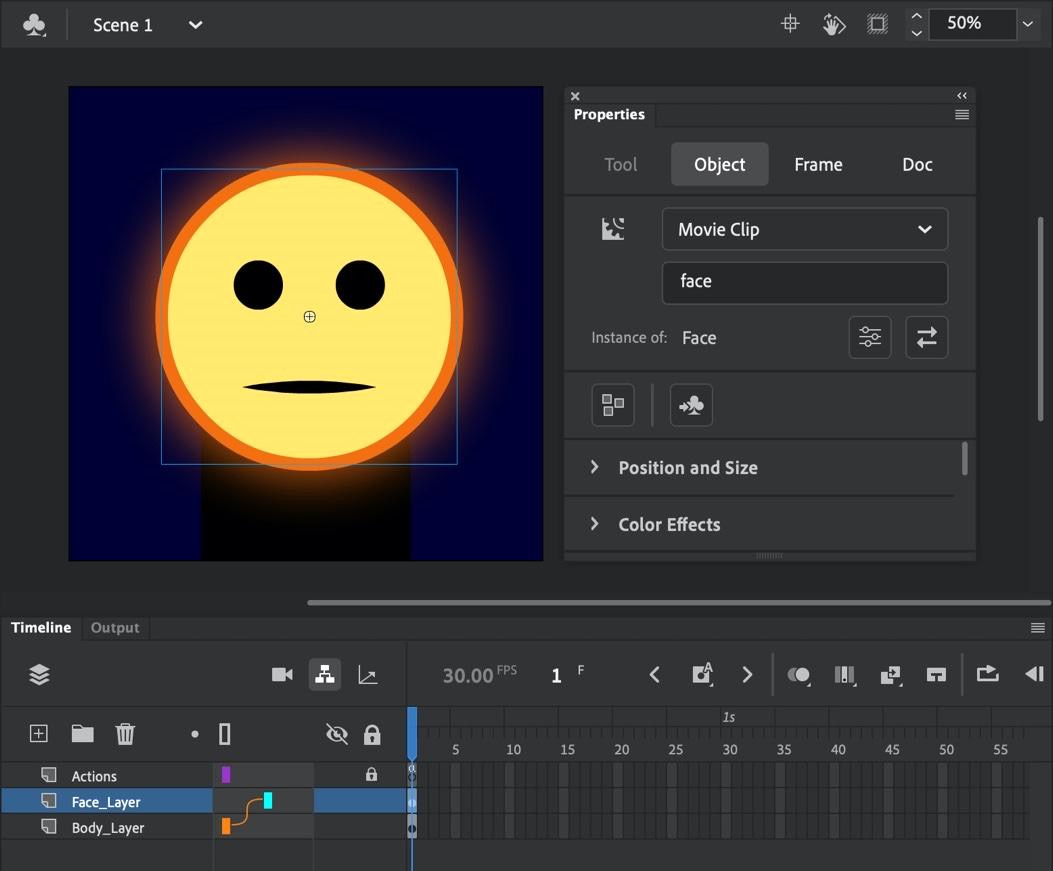
Figure 7.1 – Advanced layers and code considerations
Notice that we have a layer named Face_Layer and that, within that layer, is a Movie Clip symbol instance with an Instance Name of face.
When dealing with code, there are two possibilities. If we want to target the face instance and stop its internal timeline, we will normally write the following code (ActionScript, in this example):
this.face.stop();
However, under certain circumstances, with Advanced Layers mode, since layers may be rendered as Movie Clip symbol instances themselves when using Advanced Layers features, you may need to include the name of the layer as well:
this.Face_Layer.face.stop();
Most of the features of Advanced Layers mode are geared toward visual effects more than anything code-based, but it is good to keep this in mind as a possibility as you work through various projects.
Note
There is an optimization in recent versions of Animate that will not publish container symbols based on layers if no advanced layer feature is in use. Because of this, we can often use the shorter syntax without referencing the containing layer, even when we're using the Advanced Layers mode.
Advanced Layers mode enables the following features in Animate documents:
- Layer Parenting: This feature allows you to establish a parent-child hierarchy between layers in the timeline. These relationships are retained even when you're animating the various assets associated with these layers, which allows you to create a rigging system. This feature is the focus of this chapter and will be covered in depth shortly.
- Layer Depth: This feature can be used to manipulate the z-depth of various timeline layers, apart from their actual order. Using this feature, you can have objects pass in front of or behind one another, and even use layers set at different depths to control a parallax camera effect in your animation. We will explore layer depth further in Chapter 10, Working with the Camera and Layer Depth.
- Camera: The Camera document exists on the main timeline and can be zoomed, rotated, and panned just like a real camera. It allows for many more expanded cinematographic elements within your animated content. We will explore the Camera document alongside Layer Depth in Chapter 10, Working with the Camera and Layer Depth.
- Layer Effects: This feature allows you to make use of effects and filters on entire layers, similar to what you would normally apply to individual Movie Clip symbol instances. This feature is only available in ActionScript 3.0-based documents.
Now that we have a better understanding of what Advanced Layers mode does, we'll have a look at how to switch between that and Basic Layers mode within an Animate document.
Switching Between Layer Modes
As mentioned previously, Advanced Layers mode is enabled by default in any new document you create. For older documents, you can always enable it if desired once the document has been opened in a newer version of Animate.
Note
In WebGL glTF-based documents, you cannot disable the Advanced Layers mode as the checkbox to do so is non-functional.
In older versions of Animate, the switch to toggle between layer modes was located in the timeline. In newer versions of Animate, you will find this option within the Document Settings dialog. To access Document Settings, click the More Settings button in the Document Settings section of the Doc tab within the Properties panel or choose Modify | Document… from the application menu.
The Document Settings dialog will then appear:
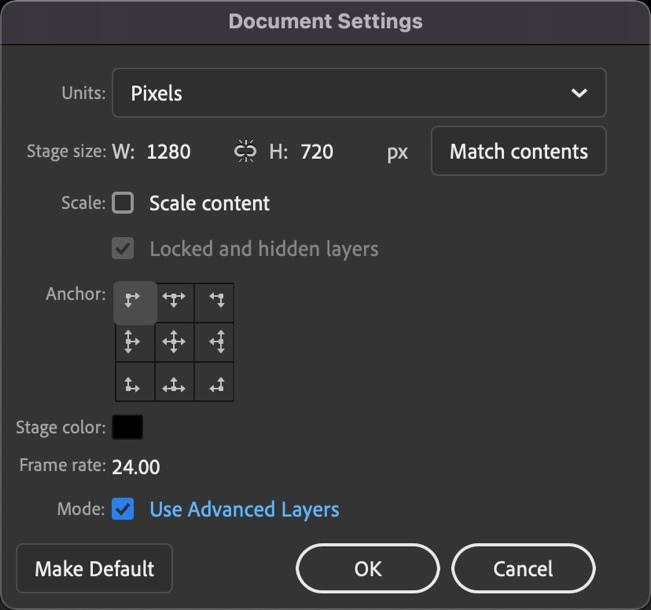
Figure 7.2 – Enabling Advanced Layers in Document Settings
There are several important settings within this dialog. Many of them, such as Frame Rate, Stage Color, Width, and Height, are available from within the Properties panel as well. Below all of these settings, toward the bottom of the dialog, you can find the Use Advanced Layers checkbox.
Any modifications that are made to this checkbox will cause an alert to appear immediately, letting you know what will happen based on your choice:

Figure 7.3 – Advanced Layers warning dialogs
It is immensely important to understand the repercussions that you may need to deal with when you switch between these various layer modes. It is best to have an understanding of what you want to accomplish in any project and choose the best layer mode at the beginning, so you don't have to deal with the hassle later on.
In this section, we explored the two available layer modes within Animate and gained an understanding of the differences, benefits, and drawbacks of each choice. Next, we'll put one of the advantages of Advanced Layers mode to use in the form of Layer Parenting.
Animating a Character with Layer Parenting
Layer Parenting is a feature of Advanced Layers mode that allows us to establish nested parent-child relationships between actual layers within the timeline of a document. The benefit of doing so is that we can create a rig across our layers in this way, through which the manipulation of any parent layer will also apply to its children and grandchildren.
A good way to envision this relationship is to visualize a human arm. If you want to move the hand without any other arm parts, it can easily be rotated at the wrist and will not affect the lower or upper arm. Moving the lower or upper arm, however, will also change the position of the hand since it has an attachment to both of those additional structures. Layer Parenting works in much the same way but allows no incidental movements across other structures as more natural physical motion would.
Note
Animating through Layer Parenting is very precise in that the rotations, positioning, and other manipulations only affect the layer whose properties are being changed and attached child layers in precise ways. There is a more natural, less precise method of rigging called Inverse Kinematics, which we'll look at in detail in Chapter 8, Animating Poses with IK Armatures, as well as a third way of rigging animated content, which we will explore in Chapter 9, Manipulating Warped Objects Advanced Rigging.
We'll now have a look at how to set up an Animate document for Layer Parenting through the import and configuration of prepared visual assets.
Preparing Assets for Layer Parenting
When you're setting up the assets in your project to be used for Layer Parenting workflows, all of the basic considerations still apply. You'll want to have layers named in a meaningful way and organized appropriately, with each object that will receive animation through tweening on a layer of its own.
Note
We've already prepared an FLA file for use in this project that contains assets that are suitable for rigging with Layer Parenting workflows. You can find this, along with all the files, at https://github.com/PacktPublishing/Adobe-Animate-2022-for-Creative-Professionals-Second-Edition.
Let's have a look at our existing document, named WoodenDoll.fla, and modify it for Layer Parenting:
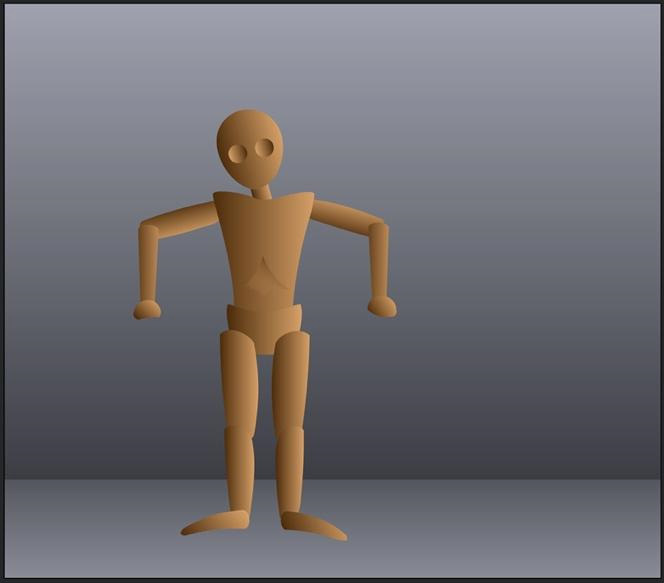
Figure 7.4 – The wooden doll
You will immediately notice a human-like figure that appears very similar to the type of posable wooden dolls that are used by sketch artists and sculptors. The doll is positioned within what appears to be a plain room, with a floor and single wall visible.
Upon inspecting the timeline, you'll notice that the document has two layers named Room and Doll:
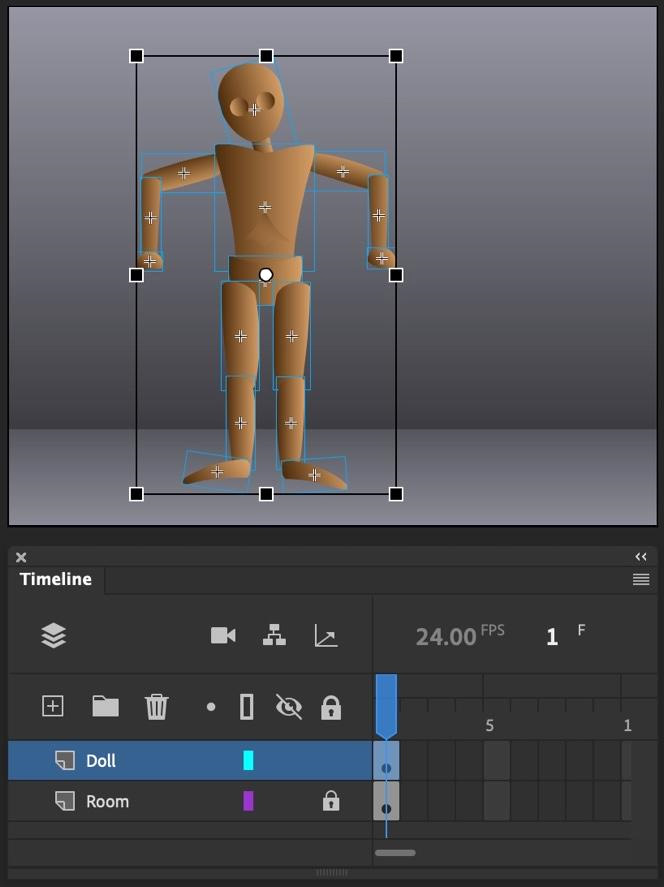
Figure 7.5 – The document Timeline and Stage
The Room layer contains the background assets and is locked. The Doll layer includes a set of 15 individual movie clip symbol instances that make up the various parts of the wooden doll we will be rigging and animating through Layer Parenting. Since we will be animating these objects using Classic Tweens, it is very important to ensure that they are all symbols that have been given identifiable names.
Now that you are familiar with how the document is set up, let's organize things a bit better:
- Since Layer Parenting involves creating parent-child relationships between different layers, we'll need to move all 15 objects out from the single Doll layer they are currently placed within and create a unique layer for each. To do this easily, simply select all 15 objects in the stage within the Doll layer by drawing a selection rectangle around them with the Selection tool.
- Right-click on the selected objects and choose Distribute to Layers from the menu that appears:
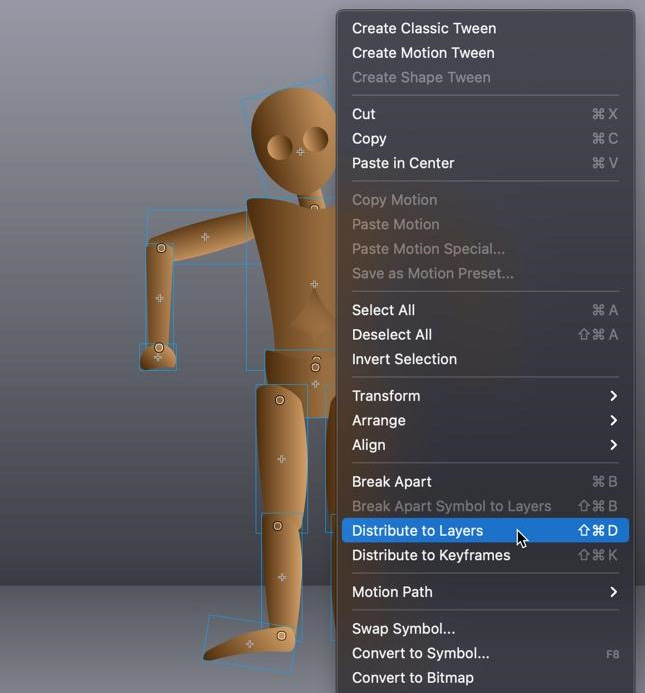
Figure 7.6 – Distribute to Layers
This will remove all 15 instances from the current layer and generate a new layer for every instance, automatically placing each inside its own layer.
- With so many layers now part of the timeline, it may help to dock the entire Timeline panel to the side of the stage instead of beneath it:
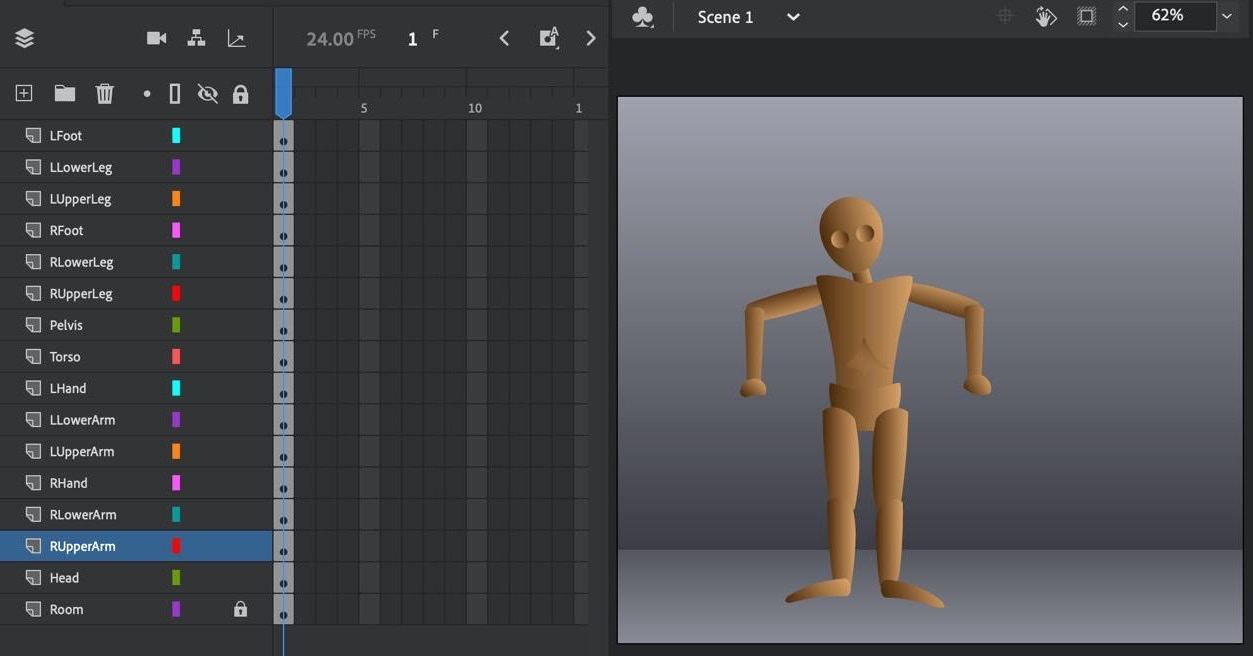
Figure 7.7 – Assets arranged across layers
Notice that each of the new layers has a meaningful name as well. This is because the Distribute to Layers option will automatically name each layer with the same name that was given to the object that the layer is being generated for. Pretty convenient!
Our character assets have now been imported into the stage and assembled into a meaningful layer structure within the timeline.
One important thing to know is that each of these body parts has been assembled to form a visual representation of the entire doll. The head is where a head should be, while the various arm and leg pieces are positioned as you would expect for a full doll.
Related to this is the fact that the transform point of each doll part, indicated by a white circle, has been positioned at the various natural joints along the body:
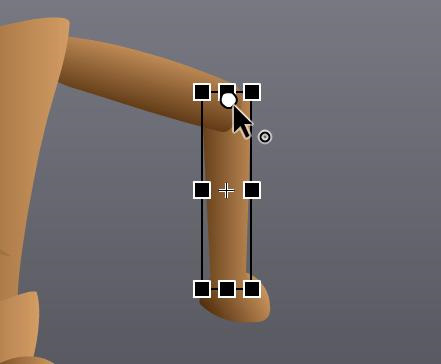
Figure 7.8 – The transform point acts as a joint
So, with the lower arm, for instance, the transform point is positioned at the elbow, where an arm would naturally rotate. You can always reposition any transform point by using the Free Transform tool to click and drag it to different locations. This will become very important once we rig our layers together and begin making adjustments and animations with it.
Tip
You may want to rearrange the automatically generated layer order if items are not grouped in a meaningful way; for instance, making sure that all the parts of the arms or legs are grouped alongside one another so that they are easy to find concerning their visual placement on the doll's body.
We'll organize these layers into a hierarchical structure using the Layer Parenting view as part of our next task.
Establishing a Layer Hierarchy
With the various objects that make up our figure delegated to individual layers, we can now activate Layer Parenting and create our rig. When using Layer Parenting within Animate, each layer can be a parent or child of another layer, and while parent layers can have multiple child layers, child layers can only have a single parent layer.
Let's go ahead and establish our rig through Layer Parenting:
- Our first task will be to open the Layer Parenting view. This can be done by toggling the small Show Parenting View button above the timeline.
It appears as a small square with lines extending to two additional boxes below it:
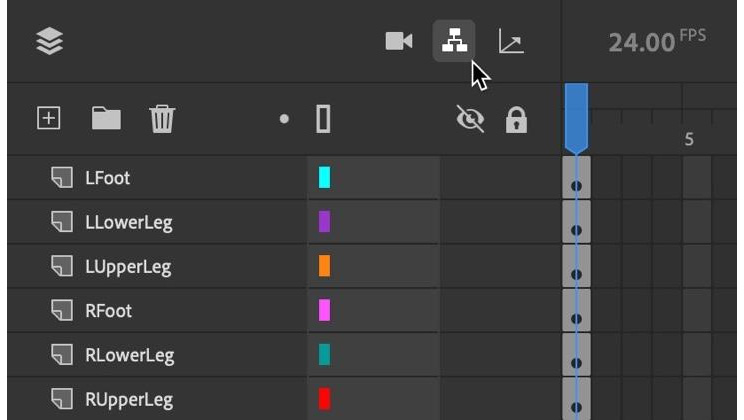
Figure 7.9 – The Layer Parenting view enabled
With this option enabled, a new column within the layers view will appear. This new column is where we can establish parent-child relationships to construct our rig.
Before clicking anything else, we should identify our root layer. This is the layer that will be the parent, grandparent, or even great grandparent to every other layer in our rig. With a human figure, the torso often makes the most sense.
- To establish a parent-child relationship and begin building your rig hierarchy across the wooden doll layers, you must identify layers that will serve as children and drag them to their parent layers.
Starting with RUpperLeg, drag the area of that layer with Parenting View activated onto the Pelvis layer:
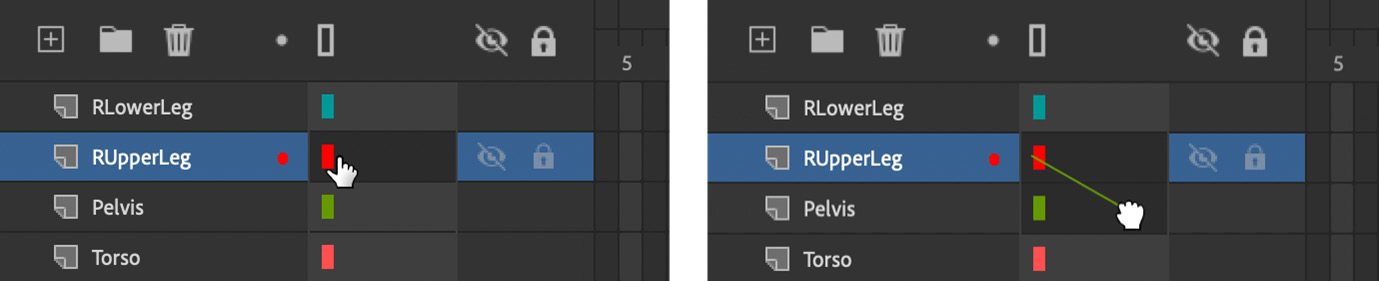
Figure 7.10 – Pulling wires to establish relationships
Note that a small line connects across layers as you drag, which indicates that you are pulling a child toward a parent to establish this relationship. The workflow is always adding child layers to parent layers, and never parent to child.
- Now, continue to pull the children to their parents in this same way. The Pelvis layer will become the child of Torso, our root layer:
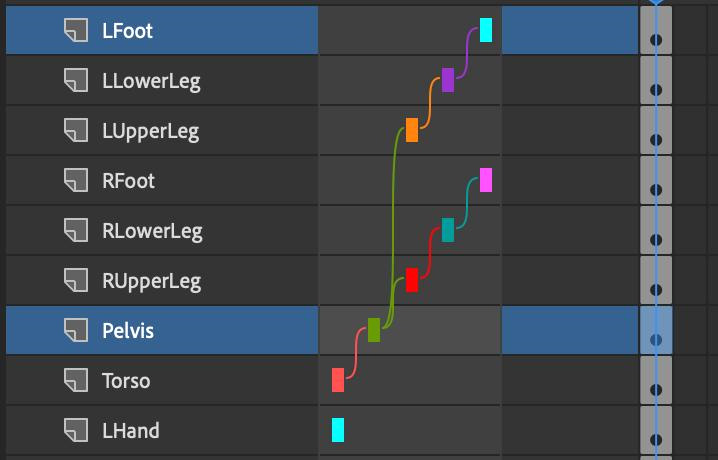
Figure 7.11 – A series of parent-child relationships
The root layer is never dragged to another layer since it is not the child layer of any other layer whatsoever.
- Move more children to continue testing how dragging the child layers to the parent layers affects everything to establish a fully formed rig. For instance, LFoot is a child of LLowerLeg, which is a child of LUpperLeg, which is a child of Pelvis, which is a child of Torso. Head is a child of Torso as well, as are RUpperArm and LUpperArm.
Create the remaining relationships in this manner:
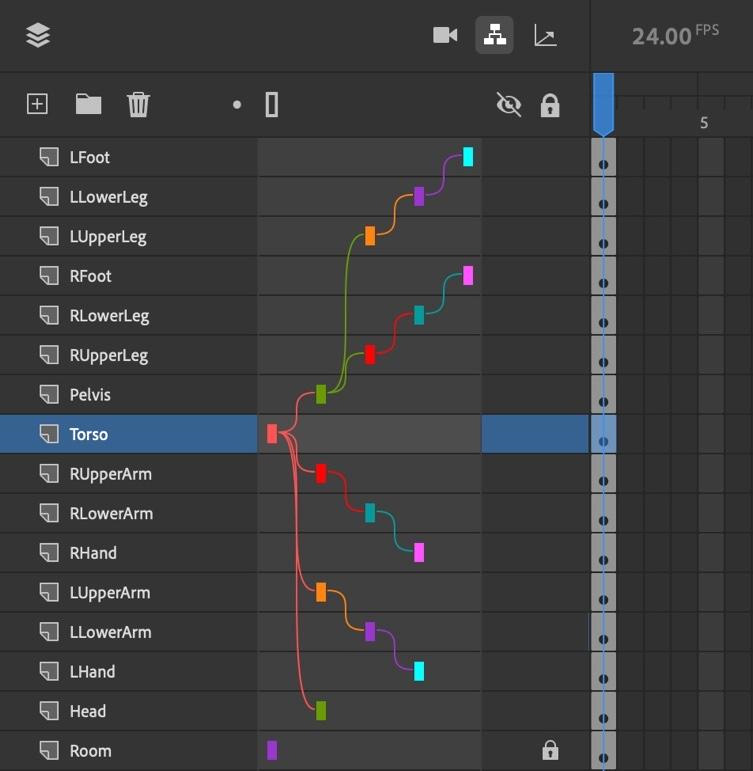
Figure 7.12 – Completed branching Layer Parenting rig
- You can now test your rig and see how everything functions. Select the Free Transform tool and rotate different parts of the doll. Notice that as you rotate any parent object, such as an upper arm, both the lower arm and the hand also rotate along with it:

Figure 7.13 – Rotating parts of the completed rig
Again, note that the arm rotates around the transform point of the object, as indicated by a small white circle when the Free Transform tool is active.
With our layer hierarchy established through the use of the Layer Parenting view, we can easily add motion to the objects within each layer to take full advantage of these parent-child relationships.
The next step will be to perform some animation using our new Layer Parenting rig.
Animating using Layer Parenting
Now that we have our Layer Parenting relationships established across the timeline layers, we can animate our content with any tween type we would like to, so long as we adhere to the constraints and capabilities of each type.
You can animate your doll however you like, but here is a standard workflow when using Layer Parenting:
- Arrange your various objects into a starting pose. I've set my wooden doll to appear to have been seated upon the floor and against the wall. You can do something similar by using the Selection or Free Transform tool:
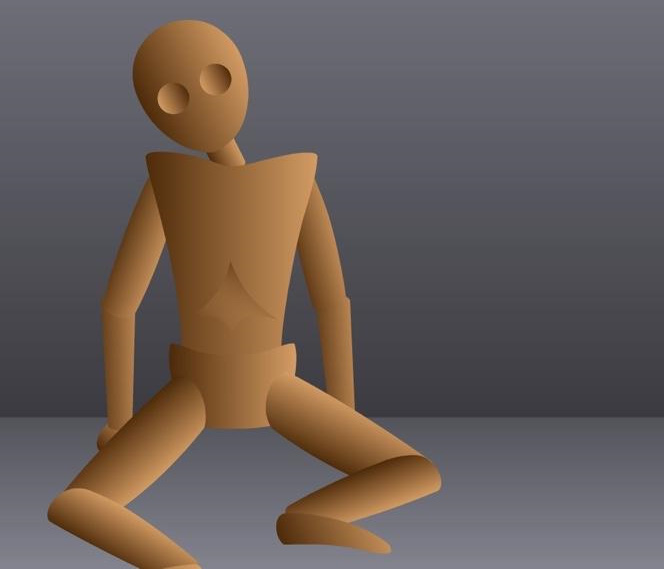
Figure 7.14 – Choosing a starting position for the wooden doll
As you manipulate the various parts, notice how the parent-child relationships affect which specific parts need to be animated, and which others follow along as a result of these relationships.
- Once you have settled on the initial position, scale, and rotation of your parented objects, you can start inserting keyframes in each layer, just as you would for a normal tween, and continuing to adjust object properties:
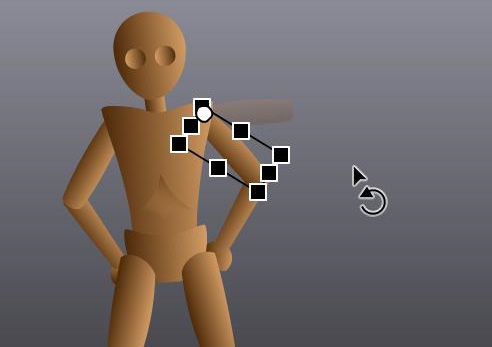
Figure 7.15 – Rotating and repositioning both the parent and children
Tweening works the same way as always here. The only difference is that Animate will interpret any change in parent properties and automatically make the same interpretation about any child and grandchild layers down the branch.
- The various keyframes can be staggered across the timeline in whatever way works best for your particular animation:
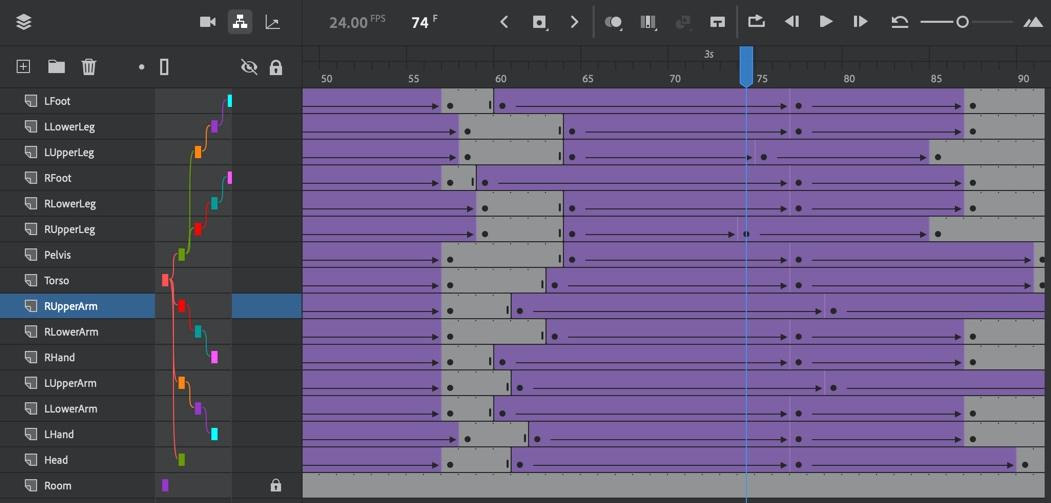
Figure 7.16 – The Layer Parenting rig with classic tweens
It's a good idea when animating in this way to take things step by step, and to test and tweak regularly! Keyframes can always be moved backward and forward as needed to create more natural motion and easing effects, and other tween adjustments can be made as you go.
When finished, you can always visualize the animation by using Onion Skin Advanced Settings:
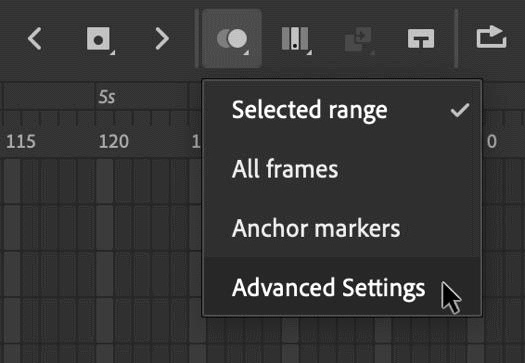
Figure 7.17 – Advanced onion skin settings
This can be accessed from the controls above the timeline. These settings allow you to view a range of frames concerning the current playhead's position so that you can tune your motion. I find viewing outlines in place of fully rendered fills provides a clearer view of the action.
By default, when using outline mode, the current frame is a red outline. Any frames before the playhead's position will be blue, and any upcoming frames will be shown in green:
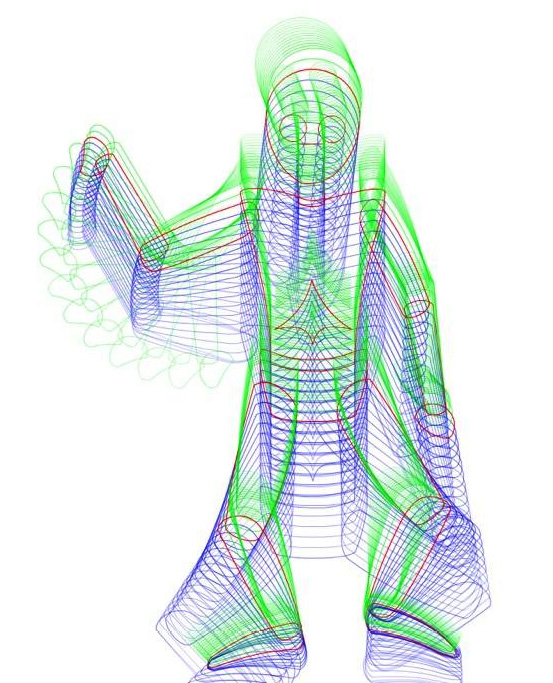
Figure 7.18 – Motion visualization via onion skinning
My wooden doll is pulling himself up from a sitting position to a standing one. This can be easily understood by using the Onion Skin mechanisms. This is just one of many tools available within Animate to help you achieve your best animation.
In this section, we learned how to use Layer Parenting to establish a hierarchical relationship among the layers that compose a full character and then apply animation to that character once successfully rigged. Next, we will explore some additional considerations and features when performing character animation of this kind.
Exploring Additional Character Animation Features
While rigging a full character through the use of Layer Parenting and performing animation through various tweens certainly demonstrates the versatility of this rigging method, there are additional features that we can make use of to enliven our animation even further.
The next method we will highlight, will examine how to add recorded audio to your character and perform automated lip sync using Graphic symbol looping properties.
Making use of Graphic Symbols
In Chapter 5, Creating and Manipulating Media Content, we mentioned that Graphic symbol instances have a special Looping section within their Object properties. Let's examine these settings in more detail.
To view the Looping properties, select any Graphic symbol instance within a project and look at the Object tab of the Properties panel:
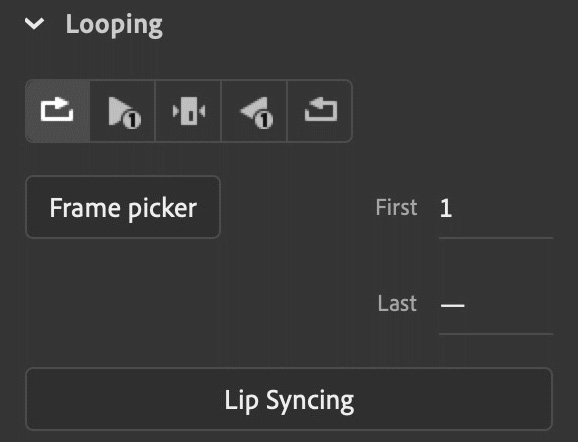
Figure 7.19 – Graphic symbol instance looping
Looping determines how the Graphic symbol instance should handle playback and which frame playback should begin and end on. The options that are included are as follows:
- Play Graphic in Loop: This option will loop the symbol timeline, so long as there are enough frames in the containing timeline.
- Play Graphic Once: This option will loop the entire symbol timeline up to its final frame, so long as there are enough frames in the containing timeline.
- Play Single Frame for the Graphic: The playhead will hold upon the specified frame within the symbol timeline. There is no movement until another keyframe is added to the main timeline with additional instructions.
- Play Graphic Reverse Once: This option will loop the entire symbol timeline in reverse up to its initial frame, so long as there are enough frames in the containing timeline.
- Play Graphic in Reverse Loop: This option will loop the symbol timeline backward, so long as there are enough frames in the containing timeline.
The Frame Picker button will open the Frame Picker dialog, which displays each frame within the symbol, allowing you to choose the initial frame to start the looping option at, or hold the motion at a specific frame, visually.
Similarly, the First option beside the Frame Picker button provides the same functionality, but strictly by numeric input. Either mechanism will allow you to choose the starting frame for playback at that keyframe, with 1 being the default. The Last option directly beneath it is blank by default. Specifying a Last frame for your loop provides you with full control over which specific portion of the internal timeline will be included in the loop.
The final option here is the Lip Syncing button, which is used by Animate to automate a properly prepared Graphic symbols sync option through Adobe Sensei, Adobe's cloud-based artificial intelligence.
Next, we will set up our project to use the Lip Syncing option to give our character a chance to speak.
Importing Audio for Stream Sync
As a feature-rich, multi-media authoring tool, Adobe Animate provides support for many media formats. Most document types have full audio support as well. The greatest support for audio can be found in ActionScript 3.0, HTML5 Canvas, and the various AIR document types. All three of these platforms can make use of a feature called Auto Lip-Sync, which automatically interprets included voice-based audio and determines which mouth shapes (or visemes) to insert at specific points in the voice performance. The first step to any of this is to record and import a suitable audio file.
In the files for this chapter, we have included an audio file named DollSpeak.mp3:
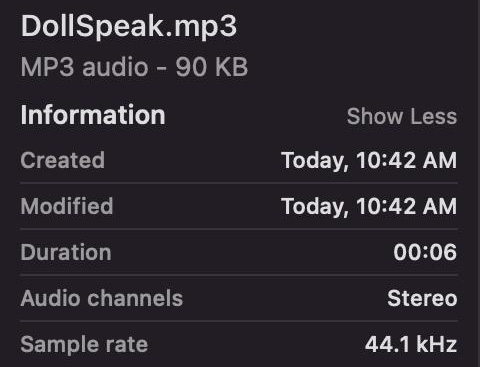
Figure 7.20 – Audio file properties
This file is a 16-bit stereo recording that's been encoded for full compatibility with Animate at 44.1 kHz and with a sample MP3 rate of 128 kbps. It is a recording of the wooden doll "speaking" to the viewer across a brief period of 6 seconds. You can use this in your project or record your voice using Adobe Audition.
Note
Animate can make use of various sound encodings and formats but to avoid problems, it is best to use audio files encoded as 16-bit at 44.1 kHz. A good sample rate for an encoded MP3 is 128 kbps. These settings represent a solid standard when working in Animate and deviating into something such as 24-bit or 32-bit audio or 256 kbps is highly discouraged.
Now, let's import the MP3 audio file and make use of it within the timeline:
- Choose File | Import | Import Audio… from the application menu and browse to the location of your audio file. Alternatively, you can drag the file from your filesystem directly into the Library panel. Either way, the MP3 file will now be displayed within the project library:
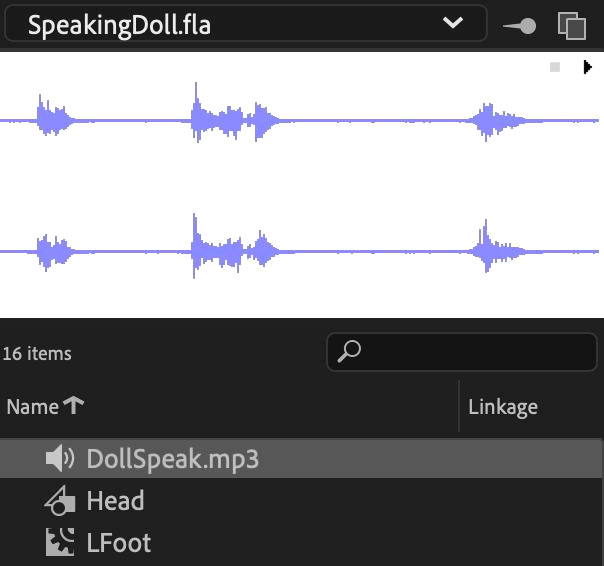
Figure 7.21 – The imported audio file in the project library
From here, you can view the audio waveform and preview the audio playback.
- Like just about everything else in Animate, audio must reside within the timeline, attached to a keyframe. In your timeline, just above the Head layer, add a new layer and name it Audio.
- With any frame of the Audio layer selected, look at the Frame tab of the Properties panel and examine the Sound section:
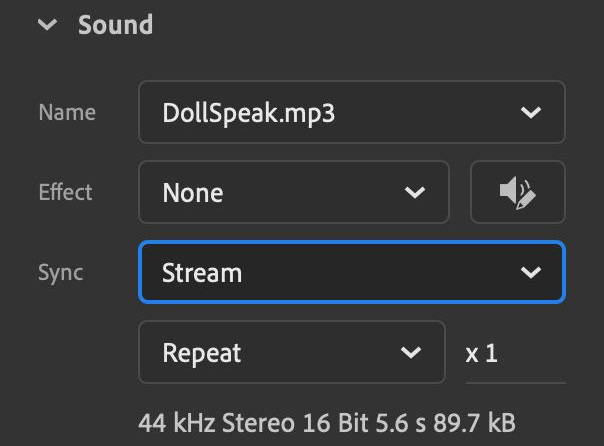
Figure 7.22 – Stream Sync type
Select the DollSpeak.mp3 file from the Name dropdown. Any audio files in your project library will appear in the dropdown for you to select.
- Before moving on, it is very important to also set the Sync type to Stream. This is necessary for the audio to work with the automatic lip-syncing feature, as Stream Sync will bind audio to each of your frames along the timeline, ensuring that the audio will neither drift nor lag. It also allows you to preview the audio by scrubbing the playhead.
- Now, look back to the timeline and examine the Audio layer. The chosen audio file is now assigned to this layer and the waveform appears across the frame span:

Figure 7.23 – A waveform appears in the audio layer
- Scrub the playhead along the timeline to hear how the audio synchronizes across the assigned frame span.
Tip
For an even better view of the audio waveform, right-click on the layer's name and choose Properties. From the dialog that appears, you can set the layer's height to, at most, 300%.
With our audio file imported and assigned to a layer within our main timeline for Stream Sync, we can start setting up the various mouth parts to switch out according to the sounds that are detected within the speech.
Configuring our Graphic Symbol Frames
With the audio file imported and configured within our project's main timeline, we will turn our attention to the head of our doll to establish various mouth shapes, which we will use to simulate speech. Perform the following steps:
- Open the Library panel and locate the Head movie clip symbol. Right-click on the symbol's name and choose Properties… to edit the symbol's properties.
- Automated lip syncing can only be used with Graphic symbols since this symbol type is the only one with dedicated Looping properties. In the dialog that appears, change Type to Graphic and then click the OK button:
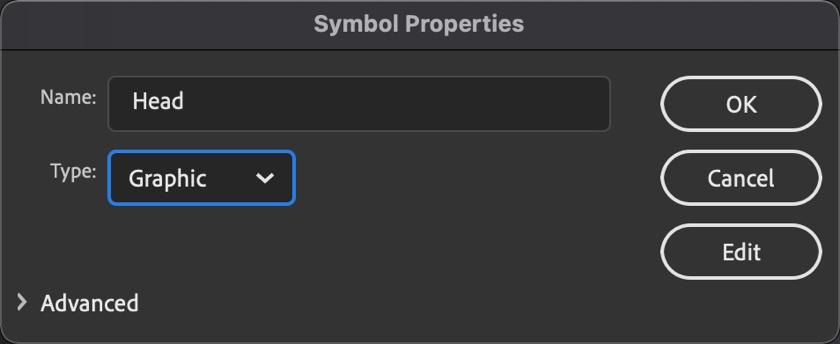
Figure 7.24 – Symbol changed from Movie Clip to Graphic
This action will not change the behavior of existing instances on the timeline. We will take care of that later.
- At this point, you must import a version of the Head symbol with all the layers and shapes already completed with the appropriate mouth parts. Choose File | Import | Open External Library… and browse to the file named Head.fla within the exercise files.
- The Head.fla file opens as another Library panel alongside the project library and only contains the Head graphic symbol. Drag the Head symbol from the imported library into the library of the current document.
- Animate will ask you what you want to do since there is already a symbol named Head in the library. Choose Replace existing items and then click the OK button:
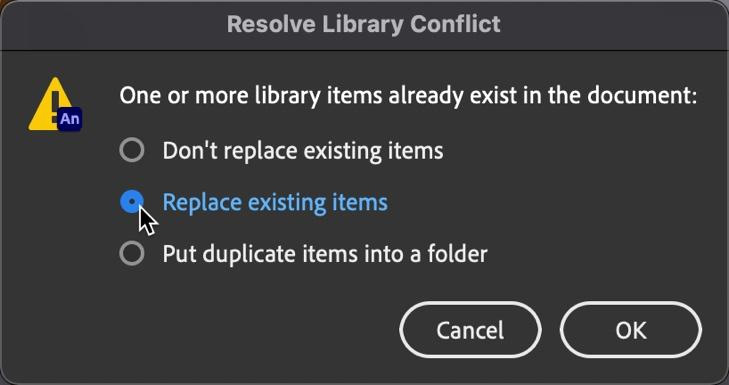
Figure 7.25 – The Resolve Library Conflict dialog
The Head symbol has now been replaced within the project library with the one you brought in from the external library.
- Double-click on the Graphic symbol icon next to the Head symbol to edit its contents. We will be taken inside the symbol, where we can now manipulate the stage and timeline of the symbol itself:
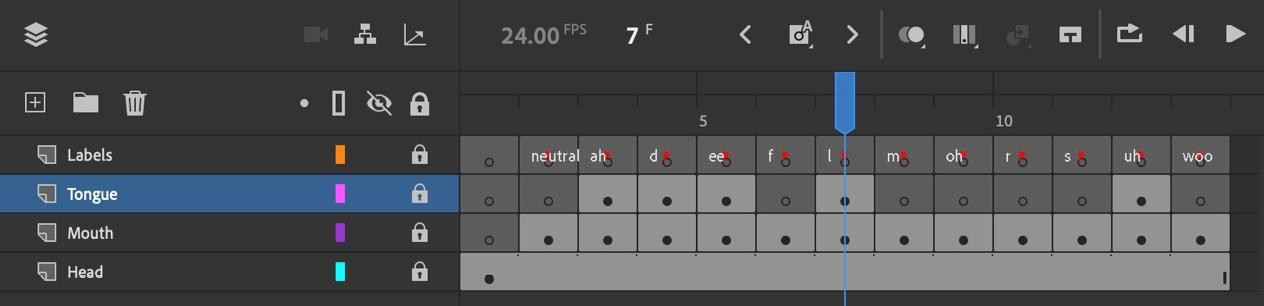
Figure 7.26 – The Head timeline with mouth parts and labels
Examine the Head timeline to discover a set of layers that include the static doll head visuals, a set of mouth and tongue shapes across two layers, and a layer dedicated to labels. The Labels layer will help us identify each frame when we map the frames as visemes later.
Explore each frame and notice how the various mouth and tongue shapes overlay the head visual and how they conform to the sound labels that have been given to them. I've kept the first frame without any mouth whatsoever so that we can keep it blank when desired.
- Exit the symbol and return to the main timeline by clicking the left-facing arrow in the top-left area above the stage:

Figure 7.27 – Returning to the main timeline
Back on the main timeline, note that the modifications we've made to the symbol have no immediate bearing on any existing instances along the timeline. We will remain on the main timeline to perform our next set of tasks.
Note
The mouth shapes and labels that were used here represent a standard set of vocal sounds that conform to established mouth forms called visemes. Of course, you can always draw your own mouth shapes if you like. The prepared Head symbol timeline can act as your guide if you wish to do so, though there are detailed examples to be found on the internet as well, in a variety of styles.
With our Graphic symbol property configured for use alongside the automated lip sync feature, next, we'll assign the various frames to a proper viseme grid for lip sync interpretation.
Assigning Visemes and Automating Lip Syncing
Earlier in this chapter, we converted our Head symbol in the project library from a Movie Clip symbol into a Graphic symbol to prepare it for automated lip sync. As you may recall, we noted that this action would not change the behavior of any of the pre-existing symbol instances on the stage. If you select any Head symbol instance on the stage and look at the Object tab in the Properties panel, you will see that the behavior of the instance remains a Movie Clip in the Instance Behavior dropdown.
Before we even attempt to set up our visemes and employ Lip-Syncing for our project, we must either create a new instance of the Head symbol or change the existing instance behaviors to use the Graphic symbol.
To change the behavior of any symbol instance, select it and make a new selection from the Instance Behavior dropdown in the Properties panel:
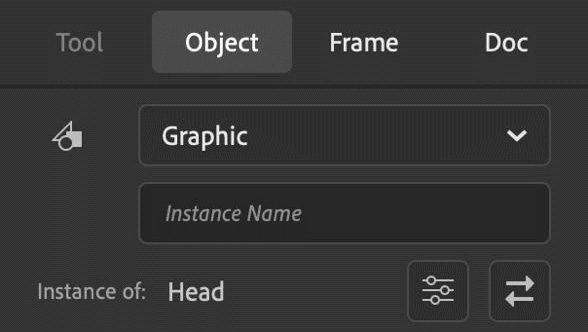
Figure 7.28 – Behavior changed to Graphic
No matter what behavior it previously exhibited, the symbol instance will now behave according to the behavior it has been assigned.
Tip
Even though you can change instance behavior between symbol types in this way, it is a best practice to change the actual symbol type in the project library as well, for clarity and consistency. As you may recall, we've already done this.
Now, let's prepare our timeline and enter the automated lip-syncing workflow:
- The first thing you must do is decide where in your existing animation you want the audio playback to start. I suggest starting the audio playback directly after any existing animation, or even removing your previous animation entirely for a clean start:

Figure 7.29 – Ensuring a clean start
In either case, shift the starting keyframe in your Audio layer to the point where the audio playback should begin (if necessary) and add a corresponding keyframe within the Head layer so that they both align.
- Scrub to the end of your timeline to ensure that you have enough frames for the audio waveform to complete. My audio file is 6 seconds in length, so I need to add enough frames to ensure there are at least 6 seconds of playback:

Figure 7.30 – Adding the required number of frames
If you need to add additional frames, go ahead and do so. Don't forget to add these extra frames across all your layers!
- Select the Head instance on the stage that aligns with the start of your audio file and look at the Object tab of the Properties panel. Instance Behavior should be Graphic. Change its behavior to Graphic if it is either Movie Clip or Button.
- With the Graphic behavior verified, look at the Looping section of the Properties panel and click the button. The Lip Syncing dialog will appear.
- The first task is to set up our visemes. You will see a grid of possible visemes, but each is identical at first. You must click each viseme and assign it to an appropriate frame derived from within the selected Graphic symbol. Since we also labeled each of our frames, this makes the assignment very simple.
Go ahead and assign each viseme to each corresponding frame from within the Head graphic symbol until they have all been matched up:
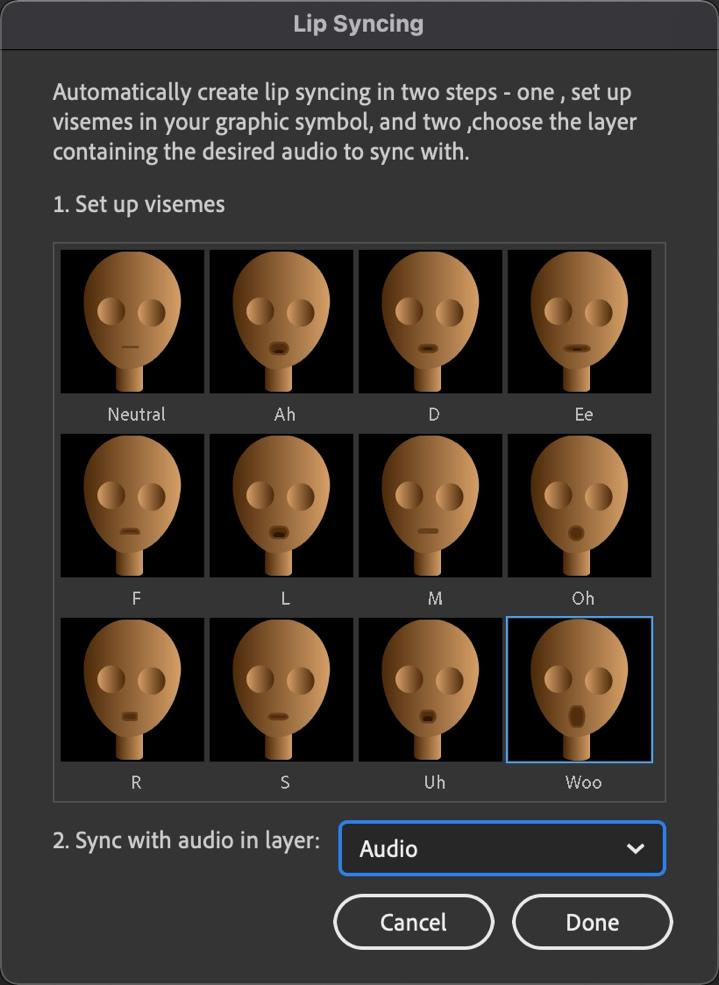
Figure 7.31 – Assigning visemes and the audio layer
- The second task is to choose which audio layer we will use in the automation process. Since we only have a single layer with audio assigned to it, the Audio layer should be selected. If not, select the Audio layer from the dropdown.
- With our visemes mapped and our audio layer selected, click the Done button to begin the automated syncing process.
This process should not take long, and when it's finished, your Head layer will include a set of automatically generated keyframes with specific visemes applied across the timeline, as per the sounds that were detected from within the spoken audio file:

Figure 7.32 – Keyframes automatically assigned
- You can use the playback controls above the timeline to test out the lip syncing and ensure that it has been applied to your satisfaction:
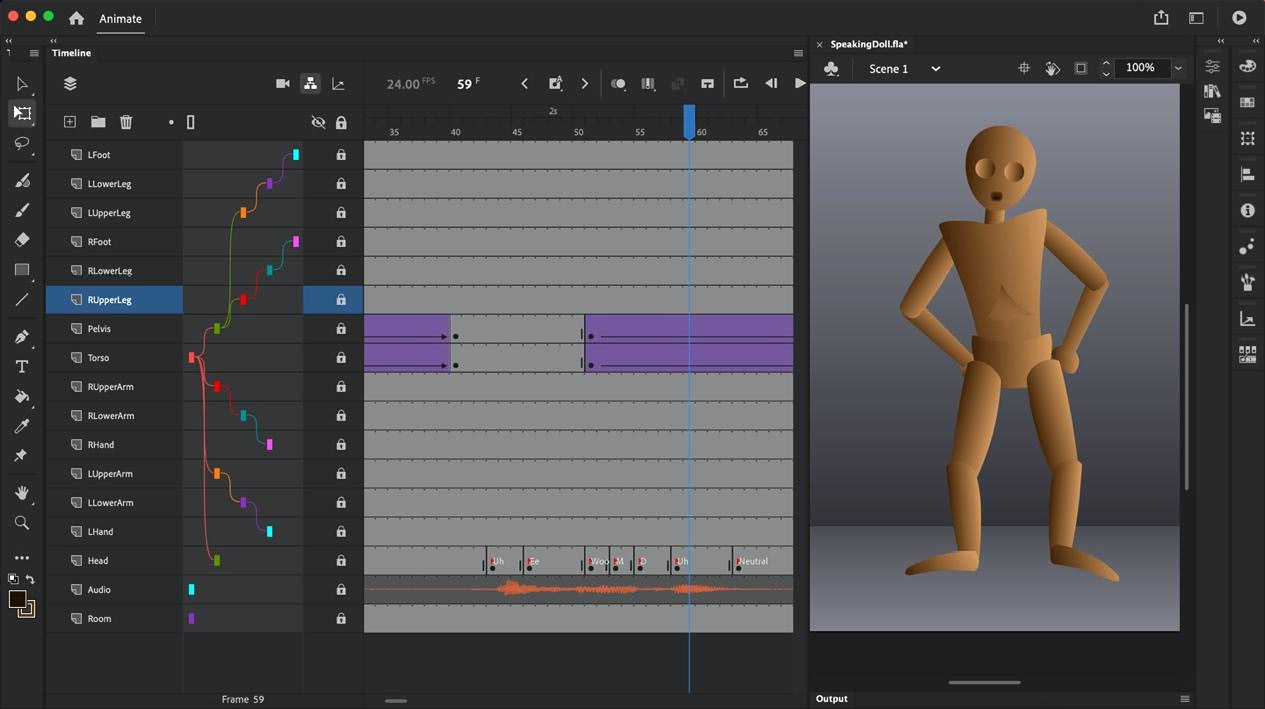
Figure 7.33 – The completed lip sync animation
Now, you can add some additional animation across the wooden doll body part layers, by utilizing the existing Layer Parenting relationships, to go along with the spoken audio and produce a fully realized character animation.
Note
If you need to adjust any viseme that was automatically assigned in error, you can always use the frame picker to select an alternative viseme for any keyframe.
In this section, we took the animated content we created with Layer Parenting and gave our wooden doll character a voice and the mouth animations to go along with it through automated Lip Syncing.
Summary
In this chapter, we began with an overall exploration of Advanced Layers mode and why we would want to use it over Basic Layers mode for various projects. Following that, we put Advanced Layers mode into practice by constructing a complex hierarchy of parent-child relationships using Layer Parenting. We also animated our newly created Layer Parenting rig through all the normal tweening mechanisms we've come to understand when animating symbol instances across the timeline. Finally, we added voice-based audio to our project and performed automatic lip syncing against that audio through a set of properly configured visemes and the Lip Syncing dialog.
In the next chapter, we will explore another type of rigging – Inverse Kinematics through the employment of armatures to be animated across various poses within an animated project.