
Chapter 4: Publishing and Exporting Creative Content
In the previous chapter, we had a look at some of the more important features of the overall Adobe Animate user interface (UI). We'll now look specifically at creating content within Animate in a form that can be accessed or reused in additional ways. We will explain the differences between publishing to a specific target platform and exporting to various file types, and we'll see why you'd want to choose one workflow over the other in certain cases. We'll also have a look at the new Assets panel and how to package assets for distribution and reuse through this mechanism. To close off the chapter, we'll examine the quick share and publish workflow.
After reading this chapter, you'll come away with the following skills:
- Understand the differences between publishing and exporting content from your projects.
- Gain awareness as to which platforms you should target for various use cases and the differences in publish settings between them.
- Understand the options available through various export formats and settings.
- Become familiar with the Assets panel and mechanisms for sharing assets with others using this workflow.
- Utilize the quick share and publish workflow to get your content out into the world.
Technical Requirements
You will need the following software and hardware to complete this chapter:
- Adobe Animate 2022 (version 22.0 or above).
- Refer to the Adobe Animate system requirements page for hardware specifications: https://helpx.adobe.com/animate/system-requirements.html.
Publishing versus Exporting
In this section, we are going to compare what it means to publish a document versus what it means to export a document. When dealing with any Animate document, there are going to be a number of choices you can make depending on what type of files you want to generate from your project.
Let's consider what it means to publish your document first. Often, new users to Animate think that by choosing a certain document type, this choice will lock them into producing only a specific type of content. This is actually only the case when considering the publish workflow.
Every document in Animate publishes to a specific target platform, such as the following:
- ActionScript 3.0 publishes to SWF for playback using Adobe Flash Player.
- HTML5 Canvas publishes to HTML and JavaScript for the native web.
- WebGL glTF (Standard) publishes a set of files that can be played back in any standard glTF player.
However, we are not restricted to the publishing format as the only way of generating content from Animate.
We'll now consider what it means to export your content. Consider an ActionScript 3.0 document. Yes, it publishes for Flash Player, and that may initially seem useless. If you consider the choices for exporting in place of publishing, though, the possibilities really open up. For example, you can export the following from a single ActionScript 3.0 project:
- HD video files in just about any format you wish
- Animated GIF files
- Still images and image sequences in the form of PNG, JPG, and even SVG
- SWF files, to be imported into other applications that read the format, such as Adobe After Effects
- Sprite sheets and texture atlases
Exporting your content allows you all the power and flexibility of your chosen document type without being locked into a specific platform!
In addition, the publish workflow will allow the generation of even more asset types, such as SWC files, Projector files, SWF Archive files, OAM bundles, and more! All of this, from a simple ActionScript 3.0 document! It is vitally important to understand both the publish and export workflows for every document type.
In this chapter, we'll be working with a simple set of example project files that engage various major document types available to Animate. You can find them as part of this book's chapter files available at .
Locate the file named ActionScript3.fla and open it to view the project:
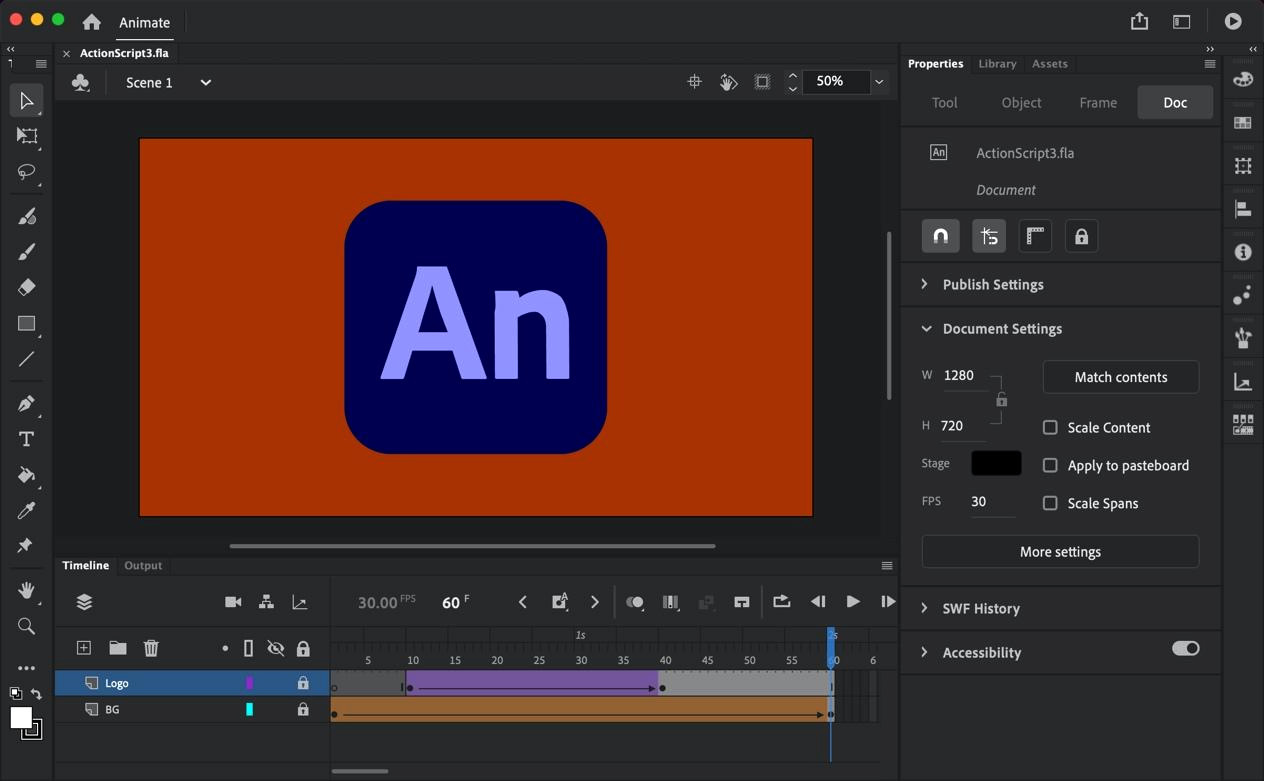
Figure 4.1 – A simple Animate project
It is a simple animation displaying the Adobe Animate logo scaling up across a color-shifting background. Of course, you can design your own projects as well if you would prefer to use your own creations.
We'll next learn specifically about the publish and export workflows and how they differ from one another.
Publishing your Projects
The full Publish Settings dialog can be accessed with two different methods. In the Properties panel, when working with the Doc tab selected, you will find a Publish Settings section, and here, clicking the More settings button will open the dialog:

Figure 4.2 – Document Publish Settings dialog
You can also open the Publish Settings dialog by choosing File | Publish Settings… from the application menu.
The Publish Settings dialog itself will differ in its appearance and available options depending on the document type you are working with. In the following figure, you can see the vast differences between this dialog when working with an ActionScript 3.0 document versus working with a document targeting HTML5 Canvas:

Figure 4.3 – Variations in the Publish Settings dialog by document type
In either case, the dialog will appear. From within this dialog, you can tweak a great variety of settings that determine how your project will publish. We'll learn more about these platform-specific settings later in this chapter. Clicking the Publish button from within the dialog will publish your project in accordance with these settings. The folder that your project is published to can be set within Publish Settings and will default to publish in the same location as the document (.fla) itself.
Tip
You can also publish directly, bypassing the Publish Settings dialog altogether, by choosing File | Publish from the application menu.
In addition to the publish workflow, we can also choose to export our content to a variety of different formats. We'll have a look at this next.
Exporting your Content
While publishing your content is intrinsically bound to your chosen document type, exporting content is completely different. These differences are not well understood by many Animate users and the differences are often overlooked.
There are actually a number of places in Animate through which you can invoke various export options. We'll cover them all in this chapter, but the most direct way to export content is from the Animate application menu.
Go to the application menu and choose File | Export – a submenu will appear, containing a variety of export options:

Figure 4.4 – Document export options
These export options are available to us regardless of the document type. They are not bound in any way to the publish options or restrictions inherent to a certain platform:
- Export Image…: This brings up a dialog with many different options for exporting PNG, JPG, and GIF file types to export a single image file based on the current playhead position in the timeline.
- Export Image (Legacy)…: This is an older – and much simpler – image export mechanism. You have minimal options when exporting to various image formats, but this dialog allows SVG export, as well as PNG, JPG, and GIF.
- Export Movie…: Using this option, you can export full image sequences (PNG, JPG, GIF, or SVG) that can then be brought into other applications. It will export one still image in the sequence for every frame in the document Timeline and number them accordingly. You can also export an SWF directly from this dialog, even when not using an ActionScript 3.0 document type!
- Export Video/Media…: This option will render your project into any video format supported by Adobe Media Encoder. We'll look at this option more closely in a bit.
- Export Animated GIF…: This option will open the same dialog as the Export Image… option; however, the settings will all be configured to produce an animated GIF file and not a still image.
- Export Scene as asset: This option allows you to export your entire project scene as an Animate asset (.ana) file for backup or distribution to others. A .ana file can be imported into the Assets panel and used across projects in Animate.
We'll explore many of these options in the latter part of this chapter.
In this section, we gave an overview of what it means to publish from Animate compared to what it means to export content from Animate. Coming up, we'll look specifically at the publish workflow and how the settings differ across the target platforms specified by the Animate document type.
Differences between Document Types when Publishing
In Chapter 2, Exploring Platform-Specific Considerations, we had a look at the variety of platforms that are tied to each document type in Animate. We'll now build upon that introduction to explore the various publish settings for these document types. The settings available for each document type vary quite a bit, with the ActionScript-based documents having the most settings due to their longevity and the beta documents having the least for the same reason.
We'll now look at the various native document types within Animate, focusing on particular associated settings when publishing your content.
Publishing ActionScript 3.0 Documents
By default, ActionScript 3.0 documents will publish both a .swf file and a .html file to act as a container document. Of course, due to Flash Player being completely banned from web browsers, this isn't all that useful!
With the Publish Settings dialog open, you'll immediately be struck with just how many settings there are for this publish workflow. You can view these settings in the following screenshot:

Figure 4.5 – Publishing ActionScript 3.0 documents
Along the side are the PUBLISH settings, for publishing your Flash content along with SWC, and also the OTHER FORMATS.
Note
Shockwave Component (SWC) is a format that was popular during the heyday of Flash Player, as it could be used to bundle assets and code together in a way that more code-based applications (such as Flex Builder) could interpret and make use of. It isn't so useful anymore.
These OTHER FORMATS include the aforementioned HTML wrapper, along with a number of image export types. There are two formats here that are especially noteworthy: Projector and SWF Archive.
Projector files can be published for either macOS or Windows and are basically a compiled executable program that contains your project alongside a special version of Flash Player that can be used to run your content on the desktop. The neat thing about this format is that there is no need to perform any sort of installation – it just runs!
SWF Archive is a mechanism that renders each individual layer of your project as a separate .swf file, then bundles the entire set as a .zip archive. This is a good mechanism for getting your project into additional applications such as After Effects for per-layer compositing workflows.
Tip
You can also import an entire .fla file directly into After Effects to achieve the same result. A new composition will be created with each layer from Animate translated to a layer in After Effects.
These are the overall settings to keep in mind when publishing ActionScript 3.0 document types. Let's turn our attention to HTML5 Canvas documents next.
Publishing HTML5 Canvas Documents
While HTML5 Canvas is a much more recent document type than ActionScript 3.0, it includes an impressive amount of publish settings due to its importance within the Animate software, especially since a .swf file can no longer be used within web browsers. Since HTML5 Canvas is a completely native web technology, it can step in and take over for Flash Player in many circumstances.
Just as with ActionScript 3.0, you'll find a variety of choices along the left-hand side of the Publish Settings dialog under PUBLISH and OTHER FORMATS. PUBLISH, in this case, includes only a single target – JavaScript/HTML. Here, you will find all the major publish settings for HTML5 Canvas documents.
These JavaScript/HTML settings are divided into three tabs, the first of which is the Basic tab:

Figure 4.6 – Publishing HTML5 Canvas, Basic tab settings
Here, we find the most general settings to do with publishing HTML5 Canvas documents. Notable settings include the following:
- Output name: This is where you can name your published files and specify an output folder through the file browser.
- Loop Timeline: Checking this box allows the timeline playback to loop continually. Uncheck this box to have the playhead stop once playback ends.
- Include hidden layers: This determines whether to publish layers that have been hidden in the timeline or not.
- Center stage: By default, the published content appears in the upper left of the browser viewport. You can override this presentation and center your published content horizontally, vertically, or both.
- Make responsive: Enabling this option will scale your content down if it doesn't completely fit within the containing element. Additionally, you can also allow it to scale up to fill the containing element.
- Include preloader: Choose an animated GIF to serve as a preloading animation if your published file size is very heavy. You can, of course, create this animated GIF using Animate!
- Asset locations: Here is where you name each of the subfolders to which Animate will publish any audio files and the local CreateJS library files.
The second tab is centered around more advanced settings around how HTML and JavaScript are handled as part of the publish process:

Figure 4.7 – Publishing HTML5 Canvas HTML/JS tab settings
The HTML/JS tab includes a number of more advanced settings when considering how your content is published. Settings of the greatest importance in this area include the following:
- HTML template: There is a default HTML template that includes a number of tokens to represent properties such as stage color, width, height, and so on. You can export this template, modify it to include additional elements, or perform more advanced actions through the code present in the template, and bring it back into Animate so that it is used when publishing your content. This is often used when creating digital ads that require specific structures and attributes. A small example of how these tokens appear in a .html file is shown here:
<canvas id="$CANVAS_ID" width="$WT" height="$HT" style="position: absolute; display: $CANVAS_DISP; background-color:$BG;"></canvas>
- Overwrite HTML file on publish: By default, Animate will overwrite the generated .html file each time you publish. Unchecking this option allows you to manipulate the .html that is exported without worrying that it will be overwritten with subsequent publish activity.
- JavaScript inclusion: Here, you can choose to include your JavaScript directly within the published .html file instead of in a separate .js file.
- Hosted Libraries: This checkbox determines whether the CreateJS JavaScript libraries are hosted on CreateJS servers or outputted to local files.
- Compact Shapes: This option will attempt to optimize shape data on publishing.
- Mutiframe bounds: When obtaining measurements and calculations against the width and height of certain objects, you must include data for multiframe bounds. This is especially useful for game development.
- JavaScript Namespaces: There are default namespaces already applied here to avoid code collision, but you can redefine these namespaces here if you need to.
The third and final tab (Image Settings) has to do entirely with how images are published as part of the HTML5 Canvas publish pipeline:

Figure 4.8 – Publishing HTML5 Canvas Image tab settings
These settings determine the handling of image files, including how they are exported, which image file type to use (along with specific encoding settings), and which portions of your content to render as part of this output:
- Image export folder: Similar to the audio folder location setting in the Basic tab, this allows you to determine the folder where published image files are located.
- Export as: You can choose from Texture, Spritesheet, or Image Assets from the dropdown. Your choice will determine which setting regarding image data can be further specified:
- Texture: This will convert all of your shape assets into bitmap textures for better performance. When this option is selected, you will be able to choose the image quality, resolution, and maximum size. These options determine how the image is encoded. You can even specify which symbols to include in this process.
- Spritesheet: This will combine all bitmap images into a sprite sheet, the settings of which you can define once selected. These settings include the file format itself and any associated settings such as quality, maximum size, and even the background color.
- Image Assets: This will simply publish all assets individually, with the choice to have Animate optimize image dimensions or not.
When publishing HTML5 Canvas documents it is obvious with so many settings available that this is considered one of the major publish options as part of Adobe Animate.
Publishing AIR Document Types
Whether dealing with AIR for desktop, AIR for iOS, or AIR for Android, there are a great number of publish settings to consider, and they differ a bit between each target platform. Additionally, whenever you're exploring the publish settings for any AIR document, you'll actually have two sets of publish settings to deal with.
The first group of settings is accessed and handled in exactly the same way as with an ActionScript 3.0 document:

Figure 4.9 – Publishing AIR
There are only two differences here as opposed to an ActionScript 3.0 document. The first is that your only options under PUBLISH are Flash (.swf) and SWC. This is due to the fact that AIR requires an SWF file to be generated first, in order to compile and package the AIR bundle. The second difference is that we are targeting AIR and not Flash Player, which leads directly into the second group of settings in a completely different dialog.
The second and perhaps most important group of AIR settings is accessed by clicking the small wrench icon directly to the right of the Target dropdown in the Publish Settings dialog. This reveals the AIR Settings dialog with an additional set of settings specific to your AIR project:

Figure 4.10 – AIR Settings
There are a lot of settings here, and they are grouped within the following tabs:
- General: These settings determine things such as what type of bundle is produced upon publication, the name and ID of the app produced, and various settings around window styles, profiles, and extra files you can define and package within the application.
- Signature: This includes settings around your code-signing certificates. The requirements for this vary by the target platform.
- Icons: This is where you define the application icons that show up once the app has been installed. The icon requirements vary by platform.
- Advanced: Here, you can define a varied set of options, which include file associations, initial window settings, the installation location, and more.
- Languages: The various languages your app can support are defined here.
We will have a deeper look at other aspects of the AIR settings when we build a small application in Chapter 13, Building Apps for Desktop and Mobile.
With the AIR settings out of the way, we'll finally have a peek at the various settings available in the WebGL glTF and Virtual Reality (VR) document types.
Publishing Beta Document Types
Since the various beta document types are still under development, these settings could change rather quickly. At this time, though, they are all nearly identical.
Choosing Publish Settings for the VR document types reveals a Publish Settings dialog similar to what we've seen for other platforms, while the WebGL glTF settings dialog appears a bit differently, as shown in the following figure:

Figure 4.11 – Publishing beta VR and WebGL glTF documents
Regardless of which document type you are working with, all four employ WebGL within the HTML <canvas> element and so they all have the same settings, aside from differences in the appearance of the dialog itself.
The particular settings are as follows:
- Output name: This is where you can name your published files and specify an output folder through the file browser.
- Loop timeline: Checking this box allows the timeline playback to loop continually. Uncheck this box to have the playhead stop once playback ends.
- Include hidden layers: Determines whether to publish layers that have been hidden in the timeline or not.
- Use JavaScript hosted libraries: This checkbox determines whether the JavaScript engine that makes these beta document types possible is hosted on Adobe's servers or whether they are output to local files.
Again, these settings are quite minimal when compared to ActionScript 3.0, HTML5 Canvas, or AIR, but that is to be expected with a set of new document types still in development.
Note
Animate also has the capability to support third-party publish and export workflows through the use of extensions. We'll have a look at some of these possibilities in Chapter 14, Extending Adobe Animate.
In this section, we had a look at the Publish Settings dialog across the native document types that ship with Adobe Animate. Coming up, we'll see how to export our content, bypassing the publish mechanisms in various ways.
Options for Exporting your Content
While publishing is completely dependent upon the Animate document type that's been chosen for a project, exporting is completely free from such restraints and can be undertaken regardless of the document type and publish platform. For instance, whether you're using ActionScript 3.0 or HTML5 Canvas documents, you can always export to an image sequence, animated GIF file, or HD video file through Adobe Media Encoder.
Let's have a look at some of these export options and see how they differ from the more restricted publish workflows.
Exporting Video Files
If your project is non-interactive, a video file is often the best format for producing it in a distributable format. Video, of course, is an incredibly popular format for sharing creative content, and it can be generated from any document type, making it quite versatile.
From the application menu, choose File | Export | Export Video/Media…, and the Export Media dialog will appear, as shown in the following screenshot:
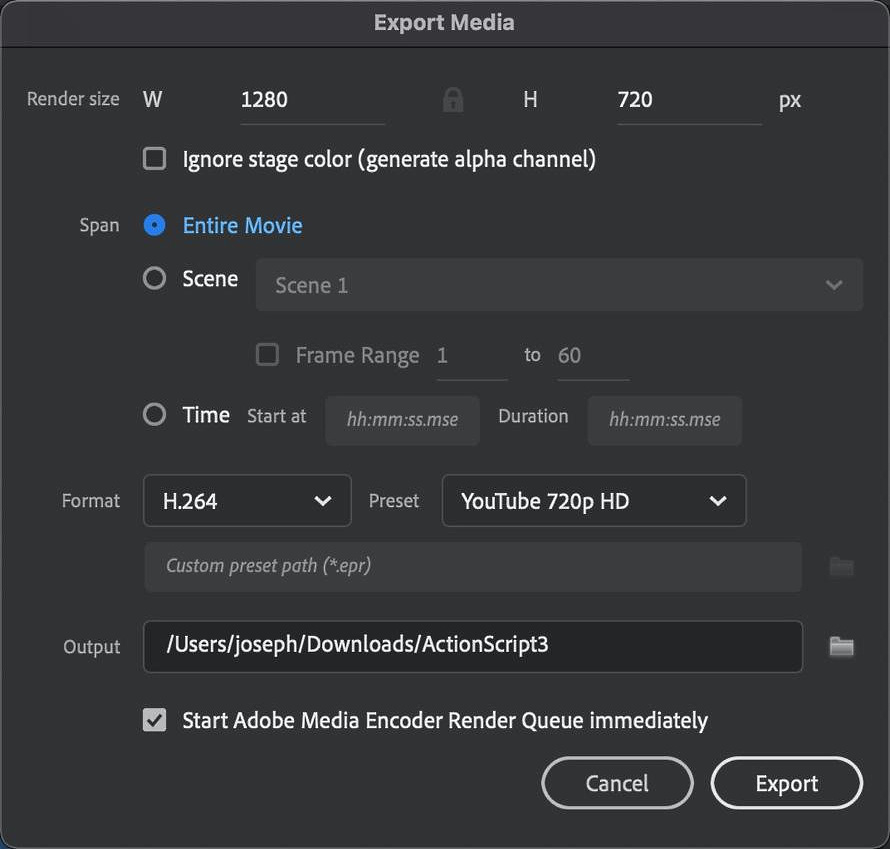
Figure 4.12 – Exporting video files
The Export Media dialog is dense with options. One of the nicer additions over the past few versions of Animate is the inclusion of the ability to define what portion of your timeline you'd like to render to video, in addition to being able to select the video format and preset directly within the dialog itself.
The options presented here include the following:
- Render size: This will default to the width and height defined in your document settings, but it can be increased or decreased here to modify the overall resolution of the output video.
- Span: Your entire project timeline will be used by default, but you can override this to only include certain scenes, frame ranges, or time selections.
- Format/Preset: These settings are drawn directly from Media Encoder and allow the selection of the video format and a format preset without even messing with Media Encoder directly.
- Output: This is where you can name your rendered video file and specify an output folder through the file browser.
You can also select whether you want to start the render queue immediately or not through a checkbox. Animate leverages Adobe Media Encoder to process video exports in a similar fashion to Premiere Pro and After Effects. Once you hit Export, Media Encoder will appear and process your video if that option has been selected, in accordance with the settings you have chosen. Media Encoder may take some time to open since it is a separate application from Animate – so be patient.
Tip
If the process doesn't kick off immediately after clicking Export, it may help to manually open Adobe Media Encoder first, then proceed to click Export after it is active.
Again, video is a tremendously popular option for producing content from Adobe Animate.
Exporting Animated GIFs
Perhaps just as popular as video among certain social networks and online platforms is the animated .gif file. The Graphics Interchange Format (GIF) file is one of the oldest available for internet playback and was supported in web browsers even before the existence of Flash Player. Traditionally, these files have been used as small, animated elements as part of a web page design, but in recent years, they've been used purely as content for use in social networks and online platforms.
From the application menu, choose File | Export | Export Animated GIF..., and the Export Image dialog will appear:

Figure 4.13 – Exporting animated GIF files
Unlike when exporting still images, this dialog will be tuned specifically for the export of animated .gif files. You will be presented with a preview of your resulting animation, underneath which are statistics such as file size and format properties. Along the opposite side are the settings you can tune to modify aspects of the resulting file.
Note
If you are using the stage background as a background color for your .gif image, it may appear incorrectly here. You can simply add in a background shape the same color as the background color of the stage to get around this anomaly.
The various settings are grouped into four categories:
- Preset: You'll want to leave the preset selection dropdown alone, but feel free to tweak other aspects of your GIF settings, including the number of colors and dither settings. To render the stage color as transparent pixels, enable the Transparency checkbox.
- Image Size: This allows you to adjust aspects of the width and height of your output. Depending upon the estimated file size, you may need to scale the resolution down somewhat.
- Color Table: A .gif file can have, at most, 256 colors. This table allows you to selectively add and remove colors.
- Animation: Here is something you'll want to check. You can set the output to loop forever or just once and stop. You also have access to a set of playback controls here to help preview the animation.
Clicking the Preview… button will generate a preview of your resulting GIF file and display it within a web browser.
Here is an example of what is shown during an animated GIF preview:
- Format: GIF
- Dimensions: 1280w x 720h
- Size: 392.7K
- Settings: Selective, 128 Colors, 100% Diffusion Dither, 60 frames, Transparency off, No Transparency Dither, Non-Interlaced, 0% Web Snap
Directly below that in the preview, you will find some example HTML tags that demonstrate how to incorporate the file into your documents:
<html>
<head>
<title>HTML5Canvas</title>
<meta http-equiv="Content-Type" content="text/html; charset=iso-8859-1">
</head>
<body bgcolor="#FFFFFF" leftmargin="0" topmargin="0" marginwidth="0" marginheight="0">
<img src="HTML5Canvas.gif" width="1280" height="720" alt="">
</body>
</html>
The entire preview process generates a single web view that includes an output of the image file encoding information, followed by an example of how to utilize the exported animated .gif file within a .html document. It couldn't get any easier.
Note
Be very careful to keep an eye on the file size of your exported .gif files. It is very easy to produce a GIF that is far larger than an equivalent video file!
To actually save your animated GIF, choose Save, and then you will be prompted for a name and location with which to save the exported file.
Now that we've covered the process required to generate an animated GIF file, let's have a look at additional image-based output choices.
Exporting Image File Sequences
Image file sequences are a series of .png, .jpg, or .svg files, which are generated frame by frame from your animation.
Choose Export | Export Movie… from the application menu and then choose an image sequence format and click Save to make an export dialog appear:

Figure 4.14 – Exporting image sequences
The dialog settings will vary depending upon the selected image sequence format.
Note
You can also export single image files instead of full sequences through the export menu by choosing Export | Export Image… or Export | Export Image (Legacy)… for .png, .jpg, .gif, or .svg file generation with the legacy choice. A single still image will be generated from the current playhead location on the timeline.
An image sequence is a useful way of getting your content into software that may not support formats such as SWF, as just about anything can handle a sequence of images. However, we can actually export a .swf file through this same export menu!
Export Options from the Library Panel
There is one more spot within Animate that allows the direct export of your content into a variety of formats, though this option works with individual assets and not the entire document.
If you open the Library panel and right-click on any symbol, a menu will appear:

Figure 4.15 – Exporting from the Library panel
This menu will include a set of additional export options that will export the selected object. You'll find a number of export options here that we've covered elsewhere, in addition to the additional options of exporting a symbol to a sprite sheet or texture atlas. Both of these options will open a dialog where you can tweak the settings to your needs.
In this section, we had a look at the variety of export options available across Animate document types. Coming up, we'll look specifically at how to export Animate content for use within Animate!
Sharing Content as Animate Asset Packages
A new method of getting content out of Animate is the ability to export Animate asset (.ana) files. These files can contain packaged objects, motions, bones, and audio for personal backup or distribution among other Animate users. This differs a bit from the other export options we've seen since the intended platform of use is Animate itself!
While Animate has had a Library panel for most of its existence, it is only used on a per-document basis to contain assets such as bitmap images, sound files, and internal symbols. Once that document is closed, you'd need to open it back up again to transfer any assets between documents for reuse.
Tip
If the Assets panel is not visible within your chosen workspace, you can enable it by selecting Windows | Assets from the application menu.
The new Assets panel works differently from the Library panel in that it contains a persistent set of assets that exist apart from any single document. When you first use the panel, it is prepopulated with a library of material from Adobe – but the real power of this panel comes into play once you create your own custom collection of assets and include them in the panel. Managing important assets in this way allows quick access to them – no matter what document you might be working in at any one time.
Assets are organized into main categories that include Animated, Static, and Sound clips:

Figure 4.16 – The Assets panel
You can search the panel for keywords and tags or expand a number of subcategories to find what you need.
Upon the initial installation, Animate includes a small number of default assets within the Assets panel. Adobe makes additional assets available through a download mechanism located at the bottom of the panel. It appears as a small cloud with a downward-facing arrow. If additional assets are available for download, this icon becomes brightly colored and you can then click on it to download additional assets from Adobe's servers.
Note
You might expect an Animate authoring file to hold the .ana extension, however, the extension for an authoring file is actually .fla! The reason for this is due to Animate formerly being known as Flash Professional.
The most direct way of exporting Animate Asset files is from the Library panel:
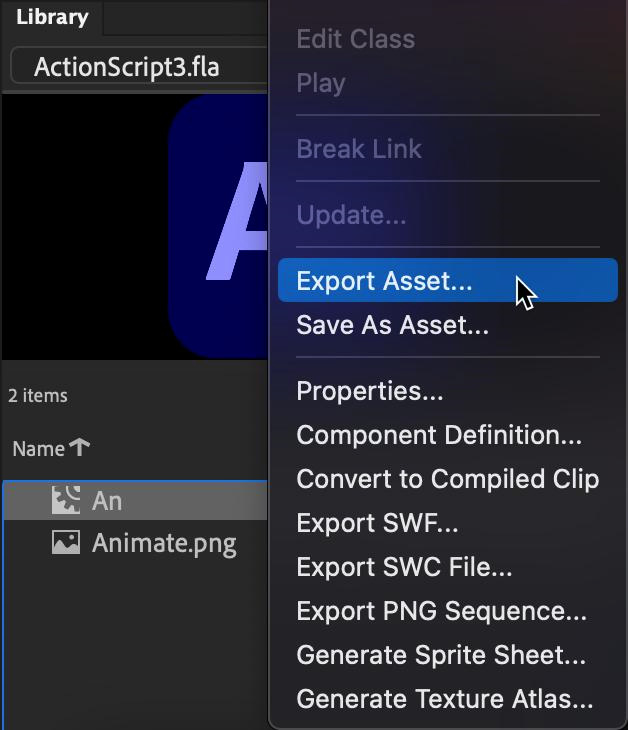
Figure 4.17 – Sharing a single asset
If you right-click on a symbol in the Library panel, you are given two menu options regarding asset files. Choosing Export Asset… will create a .ana file on your filesystem. Selecting Save As Asset… will not produce a .ana file but rather add the asset directly into your Assets panel without an intermediary import process.
Another mechanism for exporting assets can be found in the application menu by choosing File | Export | Export Scene as asset, as shown in the following screenshot:

Figure 4.18 – Sharing a scene as an asset
This option allows you to export a full scene from the main timeline as a single Animate asset. This method produces the exact same type of assets as the library method since the main timeline is basically a giant Movie Clip symbol anyway – it is only accessed differently.
When choosing to export an Animate asset file from either the Library panel or through the File | Export | Export Scene as asset menu, you are presented with the Export Asset dialog, as shown in the following screenshot:
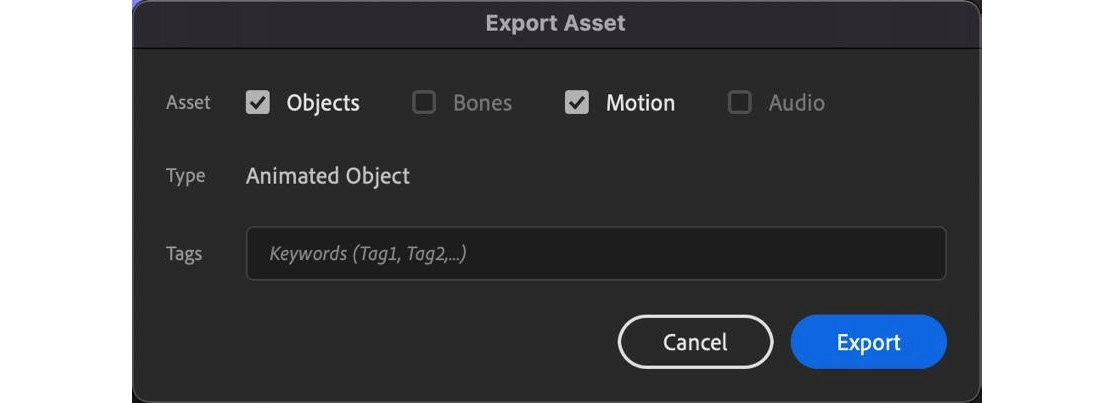
Figure 4.19 – Export Asset dialog options
From here, you can choose from the available assets to include in your file, depending on whether these types of assets exist in the selected symbol. A system of checkboxes allows you to include the following:
- Objects: Visual assets within your chosen symbol
- Bones: Any IK rigging you've designed within the symbol
- Motion: Any animation created with your provided assets
- Audio: Sound files that have been included in your symbol
You are also provided with the opportunity to tag the asset with keywords, which can then be searched through when using the Assets panel.
Once you click Export, your assets will be bundled into a .ana file on your local machine, ready to be imported or distributed:

Figure 4.20 – Animate asset file
There are a handful of uses for these Animate asset files. They can be preserved as a backup, distributed to other members of your team (or even strangers on the internet), or can be immediately imported back into Animate for use through the Assets panel:
- To perform an import using a generated .ana file, open the Assets panel. If it isn't already open, you can access it from the application menu by choosing Window | Assets.
- With the Assets panel open, look to the bottom left within the panel and click the Import Assets button (which looks like a big plus sign). Alternatively, open the panel options menu at the upper right and choose Import from the options that appear.
You will then be taken to a file browser to locate your .ana file.
- Select the file to include and click Open to complete the import process.
Once the .ana file has been imported, you can locate it within the Custom tab of the Assets panel:

Figure 4.21 – An imported Animate asset
You can filter and search custom assets just as is possible with the default assets.
Tip
It is also possible to delete assets from the Assets panel that you no longer need. Right-click on the asset you want to remove and choose Delete from the right-click menu that appears. Note that you can also rename assets in this way!
In this section, we explored a new mechanism for exporting useful assets from Animate using the new Animate asset export and import features. Coming up, we'll look at how to quickly publish and export content using the Quick Share and Publish menu.
Social Share and Quick Publish
The social share and quick publish options allow us to produce content directly to some of the most common formats – regardless of the traditional differences between exporting and sharing your Animate content. Both are accessed from the Quick Share and Publish menu in the upper right of the Animate UI – left of both the workspace switcher and the Play Movie button:

Figure 4.22 – Quick Share and Publish appears as a box with an upward arrow emerging from it
When you click this button, you gain access to the Social share (One click social media share) and Publish (Export in multiple formats) options:

Figure 4.23 – Social share and Publish options
Choosing either option will open a secondary menu of choices. Let's take a look at these options.
Social Share
Choosing Social share will bring you to the next step in that process, which presents the choice of sharing directly to Twitter or YouTube, with more social channels coming soon:

Figure 4.24 – Social share options
Selecting either of these two options will necessitate an authentication task that allows Animate to publish directly to the selected platform on your behalf. You only need to provide permissions once for each social network.
Once authenticated, Animate generates the media in a format suitable for either channel and allows the inclusion of a small message (with hashtags, of course!) before posting. After the content is successfully posted to the chosen social channel, Animate lets you know through a small confirmation dialog – at that point, the media is live.
Quick Publish
Choosing Publish leads to some alternative choices that depend on your document target platform.
For instance, if you're using HTML5 Canvas, you'll get the option to publish an MP4 video file, an animated GIF file, or a set of files compatible with HTML/JavaScript:
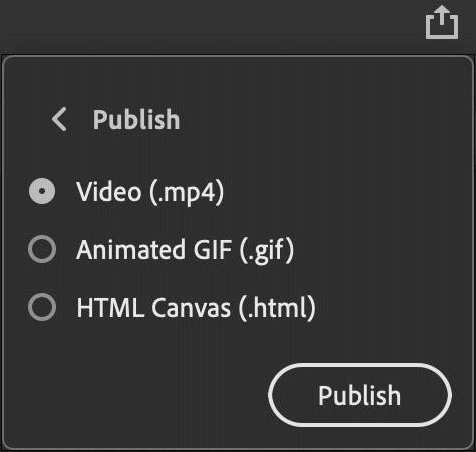
Figure 4.25 – Quick Publish options for HTML5 Canvas
However, if working from an ActionScript 3.0 document type, you'll be presented with only options for video and animated GIF files – since a .swf file is no longer appropriate for public distribution.
Just as with the channel selection for social sharing, the quick publish options will likely change over time – especially as more targets are added to Animate.
In this section, we gave an overview of the Quick Share and Publish options that are available within Adobe Animate.
Summary
In this chapter, we explored a wide variety of publish options depending on the chosen document type, and also the export options available to us, regardless of document type and target platform. It is so important to understand the differences between these two ways of getting content outside of Animate!
When executing the publish workflow across different document types, we now have a better familiarity with the options available to each, and also how these settings can differ drastically between target platforms. Regarding export workflows, we've seen how varied these can be and the wide array of file formats that can be chosen – regardless of the initial document type. We also had a look at the various export options when generating Animate asset files, and we saw how to access and use the quick share features.
In the next chapter, we'll explore how to create and manipulate assets within Animate to design engaging animated content.