
Chapter 9: Manipulating Warped Objects through Advanced Rigging
In the previous chapter, we saw how to build complex Inverse Kinematics (IK) armatures and create fully animated figures using the tools and workflows present within the software. In this chapter, we will examine workflows associated with the Asset Warp tool and the creation and management of Warped Objects.
This chapter presents an introduction to the Asset Warp tool and how to use it to create Warped Objects out of our vector or bitmap-based artwork through the placement of pins. We'll also see how to manipulate these pins across time and create animation through tweening property differences between keyframes. We then explore more advanced uses for these workflows through modern rigging and the creation of rich armatures, with the ability to manipulate bones and joints as part of our Warped Objects. Finally, we'll perform animation with an armature that makes use of hard bones, soft bones, freeze joints, and more!
After reading this chapter, you will have learned how to do the following:
- Use the Asset Warp tool to create Warped Objects.
- Use the Asset Warp tool to build modern rigs within Warped Objects.
- Make use of various pin, bone, and joint options within Warped Objects.
- Animate content using Warped Object meshes and armatures.
Technical Requirements
You will need the following software and hardware to complete this chapter:
- Adobe Animate 2022 (version 22.0.2 or above)
- Refer to the Animate system requirements page for the hardware specifications: https://helpx.adobe.com/animate/system-requirements.html
Warped Objects and the Asset Warp Tool
Using the Asset Warp tool, we can create a special kind of object—a Warped Object—out of vector shapes or bitmap images. This object type includes the underlying artwork within a container that exhibits a distortion mesh. This allows the mesh to influence the artwork within through the use of Pins and Bones. Warped Objects are somewhat similar to symbols, but they will not appear within the Library as symbols do. They can, however, be animated like symbols through the use of keyframes and Classic Tweens.
Tip
Be sure that you do not attempt to use the Asset Warp tool on a symbol instance—it simply will not work.
Initially, Warped Objects and the Asset Warp tool were added to Animate 2019 in October 2018. Despite the feature being part of the application for nearly 3 years, not much had been done to expand upon the workflows originally introduced with the tool since then. This has all changed with the release of Animate 2022, however, as the feature set has been greatly expanded with additional properties that allow the inclusion of hard and soft bones as part of the distortion mesh, frozen joints, and more!
Note
Newer features involving the creation of bones and modern rigging were not included in the initial released version of Animate 2022 (22.0.0) but were originally intended for it. They were actually released during a follow-up version (22.0.2). If you do not see these options in your installed version of Animate 2022, check for an update!
The Asset Warp tool itself appears as a pushpin icon in the Animate toolbar:

Figure 9.1 – The Asset Warp tool
Once you select this tool, you can set the general Tool properties through the Properties panel, and once you establish a Warped Object through the use of this tool on vector shapes or a bitmap image, you'll be able to define properties specific to the whole object, pins, bones, and more via the Object tab in the Properties panel:

Figure 9.2 – Asset Warp tool properties versus Warped Object properties
A Warped Object has a couple of unique properties that can be exploited within the Warp Options section of the panel. The availability of these options will depend upon whether you are observing Tool properties or Object properties. The various properties are explained here:
- Mesh—This is a toggle switch that will display the mesh when active or hide the mesh when not active. It is active by default.
The complexity of the mesh can be controlled through manipulation of the associated Mesh Density Slider when a Warped Object has been selected.
- Create Bones—Allows the creation of bones when toggled on, and if toggled off, will create simpler distortion pins instead.
- Freeze Joint—This allows you to select an existing joint and freeze it so that it is not displaced as the rest of the armature is shifted about.
- Handle Mode—An Open handle is the default mode and is more impactful to the surrounding mesh fragments:
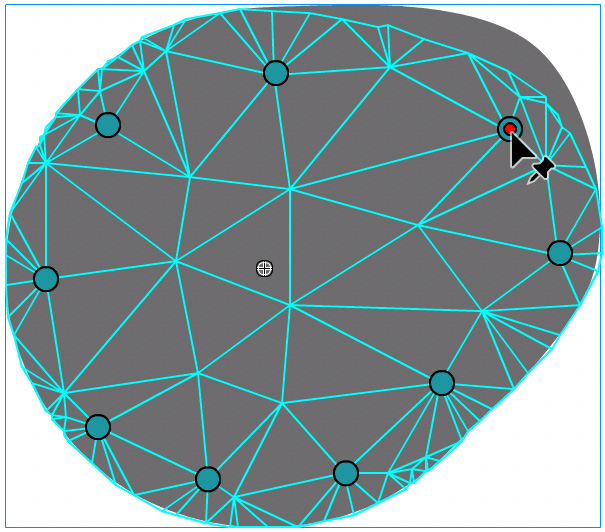
Figure 9.3 – Moving pin locations modifies the mesh
A Fixed handle is less impactful but also allows you to rotate the mesh around it:

Figure 9.4 – Fixed handle mode can rotate around pins
Play around with both handle modes to see what works best for your chosen assets. The most important thing is to make decisions about which handle modes to use before any animation is attempted.
- Bone Type—Choosing Hard will make the bone behave similarly to what we've seen in IK armatures, while choosing Soft will allow the bone and the attached artwork to bend and squish.
- Rotation Angle—Provides a convenient way to adjust the rotation angle of a pin or bone through numeric values instead of on the stage.
Note
You may want to also refer to Chapter 1, A Brief Introduction to Adobe Animate, for additional information about the Asset Warp tool and its new capabilities.
We'll explore the use of bones within Warped Object meshes in an upcoming section of this chapter. For now, let's focus on using pins to distort Warped Object meshes and influence the contained artwork.
Creating Distortion Meshes using Pins
We'll now explore the creation of Warped Objects and the use of the Asset Warp tool to create distortion meshes through pins. We first need to either import a bitmap image or design a vector graphic to establish the Warped Object upon.
Let's design a spooky little ghost character in Animate for this example:
- Create a new ActionScript 3.0 document and save it to your local hard drive. As this format is native to Animate, we can use the full range of tools and features of the software.
- Set the width and height of the stage to a value of 800px. This will be a 1:1 ratio and will form a square, suitable to publish to social networks such as Instagram. When exporting or publishing, you can always scale the resolution up or down to match specific social network standards such as Instagram's recommended 1080px – it's all scalable vector content, after all! The frames per second (FPS) value should be 30.
- Set the background color of the document to something like an autumnal orange or tan color. I'm using a value of #D06401 for mine.
- Ensure that Snap to grid is activated from the View | Grid | Edit Grid menu selection:

Figure 9.5 – Grid settings
- Set the grid cell size to 40px at each dimension. This will ensure that the shapes we draw will be easily snapped to the dimensions we want to align to when drawing.
- Now, select the Rectangle tool and disable the stroke. Choose a spooky violet color for the fill. I've chosen a value of #6666CC. This will be the color of our ghost:

Figure 9.6 – Tool settings established with Object drawing mode off
Ensure that Object Drawing Mode is disabled in order to create simple shapes and not Drawing Objects.
- Draw a square upon the stage that measures 360x360 pixels. Use the grid snapping to help you along with this task.
- Select the Oval tool and note that the stroke and fill settings are retained from the Rectangle tool. Draw a circle that also measures 360x360 pixels alongside the square but ensure they do not overlap. The result should look like this:
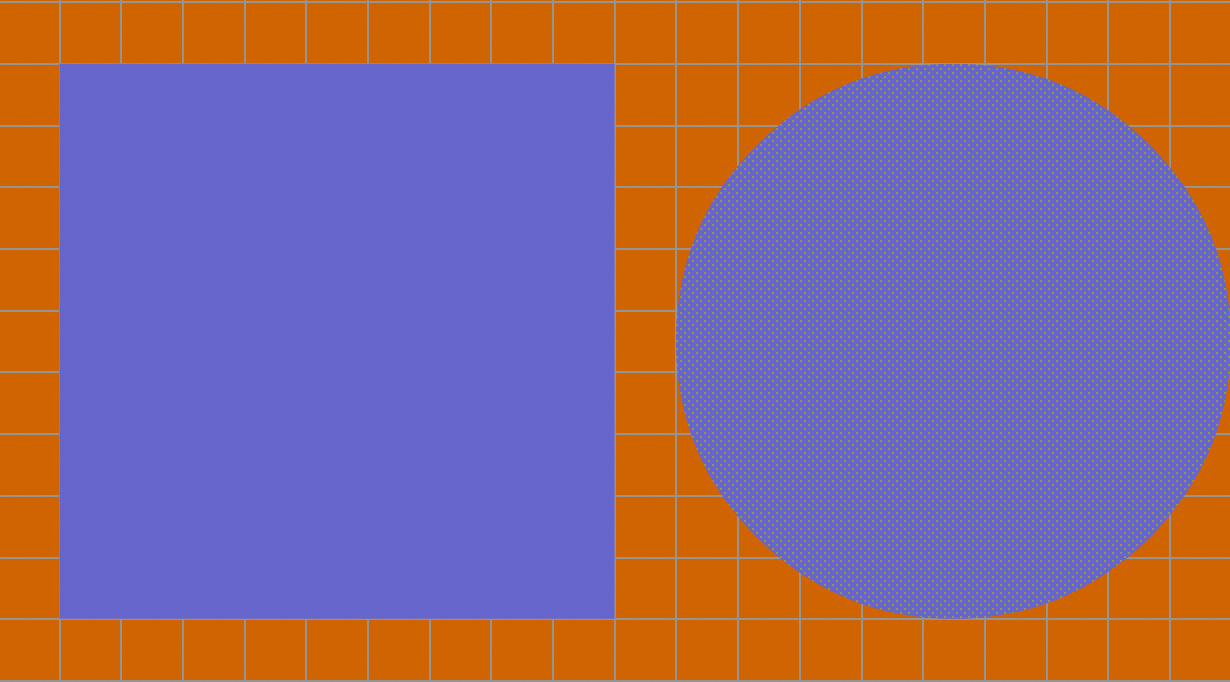
Figure 9.7 – Square and circle shapes are established
- Switch over to the Selection tool and drag the circle shape to the top of the square shape so that the center of the circle aligns with the very top of the square and both objects are perfectly vertically aligned.

Figure 9.8 – Creating a compound shape
Once again, the grid snapping should assist you in placing these objects correctly.
- Select the Oval tool once more and change the fill color to solid black. Draw a set of elongated ovals to serve as the ghost's hollow eyes. The sizing and shape of the eyes are really up to you. Here's what my example looks like:

Figure 9.9 – Black ovals for spooky eyes
- Select both eyes and place them upon the ghost shape in order to complete the ghost character.
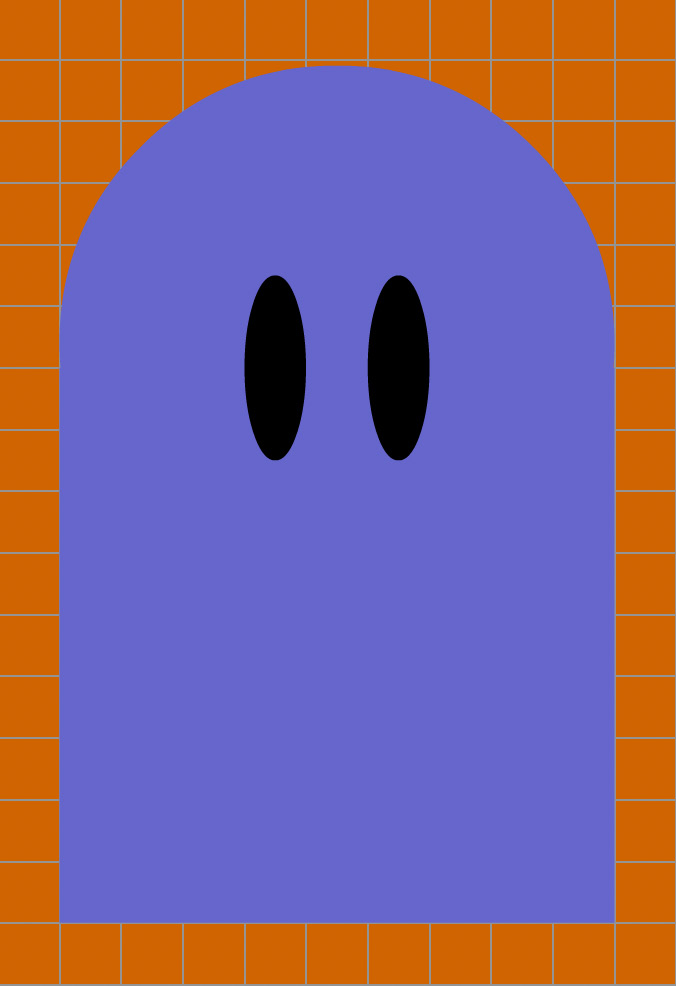
Figure 9.10 – The completed ghost character
- Double-click the ghost to select the ghost along with its black eyes. Now, use the Align panel to center the character both horizontally and vertically to the stage.
- We no longer require the grid to be visible now that the ghost is complete. Hide the grid by unchecking View | Grid | Show Grid from the application menu and save your work.
So easy to create a little ghost, right? While the edges and angles of the ghost character are very straight and clean right now, we'll want to make additional changes to provide a more ephemeral and cloth-like appearance to this ghost… especially when it comes to the bottom portion. We can accomplish all of this through the use of a distortion mesh, and we create such a mesh through the use of the Asset Warp tool.
We will now convert the set of vector shapes that make up our ghost into a Warped Object and will add a number of pins in order to provide these qualities to our ghost character. To do that, follow these steps:
- Select the Asset Warp tool from the tools panel and click anywhere on the little ghost to select it:

Figure 9.11 – Selecting an object with the Asset Warp tool
The mouse cursor changes to add a little plus (+) sign next to it, indicating that the next click will add a pin to the selected object.
- With the Asset Warp tool still selected, click the lower-right corner area of the ghost to set your initial pin:

Figure 9.12 – The shape is transformed into a Warped Object
A distortion mesh is applied to the shape and it is transformed into a Warped Object.
- Create a set of pins across the ghost in any way you like. I've simply created them along the outside edge all around:
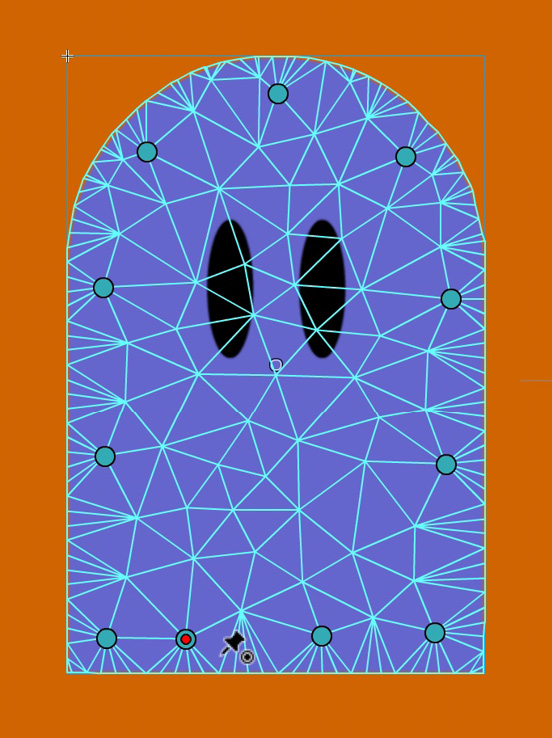
Figure 9.13 – The completed distortion mesh
- Try playing with the Mesh Density Slider to see how it changes the mesh you've created. I suggest keeping the mesh fairly simple for this small project.
- When you are ready, begin using the Asset Warp tool to select and drag pins slighting in different directions to create a visible distortion to the ghost shape. You can influence the straight lines we created to make them wavier, as you'd expect from a spooky ghost like this:
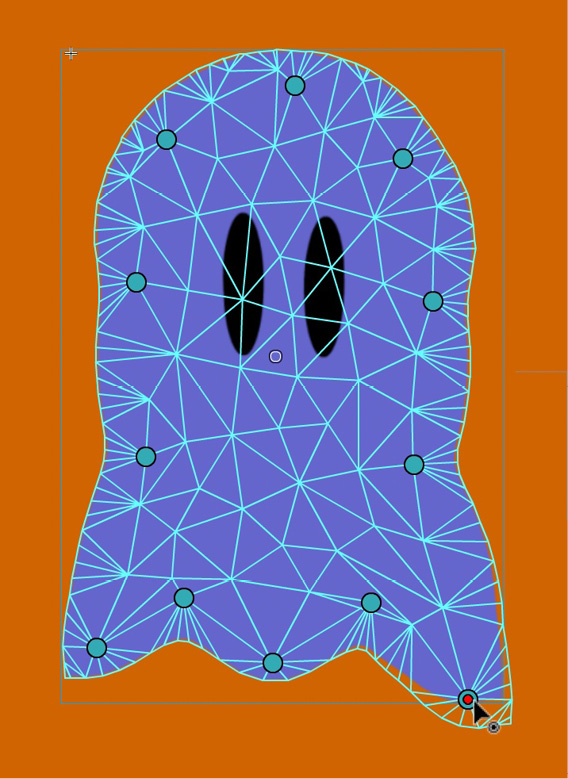
Figure 9.14 – The underlying artwork is distorted by the mesh
- Continue adjusting the pins and various properties until you are pleased with the result.
With our Warped Object established, we'll next have a look at animating between mesh states, as established through regular keyframes.
Animating Warped Object Meshes
As mentioned previously, when you convert a bitmap or shape into a Warped Object, it doesn't become a symbol and cannot be found within the Library panel. Despite this, a Warped Object can behave very much like a symbol and can be animated through the use of Classic Tweens in a similar way to symbol instances.
Tip
Even though it doesn't appear in the project library, you can still edit the underlying artwork of a Warped Object by right-clicking upon it and choosing Edit Selected from the menu that appears.
We are now going to establish keyframes across the layer containing our Warped Object and will make use of Classic Tweens to animate between these keyframes. Any variation in the mesh between keyframes will cause a distortion effect similar to moving cloth or morphing shapes that can be tweened across time.
- The first thing you'll want to do is give your layer a proper name. Double-click the existing layer you've been working on and name it ghost.
- Next, create a new keyframe at frame 15. We will be adjusting the pins at this keyframe in order to create our animation:
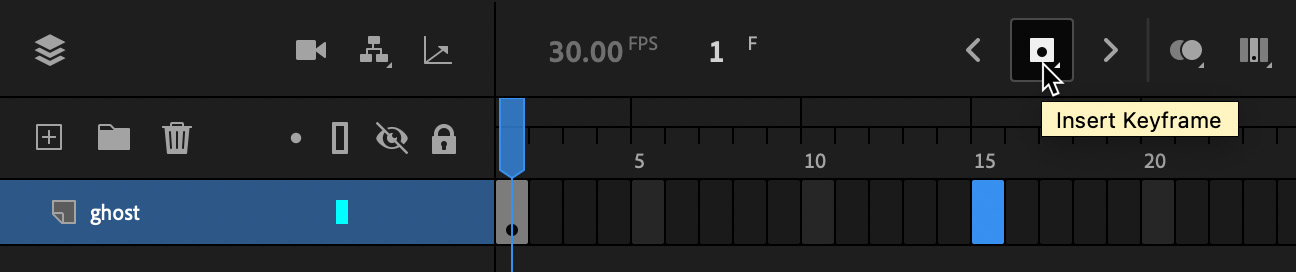
Figure 9.15 – A keyframe is created at frame 15
- Create a third keyframe at frame 30. This will exhibit the same properties as the keyframe at frame 1, completing a looping animation:

Figure 9.16 – A keyframe is created at frame 30 that is equal to the one at frame 1
- Move the playhead back to the keyframe at frame 15 and shift the various pins in order to distort the mesh in a different way.
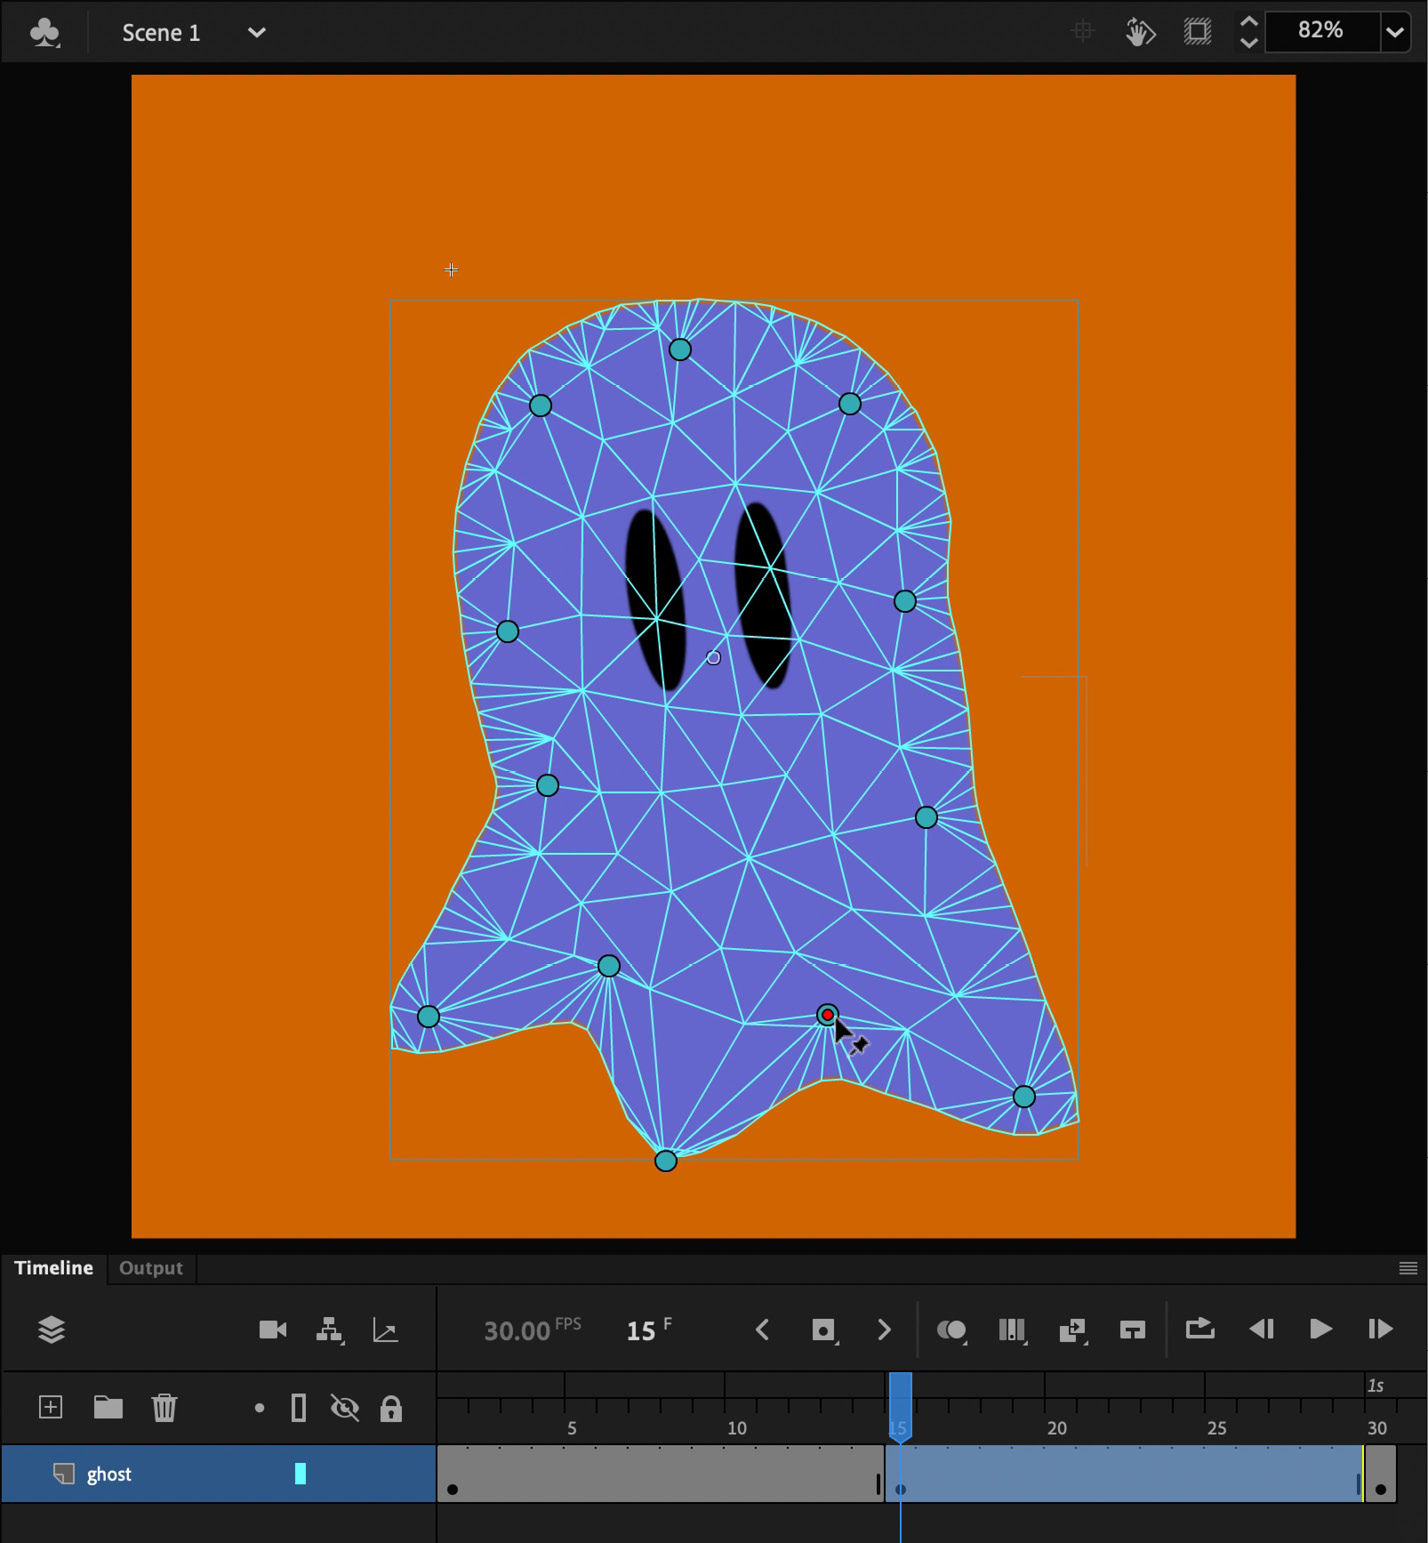
Figure 9.17 – As the mesh is distorted, the underlying artwork is represented accordingly
- Changes in pin properties across keyframes can be tweened just as with symbol instance property changes by using a Classic Tween. Selecting frames across both frame spans, create a Classic Tween:

Figure 9.18 – Creating a Classic Tween across both frame spans
- To complete the motion, we'll add an easing preset to both tweens. Apply the Sine preset from the Ease In Out category to each of them to create a floaty effect to the ghost's movement:

Figure 9.19 – Applying the Sine preset from the Ease In Out category
- Perform a Test Movie to watch the smooth, looping animation of the hovering ghost.
You can apply such mesh distortions and resulting tweened animation to all sorts of content—both vector shapes and imported bitmap images. This sort of animation based upon mesh distortion is great for things that have subtle movements, such as cloth, hair, or—of course—spooky little ghosts.
In this section, we got an overview of the Asset Warp tool and how to use it to create Warped Objects using pins and mesh deformations. We also produced a short, looping animation through the use of pin property changes and Classic Tween animation with our Warped Object. Next, we will explore an exciting new set of capabilities with the Asset Warp tool and Warped Objects through the construction of bones and modern rigging techniques.
Animating Warped Objects using Armatures
Before we begin building armatures with the Asset Warp tool, you'll likely be wondering how this type of armature differs from the IK and layer parenting rigs we've explored in previous chapters.
Rigging with Inverse Kinematics and the Bone tool is meant to be very physics-based but still quite precise as everything conforms to the IK bones that are established as part of the rig. The largest obstacle here is that IK is a more advanced type of rigging that takes a while to do correctly because you have so many options over each bone and joint.
Rigging through Layer Parenting is unique again, in that it affords a simple mechanism for tweening layer content through the use of familiar workflows possible with the Selection tool tool and Free Transform tool. Layer parenting is simple to pick up for those who are already familiar with basic tweening workflows, but the motion generated can be very mechanical and stiff as it does not have the rich physics properties associated with an IK rig.
Rigging with Warped Objects is also quite easy for newcomers to pick up but works through the same mesh deformations we've seen in the little ghost project. This type of rigging is more fluid and has a completely different appearance than the other two but still can provide precise control through the use of bones and joints.
Building armatures and then animating them is what Adobe has termed modern rigging and is meant to be more accessible to newcomers but also offers a different type of result than the other rigging options. Adobe also views the capabilities that exist in this type of rigging to be just the beginning of the modern rigging feature set. It is also important to note that this is not a replacement for any other rigging type—it is simply another option in your toolbox.
To get started with modern rigging, we'll make use of some starter files that have been prepared for this purpose. Locate the downloaded files and look within the folder for this chapter to make use of the appropriate file.
Note
The gnarly tree assets that we will use in this section can be downloaded from https://github.com/PacktPublishing/Adobe-Animate-2022-for-Creative-Professionals-Second-Edition.
Open the SpookyTree.fla file to get started:

Figure 9.20 – The Warped Object armature starter file
There are two layers present—one for the tree, and another for the background elements. The file is a 16:9 resolution at 1920 x 1080 and includes no animated content whatsoever. The frame rate is set to 30 FPS.
We will be creating a series of complex armatures for the tree and rope swing using the Asset Warp tool by transforming the gnarly tree bitmap instance into a Warped Object. Once the armatures are established, we'll perform some dynamic animation to simulate the tree being buffeted about by strong winds, with the rope swing likewise disturbed.
Creating Armatures using Warped Objects
As we've seen in our previous experiences with the Asset Warp tool, there exists an option to either create pins or bones through the use of a simple toggle switch in the Tool tab of the Properties panel with the Asset Warp tool selected.
Let's begin by creating our Warped Object:
- First, we'll select the Asset Warp tool and ensure that Create bones is toggled to the on state within the Tool tab of the Properties panel:

Figure 9.21 – Create bones must be toggled on
We will keep Bone Type set to Hard for now.
- Let's begin creating our armature. Click the bottom trunk area of the tree once to select the bitmap and click a second time to establish an initial pin and transform it into a Warped Object:
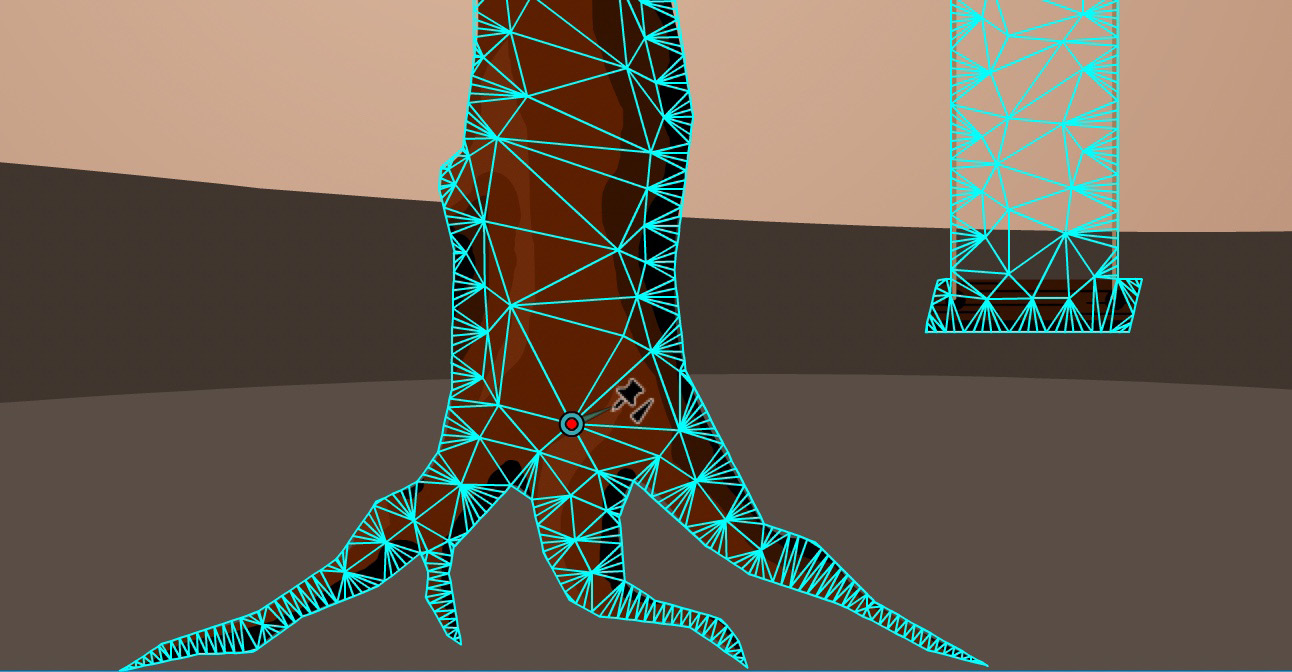
Figure 9.22 – A pin is added and a distortion mesh created
- Move your cursor up the truck of the tree about halfway and click to produce a joint. A hard bone is automatically created between the two joints:
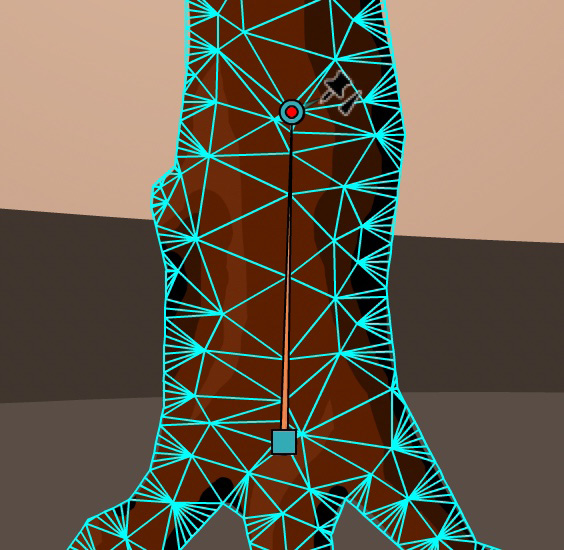
Figure 9.23 – Bones appear as sticks between joints
- Proceed in a branching pattern up each section of the tree to create a full armature. To create bones from additional joints and establish more branches, simply select the joint you'd like to have bones originate from:
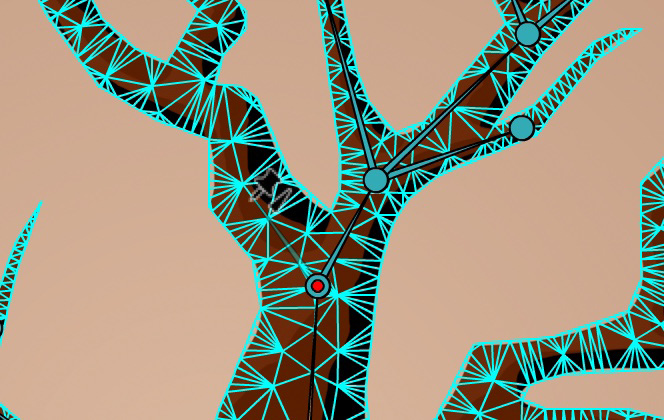
Figure 9.24 – Selected joints exhibit a red dot
Do not create any bones for the branch with the swing just yet, as we'll do that in a special way once the initial armature is established.
Before proceeding, let's examine some tips that may help you work with the joints you've laid out so far:
- To help visualize the armature you are building and unclutter the screen, you may want to turn off the mesh overlay. To do so, simply uncheck the Mesh checkbox in the Warp Options.

Figure 9.25 – Turning off the mesh overlay
- Again, to branch out from any joint along the armature, simply select an existing joint, and any additional bones you create will originate from the selected joint.
- You can delete any bones by selecting the associated joint and pressing the Delete key on your keyboard:
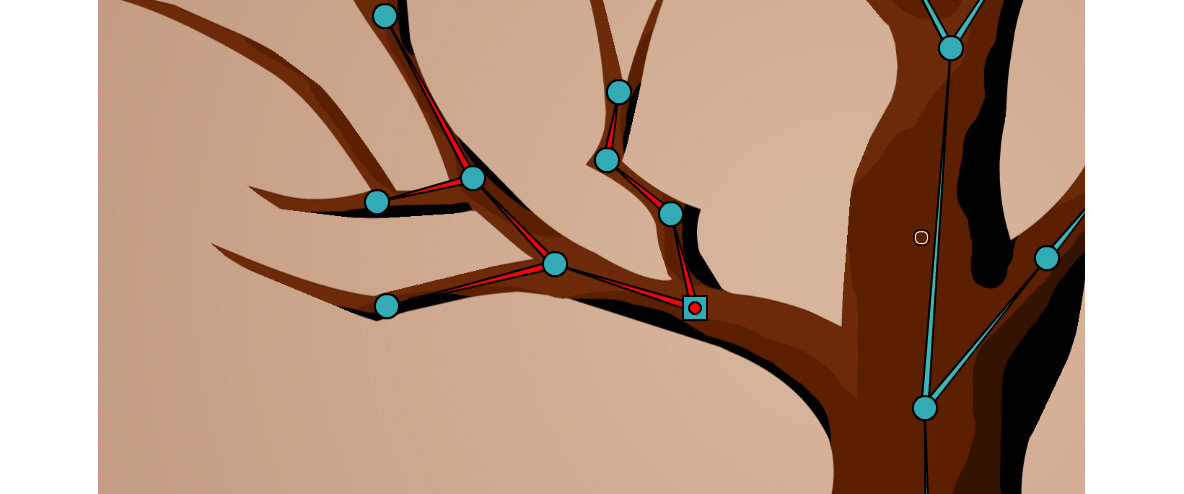
Figure 9.26 – Deleting bones in an established armature will create multiple armatures
- If you select an existing joint and hold the Option or Alt key on your keyboard as you click another joint, a hard bone will be created between them. You can even use this to connect two separate armatures.
- To relocate any joints, you can hold the Option or Alt key on your keyboard before dragging the joint to a new location:

Figure 9.27 – The cursor will change to let you know the joint is movable
Go ahead and build out your armature to match the branching structure of the tree, using the tips and tricks previously mentioned to guide you. Remember to leave the branch with the swing alone for now.
The initial structure should look similar to the figure below:

Figure 9.28 – The initial tree rig will appear similar to this
Use the Asset Warp tool to move the armature around and get a feel for how these bones work across the mesh distortion to affect the underlying artwork:

Figure 9.29 – Shifting the armature through joint movement
We've only used rigid, hard bones in this armature so far. These bones are suitable for the branches of a tree, but you can imagine that if the wind is going to make these rigid branches move and sway, it has to have a greater influence on the rope swing attached to one of the lower branches. Additionally, the thicker parts of the tree are not going to be swayed by any wind and should be frozen in place.
We'll now grow and modify our rig to take all of these concerns into account:
- Using the Asset Warp tool, create a set of bones for the remaining limb that will appear similar to what you see in the following figure:

Figure 9.30 – Bones along the rope-swing limb
It is important that a joint exists between the two ropes, as we will create a soft bone from here to influence the swing.
- Create a new bone from the joint in between the two ropes that extends to the swing seat below, and in the Properties panel change the Bone Type to Soft.

Figure 9.31 – A soft bone is created along the rope swing
- Test out the differences in the use of soft bones by dragging the joint at the base of the swing up toward the tree:

Figure 9.32 – Soft bones have a different appearance from hard bones
The ropes distort with a soft bone, just as you would expect they might in reality, bending and twirling in the wind. Soft bones are great for objects and materials of this nature.
- We'll complete our rig by making use of Freeze Joints along the thick trunk. Select one of the joints along the thick part of the trunk and toggle the Freeze joint option in the Warp Options to the on position I've frozen two of the joints along my trunk:
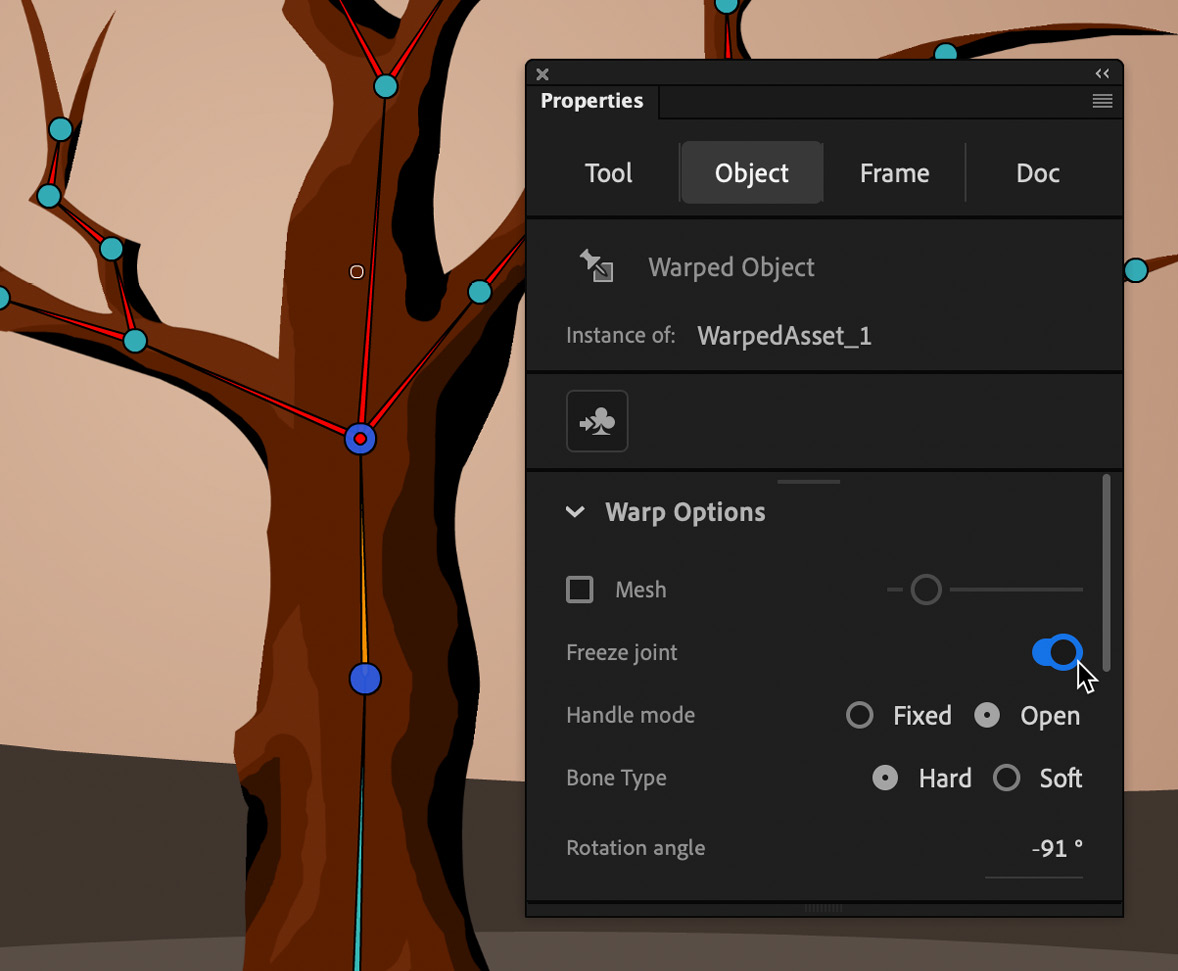
Figure 9.33 – A freeze joint will be pinned to the stage
Remember that you can always re-enable the mesh and use the Mesh Density Slider to increase or decrease the complexity of the deformation mesh. Before moving on, give the slider a go in order to get a feel for how it impacts the influence of what we've built.
When you feel you are ready to move on, compare the rig you've created with the one in the following figure. Note that the number of joints, their placement, and the mesh complexity will likely be different from what you see in my image, and that is fine! The important things are around how the rig functions as a whole.

Figure 9.34 – The completed rig with hard bones, soft bones, and frozen joints
Now that we have our rig established, we'll next look at creating some animation through keyframing and Classic Tweens to have the tree and rope swing blow about in the wind.
Animating with Modern Rigging Techniques
We've already seen how to animate a Warped Object through the use of basic pins, but we now have the ability to create bones-based armatures within Warped Objects as well. This is what Adobe has termed modern rigging within Animate and is a brand-new feature with Animate 2022 (version 22.0.2).
- Let's start by extending the frame span across all layers. Select the frames across both the Ground and SpookyTree layers at frame 90 and insert frames in order to create a 3-second timeline:

Figure 9.35 – Extending the overall frame span to 3 seconds
- Using the Asset Warp tool, modify the rig to exhibit the starting pose however you like. We'll be creating a number of poses for the tree and swing across these 3 seconds, and they will all vary according to how you envision them.
- Insert a keyframe somewhere before the 1-second marker. In this example, I'm creating a keyframe at frame 15:
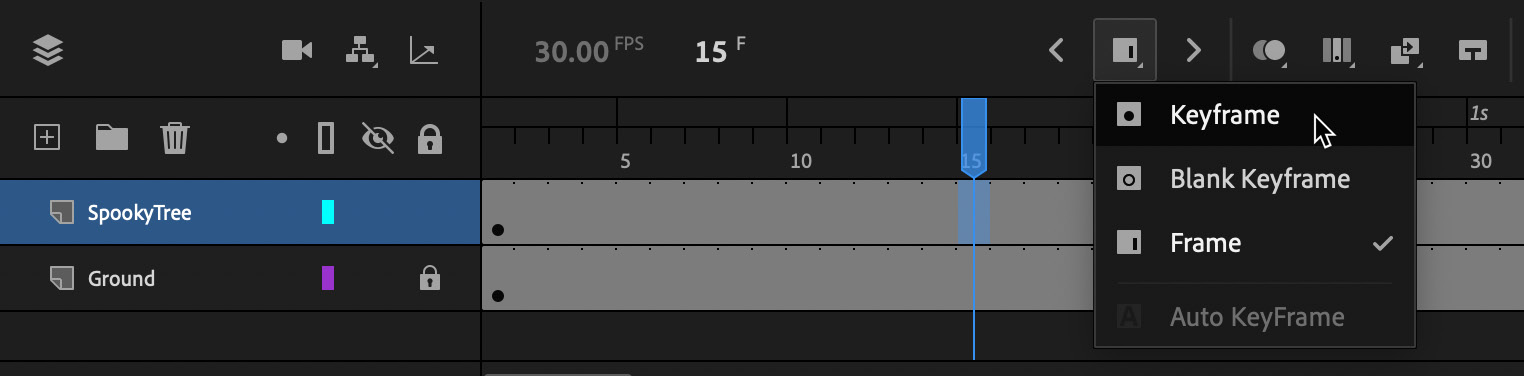
Figure 9.36 – Inserting a new keyframe along the timeline
- Move the playhead to the new keyframe and use the Asset Warp tool to position the various branching elements of the gnarly tree rig ever so slightly, as if driven by the wind.
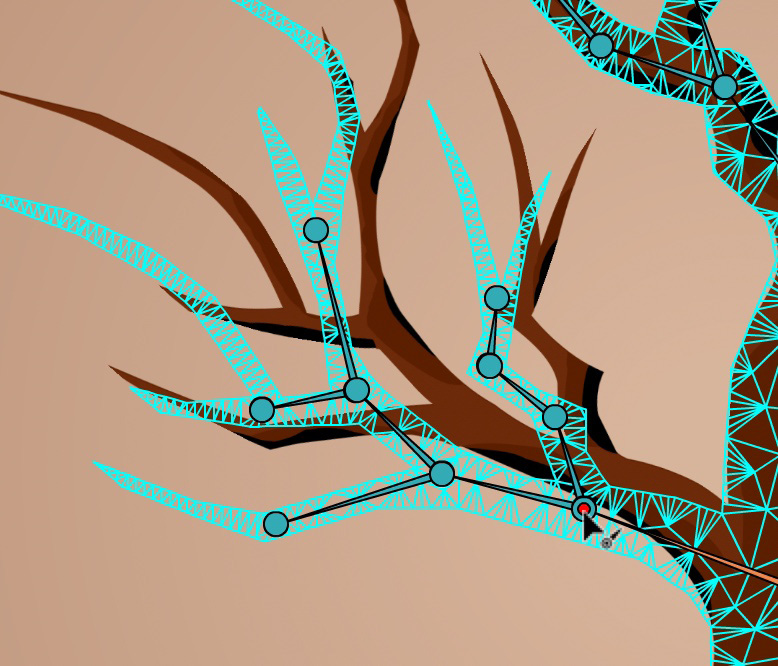
Figure 9.37 – Manipulating the hard bones of the rig branches
- Modify the position of the rope swing as well for each keyframe you create.
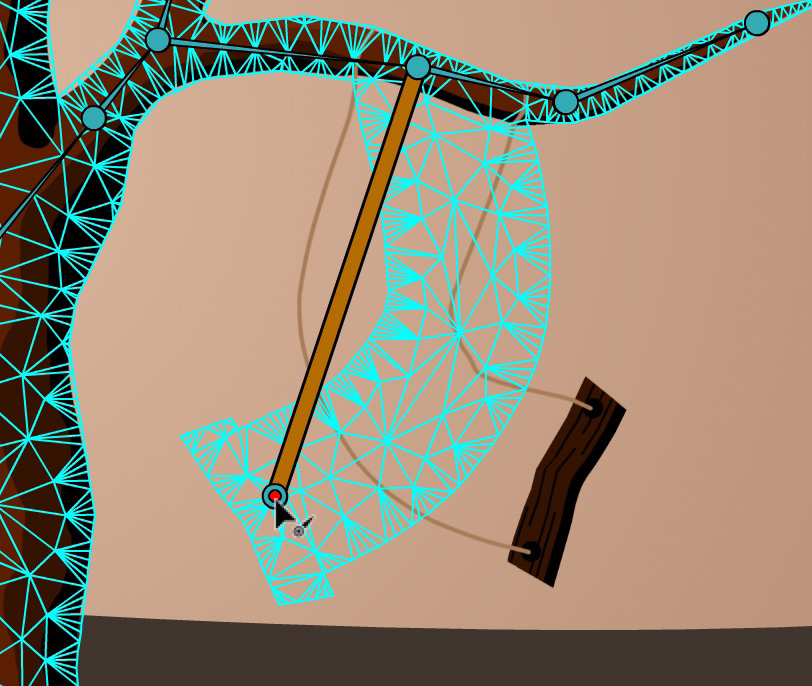
Figure 9.38 – Adjusting the soft bone associated with the rope swing
- Continue placing keyframes every 10-15 frames along the timeline and adjusting the branches slightly for each keyframe. Do not forget to tweak the position of the rope swing as well. It is up to you how many keyframes and associated poses you create, but I would suggest around seven to eight, overall.
- At the final frame—frame 90—insert a blank keyframe:
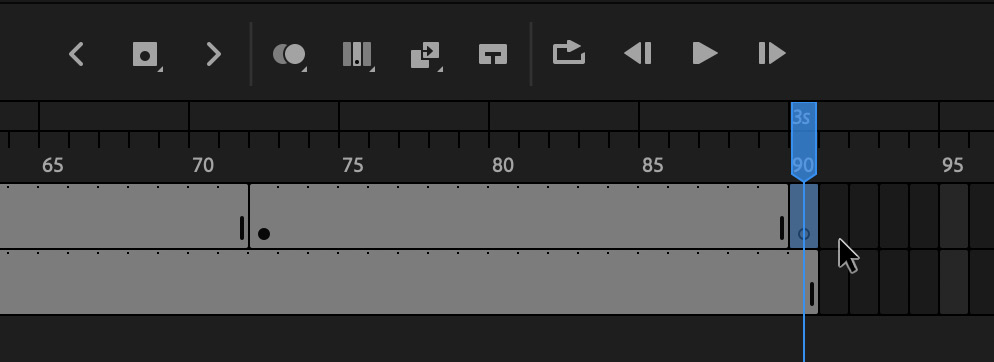
Figure 9.39 – A blank keyframe is inserted at frame 90
- Move the playhead to frame 1 and select the tree Warped Object on the stage.
- Copy the Warped Object at frame 1 and move the playhead to the blank keyframe at frame 90 once again.
- Right-click upon the stage and choose Paste in Place from the menu which appears, to insert an identical Warped Object into frame 90 from frame 1. The Warped Objects at frame 1 and frame 90 are now identical.
- Select the entire set of frames on the SpookyTree layer, as illustrated in the following screenshot, and create a series of Classic Tweens across the entire timeline:

Figure 9.40 – Creating Classic Tweens across the timeline
If we leave the content at frames 1 and 90 identical as they are now, our loop will visibly repeat the same content, causing a stutter to the otherwise seamless motion. We will adjust for this.
- Add a new keyframe at frame 89 and delete all content from the final keyframe at frame 90 to establish a blank keyframe:

Figure 9.41 - Adding a keyframe at frame 89 and deleting the keyframe content at frame 90
- Select the keyframe on frame 89 and drag it to frame 90. This will create a seamless loop with no repeating frames since frame 1 and frame 90 are no longer identical:

Figure 9.42 - Dragging the keyframe at frame 89 to frame 90
- Perform a Test Movie to view the resulting animation.
The tree branches are buffeted in the wind and the rope swing tosses wildly about the air. The tree trunk remains fixed in place throughout all this turbulence due to the frozen joints.
After viewing the animation, you may want to make further adjustments to the rig to make everything more believable and realistic. Make use of onion skinning to assist with this. You can also add easing presets to the tweens to introduce further physicality to your structural motion.
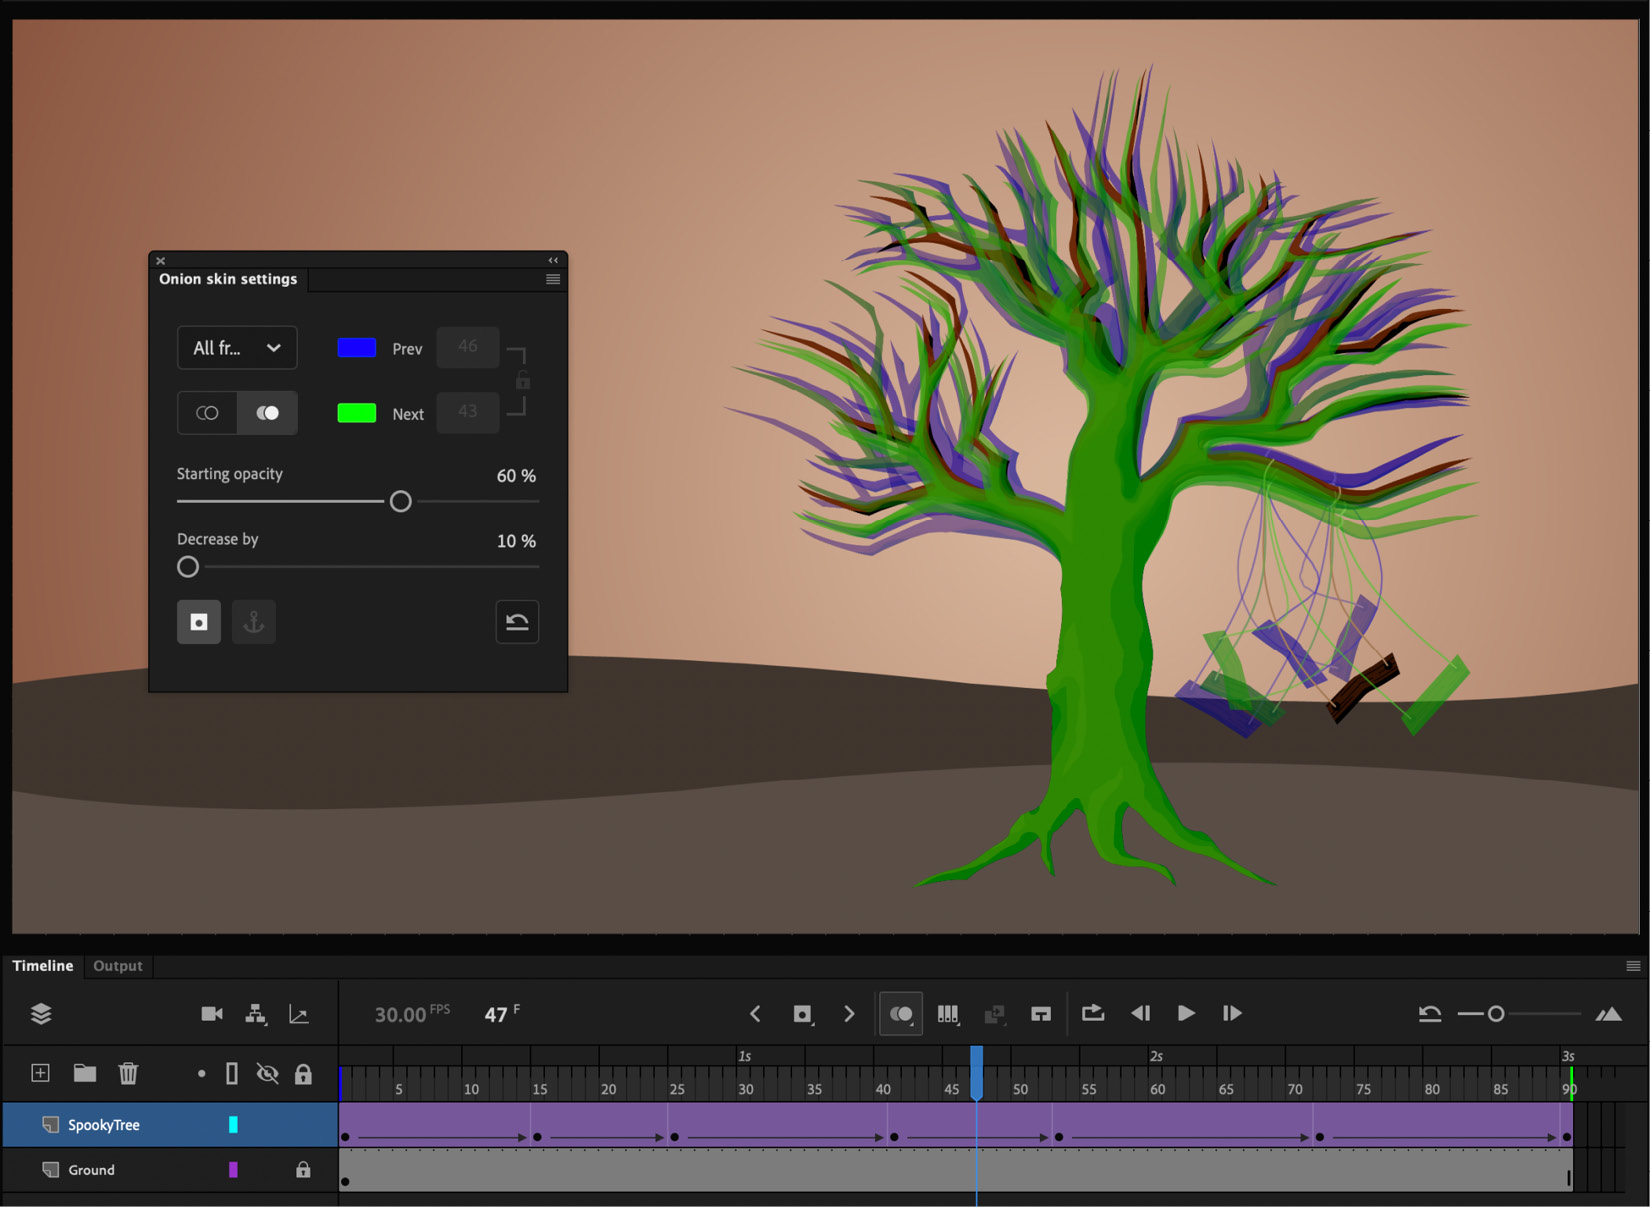
Figure 9.43 – Onion-skin controls can help you adjust the rig positions
In this section, we explored modern rigging through the use of bones created with the Asset Warp tool and Warped Objects. This is a natural extension of the existing mesh deformation functionality and is sure to expand in features as it matures further.
Summary
In this chapter, we had an in-depth look at how to create Warped Objects by establishing a distortion mesh through the use of the Asset Warp tool. We created a little spooky ghost character and used pins to animate it floating about the stage. We then explored the use of modern rigging and established a set of branching armatures with a gnarly old tree. Lastly, we made use of various bone and joint properties to give the tree some intense motion as though being blown about by a strong wind.
In the next chapter, we are going to put the focus on advanced layers once again, this time exploring the document Camera, Layer Depth, and Layer Effects!