
Chapter 10: Working with the Camera and Layer Depth
In the previous chapter, we spent time working with the Asset Warp tool to establish mesh distortions while defining both hard and soft bones within Warped Objects for complex rigging and animation.
In this chapter, we will examine the Camera, Layer Depth, and Layer Effects. All of these features rely on Advanced Layers mode, which we first put to use in Chapter 7, Character Design through Layer Parenting. Using these features, we can create some pretty amazing parallax animations by making just a few alterations to the depth of our layers and by manipulating the document-level camera. In the following sections, we'll explore various properties and workflows associated with the camera and learn how to animate smoothly between various camera states. Once that has been covered, we'll learn how to apply filters, effects, and blend modes across entire layers within our animation.
After reading this chapter, you will learn the following:
- Learn the basics of adding the document camera and manipulating its various properties.
- Understand how to change the camera's state and produce smooth movement.
- Invoke the Layer Depth panel and explore the relationship between Layer Depth and the camera.
- Apply effects and filters to your layered animations.
Technical Requirements
You will need the following software and hardware to complete this chapter:
- Adobe Animate 2022 (version 22.0 or above).
- Refer to the Animate system requirements page for the hardware specifications: https://helpx.adobe.com/animate/system-requirements.html.
Understanding the Camera
While we've done a lot of animation so far with individual layers and objects, the document-level camera in Animate allows us to achieve even more. We can use it to zoom, pan, and rotate the entire contents of the stage as though we are using a real camera on our animation. Not only that, but we can still layer and nest animated content as usual through the normal methods to create multiple levels of animation across any project.
One of the most common uses of the camera is to zoom in on a scene:

Figure 10.1 – The camera adds zoom, pan, and rotation to a scene
This can be an animated zoom or even a simple cut from one zoom level to another.
Note
The camera can only be used at the document level and not within individual symbol timelines.
We'll be using the camera in this chapter to add all sorts of interesting motion and effects to our content.
Examining the Starter Project
To make use of the camera right away, we have a starter project specifically for this chapter that you can use to follow along with as we go over the different concepts involved. You can always use your files if you wish to as these concepts can be applied to just about any content.
Note
You can find the starter file we are using here within the exercise files at https://github.com/PacktPublishing/Adobe-Animate-2022-for-Creative-Professionals-Second-Edition.
If you open CameraStarter.fla, you'll notice that the stage has been laid out, with several varied assets ready to go:

Figure 10.2 – The starter project stage
The scene is that of a vast desert with rolling sand dunes. Far away are a set of rocky outcroppings and a steep cliff face. The sky appears free of clouds and a strange haze hangs over the horizon. The view is expansive with no obstructions apart from the dunes themselves.
Set across the various dunes of sand are animated characters that have been brought into our project through the Assets panel. They are all symbol instances that contain internal animations with Graphic or Movie Clip behaviors.
Looking at the timeline, you will see that these various objects have been organized into layers according to how close or far away they are from the viewer:

Figure 10.3 – The starter project's timeline and layers
These layers have a particular order to them, with the closer layers being toward the top of the layer stack and the layers that are more distant being closer to the bottom. At the very top of the stack is an empty Watermark layer, which we will use later to add some text to our animation. At the very bottom of the stack is the Sky layer, which contains the background sky elements.
In between these two are the layers that focus on scenic content. Most of them only contain various shapes that make up the levels of the sand dunes, but there are a few layers with additional character elements that you should take note of:
- The Closer layer includes an instance of the Complainer movie clip symbol instance.
- The Close layer includes an instance of the Cat Fight graphic symbol instance.
- The Far layer includes an instance of the Boy and Flower Monster movie clip symbol instance.
- Finally, the Farthest layer includes no sand dunes but a rocky outcropping with a dead tree and an instance of the Bunny Hop graphic symbol instance.
None of the layers include any motion. We are focusing on the camera in this chapter and will be using that mechanism alone to provide motion for our project, apart from any internal symbol animations.
Go ahead and click the Test Movie button to see the current state of the project. With only a single frame included as part of the main timeline, we only see movie clip symbol instances exhibiting any animation. Graphic symbol instances require additional frames to be in the main timeline for playback, so our graphic symbol instances only display a single frame, thus no animation. It's a fairly lifeless scene!
It doesn't have to stay that way, though. We'll explore how to activate and use the camera next.
Activating and Manipulating the Camera
To use the camera within our document, we must be using Advanced Layers mode, as described in Chapter 7, Character Design through Layer Parenting. This is the default layer mode within all recent versions of Animate, so you will not need to do anything to enable this mode. With the camera available, you must activate it to use it in your document, as the camera is not activated by default.
Note
The camera is not available in WebGL-based documents, including VR document types.
The camera can be activated by clicking the Add Camera button at the top of the timeline:

Figure 10.4 – The Add Camera button
Once the camera has been activated within a document, the same control is switched to a Remove Camera button. When you're toggling this button to add or remove the camera, it is only activating or deactivating the camera. If you deactivate and then reactivate the camera at any time, all of your changes and settings will still be present!
Note
You can also activate the camera by selecting the Camera tool from the toolbar. You may need to edit the toolbar to be able to access this tool.
With the camera active, several changes across the Animate interface will become immediately apparent.
Across the timeline, a new Camera layer will be added at the very top of the layer stack:

Figure 10.5 – The dedicated Camera layer
This layer, indicated by a small camera icon and with the fixed layer name of Camera, is dedicated to the document Camera. The layer must exist at the very top of the stack and it cannot be moved. You also cannot add any content to this layer as it is meant to hold the camera; nothing else is allowed. In addition, the layer cannot be locked, have its visibility disabled, or be placed in outline mode as normal layers can.
You'll notice that a new icon has been added to the timeline that appears as a small camera with a chainlink attached. We'll see what this option does shortly.
Another big change to the interface occurs on the stage. A control overlay appears over the stage's content, toward the bottom:

Figure 10.6 – Camera overlay controls
The camera overlay includes a slider for either zooming in/out or rotating the camera. This mode can be changed by activating either the rotation or zoom options, which appear to the left of the overlay. Moving the slider to either side will adjust the selected property and snap it back to the center once released, allowing for additional adjustments.
In addition to the overlay, if you hover over the stage, you will see the cursor change to indicate the ability to pan the camera. If you click and drag anywhere on the stage with this icon visible, you can pan the camera.
Tip
When you pan the camera, the actual view moves the opposite way to the camera's pan direction. This may feel a bit odd at first but try to imagine you are actually moving a camera and not moving the stage content and it will likely feel more natural.
With the camera activated and the Camera tool selected, we can view the various properties associated with it in the Tool tab of the Properties panel:

Figure 10.7 – Camera tool properties
The Camera properties entail everything you'd expect from a virtual camera. The settings include X/Y position, zoom, and rotation values. Each of these properties can be set in either the overlay controls or through the Properties panel. Setting them this way is more precise, and each setting includes a button for quickly resetting each property to its default.
Note
There are also color effects and filters that can be set within the Camera properties, but these are only available when you're using an ActionScript 3.0-based document.
It is also important to mention that these property settings are bound to keyframes across the timeline. So, if you want to change a camera property at any point, you can simply insert a new keyframe and make adjustments through the overlay controls or the Properties panel – whichever works best for your current task.
In this section, we looked at the starter document and learned how to activate the camera and make adjustments to its properties. Next, we'll look at the layer depth settings and prepare our starter document to make use of this feature.
Understanding and Manipulating Layer Depth
In this section, we are going to learn how to manipulate the depth of layers within an Animate project. While panning and zooming the camera can be very effective, we can enhance everything we do with the camera by using another feature of Advanced Layers mode in the form of Layer Depth. This feature allows us to place specific layers closer or farther from each other and the camera to simulate a difference of depth across each. The result is that as the camera changes property setting values across time, the view shifts across the variety of depth settings, providing a feeling of enhanced immersion.
Let's explore the mechanism that allows us to adjust the depth settings of our various layers. Then, we'll use it to modify the depth of the layers that are currently within our project.
Activating the Layer Depth Panel
By default, the Layer Depth panel is visible in the Essentials workspace area, minimized to the icon view along the right-side column, along with several additional panels. It can be difficult to locate this way. You can also invoke the Layer Depth panel by choosing Window | Layer Depth from the application menu, but a more direct method is to invoke it from the timeline itself.
The simplest way to invoke the Layer Depth panel is to click the Toggle Layer Depth button at the top of the timeline:

Figure 10.8 – Invoking the Layer Depth panel
Wherever the Layer Depth panel resides, it will then appear and allow us to visualize and manipulate the depth settings of our various layers.
Let's have a look at some of the features of the Layer Depth panel to become more familiar with its layout and function:

Figure 10.9 – The Layer Depth panel
With the Layer Depth panel open, you can view the current depth setting for each layer and even visualize how close or far layers are from one another with the current settings. Since we haven't made any alterations yet, all the layers have a depth of 0 and are equidistant from the camera itself.
Within the Layer Depth panel, there are several important things to note:
- Left Column: Contains all the layers in the order that they appear on the timeline. The data value is the depth setting and the layer's color corresponds to the visual depth indicator in the right column.
- Right Column: This is a visual representation of the layer's depth regarding the depth values expressed in the left column. Each layer is represented as a line and shares its color with the layer itself. The camera is also represented here as a blue dot with two dashed lines emerging from it.
- Frame Number: Just as with the Camera properties, the Layer Depth values are tied directly to keyframes. This number represents the playhead position along the timeline for quick reference.
- Maintain Size: This changes the depth of the selected layer without affecting the sizes of the objects embedded within the layer. If this is not selected, the layer's content may scale as per the modified depth value.
All of these settings can be manipulated within the Layer Depth panel, but we should also keep a close eye on both the timeline and the stage as we do so. It will be easy to spot mistakes as changes are immediately reflected within the stage.
Tip
Normally, you need to click the Maintain size button each time you want to change the layer's depth. This can become tedious. If you hold down the Alt or Option key while dragging the layer depth values, Animate will maintain the size of the layer without needing to interact with the button each time.
With that, we have provided an overview of the Layer Depth panel. Next, we'll learn how to use the various settings within it to modify the depth of our layers across the timeline.
Modifying Layer Depth
While you can make adjustments to the depth of a layer at any time, it is best to do so before making any adjustments to the camera settings. As we're working through these concepts, have you noticed how we haven't done any work with the camera yet aside from exploring its various settings? This is because we want to establish the initial layer depth settings first. With the Layer Depth panel open, let's go ahead and assign a depth setting to each layer. Using the panel controls, there are two different ways of setting the depth of any layer.
The first way to adjust the layer's depth is to either manually enter a number into the value field beside the layer's name, or simply drag the value to either increase or decrease it:

Figure 10.10 – Numeric depth control
When making slight adjustments, dragging across the value field works well to nudge the layer, but if you're changing the depth by a larger number, you will likely want to simply click the value and type a new one in manually.
The second method of adjusting the layer's depth values is to do so visually, by selecting a layer and dragging the highlighted layer marker up or down:

Figure 10.11 – Clicking and dragging layer markers
You can keep an eye on the value that's been attributed to the selected layer to monitor its actual depth setting.
Positive numbers indicate that the layer is far from the normal field of view and more distant, while negative numbers indicate that the layer sits between the normal field of view and the camera's position. If the layer is set to a depth that is behind the camera, as indicated by the blue dot intersected with dashed lines, then that layer is no longer in view at all as it is behind the camera.
Tip
If you have layers arranged as part of a layer folder, the folder will appear within the Layer Depth panel as well, allowing you to modify the depth of all the contained layers simultaneously.
Let's set our layer depth values from top to bottom:
- Camera: We will not be modifying the camera's position, but it is something you could do to achieve a camera pass-through animation. Instead, we'll adjust the camera pan and zoom settings as that will provide more control. Keep this at 0.
- Watermark: This should be at least 1 unit more toward the camera than all the other layers since we want it to be visible atop all the layers, no matter what. We'll set this to -151.
- Closest: Set this layer to -150. Note that this is only one unit farther away than the Watermark layer.
- Closer: The layers closest to the camera are all being set to negative numbers since they fall between the camera itself and the normal field of view. This layer will be set to a value of -100.
- Close: Leave this at 0. This layer remains at the normal field of view, so it is the default depth value. It isn't necessary to have any layers at 0, but we have done so here to illustrate the differences between the positive and negative depth values.
- Far: The next four layers, including this one, all contain positive numbers. Set the depth value of this layer to 200.
- Farther: The next layer will have a depth value of 400 since as we get farther away from the normal field of view, the distances are greater.
- Farthest: The layer that includes the craggy outcropping and cliff face should be given a value of 650.
- Sky: The background imagery should be farthest away from everything else, so we will give it a value of 1000.
Your completed depth settings within the Layer Depth panel should look like this:

Figure 10.12 – Layer Depth settings
Notice that in our example, the layer's order in the timeline and the Layer Depth stacking order both share the same general order. They do not have to, though, as Layer Depth overrides the normal layer order in the timeline. We will see an example of this shortly.
A good way to see the effect that these depth settings have on our layers is to use the camera to pan around the stage:
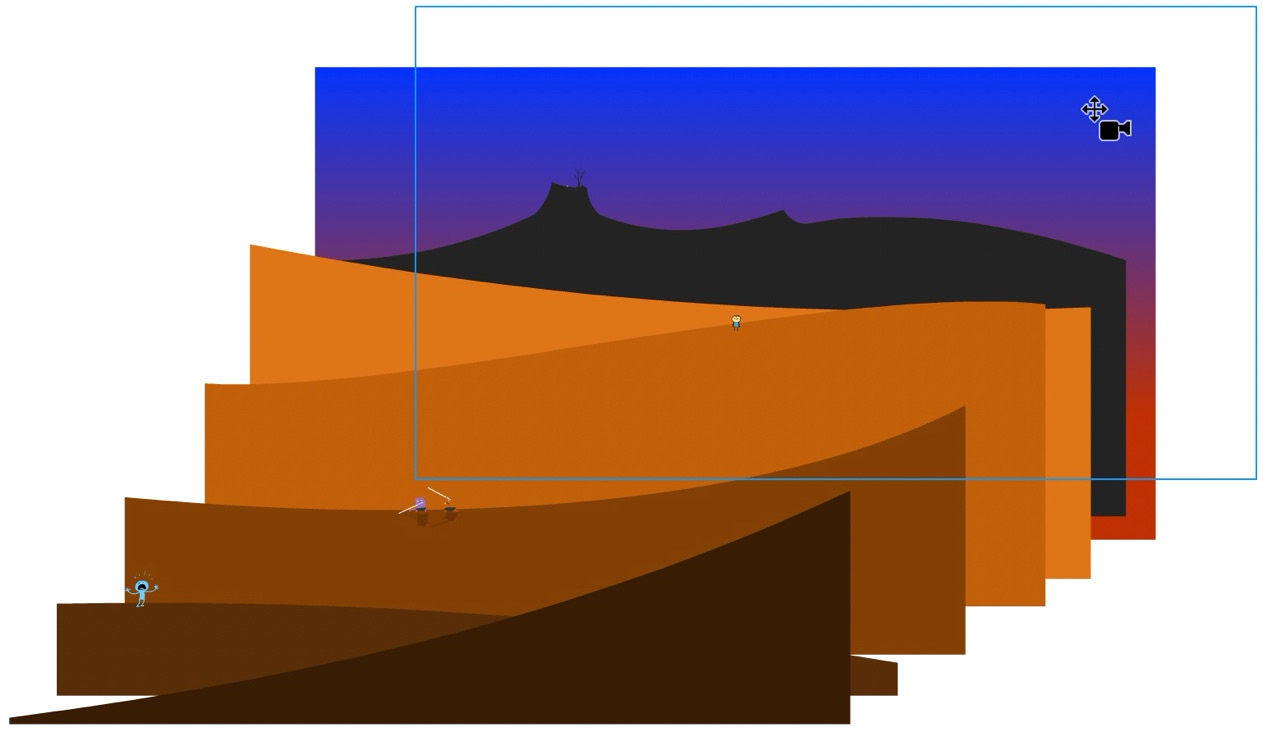
Figure 10.13 – Layer depths visualized
You will see the various layers all moving at different speeds, depending on how far or close they are. Once you have finished playing around with the camera, be sure to reset any of the values to their defaults.
With that, we have set up all our layers in this project to utilize the layer depth settings, along with the camera. We can also modify the depth of the layers across time without using the camera to create additional effects. We'll have a look at that workflow next.
Using Layer Depth without the Camera
As alluded to earlier in the chapter, you don't have to enable the camera to use Layer Depth, and you don't have to have the layers in any proper order either since the depth setting overrides the layer order.
Take a look at the exercise file named NoCameraDepth.fla for a quick example of this:

Figure 10.14 – The rocket passes before and behind the moon
In this example, we have two objects on the stage: a rocket ship and a moon. In the timeline, there is a layer for each of these objects and the rocket is animated in such a way that it travels behind the moon first and then returns to pass in front of it.
The Rocket Ship layer is always above the Moon layer, though, so how does the rocket pass behind the moon at all? Via the Layer Depth settings, of course!
Notice that the Moon layer isn't animated at all but includes two keyframes along the timeline:

Figure 10.15 – The Layer Depth values are bound to keyframes
At frame 1, the Moon depth value is set to -10, while the Rocket Ship depth is set to 0. This brings the moon closer to the viewer than the rocket. At frame 36, both layers have a depth of 0 and since their timeline order has the Rocket Ship layer above the Moon layer, the rocket is visible above the moon. This technique can be used in many cases to swap depths across time for similar effects.
In this section, we explored the fundamental properties of the camera and explored how to manipulate the Layer Depth settings in a variety of ways. Next, we'll put all of this into practice as we create different camera states and animate between them.
Animating the Camera
The camera is integrated into the timeline just like any other object in Animate, with certain restrictions. For instance, it is contained within its own layer and this special layer does not behave as the other layers do. However, certain aspects of a normal layer workflow precipitate onto the Camera layer as well. Primary among these is how motion is handled.
In this section, we'll establish camera states through keyframes and animate between these states using the techniques we've already addressed in this book.
Setting Camera Keyframes
As the document exists now, we have a single frame across all layers. To have any actual motion occur, camera-based or otherwise, we need additional layers.
First, be sure to lock all the existing layers. It's a good habit to lock and unlock specific layers as needed. The Camera layer can never be locked. Add frames up to and including frame 540 across all of the layers, including the Camera layer.
We now have 18 seconds of total frames across all layers:
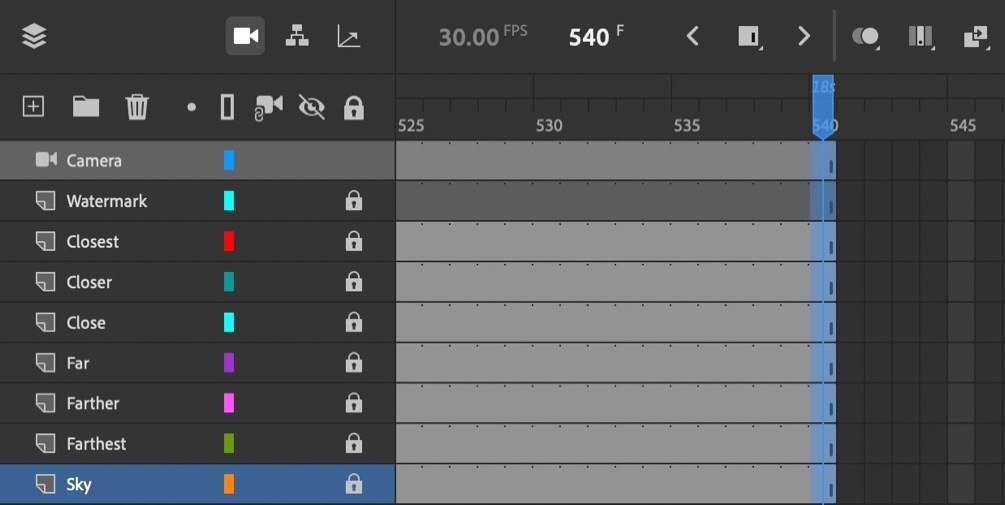
Figure 10.16 – Frames extended across all layers
With our frame spans fully extended, we'll add keyframes at specific points along the Camera layer and make adjustments to the Camera properties, such as zoom and pan. It is best to set the zoom value first, followed by the panning adjustments.
Let's plot out the keyframes to signify specific key points across the animation:
- An initial keyframe exists at frame 1, with the camera's position at 0 along both the X and Y positions and the zoom level at 100%.
- Add a keyframe at frame 20 to place a hold between these two keyframes:

Figure 10.17 – Starting with the camera's defaults
- Now, add another keyframe at frame 60 and set the Camera properties so that the Zoom value is 565 with an X position of 2110 and a Y setting of -850.
The focus for this keyframe is on the Complainer animation:

Figure 10.18 – Focusing on the Complainer animation
- Now, add a keyframe at frame 90 for a short hold with these same settings.
- Place the next keyframe at frame 140 with a Zoom value of 1026, an X position of -2025, and a Y position of 1100.
This will focus the camera on the Boy with Flower Monster animation:

Figure 10.19 – Focusing on the Boy with Flower Monster animation
- Insert another keyframe at frame 200 to hold on the Boy with Flower Monster animation a bit. Then, add another keyframe at frame 230 with a Zoom value of 325, an X position of 362, and a Y position of -513.
This will zoom out somewhat and reposition the camera to focus on the Cat Fight animation:

Figure 10.20 – Focusing on the Cat Fight animation
From the Cat Fight animation, we'll pan up and zoom toward the base of the craggy cliff face in the distance.
- Insert a keyframe at frame 280 and set a Zoom value of 1000, an X position of 4560, and a Y position of 1430.
You will begin to notice that the more extreme the zoom becomes, the more variable the numbers you input will be. Don't worry if Animate changes the values by a few units each time you change the camera settings – this is expected.
- Place the next keyframe at frame 320. This will allow us to pan the camera upward to view the Bunny Hop animation at the top of the cliff. Include a Zoom value of 3290, an X position of 14280, and a Y position of 11120.
Notice that we've zoomed in a huge amount and can see all the details of the cliff, such as the tree and stone present there. At 100% zoom, this is almost impossible to see:

Figure 10.21 – Focusing on the Bunny Hop animation
- Finally, add a keyframe at frame 380 as a hold on the Bunny Hop animation. The last keyframe will sit at frame 450, where we will pull back on the camera zoom to get a larger picture of the entire scene once more.
- Adjust the camera settings at frame 450 so that the Zoom value is 150, the X position is 0, and the Y position is also 0.
If we play our project at this point, it will consist of a collection of quick cuts as each keyframe is encountered. While a jumpcut like this can work in certain scenarios, we require a smoother motion from keyframe to keyframe.
Now that we have keyframes across the Camera layer holding specific camera settings at each, we can add tweens and eases to establish smooth motion between them.
Adding Motion and Easing to the Camera
Motion can be applied to the Camera layer by using either motion tweens or classic tweens. We will be using classic tweens in this project since it is simpler to plot out camera settings in keyframes beforehand and the ease effect presets can be interpreted and applied easily.
Tip
To achieve believable, smooth camera movement, Ease Effect presets are a must!
Our Camera layer currently contains keyframes for each camera state. Certain frame spans are meant to hold the camera at a specific position and zoom level, while others are meant to contain movement from one keyframe to the next. We will be adding classic tweens and ease effect presets to those that are intended to feature camera movement.
Additionally, following the focus on certain character animations, we will insert keyframes into the layers that contain them and remove the characters from the stage. This will be good practice for toggling the camera off and on to best select each character for removal.
For each of the following frame spans, add a classic tween and the indicated ease effect preset:
- Frame span 20 – 60: Use the Quad Ease-In effect preset.
- Frame span 90 – 140: Use the Sine Ease-In-Out effect preset.
- Additionally, add a keyframe to the Closer layer at around frame 140 and remove the Complainer character.
- Frame span 200 – 230: Use the Sine Ease-In-Out effect preset.
- Additionally, add a keyframe to the Far layer at around frame 230 and remove the Boy with Flower Monster character.
- Frame span 230 – 280: Use the Quad Ease-In effect preset.
- Frame span 280 – 320: Use the Quad Ease-Out effect preset.
- Additionally, add a keyframe to the Close layer at around frame 320 and remove the Cat Fight characters.
- Frame span 380 – 450: Use the Quart Ease-In-Out effect preset.
Once you've done this, your timeline should look similar to the following:

Figure 10.22 – Timeline with camera tweens and keyframes
Note that the frame spans of the Camera layer that are meant to serve as a motion hold do not contain tweens and certain additional layers include keyframes to remove characters following their focus.
The bulk of our camera animation is now complete. Perform a test movie to see it in action!
Creating Text and Attaching Layers to the Camera
As you may recall, we still have an empty layer right below the Camera layer named Watermark. This layer will be used to display a small, text-based #AdobeAnimate hashtag identifying the animation as having been created in Adobe Animate.
Let's create this text object now:
- The first thing we need to do is select the Text tool:

Figure 10.23 – The Text tool
- With the Text tool selected, go to the Tool tab of the Properties panel:

Figure 10.24 – Text Tool properties
Be sure to choose Static Text from the dropdown. We'll explore additional text options, including the use of dynamic text, in Chapter 11, Developing Web-Based Games, and Chapter 13, Building Apps for Desktop and Mobile.
- Choose a bold font to use for the text – I've selected Europa, which can be synced to your computer from Adobe Fonts at https://fonts.adobe.com/fonts/europa with a Creative Cloud subscription.
- Set the size value to 24 pt and the fill color to pure white (#FFFFFF).
- Unlock the Watermark layer if it is currently locked and select frame 1.
- Click in the top-left area of the stage and type in #AdobeAnimate:

Figure 10.25 – The text object has been created
- Select the text object and go to the Object tab of the Properties panel to ensure the text object is positioned 40px at both the X and Y positions.
- With the Watermark layer content in place, play the project back. Note that the text immediately zooms past the camera and offscreen.
We want the text to stay exactly where it is, no matter what the camera does. To do this, we have to attach the layer the text exists within to the camera. This will have the layer ignore anything to do with the Camera layer and its various settings.
- To attach the Watermark layer to the camera, simply activate the Attach Layer to Camera option:

Figure 10.26 – The Attach Layer to Camera option
Playing the project now will exhibit completely different behavior when it comes to our text overlay. It stays put throughout the animation, unaffected by the camera.
In this section, we looked at establishing camera states and animating the camera across the timeline. We also spent a good deal of time adjusting our tweens and additional layer frame properties to achieve an interesting, dynamic animation, using nothing but the Camera and Layer Depth settings. Next, we'll finish this animation by adding some camera effects and layer filters.
Applying Layer Effects and Filters
Another advantage of Advanced Layers mode is that you can have effects and filters applied directly to a layer, which, in turn, affects all the objects within that layer without you having to modify the objects themselves. You can also add effects directly to the camera in a similar way.
Note
Layer effects, filters, and camera effects are all only available when you're using ActionScript 3.0-based document types.
We are going to add some effects to the camera to simulate a fade in/fade out to black and add a filter to our Watermark layer to add some drop shadow to the text within it.
Adding Effects to the Camera
The camera effects and layer effects both work very similarly, with the only difference being that camera effects are applied via the Camera tool properties and the layer effects are applied through the Frame properties.
Let's add both a fade in and a fade out to our Camera layer:
- First, add a keyframe at frame 10 within the Camera layer.
- Move the playhead back to frame 1 and select the Tool tab within the Properties panel. You will see a section for Color Effects below the normal Camera properties, such as zoom and position.
- From within the Color Effects section, choose Brightness from the dropdown and set the Bright value to -100:

Figure 10.27 – Adding a camera effect
The entire stage will go black except for any of the layers attached to the camera. This is the first step in creating a fade in from black.
- Apply a classic tween to the Camera layer between frame 1 and frame 10 and add the Sine Ease-Out preset from the Properties panel.
- Move the playhead to the end of the timeline at frame 500 and add a keyframe.
- Add another keyframe at frame 530 and access the Camera tool properties, setting Brightness to -100 on this keyframe as well to establish a fade to black.
- Create a classic tween between frame 500 and frame 530 and add the Quad Ease-In preset from the Properties panel to complete our fade effects.
If you preview the animation, you'll see that the movie begins by quickly fading in from black, proceeds as normal, and then fades out to black before completion.
In the next section, we'll finish this project by adding a layer filter to the Watermark layer.
Adding Filters to a Layer
Layer filters and layer effects are both added through the Frame tab of the Properties panel. We want to have our text within the Watermark layer pop out against the background. So, for this, we will add a drop shadow to the entire layer via the Filters section of the Properties panel.
To add a filter to the Watermark layer, perform the following steps:
- Select the Watermark layer and choose the Frame tab of the Properties panel.
- Locate the Filters section at the bottom of the panel and expand it if it is closed.
- Click the Add Filter button at the top right of the panel to invoke the filter selection overlay and choose Drop Shadow.
- The Drop Shadow filter will be added to the selected layer, making the text stand out even more:
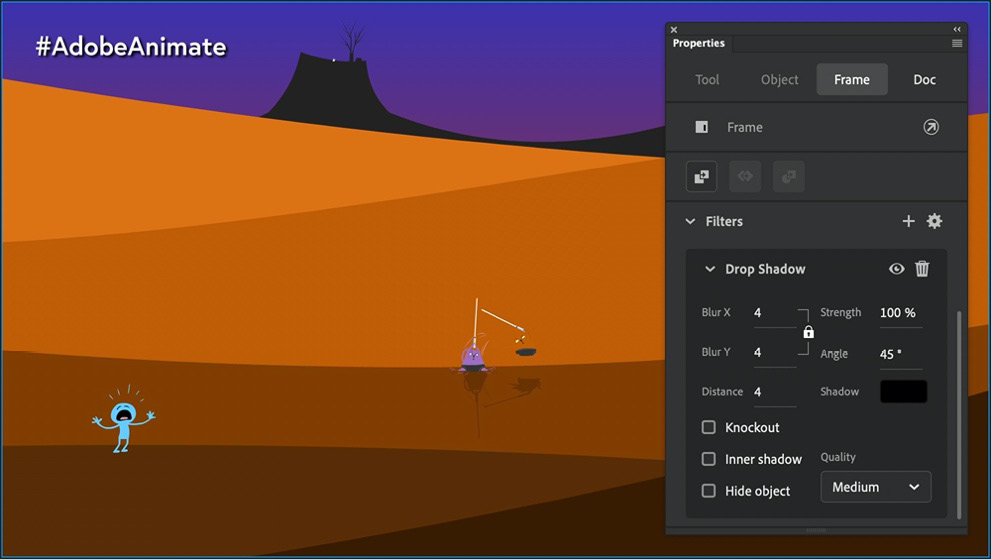
Figure 10.28 – The Drop Shadow filter added
At this point, you can modify any of the settings of this filter. The filter's settings will differ between each filter type, but for any that allow a Quality selection, I normally choose Medium.
Looking at the timeline, notice that the keyframes within the Watermark layer now appear white instead of black as they normally do. A white keyframe indicates that a filter or effect has been added to that layer.
In this section, we looked at how to add effects to the camera that affect all the layers and filters for individual layer effects. Both of these features are available as part of Advanced Layers mode and help us perfect our overall animation.
Summary
In this chapter, we learned how to animate an entire project by using the document's Camera, without that content itself being animated within the main timeline. We also explored how to manipulate layer depth and learned how to work with both the camera and layer depth to create some amazing dynamic parallax movement within our animation. We wrapped everything up by implementing both camera effects and layer filters to add a feel of completion to our animation.
In the next chapter, we'll begin working with additional platforms and have a look at writing JavaScript code to target HTML5 Canvas in the form of a simple web-based game.