
Chapter 14: Examining DHCP
Whenever you first boot up your machine to start your day, your operating system (OS) moves through a series of events. One of those events is obtaining an internet protocol (IP) address. The protocol that's used to obtain your IP address is known as Dynamic Host Configuration Protocol (DHCP). In this chapter, we'll begin by reviewing the purpose of DHCP. Then, we step through the DHCP process, which has four steps: discover, offer, request, and acknowledgment, also called the DORA process.
To familiarize ourselves with the elements that make the DHCP process possible, we'll take a closer look at the field values in a DHCP header. In addition, you'll get a better understanding of the role of the client and server during this process. We'll also take a look at DHCPv6, which is used to provide an IP address to the growing number of networks that are moving toward employing IPv6. We'll also review some of the security aspects of this essential protocol and then provide an example of a DHCP transaction.
In this chapter, we will cover the following topics:
- Recognizing the purpose of DHCP
- Stepping through the DORA process
- Dissecting a DHCP header
- Following a DHCP example
Recognizing the purpose of DHCP
Every host on the network must have a unique IP address to communicate with other network hosts. Some hosts, such as servers and printers, have a hardcoded IP address since they don't want the IP address to change. However, the vast majority of hosts have a dynamically assigned IP address.
DHCP is a method that's used on a network to provide configuration information to hosts on a network. In addition to providing an IP address, most responses provide additional information. This information can include the Domain Name Service (DNS) server's IP address and Network Time Protocol (NTP), which provides the time service for the network.
DHCP lets you conserve IP addresses on a busy network. It also removes the need for the tedious and unnecessary hardcoding of individual IP addresses.
DHCP is a client-server model, where hosts request an IP address, and the server responds with an IP address that is leased for a period. The lease time can vary as it is generally up to the network administrator to configure the different parameters of a DHCP server.
When you're requesting an IP address, a client will receive at least one, but in many cases, two are offered since many networks use multiple servers for redundancy.
On an enterprise network, DHCP will use the following elements:
- DHCP clients: These are hosts that have been configured to obtain an IP address automatically in their network bindings.
- DHCP servers: These issue IP addresses to clients on the network from a pool of usable addresses, along with configuration data for specific periods.
- DHCP relay agent: This is optionally used when the DHCP server is on a different subnetwork than the DHCP client. The relay agent receives requests and directs the (unicast) message to the DHCP server(s) on another subnetwork on behalf of the client.
Whenever a host joins the network or wakes up, it will begin the DHCP process to obtain an IP address and begin communicating. To make this possible, the host must be configured to obtain an IP address automatically.
Configuring the client's IP address
In most cases, DHCP is automatically configured on a host computer – for example, go to Network Connections and select the properties of your network interface card, Internet Protocol Version 4 (TCP/IPv4) Properties. Once there, you will likely see the Obtain an IP address automatically setting, as shown in the following screenshot:

Figure 14.1 – Internet Protocol Version 4 (TCP/IPv4) Properties
Most of the hosts on a Local Area Network (LAN) are configured to obtain an IP address automatically. Whenever a client boots up, it will begin obtaining an IP address by attempting to reach a DHCP server. However, there will be times when the DHCP server won't be on the same subnetwork as the client. In that case, a relay agent must be used.
Using a DHCP relay agent
On an IPv4 subnetwork, clients that rely on obtaining an IP address using DHCP begin the process using a broadcast out on the network. If there isn't a DHCP server on the subnetwork, the client will need a way to reach the server. Most routers do not forward broadcasts, so if a DHCP server is on the other side of the router, the client will need to use a relay agent to request an IP address on their behalf.
The relay agent is configured with the IP address of the DHCP server. The agent resides on the interface of the router where the DHCP clients reside so that it can respond to DHCP broadcasts. Once a discover packet has been accepted, the relay agent will communicate directly with the DHCP server using unicast packets.
The relay acts as a proxy and provides a bridge between the DHCP client and server, as shown in the following diagram:

Figure 14.2 – Using a DHCP relay agent on a router
On a subnetwork that uses a relay agent, the process for obtaining an IP address using DHCP works in the following manner:
- The client sends a discovery broadcast out on the subnetwork.
- The relay agent collects the request on behalf of the client.
- The request is repackaged and then sent via unicast directly to the DHCP server.
- The server responds to the relay agent with an offer that contains an IP address, along with any optional information that's been requested from the client.
- The relay agent forwards the offer to the client and will continue to exchange messages between the client and server, until the final acknowledgment.
DHCP provides a way for an IPv4 host to obtain an IP address. In the next section, we'll outline the ways that clients on a network that are using IPv6 can obtain an IP address.
Working with IPv6 addresses
While many LANs today primarily use IPv4, we are starting to see a small percentage of organizations adopting IPv6. When using IPv6, there are three ways to configure an IP address on a host:
- Manually configure an address on hosts that require a static IP address, such as servers and printers.
- Use StateLess Address AutoConfiguration (SLAAC) to automatically assign an IP address.
- Use DHCPv6 to issue an address from the preconfigured pool of addresses.
While a few hosts on a LAN will have a manually assigned IPv6 address, the vast majority will need to obtain a network address in some other way. Let's compare ways an IPv6 client can obtain an IP address. We'll start by discussing how SLAAC is used.
Employing SLAAC
On an IPv6 network, SLAAC is the preferred way to assign an IP address. When you're using SLAAC, the network administrator will need to configure a router to publish its prefix. The prefix is then used so that each client can generate their own IPv6 address.
SLAAC creates an IPv6 address by doing the following:
- First, it takes a 12-digit (48-bit) Media Access Control (MAC) address from the client's Network Interface Card (NIC).
- Then, it separates the Organizationally Unique Identifier (OUI) and the NIC serial number.
- Finally, it inserts the 16-bit identifier, 0xFFFE, between the OUI and the NIC serial number.
Once complete, it will appear as follows:

Figure 14.3 – Generating an IPv6 using SLAAC
When you're using SLAAC, generating an IPv6 address for network hosts is done automatically. However, DHCPv6 can still be used as it can offer additional configuration options for hosts.
Providing information with DHCPv6
While SLAAC can provide an efficient way to automatically create an IPv6 address, the host may need additional information, which can be provided by using DHCPv6.
Some of the configuration data a DHCPv6 server can supply to clients on the network includes the following, along with the corresponding Request for Comment (RFC), where you can find more information:

Table 14.1 – DHCPv6 options
For example, if a client has obtained an IP address using SLAAC, they can send an Information-Request packet message with an Option Request outlining the requested configuration parameters. The following is an example:

Figure 14.4 – DHCPv6 Option Request
DHCP is a widely used protocol that enables hosts to automatically obtain an IP address. However, it's important to address possible security risks when employing DHCP.
Addressing security issues
DHCP became formalized as a protocol in 1993. During that time, little thought was put into providing methods to secure DHCP and DHCP servers from malicious activity. However, there is a chance that a rogue device may launch an attack, such as a DHCP starvation attack.
One primary reason this is possible is that when using DHCP, there is no native authentication or authorization between the client and the server. Because of this, the network administrator should take steps to ensure that a DHCP server interacts only with a legitimate client on the network, before any DHCP interaction.
One way to do this is to use DHCP snooping. When configured on a layer 2 device, such as a switch, DHCP snooping will monitor the traffic and do the following:
- Allow valid DHCP client messages to communicate with a DHCP server.
- Allow valid DHCP server messages to communicate with a DHCP client.
- Deny and drop traffic from untrusted sources.
In addition, in a Windows Server environment, DHCP servers must be authorized in Active Directory before they can start leasing addresses. This is a validation check to ensure clients do not receive addresses from rogue DHCP servers.
In the next section, we will describe the process of obtaining an IP address using the DORA process.
Stepping through the DORA process
The DHCP process is an efficient way to provide addresses to clients. Because we want our IP address quickly, it uses User Datagram Protocol (UDP) as the transport layer protocol.
DHCP uses the following UDP ports:
- Clients use port 68.
- Servers and relay agents use port 67.
DHCPv6 uses the following UDP ports:
- Clients use port 546.
- Servers and relay agents use port 547.
You will see these ports in use when we examine DHCP traffic.
The DHCP process progresses through various states during a transaction, as outlined in the next section.
Moving through DHCP states
During the process of a DHCP transaction, the client can be in one of six states. Understanding these states and what transpires will help during troubleshooting. These DHCP states are as follows:
- Initiate: The client begins the process by sending a broadcast on the network in search of a DHCP server.
- Select: The client will select an offer that's been sent by the server(s).
- Request: The client will formally request an offer from a server.
- Bound: Once the server sends an IP address, the client will remain in a bound state until the lease is exhausted.
- Renew: During this state, the client will request a renewal of the lease. At this point, one of two things can happen:
- If an ACK is sent by the server, the lease is renewed, and the client reverts to the bound stage.
- If an ACK is not sent by the server and 87.5% of the time has passed, the client moves to the rebind stage.
- Rebind: During this state, the client will attempt to rebind. At this point, one of two things can happen:
- If an ACK is sent by the server, the lease is renewed, and the client reverts to the bound stage.
- If the lease expires or the server sends a Negative Acknowledgment (NAK), the client will revert to the initiate stage.
Note
When you're working with a packet capture, you may see Wireshark identify the application as bootstrap protocol (bootpc) since that is the original name of the protocol, as outlined in RFC 951. However, to view only DHCP traffic, use the dhcp (lowercase) filter in the display filter toolbar.
When you're moving through the various stages of the DHCP process, there must be a way to keep the transactions together. Let's see what role the Transaction Identifier (XID) plays in this process.
Defining the transaction ID
Throughout the DORA process, you will see an XID, which is randomly generated by the client. The server will adopt the same XID and both the client and the server will be able to recognize which transactions belong together.
In rare cases, the client will fail to provide an XID. In those cases, the server will use the Client Hardware Address (chaddr) to identify the client. Using chaddr is not normally advised as it may cause undesirable results. In addition, a malicious actor could attempt a starvation attack by flooding the DHCP server with multiple requests using a forged chaddr. This could prevent legitimate users from obtaining an IP address.
Whenever a client needs an IP address, it begins to move through the four-step DORA process. Let's dissect this procedure.
Obtaining an IP address
The DORA process moves through four phases, as follows:
- DHCP Discover: The process begins with the client sending a broadcast out on the network, asking for an IP address.
- DHCP Offer: The server responds by offering an IP address. Within the reply, there are generally many parameters.
- DHCP Request: The client formally requests an IP address.
- DHCP ACK: The server offers an IP address.
Note
The DHCP process is commonly described using four steps. However, there are actually two operations – the client asking for an IP address and the client formally requesting the IP address. As a result, the XID may be different for the first two and the last two packets.
In this section, we'll outline what takes place in each of the steps, starting with the client attempting to locate a server.
Searching for a DHCP server
When a host needs an IP address, it begins the DORA process by issuing a DHCP Discover broadcast message out onto the subnetwork. The chaddr is listed, along with a client-selected XID.
Within the Discover packet, there may be DHCP options requesting additional configuration parameters, along with possible suggestions for the IP address.
If there isn't a DHCP server on the same subnet as the DHCP client, a relay agent will need to request an IP address from a DHCP server on another subnetwork.
Once the broadcast has been sent out on the LAN, one or more DHCP servers will respond with an offer.
Offering an address
Once the server(s) accepts the Discover packet, the next step is to check the available IP addresses in the DHCP pool. If an address is available, the server(s) will record the XID and return a DHCP offer.
The offer will have a network address for the client to use, along with the lease time parameters. In addition, there may be responses to the requested options that have been sent by the client in the DHCP Discover packet.
Note
Although the client may have requested a specific IP address (for example, one that was previously used), the server does not have to honor the request. However, it's best practice to offer the client a requested IP address to avoid any conflicts.
At this point, the client will receive an offer from one or more DHCP servers.
Requesting an address
Once the client receives an offer, the next step is to formally request an IP address. If the DHCP client receives multiple offers, it will check each one and either accept, drop, or reject the offer, as follows:
- If the client accepts the DHCP offer from the server, a DHCP request message is sent as a broadcast that must include the server identifier option, along with the IP address, as supplied by the DHCP server.
- When the client receives the DHCP offer message, it will check to make sure the DHCP offer XID matches the XID of the DHCP discover message. If they do not match, the client will discard the DHCP offer.
- If the client receives more than one offer, it will reject the offer by sending a DHCP decline message to one of the servers.
The last step is for the server to respond to the client with either an IP address or DHCP NAK, as we'll see next.
Confirming the parameters
After sending an offer for an IP address, the server waits for a response from the client. Once the server receives the broadcast, it will send the DHCP Acknowledgment (DHCP ACK) to the client to indicate the completion of the four-packet DHCP Discovery process.
The acknowledgment packet contains an IP address, along with any configuration options requested by the client in the DHCP Request packet.
However, there are times when the server won't be able to supply the client with an IP address. If that happens, the server will send a DHCP NAK to the client and the client must start the DORA process again.
DHCP NAK messages are rare, but if you are seeing multiple DHCP NAK messages on your network, you will need to assess the root cause as to why clients aren't getting an IP address. Some reasons for this are as follows:
- A misconfigured DHCP pool.
- The DHCP pool is exhausted (it has run out of IP addresses).
- A DHCP server is the victim of a starvation attack.
- A misconfigured DHCP relay agent.
The good news is that in most cases, the client will receive an IP address. After this, the client will check whether any other hosts are using the same IP address.
Checking for duplicate IP addresses
Once the client has obtained an IP address, it will go through the process of making sure the newly assigned address is not already in use.
To check for a duplicate IP address, the following methods are used:
- On an IPv4 network, the client will broadcast an Address Resolution Protocol (ARP) request out onto the network and wait to see whether another host responds.
- On an IPv6 network, the client will send an Internet Control Message Protocol (ICMPv6) neighbor solicitation message.
If an IP address is already in use, the client must send a DHCP DECLINE to the server and begin the DORA process all over again. However, in most cases, the IP address won't have been assigned already, so the client can accept the IP address.
Once the client accepts an IP address and the server sends a final DHCP ACK, the client moves into the bound state until the lease time is exhausted. Next, let's see what's involved when a client leases an IP address from a server.
Leasing an IP address
The idea behind the lease is that a network address is only needed for a short period and that at some point, the host will no longer need the IP address. This allows for a more fluid environment and efficient sharing of a limited amount of IP addresses.
The lease time defines how long the client can use the IP address, which can vary, depending on the environment.
Defining the lease time
The DHCP lease time defaults at 24 hours (1,440 minutes). However, often, this value is set by the network administrator and can vary, as follows:
- In a highly volatile environment, where clients stay for a short period, such as at a gym or hair salon, setting the lease for 60-90 minutes would be appropriate.
- In a transient environment, where the clients come and stay for short periods, setting the lease time for 1 to 3 days would be appropriate.
- In a stable environment, where the hosts seldom move and clients stay for a lengthy period, setting the lease time for 1 to 3 weeks would be appropriate.
When the timer begins, the lease time moves through various states, as shown in the following diagram:

Figure 14.5 – DHCP lease time process
Once the final acknowledgment is sent from the server, the client begins a timer to monitor the lease time. The values for Timer 1 (T1) to Timer 2 (T2) are as follows:
- Rebind (T1) represents 50% of the lease time.
- Renew (T2) represents 87.5% of the lease time.
As the lease time moves from T1 to T2, various events take place. Let's outline this process, starting with events that occur before T1.
Closing in on the renewal phase
Once the client acquires the lease, the timer begins. When the timer inches toward T1, the client may (or may not) choose to extend the lease. If the client would like to renew the IP address, a renewal packet is sent directly to the DHCP server. At this point, if the server sends a DHCP ACK, the lease is renewed, and the client reverts to the bound stage.
However, if an ACK is not sent by the server and 87.5% of the time has passed, the client moves to the rebind stage.
Moving toward the rebind stage
If the server does not send a DHCP ACK in a timely manner, the client will attempt to rebind by broadcasting a DHCP Request message out on the network. If an ACK is sent by the server, the lease is renewed, and the client reverts to the bound stage.
However, if the lease expires or the server sends a NAK, the client must revert to the initiate stage to begin the process again.
Now that you understand the DORA process, let's take a look at the DHCP header and review the field values, flags, and port numbers.
Dissecting a DHCP header
When reviewing a DHCP packet, you will see many fields in the header, as shown here:

Figure 14.6 – DHCP packet structure
To follow along, obtain a copy of DHCP.cap from https://wiki.wireshark.org/uploads/__moin_import__/attachments/SampleCaptures/dhcp.pcapand and open it in Wireshark. Expand the DHCP header in Frame 1, as follows:

Figure 14.7 – A DHCP header
As we can see, each DHCP header contains key fields and identifiers. Let's look at these in more detail.
Examining DHCP field values
Within the header, you will see key fields that help the DORA process move through the various states. The field values are as follows:
- Operation Code (op): This indicates the message type; for example, 1 = BOOTREQUEST or 2 = BOOTREPLY. In Wireshark, this is displayed as Message type, as shown in the preceding screenshot.
- Hardware Type (htype): This defines the type of connection for the session. Commonly, this field is listed as Ethernet (0X01) because often, the message is coming from either an Ethernet or 802.11 client.
- Hardware Length (hlen): This defines the length of the hardware address in bytes. For example, in Frame 1, the length is 6 (bytes), which is a common size for a MAC address.
- Hops: This field is optionally used by a relay agent. Generally, this is set to 0.
- XID: This is selected by the client to keep track of messages between the client and the server.
- Seconds (secs): This specifies the time that has elapsed since beginning the DORA or renewal process. This value is set by the client.
- Flags: There are two flags, as follows:
- Client IP Address (ciaddr): This is the current IP address of the client, which will only have a value if the client is in one of three states: bound, renew, or rebinding.
- Your IP Address (yiaddr): The IP address, as supplied by the DHCP server.
- Server IP Address (siaddr): The IP address of the DHCP server responding to the requests.
- Relay Agent IP Address (giaddr): The IP address of the relay agent or gateway.
- chaddr: The client's MAC address.
- Server Host Name (sname): This is an optional value that contains the name of the server.
- Boot file: This is an optional file that's used in a Preboot Execution Environment (PXE), such as a thin client, where the device is booted via the network.
- Options: DHCP options are listed after the main header.
Note
At the end of the header fields, you will see a field called Magic cookie: DHCP, which alerts network hosts that the options are DHCP and not the legacy Bootstrap Protocol (BOOTP).
When you're examining DHCP traffic, it's common to see messages such as DHCPDISCOVER and DHCPOFFER. However, there are several other messages that DHCP uses to convey information.
Understanding DHCP messages
DHCP messages are exchanged between the client and the server to request information such as configuration data or provide status updates. The various types of messages, along with the purpose, are outlined in the following table:

Table 14.2 – DHCP messages
After the DHCP header, several options might be listed. In the next few sections, we'll take a brief look at some of the DHCP options that we may encounter.
Comparing DHCP options
In the DHCP header in Frame 1 of DHCP.cap, immediately after the Magic cookie identifier, we can see a list of options, as shown here:

Figure 14.8 – DHCP header
DHCP can have multiple options, as outlined here: https://www.iana.org/assignments/bootp-dhcp-parameters/bootp-dhcp-parameters.xhtml.
Some of these options are as follows:
- DHCP Option 3: Router (or gateway) address
- DHCP Option 6: DNS server address(es)
- DHCP Option 50: Requested IP address
- DHCP Option 51: Lease time for this IP address
- DHCP Option 53: Type of message
Within each option, various parameters will be listed. For example, in Frame 1, we can see Option: (61) Client identifier, which lists the client's MAC address, as shown here:

Figure 14.9 – DHCP Option 61
While there are several options, the most common option is Option: (53), which describes the type of message. For example, in the following screenshot, I have expanded the Option field, where you see the type of message is a DHCP Release:

Figure 14.10 – DHCP Release option
Now that we understand the general role and purpose of DHCP, along with the header field values and options, let's step through an example of the DORA process.
Following a DHCP example
When a host boots up and attempts to join the network, one of the first things they must do is obtain an IP address.
In this section, we'll look at what you may see when a client issues a DHCP Release. Then, we'll step through the DORA process and outline the details of each of the steps that are taken when a client obtains an IP address.
Let's start by seeing what happens when a client releases their network address.
Releasing an IP address
There are times when you may need to release and renew an IP address, such as during a troubleshooting exercise.
One way to release an IP address on a Windows machine is by opening a Command Prompt and typing ipconfig /release. To renew the IP address, type ipconfig /renew.
I did a manual release and then renewed while capturing traffic with Wireshark. The results are shown here:

Figure 14.11 – DHCP Release and Renew
In Frame 1, you can see where I have released my IP address along with an XID of 0xa7c87247, as shown in the following screenshot:

Figure 14.12 – DHCP Release message
Note
When you're sending the DHCP Release message, the server recognizes the client by using both the chaddr, which is 18:47:3d:4d:35:bb, and the ciaddr, which is 10.0.0.75.
Once the DHCP server receives the Release message, the IP address is returned to the pool of addresses.
Next, I entered the ipconfig /renew command, which began the DORA process, as shown in Frame 2, Frame 3, Frame 4, and Frame 5. In this DORA process, we can see an XID of 0xb5de0170.
Finally, in Frame 6, once I accepted the IP address, I sent an ARP probe to check for a duplicate IP to make sure my IP address is not in use by another host.
Now, let's move through the DORA process together. To follow along, open DHCP.cap in Wireshark so that you can see the four steps of the DORA process in the first four packets, as shown here:
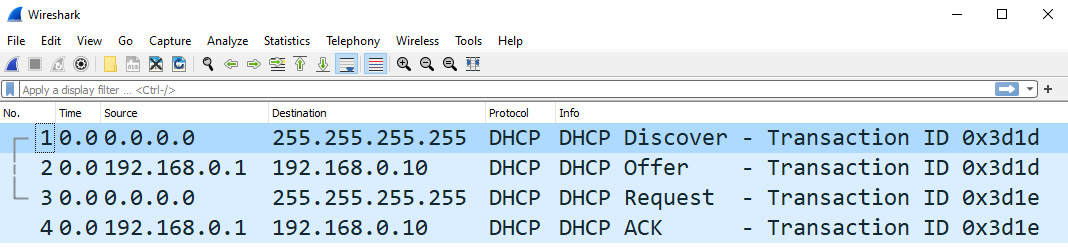
Figure 14.13 – The four-packet DORA process
Note
Although various options have been listed, we'll mainly focus on the details of the transaction.
The process begins with the client sending a broadcast message out on the network.
Broadcasting a discover packet
In Frame 1, we can see the DHCP Discover message, as shown here:

Figure 14.14 – DHCP Discover packet
Within the Discover message, you can see the following key values:
- Message type: Boot Request (1)
- Transaction ID: 0xb5de0170
- Your (client) IP address: 0.0.0.0
- Client MAC address: 18:47:3d:4d:35:bb
At this point, the client's IP address is 0.0.0.0. Transaction ID is 0x00003d1d, which both the client and server will use to keep track of the transaction. Within the options of Frame 1, we don't see a request for a specific IP address. However, if requested, the server would typically offer the last address that was used by the client.
Once the broadcast is sent out on the LAN, one or more DHCP servers will respond with an offer.
Delivering an offer
After the server(s) accepts the Discover packet, the next step is to check the available IP addresses in the DHCP pool. If an address is available, the server(s) will record the XID and return a DHCP Offer. The next step is to send an offer directly to the DHCP client. Keep in mind that there may be more than one server sending an offer to the client.
In Frame 2, the server offers a client an IP address, as shown here:

Figure 14.15 – DHCP Offer packet
Within the Offer message, you will see the following key values:
- Message type: Boot Reply (2)
- Transaction ID: 0x00003d1d
- Your (client) IP address: 0.0.0.0
- Client MAC address: 00:0b:82:01:fc:42
At this point, the client IP address is still 0.0.0.0, and Transaction ID: 0x00003d1d is the same as it was for the Discover message.
During the DORA process, the DHCP client may receive multiple offers. If this happens, the client will check each one and either accept, drop, or reject the offer. If the client chooses to accept the offer, the next step is to send a formal request to the server.
Requesting an IP address
Once an offer has been accepted, the client sends a DHCP request as a broadcast out on the network.
As shown in Frame 3, the request will include Option: (54) DHCP Server Identifier (192.168.0.1), along with Option: (50) Requested IP Address (192.168.0.10), as supplied by the DHCP server:

Figure 14.16 – DHCP Request packet
Within the Request message, you will see the following key values:
- Message type: Boot Request (1)
- Transaction ID: 0x00003d1e
- Your (client) IP address: 0.0.0.0
- Client MAC address: 00:0b:82:01:fc:42
The client's IP address is still 0.0.0.0 since it does not have an IP address. However, Transaction ID is now 0x00003d1e.
The last step is for the server to respond to the client with either an IP address or a DHCP NAK, as we'll see next.
Acknowledging the offer
In Frame 4, the server sends a final acknowledgment that indicates the IP address, along with the parameters of the lease time, as shown here:
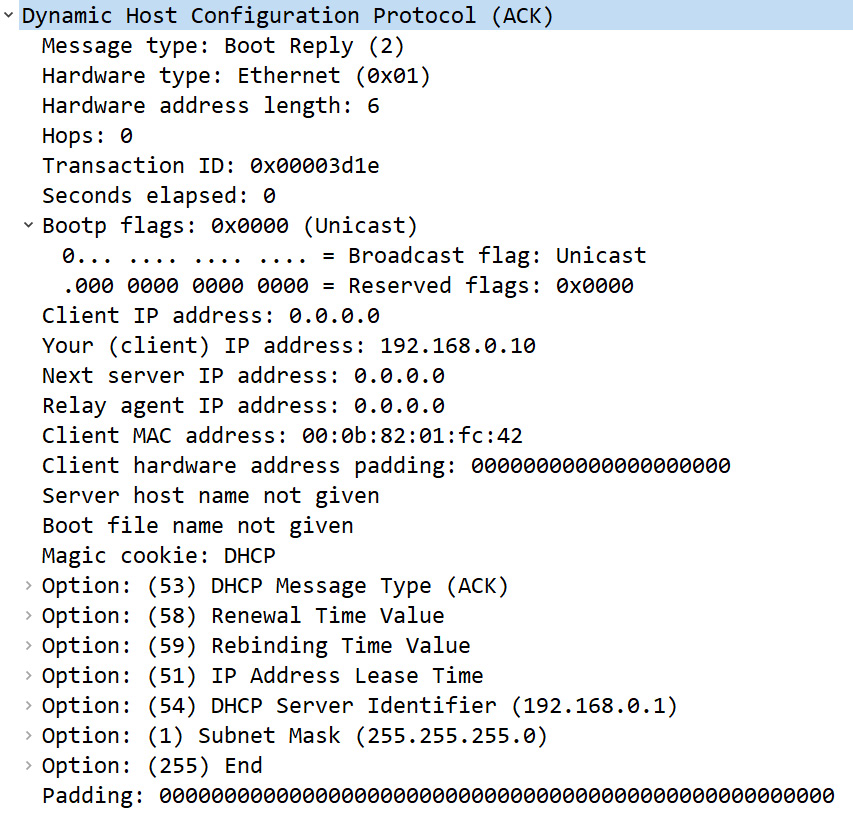
Figure 14.17 – DHCP acknowledgment packet
Within the ACK message, you will see the following key values:
- Message type: Boot Reply (2)
- Transaction ID: 0x00003d1e
- Your (client) IP address: 192.168.0.10
- Client MAC address: 00:0b:82:01:fc:42
The client's IP address is now 192.168.0.10 and Transaction ID is 0x00003d1e.
Within these options, we can see details of the lease time and other parameters, as follows:

Figure 14.18 – DHCP acknowledgment options
At this point, the client has an IP address, and the lease timer begins counting down. The client can now begin transacting with other hosts on the network.
Summary
DHCP is an essential protocol that's used on nearly all LANs. When it's configured properly, DHCP is a seamless way to assign IP addresses, with little or no intervention. In this chapter, we covered the purpose of DHCP and learned about its impressive role in supplying a host with an IP address, along with configuration details. We discovered the role of a relay agent, outlined the various ways IPv6 obtains an IP address, and briefly discussed security issues when working with DHCP.
Then, we looked at the DORA process – discover, offer, request, and acknowledgment – and examined the mechanics of the DHCP lease time. You should now have a better understanding of the DHCP header field values, along with the types of messages. In addition, you should be able to recognize the various DHCP options. We summarized this by bringing everything together and stepping through a DHCP example. We moved from the initial broadcast on the network, to the offer and formal requests, to the host obtaining an IP address so that they can communicate on the network.
In the next chapter, we'll examine Hypertext Transfer Protocol (HTTP), an application layer protocol that's used to browse the web. We'll learn about HTTP, including available versions and connection methods, and dissect the headers and fields for both the client and the server. After that, we'll compare the request and response messages and see what we can learn when we follow an HTTP stream.
Questions
Now, it's time for you to check your knowledge. Select the best response, and then check your answers, which can be found in the Assessment appendix:
- The DHCP process begins with a(n) _____ packet sending a broadcast out on the network asking for an IP address.
- Offer
- Request
- Discover
- Appeal
- The DHCP _____ packet is sent by the client and formally requests an IP address from the server.
- Offer
- Request
- Petition
- Appeal
- One way to obtain an IPv6 address is to use _____to automatically assign an IP address.
- Auto Request
- Ready Option
- Pine Option
- SLAAC
- DHCPv6 clients use UDP port 546. Servers and relay agents use port _____.
- 546
- 547
- 68
- 67
- In a DHCP header, the _____defines the length of the hardware address in bytes.
- htype
- XID
- ciaddr
- hlen
- DHCP can have several options. Option 50 represents _____.
- The DNS server address(es)
- The requested IP address
- The lease time for this IP address
- The type of message
- When you're sending the DHCP Release message, the way the server recognizes the client is by using both the chaddr and the _____.
- ciaddr
- flags
- giaddr
- htype
Further reading
Please refer to the following links for more information regarding the topics that were covered in this chapter:
- Visit https://www.computernetworkingnotes.com/ccna-study-guide/dhcp-configuration-parameters-and-settings-explained.html to learn more about DHCP configuration settings.
- To learn more about SLAAC, visit https://www.networkacademy.io/ccna/ipv6/stateless-address-autoconfiguration-slaac.
- Visit https://www.networkworld.com/article/3297800/why-dhcps-days-might-be-numbered.html to learn more about DHCP and DHCPv6.
- DHCPv6 has several options. To see a comprehensive list, go to http://www.networksorcery.com/enp/protocol/dhcpv6.htm.
- To see what's involved when a client only requires configuration information when using DHCPv6, visit https://techhub.hpe.com/eginfolib/networking/docs/switches/5130ei/5200-3942_l3-ip-svcs_cg/content/483572567.htm.
- Learn more about DHCP snooping at https://www.cisco.com/c/en/us/td/docs/switches/lan/catalyst6500/ios/12-2SXF/native/configuration/guide/swcg/snoodhcp.pdf.
- Defend against DHCP starvation attacks. Visit https://techhub.hpe.com/eginfolib/networking/docs/switches/5940/5200-1022b_l3-ip-svcs_cg/content/491966649.htm to learn more.
- For an extensive list of DHCP and DHCPv6 options, go to https://www.incognito.com/tutorials/dhcp-options-in-plain-english/.
- To learn more about how to use ARP after obtaining an IP address, go to https://www.netmanias.com/en/post/techdocs/5999/dhcp-network-protocol/understanding-the-detailed-operations-of-dhcp.