
For versions prior to v2.1.1, Qlik Sense does not provide the option to define variables outside the script as you could in the Variable Overview window in Qlikview. With v2.1.1, Qlik has introduced a new variable interface that enlists the existing variables created in the script and also provides the user with the option to create new variables.
For the purpose of this recipe,we will make use of an inline data load which gives the sales information for four countries:
- Create a new Qlik Sense application and call it
QS_Variables. - Load the following script in the application:
Sales:
LOAD * INLINE [
Country, Sales,COS
USA, 1000,500
UK, 2000,1000
France, 3000,2500
Germany, 4000,4700
];

Let vRedColor=RGB (255, 0, 0);
Let vSales= 'Sum(Sales)';
- Open the
QS_Variablesapplication. - Create a new sheet called as
Salesand go to the Edit mode for the sheet. - While in the Edit mode, notice that we have a new icon
 on the lower-left corner. Click on the icon to open the Variables interface window.
 - The Variables interface window lists all the variables that we have defined in the script:

-
At the same time, it gives us the option to create new variables outside the script directly in the interface using the
 button at the top-right corner.
 - Click on the button and define a new variable, as shown here:
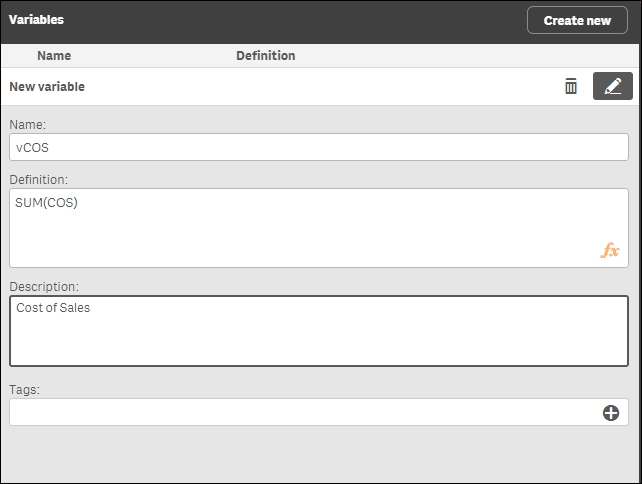
- Click on the Save button and close the variable interface. Reopen to see the list of variables.
- While still in the Edit mode, drag a table object onto the sheet.
- Use Country as a dimension.
- Create a measure with the following expression and label it
Sales:= $(vSales)
- Create a second measure with the following expression and label it
Cost of Sales:=$(vCOS)
- Define the background color expression for
Cost of Salesas follows:=if([Cost of Sales]>Sales,vRedColor,White())
- The resulting table would look like this:

The variables can be put to an effective use in the application to define expressions as well as to store certain field values. If numeric values are stored in the variables, then we don't need to use the $ sign expansion while calling the variables. It is however a good practice to always use the $ sign, as it is needed in case of expression syntax, tests or literals.
A point to be noted in our recipe is regarding the background color expression defined in step no 12. Cost of Sales and Sales are expression labels we defined earlier and not fields from the Data model.
The background color expression simply references the label of the expressions containing the numbers we need. Referencing an existing expression label instead of repeating the same code can also benefit overall chart performance. This is because Qlik Sense only has to aggregate the values at a base Data model level once; thereafter, the output can be reused from the cached memory where needed.
The variables that are defined in the script are denoted by a ![]() symbol in the variable interface and cannot be edited only through the data load editor, as shown in the following screenshot:
symbol in the variable interface and cannot be edited only through the data load editor, as shown in the following screenshot:

The variables can also be defined in external files such as a text file and then loaded into the application through the data load editor.
In order to try this, complete the following steps:
- Download the
Variables.xlsxfile from the Packt Publishing website and set up a library connection to the file location calledQlikSenseCookBook_SourceFiles(to resemble theFROM…code used in the following code). - Copy and load the following code:
VariableDefinitions:
LOAD
    Variable,
    Expression
FROM [lib:// QlikSenseCookBook_SourceFiles/Variables.xlsx]
(ooxml, embedded labels, table is Variables);

Let vNumberOfRows = NoOfRows('VariableDefinitions');
For vI = 0 to (vNumberOfRows - 1)
Let vVariable_Name = Peek('Variable',vI,'Expression');
Let [$(vVariable_Name)] = Peek('Expression',vI,'Expression');
Next
If you now go back to the Variable list from the edit sheet window, you will see a variable has been created for each row in the Excel file attached. The code below the FROM statement simply loops through each row of the Excel file, creating a new variable each time. The values in column A become the variable names and the corresponding values in column B are used as the variable definitions.