
This chapter covers how to prepare raster data for further processing with the GDAL menu tools and Processing Toolbox algorithms. There are specific considerations and tools for managing raster data. The topics that you will cover in this chapter are as follows:
- Reclassification
- Resampling
- Rescaling
- Raster mosaics
- Generating overviews (pyramids)
- Data format conversions
- Interpolation
Raster datasets often have hundreds or thousands of values. For an analysis, you may need to synthesize the data into meaningful categories. For example, elevation may be an important input in a habitat model for species X. However, you may only be interested in identifying several broad elevation thresholds that help to define the habitat. In the following example, you will use the elevation.tif sample data. You will reclassify the elevation data into several categories: less than 2,000 meters, 2,000 to 2,500 meters, and greater than 2,500 meters. This will result in a raster with three values, one for each group of elevation values. The following steps outline how to use the r.recode GRASS tool (found in the Processing Toolbox) to accomplish this:
- Load
elevation.tifand set the project's CRS toEPSG: 26912. - Turn on the processing plugin (by navigating to Plugins | Manage and Install Plugins) if it is not enabled.
- Open the Processing panel by clicking on Toolbox under Processing.
Tip
The Processing Toolbox is covered in more detail in Chapter 8, The Processing Toolbox.
- To help locate the tool, type
recodeinto the Processing Toolbox search bar and hit the Enter key. Double-click on the tool to open it. - Select the input layer by clicking on the down arrow to choose a raster loaded in the canvas or by clicking on the browse button.
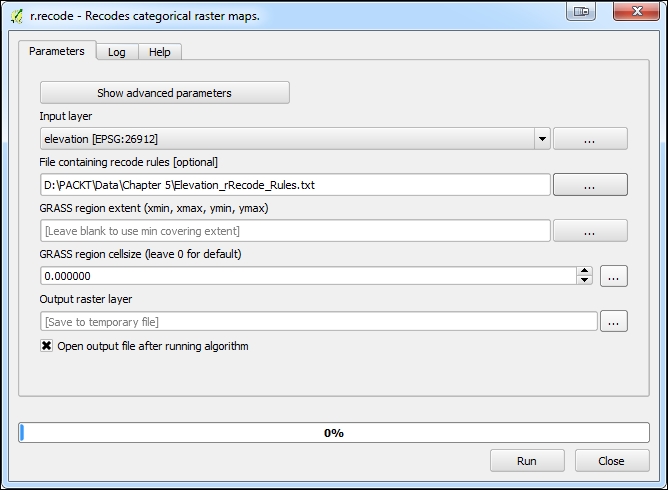
- Next, the tool will ask for a value to be filled in the File containing recode rules [optional] field. This file has to be created in a text editor. The syntax for the recode rules file is as follows:
input_value_low:input_value_high:output_value_low:output_value_high
input_value_low:input_value_high:output_value
*:input_value:output_value
input_value:*:output_value
- The following are the recode rules for this example. The first line tells the tool to recode the values less than
2000meters with a value of1in the output raster. The first asterisk is a wildcard for every value less than2000. The second line recodes the values greater than and equal to2000and less than2500as2in the output raster. The third line recodes all values greater than2500as3in the output raster:*:2000:1 2000:2500:2 2500:*:3
- Save the preceding code to a text file named
Elevation_rRecode_Rules.txt. - Select the output raster by clicking on the browse button. You can choose either to Save to a temporary file or Save to file. The following screenshot shows the completed r.recode tool:
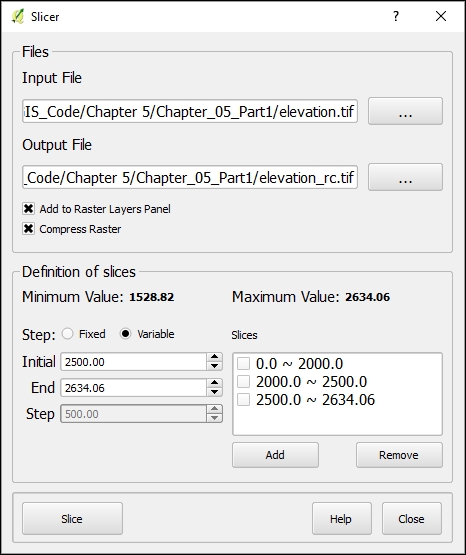
There is also a user developed plugin named Slicer that is very useful for reclassifying raster data. To duplicate the previously described reclassification of the elevation.tif dataset, install the plugin and use the following steps:
- Set the input and output files.
- In the Definition of slices section, set the type to Variable.
- For each class, define the lower value in the Intitial box, for example
0for the first class. - Then define the upper value in the End box.
- Click Add and repeat until all three classes have been added.
- Click Slice to run the operation:
In addition to these options, there are ways to use GRASS to reclassify rasters. Simply choose the method that both meets your needs and that you feel most comfortable with.
Note
There is a similar GRASS tool in the Processing Toolbox named r.reclass. The r.reclass tool is used when reclassifying integer and categorical rasters, while r.recode will reclassify floating-point and decimal value rasters. Both tools use the same format for the rules text file. More complete documentation for these tools can be found on the GRASS GIS help pages at http://grass.osgeo.org/grass65/manuals/r.reclass.html and http://grass.osgeo.org/grass65/manuals/r.recode.html.
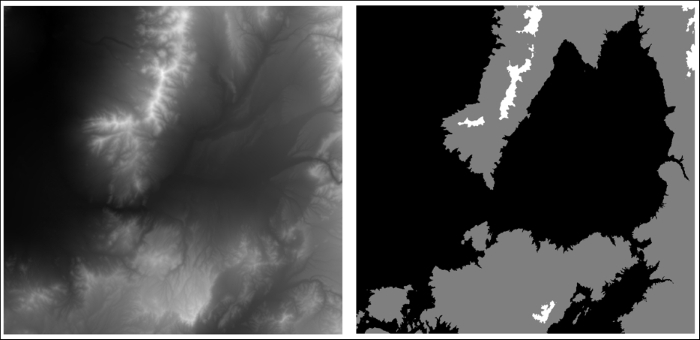
The following figure shows the result of the reclassification. The original elevation raster with the original elevation values is on the left, and the reclassified raster with three values is on the right:
Raster datasets may have integer values or floating-point values with decimal points. The r.recode tool can also be used to convert raster datasets between these formats. The elevation.tif sample data is a floating-point raster with values ranging from 1502.1 to 2898.49 meters above sea level.
To convert this raster to an integer raster, you will need to set up a rule text file with the following text:
1502.1:2898.49:1502:2898
(input_value_low:input_value_high:output_value_low:
    output_value_high)
Conversely, if you have an integer raster with values between 10 and 500 and want to convert it to floating point, you will need to set up a rule text file with this:
10:500:0.1:5.0
This will result in a raster with cell values ranging from 0.1 to 5.0.
When an analysis requires that multiple raster datasets be combined or overlaid, their pixel resolutions should be equal. The spatial resolution or cell size of a raster can be increased or decreased by a process known as resampling. Although you can increase or decrease the resolution of a raster, it is considered a better practice to decrease the resolution of the finer datasets to match the resolution of the coarsest raster.
As an example, let's say you have two rasters: a 90-meter resolution elevation raster and a 30-meter vegetation raster. In this scenario, it would be best to resample the vegetation data to a 90-meter resolution to match the elevation data. This way, all the data will be matched accurately. Conversely, if you resample to match the finest resolution raster, you will introduce false accuracy. The elevation data has a 90-meter resolution because that was the smallest unit that could be differentiated from the neighboring pixels. If you increase the spatial resolution, each elevation pixel is converted to nine 30-meter pixels. You cannot assume that all nine resulting pixels actually have the same elevation value in the real world. It is more likely that only the center pixel would have the same value.
In QGIS, there are several tools that can be used to resample a raster. In this example, the GDAL Translate tool will be used. The resolution of the elevation.tif sample data will be changed from 27.3526 meters to 100 meters. While the Translate tool can be found by navigating to Raster | Conversion | Translate, you will use the Processing Toolbox implementation of it here because it has better options for specifying the output pixel size. As you'll see in the following steps, this tool can be used for a variety of raster conversions during the resampling process:
- Open the Processing Toolbox.
- Locate the tool by navigating to GDAL/OGR | Conversion | Translate (convert format).
- Select the Input layer raster by clicking on the down arrow to choose a raster loaded in the canvas, or by clicking on the browse button.
- For a specific output resolution, enter the number in the Set the size of the output file (In pixels or %) box. To change the resolution by a percentage, click on the Output size is a percentage of input size box.
- If there are cells to designate as Nodata cells, enter the value in the Nodata value, leave blank to take the nodata value from input field.
- If there is a one-band raster with a color table, use the Expand drop-down menu to choose a setting for converting it to a three-band image.
- To change the CRS of the raster during the resampling operation, specify the new output CRS by clicking on the browse button for the Output projection for output file [leave blank to use input projection] option box.
- To subset or clip the raster during the resampling operation, enter the coordinates for the desired spatial envelope in the Subset based on georeferenced coordinates (xmin, xmax, ymin, ymax) option box.
- Additional creation parameters can be specified. For a full list of options for the gdal_translate utility, visit the help page at http://www.gdal.org/gdal_translate.html.
- Use the Advanced Parameters | Output raster type drop-down menu to choose the radiometric resolution of the output raster. The options are Byte, Int16, UInt16, UInt32, Int32, Float32, Float64, CInt16, CInt32, CFloat32, and CFloat64.
- Select the output raster by clicking on the browse button. You can choose to either Save to a temporary file or Save to file. The following screenshot shows the completed Translate tool:

The following figure shows the result of raster resampling. The original elevation raster with 27.3526-meter pixel resolution is on the left and the resampled raster with 100-meter pixel resolution is on the right.

There are two additional tools that can be used to resample raster data, and both are found in the Processing Toolbox.
Under GRASS commands | Raster tools there is the r.resample tool. Under SAGA | Grid-Tools there is the Resampling tool. Both these tools have similar options to the GDAL Translate tool and are included with most installations of QGIS.