Global Server Load Balancing (GSLB) allows us to load-balance services across different geographical regions. For instance, large organizations such as Facebook, eBay, and Microsoft use this technology to load-balance their web services. This might be for proximity reasons, because a user might be redirected to the closest available resource, or to keep redundant services available in case of datacenter failures.
So the main purposes for GSLB are:
- Performance; user proximity to the closest available resource
- Disaster recovery, where multiple sites can be grouped as primary and standby
- Load balancing resources between different multiple locations
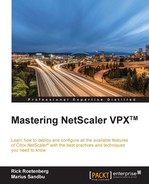
GSLB is based upon the use of DNS. So for instance when a user wants to go to www.citrix.com, that user's DNS client will do a number of queries against the different DNS servers, until it gets a response from an authoritative source for that domain. An example might be where NetScaler, which is the authoritative nameserver for that domain, responds with an A-record to that user that is one of the load-balanced vServers attached to the domain. Before that record is handed out, NetScaler has done an evaluation of the health state of the different services the user is trying to access, using SNMP based load monitors, Metric Exchange Protocol (MEP), and explicit monitors.
GSLB also consists of different components:
- GSLB sites (that represent a geographical location or datacenter)
- GSLB services (that are linked to a load-balanced vServer)
- GSLB vServers (that consist of multiple GSLB services served from GSLB sites)
- Domains (that on NetScaler are either authoritative or act as a proxy on its behalf)
- MEP used between nodes in each site to exchange information about the state and load on the site
Before we go ahead with a design we need go a bit deeper into MEP.
MEP is a proprietary protocol used by NetScaler to communicate different GSLB site metrics, network metrics and persistence info to the other GSLB sites. Communication with MEP happens on port 3011 or 3009 for secure communication. If we want to use load-balancing methods such as proximity or RTT, we need to have MEP enabled; if not, it will fall back to round robin.
So let's look closer at an example with a small design layout.
Before we go ahead with the configuration of a GSLB site, we need to cover the first crucial part—the nameserver setup. Since the ADNS service is not highly available but running on a single NetScaler, it can become the weakest link in the event of a datacenter failure. In order to ensure high availability, we need to set up multiple ADNS services with public IPs and then add the NS records to our public domain. The way to add NS may vary from provider to provider. This is a recipe to add it on GoDaddy: https://www.godaddy.com/help/managing-dns-for-your-domain-names-680.
Doing this will allow clients to reference multiple nameservers and will ensure that they can connect even if one of the NetScaler pairs is down. Most DNS clients use round-robin; if one of the name servers does not respond, the DNS client will try to communicate with the next nameserver on the list.
After we have set up the nameserver configuration, we need to set up a GSLB site. A GSLB site is in most cases a representation of a datacenter or a geographical location where a network resides. We always need a local site and a remote site in a GSLB setup.
This setup will assume that we have L2 connectivity between our sites and allows us to use private IP address ranges to communicate with the different nodes in a GSLB setup.
First we need to add the local site on one of the NetScalers using the command:
Add gslb site NAME LOCAL IPADDRESS
This is shown in the following screenshot:

Or we can add it using the GUI under Traffic Management | GSLB | Sites and then click on Add. Here we could use a SNIP or MIP address as the IP address; alternatively, in this case we used a new IP address that will represent the site. Next we need to add the remote site, using the command:
Add gslb site NAME REMOTE IPADDRESS
Here we enter the IP address of the remote NetScaler that can either be a GSLB IP or another IP that is owned by NetScaler. After we have added the two sites, we have to do the same configuration on the second NetScaler but only with opposite names and addresses. After this is done we can verify that we have completed the setup correctly and that MEP is active, using the command:
Show gslb site
After this is done we need to add services to the individual sites; these are typical services that serve the same content (for example, web servers and so on) and are typically represented as a load balanced vServer or a content-switching vServer.
We can start by adding a GSLB service to one of the NetScalers using the GUI; this will be one of the existing load balanced vServers on the NetScaler that represents some web servers.
Now when adding the service, we have some different options (for instance if we want to add a virtual server), as shown in the following screenshot:

That site we want to set up the service, what service type and so on. When we click Add we are given more options such as:
- Monitors
- Monitor threshold
- DNS views
- Site persistence
- Other settings
The important part here is monitors. Monitors can be configured if we want explicit monitors attached to the load balancing vServer; by default, MEP will control the health status of the service. If we configure a monitor it will then override MEP for health monitoring. If we, for instance, do not have the option to use MEP, we should use monitors against remote services. After we are done with adding the service, we also have to add the service on the remote site, using the same wizard but instead choosing the other site. When we choose the other, remote, site, we are not given the option to choose a virtual server and therefore need to choose from existing servers.
After we have added the necessary services to the first site, we need to add them to the second site as well; just remember that we have to adjust the site location and IP addresses.
When we have added services to both sites and the MEP is communicating, we can see that the status and health information will be exchanged.
This can be seen by using the command:
Show gslb service SERVICENAME or stat GSLB SERVICENAME
Now that we have added the services on both of the sites we have to create a GSLB virtual server.
This can be done by using the command:
Add gslb vserver VSERVERNAME
Or by using GUI Traffic Management | GSLB | Virtual Servers. Give the vServer a name. It is important to note that not all options are available before we click OK.
By default the vServer is set to serve A-records when a client requests something and the service type is HTTP; this just defines what type of services we are able to add to the vServer.
After creating the vServer we have the option to bind services to it, under the Service menu option, the result of which is shown in the following screenshot:

When we are done adding services to the vServer we should configure the load balancing methods (the default is LEASTCONNECTIONS).
There are multiple methods that we can use for load balancing:
LEASTCONNECTIONSROUNDROBINLEASTRESPONSETIMESOURCEIPHASHLEASTBANDWIDTHLEASTPACKETSSTATICPROXIMITYRTT
There are two options here that are specific for GSLB: STATICPROXIMITY and RTT. STATICPROXIMITY can use a custom location database to determine where to send clients, or we create our own custom entries.
In order to use a location database, we have to buy one from commercially configured third-party databases such as maxmind.com (https://www.maxmind.com/en/home), for instance.
In order to use custom entries, we just have to add an IP-range and set a location qualifier. By default NetScaler uses the following qualifiers for a location database:
continent.country.region.city.isp.organization
For instance if we have an IP-range that we know is in Norway we could add the following custom entries:
Add location 192.168.0.0 192.168.0.255
EU.NO.AKERHUS.OSLO.TELENOR.CITRIX
Now, after we have added the location, we have to set NetScaler to use the location parameter. So let's say that we want traffic coming from that particular IP address range to communicate with a particular NetScaler; we need to set the location parameter to use one of the qualifiers that we entered. This can be done using one of the six different qualifiers.
For instance:
set locationparameter -context custom –q2label NO
This will set up NetScaler to use a static, proximity-based decision and all addresses coming from within that range will get a response from the one with the location parameter set. If an IP address outside that range tries to communicate, NetScaler will fall back to round-robin-based load balancing.
RTT is a dynamic proximity load balancing method that measures the delay between a client's local DNS server and the data resource it is trying to access. After it has measured the RTT, NetScaler then exchanges the metric with the other sites using MEP and then sorts out the RTT between the different sites and the client. Then it makes its load balancing decision and will dynamically redirect the client request to the GSLB site that has the lowest RTT. NetScaler uses different probes to determine the RTT. By default it uses PING first; if that fails it tries a DNS UDP probe. If that does not work it tries a DNS TCP probe.
If all probes fail or RTT metrics are not available, NetScaler will fall back to round-robin load-balancing.
If we want to change the order of the probes we can do so using the following command:
set gslb parameter -ldnsprobeOrder DNS PING TCP
This might be necessary for instance if we do not allow external PING traffic via the firewall or UDP.
After we have configured the load balancing method we have to add a domain to the vServer. That can be done under the domain pane in the vServer options.
When we add the domain name, NetScaler will automatically create an A-record for it under DNS records. This will then be used by the ADNS service to respond with the domain name to clients.
Now after we have added a domain to the virtual server, we can verify that the services are up by using the command:
Show gslb domain test.local
We can also verify that the address record is set to a GSLB site by using the command:
Show addrec test.local
It is important that we also create the virtual server on the second site and add the same domain name, or else MEP might not work properly. As it might be cumbersome to do the same configuration on multiple NetScalers, Citrix has created a Sync option to sync configuration between a master NetScaler and other remote sites. This can be done using the command:
Sync gslb config
It is important to note that this option uses SSH to communicate and therefore if we have a dedicated site IP setup we need to enable that IP to use SSH, which is not enabled by default on GSLB IPs or SNIP addresses. This can be done in the GUI under System | Network | IPs. Choosing the GSLB site IP, Edit, choosing enable management access and adding SSH.
The option will also initiate from the NSIP from the master NetScaler (the one we initiate the synchronization from).
After the synchronization is done, we can verify the status by using the command:
Show gslb syncstatus
Now that this is done we can verify it by setting our client IP address DNS server to use the NetScaler ADNS IP. Then we can use nslookup, as shown in the following screenshot, to verify that the records we get are the virtual services in the GSLB setup.

Since my GSLB site setup is based upon round-robin I will get both of the records. If I set the persistence to static proximity and use the location parameter, I will be redirected to the one that has the closest qualifier set.
This setup used an active/active GSLB configuration, which means that traffic would be distributed between both sites. In some cases, we might also use an active/passive setup for disaster recovery purposes.
In order to set up an active/passive GSLB configuration, we first need to set up a GSLB site configuration
First we need to add the two sites that will act as active/passive, by using the following CLI commands:
add gslb site sitePRI LOCAL 192.168.0.200 -publicIP 192.168.0.200
add gslb site siteSEC REMOTE 192.168.0.100 -publicIP 192.168.0.100
Then we run the following command to add a vServer to the GSLB site located on the primary site:
add gslb vserver RPIserver http -lbmethod RTT
Now we need to add a service that will serve content from the primary site:
add service serverPRI 192.168.0.201
add lb vserver vserverPRI HTTP 192.168.0.202 80
bind lb vserver vserverPRI serverPRI
Now that we have a load-balanced vServer we need to bind this as a GSLB service and then attach it to the GSLB vServer on the primary site:
add gslb service gslb-srv-PRI 192.168.0.202 HTTP 80 -sitename sitePRI
bind gslb vserver PRIserver -servicename gslb-srv-PRI
And then lastly we attach a domain name to that particular vServer:
bind gslb vserver vserverPRI -domainname www.test.com
Now that we have successfully created the primary GSLB site and have configured it to have a GSLB service and respond to a domain name, we have to configure it to have a secondary site as backup. First we need to add a new GSLB vServer:
add gslb vserver SECserver HTTP
Then we need to attach a service to that GSLB vServer:
add gslb service gslb-srv-SEC 192.168.0.101
bind gslb vserver SECserver -serviceName gslb-srv-SEC
Then lastly we need to configure the backup parameter on the primary VServer:
set GSLB vserver PRIserver -backupVServer SECserver
Now we need to repeat the configuration on the secondary site; if we do not do this the information exchange will not happen and requests might fail if the primary goes down.
First we need to add the sites:
add gslb site sitePRI REMOTE 192.168.0.200 -publicIP 192.168.0.200
add gslb site siteSEC LOCAL 192.168.0.100 -publicIP 192.168.0.100
Next add a GSLB vServer that will act as the backup for the primary on the other site:
add gslb vserver SECserver http -lbmethod RTT
Now we need to add a local service on the NetScaler and then bind it to a load balanced vServer:
add service serverSEC 192.168.0.101
add lb vserver vserverSEC HTTP 80
bind lb vserver vserverSEC serverSEC
Now that we have created the load-balanced vServer we need to create it as a GSLB service:
add gslb service gslb-srv-SEC 192.168.0.101 HTTP 80 -sitename siteSEC
bind gslv vserver SECserver -servicename gslb-srv-SEC
And now we need to add the GSLB vServer on the primary site so we can reference it:
add gslb vserver PRIserver HTTP
Then we attach a service to it:
add gslb service gslb-srv-PRI 192.168.0.201
bind gslb vserver PRIserver -servicename gslb-srv-PRI
Now we need to bind a domain name to the GSLB vServer on the primary site:
bind gslb vserver PRIserver -domainname www.test.com
Lastly we configure the secondary vServer to act as a backup for the primary:
set GSLB vserver PRIserver -backupVServer SECserver
GSLB is a complex feature that might often lead to headaches if not properly configured. Therefore, it is crucial to know where to start if we need to troubleshoot a configuration.
Some basics to check for if GSLB is not working or if we cannot perform the configuration:
- Do we have the correct license?
Use the show license command in the CLI to see if GSLB is available. If it isn't, we need to upgrade to Enterprise or buy it as an add-on feature in Standard.
- Is the feature enabled?
Use the show feature command in CLI to see if the GSLB feature is enabled or not. If it isn't, we can use the enable feature GSLB command to enable the feature.
- Is DNS working as it should?
Can clients resolve the IP address of the GSLB services? In some cases we should enable the vServer to return the IP addresses of all the services to make sure that it returns the correct IP addresses. This can be done by changing the configuration on the GSLB vServer using CLI:
Set gslb vserver VSERVERNAME –MIR ENABLED - Are the nameserver and start of authority records added to the domain records or at the domain registrar?
- The best way to check this is by using
nslookupon a client. Startcmd, typenslookup, where the client is preferably configured with a public DNS server, then type:Set type=NS Domainname.example
This should return the authoritative DNS servers for the domain that is configured to be used with GSLB—for instance, the ADNS service running on the NetScalers.
- Is the NetScaler setup an ADNS or is it a proxy for an internal DNS server?
If the NetScaler is to act as an authoritative DNS server it needs to have the ADNS service running and be listed as the NS record for the public domain. If it is to act a proxy DNS server, we need to add the internal DNS server as a vServer.
Add service DNS_SVC1 192.168.0.101 DNS 53
Add lb vserver DNS_VSERV1 DNS 192.168.0.102 53
Bind lb vserver DNS_VSERV1 DNS_SVC1
- Is the configuration correct on all participating nodes?
Use the command
show gslb runningConfigto see if the configuration is configured properly. - Is proximity load balancing not working?
Make sure that the load balancing method is properly set on all participating nodes, and, if that a static proximity location is being set, that the location qualifier is set properly. This can be checked by specifying a custom IP range and connecting using a client from that range. If RTT dynamic proximity is being used, make sure that the probes work as intended; for instance, if the firewall is blocking DNS or ICMP requests, it might cause the probes to fail.
- Is MEP not working?
Make sure that the ports needed for MEP are open between the site IP addresses.
- Is traffic not being load balanced correctly?
- Are some clients unable to resolve the correct IP addresses?