
In this recipe, we'll show you how to work with an Angular component step by step. Components are lightweight, reusable, and self-contained UI widgets that have a single specific purpose. We'll use a component that shows a graphical representation of the job's salary. You can follow along with the code in the project angular_component.
Our app shows job type data in a list, together with a number of stars, to indicate the salary. This is also shown when selecting a job to show its details, as shown in the following screenshot:
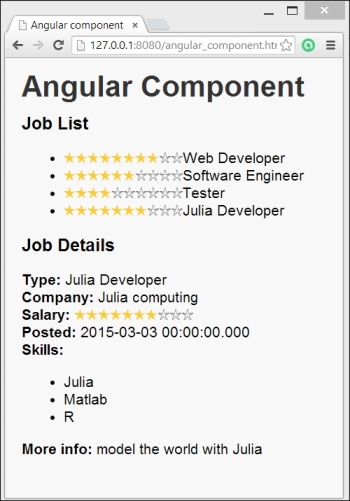
A component showing the salary
Its working is explained as follows:
- The following is the startup script
angular_component.dart:import 'package:angular/angular.dart'; import 'package:angular/application_factory.dart'; import 'package:angular_component/salary/salary_component.dart'; import 'package:angular_component/job_listing.dart'; void main() { applicationFactory() .addModule(new AppModule()) .run(); } class AppModule extends Module { AppModule() { bind(JobListingController); bind(SalaryComponent); } }
- In the web page, we see a new HTML element
<x-salary>for our component, as follows:<x-salary max-sal="10" salary="job.rate_salary"></x-salary>
This is also found in the job details section, which is now surrounded by the following code:
<div ng-if="ctrl.selectedJob != null">
  …
<x-salary max-sal="10" salary="ctrl.selectedJob.rate_salary"></x-salary>
…
</div>
The component is defined in the folder
libsalary, with an HTML fileangular_component.htmlthat defines its structure, a Dart file that describes its behavior, and a CSS file to style it. - The following is the Dart code:
import 'package:angular/angular.dart';

@Component(
    selector: 'x-salary',
    templateUrl: 'packages/angular_component/salary/salary_component.html',
    cssUrl: 'packages/angular_component/salary/salary_component.css',
    publishAs: 'cmp')
class SalaryComponent {
  static const String _STAR_ON_CHAR = "u2605";
  static const String _STAR_OFF_CHAR = "u2606";
  static const String _STAR_ON_CLASS = "star-on";
  static const String _STAR_OFF_CLASS = "star-off";

  static final int DEFAULT_MAX = 5;

  List<int> stars = [];

  @NgOneWay('salary')
  int salary;

  @NgAttr('max-sal')
  void set maxSal(String value) {
    var count = (value == null)
        ? DEFAULT_MAX
        : int.parse(value, onError: (_) => DEFAULT_MAX);
    stars = new List.generate(count, (i) => i + 1);
  }

  String starClass(int star) =>
      star > salary ? _STAR_OFF_CLASS : _STAR_ON_CLASS;

  String starChar(int star) => star > salary ? _STAR_OFF_CHAR : _STAR_ON_CHAR;
}
- The following is the HTML code for the component:
<span class="stars"
      ng-repeat="star in cmp.stars"
      ng-class="cmp.starClass(star)">
          {{cmp.starChar(star)}}
</span>
In step 1, you can see that we refactored the code of JobListingController into its own library in libjob_listing.dart. A component called SalaryComponent is now also bound to AppModule. Step 2 demonstrates how the component is used in HTML as a new kind of tag <x-salary>, with properties max-sal and salary. Why x- ? In order to be W3C compliant, custom components should have a dash (-) in their names.
Additionally, we see how we control the inclusion of HTML sections in Angular with ng-if="condition". If the condition is false, then that <div> section is removed from the DOM.
In step 3, we see how the definition of the class SalaryComponent is preceded by the @Component annotation. Its selector part states the HTML element that will instantiate the component, which also defines its scope. Note that templateUrl and cssUrl refer to the definition of the component, and publishAs is the name for the component in its scope, which is used in step 4. How does the component depict the salary? The star character comes from the Unicode "u2605", shown through {{cmp.starChar(star)}}. When the component is instantiated, its properties get set, in particular, salary="job.rate_salary". rate_salary is a getter in the class Job: the properties are set as int get rate_salary => salary~/1000. Thus, the salary in the component is the number of thousands in the job's salary. Note that salary is annotated by @NgOneWay, which means that it is a one-way property and its value flows from the object to the UI, but the UI cannot change it in the code. Note that max-sal, being an attribute, is annotated by @NgAttr. The NgAttr annotation on a field maps this to a DOM attribute. The stars list gets set to a list of max-sal numbers by List.generate(): [1,2,3,4,5,6,7,8,9,10]. The ng-class directive sets the CSS class on the component dynamically; its expression is the name of the class to be added to it, which amounts to "star-on" or "star-off". The star is pictured yellow when star is still smaller than or equal to salary. Thus, for every thousand dollars in salary, a yellow star is shown by ng-repeat, while max-sal determines the number of uncolored stars.
If a user needs to be able to change a property through the web page (for example, changing the salary), they will have to declare it as @TwoWay in the code. In our example, this can be done by defining an ng-click="event-handler" for our component.