
In the previous recipe, we made a client app that sends its data to a web server in JSON format. In this recipe, we will make the web server that receives this data step by step, possibly process it, and then send it back to the client. You can find the code in the script serverwebserver.dart in the project post_form.
Perform the following steps to make this work:
- The following is the code that starts the web server:
import 'dart:io'; const HOST = '127.0.0.1'; const PORT = 4040; void main() { HttpServer.bind(HOST, PORT).then(acceptRequests, onError: handleError); } - The
acceptRequestsfunction describes how the web server handles incoming requests based on their method as follows:void acceptRequests(server) { server.listen((HttpRequest req) { switch (req.method) { case 'POST': handlePost(req); break; case 'GET': handleGet(req); break; case 'OPTIONS': handleOptions(req); break; default: defaultHandler(req); } }, onError: handleError, // Listen failed. onDone: () => print('Web server shuts down.')); print('Listening for GET and POST on http://$HOST:$PORT'), } - The different request handlers are shown in the following code:
void handlePost(HttpRequest req) {
  HttpResponse res = req.response;
  addCorsHeaders(res);
  res.statusCode = HttpStatus.OK;
  req.listen(processData, onError: handleError);
}

processData(List<int> buffer) {
  res.write('OK, I received: '),
  res.write(new String.fromCharCodes(buffer));
  // process incoming data
  res.close();
}

handleGet(HttpRequest req) { // not needed here }

void handleOptions(HttpRequest req) { // not needed here }

void addCorsHeaders(HttpResponse res) {
  res.headers.add('Access-Control-Allow-Origin', '*'),
  res.headers.add('Access-Control-Allow-Methods', 'POST, OPTIONS'),
  res.headers.add('Access-Control-Allow-Headers',
  'Origin, X-Requested-With, Content-Type, Accept'),
}

void defaultHandler(HttpRequest req) {
  res = req.response;
  res.statusCode = HttpStatus.METHOD_NOT_ALLOWED;
  res.write("Unsupported request: ${req.method}.");
  res.close();
}

handleError(e) {
  print(e);
  // other error handling
}
Run the client from the previous recipe (start webpost_form.html) and post a job in JSON format to the server. The web server responds with an acknowledgement and returns the data back to the client. The client shows the following response:
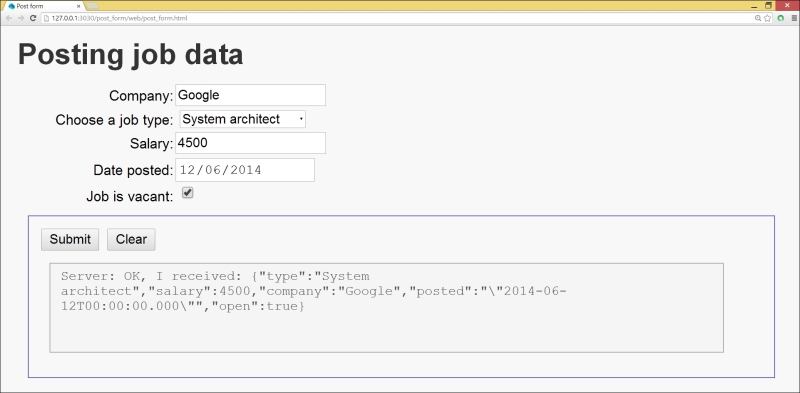
The response of the web server
In step 1, we used an alternative way (compared to the Making a web server recipe) to start up the server; we give two callback functions for the Future object returned by bind:
- The first parameter is the
acceptRequestsfunction, which receives anHttpServerobject as a parameter and then listens for incoming requests - The second parameter is the optional
onErrorargument with the callback functionhandleError; this is invoked when the binding fails, for example, when the port is in use
Another, more elegant way of writing this is shown in the following code:
HttpServer.bind(HOST, PORT)
.then(acceptRequests)
.catchError(handleError);
Step 2 gives us the processing of requests. For every incoming request, the server creates an HttpRequest object and passes it to the callback of listen(). So, the HttpServer object produces a stream of HttpRequest objects to be processed. Here, we see how you can use a switch/case to act differently on different kinds of requests (other request method), using the same exception-catching mechanism as in step 1. A second optional onDone parameter is a function that is called when the server is shut down.
In step 3, we built different request handlers. We always set the status code of the response, such as res.statusCode = HttpStatus.OK;; there are a lot of predefined values. See the docs for the class HttpStatus. In particular, you can use HttpStatus.NOT_FOUND in an error handler to signal a 404 File not Found HTTP error.
One thing to notice here is that we let the server send CORS headers to the client. This allows the client to send POST requests in the event that this web server is different from the one serving the original web application. Then, the client must first send an OPTIONS request, but for this, we don't have to write client code; it is handled automatically by the HttpRequest object. For a POST request, the code in handlePost listens for the client's data in req.listen. When all of the data is received, this is passed as a List<int> buffer to the callback function processData. In our case, this makes a string from the data and writes it back to the response. The response is a data stream that the server can use to send data back to the client. Other methods of writing to this stream are writeln(), writeAll(), and writeCharCodes().
At this point in the code, the real server processing of the data, such as writing to a file (for example code see the There's more… section) or saving in a database, will be done. Closing the response sends it to the client.
If the server has to set the content type for the response, do this as follows before the first write to the response in handlePost:
res.headers.contentType =
new ContentType("application", "json", charset: 'utf-8'),
Here, we make it clear that we send JSON data using the UTF-8 character set.
If we wanted to write the data received from the client to a file, we could do this as follows:
- Add the following line to
handlePostbeforereq.listen:BytesBuilder builder = new BytesBuilder();
- In the following code, we see
processData:processData(List<int> buffer) { builder.add(buffer); } - The
builderoption collects the buffered data in chunks through theaddmethod until all the data is delivered. Then, theonDonemethod inacceptRequestsis called, such asonDone writeToFile). In the following code, we seewriteToFile:writeToFile(builder) { var strJson = UTF8.decode(builder.takeBytes()); var filename = "jobs.json"; new File(filename).writeAsString(strJson, mode: FileMode.APPEND).then((_) { res.write('Job data was appended to file'), res.close(); }); }
- See the Using CORS headers recipe in Chapter 5, Handling Web Applications, for more information on CORS