
The web page is our view in the MVC pattern. The controller object is responsible for showing data from the model (binding them to DOM elements in the view) and in response to events, possibly changing model data and displaying these changes in the view. All public fields of the controller can be shown, and all public methods can be invoked from within the view. Data binding is done through the same syntax as in Polymer using double curly braces {{ … }}. A controller should contain only the business logic needed for a single app or view; it should not manipulate the DOM.
In this recipe, we'll show you how to work with an Angular controller step by step. You can follow along with the code in the project angular_controller.
Our app will show job type data in a list, and when a job is selected, its details are shown, as shown in the following screenshot:
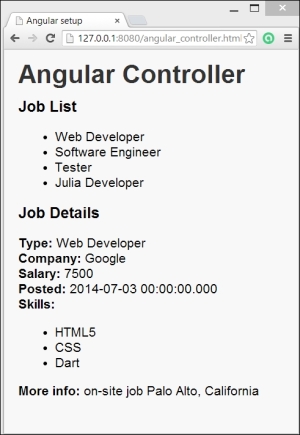
The controller in action
Its working is explained as follows:
- The
Jobclass, which is the model, is defined inangular_controller.dartas follows:class Job { String type; int salary; String company; DateTime posted; // date of publication of job bool open = true; // is job still vacant? List<String> skills; String info; Job(this.type, this.salary, this.company, this.posted, this.skills, this.info); } - The
controlleris a separate class,JobListingController, in the same file:@Controller( selector: '[job-listing]', publishAs: 'ctrl') class JobListingController { Job selectedJob; List<Job> jobs; JobListingController() { jobs = _loadData(); } void selectJob(Job job) { selectedJob = job; } // model data: List<Job> _loadData() { return [ new Job('Web Developer',7500, 'Google', DateTime.parse('2014-07-03'), ["HTML5", "CSS", "Dart"], "on-site job Palo Alto, California"), // other job data ]; } }
- In the web page, everything happens in
<div>marked withjob-listing:<div job-listing> <h3>Job List</h3> <ul> <li class="pointer" ng-repeat="job in ctrl.jobs" ng-click="ctrl.selectJob(job)"> {{job.type}} </li> </ul> <h3>Job Details</h3> <div><strong>Type: </strong>{{ctrl.selectedJob.type}}</div> <div><strong>Company: </strong>{{ctrl.selectedJob.company}}</div> <div><strong>Salary: </strong>{{ctrl.selectedJob.salary}}</div> <div><strong>Posted: </strong>{{ctrl.selectedJob.posted}}</div> <div><strong>Skills: </strong> <ul> <li ng-repeat="skill in ctrl.selectedJob.skills"> {{skill}} </li> </ul> </div> <div><strong>More info: </strong>{{ctrl.selectedJob.info}}</div> </div>
- To start up the Angular machinery, something more has to be done now as shown in the following code:
void main() {
  applicationFactory()
        .addModule(new AppModule())
        .run();
}

class AppModule extends Module {
  AppModule() {
    bind(JobListingController);
  }
}
The controller in step 2 contains the list of jobs to be shown; it loads them in through _loadData() in its constructor. It also holds the selected job, if any. This controller is marked with the @ annotation. Have a look at the following code:
@Controller(
    selector: '[job-listing]',
    publishAs: 'ctrl')
The string after selector, between brackets, is the name of a CSS selector (here, job-listing) in the page. In step 3, we see that there is a <div> element that has this name as selector. This <div> element defines a scope in which the controller is active and known. When Angular sees this <div> element, it instantiates the controller class, making its content available. The publishAs code gives the name (here, ctrl) that the controller is known by in the <div> scope in the view: that's why we see that name appear throughout the HTML code.
In <ul>, all the jobs from the list in the controller known as ctrl are shown through the directive ng-repeat="job in ctrl.jobs"; this iterates over the model (the job property in JobListingController) and the clone <li> in the compiled DOM for each job in the list. More specifically, only type is shown because the <li> tag contains {{job.type}}.
The same tag also contains an ng-click directive, which registers an event-handler for a click event on the list item ng-click="ctrl.selectJob(job)". This can be attached to any HTML element, and here it calls the method selectJob in the controller, passing the job that was clicked. In step 2, we see that this method passes this job to selectedJob. Because this variable now gets a value, the view updates, and all {{ctrl.selectJob. } expressions are evaluated and shown, including the list of skills, where an ng-repeat="skill in ctrl.selectedJob.skills" directive is used.
To make this work in Angular, we need to wrap our controller in the class AppModule, which inherits from Module. To instantiate this new module, it has to be added to the Angular engine via the method addModule(), a dependency injection technique that is used for other Angular items too as we will see in the next recipes; in general, an Angular app will have a list of modules with which it works.