
PostgreSQL is another popular open source SQL database. Dart can talk to PostgreSQL using the pub package postgresql by Greg Lowe (https://github.com/xxgreg/postgresql). In this section, we will demonstrate how to use this driver step by step. You can see it in action in the using_postgresql project.
To get the database software, download and install the PostgreSQL Server installer from http://www.postgresql.org/download/ using the following steps:
- The database server is configured to start automatically. We need to create a database and table to store data. The easiest way is to start the
pgAdminprogram, make a new connection, and then select Edit, New Object, and New Database from the menu, name it jobsdb, and click on OK. - Select the public schema, and again select Edit, New Object, and then New Table.
- Name the table
jobs, and createdbKey,type,salary,company,posted, andopenas columns;dbKeyis the primary key. - To import the driver to your application, add
postgresqlto thepubspec.yamlfile and save it. Apub getcommand is then done automatically.
The application starts from using_postgresql.dart, where a JobStore object is created, the database is opened, records are written to the jobs table, and then these records are retrieved:
import 'job.dart';
import 'jobstore_postgresql.dart';

Job job;
JobStore js;

void main() {
  js = new JobStore();
  // 1- create some jobs:
  job = new Job("Web Developer", 7500, "Google", new DateTime.now());
  js.jobs.add(job);
  job = new Job("Software Engineer", 5500, "Microsoft", new DateTime.now());
  js.jobs.add(job);
  job = new Job("Tester", 4500, "Mozilla", new DateTime.now());
  js.jobs.add(job);
    // 2- storing data in database:
  js.openAndStore();
  // 3- retrieving and displaying data from database:
  js.openAndRead();
}
After running the preceding code, we can verify via pg Admin in the jobs table that the insertions succeeded, as shown in the following screenshot:
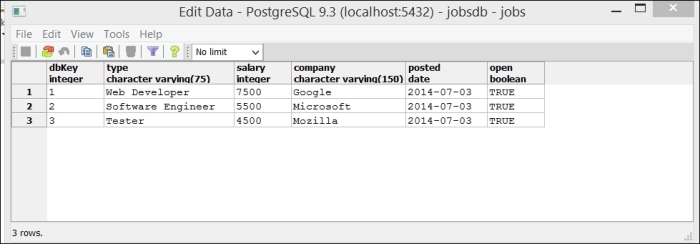
Data in PostgreSQL
The readData method reads the data from the jobs table and prints it to the console:
1 - Web Developer - 7500 - Google - 2014-07-03 00:00:00.000 true
2 - Software Engineer - 5500 - Microsoft - 2014-07-03 00:00:00.000 true
3 - Tester - 4500 - Mozilla - 2014-07-03 00:00:00.000 true
The interaction with PostgreSQL through the driver takes place in the JobStore class in jobstore_postgresql.dart:
library store;

import 'package:postgresql/postgresql.dart';
import 'job.dart';

class JobStore {
  final List<Job> jobs = new List();
  Job job;
  Connection conn;
  varuri = 'postgres://username:passwd@localhost:5432/jobsdb';

  // 5- opening a connection to the database:
  openAndStore() {
  connect(uri).then((_conn) {
  conn = _conn;
  storeData();
  })
  .catchError(print);
}
storeData() {
  for (job in jobs) {
  insert(job);
}
// 6- close the database connection:
close();
}

// 7- inserting a record in a table:
insert(Job job) {
  var jobMap = job.toMap();
  conn.execute('insert into jobs values (@dbKey, @type, @salary, @company, @posted, @open)',
  jobMap)
  .then((_) { print('inserted'), })
  .catchError(print);
}

openAndRead() {
  connect(uri).then((_conn) {
  conn = _conn;
  readData();
})
.catchError(print);
}

// 8- reading records from a table:
readData() {
  conn.query('select * from jobs').toList().then((results) {
  processJob(results);
  close();
  });
}

// 9- working with record data:
processJob(results) {
for (var row in results) {
  // Refer to columns by nam:
  print('${row.dbKey} - ${row.type} - ${row.salary} - ${row.company} - ${row.posted} ${row.open}'),
  // print(row[0]);    // Or by column index.
  }
}
close() { conn.close(); }

// 10- updating a record in a table:
update(Job job) {
  var jobMap = job.toMap();
  conn.execute('update jobs set type = @type, salary = @salary, company = @company, '
  'posted = @posted, open = @open where dbKey = @dbKey', jobMap)
  .then((_) { print('updated'), })
  .catchError(print);
}

// 11- deleting a record in a table:
delete(Job job) {
  var jobMap = job.toMap();
  conn.execute('delete from jobs where dbKey = @dbKey', jobMap)
  .then((_) { print('deleted'), })
  .catchError(print);
  }
}
Obtaining a connection with a Postgres database needs a valid connection string of the following form:
var uri = 'postgres://username:password@localhost:5432/database';
This is given as an argument to the connect method, as shown in the fifth comment; the writing of the data in storeData is done in the callback handler, in order to be sure that we have a Connection object at that point. Inserting a record happens in comment 7; the values to be inserted in the insert SQL in the @ markers must be given through a map (here jobMap):
conn.execute('insert into jobs values (@dbKey, @type, @salary, @company, @posted, @open)', jobMap).then((_) { … }So all the insert, update, and delete queries are given as string arguments to the method conn.execute. Strings will be escaped to prevent SQL injection vulnerabilities. After the inserts, we explicitly close the connection with conn.close() to save resources. Select queries are performed through conn.query:
conn.query('select * from jobs').toList().then((results) {…}The processing of the results is done in the callback handler:
for (var row in results) {
  print('${row.type} - ${row.salary}'),
print(row[1]);
Fields can be retrieved by their name or index. As always, we catch the errors with catchError, which at least prints the error to the console. Similar to MySQL, a connection Pool object can be used to avoid the overhead of obtaining a connection for each request:
var pool = new Pool(uri, min: 2, max: 5);
pool.start().then((_) {
print('min amount connections established.'),
pool.connect().then((conn) { // Obtain connection from pool
    // … }
}
The connection method runInTransaction allows queries that need to be executed in "an all or none" way, to be bundled in a transaction.
- The complete API docs can be found at http://www.dartdocs.org/documentation/postgresql/0.2.14/index.html#postgresql