
MySQL is undeniably the most popular open source SQL database. Dart can talk to MySQL using the pub package sqljocky by James Ots (https://github.com/jamesots/sqljocky). In this section, we will demonstrate how to use this driver step by step. You can see it in action in the using_mysql project.
- To get the database software, download and install the MySQL Community Server installer from http://dev.mysql.com/downloads/mysql/. This is straightforward. However, if you need any help with the installation, visit http://dev.mysql.com/doc/refman/5.7/en/installing.html.
- Run the MySQL database system by starting
mysqldon a command prompt from the bin folder of the MySQL installation. We need to create a database and table to store data. The easiest way is to start the MySQL Workbench program, make a connection, and then click on the button Create a new schema in the connected server, name itjobsdb, and click on apply. - Select the schema by double-clicking on it, and then clicking on the button on the right to the previous button Create a new table in the active schema. Name the table
jobs, and create thedbKey,type,salary,company,postedandopencolumns;dbKeyis the primary key. To import the driver to your application, addsqljockytopubspec.yamland save it. Apub getcommand is then done automatically.
The application starts with using_mysql.dart, where a JobStore object is created, the database is opened, records are written to the jobs table, and then these records are retrieved, as shown in the following code:
import 'job.dart';
import 'jobstore_mysql.dart';

Job job;
JobStore js;

void main() {
  js = new JobStore();
  // 1- create some jobs:
  job = new Job("Web Developer", 7500, "Google", new DateTime.now());
  js.jobs.add(job);
  job = new Job("Software Engineer", 5500, "Microsoft", new DateTime.now());
  js.jobs.add(job);
  job = new Job("Tester", 4500, "Mozilla", new DateTime.now());
  js.jobs.add(job);
  // 2- opening the database:
  js.open();
  // 3- storing data in database:
  js.storeData();
  // 4- retrieving and displaying data from database:
  js.readData();
}
After running the preceding code, we can verify that the insertions succeeded in MySQL Workbench in the jobs table:
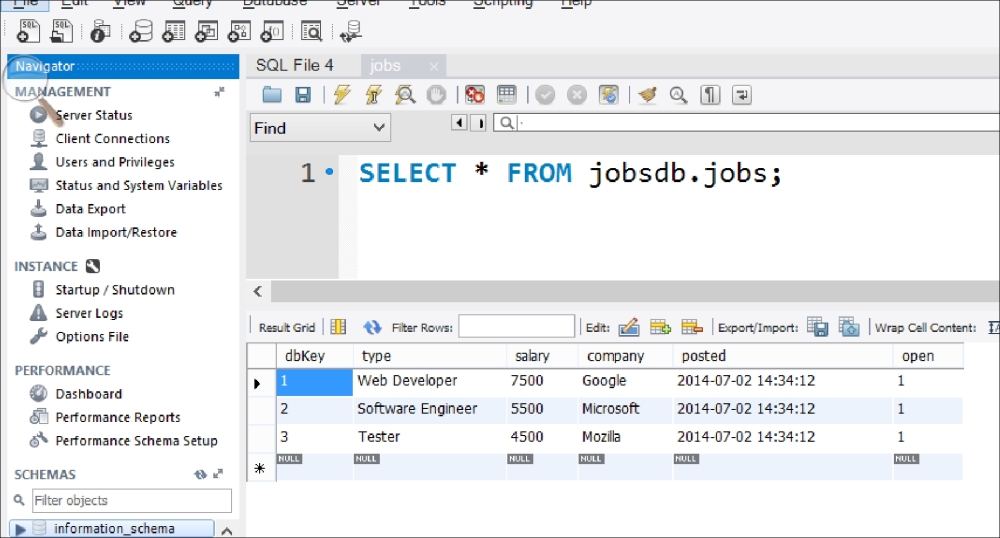
The readData method reads the data from the jobs table and prints it to the console:
dbKey: 1, type : Web Developer, salary: 7500, company: Google, posted: 2014-07-02 14:34:12.000, open: 1
dbKey: 2, type : Software Engineer, salary: 5500, company: Microsoft, posted: 2014-07-02 14:34:12.000, open: 1
dbKey: 3, type : Tester, salary: 4500, company: Mozilla, posted: 2014-07-02 14:34:12.000, open: 1
After the first run, readData will not show any output because it gets executed before the insertions in the database are complete; verify the output through a second run.
The interaction with MySQL through sqljocky takes place in the JobStore class in jobstore_mysql.dart:
import 'package:sqljocky/sqljocky.dart';
import 'package:options_file/options_file.dart';
import 'job.dart';

ConnectionPool pool;

class JobStore {
  final List<Job> jobs = new List();
  Job job;

  // 5- opening a connection to the database:
  open() {
    pool = getPool(new OptionsFile('connection.options'));
  }

  ConnectionPool getPool(OptionsFile options) {
    String user = options.getString('user'),
    String password = options.getString('password'),
    int port = options.getInt('port', 3306);
    String db = options.getString('db'),
    String host = options.getString('host', 'localhost'),
    return new ConnectionPool(host: host, port: port, user: user, password: password, db: db);
  }

  storeData() {
  for (job in jobs) {
  insert(job);
  }
}

// 6- inserting a record in a table:
insert(Job job) {
var jobMap = job.toMap();
pool.prepare('insert into jobs (dbKey, type, salary, company, posted, open) values (?, ?, ?, ?, ?, ?)').then((query) {
  var params = new List();
  params.add(job.dbKey);
  params.add(job.type);
  params.add(job.salary);
  params.add(job.company);
  params.add(job.posted);
  params.add(job.open);
  return query.execute(params);
  }).then((_) {
  }).catchError(print);
}

readData() {
  pool.query('select * from jobs').then((results) {
  processJob(results);
  });
}

processJob(results) {
  results.forEach((row) {
  print('dbKey: ${row.dbKey}, type : ${row.type}, ' 'salary: ${row.salary}, company: ${row.company}, ' 'posted: ${row.posted}, open: ${row.open}'),
  });
}

// 7- updating a record in a table:
update(Job job) {
  var jobMap = job.toMap();

pool.prepare('update jobs set type = ?, salary = ?, company = ?, posted = ?, open = ? where dbKey = ?').then((query) {
  var params = new List();
  params.add(job.dbKey);
  params.add(job.type);
  params.add(job.salary);
  params.add(job.company);
  params.add(job.posted);
  params.add(job.open);
  return query.execute(params);
  }).then((_) {
  }).catchError(print);
}

// 8- deleting a record in a table:
delete(Job job) {
  var jobMap = job.toMap();
  pool.prepare('delete from jobs where dbKey = ?').then((query) {
  var params = new List();
  params.add(job.dbKey);
  return query.execute(params);
  }).then((_) {
  }).catchError(print);
  }
}
The connection information for the database is stored in the connection.options file. In the fifth comment, a connection to the database is opened by calling getPool, which returns a ConnectionPool object that maintains a pool of database connections. The getPool option takes as argument an OptionsFile object, from the options_file package, and reads the information from connection.options:
# connection.options to define how to connect to a mysql db
user=root
password=?????  # substitute your password here
# port defaults to 3306
port=3306
db=jobsdb
# host defaults to localhost
host=localhost
All interactions with the database work via queries. If there is a free connection in ConnectionPool when queries are executed, it will be used; otherwise, the query is queued until there is a free connection. As we can see in readData, a select query is made via pool.query(selectStr);. This returns a Future object, so the processing of the results takes place in the then section. This can be done using the following code:
results.forEach((row) {
print('dbKey: ${row.dbKey}, type : ${row.type}, …'),
The preceding line can also be written as follows:
results.forEach((row) {
print('dbKey: ${row[0]}, type : ${row[1]}, …'),
Insert, update, and delete queries (coded in the methods with the same name) have to first go through the prepare stage and then the execute stage. Let's see a few examples. For insert, this query becomes as follows (refer to the sixth comment):
pool.prepare('insert into jobs (dbKey, type, salary, company, posted, open) values (?, ?, ?, ?, ?, ?)').then((query) {})An insert query on a table that contains an autoincrement field will return the value of that field in ${result.insertId}. For update, this query becomes as follows (refer to the seventh comment):
pool.prepare('update jobs set type = ?, salary = ?, company = ?, posted = ?, open = ? where dbKey = ?').then((query) {}The query for delete is as follows (refer to comment 8):
pool.prepare('delete from jobs where dbKey = ?').then((query) {}The ? character represents values to be substituted in the SQL string. These values are placed in the specified order in the params list, which is given as an argument to query.execute. A query with multiple parameter sets can be executed with query.executeMulti(). If you need a number of queries to be executed as a whole (or all or none succeed), use the Transaction class from sqljocky in the following format:
pool.startTransaction().then((trans) {
trans.query('...').then((result) {
trans.commit().then(() {...});
});
});
The complete API documents can be found at http://jamesots.github.io/sqljocky/docs/.