
In previous chapters, we covered all the basic features of JIRA and showed how you can customize many of its out-of-box features to make JIRA work for you. In Chapter 10, General Administration, we also introduced add-ons, small self-contained extensions that can expand JIRA's existing features. In this chapter, we will take a look at two add-ons that can transform your JIRA to be more than just a simple issue-tracking system.
By the end of the chapter, you will have learned how to:
- Run agile projects in JIRA with GreenHopper
- Collect feedback from visitors directly on your website with Issue Collector
So far, you have seen and used JIRA as a traditional issue-tracking system, where users can log issues and transition them through workflows. With the recent increased adoption of agile development methodologies, it is clear that JIRA by itself is not enough, and this is where GreenHopper comes in.
GreenHopper adds the power of agile methodologies to JIRA, by providing a new user interface to help you and your team plan and visualize the tasks you have at hand. GreenHopper is a separate product and does not come with JIRA. So the first step for us is to install it via the Marketplace.
GreenHopper is a commercial add-on provided by Atlassian. As we have seen in Chapter 10, General Administration, we can discover and install add-ons directly from JIRA through the Universal Plugin Manager. Perform the following steps to install GreenHopper via the UPM:
- Browse to Universal Plugin Manager.
- Select the Find New Add-ons tab.
- Search for
GreenHopperin the search box. This will locate the add-on GreenHopper - Agile project management for JIRA. - Click on on the Free Trial button if you want to evaluate GreenHopper before purchasing, or click on the Buy Now button to purchase directly. This will prompt the UPM to start downloading and installing the add-on.
- Click on the Get License button when prompted, and follow the steps to either generate a trial license or purchase a full license:

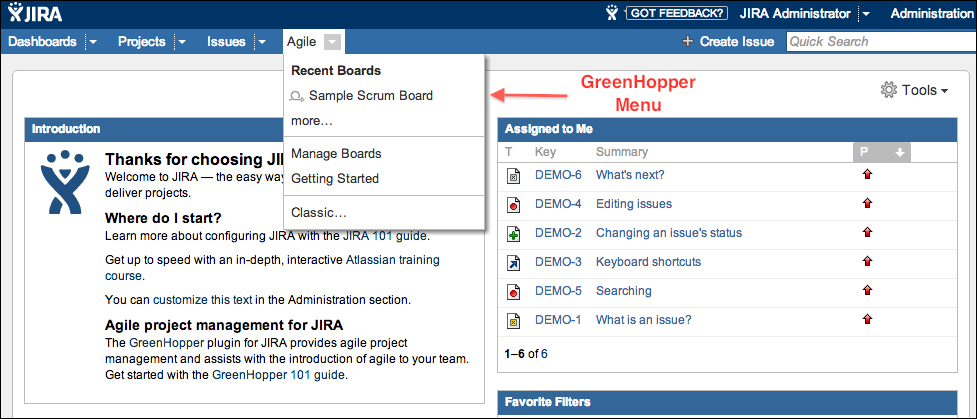
After you have successfully installed GreenHopper, there will be a new item added to JIRA's top menu bar called Agile, as shown in the following screenshot:
Before we start using GreenHopper, the first thing you need to understand is that GreenHopper adds a new user interface to JIRA, allowing you to better visualize the data you already have in JIRA. For example, an issue in GreenHopper is the same as an issue in JIRA, and you can go back and forth between the two user interfaces.
Now that the relationship between GreenHopper and JIRA is clear, we need to familiarize ourselves with a number of new terminologies that we will be using.
Scrum is an agile software development methodology, where the development team plans and works on the project iteratively and incrementally to complete the project.
You can read more on Scrum at http://en.wikipedia.org/wiki/Scrum_(development).
Kanban is a methodology where the focus is to visualize and limit the amount of work that is in progress. Kanban allows the project team to focus on delivering custom value.
You can read more on Kanban at http://en.wikipedia.org/wiki/Kanban_(development).
A board is what GreenHopper uses to display and visualize issues in JIRA. You can think of it as a traditional white board, where you will have sticky notes representing the tasks to be completed.
Following the preceding white board analogy, a card is the sticky note that represents the task to be done. With GreenHopper, a card is an issue, visualized differently:

Stories or user stories represent requirements or features that are to be implemented. They are usually written in a non-technical language and describe what needs to be done and whom the requirement is designed for (e.g. the end user, the administrator), in a few short sentences.
In GreenHopper, a story is represented as an issue of type User Story.
Sprints also known as iterations, are used in iterative agile development methodologies, such as Scrum. A sprint has a specific duration (that is, a start and end date) and is usually between one to four weeks, in which the team works to deliver a portion or an improvement of the whole product or project.
An epic is a large user story that has not yet been broken down into smaller, more manageable stories, usually a group of related stories. Epics should be broken down into their component stories during the planning session, before becoming part of a sprint.
In GreenHopper, an epic is represented as an issue of type Epic.
To start working with GreenHopper, you need to get familiar with boards. You can view and access boards from the Manage Boards page, by pulling down the Agile menu and selecting Manage Boards. From the Manage Boards page, you will see all the boards that are shared with you. The following screenshot shows three boards, two are shared with Sample Project, and one is not shared at all, making it a private board:

GreenHopper has two types of boards, Scrum and Kanban. The Scrum board is designed to support the Scrum methodology, where teams plan and work in sprints. Scrum boards have access to all three modes mentioned above.
The Kanban board is designed to support the Kanban methodology, where teams focus on managing and constraining their work in progress. Since Kanban does not have a planning session like Scrum, its boards do not have the Plan mode.
There are three modes for GreenHopper boards, namely Plan, Work, and Report:
- Plan: This is where you plan your sprints. This mode is only available to Scrum boards.
- Work: This is where cards (issues) are progressed (workflow transition) from one column (issue status) to another.
- Report: This contains a number of built-in reports and charts such as the Burndown chart (Scrum) and Control chart.
The following screenshot shows an example of a Scrum board in the Plan mode:

There are two ways to create a new board. You can create either a new Scrum or Kanban board. Perform the following steps to create a new board from presets:
- Bring down the Agile menu and select Manage Boards.
- Click on the Tools option at the top-right and select Create Board.
- Choose to create either a Scrum or Kanban board.
- Provide a name for the new board.
- Select the project the new board is for.
- Click on the Create button.
When creating a new board based on the presets, GreenHopper will automatically generate the necessary JQL queries based on the selected project. For a Scrum board, it will include all the issues in the project, while for a Kanban board, it will include all the issues that do not belong to a released version.

Creating a new board based on the presets is simple and fast but each board is linked to a project only. You can also create a new board with a filter, and this way, you can control what issues will be added to the board. One thing to keep in mind is that you can only create Kanban boards this way. You cannot create a Scrum board with a filter.
Perform the following steps to create a new Kanban board with a filter:
Teams that work with the Scrum agile methodology should use Scrum boards, which as we have seen, can be created with the Scrum preset. Scrum boards have a Plan mode, which lets you create epics, add stories to epics, and set up sprints.
As you have already seen, an epic is a large user story, which needs to be broken down during the planning session before the start of a sprint.
You can create epics directly on your Scrum board in GreenHopper. Perform the following steps to create a new epic:
- Browse to your Scrum board and make sure you are in the Plan mode by clicking on Plan at the top-right.
- Click on the plus (+) button in the Epic Panel to the left.
- Provide a name for your new epic in the Epic Name field. The epic name is what will be used to identify other issues, such as stories that are linked to it.
- Provide a summary for the new epic. It should be a short.
As shown in the following screenshot, the Create Epic dialog box looks very similar to the normal Create Issue dialog box. In GreenHopper, when creating a new epic, you just create a new issue of type epic in JIRA. This means that you can create epics via the traditional method as well:

After you have created your epic, you can start adding issues to it. Adding issues to an epic allows you to group similar stories together. You can add new as well as existing issues to an epic.
Perform the following steps to add a new issue to an epic:
- Browse to your Scrum board and make sure you are in the Plan mode by clicking on Plan at the top-right.
- Click on the triangle icon next to the epic's name to expand the epic's details.
- Click on the Create issue in epic link.
- Create the issue as per normal.
By default, GreenHopper will assume that you are creating a new story under the epic, but you can change the issue type for other types of issues.
Perform the following steps to add an existing issue to an epic:
- Browse to your Scrum board and make sure you are in the Plan mode by clicking on Plan at the top-right.
- Drag-and-drop the issue onto the epic you want to add it to. The epic will turn green when the issue is dragged onto it.
During your planning sessions, you and your team will need to decide what issues in the backlog will be in your next sprint. To create a new sprint in GreenHopper, all you have to do is to click on the Create Sprint button in your backlog.
After creating your new sprint, you can drag-and-drop issues from your backlog into the sprint, or you can add issues from your backlog by dragging the sprint marker or footer down, and all issues that are above the marker will be automatically added to the sprint. You can add issues from the backlog or other sprints that have not yet started, but not issues that are a part of an active sprint.
After creating your next sprint and including issues to be completed, you are ready to start your sprint. Perform the following steps to start a sprint:
- Browse to your Scrum board and make sure you are in the Plan mode by clicking on Plan at the top-right.
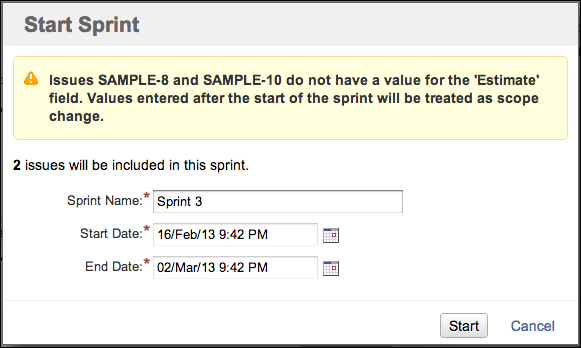
- Click on the Start Sprint link. This will bring up the Start Sprint dialog box.
- Specify a name for the sprint if you want to change it.
- Specify the start and end date for the sprint.
- Click on the Start button to start the sprint, and you will be taken to the Work mode of the board:
On the last day of the sprint, as specified when you started it, you can end it. Any issues that have not been completed will be returned to the backlog or the next available sprint if there is one. Perform the following steps to end a sprint:

There is no Plan mode in Kanban boards, and you start in the Work mode directly. With Kanban, the focus is on visualizing and understanding what you and your team are working on, and also limiting the amount of work in progress.
So, with each Kanban board, you can set a minimum and maximum constraint on the number of issues that can be within each of the columns, and if the constraints are exceeded, the board will alert you of that. The following screenshot shows a Kanban board in the Work mode, and as you can see, the In Progress column is highlighted in red to indicate that the constraint placed on the column has been exceeded:

Each column on a Kanban board can have its own minimum and maximum constraints. Perform the following steps to set up the constraints for a board:
- Browse to your Kanban board and make sure you are in the Work mode by clicking on Work at the top-right.
- Bring down the Tools menu and click on the Configure option.
- Select the Columns tab.
- Select the type of Column Constraint.
- Specify the minimum and maximum constraint values for each of the columns you want to place a constraint on. The constraints will be saved automatically.
The following screenshot shows that we are limiting the maximum number of issues that can be in the To Do and In Progress columns to 10 and 5 respectively, and the minimum number of issues in the Done column to 5:

Since Kanban does not have sprints, instead of ending a sprint in the Work mode, you release a version. While releasing a version from a Kanban board, a new version will be created in JIRA, and all issues that are released, as part of the version will automatically have their Fix Version/s field set to the new version. Perform the following steps to release a version from a Kanban board:
- Browse to your Kanban board and make sure you are in the Work mode by clicking on Work at the top-right.
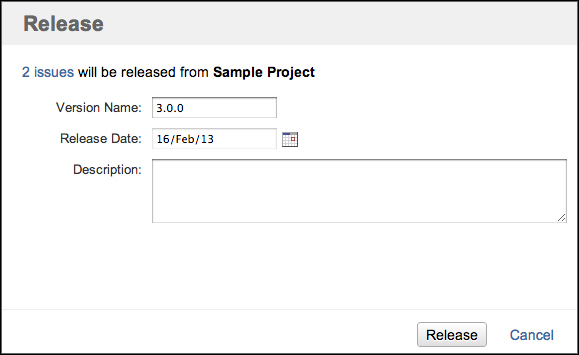
- Click on the Release link at the top of the Done column.
- Provide a new name for the new release version.
- Specify the release date; usually today's date.
- Provide an optional description for the release.
- Click on the Release button.
By default, the JIRA home page will be the dashboard. But after a while, you may find that you are working in the GreenHopper interface more and more and would like to default the home page to your board instead. You can do this by performing the following steps:
- Click on on the triangle icon next to your name at the top right to bring down your user menu.
- Select Agile under the My JIRA Home heading:
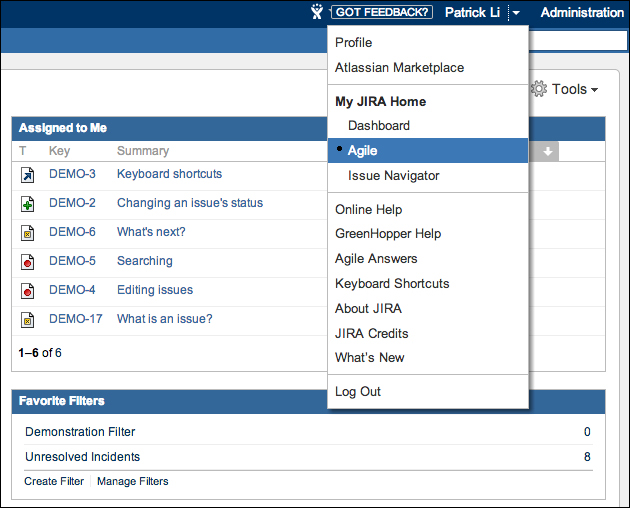
After setting your home to Agile, the next time you log in or click on the JIRA icon at the top left-corner, you will be taken to your last visited GreenHopper board instead of the standard JIRA dashboard.