JIRA manages its permissions in a hierarchical manner. Each level is more fine-grained than the one above it. For a user to gain access to a resource, for example to view an issue, he/she needs to satisfy all three levels of permission (if they are all set on the issue in question):
You will look at each of the permission levels and how you can configure them to suit your requirements, starting from the most coarse-grained permission level – global permissions.
Global permissions, as the name suggests, is the highest permission level in JIRA. These are coarse-grained permissions applied globally across JIRA, controlling broad security levels such as the ability to access JIRA and administer configurations.
Because they are not fine-grained security, global permissions are applied to user groups rather than users. The following table lists all the permissions and what they control in JIRA:
|
Global permission level |
Description |
|---|---|
|
JIRA System Administrators |
Permission to perform all JIRA administration functions. This is akin to the |
|
JIRA Administrators |
Permission to perform most JIRA administration functions that are not related to system-wide changes. (for example, configure SMTP server, export/restore JIRA data). |
|
JIRA Users |
Permission to log in to JIRA. Newly created users will automatically join the groups with this permission. |
|
Browse Users |
Permission to view the list of JIRA users and groups. This permission is required if the user needs to use the user/group picker function. |
|
Create Shared Object |
Permission to share filters and dashboards with other users. |
|
Manage Group Filter Subscriptions |
Permission to manage group filter subscriptions. Filters will be discussed in Chapter 9. |
|
Bulk Change |
Permission to perform bulk operations including the following:
|
For people who are new to JIRA, it is often confusing when it comes to distinguishing between the JIRA system administrator and JIRA Administrator. For the most part, both are identical, in that they can carry out most of the administrative functions in JIRA.
The difference is JIRA administrators cannot access functions that can affect the application environment or network while the JIRA system administrator has access to everything.
Although it is not necessary to have a separate role for both, it is sometimes useful to have one person overlook general JIRA administrative tasks while have another with the ability to configure system-wide settings such as the SMTP mail service, which is a system resource outside of the JIRA application. By default, the jira-administrators group has both JIRA system administrators' and JIRA administrators permission.
The following list shows system operations that are only available to people with JIRA system administrators' permission:
- Configure SMTP server details
- Configure CVS source code repository
- Configure listeners
- Configure services
- Configure where JIRA stores index files
- Import data into JIRA from an XML backup
- Export data from JIRA to an XML backup
- Configure where attachment settings
- Access JIRA license details
- Grant/revoke JIRA system administrators' global permission
- Delete users with JIRA system administrators' global permission
Global permissions are configured and maintained by JIRA administrators and JIRA system administrators (to grant JIRA system administrator global permission), as follows:
- Browse to the JIRA administration console.
- Select Global Permissions to bring up the Global Permissions page:
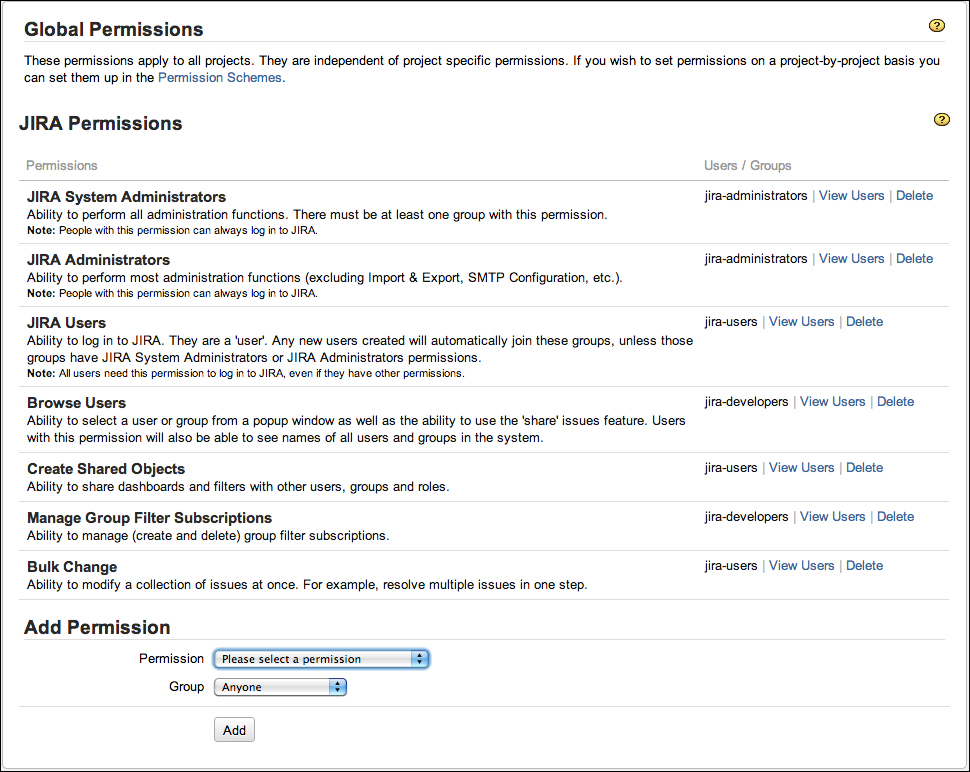
Global permissions can only be granted to groups. For this reason, you will need to organize your users into logical groups for global permissions to take effect. For example, you will want to have all your users belong to a single group such as the jira-users group, so you can grant them the permission to access JIRA:
- Browse to the Global Permissions page.
- Select the permission you wish to assign from the Add Permission section.
- Choose the group to be given the permission.
- Click on the Add button to add the assignment.
The Group drop-down list will list all the groups in JIRA. It will also have an extra option called Anyone. This option includes users that are not logged in. You cannot select this option when granting the JIRA Users permission, as JIRA Users is required to log in and Anyone refers to a non-logged-in user. For a production system, it is recommended to take care when granting any global permission to Anyone (non-logged-in users) as this can lead to security and privacy concerns. For example, by granting Anyone as the global permission for Browse Users, anyone with access to your JIRA instance will be able to get your registered users' information.
Global permissions can also be revoked. There are, however, a few rules and restrictions you need to be aware of:
- Both JIRA system administrators and JIRA administrators can revoke global permissions, but JIRA administrators cannot revoke the JIRA system administrator global permission.
- If you revoke JIRA users' permission, you are effectively disallowing the affected users from accessing JIRA (they will not be able to log in to JIRA).
- You will not be able to grant additional JIRA users permission if you have exceeded the number of users permitted by your license.
Perform the following steps to delete a global permission from a group:
- Browse to the Global Permissions page.
- Click on the Delete link for the group you wish to remove from the global permission. This will take you to the Delete Global Permission page.
- Click on the Delete button to remove the global permission.
JIRA has built-in validation rules to prevent you from accidentally locking yourself out by accidentally removing the wrong permissions. For example, JIRA will not let you delete the last group from JIRA system administrators' global permission, as doing so will effectively prevent you from adding yourself back (as only JIRA system administrators can assign/revoke global permissions).
As you have seen, global permissions are rather coarse in what they control and are applied globally. Since they can only be applied to groups, they are rather inflexible when it comes to decide whom to grant the permissions to.
To provide a more flexible way of managing and designing permissions, JIRA allows you to manage permissions on the project level, which allows each project to have its own distinctive permission settings. Furthermore, JIRA allows you to grant permissions to users through a range of options including the following:
- Reporter: This is the user who submitted the issue
- Group: These are all users that belong to the specified group
- Single user: This is any user in JIRA
- Project lead: This is the lead of the project
- Current assignee: This is the user currently assigned to the issue
- User custom field Value: This user is specified in a custom field of type User Custom Field.
- Project role: These are all users that belong to the specified role.
- Group custom field Value: These are users within the specified group in a Group Custom Field.
The list of permissions is also more fine-grained and designed more around controlling permissions on a project level. The only catch to this is that the list is final, and you cannot add new permission types.
|
Permission |
Description |
|---|---|
|
Permission to administer a project. Users with this permission are referred to as project administrators. Users with this permission are able to edit project role membership, components, versions, and general project details such as name and description. | |
|
Permission for users to browse and view the project and its issues. If a user does not have the browse project permission for a given project, the project will be hidden from him/her, and notifications will not be sent. | |
|
Permission to view version control system configured for this project (usually for software development projects). | |
|
Permission for users to create issues. | |
|
Permission for users to edit issues | |
|
Permission for users to set and update due dates for issues. | |
|
Permission for users to move issues. | |
|
Permission for users to assign issues to different users. | |
|
Users that can be assigned to issues. | |
|
Permission for users to resolve an issue and set values for the Fix For Version field. | |
|
Permission for users to close an issue. | |
|
Permission for users to change the value of the Reporter field. | |
|
Permission for users to delete an issue. | |
|
Permission for users to link issues together (if issue linking is enabled). | |
|
Permission for users to set issue security levels to enable issue-level security. Please go through the next sections to know more about Issue Security. | |
|
Permission to view the voters and watchers' list of issues. | |
|
Permission to manage the watchers' list of issues (add/remove watchers). | |
|
Permission for users to add comments to issues. | |
|
Permission for users to edit comments made by all users. | |
|
Permission to edit own comments. | |
|
Permission to delete all comments. | |
|
Permission to add attachments to issues (if attachment is enabled). | |
|
Permission to delete all attachments on issues. | |
|
Permission to delete attachments on issues added by yourself. | |
|
Permission to log work done on issues (if time tracking is enabled). | |
|
Permission to edit worklogs made by yourself. | |
|
Permission to edit all worklogs. | |
|
Permission to delete worklogs made by yourself. | |
|
Permission to delete all worklogs. |
As you can see, even though the list cannot be modified, JIRA provides you with a very comprehensive list of permissions that will cover almost all of your permission needs.
As you would have guessed, with this many permissions, it will be highly inefficient if you have to create them individually for each project you have. JIRA lets you define your permissions once and apply them to multiple projects, with permission schemes.
Permission schemes, like other schemes such as notification schemes, are collections of associations between permissions and users or a collection of users. Each permission scheme is a reusable, self-contained entity that can be applied to one or more projects.
Like most schemes, permission schemes are applied at the project level. This allows you to apply fine-grained permissions for each project. Just like project roles, JIRA administrators oversee the creation and configuration of permission schemes, and it is up to each project's administrator to choose and decide which permission scheme to use. This way, it encourages administrators to design their permissions that can be reused based on the common needs of an organization, and with meaningful scheme names and descriptions, project administrators will be able to choose the scheme that will fit their needs the best, instead of requesting a new set of permissions to be set up for each project.
We will first look at how JIRA administrators manage and configure permission schemes and then how project administrators can apply them in their projects.
Perform the following steps to start managing permission schemes:
- Browse to the JIRA administration console.
- Select Permission Schemes to bring up the Permission Schemes page:

On the Permission Schemes page, you will see a list of all the permissions schemes. From here, you will be able to create new schemes, edit and delete existing schemes, as well as configure each scheme's permission settings.
JIRA comes with a preconfigured permission scheme called Default Permission Scheme. This scheme is suitable for most simple software development projects. However, it is often not enough and it is usually a good practice to not modify the Default Permission Scheme directly, so you should create your own permissions schemes:
- Browse to the Permission Schemes pages.
- Click on the Add Permission Scheme button. This will take you to the Add Permission Scheme page.
- Provide a meaningful name and description for the new permission scheme.
- Click on the Add button to create the permission scheme.
For new permission schemes, all of the permissions will have no permission configured. This means that if you start using your new scheme straightaway, you will end up with a project that nobody can access. You will look at how to configure permissions in the later sections.
You can keep a permission scheme's name and description up to date. You will often need to do this after making a copy of an existing permission scheme. As you will see in the following section, when you copy a permission scheme, JIRA automatically generates a name for your new scheme:
- Browse to the Permission Schemes pages.
- Click on the Edit link for the permissions scheme you wish to update. This will take you to the Edit Permissions Scheme page.
- Update the name and description with new values.
- Click on the Update button to apply the changes.
Unlike some other types of schemes, you can delete permissions schemes even if they are being used by projects:
- Browse to the Permission Schemes pages.
- Click on the Delete link for the permissions scheme you wish to remove. This will take you to the Delete Permissions Scheme page.
- Click on the Delete button to remove the permission scheme.
If you are deleting a permission scheme that is being used by one or more projects, JIRA will prompt you with the list of projects that are currently using the scheme. If you delete it, all the projects will be automatically updated to use the Default Permission Scheme.
It is not always desirable to create permission schemes from scratch, as there are around thirty permissions you will need to set for a new one. JIRA allows you to easily clone existing permissions schemes with the copy function:
- Browse to the Permission Schemes pages.
- Click on the Copy link for the permissions scheme you wish to clone. This will immediately create a copy of the permission scheme with the name with Copy of appended to the front of the original scheme's name.
One good use of the copy function is to create a backup of an existing permission scheme before you make changes. It is sometimes a good practice to name your permission schemes with a version number, and every time you need to make a change, create a copy and increment the version number in the name. This way, it helps you to keep track of your changes and help you to rollback your changes if things do not work out as planned.
Just like most other schemes in JIRA, you need to further fine-tune your permission scheme to make it useful:
- Browse to the Permission Schemes pages.
- Click on the Permissions link for the permissions scheme you wish to configure. This will take you to the Edit Permissions page.
In this page, you will be presented with a list of project-level permissions, along with short descriptions for each, and the users, groups, and roles that are linked to each of the permissions. You will notice that for the Default Permission Scheme, most of the permission options have default users linked to them, through project roles. If you are looking at a new permission scheme, there will be no users linked to any of the permissions. This is your one-page view of permission settings for projects, and you will also be able to add and delete users.
Unlike some other schemes, such as the notification scheme, which allows you to add additional options (through custom events), you cannot define new permissions for a permission scheme:

Like the notification scheme, JIRA offers you a range of options to specify which users should have certain permissions. You can specify users through some of the most common options such as groups, but you also have some advanced options, such as using users specified in a custom field.
Again, you have two options to grant permissions to a user. You can add them to specific permissions or multiple permissions at once. Both options will present you with the same interface and there is no difference between the two:
- Browse to the Edit Permissions page for the permission scheme you wish to configure.
- Click on the Grant permission link or the Add link for a specific permission. This will take you to the Add New Permission page.
- Select the permissions you wish to grant to the user.
- Select the user option to specify who to grant the permission to.
- Click on the Add button to grant the selected permission.
Permission options, such as User Custom Field Value, is a very flexible way of allowing the end users to control access. For example, you can have a custom field called Editors, and set up your Edit Issues permission to allow only users specified in the custom field to be able to edit issues.
The custom field does not have to be placed on the usual view/edit screens for the permission to be applied. For example, you can have the custom field appear on a workflow transition called Submit to Manager, and once the user has selected the manager, only the manager will have permission to edit the issue.
You can easily revoke a permission given to a user, as follows:
- Browse to the Edit Permissions page for the permission scheme you wish to configure.
- Click on the Delete link for the permission you wish to revoke. This will take you to the Delete Permission page.
- Click on the Delete button to revoke.
When you are trying to revoke permissions to prevent users from gaining certain access, you need to make sure that there are no other user options granted to the same permission that might be applied to the same user. For example, if you have both the Single User and Group options set for the Browse Projects permission, then you will need to make sure to revoke the Single User option and also make sure that the user does not belong to the Group option selected, so you do not have a loophole in your security settings.
We have been saying how permission schemes can be selected by project managers to set permissions for their projects all this time, now we will look at how to apply the scheme to your projects. There really is not anything special, permission schemes are applied to projects in the same way as notification and workflow schemes:
- Browse to the Project Administration page for the project you want to assign project roles for.
- Select the Permissions tab.
- Select Use a different scheme option in the Actions menu.
- Select the permission scheme to use.
- Click on the Associate button.
Permission schemes are applied immediately and you will be able to see the permissions take effect.
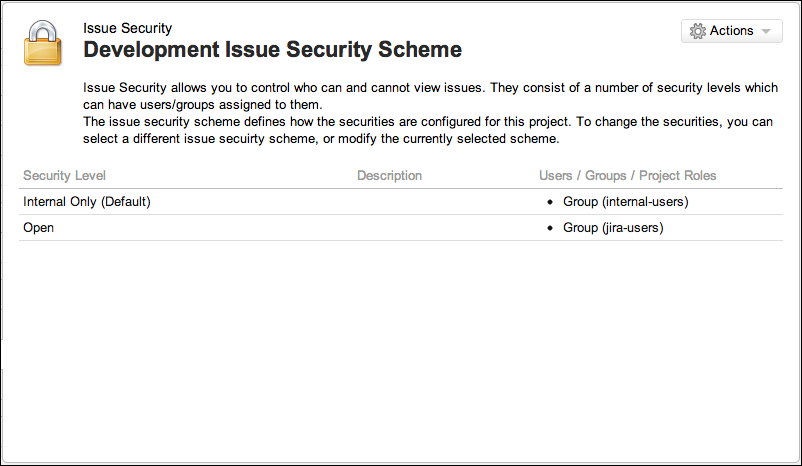
We have seen how JIRA administrators can restrict general access to JIRA with global permissions, and what project administrators can do to place fine-grained permissions on individual projects through permission schemes. JIRA allows you to go to down yet another level to allow ordinary users to set the security level on the issues they are working with, with Issue Security.
Issue security allows users to set view permissions (not edit) on issues by selecting one of the preconfigured issue security levels. This is a very powerful feature, as it allows the delegation of security control to the end users and empowers them (to a limited degree) to decide who can view their issues.
On a high level, issue security works in a similar way to permission schemes. The JIRA Administrator will start by creating and configuring a set of issue security schemes with security levels set. Project administrators can then apply one of these schemes to their projects, which finally at the end allows the users (with Set Issue Security permission) to select the security levels within the scheme and apply them to individual issues.
As explained earlier, the starting point of using issue security is the issue security scheme. It is the responsibility of the JIRA administrator to create and design the security levels, so they can be reused as much as possible:
- Browse to the JIRA administration console
- Select Issue Security Schemes at the bottom to bring up the Issue Security Schemes page:
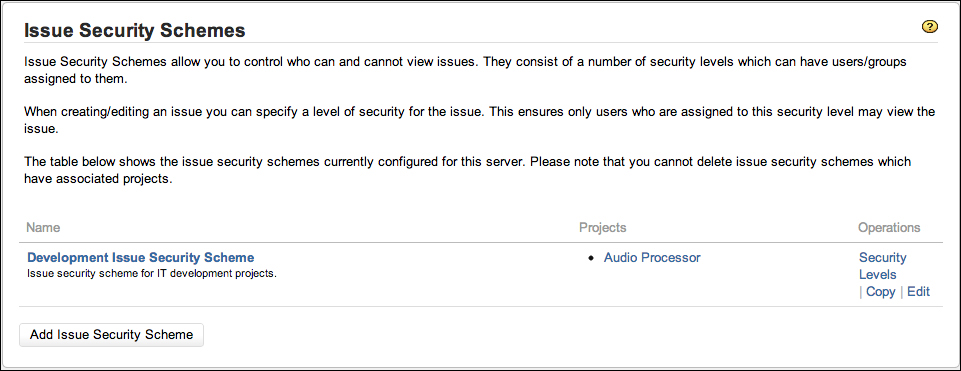
JIRA does not come with any predefined issue security schemes, so you will have to create your own from scratch. Perform the following steps to create a new issue security scheme:
- Browse to the Issue Security Schemes page.
- Click on the Add Issue Security Scheme button. This will bring up the Add Issue Security Scheme page.
- Provide a meaningful name and description for the new scheme.
- Click on the Add button to create the new issue security scheme.
Since the issue security scheme does not define a set of security levels like the permission scheme, you will need to create your own set of security levels right after you have created your scheme.
Unlike permission schemes that have a list of predefined permissions, with issue security schemes, you are in full control over how many options you will like to add to the schemes.
The options within an issue security scheme are known as Security Levels. They represent the levels of security that users need to meet before JIRA will allow them access to the requested issue. Please note that even though they are called security levels, it does not mean there are any forms of hierarchy amongst the set of levels you create.
Perform the following steps to configure an issue security scheme:
- Browse to the Issue Security Schemes page.
- Click on the Security Levels link for the issue security scheme you wish to configure. This will bring up the Edit Issue Security Levels page:
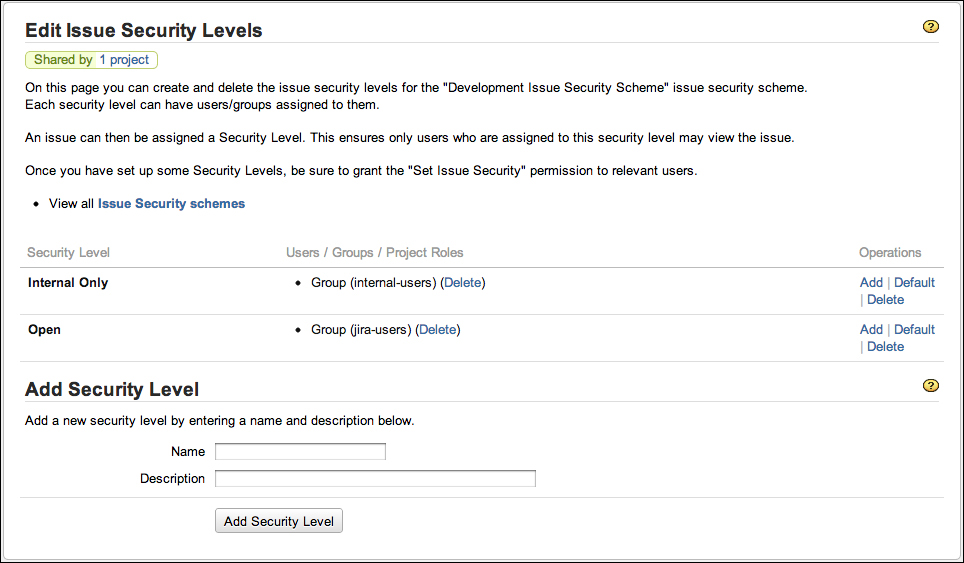
From here, you can create new security levels and assign users to existing security levels.
Since issue security schemes do not define any security levels, the first step to configure your scheme would be to create a set of new security levels:
- Browse to the Edit Issue Security Levels page for the issue security scheme you wish to configure.
- Provide a meaningful name and description for the new security level in the Add Security Level section.
- Click on the Add Security Level button.
You can add as many security levels as you like in a scheme. One good practice is to design your security levels based on your team or project roles.
Similar to permission schemes, once you have your security levels in place, you will then need to assign users to each of the levels. Users assigned to the security level will have permissions to view issues with the specified security level:
- Browse to the Edit Issue Security Levels page.
- Click on the Add link for the security level you wish to assign users to. This will bring up the Add User/Group/Project Role to Issue Security Level page.
- Select the option you wish to assign to the security level.
- Click on the Add button to assign the users:
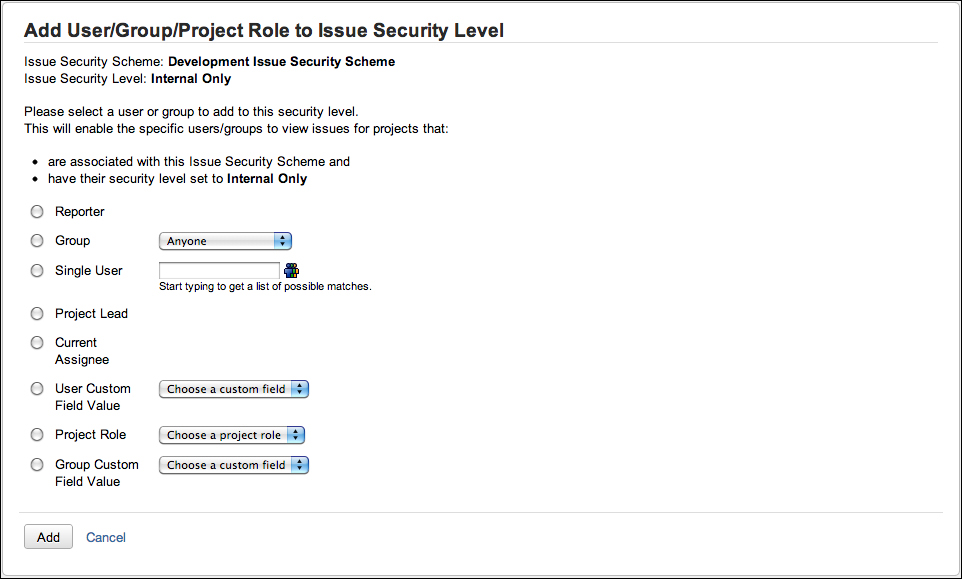
While it may be tempting to use the Single User option to add individual users, it is a better practice to use other options such as Project Role and Group, as it is more flexible by not tying the permission to individual users, and allows you to control permission with options such as group association.
You can set a security level to be the default option for issues if none is selected. This can be a useful feature for projects with high security requirement to prevent users (with Set Issue Security permission) from forgetting to assign a security level for their issues:
- Browse to the Edit Issue Security Levels page.
- Click on the Default link for the security level you with to set as default.
Once set as default, the security level will have Default next to its name. Now, when the user creates an issue and does not assign a security level, the default security level will be applied.
You can revoke users assigned to security levels or remove the security level completely. When you revoke a user, he/she will no longer have access to the issue unless there is another user setting, which the user also belongs to, applied to the same security level.
Perform the following steps to revoke a user from a security level:
- Browse to the Edit Issue Security Levels page.
- Click on the Delete link for the users/groups/project roles you wish to remove. This will take you to the Delete Issue Security page.
- Click on the Delete button to revoke the user.
When you delete a security level, you will be affecting all of the issues that are currently set to the security level. JIRA allows you to update those issues to use a different security level (if one is available), or have no security level applied:
- Browse to the Edit Issue Security Levels page.
- Click on the Delete link for the security level you with to remove. This will take you to the Delete Issue Security Level page. If there are issues set to the security level, JIRA will list the issues and also ask you to change their security level settings.
- Select a new security level for the issues affected.
- Click on the Delete button to remove the security level.

Just like permission schemes, the project administrators apply issue security schemes to projects. Applying the issue security scheme is similar to applying the workflow scheme, where there is an intermediate migration step involved. This is to ensure that existing issues with issue security levels set can be successfully migrated over to the new security-levels in the scheme:
- Browse to the Project Administration page for the project you want to assign project roles for.
- Select the Issue Security tab.
- Select Use a different scheme option in the Actions menu.
- Select the permission scheme to use.
- Click on the Next button to move to step 2 of the process.
- Select the new security level to apply to the existing issue that might be affected by this change.
- Click on the Associate button to apply the new issue security scheme: