
As seen earlier, issues in JIRA can represent many things ranging from software development tasks to project management milestones. Issue type is what differentiates one issue from another.
Each issue has a type (therefore the name issue type), which is represented by the issue type field. This lets you know what type of issue it is, and also helps determine many other aspects of it, such as what fields will be displayed for this issue.
JIRA comes with a set of default issue types, as shown in the following table:
|
Issue type |
Description |
|---|---|
|
A problem that impairs or prevents the functions of the product | |
|
An enhancement to an existing feature | |
|
A new feature of the product | |
|
A task that needs to be done |
The default issue types are great for simple software development projects, but they do not necessarily meet the needs of others. Since it is impossible to create a system that can address everyone's needs, JIRA lets you create your own issue types and assigns them to projects. For example, for a help desk project, you might want to create a custom issue type called ticket
. You can create this custom issue type and assign it to the Help Desk project and users will be able to log tickets, instead of bugs in the system.
Issue types are managed through the Manage Issue Types page. Perform the following steps to access this page:
- Log in to JIRA as a JIRA administrator.
- Browse to the administration console by clicking on the Administration link at the top navigation panel.
- Click Issue Types under the Issue Types section at the bottom-right of the page:

You can create any number of issue types. Perform the following steps to create a new issue type:
- Browse to the Manage Issue Types page.
- Click on the Add Issue Type button.
- Type a unique name for the new issue type.
- Type in a general description for the issue type.
- Select if the new issue type will be a standard issue type or a subtask issue type.
- Click on the select image link to bring up the Icon selection page.
- Select an image icon.
- Click on Add to create the new issue type.
When deleting an issue type, you have to keep in mind that the issue type might already be in use; meaning there are issues created with that issue type. So, if you delete an issue type, you will need to select a new one for those issues. The good news is that JIRA takes care of this for you. As shown in the next screenshot, we delete the Bug issue type and JIRA informs us of the already existing three issues of type Bug. You will need to assign them to a new issue type, such as Improvement.
Perform the following steps to delete an existing issue type:
- Browse to the Manage Issue Types page.
- Click on the Delete link for the issue type you wish to delete. This will bring up the Delete Issue Type page. If there are existing issues with the issue type you are trying to delete, you will be asked to select a new issue type.
- Select the new issue type for the existing issues. Once deleted, those issues will be automatically updated to the new issue type.
- Click on the Delete button to delete the issue type:

JIRA allows only one person (assignee) to work on one issue at a time. This design ensures that an issue is a single unit of work that can be tracked against one person. However, in the real world, we often find ourselves in situations where we need to have multiple people working on the same issue. This may be caused by a poor breakdown of tasks or simply because of the nature of the task at hand. Whatever the reason, JIRA provides a mechanism to address this problem through subtasks.
Subtasks are similar to issues in many ways, and as a matter of fact, they are a special kind of issue. They must have a parent issue, and their issue types are flagged as subtask issue types. You can say that all subtasks are issues, but not all issues are subtasks.
For every issue, you can have one or more subtasks that can be assigned and tracked separately from one another. Subtasks cannot have other subtasks. JIRA allows only one level of subtasks.
Subtasks are enabled by default. If you have subtasks disabled for some reason, you will need to enable this feature.
Perform the following steps to enable subtasks in JIRA:
- Log in to as a JIRA administrator user.
- Browse to the administration console by clicking on the Administration link at the top navigation panel.
- Click on Sub-Tasks under Issue Types section. This will take you to the Sub-Tasks Administration page.
- Click on Enable to enable subtasks in JIRA.
Since subtasks belong to an issue, you need to browse to the issue first before you can create a new subtask:
- Browse to the issue you wish to create subtasks for.
- Select Create Sub-Task from the More Actions menu.
You will see the familiar Create Issue dialog box. However, one thing you will notice is that, unlike when you are creating an issue, you do not select which project to create the subtask in. This is because JIRA can determine the project value based on the parent issue. You will also notice that you can only select issue types that are subtasks.
Other than these differences, creating a subtask is no different than creating a normal issue. You can customize the fields shown on the dialog box and choose to rapidly create multiple subtasks by selecting the Create another option.
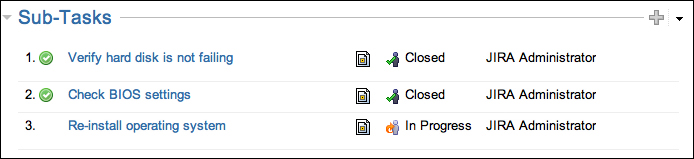
Once the subtask has been created, it will be added to the Sub-Tasks section of the parent issue. You will see all the subtasks that belong to the issue and their status. If a subtask has been completed, it will have a green tick next to it:
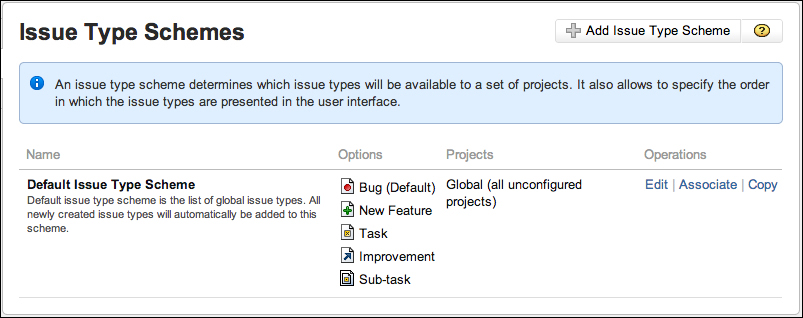
Issue type schemes are templates or collections of issue types that can be applied to projects. As shown in the next screenshot figure, JIRA comes with Default Issue Type Scheme, which is applied to all projects that do not have specific issue type schemes applied.
When a new issue type is created in JIRA, it is added to Default Issue Type Scheme. This means that the new issue type will be available to all the projects by default. This will become a problem when you start to have specialized projects such as help desk, and issue types such as Bug become inappropriate:
To overcome this problem, JIRA lets us group a collection of issue types together. We can also rearrange the order of the issue types within the collection so that they appear in the drop-down list in a logical manner to the users. In effect, we create an issue type scheme, a template for issue types, and their order, which can be reused and applied to one or more projects.
We will create a new issue type scheme for our example JIRA implementation later in the chapter.
Perform the following steps to create a new issue type scheme:
- Log in to JIRA as a JIRA administrator.
- Browse to the administration console by clicking on the Administration link at the top navigation panel.
- Click on Issue Types Schemes under the Issue Types section. This will bring you to the Manage Issue Type Scheme page.
- Click on the Add Issue Type Scheme button.
- Provide a name for the new issue type scheme in Scheme Name.
- Drag the issue types you want to be part of the scheme from the Available Issue Types list and drop them into the Issue Types for Current Scheme list.
- Select a Default Issue Type value. Note that you can only select a default issue type after you have selected at least one issue type for the new scheme.
- Click on the Save button:

After the issue scheme has been created, you will need to associate it with the projects you want to apply the scheme to. The simplest way to do this is to click on the Associate link for the issue type scheme and then select the projects you want. This allows you to apply the scheme to multiple projects at once.