There will be many instances during CG compositing where a few specific meshes in the image would require a mask pass. This provides control to modify specific pixels. To obtain these mattes, the ID Mask node can be used along with the information stored in Object Index or Material Index passes.
When given a value for the index, the ID Mask node creates a mask for the meshes that have the same value assigned as their Pass Index value, as shown in the following screenshot. All these Pass Index values of meshes can be obtained using the Object Index pass. The Object or Material Index pass has to be connected to the ID value socket of the ID Mask node, for the node to pick the Index values. The generated mask information can be used as an input for the Fac sockets available to many Blender nodes to affect only the required mesh.
In the following screenshot, assigning Pass Index to one of the three cubes and enabling the Object Index pass is explained. When the Object Index pass from this example is plugged into the ID value socket of the ID Mask node and a value of 2 is given as the index value to the ID Mask node, it outputs the mask of the blue cube.

The following screenshot shows how the blue cube mask is created using the ID Mask node, using the Object Index pass:

Now that the mask for the blue cube is available, this blue cube can be converted to a pale and bright colored cube, with the flow explained in following screenshot:

Similar to Object Index, Material Index can also be used with the ID Mask node. Material Index is available in the Material option.
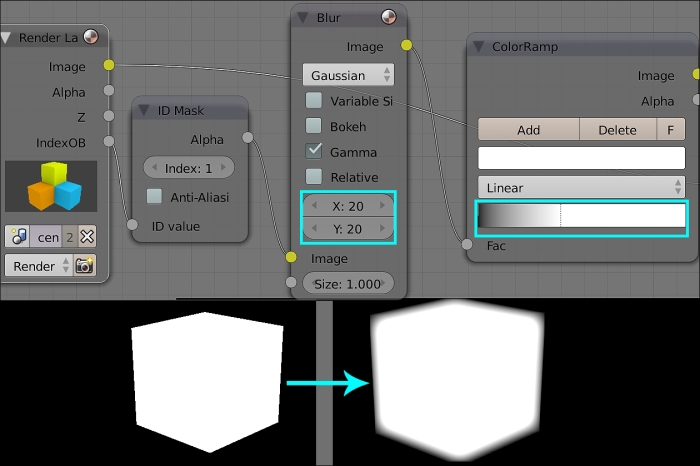
Sometimes, the edges of the alpha need to be expanded or blurred to obtain a specific effect or to soften the aliased edges. This effect can be achieved using the Blur and ColorRamp nodes in cohesion.
To blur the mask generated for the blue cube, it has to be connected to a Blur node and the Blur node has to be connected to the ColorRamp node, as shown in the following screenshot. Now, by increasing the X and Y values in the Blur node, the mask area can be expanded or contracted. Using the black and white handles in the ColorRamp node, the edge of the modified mask can be softened or sharpened. This process of altering the mask boundary is termed as edge filtering.

