Blender Compositor UI is very intuitive yet powerful. Layout switcher, shown in following screenshot, can be used to switch to the compositing workspace. This UI primarily consists of two modules:

Alternatively, the UI can be customized by splitting or joining the layout as per requirement, as shown in the following screenshot. Moving the pointer to any edge of the panel turns the pointer into a two-sided arrow. Then, right-clicking will show you options to split or merge the panel as per your requirement. The customized layout can be saved as a scene preset in layout switcher.

The following screenshot shows a typical compositing environment with all the relevant panels:

The Node Editor has a menu panel and workspace area as shown in following screenshot. The menu panel has all the menu items required to create the nodes and view options. The workspace area is where the graph will be built. As an initial set up, the Use Nodes checkbox in the menu panel has to be checked. The Add menu in the menu panel can be used to find all of the available Blender' Compositor nodes, which will automatically be populated in the workspace area when selected.
The Backdrop checkbox provides a means to be able to project the viewer node's output as background in the workspace area. When working in the Node Editor, use the left mouse button to move the selected nodes, roll the mouse roller to zoom the view, click on the node, and move the mouse roller to pan the view:

Media can be dragged and dropped on to the Node Editor's workspace. All nodes can be connected using the round dots called sockets attached to nodes. To be able to view the image in backdrop, we need to check Use Nodes and create a viewer node by navigating to Add | Output | Viewer, as shown in the following screenshot. Then, the connections can be made by clicking and dragging on the round socket dots and dropping them on the input socket dot of the other node.

When Use Nodes is enabled, Blender creates a render layer and composite nodes by default. The render layer carries the 3D render data from the current Blender scene file. Composite node renders the result of the node flow connected to it when the render is invoked (the F12 key for current frame or Ctrl + F12 for animation). This is done by switching on the Compositing checkbox in the Post Processing option in the properties editor, as shown in following screenshot:

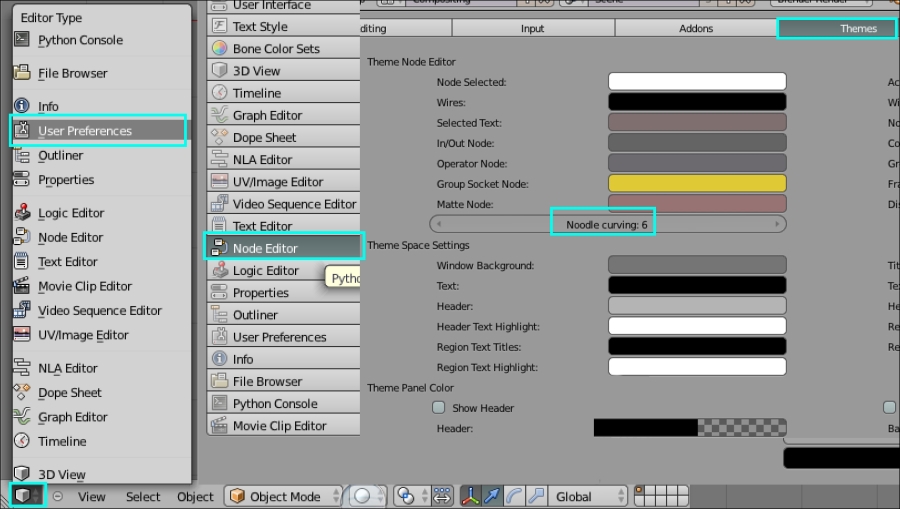
The noodles curvature can be modified by selecting User Preferences in the current editor type as shown in the following screenshot. Alternatively, User Preferences can be found in the File menu available on top-left screen of the Blender UI:
UV Image Editor also has a menu panel and workspace area. As shown in the following screenshot, Browser helps in choosing which output to be viewed and Pass Select helps in showing the render passes of the media selected in the browser. This selected data is displayed in the workspace area. An advantage of using this editor to view the output instead of the backdrop in the Node Editor is that the left mouse click shows pixel information, such as R, G, B, H, S, V, and A:

UV / Image Editor also provides histogram and waveform displays, shown in the following screenshot, to perform precise grading. These options can be displayed by clicking on the Scopes menu item in the View menu as shown in following screenshot:
