Every camera lens is bound to have a level of error in it. This leads to luminance drops and patterns such as lens flares, glares, and chromatic aberrations. Some lenses are used to capture images with distorted or enhanced perspectives, such as the fish eye lens and spherical lens. Adding these effects to a CG image will enhance the realism of it. Blender provides a very wide range of nodes to achieve these distortions.
Glare is a discomfort of vision in the presence of a bright source of light. This is seen in any photograph with a light source in its content. This phenomenon exhibits streaks, discs, or foggy rays shooting away from the source. Adding these effects adds realism to the image.
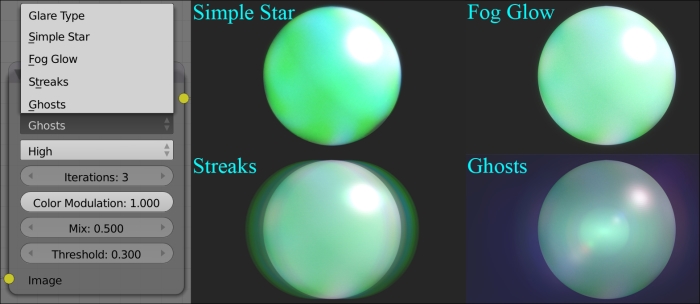
Blender's Glare node provides multiple options to simulate this behavior. The following screenshot illustrates the four types of glares available in Blender's Glare node:
The Lens Distortion node provides perspective alteration procedures with a chromatic aberration effect, that is, a distortion due to failure of the lens to focus all colors to the same convergence point.
- Distort: This can be used to alter the perspective. This value is 0 by default. Increasing this value can lead to perspective distortion.
- Dispersion: This can be used to simulate a chromatic aberration effect. This value is 0 by default. Increasing this value begins to show disparity of colors in the edges of the objects/pattern in the image.
- Jitter: When enabled, this introduces grain to the image, simulating loss of luminance from lens.
- Fit: This can be used to fit the distorted image to a size that covers the empty pixels created due to distortion. Since this resizes the pixels to fit within the resolution, a higher distortion value can show a pixelated image.
All these options can be used in cohesion to obtain multiple lens distortion effects, thus simulating a real world lens and adding more realism to the image.
The following screenshot illustrates the effects that can be obtained using this node. Observe the black/empty pixels created at the bottom corners due to distortion of the perspective.

The Despeckle node simulates an effect of shattering the pixels. Threshold can be used to limit the effect based on the luminance of the image. Alternatively, a gray-scale image can be connected to factor input to control the effect of the Despeckle node, as shown in the following screenshot:

The Filter node implements various image enhancement filters, producing a variety of image distortion effects. The following is a list of filter types available in this node, followed with a screenshot:
- Soften: This blurs the image slightly
- Sharpen: This increases the contrast, especially at the edges
- Laplace: This softens the edges
- Sobel: This creates a negative image that highlights the edges
- Prewitt: This tries to do what Sobel does, but goes one step better
- Kirsch: This is the same as Prewitt or Sobel but gives a better blending on the edges
- Shadow: This performs a relief emboss/bump map effect, darkening the outside edges
