
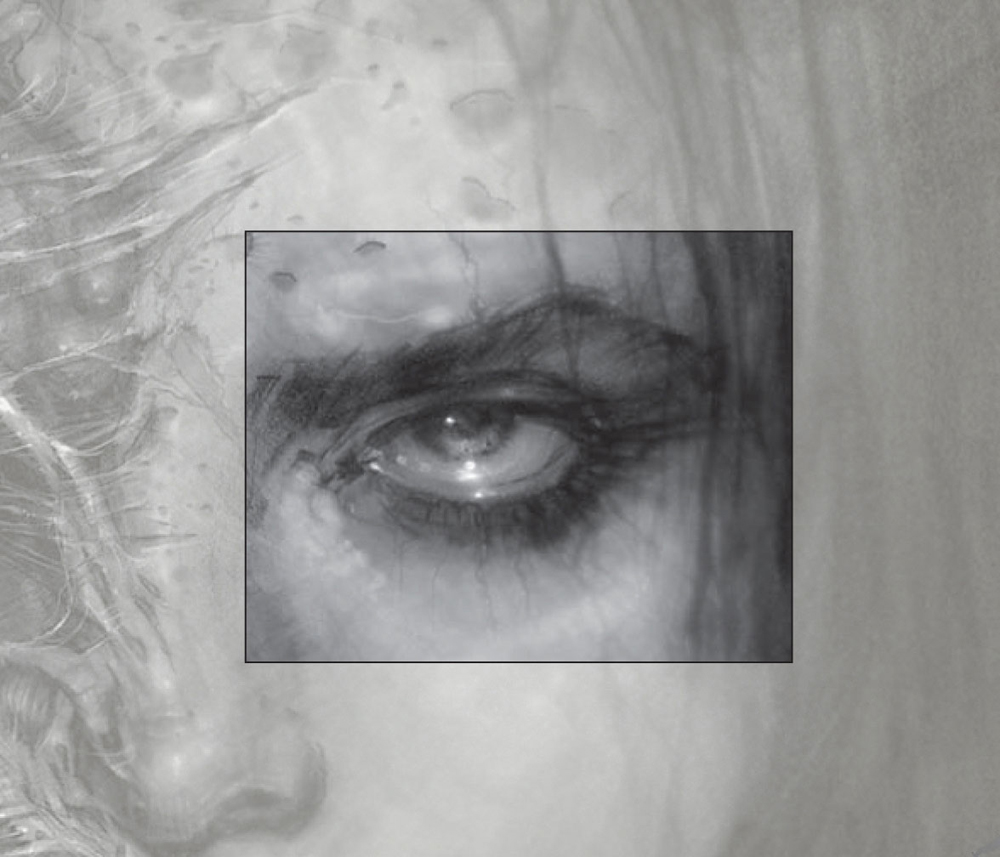
Drawing zombies is a bit simpler than painting or rendering them on the computer, so let’s start here. Basically, drawing consists of indicating shapes and defining values (the lightness or darkness of a color or of black). Because one relies so heavily on value to represent the subject, it’s important to include a range of values for variety and contrast. Keep this in mind throughout your drawing process—from the beginning stages to the final details.
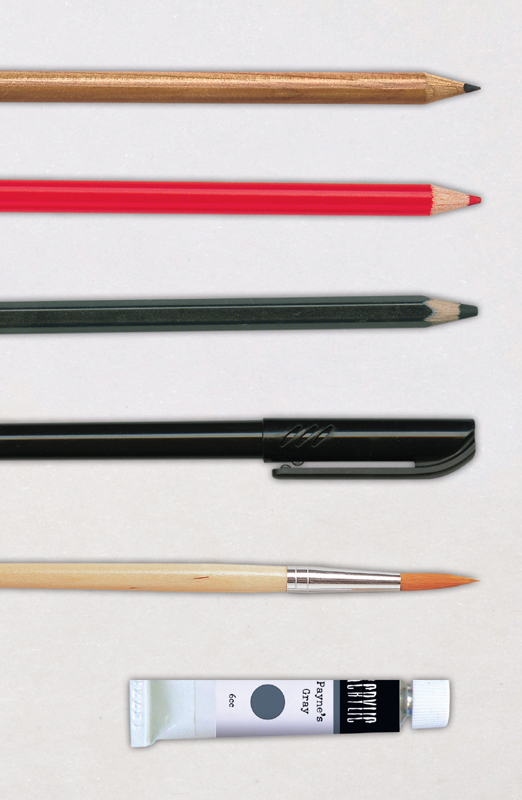
Materials shown include: drawing pencil, colored pencil, charcoal pencil, indelible marker, paintbrush, and acrylic paint.
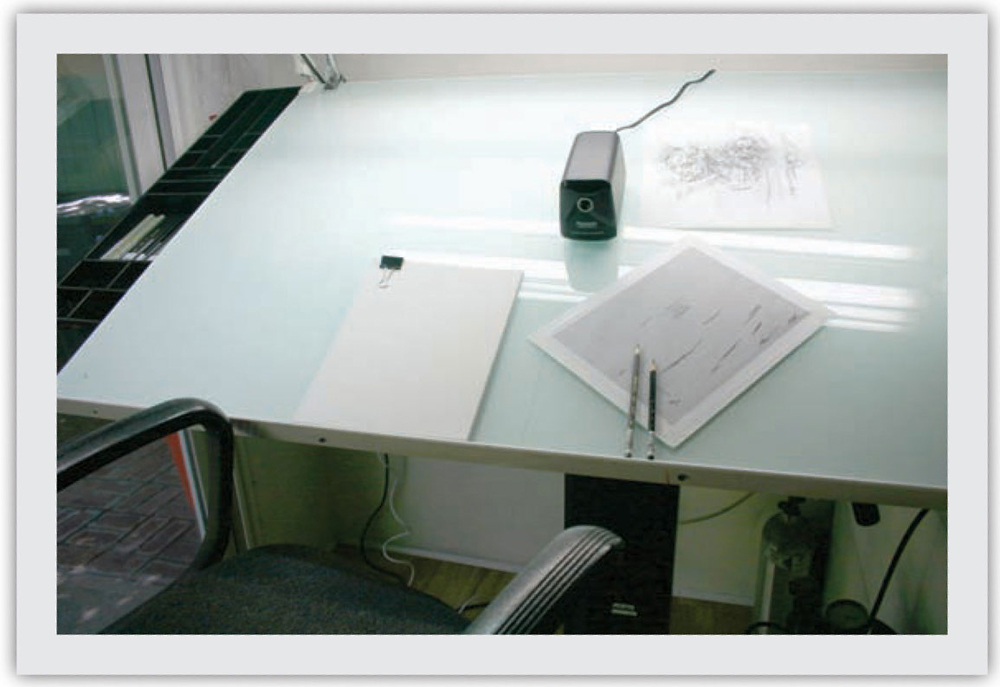
The projects in this book will be easiest if you have access to a light table, such as the one shown on the right. This illuminated surface makes it possible to create a clean outline from a sketch, simply by placing a sheet of paper over your sketch and tracing. If you don’t have a light table, you’ll want to keep your initial sketch lines very light so they can be erased at a later stage.
Pencils
Graphite drawing pencils are generally graphite “leads” encased in wood. The lead comes in grades and is usually accompanied by a letter (“H” for “hard,” or “B” for “soft”) and a number (ranging from 2 to 9). The higher the number accompanying the letter, the harder or softer the graphite. (For example, a 9B pencil is extremely soft.) Hard pencils produce a light value and can score the surface of the paper, whereas softer pencils produce darker values and smudge easily. For this reason, stick to an HB (aka #2) pencil, which is right in between hard and soft pencils.
In addition to graphite pencils, you will also use a charcoal and a few colored pencils. Charcoal, (made up of burnt wood), is a dark, rich medium that can give a drawing dramatic contrast. Be careful—it smears easily! Colored pencils are less likely to smear and come in a wide range of colors. (See also “Colored Pencils” on page 65.)
Kneaded Eraser
A kneaded eraser is a helpful tool that can serve as both an eraser and a drawing tool. It can be molded into any shape, making it easy to remove graphite from your drawing surface. To erase, simply press the kneaded eraser onto your paper and lift. Unlike kneaded erasers, rubber or vinyl erasers can damage delicate drawing surfaces, and it’s not as easy to be precise.
Paints
The project in this chapter involve mostly drawing, but they do suggest paint to accent areas here and there. The gouache (an opaque type of watercolor) and acrylic paints listed are all water-soluble, so you’ll need a jar of water and some paper towels when using them. You can use either natural or synthetic hair bristles with gouache paint, but you’ll want to stick with synthetic bristles when using acrylic.
Workable Spray Fixative
Coating your drawings with a layer of spray fixative can help prevent smudging as you develop your drawings. It’s easy—especially while using charcoal—to accidentally smear your strokes. Workable spray fixative allows you to spray occasionally throughout your drawing process, so you can prevent accidents along the way.
Drawing Surfaces
Traditional drawing paper comes in three types: hot-press (smooth), cold-press (textured), and rough. Choose your texture according to your desired look. In general, rough paper produces broken strokes; it’s not conducive to creating detail, but it’s ideal for a sketchy style. Smooth paper allows for smooth, controlled strokes. In this chapter, the projects call for vellum paper and illustration board, which offer suitable surfaces for a multimedia drawing approach.


For the average glamour girl, beauty is only skin deep. Not so for the zombie—for her it goes all the way to the bone. In a zombie beauty contest, gore, sinew, and rotting flesh are all part of the pageant, so this project focuses on the contrast between earthly beauty and disgusting decomposition.
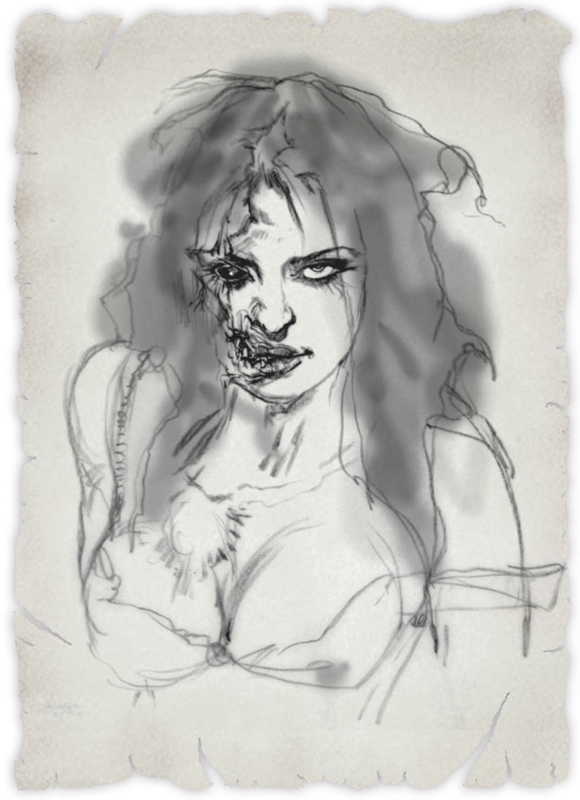
Step One Plan your portrait with a rough sketch, working out the pose and the general value distribution.

Step Two Once you’re satisfied with the concept of your thumbnail, begin a linear drawing on vellum paper. At this early stage, make sure that the features are positioned properly. (You can transfer this sketch; see “Transferring a Drawing” on page 25.)

Step Three After the drawing is complete and you’re happy with the proportions, immediately start on the distorted zombie features. Use the black colored pencil at this point.
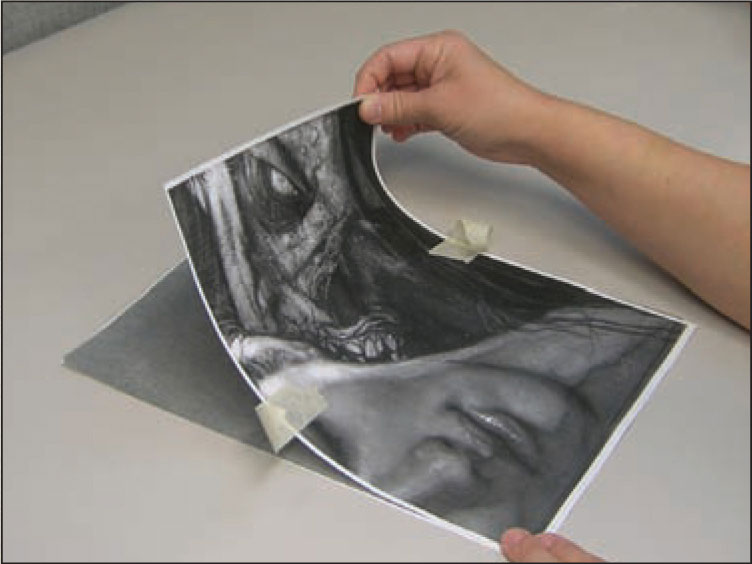
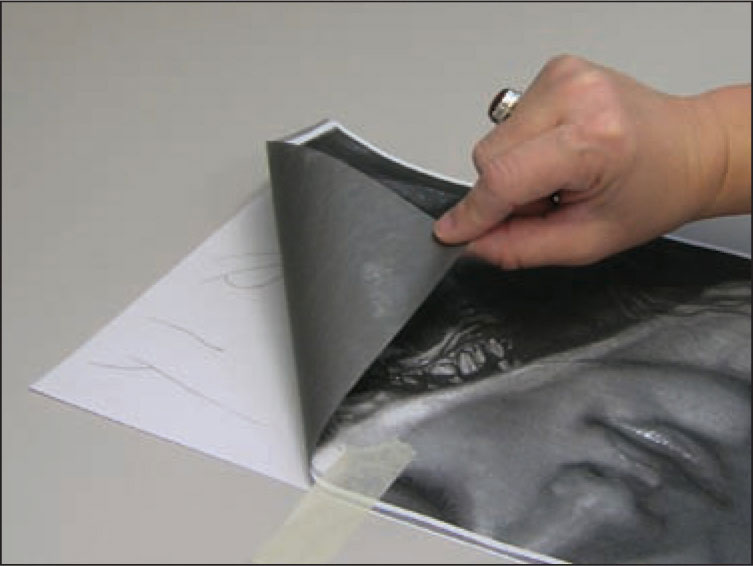
To begin the projects in this book, you might find it helpful to trace a basic outline of the final piece of art (or one of the early steps). Transferring the outlines of an image to your drawing or painting surface is easier than you may think. The easiest method for this involves transfer paper, which you can buy at your local arts and crafts store. Transfer paper is a thin sheet of paper that is coated on one side with graphite. (You can also create your own version of transfer paper by covering one side of a piece of paper with graphite from a pencil.) Simply follow the steps below.
Step 1 Make a photocopy of the image you would like to transfer and enlarge it to the size of your drawing paper or canvas. Place the transfer paper graphite-side-down over your paper or canvas. Then place your photocopy over the transfer paper and secure them in place.

Step 2 Lightly trace the lines that you would like to transfer onto your drawing or painting surface. When transferring a guide for a drawing project, keep the lines minimal and just indicate the position of each element; you don’t want to have to erase too much once you remove the transfer paper.
Step 3 While tracing, occasionally lift the corner of the photocopy to make sure the lines are transferring properly. Continue tracing over the photocopy until all of your lines have been transferred.

Step Four It’s extremely important to keep your pencils sharp, especially when drawing at this size and when using vellum paper. It’s best to use an electric sharpener that produces very sharp tips (preferably to a 16-degree point). Next, use 600-grit sandpaper to further sharpen the pencil. This also creates a chiseled edge which makes it easier to vary the width of your line as you draw.

Step Five Next, start adding tone and detail to the structure on the zombie side of the vixen’s face, making sure that it looks believable.
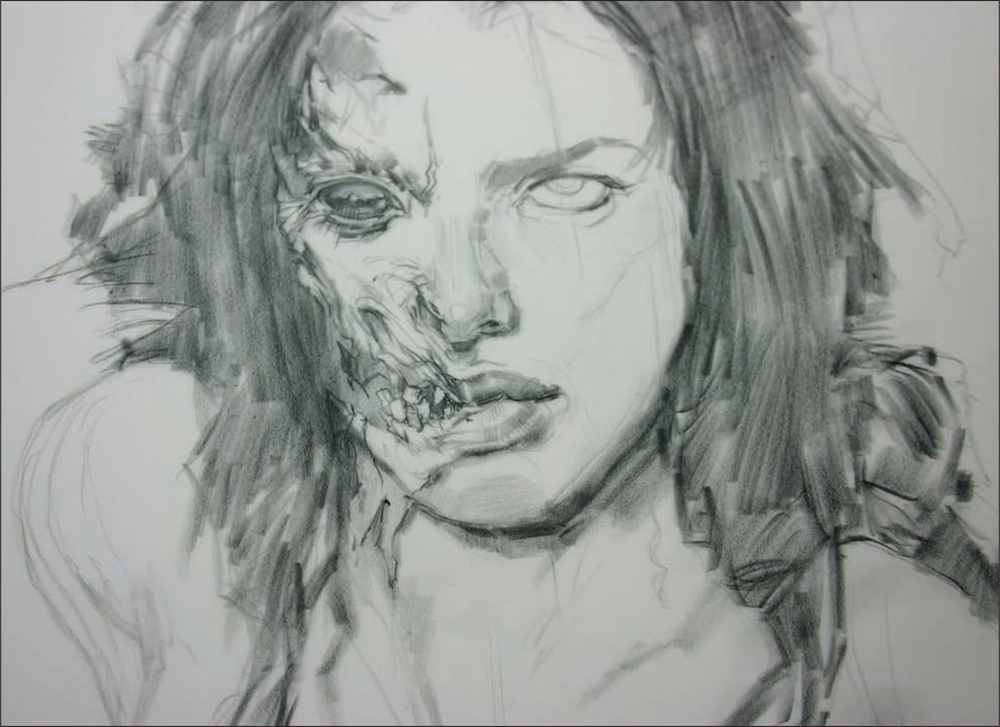
Step Six At this point, you want to set up the values for the next stage of the drawing. It’s incredibly important to be aware of your line quality and design of shape as you move into each step of your illustration.

Step Seven Once some of the twisted facial features of the zombie have been laid in, move on to the human features. Slowly build up the values on the skin tone, using a 30% cool gray colored pencil. Again, remember to keep it very sharp. Use a rubber pencil eraser to pick out highlights that will accent the facial structure.
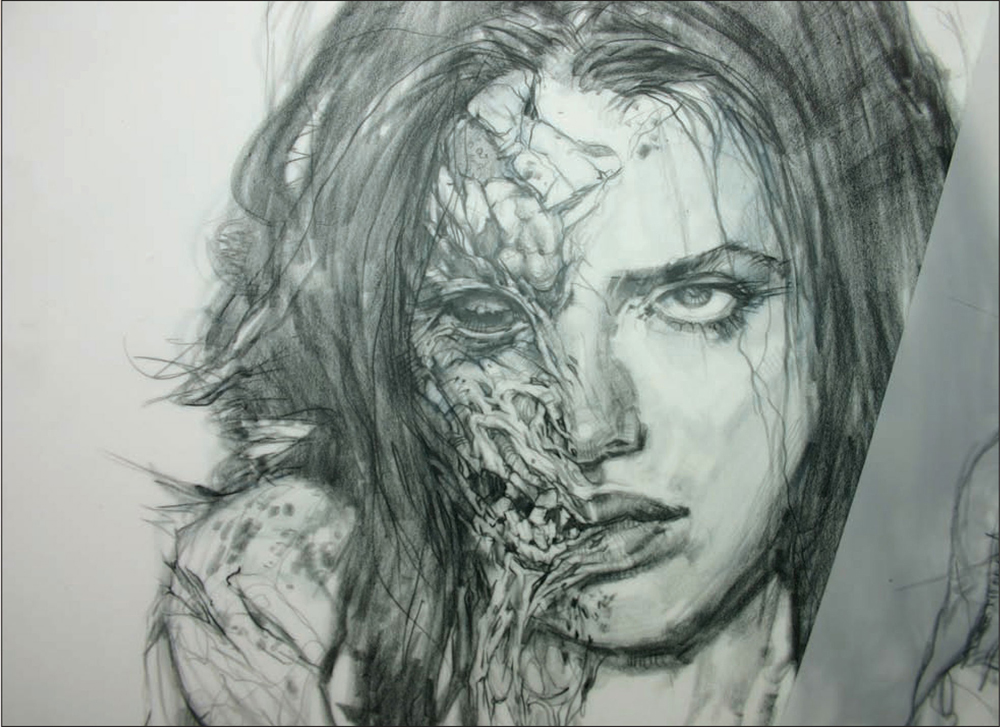
Step Eight After finishing the softer features of your sexy zombie vixen, focus on creating a sense of depth by showing different textures of human anatomy such as bones, flesh, and brain matter. Then, start the process of integrating these textures into wonderfully horrific, yet well-designed shapes.
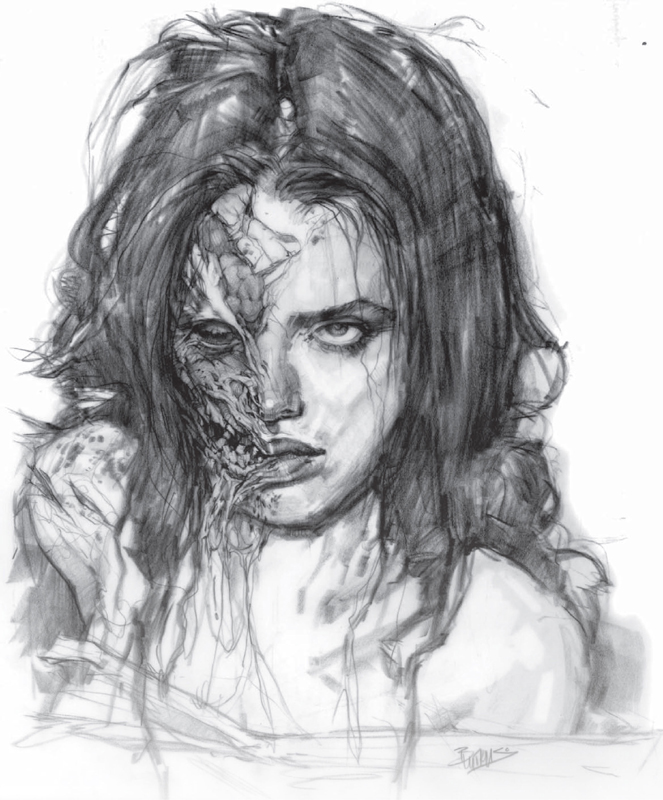
Step Nine At this point, we have completed the drawing. However, you may want to follow the next four steps to give your work a little digital enhancement. Begin this stage by scanning the drawing and bringing it into image-editing software, such as Photoshop®.
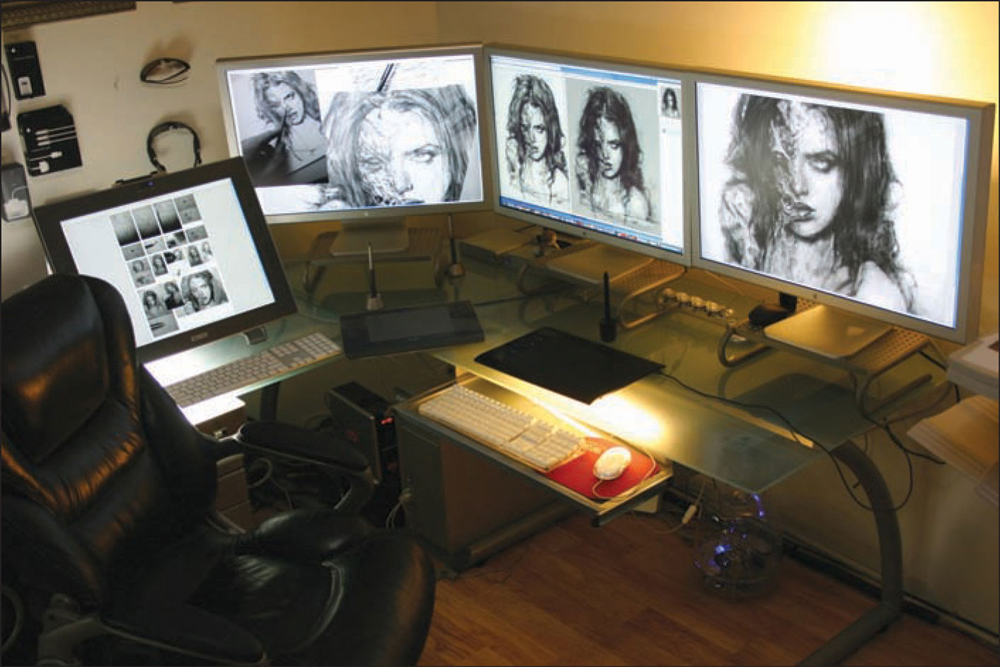
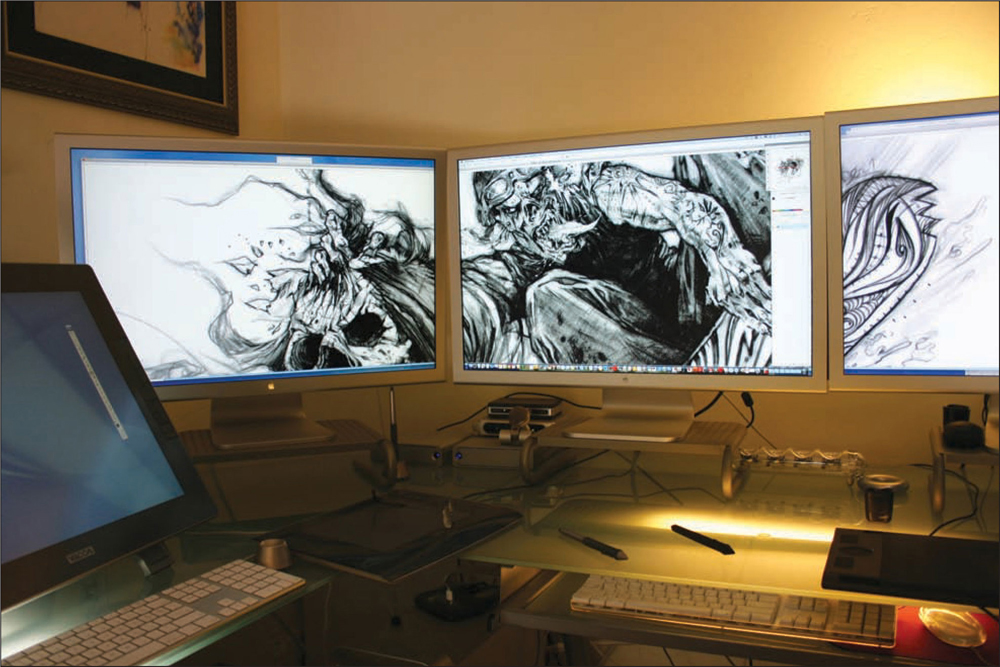
Step Ten This is my studio setup. On the left, I have both my reference material and the beginning stages of the drawing. I work off the middle screen, and refer to the original as I work.

Step Eleven Next, using the levels tool (page 101), darken the whole illustration by about 20%. This immediately gives the mid value we need without spending a lot of time darkening the actual drawing. Then use the eraser tool with a soft edge (page 101) to bring out the highlights.
Note: I have added spots of rotting flesh over the shoulder and chest. The great part about adding details digitally is that you can be experimental; your changes are not permanent, so long as you don’t save over the original scan!
Step Twelve Use the eraser tool to pull out strings of flesh on the zombie side of the face. You can also use the eraser tool to create some energy and texture in the hair and skin, thus giving a frenzied look to our zombie beauty.
Step Thirteen Next, use the dodge tool (page 101). Select the highlight as the range and bring out the highlights of the eyes, the flesh, and the lips to make them appear wet. Adjust the diameter and exposure of your tool as necessary.

Step Fourteen Again using the dodge tool, blow out the background—only use a much bigger diameter this time. This will bring the zombie forward and provide a more exciting contrast. Once all this is done, use the blur tool to soften the edges and create an almost photographic quality. In this illustration, 90% of the drawing was done traditionally, while only the last ten minutes were spent on the computer.

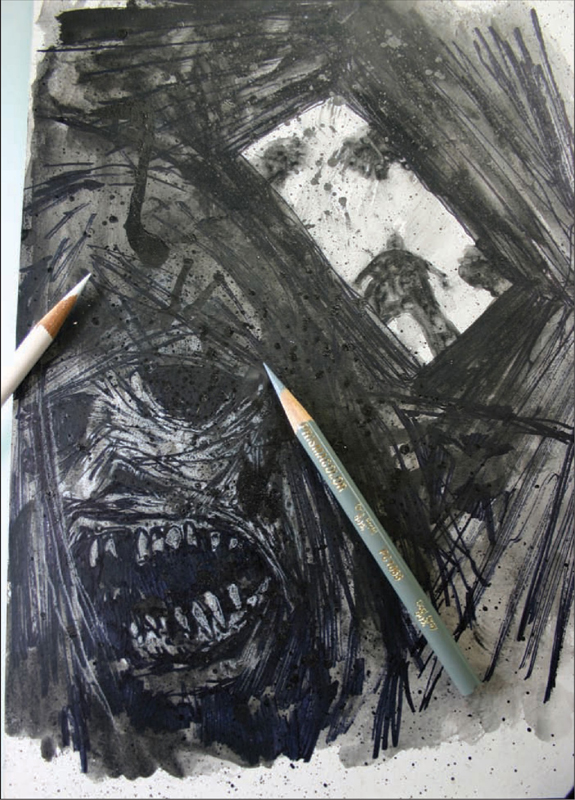
You can accomplish a lot with a little help from your friends. Here we see a zombie escaping from the grave, watched over by a crowd of his undead pals. This black and white illustration will focus on how to create a dynamic composition.
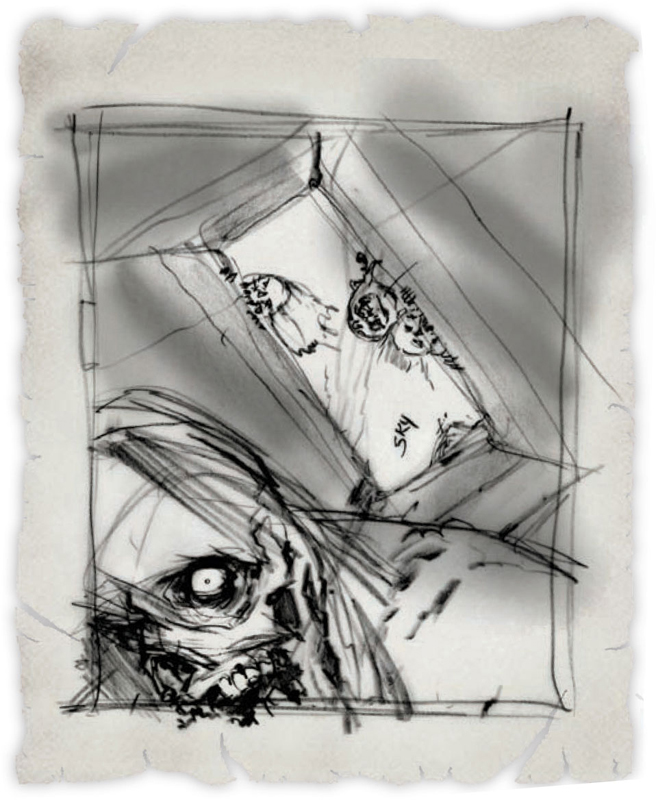
Step One This is the thumbnail for our next illustration in which we will be focusing on dynamic composition.

Step Two This project involves a fun and quick technique. On a gessoed board, start the drawing with a #2 pencil, basing it on the composition of the thumbnail. (You can transfer this sketch; see “Transferring a Drawing” on page 25.)

Step Three With your line drawing in place, use the black felt pen to go over the drawing, making sure your lines and shapes are exciting and full of energy.
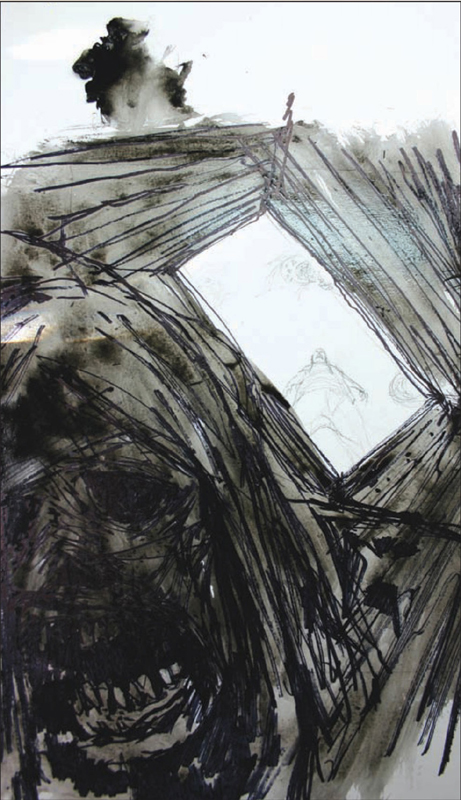
Step Four Diluting your lamp black gouache with a good amount of water, quickly brush in a dark value around the grave and zombies.
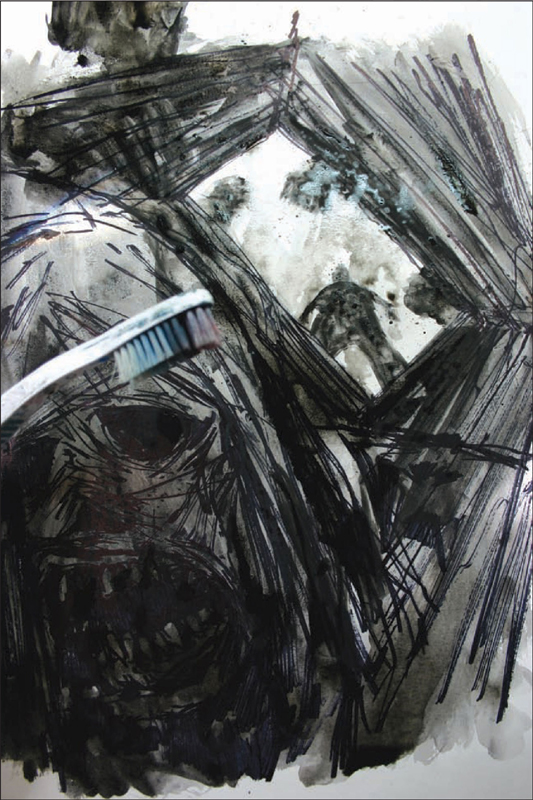
Step Five When you’ve finished with the gouache, take your illustration outside and lightly spray it with workable fixative. Once dry (about 10 minutes), dip an old toothbrush in the black gouache and splatter the paint all over the drawing, immediately creating new textures. Then hit it once more with a little workable fixative.
Step Six Using my 30% gray pencil, start bringing out the teeth, face, and strands of hair. Be sure to emphasize the stretching and pulling of the taut dead flesh by using thinner lines over the dark shapes. Also start working on the sky by mixing some white gouache with water and painting around the silhouettes of the distant zombies.

Step Seven With the #5 brush, dip it lightly in the white mixture and paint in some soft, fuzzy shapes for the hair, emphasizing the dry, frizzy texture.

Step Eight Switching over to the very small detailing brush (size #00), start adding highlights along the left side of the face. Then paint in a rim light along the edge of his hair and shoulders to suggest the light source from the sky and to separate the main character from the background.

Step Nine Now it’s time to work on the zombie onlookers. Still using the fine brush, quickly block in the big shapes of the skeletal faces and indicate the light source by painting a rim light around the body of the standing zombie.
Note: You’ll see that the project strayed from the thumbnail; the outside zombies have changed. I constantly play and experiment with my characters and composition throughout the process. Remember, this is from your imagination. Don’t be afraid to explore for a more successful composition.

Step Ten In this final step, take time to finely tune the personality of the character. Study the illustration and see what other measures you can explore to push the overall creepiness. Using the white colored pencil, concentrate on different parts of the face to create as much drama as possible by pushing and pulling the facial features. For the sky, use more white gouache to create a dramatic and graphic impact for the rest of the illustration.

Buffy the Vampire Slayer has nothing on this teenage high school student, ready to single-handedly take on a zombie horde. This is a heroine worthy of her own graphic novel, and her innocence makes a nice contrast with the monsters she battles.
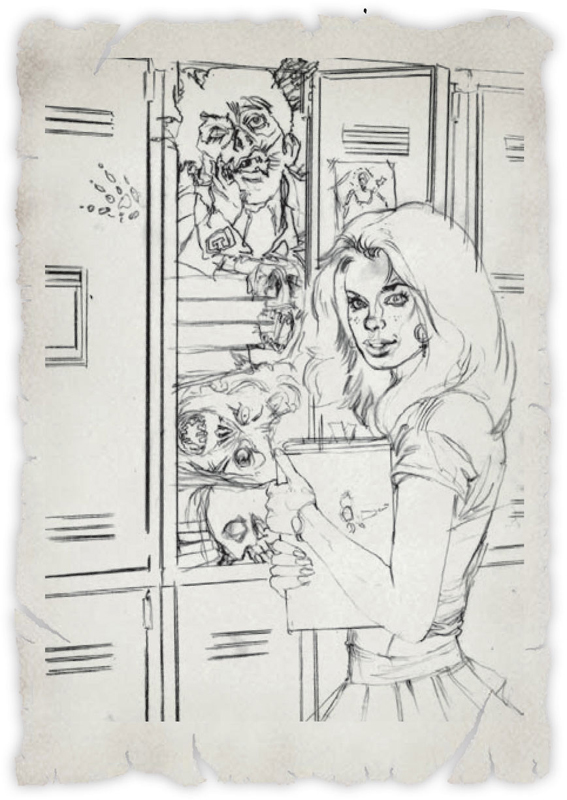
Step One We begin the project by working out the sketch on tracing paper.
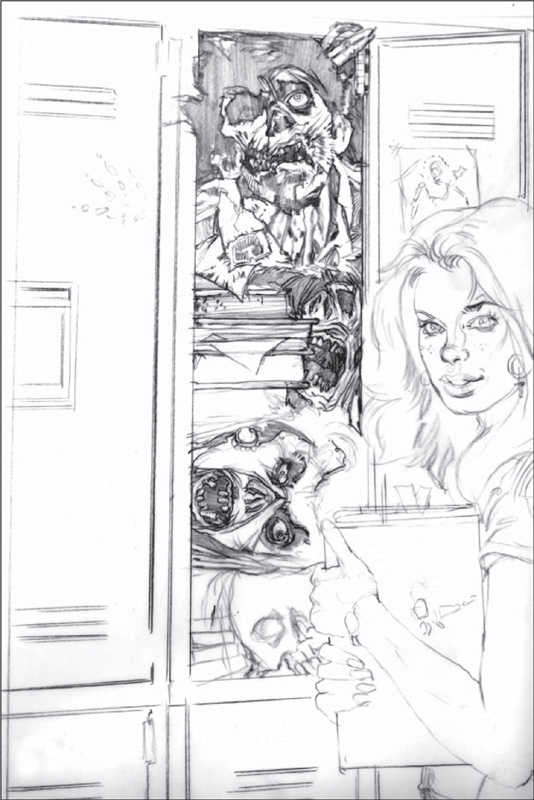
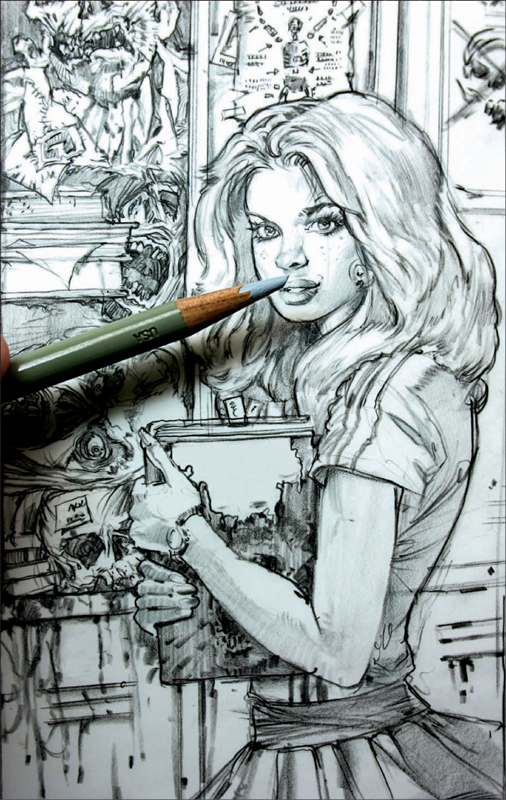
Step Two Once you’re happy with your concept, transfer the image onto vellum paper. (See “Transferring a Drawing” on page 25.) Then, create a linear sketch using a black colored pencil. Once complete, block in the dark values on the zombie heads in the locker, using smooth and consistent strokes. To add more depth to these shadowy areas, start putting in some darker accents. For example, focus on the eye sockets, the insides of the mouths and corners of the eyes. Note: Always keep your pencil sharp when drawing on vellum. You can keep another 20 or so sheets of vellum under your illustration to give your pencil a slight bounce and the drawing a “creamy” texture.
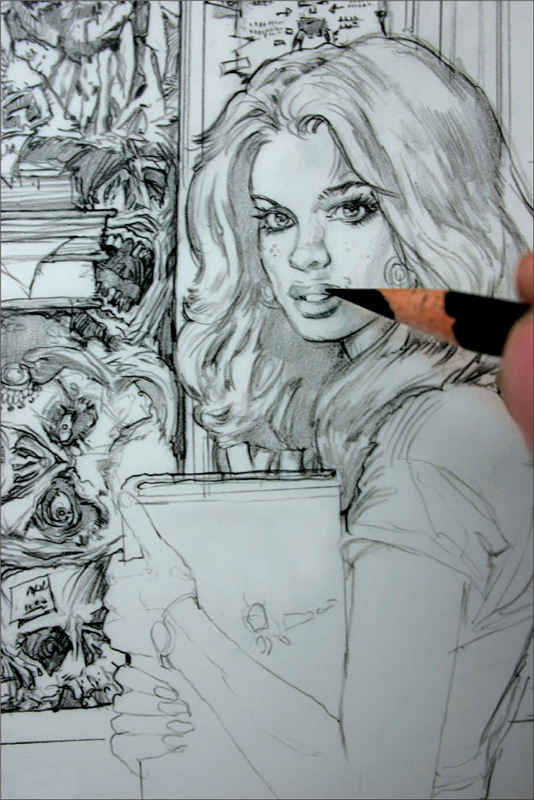
Step Three Once the three main values have been established, begin to work on the teenage zombie killer. Draw a holding line around her to give this illustration a comic book feel. Since she is supposed to be young and pretty, the less you do, the better she will look. Concentrate on designing attractive lines and shapes. Keep the values light with the exception of some accents in the eyes and the corners of the mouth.
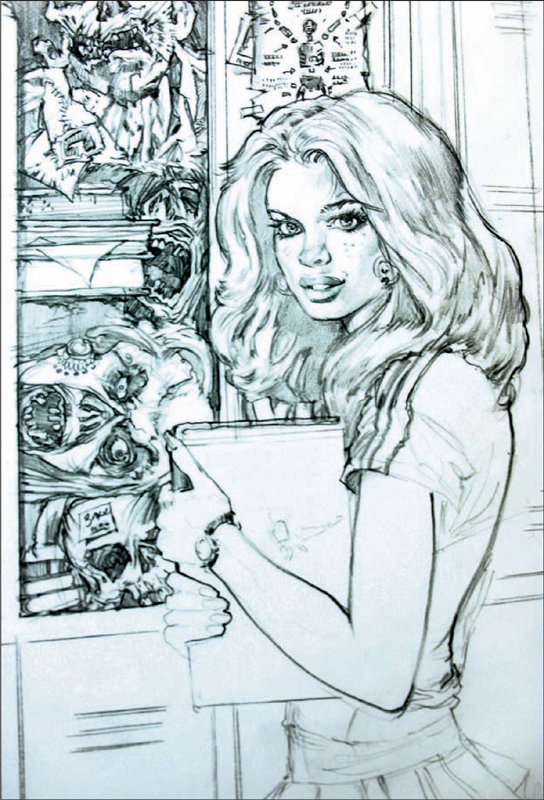
Step Four For this step, continue the holding line down the rest of her body, varying the quality of the line from thick to thin to suggest form. The line is just as important as value and shape in sustaining the energy of any drawing.
Step Five Now it’s time to start adding the lines and shapes that create the folds of her clothes and her textbook. Once she is complete, switch to your gray pencil and put in a very light value for her skin. To add some gore to the environment, use a black pencil to indicate blood dripping down the locker doors, making sure you follow what would be the curvature of the metal. Note: Even though this is a gory scene, don’t let it become sloppy. Try to keep your shading clean and consistent.

Step Six In this last stage, look over your drawing and fine-tune any detail you may have overlooked. If you study it closely, you’ll note that this illustration is mostly linear and has very few values. Because of this, the placement of the dark accents and the holding line are very important—otherwise, the drawing may appear unfinished.


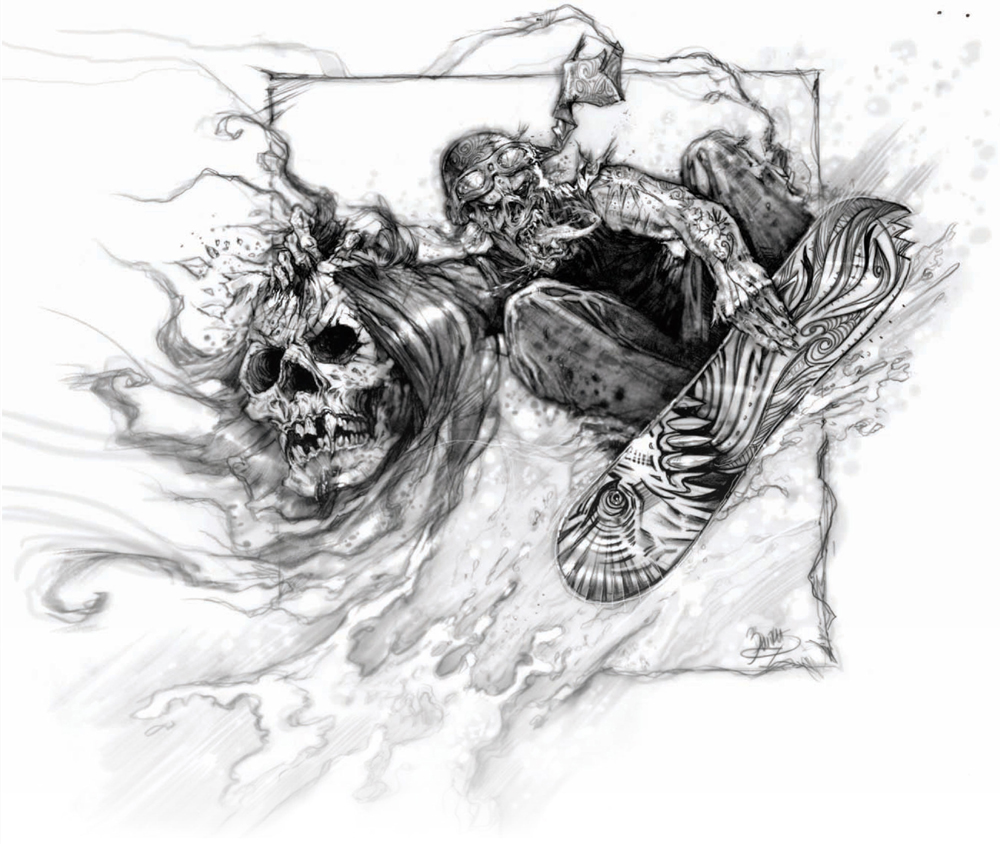
Every teenager loves extreme sports, and the zombie teen is no exception. This illustration focuses on how to convey energy, body language, and dynamic composition.

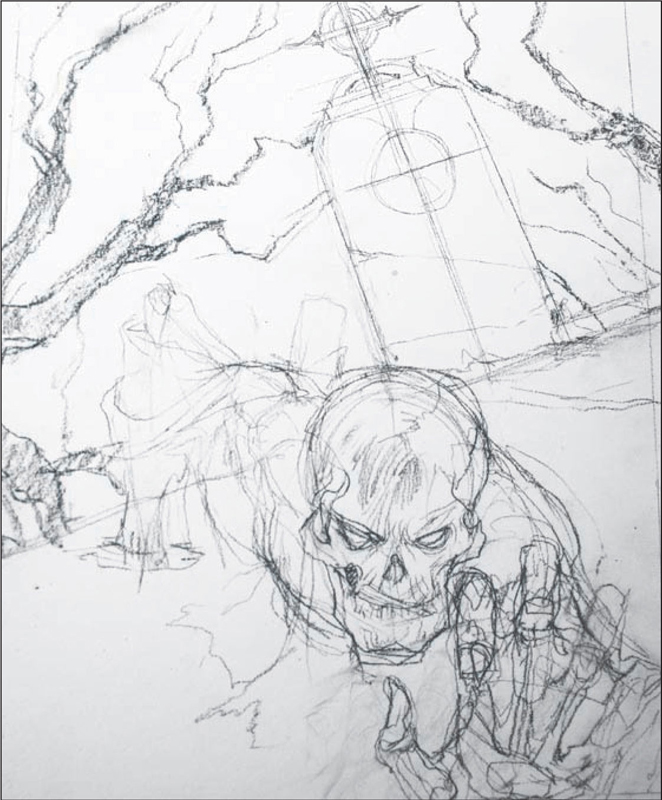
Step One We begin this project with a rough line drawing of a zombie snowboarder.
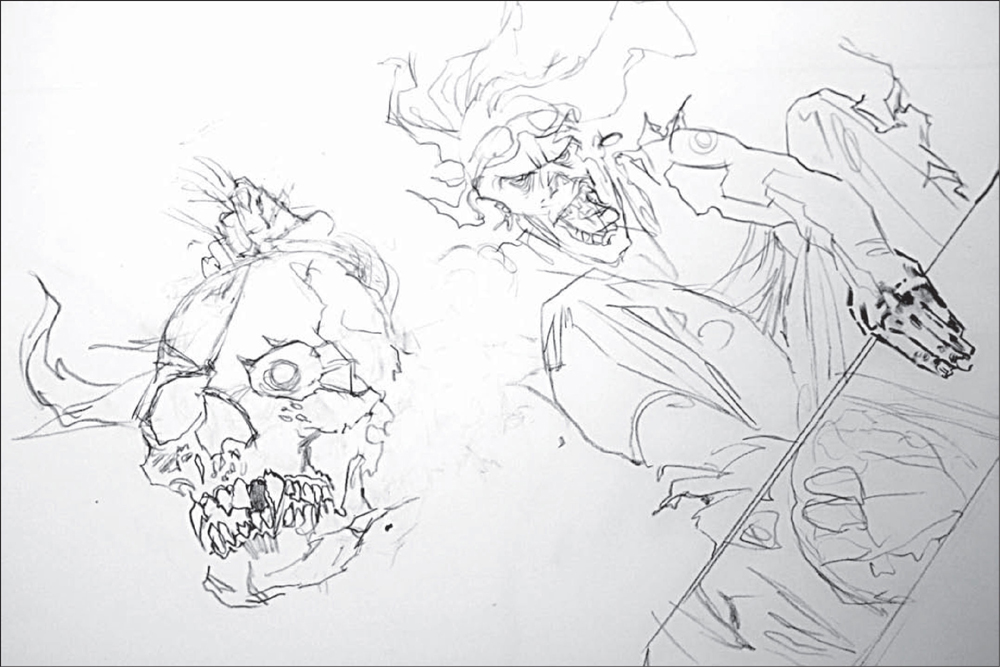
Step Two With a sharp #2 pencil, create the sketch for the final drawing on vellum paper. Note that the original sketch has been changed; now the skull is staring off into the distance, instead of facing the viewer like the zombie. (You can transfer this sketch; see “Transferring a Drawing” on page 25.)

Step Three Begin working on the skull. Shade in all the shadow areas and make sure the shapes are clear and well-designed. Exaggerating the size and the shapes on the skull will emphasize its wicked expression. Also, add some quick little nicks and scratches to show that it’s been through some tough times. Then, make the hair look almost like wisps of smoke to convey a sense of movement. Next, start putting the darks on the face of the killer airborne zombie. Then, begin to shade all the big shapes of the clothes. Although this is a fast process, make sure your strokes are smooth, consistent, and clean. You don’t want this area to distract the viewer. Once you have established the middle value, start laying in the darks of the folds and creases. Notice that the shapes are strong and stylized. You can look through fashion magazines or photograph a model to make sure the folds of the fabric look realistic.
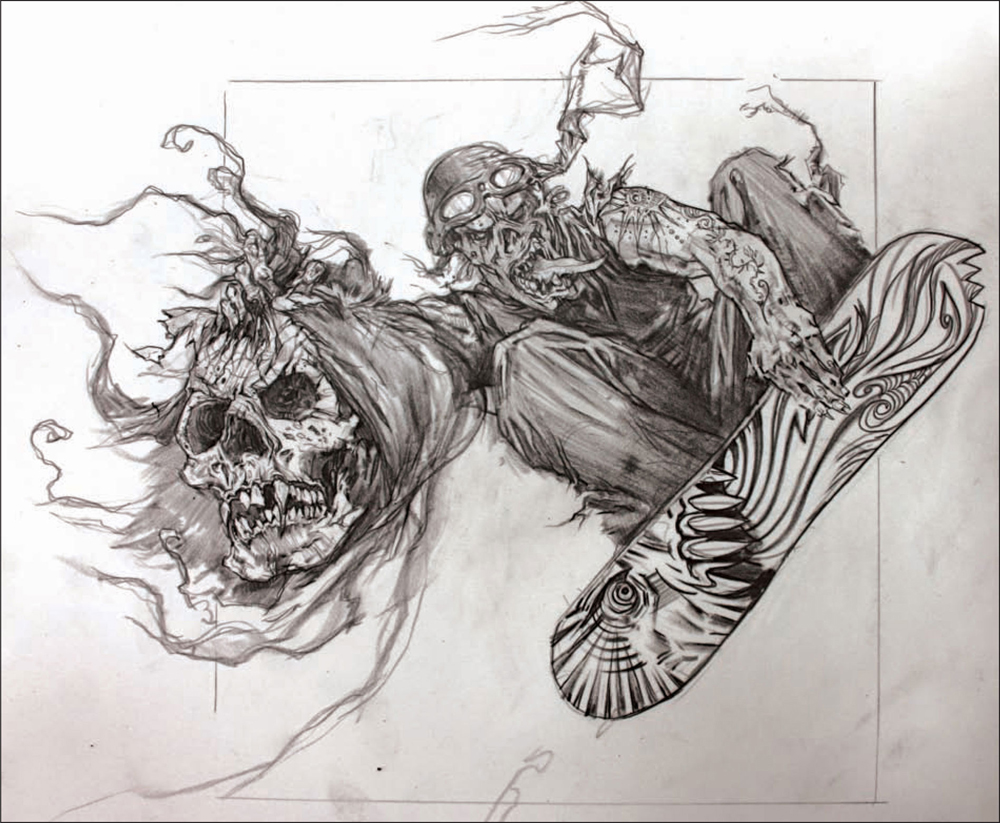
Step Four This is the stage where the drawing really starts to get exciting. At this point, the personality emerges, almost as if the character is jumping out at you. The fact that the image breaks the frames gives the drawing a dynamic energy. Remember, you don’t have to confine yourself to four corners; instead, use them to your advantage. Add some tattoo art on the zombie’s arm to show what his personal style was before he became one of the undead. Also, emphasize the zombie’s crouching position by pushing his body back into a darker value. Now, move on to the intricate designs of the snowboard. Just because the snowboard designs look intricate doesn’t mean they will take a long time. As long as you keep your line quality clean and varied, and the shapes strong and attractive, it will appear that you spent more time than you actually did.

Step Five Here you can see an example of breaking frame, as discussed in Step Four. Add external elements like flying snow and make sure they bleed off the edges. Having the snow weave in and out of the composition helps to create a sense of action.

Step Six Continue building values throughout the drawing and adding a few sprays of snow here and there. With the drawing complete, the next several steps are optional and involve working on a computer. For this part of the process, we first scan it into Photoshop®, then put in a few highlights, and do a little clean up. This process should take only about 10 minutes.
Step Seven Enlarge the drawing to find any areas that need attention.

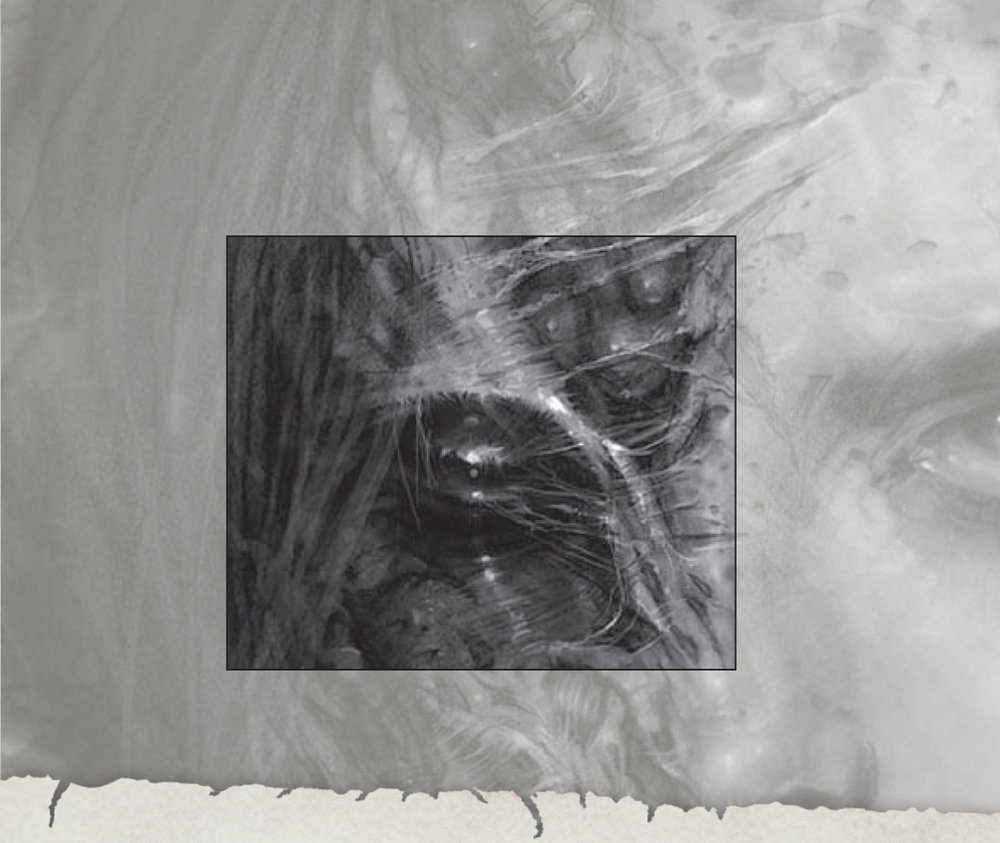
Step Eight I have a Wacom Cintiq—a screen that you can actually draw on. Once my drawing is on the Cintiq, I use the stylus pen and select the airbrush tool from Photoshop®’s tool bar. From the palette, select a medium-light gray, and then start to soften edges and intensify some of the darks. (See page 101.)
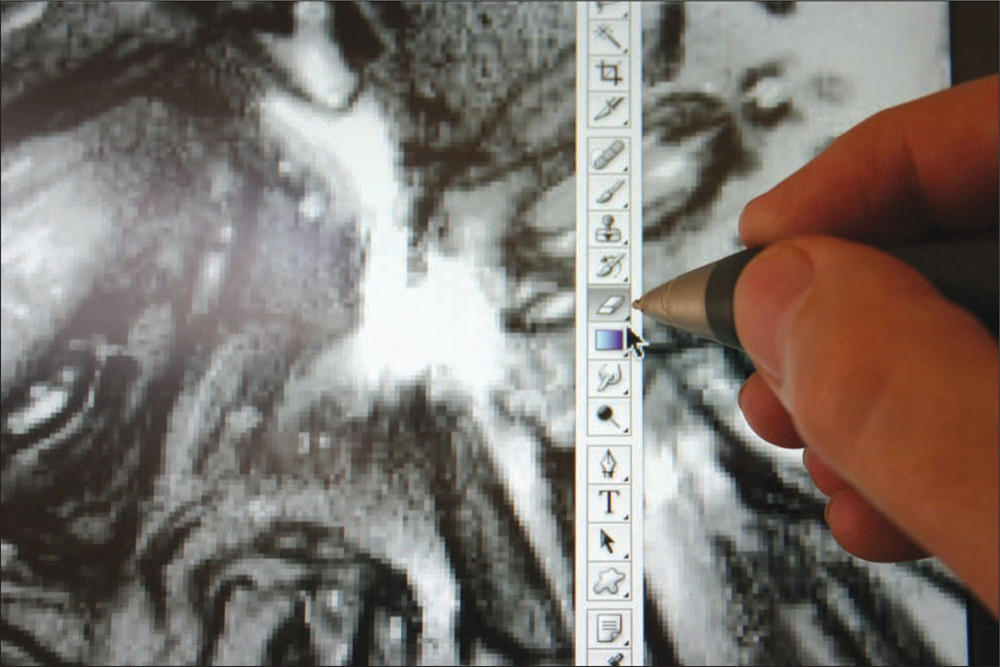
Step Nine The eraser tool is extremely useful for brightening highlights, softening edges, and removing any extraneous lines. You can adjust the width, opacity, and softness of the eraser.

Step Ten In this step, you can see how much detail can be added to a relatively small drawing (6" × 10") in a short period of time by using Photoshop®.

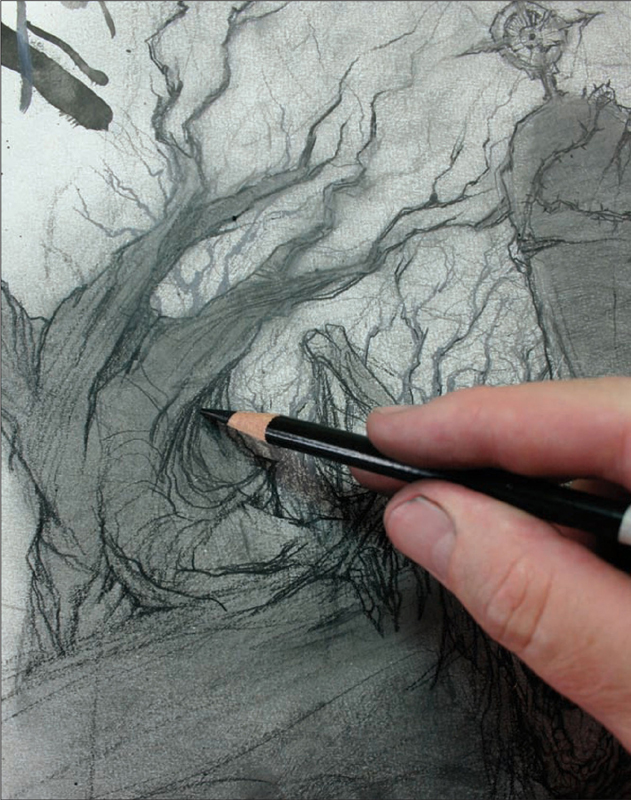
You just can’t keep a good man down—especially when he’s a zombie. Here we see the decomposing monster returning from the grave. Special effects, created with an airbrush and Photoshop®, add just the right touch of supernatural light and fog.

Step One Begin with a sketch that engages the viewer. Make it look as though the zombie is climbing out of the grave and off the picture toward the viewer.
Step Two On a raw white illustration board, begin a fresh drawing with a black charcoal pencil. (You can transfer this sketch; see “Transferring a Drawing” on page 25.)

Step Three To achieve the effect of a creepy, foggy grave site, smudge the charcoal with your fingers, still keeping a light value of the drawing intact.

Step Four After smudging the background, begin to pick out the highlights with the kneaded eraser.

Step Five Next, take the drawing outside and spray a light layer of workable spray fixative to seal it. Once it is completely dry, begin drawing back into the illustration using a black colored pencil. This process will enhance the line quality.
Step Six Use a charcoal pencil to add the dark values. This allows you to do a little more smearing. Notice that all the lines and shapes are strategically placed to help intensify the perspective of the advancing zombie.

Step Seven Now, draw back into the illustration using a black colored pencil. Note that I decided to open up the mouth of the zombie to create a more desperate and hungry look. Once all the details have been drawn with the colored pencil, take your charcoal pencil and smear a darker value over the zombie and the surrounding areas. Then, hit the drawing with another layer of workable fixative to set it up for the acrylic paint.
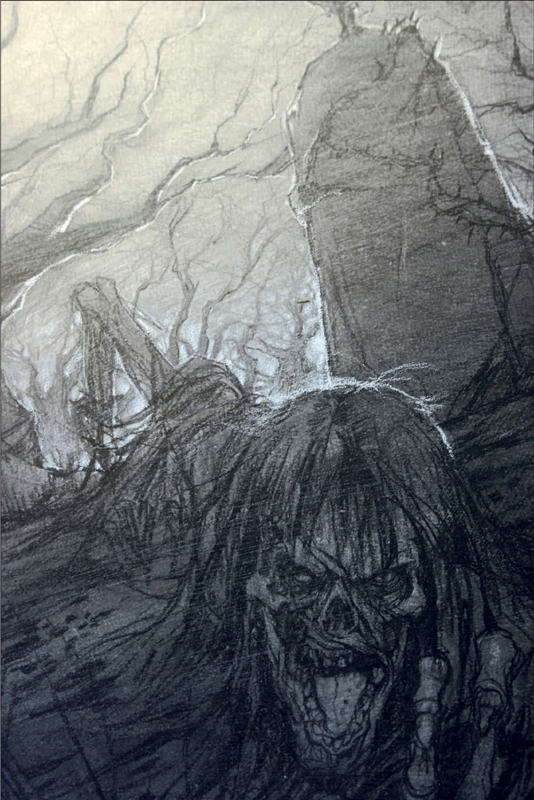
Step Eight Using just a white colored pencil, brighten up the horizon and give the zombie a rim light to separate him from the background.

Step Nine To create the mist, get out your airbrush and fill it with a little titanium white acrylic paint mixed with water. With the exception of the zombie’s face, give the whole illustration a light spray. Then, with a small brush, use some Payne’s gray and a little titanium white for the transitional values between the mist and the zombie. Note: An airbrush is the best tool for creating a misty effect. However, you can use very thin washes of white paint, blending away any hard edges with water.

Step Ten After you’re finished with the airbrush, take a white colored pencil and redefine both the rim lighting and highlights.
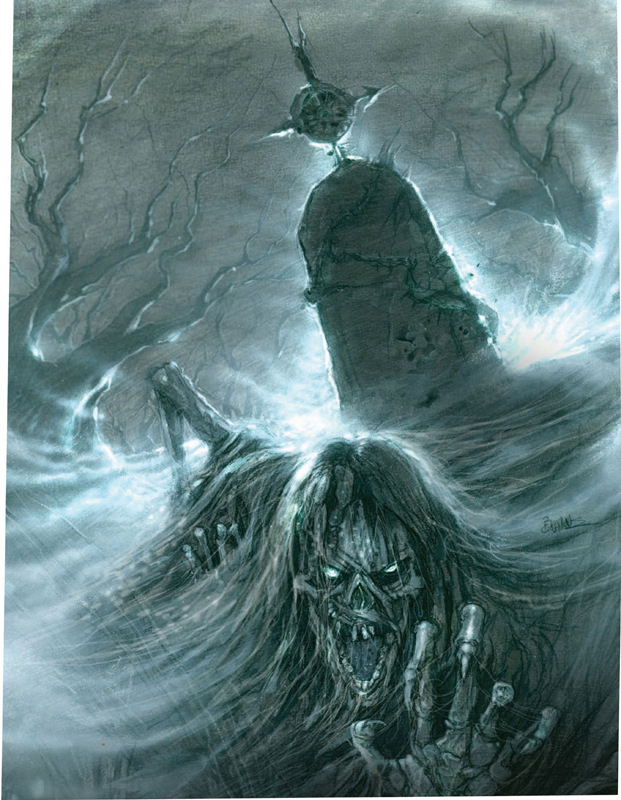
Step Eleven To make the crawling zombie pop out of the environment a bit more, mix a little bit of Mars black and a lot of water, and then lightly paint him with a thin layer of the wash. Then scan the illustration into Photoshop®. Using the dodge tool (see page 101), quickly intensify the highlights and adjust the levels to create a bit more contrast.

This project features a black-and-white illustration that could fit into multiple genres: Cartoon, comic book, graphic novel, or editorial commentary. Out for an afternoon shopping spree, this suburban zombie couple is shown attempting to withdraw some cash from the local A.T.M. machine.

Step One The process begins with a thumbnail sketch. Note that the design often changes from one step to the next. This is all part of the natural evolution of an illustration.

Step Two Block in your drawing using a black colored pencil on tracing paper. You can be as sketchy as you’d like at this point; this project focuses on the process of refining a sketch and stylizing your strokes.
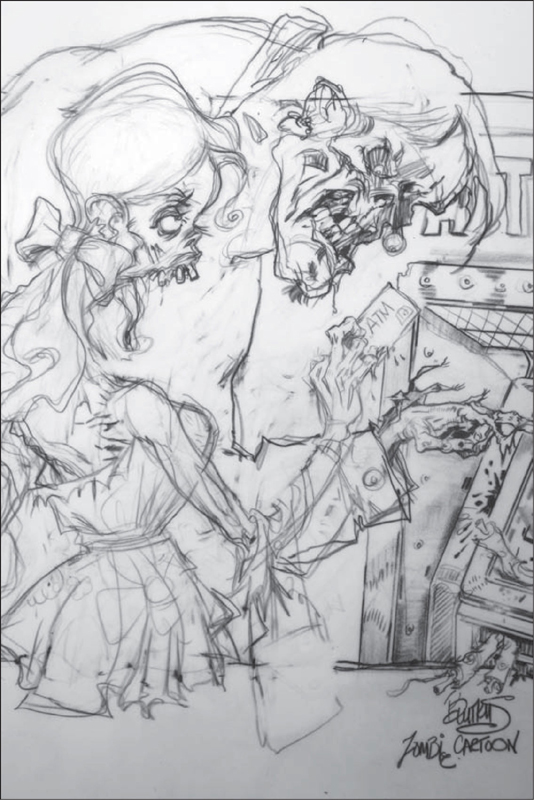
Step Three Here we see part of the design evolution in progress. There needed to be a greater size difference between the male character and his lady friend. The male character was erased with a kneaded eraser and then transformed into a “muscle-head boyfriend” for the female zombie. He now hulks outside the frame to emphasize his mass. This is one guy you wouldn’t want to rob from at the A.T.M.—assuming he could figure out how to withdraw money in the first place.

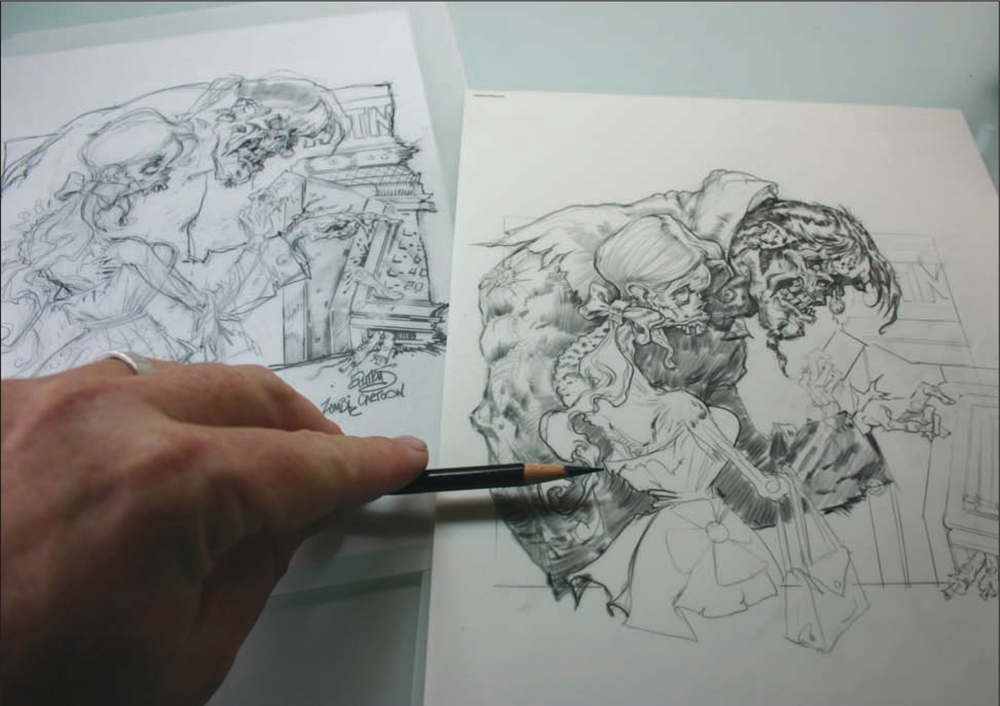
Step Four Once you’re happy with your sketch, take a sheet of vellum paper and lay it over the block-in for the finished illustration. Using black colored pencil on vellum gives a clean, creamy finish, perfect for the look we want on this drawing. The key here is to keep your pencil extremely sharp.
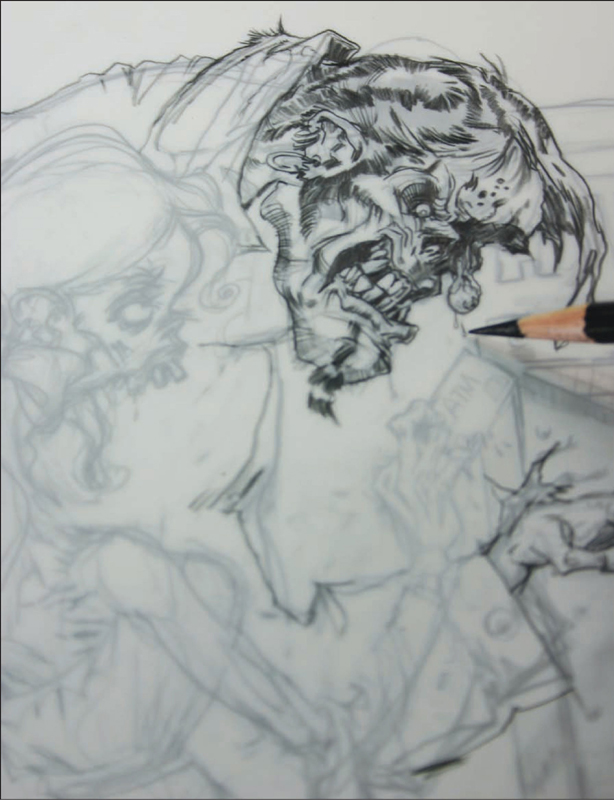
Step Five Concentrate on the zombie boyfriend first. Emphasize his masculinity by keeping his features angular and by adding facial hair. Also, exaggerate his grimace and frown lines to show that this zombie probably never knew how to operate an A.T.M., dead or alive.
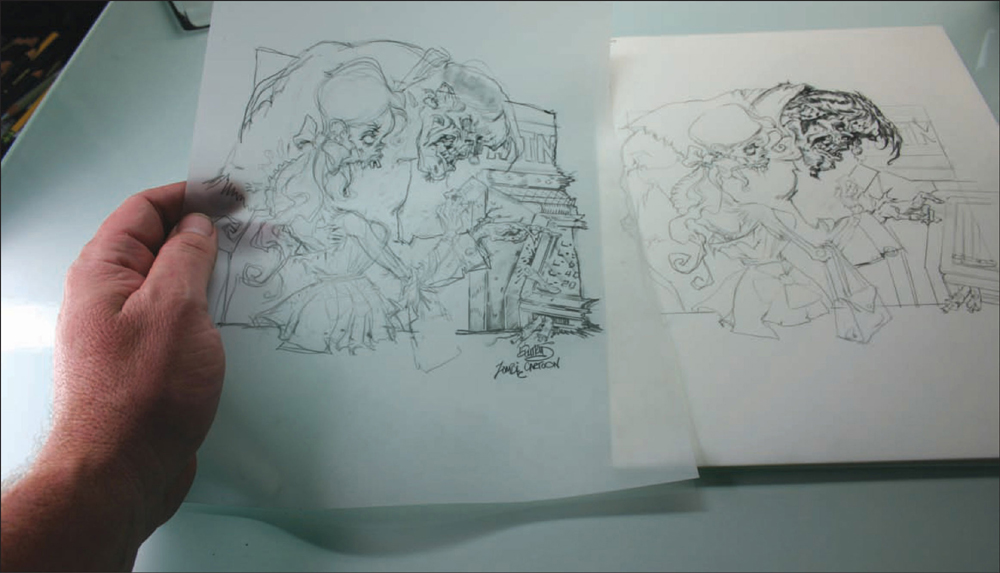
Step Six It’s a good idea to compare the sketch with your final drawing from time to time. Do this to see how close your final illustration is to the original lay-in, and to decide whether you want to make any changes. This process will give you a fresh eye.
Step Seven Next, work on the rest of the male zombie’s form. Most of his body will in be shadow so we’ll be able to see the silhouette of his zombie girlfriend clearly. Add detail to his tattered shirt and some spiky tattoos to his ape-like arm for interest.

Step Eight Now, move on to the zombie valley girl. In contrast to her ultra masculine boyfriend, give curves to her skeletal body and add feminine touches like a big bow to her hair and some floral designs to her dress. Vary your line quality from straight to curvy and thick to thin. There won’t be a lot of value work to her, so pay special attention to designing her shapes. The contrast between shape, line quality, and value are the keys to making an exciting and successful black-and-white drawing.

Step Nine Keep the drawing simple on the A.T.M. machine—you only need to indicate all the buttons and blinking lights. The ATM machine becomes believable if you remember to keep the lines straight and crisp and the perspective accurate. Then, add some more goo and gore to the illustration. Even though this couple’s on a shopping spree instead of a killing spree, they’re still zombies!
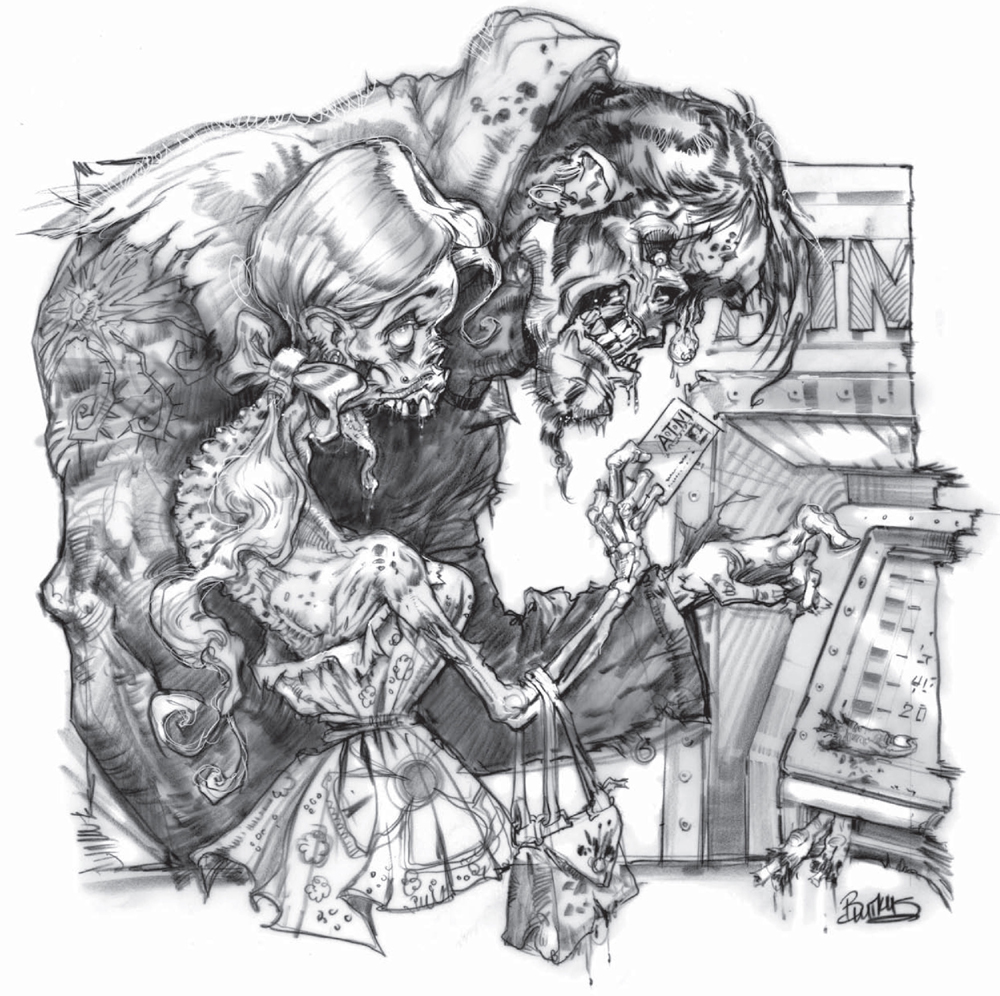
Step Ten For the last step, add some final dark accents to our zombie couple. Notice how this illustration breaks the compositional frame with fun shapes and line texture. Remember, you don’t have to think inside the box.