Up to this point in the book, you have learned a lot about Game Maker’s features and capabilities. You have also learned how to navigate Game Maker’s IDE and how to work with the basic building blocks that make up Game Maker games. You’ve even created both a demo and your first game. Now that you have a good understanding of the mechanics involved in creating games, this chapter takes a step back and focuses on the principles of good game design. By applying this information, you will be able to create better and more challenging games.
An overview of the major topics covered in this chapter includes:
An exanimation of the importance of setting goals for game play and rewarding players when they accomplish those goals
A review of different ways in which developers can provide players with a feeling of control
An examination of different options that you can use to ensure game play remains challenging throughout the game
The first step in creating a new computer game is to come up with a good and unique idea. Typically, this involves the creation of an innovative character and story line or a formula for the development of a challenging and exciting playing experience. In addition to these primary ingredients, all good computer games also consist of the following features.
Visually appealing graphics that help bring a sense of realism and excitement
Quality sound effects and background music that are seamlessly integrated into the game and help establish a sense of realism and excitement
A good design backed by clear understanding of the goal of the game
In professional games, the creation of visually stunning graphics for use as sprites and backgrounds is performed by professional graphic artists with years of education, training, and experience. Likewise, realistic sound effects and mood setting background music are developed by professional sound effect specialists and musicians.
Hint
Exploration of graphic design and audio development is well outside the scope of this book. You can learn more about these topics from other books and from colleges and universities with game development, multimedia, and music programs.
Instead of trying to teach you graphic design and audio engineering skills, this chapter’s focus is on teaching you the basic principles of good game design. Once you understand the qualities that make games fun and appealing, you can worry about the rest later. In the interim, you can take a stab at creating your own graphics and audio using free or low-cost multimedia applications or you can also look for graphic and audio content on the internet, where graphic artists and audio engineers eagerly wait to show off and sell their hard work to aspiring game developers.
Before you sit down at your computer to begin creating the world’s next great computer game, you should first set aside a little time to plan the design of the game. Professional game development companies typically assemble teams of professionals who lock themselves away in rooms outlining the premise and design of their next new game, before anyone starts working on it. By taking the time to put a plan or outline on paper, you help to focus your thoughts.
Begin by writing down a sentence of two that describes the overall premise of your game. Next, write down the goal of the game. Is it for the player to go on an adventure and find a lost treasure or to race right through a series of challenging levels and to overcome an ultimate foe at the game’s final level? Once you have the goal defined, develop subgoals for the game. These subgoals may be things achieved at regular intervals during game play. For example, players may have to achieve a different subgoal on each level of the game in order to advance to the next level.
Next, describe the different characters (objects) that you intend on adding to the game and list their major characteristics, features, and any sounds (special effects) they may make. You should also identify the controls that you will create for controlling these objects and specify how objects might interact with one another. If your game is going to consist of different rooms (levels), describe each one, explaining how it looks and identifying which rooms the game’s different objects can be found in. Don’t forget about specifying the different types of background music you want to use in each room.
Once you have completed putting together an overall design outline for your game, you need to go about creating or collecting the graphics and audio files you will need to create all of the game’s sprites, backgrounds, and sounds. Once all of this is in place, you will be ready to sit down and begin work on your new game.
One critical aspect of game development is the design of the different levels that make it up. Obviously, you need to start out by presenting easier levels first, saving more complicated levels for the end of the game. As you design your game’s levels keep in mind that players who are new to your game have a lot to learn upfront. As such, it’s a good idea to limit the number of controls that the player must learn in the beginning. You can always introduce new controls as the player progresses through the game.
By the time players advance through the first two to three levels of the game, they should be getting comfortable with the game and its controls. This is the point where the game’s levels should be designed to be really challenging. If players really like your game, they should become fully engrossed and addicted, forgetting everything else. Players’ skill levels should begin to grow rapidly. It is important that you continue to toss new challenges out to them at an appropriate rate. Throw them out too fast and players can get frustrated. Throw them out too slow and players may get bored.
Eventually, players who stick with the game will get really good at it. Their level of improvement will begin to level off. If you time things right, this should coincide with the point in the game where the player is introduced to the game’s climax, hopefully making for a great finale and conclusion. If you do not time things correctly, and wait too long, players may not stick around long enough to reach the end. If you let the player reach the end of the game too soon, things may work out or players may come away feeling cheated because they were emotionally unprepared for the ending.
The best way to determine whether you are getting things right with the design of your levels is to lay them out carefully, going from simple to complex all the while introducing new features, obstacles, and rewards. Of course, you need to test each level and make sure that it feels right and that together they provide the player with a fun, fair, and well-balanced experience. But don’t take your own word for it. Enlist the help of your friends and get their feedback. Make sure you ask them about each level and whether or not you got them in the correct order. Find out what they like about a given level and consider adding it in other levels. Find out what they don’t like and consider reducing its occurrence or even eliminating it all together.
A computer game is an interactive experience involving one or more players in pursuit of a common goal. In order to achieve this goal, multiple obstacles or challenges must be overcome. In order to be successful, your games must challenge players and keep them entertained. This is achieved by creating an interactive experience in which players at all skill levels are kept engrossed in the gaming experience.
Keeping games challenging for players with different skill levels is an important game design consideration. If you make your games easy enough for beginner players, more experienced players will quickly get bored and move on. On the other hand, if you make your games challenging enough to engross experienced players, beginners will feel overwhelmed and walk away. Designing a game to satisfy the needs of both of the groups is not always easy, but it can be done using some basic design techniques.
One way of satisfying the needs of players with different levels of skill is to design the game to operate at different levels of difficulty. For example, you might give players the options of clicking on buttons labeled Easy, Medium, and Hard located on the games intro screen. Then based on the player’s selection, you could vary the speed at which things move or change the number of enemies that are generated at any one time. You might instead consider creating different levels to support easy, medium, and hard levels of play. Easy levels might be smaller, less complex, have fewer obstacles, and require fewer controls to navigate and control. Medium and hard levels might feature additional objects as well as new enemies and monsters that only more experienced players will be able to overcome.
You might also consider adding a few optional training levels to your game that are designed to acclimate new players to your game and to give players a chance to pick up the basic skills required to be successful without running the risk of initially overwhelming them. Another way of accommodating players with different levels of skills is to keep an eye on the player’s score and to use that score as a trigger for unleashing new levels of challenges. This way, players who are unable to score lots of points quickly can advance slowly from challenge to challenge while advanced players capable of moving quickly between challenges can do so just as fast as they can rack up points.
Yet another way of accommodating the needs of advanced players is to create a number of optional or secret advanced levels, which players do not have to play in order to complete game but which provide experienced players with greater and more satisfying challenges.
Trap
In your quest to create challenging levels do not fall into the trap of thinking that challenging means complex. It is very easy to get carried away in game development by making things too difficult. One way of inadvertently doing so is by giving the player access to too many controls and make the use of those controls essential to playing the game. Most players can remember five to seven different controls at most. Any more than that and players tend to get confused and frustrated. This does not mean that you cannot add any number of extra controls to your games. Just don’t make them all essential. This way players can use them if they want or they can ignore them all together and stick with a few fundamental controls.
Every game needs a goal and it is critical that the player knows from the outset what that goal is. This helps to focus the player’s attention and keep his interest. However, if goals seem too overwhelming or distant, they may instead turn players off. A good way of overcoming this situation is to create smaller and easier to achieve objectives, the sum total of which lead the player ever closer to meeting the game’s goal.
Just as important as setting a clear goal and objectives is keeping the player informed of how well he is progressing towards them. You can do this in a variety of ways. For starters, you can display a score that lets the player know how well he is doing. For example, in a treasure hunting game, you might provide players with the ability to view their inventory or provide a map that shows how far the players have progressed on their journey.
Many action shoot-up games involve a series of battles fought over a number of levels, culminating in a fight with the game’s primary antagonist, often referred to as the boss. In these games the boss is a computer-controlled opponent that must be defeated as the climax in the game’s final level. Along the way to reach the game’s boss, players may need to defeat a number of tough mini bosses. To help the player keep track of his progress, you might display the player’s score along with the current level.
Game Maker provides a high score mechanism that you can include in your games to let players know how well their final score matches up against that of other players. By keeping track of high scores, you can provide players with the inspiration needed to keep playing as they aspire to earn the much-cherished high score.
During game play all kinds of things are going on and players have all kinds of things to think about and respond to. For example, in a Pac-man-style maze game, players have to decide whether to move up, down, right, or left at any moment in the game, while taking into consideration where various rewards lie and the location and direction that protagonist ghosts are moving. For these types of games, the choices are pretty straightforward and the consequences are obvious. However, other types of games allow the player to make different types of choices.
Some games allow players to select the character that they will control during game play. These characters might be a Viking warrior, a wizard, or a troll. In order for the player’s choice to have any real value, there must be consequences to their decision. This could be achieved by assigning different abilities to each character. The warrior might be fast and good with a sword. The wizard might be a lousy fighter but be able to ward off enemies or even hypnotize them with a magic wand. The troll might be quite slow but impervious to certain types of blows. By giving each character unique abilities, you make character selection meaningful.
As you work on your games, when you create a situation where the player has a choice to make, ask yourself, is the choice worth making? After all, if you give the player a choice between carrying either of two types of weapons, both of which are functionally identical, what is the point? Player choices should have meaning and consequences.
An important feature of any game is the proper care and feeding of the player. One way of doing this is to provide players with rewards for good play or perhaps for no reason whatsoever. The proper and timely provision of rewards can have a big impact on keeping players happy. Happy players keep playing and will keep coming back for more. Unhappy players give up and move on, which is the last thing any developer wants.
Rewards are important because they provide players with a sense of satisfaction and achievement for deeds well done. For example, when players accomplish certain tasks, you can reward them with bonus points. You can also reward players with extra lives or extra time to perform tasks that must be accomplished within specific time frames. There are other ways to provide players with rewards. One easy way is to display a message acknowledging when particular tasks are accomplished. A more involved approach might be to display a clever animated sequence at the conclusion of a level. In addition to letting players know they did well, you could use this as an opportunity to help make transitions between different levels and to instruct players on what their next objective is.
Rather than just assigning rewards for performing tasks, you can add objects at various locations within the game that players can collect as rewards. For example, you might strew a collection of medical kits around a room that when collected help to repair player health. Likewise, you might strategically place various objects that when collected give the player new or temporary abilities, like invisibility, invulnerability, or extra powerful ammunition.
Be consistent with any new capabilities you provide players and don’t get carried away too early in the game. This is a common mistake. It is important that as you introduce new features that you do so in a reasonable and equitable fashion. This means not giving the player access to every possible ability under the sun in the first or second level, but instead handing them out evenly throughout the course of the game. Otherwise, what do players have to look forward to? You might want to consider giving the player access to objects that provide different abilities on different levels. This can really keep things interesting and help to keep players on their toes. Also, do not give players an ability early on that they will love and then deny players that ability in later levels.
When it comes to rewards, remember two rules. First be generous but not too generous. A healthy dose of well-earned points can be a big motivator. On the other hand, loading up the player with a ridiculous number of points every time a small or menial task is performed quickly loses any motivating appeal. The second rule of rewards is to occasionally hand them out for no reason at all. Not only is this a nice surprise but it also motivates players by giving them hope that no matter how desperate a situation may be, there is always a chance that some random reward may be around the corner.
Another important part of game design is to make sure, unless you have a special reason for not doing so, that you provide players with all of the common features and controls that they expect. An example of something that players have come to expect from most computer games is to be able to create and reload save points. This is especially important in adventure-style games that can take hours or days to complete, as the player will get very upset if he realizes that he has to start all over from the beginning of the game or from the beginning of a level when his character dies. Game Maker helps you do this by providing Save Game and Load Game actions.
Players also expect to be able to keep track of their character’s health and to be able to tell at a glance how many lives they have left. You can provide this using Game Maker’s health and lives mechanisms. It is equally important that players be able to keep an eye on their score. To help you do this, Game Maker provides access to a number of score actions.
To make all of this information visible without interfering with game play or crowding up the display of the game screen, you can display an information plan at the top, bottom, or side of the screen. Players also expect to be able to take credit for their achievements in games where they earn a score. To satisfy this requirement, you can take advantage of Game Maker’s Show Highscore action.
When considering what types of features are essential to your games, shop around and take a look at what your competition is up to. Is there a common set of features? If so, you should probably make sure your games provide the same features.
All right, now it is time to begin work on the development of this chapter’s application project, the Skybuster game. Skybuster is inspired by Atari’s Breakout game, which was one of that company’s original hit games. In this single-player game, the player is given control of a paddle located at the bottom of the room and challenged with the task of trying to knock out all of the bricks located at the top of the room. The bricks come in two different colors and have different point values. The game consists of three increasingly complex levels. Players advance to the next level by clearing out all of the bricks on the current level. The player is given three lives, after which the game ends. If the player manages to advance to and clear the third level, game play continues by starting over at the first level.
Figure 5.1 shows an example of how the game will appear once you are done working on it.

In order to create this game, you will need to perform a number of steps, as outlined here:
Define the sprites used in the game.
Define sounds that will be used to generate sounds effects.
Configure the game’s background.
Add a room to the game and populate it with objects.
Define objects used to control game play and develop their program logic.
The first step in creating Skybuster is to add the sprites needed to represent the game’s ball, walls, paddles, and red and green bricks. If you have not already done so, start Game Maker, or if it is already started, click on File > New to create a new application. Use the steps outlined below to add the game’s first sprite.
Click on Resources > Create Sprite and then type
spr_ballas the name for the game’s first sprite.The graphic files you will need to create the game’s sprites are available for download on this book’s companion website (www.courseptr.com/downloads). Click on the Load Sprite button and navigate to the location where you saved the files, and select the
ball.giffile and then click on Open.Click on OK to close the Sprite Properties window.
Using the same set of steps outlined above, create a new sprite named spr_paddle assigning it the paddle.gif file, a sprite named spr_goal assigning it the goal.gif file, a sprite named spr_miss, assigning it the miss.gif file, and a sprite named spr_wall, assigning it the wall.gif file. Unlike all of the other graphic files, the wall.gif file does not have a transparent background, so disable the spr_wall sprite’s Transparent setting. Next add another sprite named spr_redbrick and assign it the redbrick.gif file and a sprite named spr_greenbrick, assigning it the greenbrick.gif file.
The next step in the development of the Skybuster game is to add the sounds needed to play the game’s sound effects. This game will need three sounds, one for when the ball collides with the wall or a paddle, one for when the player misses the ball, and one for when the ball collides with the bricks. You will use audio files that come with Game Maker when creating these sounds. By default, these files are located in C:Program FilesGame Maker7Sounds.
The following procedure outlines the steps required to create the first sound.
Click on Resources > Create Sound. The Sound Properties window appears.
Assign a name of
snd_collisionto the sound and then click on the Load Sound button, navigate to the C:Program FilesGame Maker7Sounds folder, select theBeep1.wavfile, and then click on Open.Click on OK to close the Sprite Properties window.
Using the steps outlined above, create a new sound named snd_miss, assigning it the zap.wav file and then create another sound, naming it snd_hitbrick, and assign it the beep5.wav file.
Now it’s time to define a background for the game. The steps required to add the game’s background are outlined here:
Click on Resources > Create Background. The Background Properties window appears.
Enter
bck_skyinto the Name file.The graphic file you will need to create the background is supplied with Game Maker and by default is located in the C:Program FilesGame Maker7Backgrounds folder. Click on the Load Background button, navigate to the Backgrounds folder, select the
sky.giffile, and then click on Open.Click on OK to close the Background Properties window.
The next step in the development of Skybuster is to add three rooms in which the game is played. The game consists of three levels, so three rooms will be needed. To create the first room, click on Resources > Create Room. The Room Properties window appears. Name the room room_level1 and increase the size of the room by clicking on the Settings tab and changing the room’s width to 800 and its height to 594. Also, add a caption of Skybuster - Level 1 to the Caption for the Room field. Next, click on the Backgrounds tab and clear the Draw Background Color setting and then select bck_sky as the room background. At this point, this room contains all of the base features needed by every room in the game, so to make things easy, click on OK to close the room you just started creating and then right-click on it and select Duplicate from the list of options that appears. Game Maker creates an exact duplicate of the room. Repeat this step one more time to add a third room to the game. Right-click on the first duplication and select the option to rename it, assigning it a name of room_level2. Repeat this process with the second duplicate room, naming it room_level3.
You are now ready to begin populating each of the rooms with the objects needed to facilitate game play. Begin by opening room_level 1 and selecting its Object tab. Next, select the obj_wall object and then draw repeated instances of it around the left, right, and top edges of the room, as shown in Figure 5.2. Then add 10 instances of the obj_redbrick object across the upper portion of the room. Next, select the obj_miss object and use it to draw a line across the bottom of the room. Finally, add an instance of the obj_paddle object just above the bottom center of the room and add an instance of the obj_controller object to the room anywhere you want.

Once you have finished working on this room, click on the green check button located on the Room Properties toolbar to save and close the room. Using the same steps outlined above, open room_level2 and then configure it so that it contains three rows of green bricks laid out as shown in Figure 5.3.

When done, close this room and open room_level3, configuring it as shown in Figure 5.4.

When done, close this room and proceed to the next section where you will add and then configure the objects needed to bring the game to life.
Skybuster is made up of a number of different objects, some of which are visible and some of which are not visible. The visible objects include the ball, paddles, walls, and color bricks. The invisible objects include the obj_miss object that will be placed at the bottom of the screen and used to determine when the player has failed to deflect the bouncing ball back into play. An invisible controller object will also be used to initiate the start of game and start of room actions as well as to track the number of bricks left in the room and manage the process of switching between rooms when all of the bricks have been knocked out. The controller object will also track player lives and determine when game play should end.
Let’s begin by defining all of the objects that will be visible to the players, starting with the ball object, moving on to the paddle objects, followed by the wall object and then the red and green bricks.
Click on Resources > Create Object. The Object Properties window appears.
Type
obj_ballin the Name field.Click on the context menu icon located at the end of the Sprite text field and select
spr_ballfrom the list of all the sprites that appear.Add a
Createevent to the object and then click on the main2 tab and drag and drop an instance of theSleepaction to the actions list, entering 2000 into the Milliseconds field when prompted. Next, select the Move tab and add theMove Fixedaction. When prompted, select all three of the buttons on the first row in the Directions area and then enter 10 into the Speed field, as shown in Figure 5.5. This will launch the ball in one of three predictable directions at the beginning of the game.Add a collision event for the
obj_wallobject, select the Move tab, and add the Bounce action to the actions area. No configuration of this action is needed, so you can click on OK to close the Bounce window. This will make the ball bounce off all three of the game’s walls. Next, select the main1 tab and add thePlay Soundaction, specifying snd_collision as the sound to be used as shown in Figure 5.6. Click on OK to close the Play Sound window.Add a collision event for the
obj_paddleobject and then select the Move tab and add theMove Freeaction to the actions area. When prompted, typeRandom(100) + 40in the Move Free window’s Direction field andspeed + .5in the Speed field, as shown in Figure 5.7.
Figure 5.7. Configuring the ball object to move in a range of random directions at an ever increasing pace.
Hint
The entries that you made in the Move Free window require some additional explanation. In both cases, you entered expressions whose values are calculated dynamically as the game is running. The first expression uses a built-in GML function called
random(). This function generates a random number between 0 and a number specified inside its parentheses (e.g., 100). A value of 40 is then added to this number. The end result is a number in the range of 40 to 140. Game Maker supports the use of angles. The maximum angle you can have is 360 degrees. In Game Maker, 0 degrees points directly to the right, 90 degrees points straight up, 180 degrees point directly left, and 270 degrees points straight down.By specifying a randomly generated number in the range of 40 to 140, you provide a wide range of possible directions that the ball may randomly travel after being deflected by the paddle. Using the
Move Freeactions in place of theMove Fixedaction makes the game a lot more unpredictable and fun because instead of limiting the upward movement of the ball in one of three predictable directions, you instead provide for up to 100 unique angles, as demonstrated in Figure 5.9.The second expression that you entered altered the speed at which the ball travels by increasing the number of pixels at which the ball moved—.5 every time the ball collides with the paddle. As a result, the longer the player keeps the ball in play, the faster it moves and the more challenging the game becomes. Game Maker provides access to a collection of built-in variables of which speed is one. A variable is a named value stored in memory. Every time Game Maker gets ready to move the ball, it checks the value of its assigned speed. You will learn more about variables, expressions, and GML programming later in Chapters 9 through 11.
Next, select the main1 tab and add the
Play Soundaction, specifyingsnd_collisionas the sound to be used. Click on OK to close the Play Sound window.Add a collision event for the
obj_missobject and then select the Score tab and add theSet Livesaction to the actions area. When prompted, enter -1 into the New Lives field and click on OK to close the Set Lives window. This removes 1 from the number of lives the player has when the ball is allowed to drop off the bottom of the screen.Click on the main1 tab and then add the
Destroy Instanceaction. Leave the default setting ofSelfenabled and click on OK to close the Destroy Instance window.Add an instance of the
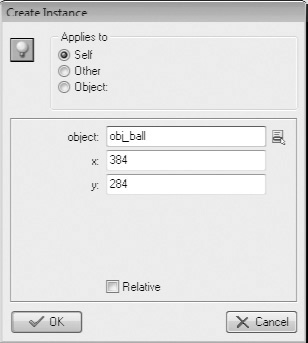
Play Soundaction to the bottom of the actions area and configure it to play thesnd_misssound.Add an instance of the
Create Instanceaction and create a new instance of theobj_ballobject at coordinates 384, 284 as shown in Figure 5.10.Add a collision event for the
obj_redbrickobject, select the Move tab, and add theBounceaction to the actions area. Leave the default settings in place and click on OK to close the Bounce window.Repeat the last step, this time for the
obj_greenbrickobject.Click on OK to close the Object Properties window.


Click on Resources > Create Object. The Object Properties window appears.
Type
obj_paddlein the Name field.Click on the context menu icon located at the end of the Sprite text field and select
spr_paddlefrom the list of all the sprites that appear.Add a collision event to the object for the
obj_wallobject, click on the Move tab, and drag and drop an instance of theReverse Verticalaction to the actions area. Click on the OK button to close the Vertical Reversal window.Click on the Add Event button and then add a
<noKey>keyboard event to the object.Select the Move tab and then add the
Move Fixedaction to the actions area. Select the center button in the Direction area to halt the movement of the ball.Add a
<Left>keyboard to the actions area and then drag and drop an instance of theSpeed Horizontalaction. Type -7 into the Hor. Speed field to instruct Game Maker to move the paddle 7 pixels towards the left when the left arrow key is being pressed.Repeat the previous set, this time for the
<Right>keyboard event, and assign a value of 7 to the Hor. Speed field (moving the paddle towards the right when the right arrow key is pressed).
Click on Resources > Create Object. The Object Properties window appears.
Type
obj_redbrickin the Name field and then enable itsSolidproperty.Click on the context menu icon located at the end of the Sprite text field and select
spr_redbrickfrom the list of all the sprites that appear.Add a collision event for the
obj_ballobject and then click on the main1 tab and add an instance of theDestroy Instanceaction to the actions area. Click on OK to close the Destroy Instance window.Add an instance of the
Play Soundaction and configure it to play the snd_hitbrick sound.Lastly, select the Score tab and add the
Set Scoreaction to the bottom of the actions area. Enter a value of 10 in the New Score field and enable the Relative setting. Click on OK to close the Set Score window.
Click on Resources > Create Object. The Object Properties window appears.
Type
obj_greenbrickin the Name field and then enable itsSolidproperty.Click on the context menu icon located at the end of the Sprite text field and select
spr_greenbrickfrom the list of all the sprites that appear.Add a collision event for the
obj_ballobject and then click on the main1 tab and add an instance of theDestroy Instanceaction to the actions area. Click on OK to close the Destroy Instance window.Add an instance of the
Play Soundaction and configure it to play thesnd_hitbricksound.Lastly, select the Score tab and add the
Set Scoreaction to the bottom of the actions area. Enter a value of 20 in the New Score file and enable the Relative setting. Click on OK to close the Set Score window.
Now let’s define the game’s two invisible objects. The first of these two objects is the special controller object. The obj_controller object will set the number of lives available to the player to 3 at the beginning of the game. It will also set the player’s score to 0 and create an initial instance of the obj_ball object to start off game play. In addition, the obj_controller object will continuously execute at every step of the game, checking to see if all of the bricks have been knocked out of the room, and if this is the case, it destroys the ball object and either moves to the next higher level (room) or if the third level has just been cleared, moves the game back to the first level (room) and then creates a new instance of the ball to initiate play. The obj_controller object also checks to see if the player has any lives left, and if he does not, it displays a message declaring the game over and then restarts the game. The obj_miss object, on the other hand, does not have any events of associated actions. All that you have to do when creating it is to make it invisible.
Click on Resources > Create Object. The Object Properties window appears.
Type
obj_controllerin the Name field and then disable itsVisibleproperty.Click on the Control tab and then add the
Test InstanceCount action to the actions area. Select obj_redbrick as the object to be tracked and 0 as the number of instances and leave Equal to as the operation to be performed. When configured as shown in Figure 5.11, the action will only execute when all of the red-colored bricks have been removed from the room.Add a
Start Blockaction followed by aDestroy Instanceaction (set toobj_ball) and then aSleepaction (set to 1000 milliseconds).Next add a
Check Nextaction (set to<no effect>). This will load the next room defined in the game.Add a
Create Instanceaction and configure its target object asobj_ball, assigning coordinates of 384 and 284.Add an
End Blockaction to the end of the actions area followed by anElseaction and then aStart Block.Add a
Different Roomaction (set toRoom_level1) followed by theCreate Instanceaction (set toobj_ballwith coordinates of 384 and 284).Next, add three consecutive
End Blockactions to the end of the actions area. As you add these actions, take note of how Game Maker automatically aligns them with previousStart Blocksto form logical groupings of code statements, each execution of the actions embedded within each matching set ofStart Block, andEnd Blocksexecuted only when the preceding conditional actions evaluate as true.Next, add a
Test Livesaction (set to equal to 0) followed by a finalStart BlockandEnd Block.Embed a
Display Messageaction (set toGame over. Click on OK to play again.) followed by aSleepaction (set to 500 milliseconds) and theRestart Gameaction within the finalStart BlockandEnd Block. At this point, the programming logic for theobj_controllerobject’sStepevent should looks like the example shown in Figure 5.12.Click on the Add Event button to display the Event Selector window. Click on the Other button and then select the
Game Startevent from the list of events that are displayed. Add aSet Livesaction (set to 3) to theGame Startevent.Click on the Add Event button to display the Event Selector window. Click on the Other button and then select the
Room Startevent from the list of events that are displayed.Add a
Set Scoreaction (set to 0) followed by aScore Captionaction (disabling the display of health).Lastly, add a
Create Instanceaction to the actions area and set its target object toobj_ball.


Click on Resources > Create Object. The Object Properties window appears.
Type
obj_missin the Name field and then disable itsVisibleproperty.
That’s everything! Assuming that you followed along carefully with all of the instructions that have been provided, your copy of the Skybuster game should be ready to go.
This chapter’s focus was on the principles of good game design. It explained the importance of providing your games with clear goals and the need to give players rewards. This chapter also provided you with a review of different ways in which you can ensure that players get a feeling of being in control during game play. In addition, this chapter also discussed the importance of doing your best to ensure that players of all skills levels are consistently challenged during game play. By applying the information you learned in this chapter, you will be able to build better and more challenging games.