Programming Basics
This chapter focuses on the building blocks that are necessary to become a great Swift programmer. This chapter covers how to use the playground user interface, how to write your first Swift program, and how to use the Xcode integrated development environment (IDE).
Note We will introduce you to using playgrounds, which will enable you to program right away without worrying about the complexities of Xcode. We have used this approach for the last six years, teaching Objective-C and Swift, and know that it helps you learn the concepts quickly, without discouragement, and gives you a great foundation to build upon.
Touring Xcode
Xcode and playgrounds make writing Swift code incredibly simple and fun. Type a line of code, and the result appears immediately. If your code runs over time, for instance through a loop, you can watch its progress in the timeline area. When you’ve perfected your code in the playground, simply move that code into your Swift iOS project. With Xcode playgrounds, you can do the following:
- Design a new algorithm, watching its results every step of the way
- Create new tests, verifying that they work before promoting them into your test suite
- Experiment with new APIs to hone your Swift coding skills
First you’ll need to learn a little more about the Xcode user interface. When you open an Xcode iOS project, you are presented with a screen that looks like Figure 2-1.

Figure 2-1. Xcode Integrated Developer Enviroment with a Swift project
The Xcode user interface is set up to help you efficiently write your Swift applications. The user interface for playgrounds is similar to the user interface for an iOS application. You will now explore the major sections of Xcode’s IDE workspace and playgrounds.
Exploring the Workspace Window
The workspace window, shown in Figure 2-2, enables you to open and close files, set your application preferences, develop and edit an app, and view the text output and error console.

Figure 2-2. Xcode’s workspace window
The workspace window is your primary interface for creating and managing projects. The workspace window automatically adapts itself to the task at hand, and you can further configure the window to fit your work style. You can open as many workspace windows as you need.
The workspace window has four main areas: Editor, Navigator, Debug, and Utilities.
When you select a project file, its contents appear in the Editor area, where Xcode opens the file in the appropriate editor.
You hide or show the other three areas by using buttons in the view selector in the toolbar.
![]() Clicking this button shows or hides the Navigator area. This is where you view and maneuver through files and other facets of your project.
Clicking this button shows or hides the Navigator area. This is where you view and maneuver through files and other facets of your project.
![]() Clicking this button shows or hides the Debug area. This is where you control program execution and debug code.
Clicking this button shows or hides the Debug area. This is where you control program execution and debug code.
![]() Clicking this button shows or hides the Utilities area. You use the Utilities area for several purposes, most commonly to view and modify attributes of a file and to add ready-made resources to your project.
Clicking this button shows or hides the Utilities area. You use the Utilities area for several purposes, most commonly to view and modify attributes of a file and to add ready-made resources to your project.
Navigating Your Workspace
You can access files, symbols, unit tests, diagnostics, and other facets of your project from the Navigator area. In the navigator selector bar, you choose the navigator suited to your task. The content area of each navigator gives you access to relevant portions of your project, and each navigator’s filter bar allows you to restrict the content that is displayed.
Choose from these options in the navigator selector bar:
 Project navigator. Add, delete, group, and otherwise manage files in your project, or choose a file to view or edit its contents in the editor area.
 Symbol navigator. Browse the class hierarchy of the symbols in your project.
 Find navigator. Use search options and filters to quickly find any string within your project.
 Issue navigator. View issues such as diagnostics, warnings, and errors found when opening, analyzing, and building your project.
 Test navigator. Create, manage, run, and review unit tests.
 Debug navigator. Examine the running threads and associated stack information at a specified point of time during program execution.
 Breakpoint navigator. Fine-tune breakpoints by specifying characteristics such as triggering conditions.
 Report navigator. View the history of your builds, app console output, continuous integration, and source control tasks.
Editing Your Project Files
Most development work in Xcode occurs in the Editor area, which is the main area that is always visible within the workspace window. The editors you will use most often are as follows:
- Source editor: Write and edit Swift source code.
- Interface Builder: Graphically create and edit user interface files (see Figure 2-3).
- Project editor: View and edit how your apps should be built, such by specifying build options, target architectures, and app entitlements.
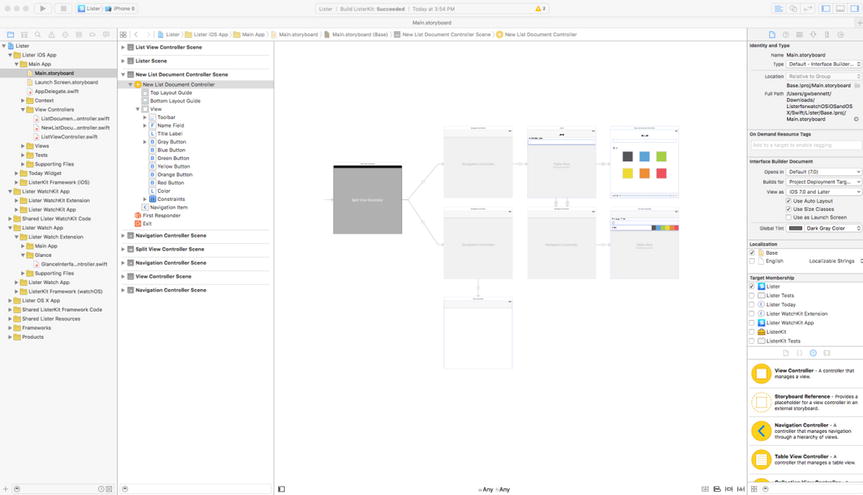
Figure 2-3. Xcode’s Interface Builder showing a storyboard file
When you select a file, Xcode opens the file in an appropriate editor. In Figure 2-3, the file Main.storyboard is selected in the Project navigator, and the file is open in Interface Builder.
The editor offers three controls:
![]() Clicking this button opens the Standard editor. You will see a single editor pane with the contents of the selected file.
Clicking this button opens the Standard editor. You will see a single editor pane with the contents of the selected file.
![]() Clicking this button opens the Assistant editor. You will see a separate editor pane with content logically related to that in the Standard editor pane.
Clicking this button opens the Assistant editor. You will see a separate editor pane with content logically related to that in the Standard editor pane.
![]() Clicking this button opens the Version editor. You will see the differences between the selected file in one pane and another version of that same file in a second pane.
Clicking this button opens the Version editor. You will see the differences between the selected file in one pane and another version of that same file in a second pane.
Creating Your First Swift Playground Program
Now that you have learned a little about Xcode, it’s time to write your first Swift playground program and begin to understand the Swift language, Xcode, and some syntax. First you have to install Xcode.
Installing and Launching Xcode 7
Xcode 7 is available for download from the Mac App Store for free, as shown in Figure 2-4, and from the Apple Developer Center, as shown in Figure 2-5.

Figure 2-4. Xcode 7 is available for download from the Mac App Store for free

Figure 2-5. The Apple Developer Program
Note This package has everything you need to write iOS apps. To develop iOS apps, you will need to apply for the Apple Developer Program and pay $99 when you’re ready to submit to the App Store. See http://developer.apple.com. In 2015, Apple combined the iOS, watchOS, Mac OS X, and Safari developer programs into one program called the Apple Developer Program.
Now that you have installed Xcode, let’s begin writing a Swift playground.
Launch Xcode and click “Get started with a playground,” as shown in Figure 2-6.

Figure 2-6. Creating your first Swift playground
Using Xcode 7
After launching Xcode, follow these steps:
- Let’s name the playground HelloWorld and select iOS as the platform, as shown in Figure 2-7. Then click Next and save your app in the folder of your choice.

Figure 2-7. Name your playground HelloWorld and select iOS as the platform
Xcode does a lot of work for you and creates a playground file with code ready for you to use. It also opens your playground file in your Xcode editor so you can start, as shown in Figure 2-8.

Figure 2-8. The playground window
You now need to become familiar with the Xcode playground IDE. Let’s look at two of the most often used features.
- The Editor area
- The Results area
Xcode Playground IDE: Editor and Results Areas
The Editor area is the business end of the Xcode playground IDE—where your dreams are turned into reality. It is where you write your code. As you write your code, you will notice it change color. Sometimes, Xcode will even try to autocomplete words for you. The colors have meanings that will become apparent as you use the IDE. The Editor area is also where you debug your apps.
Note Even if we’ve mentioned it already, it is worth saying again: you will learn Swift programming by reading this book, but you will really learn Swift by debugging your apps. Debugging is where developers learn and become great developers.
Let’s add a line of code to see the power of Swift playgrounds. Add line 6 shown in Figure 2-8. As soon as you enter the line of code, Xcode automatically executes the line and shows the result, “Hello World.”
When you write Swift code, everything is important—commas, capitalization, and parentheses. The collection of rules that enable the compiler to compile your code to an executable app is called syntax.
Line 5 creates a string variable called str and assigns “Hello, playground” to the variable str.
Line 6 reassigns “Hello World” to the variable str.
Let’s create a syntax error by entering line 8 shown in Figure 2-9.

Figure 2-9. The playground with a syntax error caught by the Swift compiler
On line 8, print is a function that will print the contents of its parameters in the Results area. As you enter code, the Results area automatically updates with the results for each line of code that you entered.
Now, let’s fix the app by spelling the str variable correctly, as shown in Figure 2-10.

Figure 2-10. Syntax error fixed
Feel free to play around and change the text that is printed. Have fun!
Summary
In this chapter, you built your first basic Swift playground. We also covered new Xcode terms that are key to your understanding of Swift.
Key to Success As mentioned in the introduction of the book, you can visit http://www.xcelme.com/ and click the Free Videos tab to view videos related to this chapter. The videos will help you understand more about Xcode, IDEs, and playgrounds. Also visit http://forum.xcelme.com/ to ask questions about these concepts.
The concepts that you should understand are as follows:
- Playground
- Editor area
- Results area
Exercise
- Extend your playground by adding a line of code that prints any text of your choosing.