
![]()
Setting Up Your Data
The primary purpose of LightSwitch applications is to connect to and work with data. So, to get the most out of the product, it’s vital to understand the intricacies of working with data sources, tables, and fields. In this chapter, I’ll show you how to
- design tables and attach to existing data;
- define relationships between tables; and
- create computed properties and apply business types.
This chapter will describe the start of an application to manage help-desk issues. The intention is to provide an example of a business application that contains sufficient complexity to demonstrate the most prominent features of LightSwitch.
In this chapter, you’ll learn how to create tables to store help-desk issues and engineer details. You’ll find out how to associate engineers with multiple issues and how to define a manager/engineer hierarchy by creating a self-referencing relationship. Later on, I’ll show you a technique to summarize data for each row in a table. This “summary property” combines each engineer’s first and last name and provides a helpful way for users to identify records, particularly in lists of data.
Choosing Where to Store Your Data
There are two approaches in LightSwitch that you can use to store data. You can create your own tables in the Intrinsic database by using the built-in table designer, or you can attach to an external data source. Of course, these two approaches are not mutually exclusive. You can create your own tables and also attach as many external data sources as you want in a single application.
When you build tables using the built-in table designer, LightSwitch persists any data that you add at design time. So, if you add some data to a table during a debug session, your data will still be there during the next debug session. For this to work, LightSwitch creates a LocalDB development database in the location BinData ApplicationDatabase.mdf.
The benefit of creating tables in the Intrinsic database is that it makes your project self-contained. If you share your LightSwitch project with other users, they’ll be able to run your project without having to reattach the external data.
The difficulty arises when you deploy your application. The deployment wizard doesn’t allow you to deploy your development data into the live environment. This can be frustrating if you’ve spent a lot of time entering data during the design process. So, if design time data is important to you, consider building your tables externally in a SQL Server database rather than building it internally within LightSwitch. The alternative is to create and execute data scripts on your deployment database after you install your application.
What Are Entities and Properties?
Database developers often use the terms tables, rows, and columns. However, LightSwitch regularly refers to entity sets, entities, and properties instead. An entity represents the data from a single row in a database table, whereas a property is analogous to a field or column from a database table.
LightSwitch uses Microsoft’s Entity Framework internally to provide object relational mapping. Entity and properties are terms that the Entity Framework uses, and are more appropriate given that LightSwitch can connect to non-relational data sources. For example if you connect to a SharePoint data source, list items map to LightSwitch entities, and list columns are exposed as LightSwitch properties.
In this book, I use the words tables and fields interchangeably, because it’s often clearer to use the database terms. For example, a property in the screen designer can mean a local instance of an entity or something you can find in Visual Studio’s property sheet. And when you start talking about the properties of a property, things can quickly become quite confusing.
Let’s start by creating a new table and defining some fields. We’ll create a table called Engineers that stores engineer details.
From Solution Explorer, right-click the Data Sources folder and choose the “Add Table” option. At the bottom of the table designer, you’ll see a banner you can use to change perspective (Figure 2-1). These three views show the fields and settings you can access while you work in the server, HTML, or desktop client (Silverlight) projects in your solution. This feature is useful, because some of the properties in the server project aren’t available in the HTML client project.

Figure 2-1. Creating a table and editing its properties
To configure the properties of a table, click the blue table-name heading and open the properties sheet. Here, you’ll find the table properties you can set (Figure 2-2). Some of the property values are specific to the perspective that you choose. For instance, you can apply different summary property and display name values for desktop and HTML clients (Figure 2-2).

Figure 2-2. The table properties you can set will differ depending on the perspective
The table properties you can set include:
- Name – The name value uniquely identifies your table. The name must begin with an alphabetic character and can only contain alphanumeric characters and the underscore character. Other special characters such as spaces or the full stop character are not permitted. The table name has a maximum length of 64 characters.
- Display Name – This is the friendly name that describes your table; it can contain spaces.
- Description – The description field provides a long description of the table.
- Plural Name – LightSwitch uses the value you enter here to name the collections of entities you add to a screen. You also use the plural name to refer to collections of entities when you write code. The maximum plural name value you can set is 64 characters.
- Summary Property – Think of this as the “display” field for a table. The summary property specifies the property that identifies a data row to a user. You can add a control to your screen called a summary control that displays the value of this property to the user.
- Default Screen – The summary control renders itself as a link. When a user clicks this link, it opens the default screen that you specify here. In desktop client perspective, there is an option to select “Auto” from the drop-down list. If you select this, LightSwitch displays an auto-generated screen. In HTML applications, the concept of an auto-generated screen doesn’t exist.
- Is Searchable – Selecting this ensures that the text properties in the table will be searchable.
- Enable Created/Modified Properties – When you select this option, LightSwitch automatically stores the username and date/time on which each record in the table was created and modified. You can use this feature to implement row-level tracking.
![]() Tip If you want to secure your application so that users can only work with the records that they created, make sure to check the “Enable Created/Modified” property.
Tip If you want to secure your application so that users can only work with the records that they created, make sure to check the “Enable Created/Modified” property.
Once you add a table, you can define the data you want to store by creating properties (or fields). To do this, switch to the server perspective and use the table designer to define your properties. For each field you add to a table, you need to specify the type of data that the field will store. Let’s take a look at some of the data types that you can use.
![]() Caution Try not to name your fields using words that are reserved keywords in SQL Server or the Entity Framework. Prefixing field names with the word Entity (e.g., EntityKey) caused unexpected errors in LightSwitch 2011. This particular bug has now been fixed.
Caution Try not to name your fields using words that are reserved keywords in SQL Server or the Entity Framework. Prefixing field names with the word Entity (e.g., EntityKey) caused unexpected errors in LightSwitch 2011. This particular bug has now been fixed.
In a typical application, much of the data you store will be string (or textual) data. The string data type includes support for international character types (e.g., Arabic, Chinese, and Japanese). For best performance, it’s a good idea to set the maximum field size to a value that’s no longer than the maximum length of the data that you want to store.
If you want to store unlimited-length/multi-line text, clear the contents of the maximum field textbox and leave it blank, as shown in Figure 2-3.

Figure 2-3. Setting a string field to store text with unlimited length
Storing Numbers (Double and Decimal Types)
If you want to store numbers with decimal places, you can choose to use either the double or the decimal data types.
The practical difference between these two types is that doubles can store a wide range of numbers in a smaller amount of memory. However, doubles are less precise and are subject to rounding errors when you perform calculations against them.
Decimals do not suffer from such rounding errors but do take up more space and are slower to compute. Sums of money should always be based upon the decimal data type.
Other important attributes that relate to decimals are precision and scale. Precision defines the total number of digits in a number. Scale defines the number of digits after the decimal place. Figure 2-4 illustrates precision and scale using the example number 123456.789.

Figure 2-4. Precision and scale
Decimal fields in LightSwitch are created with a default precision and scale of 18 and 2, respectively. In keeping with good practice, you should shorten these values if that level of accuracy is too precise for your needs.
Storing Numbers (Integer Types)
If you want to store numbers without decimal places, there are three data types you can use: short integer, integer, and long integer.
The range of data values that you want to store dictates the data type that you choose. The maximum positive or negative values you can store for each of these data types are approximately as follows: short integer, 32 thousand; integer, 2 billion; long integer, 9 quintillion (that’s a 9 with 18 zeroes after it).
You can specify a display format for each numeric property that you define in LightSwitch. When LightSwitch shows the data on a user’s screen, it formats the value using the pattern you supply (for desktop applications only).
Figure 2-5 shows a field that stores a feedback rating. A format string of N2 means that LightSwitch formats the number to two decimal places.

Figure 2-5. Setting the format
.NET format strings begin with the format specifier, followed by a number that indicates the desired number of decimal places. Table 2-1 shows the format specifiers that you can use.
Table 2-1. .NET Format Specifiers
|
Format Specifier |
Description |
|---|---|
|
C or c |
Currency |
|
D or d |
Decimal |
|
E or e |
Scientific (exponential) |
|
F or f |
Fixed-point |
|
G or g |
General |
|
N or n |
Number |
|
P or p |
Percentage |
|
R or r |
Round-trip |
|
X or x |
Hexadecimal |
![]() Note The initial version of LightSwitch didn’t include the feature to format numeric fields with .NET format strings. In 2011, I submitted this idea on Microsoft Connect, a website you can use to provide feedback on how to improve Microsoft products. I’m pleased that Microsoft chose to add this feature to LightSwitch, and it’s reassuring to know that they do listen to customer feedback.
Note The initial version of LightSwitch didn’t include the feature to format numeric fields with .NET format strings. In 2011, I submitted this idea on Microsoft Connect, a website you can use to provide feedback on how to improve Microsoft products. I’m pleased that Microsoft chose to add this feature to LightSwitch, and it’s reassuring to know that they do listen to customer feedback.
https://connect.microsoft.com/VisualStudio/feedback/details/654220/lightswitch-allow-data-to-beformattedThe image type provides storage for image data. For desktop applications, LightSwitch includes image editor and image viewer controls with which users can upload and view images. Note that these controls only support images in JPG and PNG formats. If you want to upload and view image files in other formats, you need to write or purchase a third-party custom control.
You can use the binary data type to store binary large objects such as documents, videos, or other file types. Chapter 11 will show how you can write the screen code to enable users to upload and download files in your application.
There are three data types that you can use to store dates: date, datetime and datetime offset. The date data type stores dates without a time component, whereas datetime is designed to store simple dates and times. Datetime offset is the best of all these data types, because it stores the time zone value, and stores a wider range of date values to a greater level of accuracy.
Here’s an example of where you would use the datetime offset data type. Imagine an order-processing system for a company that’s hosted on a US server. When the company dispatches an order, the warehouse operator sets the shipping time based on the local US time zone. If a customer from Europe chooses to view this order through a web interface, the shipping time should show the local European time, rather than US time. The datetime offset data type provides support for this scenario because it stores the time zone data.
Other common applications that use the datetime offset data type are scientific or genealogy systems (for tracing family trees). The lowest date value you can store in a datetime field is 1st January 1973, whereas with datetime offset, the earliest value you can store is 1st January 0001. Another benefit of datetime offset is that you can store times to an accuracy of 100 nanoseconds (that’s one ten-millionth of a second). In comparison, datetime is less accurate and stores times by rounding up in increments of .000, .003, or .007 seconds.
In the properties sheet for a date type field, you’ll find validation controls you can use to specify the minimum and maximum values in short date format (Figure 2-6). What might not be clear is the exact format in which you should enter these date values. The answer is that you should enter these values using the short date format that matches the regional settings of the computer that you’re developing on, rather than the regional settings of the server that you plan to deploy your application onto. For example, if you use a computer with British regional settings (like me) and want to restrict users from entering dates earlier than 1st April 2015, you would enter 01/04/2015, rather than 04/01/2015.

Figure 2-6. Configuring date validation settings
The properties sheet for each field contains a checkbox called “Include in Unique Index.” Selecting this checkbox adds the field to a composite (or multi-column) index.
It’s not possible to create individual unique fields through the designer. If you want to do this, you can write validation to enforce uniqueness at a field level. Chapter 5 contains sample code that will show you how to do this. Alternatively, you can create unique indexes on your SQL Server table if you’re using an attached SQL database.
If you make major changes to the schema of a table in the Intrinsic database, LightSwitch may discard the data in your development database. At worst, it can even destroy and recreate your entire development database. However, it generally warns you before any data loss occurs (Figure 2-7).

Figure 2-7. Warnings that appear before data loss occurs
Using LightSwitch Business Types
LightSwitch includes special data types that you won’t find in other database management systems. These include Email, Money, Phone Number, Web Address, Percent, and People. These data types are called business types. They’re designed to store specialized data, and provide built-in validation and data-entry controls. These business types include properties that control how LightSwitch displays data on screen, as well as data-entry and validation characteristics. Let’s take a closer look at some of these business types.
As its name suggests, the Email business type provides storage for email addresses. When you add an email field, there are two properties in the server perspective that you can set (Figure 2-8).
- Default Email Domain – If the user leaves out the email domain, LightSwitch appends the default email domain to the end of the email address. This setting is ideal for internal systems that are used by a single company.
- Require Email Domain – When checked, the user must enter an email domain when entering an email address.

Figure 2-8. Email business type properties
When you add a money field to a table, you’ll find additional properties that you can set in client perspective (Figure 2-9). Any money-type controls you add to a desktop application will apply these settings at runtime. The specific settings you can set are:
- Currency Code – Use this field to specify the locale for the currency. For example, if you want to specify United States dollars, specify en-US. Appendix A shows a list of valid codes that you can use.
- Is Formatted – If you select this option, LightSwitch applies formatting when you use the currency control on a desktop client screen to display your money value. The formatting that the control applies includes the currency symbol, the grouping separator, and decimal places.

Figure 2-9. Money-field properties
The options below only apply if you check the “Is Formatted” checkbox.
- Is Grouped – If checked, LightSwitch shows digit-grouping separators. For example, it displays 1,234,567.89, rather than 1234567.89.
- Symbol Mode – You can choose from Currency Symbol, ISO Currency Symbol, or No Currency Symbol. Here are some examples of how LightSwitch formats a monetary value using the available symbol modes:
- Currency Symbol - $123.45
- ISO Currency Symbol - 123.45 USD
- No Currency Symbol – 123.45
- Decimal Places – This defines the number of decimal places LightSwitch shows when it formats a monetary value.
Note that although the HTML client includes money viewer and money editor controls, you cannot apply formatting settings at the table level, unlike with Silverlight clients.
The Phone Number business type validates data by making sure that users can only enter phone numbers that match a list of predefined formats.
You can define formats by using the dialog that’s shown in Figure 2-10. The symbols you can use to define a format are:
- C – Country code
- A – Area or city code
- N – Local number

Figure 2-10. Phone number format dialog
Other additional symbols that you can use include: +, -, (,), .
When a user enters a phone number through the desktop client phone number control, the control attempts to validate the phone number against the first format in the list. If the digits match the format, the phone number passes validation. Otherwise, the control attempts to validate the phone number against all remaining formats in the list until it finds a match. If a match isn’t found, LightSwitch prevents the user from saving the record.
When LightSwitch saves the phone number in the database, it saves the number without any formatting. If you want to create reports or use the phone number data outside of LightSwitch, you would need to write your own procedure to format the data.
Unfortunately, it isn’t possible to specify additional formats on a global or application basis. If you want to do this, you must specify the additional format individually for each phone number field in every table.
Storing Web Addresses and Percentage Values
The Web Address business type is designed to store web addresses. In desktop client applications, users can use the web address editor and web address viewer controls to add and view data.
The Percent business type stores percentage values, and, just like for the other business types, LightSwitch provides percent editor and percent viewer controls for data entry.
The People business type stores usernames, or data that uniquely identify an individual. You might be interested in what benefit the People type offers. After all, you could simply store these values in a string field.
The real benefit of the People type becomes apparent when you write code. The People type allows you to look up additional properties that are stored in Active Directory or SharePoint. For example, if you add a Manager field to the engineer table, the manager property includes helper methods you can call to look up the full name from Active Directory.
Another benefit of this data type is that when you write queries, LightSwitch provides the ability to filter the contents of a People field by the current user. You can use this feature to show only the records that the logged-in user created.
Examining What Happens in SQL Server
When you create a table in the table designer, LightSwitch creates the actual table in the Intrinsic SQL Server database. If you create a string property of 255 characters, LightSwitch creates a 255-length nvarchar column (a data type that stores variable-length Unicode data) in the underlying SQL Server table.
You can access any property that’s visible in the table designer through code. When you write code, LightSwitch exposes table properties using .NET data types. Table 2-2 shows the mapping between LightSwitch, .NET, and SQL Server data types.
Table 2-2. Mappings between LightSwitch, .NET, and SQL Data Types
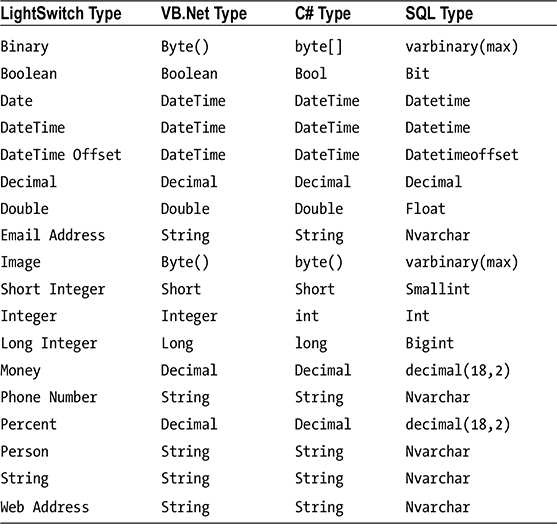
In Table 2-2, notice the business type mappings. LightSwitch uses SQL nvarchar and numeric types as the underlying storage type for business types.
With LightSwitch, users can enter data by choosing an item from a “picker”-type control. In desktop applications, this control would be an auto-complete box, whereas in HTML client applications the control would be a drop-down box. In both cases, a choice list can provide the data source for the picker control. You define choice lists against table properties, and it’s possible to specify choice items on fields from external data sources, as well as on tables that you create yourself in the Intrinsic database.
A choice list contains a set of name-value pairs, and you can configure these for most data types, including Boolean and numeric types. For example, you can create a choice list for a Boolean field with the choice values of Yes and No, or True and False. The data types that don’t support choice lists include image and binary types.
To create a choice list, click on the Choice List link from the properties sheet for your field and enter a list of value and display name pairs. When the choices appear on screen at runtime, they will appear in the order that’s shown in the list. You can reorder the choices by right-clicking the item and selecting the “Move Up” or “Move Down” options, as illustrated in Figure 2-11.

Figure 2-11. Reorder items using the right click context menu
Unlike earlier versions of LightSwitch, the choice list dialog fully supports copy and paste. If you have data in an Excel spreadsheet, you can copy and paste your values across. This makes it easier for you to duplicate choice list data across multiple properties.
Choice List Versus Related Tables
If you want your users to enter data by choosing from a list of available choices, you can either use a choice list or a related table.
A choice list is ideal for data items that are relatively static. The disadvantage of using a choice list is that adding or deleting items requires you to recompile and redeploy your application, which can be cumbersome. Table 2-3 summarizes the pros and cons of choice lists and related tables.
Table 2-3. Choice List and Related Table Pros and Cons
|
Choice List |
Related Table |
|---|---|
|
✓Very simple to create |
xMore complex setup. The choice tables need to be created and relationships set up. |
|
✓Choice list values are deployed with your application. |
xAn extra step is needed to populate the database table with values. |
|
xAdding or deleting requires a rebuild and redeployment of the application. |
✓List items can be maintained through the application. |
|
xChoice list items must be duplicated if you want to use them in more than one field. |
✓List items can be entered once into a table and used in multiple fields. |
If relationships exist between sets of tables in your application, it’s important that you properly define these in the table designer. Otherwise, screen design becomes very difficult, particularly when you want to use parent-child grids or drop-down (auto-complete) boxes. The following section will describe the various types of relationships you can define.
Defining One-to-Many-Type Relationships
One-to-many relationships are a common type of relationship between two tables. The following example shows you how to set up your tables so that engineers can be assigned to multiple help-desk issues.
To begin, create the Issue and Engineer tables as shown in Figure 2-12. At this point, no relationship exists between these two tables.

Figure 2-12. Issue and Engineer tables without relationships
To create the relationship, click the Relationships button in the designer toolbar and set up the relationship as shown in Figure 2-13.

Figure 2-13. Relationship dialog
In the Relationship dialog, the Multiplicity row defines the type of relationship between the two tables—in this case, a one-to-many relationship exists between our two tables. This means that when a help-desk operator creates an issue, the operator must assign an engineer.
The last row of the dialog defines the navigation property names for each table. This is where you can give a meaningful name to the relationship. In this case, the navigation property on the Issue table is named AssignedTo.
If you want to add another relationship to the Engineer table (e.g., to store the name of the engineer that closes the issue), you can rename the navigation property to ClosedBy so as to clearly distinguish it from the other relationships that might exist between the two tables. The default navigation property name in this example would be Engineers1, which isn’t very meaningful.
The purpose of a navigation property is to give you a way to navigate related entities. When you write code, these properties appear as objects you can use to reference child and parent entities. You can also query navigation properties by constructing language-integrated query (LINQ) expressions in code.
How Relationships Are Defined in SQL Server
With LightSwitch, you define the relationships between tables through dialogs that use simple language. Although this simplifies the process for the novice, it might feel alien for more experienced database developers. If this applies to you, what follows is what happens when you create a relationship in LightSwitch (Figure 2-14).
Figure 2-14 compares what you see in the LightSwitch designer to what you’d see in SQL Server.

Figure 2-14. What you see in LightSwitch versus what you see in SQL Server Management Studio
This diagram illustrates a modified version of the Issue table, which has been amended to store the engineer who closes the issue. This relationship is defined as a (zero-or-one)-to-many relationship, and the navigation property is called ClosedByEngineer. A (zero-or-one)-to-many relationship means that for an issue, setting a “closed by engineer” is optional.
For the AssignedTo relationship, notice how LightSwitch creates a column in the issue table called Issue_Engineer. And for ClosedByEngineer, it creates a nullable column called Engineer_Issue. This allows SQL Server to support the (zero-or-one)-to-many relationship that we define. For both these columns, LightSwitch also creates a SQL Server foreign-key relationship to the Id column in the Engineer table.
So, when you create relationships in the table designer, LightSwitch carries out the same keying that you would need to carry out if you were to create the tables manually.
Defining Self-Referencing Relationships
Self-referencing or recursive relationships are relationships where entities reference themselves. You often find these when you model hierarchies. To illustrate this type of relationship, let’s modify the Engineer table so that it stores the name of the engineer’s manager.
To create a self-join, open the relationship dialog and select the same table name in the To side of the relationship, as shown in Figure 2-15. Rename the navigation properties to Subordinates (in the From column) and Manager (in the To column). This creates two navigation properties for the engineer entity, each representing one end of the relationship.

Figure 2-15. Setting up a self-join in the relationship dialog
Defining Many-to-Many Relationships
In the relationship designer, many-to-many relationship types are not natively supported. If you want to create a many-to-many relationship, you need to create an intermediary table that contains two one-to-many relationships.
To demonstrate this, here’s how to create a set of tables to store engineer skills. An engineer can have many skills, and a skill can be assigned to one or more engineers.
Once you create the Engineer and Skill tables, create an EngineerSkill table to store the many-to-many relationship. In the table designer for the EngineerSkill table, create a one-to-many relationship between the Engineer and EngineerSkill tables. Next, create a one-to-many relationship between the Skill and EngineerSkill table. Figure 2-16 illustrates this table structure.

Figure 2-16. The data structure behind a many-to-many relationship
This completes the table design, and you’ll find out later in this book how you can create screens to enter many-to-many data.
Determining How Child Records Are Deleted
When you create a relationship, you can use the On Delete Behavior setting to determine what happens when a user deletes a record. There are three possible options:
- Cascade delete
- Restricted
- Disassociate
In the engineer and issue example, setting the deletion behavior to cascade delete will delete all related issue records when a user deletes an engineer.
If you set the behavior to restricted, engineers can’t be deleted until all related issues have been deleted.
The disassociate option sets all engineer references to null on related issues prior to the deletion of an engineer. The disassociate option is only valid on (zero-or-one)-to-many relationships.
The deletion behavior option is not available and is grayed out if you attempt to create a relationship between two separate data sources. Furthermore, these deletion options are only available for tables that belong in the Intrinsic database. They aren’t available for external data sources.
The other way to use data in LightSwitch is to connect to an external data source. With LightSwitch, you can connect a wide range of data sources. When you choose the option to attach to existing data, LightSwitch provides five choices (Figure 2-17). You can attach to a database, a SharePoint list, an OData Service, an SAP, or a WCF RIA Service (Windows Communication Foundation Rich Internet Application Service).

Figure 2-17. Attaching to an external data source
The list doesn’t end there, however. As long as there’s an entity framework provider for your data source, LightSwitch can consume the data. This enables you to connect to data sources such as Oracle, MySQL, and other database management systems (as shown in Figure 2-18).

Figure 2-18. Connecting to other database data sources
If there isn’t an entity framework provider for your data, you can write your own RIA Service, OData Service, or even your own custom data source extension. These options enable you to connect to data sources that are not natively supported by LightSwitch.
When you attach to an external data source, you can’t add new tables or new fields. You also can’t rename existing fields or modify the schema of any of the attached database objects.
However, you can change the data type of an attached field so that it uses a LightSwitch business type. For example, you can configure a SQL Server nvarchar field to use the Phone Number business type, rather than a string data type.
![]() Tip If you attach a table that contains an image column, LightSwitch sets the data type for that column to binary. If you want the column to behave as an image column and to use the built-in LightSwitch image controls, be sure to open the table in the designer and change the data type from binary to image.
Tip If you attach a table that contains an image column, LightSwitch sets the data type for that column to binary. If you want the column to behave as an image column and to use the built-in LightSwitch image controls, be sure to open the table in the designer and change the data type from binary to image.
Attaching to an Existing Database
To attach to an existing SQL Server database, right-click the Data node in Solution Explorer and select “Add a Datasource.” Select the “Database” option and follow the steps in the wizard.
You’ll eventually reach the dialog that’s shown in Figure 2-19, which prompts you to choose the tables and views that you want use in your LightSwitch application.

Figure 2-19. Choose your database objects dialog
LightSwitch doesn’t natively support stored procedures or user-defined functions, and these objects will not appear in the dialog that’s shown. If you want to use stored procedures, you can do so by writing a custom RIA Service.
![]() Note After attaching to an external table, you can use the table designer to reorder the columns. Although this will not affect the underlying SQL table, the data controls that appear on any new screens will be ordered in the sequence that matches the order that’s shown in the table designer.
Note After attaching to an external table, you can use the table designer to reorder the columns. Although this will not affect the underlying SQL table, the data controls that appear on any new screens will be ordered in the sequence that matches the order that’s shown in the table designer.
If a table does not include a primary key, LightSwitch will attempt to infer a primary key so that it can uniquely identify the records in a table. If LightSwitch cannot infer a primary key, it hides the table from the dialog that’s shown in Figure 2-19.
LightSwitch uses columns that do not accept null values to infer the primary key. Figure 2-20 illustrates this behavior when you attach a table with no primary key to your application. So, to attach a table that’s missing from the “Choose your Database Objects” dialog, you should define a primary key on the table at the database level.

Figure 2-20. LightSwitch infers the primary key for a table based on columns that do not allow nulls
If the location of your database server changes, or if the schema of your tables changes, you can refresh your LightSwitch model by right-clicking your data source and choosing the “Refresh Data Source” option.
When the wizard appears, you can update your database connection details by returning to the very first page in the wizard. Although you can change the connection string from one database server to another, you can’t change the underlying data provider. For example, you can’t change from SQL Server to MySQL without deleting the tables in your application and re-importing.
If the wizard detects any table changes, it indicates them by using a red cross or an exclamation point (shown in Figure 2-21).

Figure 2-21. Database objects dialog showing changed items
When you click the Finish button, the wizard updates all screens and removes controls that are bound to the deleted fields. However, it won’t update any references to those fields that exist in code. If references exist in code, they’ll become invalid and will show up in the Error List window. At this point, you can work through the error list and resolve any remaining errors.
When you connect to an existing database, you will notice that there are four SQL types that are currently unsupported. These are the spacial data types geography and geometry, as well as hierarchyid and sql_variant. If a table in your existing database uses any of these data types, LightSwitch won’t be able to read or write to those fields.
You can connect your application to a SharePoint 2010 (or higher) data source. LightSwitch uses a custom OData provider and, therefore, it doesn’t support versions that are from prior to SharePoint 2010.
You can attach to SharePoint lists using the Data Source wizard in the same way that you would connect to SQL Server data.
There are various limitations when you attach to a SharePoint data source. First, LightSwitch cannot manage SharePoint attachments or documents. Second, there’s limited support for the SharePoint column types of Picture and Hyperlink. This is because there are no native controls to display these data items. Multi-line text is also not fully supported because there is no native HTML control available to edit the content.
If you delete a data source, LightSwitch removes all entities that relate to that data source from all screens in your application. The screens themselves will not be deleted, but instances of entities and related controls within those screens will be removed.
Defining Relationships between Data Sources
Although it might not seem obvious, you can define relationships between tables in the Intrinsic database and tables in external data sources. By defining relationships, you can use data controls on the screens that you design. In case you’re worried about damaging your attached data source, there’s no need. LightSwitch won’t make schema changes to your attached data source when you define relationships between it and the Intrinsic data source.
Computed properties are special properties that derive their values through calculations and possibly from other fields. Computed properties are read-only by definition and appear in the entity designer with a calculator icon next to the field.
For desktop client applications, LightSwitch computes the calculated property value on both the client and the server. From a practical point of view, this means LightSwitch can recalculate and display immediately the value of a computed property on screen without requiring any intervention that triggers a server event, such as a user clicking the Save button on the screen.
It’s important to note that HTML client screens cannot display computed properties. Computed properties are defined with .NET (VB or C#) code. The HTML client is incompatible because it uses the browser’s JavaScript engine for computational tasks.
To further explain how computed properties work, I’ll now show you some examples. This will give you an idea of the type of code that’s involved in constructing a computed property. In subsequent chapters, you’ll find out how to display the computed property values in screens.
![]() Tip There’s nothing to prevent you from creating a computed property on an attached table. Computed properties are not just limited to tables that you create in the Intrinsic database.
Tip There’s nothing to prevent you from creating a computed property on an attached table. Computed properties are not just limited to tables that you create in the Intrinsic database.
For each table, you can specify a summary property through the properties sheet in the table designer. Summary properties are designed to summarize the contents of a data row for display purposes. To show a summary property on a screen, you use a summary control. This control is most often used in grids and auto-complete boxes.
The example that follows shows you how to create a computed property in the Engineer table called FullName that concatenates the first name and surname of an engineer.
To create this computed property, open the Engineer table and create a new property called FullName. In the General section of the properties sheet for the new property, check the “Is Computed” checkbox. Click on the “Edit Method” hyperlink and enter the code that’s shown in Listing 2-1.
Listing 2-1. Formatting strings in a computed property

This code demonstrates how to format strings using .NET’s String.Format method. This method accepts two arguments. The first argument specifies the string to be displayed and includes placeholders in the format {0},{1} and so on. The second argument is a comma-separated list of data items that are then substituted into the display string.
To set this as the summary property, open the properties sheet for the Engineer table and choose FullName from the summary property dropdown (Figure 2-22 ![]() ).
).

Figure 2-22. Summary property set to a computed field
Figure 2-22 ![]() shows the Full Name Summary on a screen that is designed for entering new issues.
shows the Full Name Summary on a screen that is designed for entering new issues.
![]() Note LightSwitch stores computed property code in the folder ServerDataSourcesApplicationData. For projects that you upgrade from earlier versions of LightSwitch, you’ll find the computed property code in the folder ServerUsercodeShared.
Note LightSwitch stores computed property code in the folder ServerDataSourcesApplicationData. For projects that you upgrade from earlier versions of LightSwitch, you’ll find the computed property code in the folder ServerUsercodeShared.
Calculating Dates with Computed Properties
You can use computed properties to calculate dates. This example shows you how to calculate the difference between two dates. The Engineer table contains a date of birth field. By using a computed property, you can calculate the age of a person in years.
To do this, create an integer-computed property called Age and enter the code as shown in Listing 2-2.
Listing 2-2. Calculating date differences

This code illustrates the use of the VB.NET DateDiff function. This function allows you to accurately calculate date and time differences, and also takes leap years into consideration. C# doesn’t have an equivalent method, and the calculation is therefore slightly more complex.
![]() Caution The Silverlight client caches data from the server. Therefore, Computed Properties that refer to data can produce incorrect results, especially those that calculate real time data (e.g. the number of minutes since a support issue was opened).
Caution The Silverlight client caches data from the server. Therefore, Computed Properties that refer to data can produce incorrect results, especially those that calculate real time data (e.g. the number of minutes since a support issue was opened).
Summarizing Child Records with Computed Properties
You can easily refer to related records by using navigation properties. In this example, we will create a computed property in the Engineer table that returns the number of help desk issues that are assigned to each engineer. To do this, create a computed property called IssueCount and enter the code shown in Listing 2-3.


The code in Listing 2-3 demonstrates how to refer to child items in a computed property. Specifically, it shows you how to use the aggregate count operator against a navigation property. Other useful aggregate operations you can use include Sum and Average.
Returning Images with Computed Properties
You’re not just limited to returning string and numeric data in a computed property. This example shows you how to create a computed property that returns an image. If the current date exceeds the target end date, this computed property returns a warning icon. Otherwise, it returns a blank white image.
To create this example, create an image field called Icon and enter the code shown in Listing 2-4.
Listing 2-4. Creating a computed property that returns an image

This computed property returns a hardcoded, base-64 encoded image. You can find various websites where you can upload an image and find out its base-64 encoding. Alternatively, you can retrieve the image from a table. Figure 2-23 shows an example of how this computed property appears on a data grid.

Figure 2-23. A computed column that returns an image
Sorting and Filtering by Computed Properties
A slight limitation of computed properties is that you can’t sort or filter by these fields. If you create a query that uses a table with computed properties, these fields will not appear in the drop-down list of available fields when you try to add a filter or sort condition.
If you need to sort grids by computed properties, a possible workaround is to use a SQL Server computed field rather than a LightSwitch computed property. This approach will only work with data in an external SQL data source. Furthermore, SQL Server computed columns are less powerful because you can’t refer to data in other tables.
If you want to sort a table by a computed value, you can do this by creating a query and writing code in the PreProcessQuery method. Chapter 10 describes this type of code in more detail.
Summary
LightSwitch provides two methods you can use to add data to your application. You can either create tables in the built-in Intrinsic database or you can connect to an existing data source. A single LightSwitch application can connect to multiple data sources, and you can work with almost any data source that you require. This is because, if LightSwitch doesn’t support your data source, you can write your own RIA Service or custom data source extension to access your data. The data sources LightSwitch natively supports include SQL Server, SharePoint, OData, SAP, and RIA.
While you’re developing your application in Visual Studio, LightSwitch hosts your Intrinsic database using LocalDB (the successor to SQL Server Express). LightSwitch persists any data you add at design time between debug sessions. However, note that there isn’t a built-in way to deploy your design-time data to your live SQL Server environment.
In terms of terminology, LightSwitch uses the word entity to refer to a row of data from a table. A property refers to a field or column in a table. You can store your data using standard data types, such as strings and integers. But unlike with other databases, you can also store rich data types like web addresses, phone numbers, and email addresses. These data types are called business types. They provide custom validation and specialized data-entry controls, and you can take advantage of these features by simply setting the type of a field to a business type.
Business types use native data types for their underlying storage. This means that they’re not limited to fields in your Intrinsic database. You can also apply business types to table fields that belong to attached data sources.
You can set up relationships between tables, even if your tables belong to different data sources. It’s important to define relationships on your tables; otherwise, you’ll find it very difficult to design screens later on.
If you want your users to enter data by choosing from a list of predefined selections, you can either use a related table or create a choice list. Choice lists are ideal for storing static lists of data that rarely change.
For each row in a table, you can carry out some math or computational logic and expose the result as a computed property of the row. To give an example, for a table that stores the date of birth of individuals, you can create a computed property that returns the age for each individual. Computed properties aren’t just limited to tables in your Intrinsic database. You can also define them on tables in attached databases. One caveat is that you can’t sort or filter collections of entities using computed columns. Another important point is that you can’t display the value of computed properties in HTML client applications.