
![]()
Quer ying Your Data
Queries are a fundamental part of all applications. By using queries to filter data, you can build screens that display a subset of records, or configure controls to show targeted pieces of information. In this chapter, you’ll learn the following:
- how data retrieval works and what happens at the server during query execution
- how to filter and sort data by using the graphical designer
- how to practically apply queries to your application
LightSwitch provides a designer that you can use to graphically build a query. To keep things simple, this chapter will focus only on the graphical designer. Later in this book, I’ll show you how to build more-complex filter expressions through code.
To illustrate practical examples of how to use queries in your application, the final part of this chapter will show you how to limit the engineer names that are shown in the data picker controls as well as how to build a screen that shows only the help-desk issues that are overdue.
Introduction to Data Retrieval
I’ll begin this chapter by explaining the data-retrieval process and describing what happens at the server when LightSwitch executes a query (the Query pipeline process).
From a technical perspective, every data source in your application has a corresponding data service that runs on the server. When you build a query in the graphical designer, LightSwitch creates a Query operation at the data service. It exposes this Query operation as an OData service endpoint.
When a user wishes to retrieve some data, the LightSwitch client calls the Query operation method via an OData call. If you define parameters on your query, the client will supply the necessary arguments. When the server completes the query, the Query operation returns either single or multiple entities to the client.
LightSwitch Queries Always Return Entities
Because query operations return entities from an entity set, the shape of the query results cannot be modified. For example, a query could return a single engineer, or a collection of engineers. Alternatively, it could return a single issue, or a collection of issues. However, a query can’t return just the first name from a set of engineers, nor can it return some sort of combined object that’s created by joining engineers and issues.
This behavior may seem strange, particularly for Access or SQL developers who are accustomed to selecting just the columns they need or returning results that are joined to other tables.
At this point, you might wonder how to retrieve additional data that isn’t part of the underlying data set. Provided that you’ve set up correct relationships between entities, you can retrieve related data by using the navigation properties that you’ve defined.
Once you start thinking in the LightSwitch way, you’ll soon realize that it isn’t necessary to return joined data from queries.
Understanding the Query Pipeline
When you call a query in LightSwitch, the server-side execution passes through the Query pipeline. The Query pipeline consists of phases that include points where you can inject your own custom server-side code. Figure 5-1 shows the phases in the Query pipeline and highlights the points where you can add custom code.

Figure 5-1. Query pipeline
At the start of the Query pipeline, the CanExecute method allows you to carry out security checks and to apply access-control rules. You can find more about writing authorization code in Chapter 22.
You can apply complex filters and sort conditions by writing LINQ code in the PreProcessQuery method—you’ll see plenty of examples of how to do this later in the book.
During the Execution phase, LightSwitch transforms the query into one that the data provider understands (examples of data providers are the ADO.NET Entity Framework provider for SQL Server, or the OData data provider for SharePoint). During the Execution phase, LightSwitch also translates business types between their underlying storage type and business-type representation.
If the query succeeds, the Query pipeline executes any custom code that exists in the Executed method. For example, you could write custom code here to audit the users who have viewed the data.
If the query fails, you can perform additional error handling by writing code in the ExecuteFailed method.
![]() Tip If your query fails to return data, handle the ExecuteFailed event and place a breakpoint in the method. Once you do this, you can use the debugger to see the details of the full exception by examining the queryDescriptor object.
Tip If your query fails to return data, handle the ExecuteFailed event and place a breakpoint in the method. Once you do this, you can use the debugger to see the details of the full exception by examining the queryDescriptor object.
Using LightSwitch’s Default Queries
LightSwitch automatically generates two queries called All and Single for each entity set in your application. Taking the engineers example, LightSwitch generates a query called Engineers_All that returns all engineers, and a query called Engineers_Single that returns a single engineer by ID value.
These default queries are important, because you can use them in several ways. If you create an Editable Grid screen and select Engineers from the screen data drop-down, LightSwitch uses the Engineers_All query as the data source. If you create a Detail screen for an engineer, LightSwitch uses the Engineer_Single query as the data source.
Another place where you’ll see default queries is if you add additional data items to a screen by clicking the Add Data Item button in the screen designer, as shown in Figure 5-2.

Figure 5-2. Adding default queries to your screen
If you create a query by right clicking the Engineer table in Solution Explorer and choosing the “Add Query” menu item, LightSwitch bases your query on the Engineers_All query.
Theoretically, this reveals two important principles about queries. The first is that queries that return collections are composable. This means that you can create queries that are based on other queries. The second principle is that the _ALL query will always be the base query for any user query that you define.
Filtering and Sorting data
LightSwitch provides a clean and simple tool with which you can build queries: the graphical query designer. This allows you to sort and filter data in several different ways. For example, you can filter by hard-coded values, other property values, or by global values. This section will describe all of these options in greater detail.
Creating Queries Based on Entities
To create a user-defined query, right click a table in Solution Explorer and choose the “Add Query” menu option. Because queries are composable, you can extend existing queries by selecting the right-click “Add Query” item for the query.
When you create a query, you can use the properties sheet to set various attributes (Figure 5-3). Let’s look at some of these settings in more detail.

Figure 5-3. Query properties
- Name – This value uniquely identifies your query in Solution Explorer and appears in the screen data drop-down box that’s visible in the Add New Screen dialog.
- Number of Results returned – This displays a drop-down box with the options “One” or “Many.”
- Description – You can use the description to add a comment about your query at design time. The description text isn’t exposed elsewhere in LightSwitch during design time or runtime.
- Display name – This specifies a friendly name and appears in the query source drop-down in the screen designer (Figure 5-4)
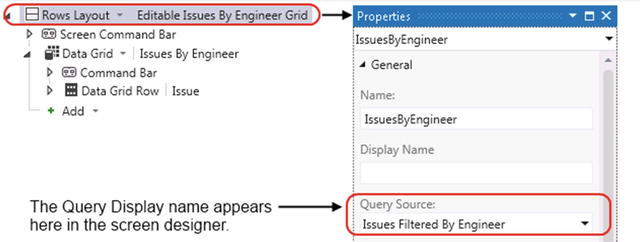
Figure 5-4. Query display name shown on a screen
By default, any new query that you create returns multiple records. The Number of Results setting controls this behavior.
Selecting the “one” option from this drop-down defines the query as a singleton query. This is a query that returns either a single record or null. Singleton queries are not composable and can’t be further modified. If you designate a query as a singleton query and create a query that returns more than one record, LightSwitch will not generate a compile-time error. Instead, it will throw an exception at runtime when the query executes.
The Number of Results Returned option also specifies where the query appears in the Add New Screen dialog. You can use singleton queries to create New Data and Detail screens in desktop applications, or View Details and Add/Edit Details screens in HTML applications. In desktop applications, you can use queries that return multiple records to build Editable Grid, List and Details, and Search Data screens. And in HTML applications, you can use queries that return multiple records to build screens with the Common Screen Set and Browse Data Screen templates.
Applying Filters
Once you add a query, you can use the graphical designer to filter your data. Figure 5-5 illustrates the controls that you can use to set up filters.

Figure 5-5. The parts that make up a filter
The operator drop-down defines the operator that you want to apply. Some of these operators will depend on the data type of the selection property and whether the property is defined as a required property.
The comparison type drop-down allows you to choose from the options literal, property, parameter, or global.
The literal option creates a filter that uses a hard-coded value. For example, Figure 5-6 illustrates how to create a query that returns issues that are assigned to a specific engineer. Because engineer details are held in a separate table, this screenshot illustrates how you can use the AssignedEngineer navigation property to filter by related parent records.

Figure 5-6. Creating filters using literal values
When you apply multiple filter conditions to a query, you can parenthesize your conditions by adding filter groups (Figure 5-7). The operators you can apply between groups are “And,” “Or,” “And Not,” and “Or Not.”

Figure 5-7. Applying filter groups
Comparing Against Other Fields/Properties
The comparison type drop-down enables you to create a filter that compares by property. This allows you to compare two fields from the same record. After choosing the property option, LightSwitch displays a second drop-down box you can use to specify the comparison property.
Figure 5-8 illustrates a query that returns issues that have overrun by filtering on issues where the close date exceeds the target end date.

Figure 5-8. Comparing against another property
Passing Arguments into a Query
Rather than use hard-coded literal values, you can make queries more reusable by creating parameters. To create a parameter, choose the parameter option from the comparison type drop-down menu. After you select the parameter option, a second drop-down box appears that prompts you to either create a new parameter or to select an existing parameter (if one exists).
If you choose to create a new parameter, the parameter appears in the parameter section in the lower section of the query designer.
You can make parameters optional by checking the “Is Optional” checkbox. If the user doesn’t set the value of an optional parameter at runtime, LightSwitch won’t apply the filters that use that parameter. Optional parameters are ideal for creating search queries that filter on multiple fields. If the user doesn’t enter search criteria for any given field, LightSwitch simply omits the filter clause. The outcome is that LightSwitch can execute the query more quickly and efficiently.
Filtering by Global Values
When you create filters on date or person properties, you can filter by a range of dynamic values that are known as global values. If you filter by a date property, you can choose from a set of global values that includes Today, Start of Week, End of Week, and several others (Figure 5-9).

Figure 5-9. Global value options when filtering by Date/DateTime
If you filter on a DateTime property, take care when you apply the equals operator with the Today global value. For example, the Issue table contains a field called ClosedDateTime. If you want to create a query that returns all queries that are closed today, the filter ClosedDateTime=Today won’t work as you’d expect.
This is because Today returns today’s date with a time element of 12:00:00am. So, to apply the correct filter, you have to use the “is between” operator and filter the ClosedDateTime property between Today and End of Day. Therefore, Start of Day is perhaps a better description for the value that’s returned by the Today global value.
For Person type properties, LightSwitch provides the global values Current User and Anonymous User. You can see this by creating a query and adding a filter that filters by the built-in CreatedBy property (Figure 5-10). A practical use of this feature is to build screens that show only the records that were created by the current logged-on user.

Figure 5-10. Global values for Person properties
Modifying Screen Queries
When you create a screen that’s based on a collection of data (an Editable Grid screen in a desktop application or a Browse screen in an HTML client application), you can define additional parameters, filtering, and ordering at the screen level.
To do this, click on the Edit Query link that appears next to your data collection (Figure 5-11). This opens the graphical query designer and enables you to apply filter and sort conditions.

Figure 5-11. Editing a screen query
Compared to creating a custom query, a benefit of modifying the screen query is that it keeps the logic contained within the screen and saves you from cluttering up your view in Solution Explorer with lots of one-off queries. However, a disadvantage of this approach is that filter conditions are applied only to the screen and cannot be reused on other screens. It’s also not possible to customize this type of query further by writing code.
Sorting Data
You can use the graphical query designer to sort the output of your query by multiple properties (Figure 5-12). Any control you bind to a sorted query will display data in the sort sequence that you define.

Figure 5-12. Sorting a query by multiple properties
The first drop-down allows you to select a property. The second drop-down allows you choose from the sort sequences Ascending and Descending. After you specify a sort condition, you can sort on additional properties by clicking on the Add Sort button.
You can sort queries by related parent properties. In Figure 5-12, notice how you can sort issues by the related engineer’s surname. However, it isn’t possible to sort queries by related child records. To illustrate this in the context of the Help Desk application, users and engineers can add multiple issue-response records to each issue. It isn’t possible to create a query on the Issue table that sorts the output using the response date that’s held in the issue response table (this would allow you to return the issues that have most recently been worked on). To perform this type of sort, you need to extend your query by writing code in the PreProcessQuery method, which I will cover later in this book.
Sorting Data Grids in Desktop Applications
In desktop applications, users can toggle the sort order of the data in a grid by clicking on the column headings. The column header includes an arrow that indicates the sort order that’s currently in use (shown in Figure 5-13).

Figure 5-13. Sorting a query
LightSwitch retains the sort sequence between sessions, and even retains the sort sequence after the user closes and reopens your application. The problem with this behavior is that it isn’t possible for a user to clear the grid sort order and return to the initial sort sequence that you intended.
To give an example, let’s suppose you create an Editable Engineer Grid screen that uses a query that sorts the data by surname followed by first name. If the user opens this screen and sorts the data by priority, there isn’t any way for the user to return to the initial sort sequence of surname followed by first name.
Therefore, if you create Grid screens that use queries that are sorted by multiple properties, it makes sense to disable sorting to prevent this problem from occurring. To do this, uncheck the “Support Sorting” checkbox for your query in the screen designer.
![]() Note The controls in the HTML client application include no built-in way for users to sort the data that’s shown on the screen. By using queries, you can add sort capabilities to your HTML client application.
Note The controls in the HTML client application include no built-in way for users to sort the data that’s shown on the screen. By using queries, you can add sort capabilities to your HTML client application.
Examining User-Setting Files
To explain the grid sort behavior for desktop applications, LightSwitch retains the user settings for your application in the following path, which appears below your Documents folder (or My Documents on Windows XP machines): MicrosoftLightSwitchSettings
This folder contains a subfolder for every LightSwitch application that you’ve run on your computer. Inside each application folder, you’ll find a .SortSettings file for each screen in your application (Figure 5-14). This is an XML file that contains the user sort orders for the screen. Users can clear their sort settings by manually deleting this file.
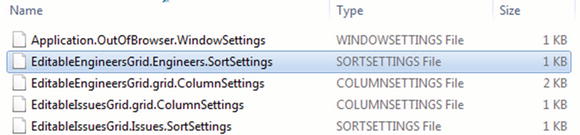
Figure 5-14. File listing of C:UsersTimDocumentsMicrosoftLightSwitchSettingsHelpDesk.1.0.0.0
In this folder, you’ll find various other files. If a user resizes the widths of the columns on a data grid, LightSwitch persists these settings between sessions in the .ColumnSettings file. LightSwitch uses the remaining files to retain the state of the application, navigation, and ribbon settings. Listing 5-1 shows you the contents of the Application.OutOfBrowser.WindowSettings file. LightSwitch uses the data in this file to reopen your application in the same screen position as your last session.
Listing 5-1. Contents of Application.OutOfBrowser.WindowSettings

Walkthrough: Working with Queries
To demonstrate the topics in this chapter, the following walkthrough describes practical examples of how to apply queries in the Help Desk application. To begin, I’ll show you how to limit the engineer names that are shown in the data picker controls, and then I’ll show you how to build a screen that displays help-desk issues that are overdue.
5-1. Filtering Controls
Here’s a typical scenario that occurs when you work with employee data. In the context of the Help Desk application, issues are assigned to engineers. When an engineer leaves the company, the engineer record must still remain in the database for historical purposes. But when a user creates a new issue record in the application, it shouldn’t be possible to assign an ex-exployee to a new issue.
To support this functionality, the Engineer table includes a Boolean field called active. Managers of the Help Desk application can therefore mark ex-employees by disabling the active flag. Figure 5-15 shows a screenshot that highlights how the application looks when complete.

Figure 5-15. Final outcome of this walkthrough
The screenshots in this section are based on an HTML client application, but the steps are identical for a desktop application. As a prerequisite, you need to add an Add/Edit Details screen (HTML client), or a New Data screen (desktop client) for the Issue table. Here are the steps to carry out:
- In Solution Explorer, right click the Engineer table and select the “Add Query” menu item.
- Click the Add Filter button and add a filter that filters the active property by the literal value True (Figure 5-16). Name your query ActiveEmployees.

Figure 5-16. Create a query and filter the Active property to True
- In your client project, open the Issue Data Entry screen you want to use. Click the Add Data Item button and add the ActiveEngineers query to your screen (Figure 5-17). This step is necessary in order to make the query visible on your screen.

Figure 5-17. Use the Add Data Item dialog to add the query to your screen
- In the screen designer, select the assigned engineer control. In the case of an HTML client application, this would be a details picker control, whereas for a desktop application, it would be an auto-complete box control. Here’s the key step. Open the properties sheet for your control and set the Choices property to the ActiveEngineers query (Figure 5-18).

Figure 5-18. Configure your control to use the ActiveEngineers query
You can now run your application. When you open your Issue Data Entry screen, you’ll be able to assign only active engineers to the issue record.
5-2. Using Queries on Screens
This second walkthrough will show how to create a screen that displays all issue records that are overdue. This demonstrates a typical screen in an application to help users focus on specific records, or to carry out a particular piece of workflow.

Figure 5-19. Outcome of this walkthrough—A view of all overdue issues
Here are the steps to complete this walkthrough. Just like the previous walkthrough, these steps are appropriate for both HTML and desktop client applications.
- Create a new screen for your application that’s based on the Issue table. For an HTML client application, choose the Browse Data Screen template, whereas for the desktop client, choose the Editable Grid Screen template. Name your screen Overdue Issues.
- Modify the screen query to return the relevant records. To do this, click the Edit Query link that appears next to the Issues collection in the Screen Member List. When the query designer opens, create a new filter on the TargetEndDate property. Set the Operator to “<=”, the comparison type to Global, and the Comparison Value to Today (Figure 5-20).

Figure 5-20. Query filter
This completes the walkthrough, and you can now run your application. Now when you open the Overdue Issues screen, it shows only records that have exceeded the target end date.
Summary
Queries help you customize the data that’s shown to a user, and they play an important part in application design. Technically, the LightSwitch client retrieves query data via an OData call to the data-service endpoint. The data service returns either single or multiple entities. Because LightSwitch works only with entities, you can’t remove properties (e.g., table columns) from the output of a query, nor can you create a query that joins or unions multiple tables.
By default, LightSwitch creates two queries that return all entities, or a single entity by ID value. In practice, you use these queries when you create screens that are based on a table data source. When the server executes a query, the process passes through a Query pipeline. This consists of several phases, and there are various points in the pipeline where you can add custom code. Most notably, you can add .NET code to the PreProcessQuery phase to further filter or sort your data, and you will find out more on how to do this in Chapter 10.
The query designer provides a graphical way for you to filter data by hard-coded values, parameters, or by other fields in the same table. One neat feature is the ability to filter by global values. A global value is a dynamic criteria value, and in the case of a date property, you can filter by the global values of Today, Start of Week, Start of Month, and many more. When you add a filter against a property that uses the person data type, you can filter by the global value Current User. By using this technique, you can create screens that show only the records that are assigned, or that were created by the currently logged-in user.
In general, you add queries to your application by right clicking a table in Solution Explorer and selecting the “Add Query” menu item. If your application contains both HTML and desktop clients, the queries you create this way will be visible in both project types.
Another way for you to use the graphical query designer is to open a screen and to click the Edit Query link next to the relevant collection in the screen designer. One benefit of screen queries is that they provide a tidy way for you keep your query logic related to a specific screen, and in larger projects you can reduce the number of queries that appear in Solution Explorer, which can help keep your application more manageable. However, a disadvantage of screen queries is that you can’t use the same query in multiple screens. Also, you can’t build additional queries on top of a screen query, nor can you customize the output of a screen query in code.