Switches
After finishing the touches app in Chapter 5, you can say without flinching that you’ve coded Objective-C apps! You’re not alone if, while coding Chapter 5, you felt as though you were struggling to make your way across a tough and rocky road. I say this because all programmers have had to journey over this road. It’s absolutely okay to look back on that chapter and not remember what you did. That’s normal, and I’m about to prove to you that it’s normal. First, I need to explain why you’re going to take time out at this point.
In my experience, when teaching students languages such as C, C++, C#, assembly, machine languages, Java, and others, many students drop out even when they seem to be doing fine. In recent years, I began to catch students as they neared this junction, and I would ask them why they were contemplating dropping out. They would all tell me something similar to this: “I can see I did the homework but I’m scared I will fail because it’s just not sinking in. I don’t grasp it.” About four years ago I tried an experiment. When the students walked into the lecture hall they were in shock when I told them to close their textbooks, close their laptops, and put away their books because we were going to take a journey inside their brain and have a class on neurology. In fact, we were going to scientifically illustrate why many felt they were stupid, not getting it, and essentially feeling like a dork. The entire lecture hall collapsed in laughter. At the end of the lecture that I now call “Don’t Freak Out! Let’s Have a Look at Your Brain!” some students were crying and came up to me after class and thanked me. Not a single student dropped out.
Right now, I bet that you feel that you’ve not retained anything from Chapter 5 and that you feel a little overwhelmed and insecure in your geek abilities. Well, that’s okay—just read on and you’ll see why you feel a little uneasy. Even if you do feel confident at this point, you’ll probably falter at some point down the road as it gets harder, but I still want you to read on. This is important, so I want you to really understand this.
Don’t Freak Out: Let’s Look at Your Brain!
One of the best ways to explain this is to ask you something that has nothing to do with Objective-C and computer science. It’s about childhood memories.
Do you ever smell something you’ve not smelled before and without any warning your brain immediately takes you back to a place in your early childhood? This happens to all of us. After smelling this smell, you’ll suddenly see everything clearly in your head: the walls, the people—it’s all crystal clear. And sometimes it may overwhelm you emotionally. You may feel blown away that you’ve not thought about those walls or images for many years, and now suddenly they’re overwhelming your senses. Let me explain why this happens. I will use my smell of old-fashioned soap to illustrate this, and then show how this is related to the neural connectors you’ve just created.
Look at Figure 6-1. Under the first title, ILLUSTRATION, you see a very simplified illustration of how, once your brain receives a new input that it’s never experienced before, it creates a nucleus housed inside a cell body that retains that event. This is connected to the rest of your brain by threads and axons. As you experience new events that relate to this new event, a tree of synapses and neurons connect to this nucleus. Some of these connections become quite full of what are called dendrites.
When I was a little boy in Durban, South Africa, I went down to where the servants were washing laundry. Back in 1963, most families used old-fashioned ammonia-filled soap that had a very distinct smell. This smell created a new nucleus in my baby brain. It connected with the joyful songs the Zulu servants were singing as they hand-washed the laundry. My brain also connected the imagery of the walls, the paint, and my dog Samson. These connectors of the singing, the walls, the paint and the dog formed four groups of connections to that new smell, as illustrated under SYNTHESIZED in Figure 6-1. Some groups immediately had more connections, such as songs, because I used to sing many Zulu songs as a small boy. The next biggest group was probably that of my dog. I’ve labeled the groups from 1 to 4 in order of size.
Many years later, in New York City, probably around 1993, I was rushing to keep an appointment with a law professor who had said he would meet me for lunch at a little restaurant. As I was running across 8th Avenue, I noticed some people cleaning the sidewalk in front of another restaurant. They were using soap and water and scrubbing it with these large straw brushes. Suddenly I smelled it. The smell I hadn’t smelled since I was three in that laundry room. I suddenly saw those servants, I could hear their songs and laughter, and I could see my old dog Samson. I became so overwhelmed with that day, the people, and the energy from so long ago that I stopped running and started crying. When I reached the restaurant, the law professor stood resplendent in his tweed suit and said, “Rory, it’s okay that you’re a couple of minutes late. Oh, my gosh, are you crying?”

Figure 6-1. Don’t freak out: Let’s have a look at your brain
So what happened? What happens when you experience similar events? Why does this often happen with smell? Let’s first look at events in life, such as the first time you realized that 1 + 1 = 2. Do you remember the first time you realized 1 + 1 = 2? Probably not. That’s because after you created a nucleus associating 1 + 1 = 2, trillions of connectors were going to 1 + 1 = 2. Every time you perform any function that relates to 1 + 1 = 2, your brain makes a connection to the nucleus housing 1 + 1 = 2. Even as you flip through this book and it goes from page n to n + 1, you make synaptic connectors to dendrites and groups of associations connected to 1 + 1. Somewhere in those trillions of 1 + 1 = 2 connectors are the visuals and sound effects of the room where you realized this, but it is lost in the maze of trillions of other connectors.
That rare smell though, that’s different. Think about it. I have illustrated four groups associated with that smell from when I was three. Over the next 30 years, following the creation of that nucleus and the four groups linking it, there was never a connection made. It just lay there. However, as I crossed 8th Avenue and smelled that smell, it immediately invoked that same nucleus and the contents of the four groups connected to that event. These connectors were strong because they were not interconnected with other complex relationships. This made the singing, the feeling I had towards my dog, the laughter, and the other events come hurtling into me.
Now go back to when you read Chapter 5 for a moment. Look at the YOU RIGHT NOW illustration in Figure 6-1. You created a set of nuclei when you made your way through Chapter 5. Let’s imagine, for the purposes of illustration, that it was only one event or one thing you learned while reading Chapter 5. The nucleus containing that knowledge is housed in the light grey circle. You may, at the most, have created one semblance of connectivity to some related thought or concept. That’s why I connected one small group to the Chapter 5 knowledge nucleus. More importantly, notice that I’ve created five other groups of potential connectors to Chapter 5: they are “Rest of the book,” “Problem solving,” “Teaching to others,” “Real life application,” and “Making $$.” Right now it’s absolutely natural that these groups have no connectivity to the nucleus of Chapter 5’s knowledge because you have not had time to create these connections. For example, right now, as you read this chapter, you probably “feel” like you have no connection to the knowledge you gained in Chapter 5. That’s because there is no connection to it as you read this. There is also zero connectivity to making $$ from what you learned in Chapter 5, nor to the other groups.
I carefully choose topics, innuendo, and semantics to optimize, as best I can, connectivity between what I teach at the moment to what was taught in the past. By the time you reach the end of this book, create your first app, and sell it, your brain will have begun to create many connectors to Chapter 5. I’ve illustrated this in Figure 6-1 under GEEKDOM. Something that connects a huge amount of synapses to nuclei containing a difficult-to-understand concept is teaching others. It’s great to go onto forums, such as mine at www.rorylewis.com/ipad_forum/, and help out newbies with their questions (even if you’re a newbie yourself) because it creates many connections to that difficult concept, making you smarter. In essence, helping others forces one to answer the same question in thousands of different ways. So, I strongly encourage you to go to the forum, ask questions, and then, as you become wiser, help others.
So, the first good news is that it’s okay to feel disconnected to what you coded in Chapter 5. You’ll make those connections as you move forward. The second piece of good news is that Chapter 6 will not be as huge a leap as Chapter 5 was. Instead, you’re going to take a break from serious code and connect new ideas to the synapses that you connected with code in Chapter 5. In fact, in both Chapters 6 and 7, there will be very little code! Instead, I will connect cool new thoughts to the portion of your brain that’s associating code with ideas explored in Chapter 5. Once you’ve established these connections in your brain, you’ll associate more code. In Chapter 6, you’ll explore a popular method for navigating through iPhone apps using the platform of a Tabbed Application. But for now, just relax and enjoy the chapter.
switches: A Tabbed Application
So far, you’ve written code that allows the user to poke or prod an iPhone or iPad in certain ways to make it do interesting things. That’s now going to change. In this chapter, you’ll demonstrate how to create an iPhone app that allows you to do all of these cool functions without overwhelming your user, by dividing the functionality into several easy-to-locate tabs. This model, called the tabbed model, is so popular among app developers that Apple has included a basic Tabbed Application project in the New Project options in Xcode. In other words, the people at Apple recognize how much programmers like to use this model, so they created most of the code you need. When you’re all done writing this app, you’ll have a display with two tabs at the bottom. The content of the first tab will be an image that you set using Interface Builder with a button overlaid on top of it. This button will cause Mobile Safari to open the Apress web site. The content of the second tab will be a different image, but you can set the image name and other attributes in the implementation file.
You can watch a video of this switches app at http://bit.ly/SFmG64 and simply follow along with me. You can also download the code to this project at http://bit.ly/SzvMif where you can visually compare your code with mine. Most importantly, you’ll need to download the 16 images and DemoMonkey file from http://bit.ly/SFn70d.
- Start off by cleaning out your desktop so there’s nothing on it except for the files folder you downloaded from http://bit.ly/SFn70d. This is shown in Figure 6-2.
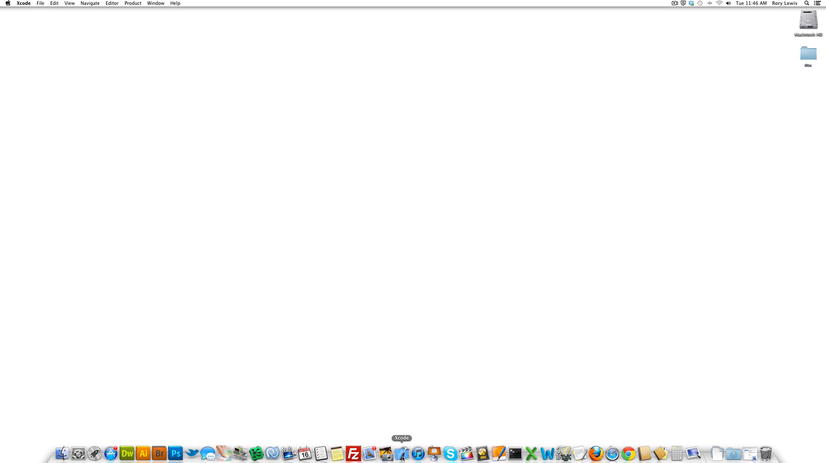
Figure 6-2. Download the three images onto your squeaky clean desktop
- This second step is only necessary if you’ve decided to not use my files and use your own. If you use my files, go to step 3 now. To make your own files:
- Create eight 512 × 512 pixel icons representing eight of your favorite social media sites.
- Also create one 740 × 366 Apress splash screen.
- You’ll need two iPhone icons for this app, one retina icon at 114 × 114 pixels and another regular icon at 57 × 57 pixels.
- You’ll also need three splash screens: one Retina “35” at 640 × 640 pixels, another “40” retina splash screen at 640 × 366 pixels, and a regular splash screen at 320 × 480 pixels.
- You’ll need two wallpapers at 638 × 997 pixels for each of the two views.
Now, let’s create the app.
- 3. Start this app just as you’ve started all the apps so far: use z+Ò+N to start a new project. Select Tabbed Application from the sheet that appears. This template sets up a significant portion of the tab framework for you, so you can focus on filling in the content and not worrying about the gory details of the interaction model. Click Next, as illustrated in Figure 6-3.

Figure 6-3. Start a Tabbed Application
- 4. As illustrated in Figure 6-4, name your app switches and ensure that both of the checkboxes are unchecked. Use Storyboards drastically changes how a Tabbed Application is set up and is explored in detail in Chapter 7. In this app, you’ll specifically target the iPhone because tabs become cumbersome on the iPad.

Figure 6-4. Name the app switches
Note I have not selected Automatic Reference Counting in this project because there will be no need to use large memory management here. Automatic Reference Counting makes Xcode manage memory on the compiler and manage retain, release, and autorelease.
Adding the Images to the Project
At this stage, it’s probably a good idea to drag your imagery to use on the tabs, so you won’t have to worry about it later.
- 5. Drag your images from the desktop into Supporting Files, and in the process develop a very good habit for yourself. Figure 6-5 only shows the first four images being dragged in. I later select them all. After dropping your images into the folder, you’ll see the dialog shown in Figure 6-6.

Figure 6-5. Drag in your three images from the desktop

Figure 6-6. Copy the items into the destination page’s folder
- 6. Xcode recognizes that the images are not already part of this project, so it strongly recommends that you let it add them for you. As mentioned before, it’s also making sure that it has encapsulated your images inside itself, so if you go to another computer to run it, it will be able to find your images and display them. This dialog also gives you the opportunity to change the actions it’s about to perform, but, in general, the assumptions it makes are correct, so accept Xcode’s recommendations, as illustrated in Figure 6-6.
- 7. Drag your icon files to the app’s properties. Notice how Xcode takes care of putting it in the right place in your project and setting up all the necessary linkages. This step is not critical if you don’t have an appropriately sized .png readily available. You can always change the icon later. Note that it only allows you to drop the correct-sized icon into each specific box. In Figure 6-7, you see the icon being dragged into the app’s icon property. Sometimes, as seen in these earlier versions of Xcode 4, the image of the splash screen doesn’t show up. This is fine—just look in your root folder on the upper left-hand corner, and if you see it’s there, then all is cool. This will most probably be fixed by the time you read this.
Figure 6-7. Drag your icons to the app’s icon property
- 8. As with previous apps, you need to do some housekeeping. The default placement of the icons you just dragged in is in the root directory. So, move them to your Supporting Files folder as shown in Figure 6-8.

Figure 6-8. Housekeeping: move icon apps to Supporting Files folder
Some of the readers of previous editions of this book and students from my former classes actually work at Apple, developing iOS code and doing the very special things you’re about to see in this in step 9. That’s why I love to say, “The clever people at Apple have coded…” because these clever people at Apple include people just like you, who began right here, reading the first version of this book. Right now, you probably just want to see what the clever people have coded for the Tabbed Application.
- 9. Run the app by clicking the Run button or pressing z+R, as shown in Figure 6-9. If you’ve followed the instructions faithfully, you’ll see a “Build Succeeded” message, and the iOS Simulator will start. Note how now all three of the splash screens are visible!

Figure 6-9. Run it so you can see what Apple has already coded for you
- 10. As shown in Figure 6-10, after you run the app, you’ll see how the iOS Simulator pops up a First View. This is quite amazing. Those clever people at Apple have coded so much hardcore stuff and cool things that it leaves very little for you to do. Go ahead and play around with the app; click the tabs to see that there really are, in fact, two different sets of content being shown. Remember that you haven’t even touched the .xib files or any of the code! However, this is exactly the point where the magic of the Tabbed Application template ends and your creative input begins.

Figure 6-10. The first view to pop up will be the . . . First View
- 11. When you click the Second tab at the bottom of the screen, you’ll see that Second View pops up. So, the tabs are actually working perfectly. I’m sure you’ll notice that while the Tabbed Application template sets up quite a bit and has prefilled some content, it’s rather drab and uninteresting. Most importantly, it doesn’t reflect anything that you might want it to do. Let’s fix that.
That Second View that you see in Figure 6-11 can be replaced, along with the introductory First View, with code, or the next level of a game, or the details of an address tab or recipe. For your purposes, simply insert a first image into the First View and a second image into the Second View.
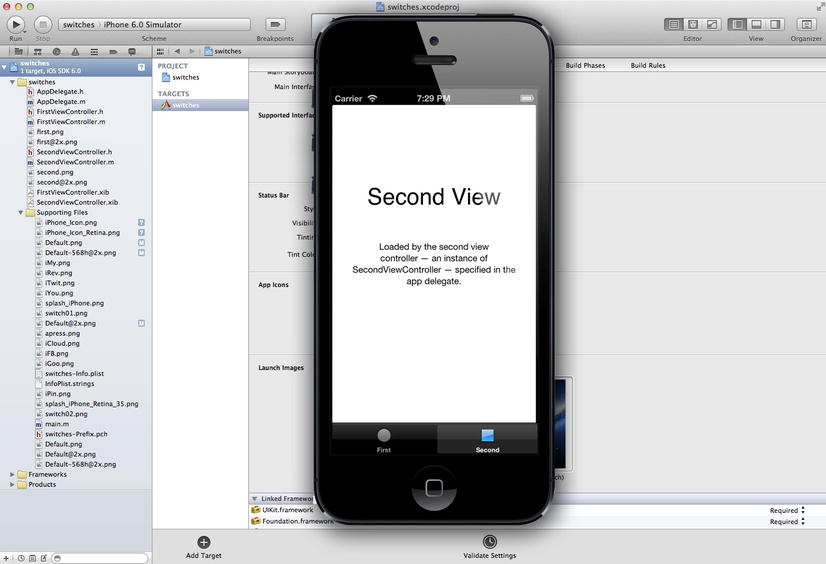
Figure 6-11. The Second View appears when you select the Second tab
- 12. Switch back to Xcode and click the Stop button. Select the .xib file called FirstViewController.xib. This shows what you saw in the iOS Simulator, minus the actual tabs on the Tab Bar. Let’s set up your environment to make it easier for you to edit the nib (.xib). If you don’t already have the Utilities View visible, click the appropriate view button to make it visible at the right side of the screen. Then select and delete all the text so that it looks like mine in Figure 6-12.

Figure 6-12. Open up the First View nib file
- 13. From the toolbox at the bottom of the Utilities View, find the Image View (UIImageView) icon and drag it into the main area. As you do so, it expands to the same size as the area you can fill (in this case, the whole view). Use the guides to line up the UIImageView with the borders of the simulated iPhone window, as shown in Figure 6-13.

Figure 6-13. Drag a UIImagView onto your view
- 14. In the Utilities View, go to the Attributes Inspector (%z4) and click the Image drop-down, as shown in Figure 6-14. This list is populated with a list of images that Xcode has found in your project: select switch01.png, and Xcode will instantiate it in the UIImageView.

Figure 6-14. Associate your first images with the first UIImageView
- 15. You now need to repeat the last three steps for the Second View; associate the second background image with the Second View. Select the .xib file called SecondViewController.xib as shown in Figure 6-15. Then select and delete all the text.

Figure 6-15. Open up the Second View nib file
- 16. Go to the Utilities View and drag another UIImageView into the main area. Remember to use the guides to line it up with the borders of the simulated iPhone window, as shown in Figure 6-16.

Figure 6-16. Drag a UIImagView onto your view
- 17. Go to the Attributes Inspector (%z4) and select switch02.png. Xcode will instantiate it in the UIImageView, as shown in Figure 6-17.

Figure 6-17. Associate your second images with the second UIImageView
Okay, you’ve successfully populated the background of both views with some cool wallpaper. In essence, you’ve customized the two views to look pretty cool and pretty custom. Now you’ll move on to customizing your buttons. Up until now, you’ve used the default buttons, and you may have thought to yourself how come all the cool apps I see have buttons that look so different and so innovative? Well, just as you customized the views, you’re going to learn how to customize your buttons. You’ll have a custom button going to the Apress web site on the First View, and then eight custom buttons in the Second View going to various social media sites.
- 18. You need to first drag the button that will be the customized Apress button onto the canvas of the First View. So, open up the First View (nope, I’m not holding your hand through each step—if you need to refresh your memory, go back and see how you’ve done it before) and drag a button to the First View, as shown in Figure 6-18.

Figure 6-18. Drag a button onto the First View
- 19. Click once on your button to select it. Now go to the Attributes Inspector and in the Button drop-down menu, change it to a Custom button, as shown in Figure 6-19.

Figure 6-19. Change the Apress button to a Custom type
- 20. You’ll be inserting an image inside the button so it will show a beautiful glossy “gel” button surface covering the image of the Apress logo. This means that you don’t want any silly text getting in way of the Apress image. So, delete the “Button” text, as shown in Figure 6-20. This is something that will come as naturally as closing the car door before you drive off. When you create a custom button with an image, you always delete the text.

Figure 6-20. Delete the default text from the Apress button
- 21. Let’s see, you’ve created the custom button and deleted the text that would be in the way. But now, you need to associate apress.png with this button. Go down to the Image slot and select apress.png from the drop-down menu, as shown in Figure 6-21. Immediately, you’ll see the Apress logo appear inside the button. Cool, huh!

Figure 6-21. Associate the Apress image with the Apress custom button
- 22. You now need to do something that you’ll probably do over and over and over: adjust the size of your custom button to the size of the custom button’s image. If your custom button is x pixels long and y pixels high, you’ll go to the size Editor and make your custom button exactly x pixels long and y pixels high. In this case, I made the Apress image 111 pixels in width and 54 pixels in height. So, go to the size Inspector and make the Apress custom just that: 111 pixels wide and 54 pixels high, as shown in Figure 6-22.

Figure 6-22. Adjust the size of the button
- 23. Save everything and run it (please don’t let me hear you asking how to run it). You’ll see that without typing any code, you have two views that work beautifully when you switch from the First View to the Second View and back. You can also see that you have an absolutely beautiful custom Apress button, as shown in Figure 6-23. What do you notice happens when you tap it? It does nothing! That’s correct, you haven’t associated an action with this button in the header file, and you haven’t associated code that the button will implement when you click it. Just a hint: you’ll use a method called NSURL to have your button go to the Apress URL.

Figure 6-23. Run it: you have two views and a custom button already!
- 24. You need to start populating buttons onto the Second View. Now, you’re not going to repeat the entire process you went through on the Apress button on the First View. Instead, you’ll make one social media button in this Second View and then copy and paste it in a specific way to reduce your work. Open your Second View and drag a button to the upper left-hand corner, as shown in Figure 6-24.

Figure 6-24. Add the first button to your Second View
Looking back at what you’ve done and where you want to go: you’ve created the Apress button on the First View. You now want to create eight buttons on the Second View that link to various social media sites.
- 25. As you know, you’re going to first create one fully loaded custom button for your social media sites on the Second View. You’ll do this in five steps, which you’ve just done for the First View. Now you’ll do them, with less handholding from me, as shown by the five arrows numbered 1–5 in Figure 6-25. Select the social media button you just dragged onto the canvas in Figure 6-24 and, with it selected, in the Attributes Inspector change it to Custom (arrow 1), then delete the text (arrow 2), and then go to the Size Inspector (arrow 3) and change the size of the button to 66 × 66 pixels, as shown by arrow 4. Finally, associate the Facebook image with this icon by going back to the Attributes Inspector and selecting iFB.png from the Image drop-down menu, as shown by arrow 5.

Figure 6-25. Create the first custom button for the Second View
- 26. Select the first Facebook button you just created and copy, as shown in Figure 6-26.

Figure 6-26. Copy the first button
- 27. Once you’ve copied the first button, paste the copy alongside the first one, as shown in Figure 6-27. This may seem trivial, but you’ll be duplicating these two buttons four more times. In other words, you’ll be duplicating the exactness of the distance and alignment between these two buttons four more times. It’s important to space them in a way that will look plausible when there are four buttons going across, and to align them perfectly, as shown in Figure 6-28.

Figure 6-27. Paste the copied button alongside first one

Figure 6-28. Select and copy the first two buttons and paste them
- 28. Select the first two buttons you’ve created from Figure 6-27. Copy and paste them alongside those first two buttons, as shown in Figure 6-28. Notice that because you’ve been very careful to make sure they are properly aligned, the buttons look professionally placed. Once they’re placed as shown in Figure 6-27, select all four of them and copy them.
- 29. Paste the four buttons you copied. Initially, they will paste “over” your initial four buttons, as shown in Figure 6-29. Don’t worry about this. They’re still all grouped together as one. In the next step, you’ll move them appropriately. The reason I’m forced to include the step is because I can’t tell you the number of times students have called me over to their desk when they’ve pasted these four icons and said, “They’re all lying on top of the other ones, Dr. Lewis.” So again, this is perfectly acceptable; see you at the next step.

Figure 6-29. Paste the four buttons you copied
- 30. Move the four buttons directly under the original four buttons and drop them there. Now you need to start changing the images in all the buttons. Select the second button from the left and associate it in the Attributes Inspector image drop-down menu with the Twitter image named iTwit.png, as shown in Figure 6-30. You’ll continue associating all the buttons this way. The following table shows the name and .png for each of the eight icons. Note that you have already completed Facebook (iFB.png) and Twitter (iTwit.png) in row 1, so go ahead on your own now and complete associating the remaining six icons, and I’ll meet you at the next step.
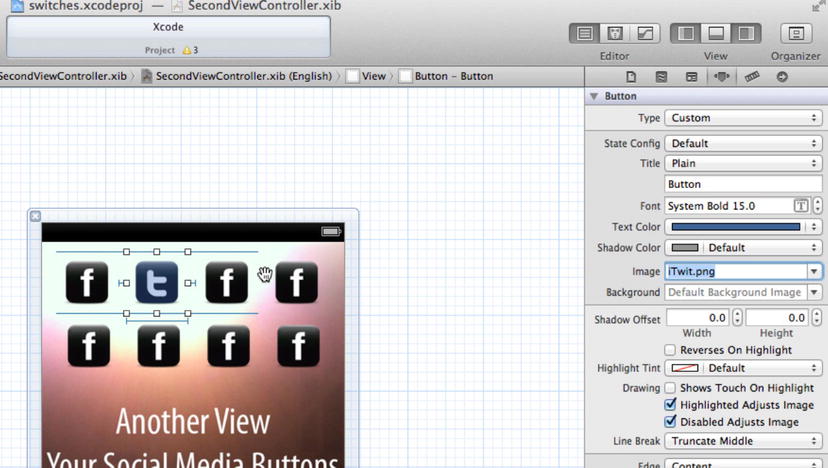
Figure 6-30. Name the remaining icons
Table 6-1. The Eight Icons

Connecting and Coding the Buttons
You now need to code the lone Apress button on the First View and then the eight social media buttons you’ve just created in your Second View. Because you’re here on the Second View with your social media buttons, let’s first connect these to the Second View’s header file. Once that’s done, you’ll then go back to the First View and connect your Apress button to the header file.
Once all y our buttons are connected, you’ll code the First View’s implementation file’s NSURL by hand, so you can learn it the old-fashioned way. Last, you’ll bring in the eight NSURL instances for the Second View all in one swoop via DemoMonkey to save time and tediousness. I do things this way because there’s always a balance between encouraging students to type code the old-fashioned way, doing it by hand, so that the synapses make appropriate connections, and not making them do tedious work that in the real world would be done differently using tools. If you just use tools to bring in code, you never get to learn how to code yourself or what the small nuances of each line of code really mean. On the other hand, if I only make you type in all that code by hand, then you miss out on having hands-on experience using tools used in the workforce, such as DemoMonkey.
Having you code the Apress URL in the First View by hand and then learning DemoMonkey gives you the best of both worlds.
- 31. As you’ve done before, you need to set up your canvas so you can start to code. Open up the Assistant and, if you’re short of space, close the Utilities panel, as you can see me doing in Figure 6-31.

Figure 6-31. Get your canvas ready for coding
- 32. Control-drag from the Facebook icon in your nib file over to the Second View’s header file, as shown in Figure 6-32.

Figure 6-32. Re-inspecting the code
- 33. The Facebook button, like the other seven social media buttons, will be of type Action, because when the user taps the button it will use the NSURL method to go over to a web site, and that is indeed an action. This is shown in Figure 6-33.

Figure 6-33. Make the connection an Action
- 34. You want to call the Facebook connection facebook, as shown in Figure 6-34. You may wonder why I’m showing a complete view for such a simple step. The reason is because you’ll be doing the remaining seven icons on your own. Figures 6-32 through 6-34 demonstrate these three elementary steps you have done before. For your convenience, I put them here so that you have a reference. I want to encourage you to try and do the remaining seven buttons on your own without making reference to the book at all except for the naming change, as shown in Table 6-2. Of course, you can name them anything you please. But if you want to compare your code to mine and follow along with me, I suggest that you pay careful attention and name your buttons and actions exactly as I have named them, paying careful attention to their cases. There are no capital letters.

Figure 6-34. Connecting the Facebook button
Table 6-2 Renaming the Buttons

- 35. Complete your eighth button and connect the YouTube button to your Second View’s header file, as shown in Figure 6-35. You may note that I misspelled Pinterest in the code. You, of course, will spell it correctly; everything will work just fine if you do.

Figure 6-35. Connecting the last of the social media buttons
- 36. As mentioned earlier, if you want to be able to check your code against mine in the event things don’t quite work out, it’s critical that you name your actions exactly as I have. Figure 6-36 is a screenshot of my page before I move onto the First View. You may want to check that yours is exactly like mine.

Figure 6-36. Before you continue, check that your page is like mine
- 37. Notice that I haven’t held your hand, showing you exactly how to go back and close your Second View’s nib file and open your First View’s nib file. Once you’ve opened the First View’s nib file, make sure you have the First View’s header file on the right-hand pane. Control-drag from the Apress button over to the header file, as shown in Figure 6-37.

Figure 6-37. Back to the First View
- 38. Once you’ve dropped it into the header file, as you have done eight times already today, change it from an Outlet to an Action. In Figure 6-38 you see me selecting the Outlet right before I change it to an Action.

Figure 6-38. Change from an alternate to an action
- 39. As shown in Figure 6-39, name the button apress. Make sure you only use lowercase letters.

Figure 6-39. Name it apress
- 40. Again, before you move on to coding, make sure and check that your buttons are Actions and named like mine, with no capital letters, as shown in Figure 6-40.

Figure 6-40. Make sure your code is like mine
- 41. You’ve seen in previous chapters that you typically code in the Standard Editor. This lets you see one screen and stay focused. So, go ahead and click the Standard Editor, as shown in Figure 6-41.

Figure 6-41. Set the stage for coding
- 42. I had mentioned earlier that you’ll code the First View by hand, go through each step slowly and learn as you do it, and then you’ll have some practice using DemoMonkey to bring in a chunk of code that you’ll be quite familiar with by the time you do it. Start by opening up the First View’s implementation file. Click the FirstViewController, as shown in Figure 6-42.

Figure 6-42. Start with the First View
- 43. You’ve Control-dragged a connection from your Apress button in your First View’s nib file over to the header file. You made it an action and called it apress. This instantiated, for you, without any coding, an apress method for your Apress button. It is in here that you want to tell the compiler what actions to execute when the user taps the Apress button. Therefore, you need to code what happens in this method called apress. Scroll down to the bottom of your implementation file until you see the apress method. You have to create space to code, so place your cursor inside the first open squiggly bracket and press Return, as shown in Figure 6-43.

Figure 6-43. Go to the apress method
- 44. You’ll use Apple’s Code Sense to help you type code. Some people still call it Code Completion, but that’s wrong. As time goes on, you’ll learn many shortcuts, but for now, let’s assume that you know just one thing in pure Xcode tautology, and that is that whenever you see code inside a set of square brackets, you know that its sending stuff, things, commands, whatever, to either an object or a class. I’ve touched on this in previous chapters, and not knowing it all now is fine. You’ll use two calls to classes, and they’ll be nested (stop thinking about classes, just pretend you know what they are for now, this is how I teach). If they’re going to be nested, then you need a set of square brackets nested inside an outer set of square brackets. Do it! This is shown in Figure 6-44.

Figure 6-44. Create two sets of square brackets
- 45. You first need to have a UIApplication, so type UIAp and when you see UIApplication show up in Code Sense, scroll down to it and press Enter or tab, as shown in Figure 6-45. This thing called a UIApplication is a class reference, which creates an environment that defines and groups a bundle of code such as the stuff you’re about to code.

Figure 6-45. Type UIApplication
- 46. You want your UIApplication to call a handler to call and start execution code in the background and share the compiler resources while in that thousandth of a second the user sees the button being pressed in. For that, call an instance method called sharedApplication. So enter sha, and Code Sense will know to bring up sharedApplication because as sure as a paint brush will be dipped in paint, a UIApplication will call sharedApplication to return something to you … hmmm … what could that be … oh, yeah! A URL to Apress that you can execute! Awesome! This is shown in Figure 6-46.

Figure 6-46. Enter sha
- 47. You know you’re calling the compiler to show you something. You’ve got that down. Now you need to step out of the first inherited call and code what you want UIApplication to bring. This will be the URL, or in Xcode, NSURL. In Xcode you use the NSURL object to call, tweak, store, and manipulate URLs and their contents. This includes of course, just opening up a web site. You want the Apress button to open up the Apress web site so that it fits; this is where you will want to use the NSURL object to do this work for you. Type openURL and Code Sense will know from seeing the UIApplication sharedApplication that you probably want NSURL, as shown in Figure 6-47. Select it by pressing Enter.

Figure 6-47. Step out of the first set of squiggly brackets
- 48. You want an NSURL with a string of text showing precisely what you want, so you need to delete the grey shaded (NSURL *) shown in Figure 6-48 and enter in its place your specific type of NSURL in the next step.

Figure 6-48. Delete the NSURL pointer
- 49. You want to have a URL that will call a function. This means you’ll need another bracket, so type it, retype NS, and select NSURL from Code Sense, as shown in Figure 6-49.
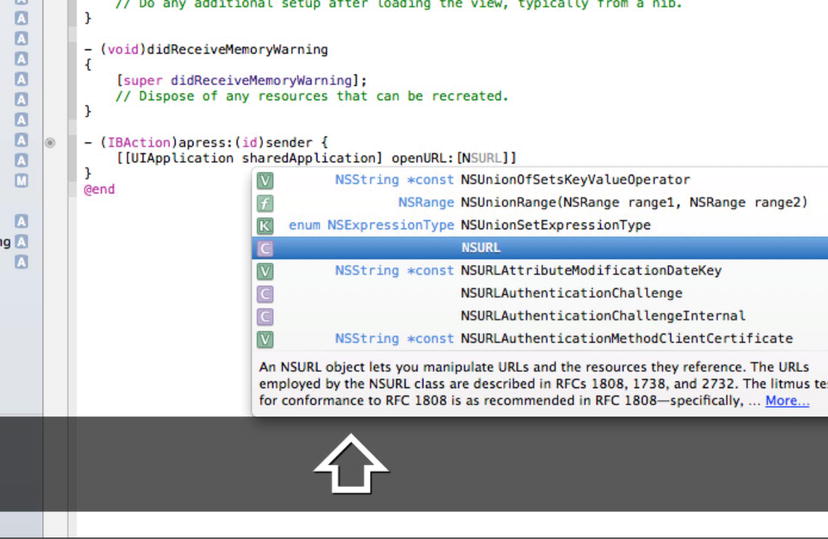
Figure 6-49. Enter [NS for a bracketed NSURL
- 50. Once NSURL is located inside the new square bracket, Code Sense knows exactly what you want. You only need to enter U, and it produces id URLWithString: (NSString *), which you’ll select, as shown in Figure 6-50.
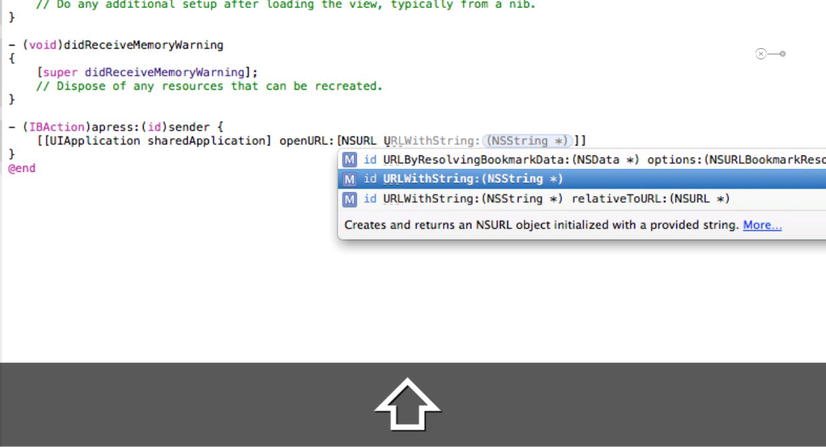
Figure 6-50. Bring in the URL with string
- 51. You want to type text inside the “string” portion that represents a URL, so delete the (NSString *) in the grey coded sections, as shown in Figure 6-51.

Figure 6-51. Delete the string section
- 52. Enter the Apress URL after the @, as shown in Figure 6-52. You’ll soon know that UIApplication sharedApplication] openURL:[NSURL URLWithString: is what you need to code before you call a URL in Xcode. It sounds complex, but really, you don’t think about the 20 things your body does as you get into a car, sit down, shut the door, put on the safety belt, turn on the ignition, wait until the engine is on, put it into gear, look in your rear view mirror, open the garage door, and then release the brake to allow yourself to reverse out of the garage. No. You barely think of any of this. You probably only wake up halfway to work. Such is the case with certain snippets of code. When you want to call a URL, you’ll enter UIApplication sharedApplication] openURL:[NSURL URLWithString: before you even realize you need to recheck where the actual address of that web page is. See … you’re getting the geek thing into perspective now! Awesome. So enter: @" http://www.apress.com " as shown in Figure 6-52. Yeah!

Figure 6-52. Enter the Apress URL
- 53. After you run it and click the Apress button, you see the Apress home page appear, as shown in Figure 6-53. When you think about it, it’s really amazing that a seemingly complex operation like opening Mobile Safari from within your own app could have been condensed into a single statement by the people at Apple. In iOS, all apps are sandboxed into their own little piece of the system’s resources. The topic of sandboxing is so complex that books can and have been written about the subject, so I won’t go into detail here. Instead, it’s sufficient to understand that iOS isn’t going to let your app just do whatever it wants, so you have to use certain APIs that Apple has provided to tell the underlying system to do these things on your behalf. In this case, send a message to the UIApplication class to obtain a reference to sharedApplication—that is, an object representing your application’s gateway to the rest of the system. This object has a method called openURL, which does exactly that when passed as an instance of NSURL. To pass openURL an instance of NSURL, send the NSURL class the URLWithString message, which transparently converts the string you provide into an instance of NSURL.

Figure 6-53. Run it and click the Apress button
- 54. You’re about to use DemoMonkey to drag in a whole bunch of NSURL instances all in one swoop. Open your SecondViewController implementation file, as shown in Figure 6-54.

Figure 6-54. Open the SecondViewController.m file
- 55. When you scroll to the bottom of the Second View’s implementation file, you see your eight social media methods all empty, just as you first saw an empty apress method before you coded it. You could code each one if you wanted to, but you’ll be using DemoMonkey. So, select the eight methods and delete them, as shown in Figure 6-55.

Figure 6-55. Delete the instantiated empty methods
- 56. As shown in Figure 6-56, you see a green + sign being dragged over from the DemoMonkey folder on the right. With your DemoMonkey folder open, simply drag the Second View URL’s object text from the DemoMonkey file onto your Second View’s implementation file. Once you have it located where you just deleted the eight empty methods in step 6-55, let it go, and all the code I typed for you will magically appear.

Figure 6-56. Dragging in our DemoMonkey file
- 57. As shown in Figure 6-57, you see all the NSURL instances for the eight social media sites all placed in perfect position. I don’t have to explain what each repetitive line of code calling the URLS does because you went through it earlier. The awesome thing is that first you didn’t have to code it, and now you have experience with DemoMonkey. Okay, you’re done! Run it! :)

Figure 6-57. The code inside DemoMonkey revealed
- 58. When you first run it, you’ll see the splash screen. Tapping the home button, you see your beautiful Switches button, as shown in Figure 6-58.

Figure 6-58. Your sixth iPhone app
- 59. Feel free to enter the URLs of your own social media sites. I’ve used mine and Apress because it’s easy legally. In Figure 6-59, you can see Facebook, SoundCloud, and YouTube.
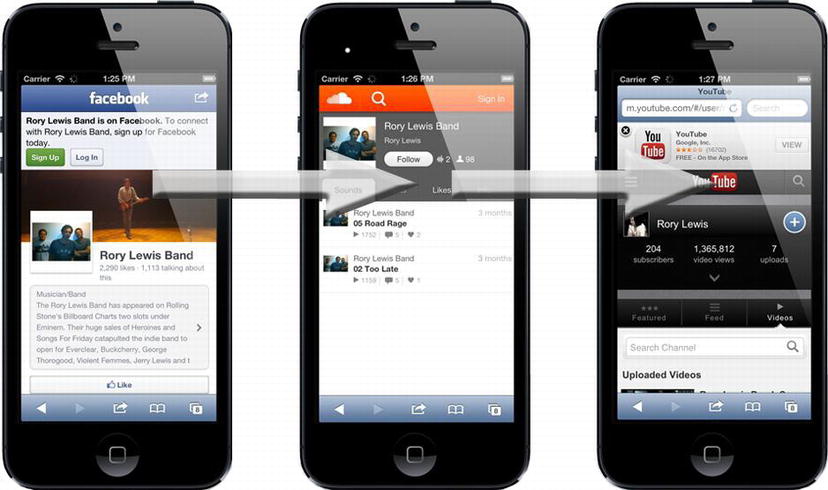
Figure 6-59. Some of the social media sites
- 60. Figure 6-60 shows that the app also goes perfectly well to ReverbNation, Google+, Myspace, and Twitter.

Figure 6-60. Four more views
In this chapter, you spent some time digging the code already. One issue you may want to look at is compiling, how the computer looks at your code and implements what you wrote. Sometimes students get mixed up between compile-time and runtime. If you feel fresh and want to read this, go ahead. Otherwise, I’ll see you in Chapter 7. Good job!
Compile-time indicates that something happens when your project is compiled, or built, prior to being run on the Simulator or on a real iOS device. These are things like the definition of classes in .h and .m files, the organization and layout of UIView instances in your nib files, and the configuration you do in Xcode’s various inspectors. Everything that is set at compile-time defines exactly the state your app will be in when it’s started.
Runtime, on the other hand, describes the segment of time after your app has started running. This is when all the code you’ve written is actually executed, effecting changes in the state of the app from the way it was set up at compile-time. In this chapter, you specified the image for the second tab through a message in your implementation file. Thus, the image to show was unspecified at compile-time, but at runtime a series of instructions was executed to display the desired image in the UIImageView you provided. In essence, both load at compile time but while the code behind the second image is not executed by the user, it will remain compiled but unspecified. The instant the user executes the code for the unspecified image, the runtime associates the image to the secondViewController and the image is now specified.
Why is this difference significant? You proved, during the course of writing this app, that you can do the exact same thing at runtime as you could at compile-time. However, executing instructions to do what you wanted required several extra clicks and drags and a few more lines of code. If you already know how you’re going to configure something at compile-time, the advantages of writing code to do the same thing will diminish. However, if you want to dynamically change the properties of an object during the execution of the app (last chapter’s touches app is a great example of this), it’s obviously impossible to set all aspects of the state at compile-time.
In short, compile-time defines the starting state of your app, whereas runtime describes the actions that occur once your app begins running.
In Chapter 7, you’ll move into the next level of complexity: storyboarding. Storyboarding is the new way Apple lets you lay out how a user moves through an app, in much the same way that a movie producer sets up a storyboard to show how a movie will go from one scene to the next. Storyboarding has segues (pronounced “segways”) that connect each view in your app with another. It is tempting to just go straight to storyboarding, but it’s best to first learn a little about the code behind these buttons and images, as you have done. So take a break, and then let’s move on to the land of storyboarding.