Storyboards
This chapter introduces a new way to create an app quickly and visually. First, you’ll lay out some views and you’ll see how they can be connected without writing code—plus you’ll get some neat transition animations for free. This new technique was first brought to the public’s attention when Apple announced that it would be introducing a never-before-seen feature called Storyboards, which would be built in to Xcode. Storyboards would allow the easy layout of workflow apps that use navigation and tab bars to transition between views.
Apple went on to say that the new Storyboards would manage the View Controllers for you, while visually creating an easy-to-manage geospatial view of your project. It would specify the transitions and segues that are used when switching between views, without having to code them by hand! Everyone waited with anticipation for the beta to come out and, when it did, everyone was blown away. It changed the entire coding landscape.
When you tell a story, you communicate with others. Whether young or old, everyone loves a story. When you communicate with a user, you’re telling them how to travel a path you’ve created that will bring them to a place where they will get what they want, be it a map, a song, a recipe, the weather, where they parked their car, a phone number, a movie, or something else. So why wasn’t this thought of before? Why was the creation of apps seen as geeks programming code, whereas storytellers were seen as doing something different? I’m not sure of the answer, but as I began to think about it, I realized that this was an incredible concept. Think of it. When Walt Disney began to think of the most efficient means to organize and structure cartoons, back in the early 1920s, he came up with the concept of storyboards. He would gather his artists together, and they would mount a series of boards with key scenes from a story, and then they would organize these boards into a beautiful story. This technique became a huge success; it took over the movie industry, and it is the blueprint for planning every modern film. You can see a great movie that illustrates how Disney’s storyboarding took over the industry at http://bit.ly/oWg5mc.
The Storyboard feature, introduced in iOS 5, works on a similar principle, except you’re not necessarily looking at pictures; you’re looking at a geospatial representation of your app that allows you to organize it beautifully. Before iOS 5 came out, nib files were used to define the user interface (UI). There was no choice but to do that one View Controller at a time. If you had 16 View Controllers, you would have to define the UI 16 times. Not only was this boring, but it became complex and confusing. Conversely, as you’ll soon see, a Storyboard file captures all your UIs in one geospatial view and gives you the ability to easily create and edit all your individual View Controllers and the transitions between them. You can move your View Controllers around like cards in a deck, just like the guys at the Disney studios. Storyboards make it easy to realize and edit the flow of the overall UI and experience in your app.
You now know enough of what happens behind the scenes to install a new way of doing things. It’s as if you’ve spent enough time tinkering around with lawnmower engines and basic car engines that you can appreciate installing a brand new engine in your old car. As you install this new engine, you know that inside this engine are pistons, spark plugs, carburetors, and so on. You don’t have to yank the engine open to know these items exist; you can just install it and connect it to the chassis, the drive train, and the electronics. In Storyboarding, you’re going to use a whole new method for designing your app; you simply connect it to your outlets, View Controllers, and the other elements of your app. You don’t have to open up Storyboard and look inside, because you know it works; you simply have to know how to connect things. So let’s do it!
This app has been divided into three phases. The most important is Phase I; it’s common for most of the potential uses for Storyboarding. Because Phase I is the lowest common denominator for so many of the future Storyboards you’ll find yourself doing, you’ll focus on it quite a bit, and I encourage you to perform exercises that will enable you to quickly become efficient at Storyboarding. Phase I sets up the root of what will be done over and over again. Phases II and III are specific to this particular app:
- Phase I sets up the core of most potential Storyboarding configurations.
- Phase II starts at Figure 7-20 and is comprised of setting up the View Controllers and establishing their content.
- Phase III starts at Figure 7-32 and is comprised of closure and coding.
Evolve: A View-Based Storyboard Application
Once again, you’ll work with images that let you know where in the story you are. In more technical terms, you’ll use images rather than code to represent a state in your app. I encourage my students to use images because, if it doesn’t work, then you know it’s a bug in the high-level code that directs the user from state to state—not a bug in the code for a particular state.
In this app, you’ll see a funny set of states that show the state of a male, female, and third kind of human being—a geek. The app shows that when men or women evolve into a higher state of consciousness, they become geeks. Then, to add another state, for fun and to illustrate the purpose, when geeks evolve they become übergeeks! As funny as this is, it simply gives us a nice set of diverse states that in Storyboarding is easy, but that in the old one-at-a-time nib manipulation would have been substantially harder and more complex.
First, download the images from http://bit.ly/TXN9HM, where you can also download the code or view the video. Once you’ve downloaded the zip file containing the images, unzip the folder and store the images on your desktop.
Phase I: Creating Core Storyboarding Configurations
Let’s get going with Phase I, where you’ll build a core configuration.
- Start a new project in Xcode by using your keyboard shortcut,
 and selecting the Single View Application project type As shown in Figure 7-1. The Single View Application is the starting place for this and many more of this book’s applications, and likely many of your own.

Figure 7-1. Start by choosing a Single View Application skeleton. More views will be added later
- Let’s name this application myStory. The Company Identifier isn’t relevant right now, so feel free to put something creative there. For simplicity, just target the iPhone device family at this time. Check the Use Storyboard option This is shown in Figure 7-2. Doing so presents you with a slightly different project layout once you’ve saved the project. Go ahead and save your project by clicking Next.
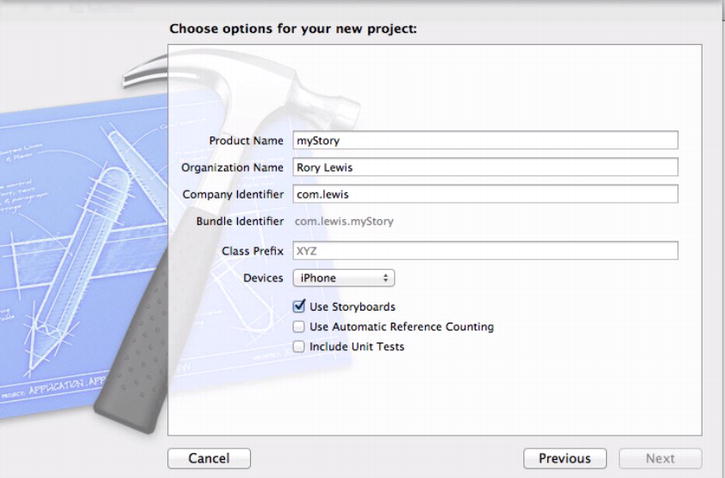
Figure 7-2. Start with just an iPhone version of the app and the new Storyboard feature selected to let you jump directly into design and layout. I named it myStory
- The next step is to drag in your two icons from your images all laid out on your desktop. I’ve already dragged the 114 × 114 Retina Display icon into its slot, and I’m dragging the regular icon into its slot in Figure 7-3.

Figure 7-3. Dragging the two icons into the App Icon slots
- Drag the remaining six items from your desktop into your project’s Supporting Files directory in Xcode. These six items include the two Controller Views which are the Navigation Controller, called myStory NC.png, and the View Controller, called myStory VC.png. The four remaining images are your views for Female (01_Female.png), Male (02_Male.png), Geek (03_Geek.png), and ÜberGeek (04_Uber.png). Figure 7-4 shows the grouped files being dropped into my project’s Supporting Files directory in Xcode.

Figure 7-4. Drag the images that you downloaded earlier to the project’s Supporting Files directory in Xcode
- Remember that the Supporting Files directory you just dropped your images into is just a logical directory, and the files can actually go almost anywhere in the MyStory directory. Be sure that these files are copied accordingly, so go ahead and click “Copy items into destination group’s folder (if needed),” as shown in Figure 7-5.

Figure 7-5. Make sure you copy the items into your destination group’s folder
- As you’ve begun to see from previous chapters, the last step in the setting-up-the-images routine is to drag the icons you want into the Supporting Files folder. Xcode always inserts them into the target directory, sometimes called the root directory. But we like to keep things organized; you should keep all supporting files you bring into the project in your . . . erh . . . Supporting Files folder. So, go ahead and drag those two icons into your Supporting Files folder, as shown in Figure 7-6.

Figure 7-6. Drag your two icons into the Supporting Files folder
- One reason I’m recording this app on MacBook Pro’s the smaller screen is that I’ve had many e-mails asking me how one manipulates and controls the Storyboard canvas on a small laptop screen. So, in Figure 7-7 you see three arrows. Briefly, arrow 1 opens up Storyboarding, arrow 2 maximizes the canvas, and arrow 3 zooms out the canvas so you can see everything. Note that you just double-click an item to zoom in. Now, select the MainStoryboard.storyboard file in Xcode’s project file browser, as shown by arrow 1. This shows you something familiar: a UIView. But this isn’t just a UIView—it also has an associated controller that’s automatically created and linked to the view. Once you’ve opened the Storyboard canvas, you want to maximize the real estate of the canvas, as shown by arrow 2. Once you’ve maximized the canvas, practice zooming in and out (arrow 3) so you become familiar with a tool you’ll be using quite often in storyboarding.

Figure 7-7. Select the MainStoryboard.storyboard file, and you’ll be presented with your only default view
- Bring up the Utilities panel. Once you’ve opened the Utilities panel, locate the Navigation Controller (UINavigationController), as shown by arrow 1 in Figure 7-8. Select it and start dragging the Navigation Controller onto your Storyboard, as shown by arrow 2 in Figure 7-8. Placement doesn’t matter at this point; just make sure that when you drop it, it’s bounded in the Storyboard canvas. If it’s not, it will zoom back into your Library. As you drag the Navigation Controller onto the Storyboard, you’ll see that instead of just a Single View, you get a connected pair of controllers depicted as views. Drop it anyplace—move it around as much as you need. This is, in fact, the case for almost everything that you’ll do in Storyboards. You’re not dealing just with views; you’re actually seeing Apple instantiate each UI element into a set of views and controllers that allow you to build transitions. These transitions in Xcode are called segues, as shown in Figure 7-8.

Figure 7-8. Drag a new Navigation Controller to the Storyboard area. Two new views appear, with a link between them
- When Xcode instantiates the UINavigationController, it defaults its accompanying View Controller with a Table View, as shown In Figure 7-9. You don’t want a Table View; you want a blank View Controller into which you can insert your images. So, click the Table View once and delete it so you can replace it with a clean View Controller.

Figure 7-9. Delete the Table View
- Replace the deleted Table View with a View Controller (UIViewController). Select it (arrow 1 in Figure 7-10) and drag it to the right side of the Navigation Controller (arrow 2).

Figure 7-10. Drag on a simple View Controller
- Control-drag from your Root View Controller to the new View Controller and select the “root view controller” option from the dialog box, as shown in Figure 7-11.

Figure 7-11. Link your new Root View Controller to the Navigation Controller
Note If you’re curious why you need to link the Root View Controller to the Navigation Controller, well, unfortunately that’s beyond the scope of this book. For this book, you simply say that when you replace a View Controller, you connect it as a Root View Controller. But if you want a quick explanation: deep in Xcode, the Navigation Controllers array needs to be linked with the Root View Controller. You can’t do that with a push, modal, or custom segue. It has to be a Relationship Segue Root View Controller.
- You need to drag Image Views onto the left View Controller and the Navigation Controller so you can place the greeting screens for each of them respectively. Figure 7-12 shows the UIImageView being dragged onto the left View Controller.

Figure 7-12. Drag a UIImageView onto your View Controller
- Now drag the second UIImageView Controller, this time onto the Navigation Controller’s View Controller, as shown in Figure 7-13.

Figure 7-13. Drag a UIImageView onto your Navigation Controller’s View Controller
- Click on the Navigation Controller’s UIImageView you placed in step 7–13 and select myStory NC.png from the Image drop-down menu, as shown in Figure 7-14. Click the View Controller’s UIImageView you placed in step 12 and select myStory VC.png from the Image drop-down menu.
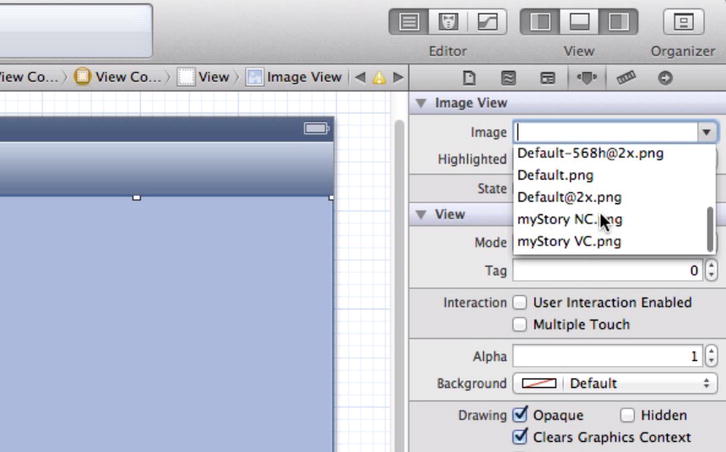
Figure 7-14. Associate the images for the Navigation and View Controllers
- As shown in Figure 7-15, you need to have a button on your Main View Controller, so drag a Round Rect button (UIButtonView) onto it, so that you can have an actionable item to tap, which will push the next View Controller to the stack.

Figure 7-15. Drag a UIButtonView out to the Main View Controller so that you can have an actionable item in order to push the next View Controller to the stack
- When the user taps this first button, you want it to take the user to the Navigation Controller. Let’s tell the user this will happen if they tap this button. This is illustrated in Figure 7-16.

Figure 7-16. Insert text into your button. I used “Show Navigation Controller”
- This step is really the heart of Storyboarding. Let’s think about this. You want users to be directed to the Navigation Controller when they tap the Show Navigation Controller button. Rather than writing code, just link the button to the Navigation Controller. Position your mouse pointer over the button, Control-drag, and release over the Navigation Controller to create a transitional link; make sure to select modal from the list too. This is the magic—no code is written to make this transition with animation, as shown in Figure 7-17. It’s just free! A gift from the remarkably clever people at Apple, who include—if you don’t mind me reminding you again—students and readers of the previous editions of this very book. So hang in there. Don’t worry if you don’t understand the following bullets—just read them and let the information start brewing in your brain; as you program more Storyboards, it will all become natural:

Figure 7-17. Start the actual linking
- a. Push means that a Navigation Controller pushes a new View Controller onto the navigation stack. Note that when you use a push segue, you need a Navigation Controller for your View Controller. Conversely, if you don’t have a Navigation Controller, you need to use the modal or custom options to manage the swapping of your View Controllers.
- b. Modal is used to present a View Controller modally. Apple explains modal segues best: When you present a Modal View Controller, the system creates a relationship between the View Controller that did the presenting and the View Controller that was presented.
- c. Custom allows you to code your own animation and transitions. That topic is beyond the scope of this book, but it’s important to know that you can completely code your own transition and View Controller management.
- Transitions are the animation types available for each style of segue. Again, just stick with the default. I chose the Flip Horizontal style for no particular reason other than it suits me. You can choose another style if you want. Feel free to experiment here, but keep usability in mind. It’s very easy to get too flashy with the animations. I often find that the popular apps, and smarter students, tend to have less flash and more utility and efficiency. As shown in Figure 7-18, first select the segue connecting the View Controller to the Navigation Controller and then select a transition of your choice from the drop-down menu. At this point, running the app will show you how little you actually had to do to get a working app with some direction. So, click that Run button and see what you have.

Figure 7-18. Select the transition of your choice
Note You should emulate what I make my students do at this point. I make them erase everything they have done so far, except for the five icons on their desktop. Then I make them repeat these steps over and over again until they can get all the way through step 17, run the app, and have it appear in the Simulator within 50 seconds, without using the book. I strongly encourage you to do this. Just as a golfer needs to practice his swing to create muscle memory, you need to be able to get to this point without even thinking. First, do it at your own pace with the book, and then go faster and faster until you get below 50 seconds! Yeah!
- After clicking Run, the Simulator opens and voila—it works! You’ve hardly done anything and used no code. You just shifted, dragged, and connected a few items, and you now have a running app. Clicking the button flips the view and shows a blank view, with a navigation bar at the top named Root, as depicted in Figure 7-19. Beautiful!

Figure 7-19. And, sure enough, clicking the button flips the view and shows the Navigation Controller
Phase II: Setting Up and Establishing the Content of the View Controllers
Of course, you want to make this app do something more interesting than what you now have. Remember, in this evolving app you have three types of human—men, women, and geeks—and they can all potentially evolve into übergeeks. This means that you need to have three views connected directly to your Navigation Controller. So, before you begin to drag three View Controllers onto the Storyboard, make sure of the following:
- That you can see everything—enough for three horizontally placed UIViewController instances.
- That your alignment on the grid can be kept so that your connection lines don’t get silly looking later on, and therefore harder to follow.
- Let’s drop three more View Controllers into the Storyboard, to the right of the Root View Controller. This is a personal preference, but it sure makes you look like a supercalifragilistic geek if you can do it. You can watch me do this in the video at http://bit.ly/Tlh0eU. Try to get your screen looking like the one in Figure 7-20, which shows the first of the three UIViewController instances being dragged onto the Storyboard. Remember, if you’re having trouble with the zoom, just click the equal button in the zoom control area so that you can add other stuff to the individual controllers.
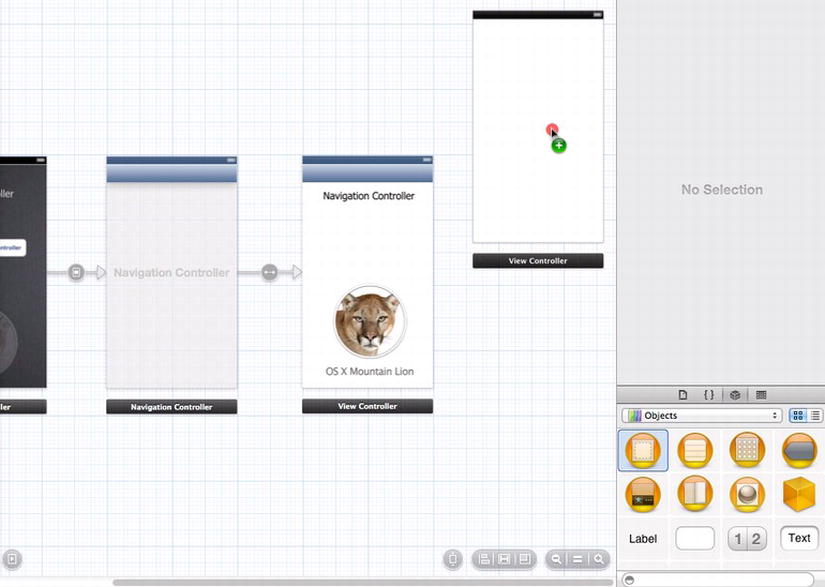
Figure 7-20. Zoom out and drag a new View Controller onto the Storyboard
- Figure 7-21 shows how your screen should look after you’ve dragged all three View Controllers onto your Storyboard. Note that they’re aligned, spaced equally apart, and locked into the grid.

Figure 7-21. Your Storyboard after all three View Controllers are placed on the Storyboard
Note Objects not sticking? It will get frustrating if you continually try to drag objects to a view, and they never stick, so be sure you return to the normal zoom level.
- As shown in Figure 7-22, add a new UIButtonView to the view. Use each button’s activation to move to another view. You can either drag three buttons by repeating the process three times or practice using the Option-drag technique: So, Option-drag from the first button you’ve placed and duplicate it twice, because you need three. These will now only need relabeling. Name the buttons Female, Male, and Geek in descending order and resize them as you see fit.

Figure 7-22. Drag a UIButtonView to the Navigation Controller and duplicate it
- You need to create segues from each of your three buttons to their associated View Controllers. So, as before, Control-drag from each button to another View Controller to create a segue link for each button. These will all be of type Push. I connected Female to the top, Geek to the bottom, and Male to the center, as shown in Figure 7-23, because it makes the link lines look nice and organized. Connect all three View Controllers to their appropriate buttons, remembering to make them of type Push.

Figure 7-23. Create more segues from each button to the three View Controllers
- Naming the Controller Bar titles in Storyboarding actually instantiates connectivity under the hood, and this eliminates the need to code some of these segues if at some point you advance to the point where you’ll code. Right now for this app you’re doing no coding; however, it’s a good habit to name the Controller Bars in the same manner that you may name a view’s corresponding pointers and classes too. Just double-click toward the center of the Controller Bar and start typing. Do these with your Male, Female, and Geek Controller Bar titles. In Figure 7-24, you can see that the default value of the Female controller has already been changed from “_” to “Female.” I’m renaming Geek’s Controller Bar in Figure 7-24. Go ahead and name the Male Controller Bar too.

Figure 7-24. Name the Controller Bar titles
- Your next step will be to add images to your Male, Female, and Geek View Controllers. Let’s start at the top and drag an Image View onto the Male view, as shown in Figure 7-25. Go ahead and drag Image Views onto the Geek and Female View Controllers too.
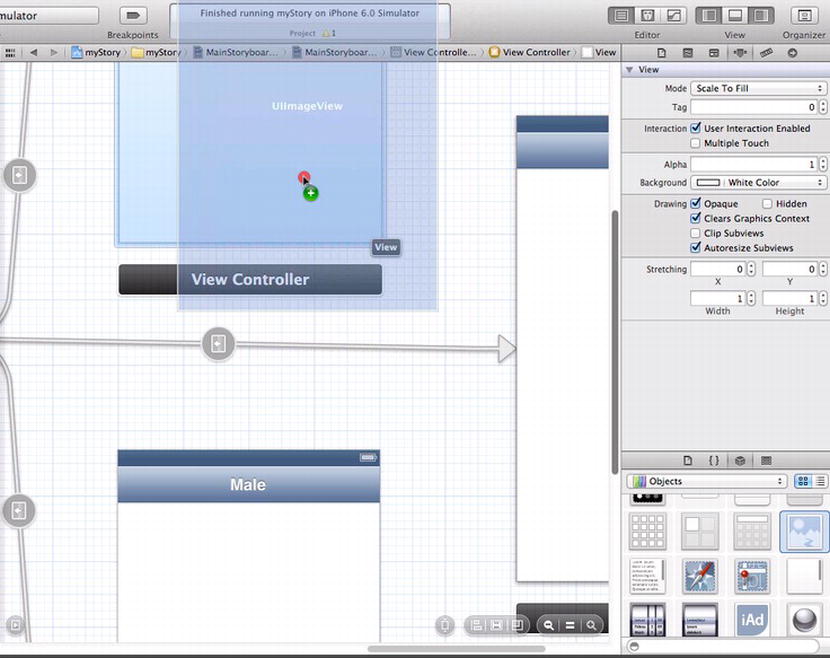
Figure 7-25. Add a UIImageView to the Male view
- Associate the 01_Female.png image with the Female controller by selecting it from the Attributes panel, as shown in Figure 7-26. Go ahead and associate the 02_Male.png image with the Male controller and the 03_Geek.png image with the Geek controller. Then run it, and let’s see what we have.

Figure 7-26. Select the image to use for Female from the Attribute panel
- It works! Figure 7-27 illustrates how the app, without any coding, is working beautifully. All the images show not one state but the transition between two states, connected by the segue. The figure also illustrates the flow of the Storyboard from the View Controller to the Navigation Controller’s three buttons that segue to three views of Female, Male, and Geek. Almost done—let’s do the last step now.

Figure 7-27. Workflow is working already
Note Because you didn’t change the segue type, you have the push effect for each of the three segue transitions created.
- You’re now getting to the fun portion of this app that makes students laugh out loud in class. In your app, you’re going to show the world that evolution is still happening. You’re going to show the world that both males and females can still evolve to a higher level of consciousness—and that, of course, is the state of being known as . . . yes, you got it . . . geek! You need to add a segue going from your Male and Female state to Geek. How should you do this? How about adding a Button Bar icon to both the Male and Female Views’ Navigation Bars and giving them the title Evolve? After that, you can segue from these Evolve buttons to Geek. Start off by dragging a Bar Button icon onto the Female, as shown in Figure 7-28. Once you’ve dropped your second Bar Button item onto the Female, double-click it and type the word Evolve. Repeat the same process for the Male.

Figure 7-28. Now let’s “evolve”
Note Button Bar icons act just like regular UIButtonView instances, but they look different and are designed to go in only one place: a Navigation Bar. There’s something important I want you to remember about Button Bar icons.
- Control-drag from the Male’s Evolve button to the Geek View Controller and make it of type Push, as shown in Figure 7-29. You want to segue from the Evolve button to Geek. Note that I kept the transitions linear for simplicity. They can have loops or be entirely circular. Repeat the same process from the Female’s Evolve button, also making it of type Push.

Figure 7-29. Control-drag from the Male’s Evolve button to the Geek View Controller
- Now that you’ve been living in the geek world for a few chapters, you’ve probably caught on to the fact that geeks know something normal people are completely unaware of. Yup! There’s an even higher state of humankind than a geek. Übergeeks are very rare and can only be recognized by geeks. But this will be illustrated in your app. You need to add another state of human evolution beyond that of geek, which can only be seen by geeks. Add one last UIViewController, which will demonstrate how to gain programmatic access to the Controller and its data, as illustrated in Figure 7-30.

Figure 7-30. One last UIViewController
- The next state up, ÜberGeek, is invisible. So you need to make an invisible button so that only Geeks will know segues to the higher ÜberGeek state of consciousness. As shown in Figure 7-31, drag a seemingly innocent, benign round rectangular button onto your Geek object.

Figure 7-31. You can use an invisible button over your background imagery as a simple hack to avoid spending time working on a fancy button
- As shown in Figure 7-32, once your button is placed on the Geek object, expand it so it covers the entire Geek symbol.

Figure 7-32. Cover the entire Geek symbol, for starters
- You want to make it invisible, so set the button type to Custom, as shown by arrow 1 in Figure 7-33. The GUI will immediately default to making the button invisible, though still clickable for Geeks . . . almost! You can see that the text “Button” is still there though. No problem. Simply delete the button text, as indicated by arrow 2.

Figure 7-33. Make that button vanish into thin air
- Now that you’ve made your invisible button, you need to make a segue to the next transition and make it of type Push. Click where you know your invisible button is and then Control-drag over to the new View Controller, as illustrated in Figure 7-34.

Figure 7-34. Control-drag from the invisible button to the next View Controller
- Almost done! You need to add an image onto the new view. Drag a UIImageView onto the view, as shown in Figure 7-35.
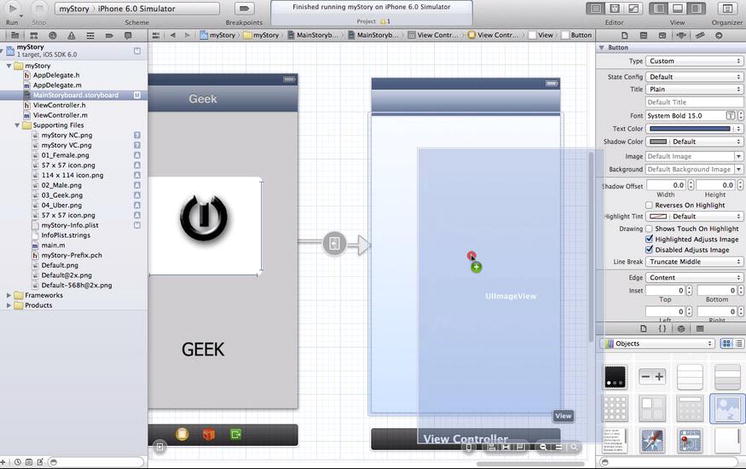
Figure 7-35. Let’s add another UIImageView to the view
- Figure 7-36 shows the association of the 04_Uber.png with the ÜberGeek’s View Controller.

Figure 7-36. Associate the 04_Uber.png image with the UIImageView
- Similarly to how you named the title bars previously we will name this title bar ÜberGeek. To get the umlaut (two dots), press Option+U. Once the two dots appear, press Shift+U to capitalize it, as shown In Figure 7-37.

Figure 7-37. Name the Title Bar ÜberGeek
- Initially, I didn’t think I would have to spend much time arranging the objects/views on the Storyboard. But after having some difficulty myself, and then seeing the wonderful spaghetti messes that some of my students came up with, I’ve decided to spend a little time coming up with some basic principles, which, if adhered to, will prevent a chaotic and tangled mess. Zoom out, as I have, and then move your objects around accordingly as you follow the three protocols I’ve developed:
- a. Mutual exclusivity: Keep the order of your buttons mutually exclusive from the order of your views. The buttons on the Navigation Controller go Male, Female, and then Geek. Maintaining that order on the Storyboard would create problems, because it would violate other principles I’m about to mention.
- b. Maintain initial momentum: If, for example, on the Female View, at the bottom of Figure 7-38, you have a fan of 10 segues to 10 views that were all void of segues to the Geek branch, then keep those Female-based segues going downward.

Figure 7-38. Zoom out and arrange/neaten up the views
Looking at Figure 7-39, one can see a perfect example of how not to maintain initial momentum. Not only are the segue connections hidden, they also overlap and disrupt the ability to follow where the segues start and end.
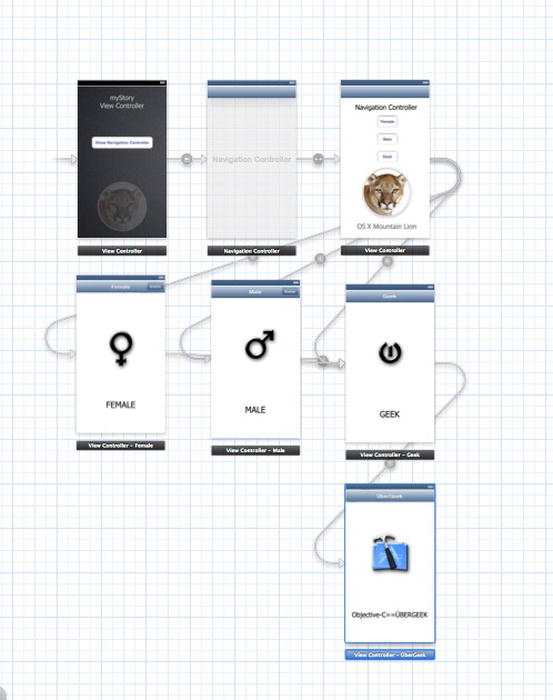
Figure 7-39. Oops! Violation of the “maintaining initial momentum” protocol
- c. Minimize segue connection angles: This is easier explained when you first see it: look at the Male and Female segue connections from the Navigation Controller in Figure 7-38. Notice how they first slope back and then slope forward, as compared to the less angular connections from the Navigation Controller to the same two Male and Female Views depicted in Figure 7-39 and onward. An easy way to adhere to this protocol is this: once the segue is connected, move the object it’s connected to horizontally and vertically until the segue connection is almost perfectly horizontal or vertical.
- You really need to be careful how you place your objects because the GUI can make things look very odd, as shown in Figure 7-39, which demonstrates a violation of the protocol of maintaining initial momentum. But note that because you moved the Male and Female to the top and bottom respectively in Figure 7-38, you can see that you’ve adhered to the protocol of minimizing segue connection angles.
- Run it! As you go from screen to screen it will flow similarly to the sequence shown in Figure 7-40. It’s amazing how you did all that without a single word of code. You may want to know that in the first edition of this book, this app took three chapters of complex code. :)
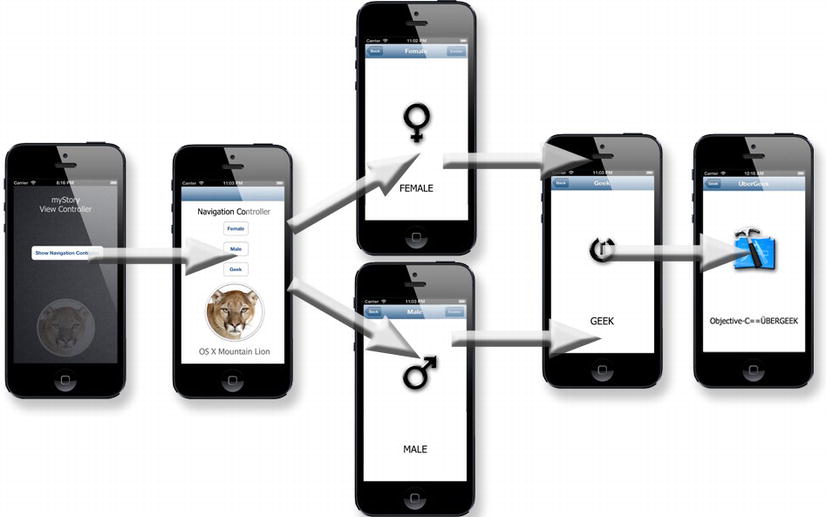
Figure 7-40. Try to keep track in your head. It can get complicated, but you did not type one word of code. Amazing!
Finally, if your Storyboard isn’t connected to your Destination View Controller, you can create it programmatically; but the author hasn’t explored this in depth on the Apple Dev site. I have no idea why you would want to do this, but it is in the View Controller Programming Guide for iOS on the Apple web site. If you want to understand Storyboarding, remember two things:
- First, it inherits from, and conforms to, NSObject.
- Second, its framework is from /System/Library/Frameworks/UIKit.framework.
The important issue I want you to understand is that, right now, you can program endlessly using what you already know about Storyboarding. Keep in mind the basics, and really understand these basics. Forget about programming Storyboards programmatically. Use them as they are, and understand the basics.
Storyboards all need to begin with an initial View Controller that represents the starting point of your app and connects to your UI. This is the first screen your user sees. In your case, it was My Story’s View Controller. If you have a bug, you may want to check your transitions to the initial View Controller in a different Storyboard file. That’s the Storyboard file specified in the application’s Info.plist file using the UIMainStoryboardFile key, which is the initial View Controller that’s loaded and presented automatically when your program begins.
In Chapter 8, I introduce you to the world of MapKits. This is very exciting because everybody loves MapKit apps. Chapter 8 is the introduction, and Chapter 9 really digs down into MapKits to make an awesome app.
Onward to the maps that await us in the next chapter!