In this chapter, you’ll get started using MapKit, one of the most successful frameworks for iOS. You’ll also explore some cool apps that are currently based on the MapKit framework. Of course, in addition, you’ll create your first MapKit app. This app will run on both the iPhone and iPad and allow you to scroll through Apple’s world map, zoom in, and zoom out—all with no code from you whatsoever! This is the simplest way to dip your big toe into the waters of MapKit-based apps.
Although MapKit, as a toolbox, is a challenging set of utilities and devices, you’ll soon see just how easily you can put together a basic app using MapKit. Before going any farther, however, I want to talk about frameworks. After that, we’ll dig deeper to see what other programmers have done using MapKit and glean what we can from them. Then you’ll see what MapKit can already do without your having to program anything at all.
The objective here is to get you to a place where you can say, “I’ve programmed a basic MapKit app and I understand how to move forward with confidence into the more advanced goal of utilizing MapKit to create more advanced map applications.”
A Little About Frameworks
When Steve Jobs was fired from Apple, he formed a computer company called NeXT. In the early 90s, his company produced beautiful, black, streamlined computers that made me drool with envy. A few of my professors owned NeXT computers, and I was aware of their capabilities. The most profound aspect of this outfit was not that they cranked out these black, streamlined boxes, but rather that they used a language called Objective-C. Jobs had found that, even though programming in this complex language was difficult, the code it produced was able to “talk to” the microprocessor quite elegantly. So, what does this have to do with MapKit?
What NeXT did was create frameworks of complex Objective-C code, which you can think of as the tools that a carpenter might have in his toolbox. When you use MapKit, you’re bringing into your own code a framework of map-related tools—just as a carpenter may have one set of tools for cabinetry and another specially made set specifically for making intricate furniture. Such specialized tools differ significantly from the type of tools that a roofing carpenter might use.
To this end, you’ll bring the MapKit framework into Xcode. It will be almost as if you’d been learning techniques as a flooring and cabinetry carpenter in Chapters 1–7, but now you’re going to the hardware store to get outfitted for your next gig, which will be audio–video installations in walls and ceilings. Therefore, before you continue on to the next program, you’re going to have to go buy a brand new tool. In this case, the tool is MapKit, and it lets you interact with maps in a number of different of ways. You’ll use MapKit in both this project and the next. In both chapters, it’s the centerpiece of our discussion.
With the iPhone and iPad, Apple helped to bring maturity to the modern interfaces we now use to interact with our mobile devices. Before the advent of these slick devices, 99 percent of all interactions with computers were based on the mouse and keyboard. In the examples you’ve already programmed, you’ve used unique methods and classes to jump between screens and sense when a user is pinching, tapping, or scrolling on the screen. These tools are also built in to MapKit. For a user to have basic interaction with the map, you don’t have to supply any code, as you did in previous chapters. The map reacts to the user’s touches without intervention because it incorporates some of the very same techniques you’ve already learned.
MapKit Showcase: Preinstalled Apps
Since the first version of the iPhone, Apple has been steadily building out its map technologies to provide readily available geo information on the go. For those who carry an iPhone or iPad everywhere, it’s rare to be truly lost, no matter where you travel. Today, you can move about the world with confidence and freedom, thanks to your friends at Apple, who continually work to improve the technologies that affect our daily lives. Keep in mind that Apple’s MapKit, coupled with its other technologies like CoreLocation, serve to inspire very smart and innovative people who provide us with beautifully ingenious apps every day. This is illustrated in Figure 8-1 where one can see the new vector-based Apple maps that keep crisp no matter how much you zoom in or out.

Figure 8-1. Apple’s latest Maps application—vector-based maps that keep text crisp, graphics clear, and panning and zooming smooth and responsive
To take maximum advantage of the new ideas presented in this chapter, and to be prepared to stretch and expand into a new level of creativity, you’ll first take a tour of the existing apps that are preinstalled on the iPad and iPhone. You want to become familiar with these so that you can gain ideas for adding your own bells and whistles to your creations.
iPhone owners no longer need to carry around separate GPS devices to help with travel directions. You can now travel lighter by ridding yourself of other gadgets and replacing them with the iPhone 5. Find your way to your destination using turn-by-turn spoken directions, a 3D view, and real-time traffic information. This is illustrated in Figure 8-2
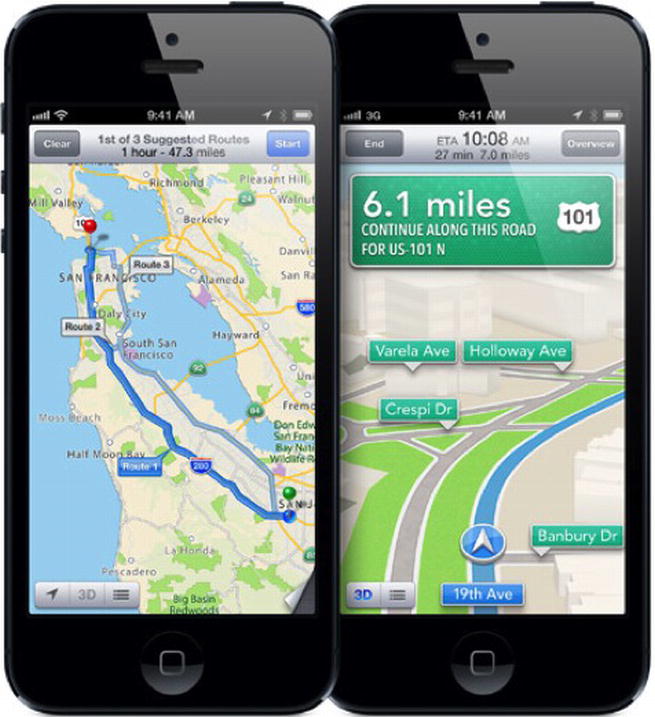
Figure 8-2. Navigation—a powerful turn-by-turn navigation tool included on iPhone/iPad
As you approach a turn, Maps speaks directions so you can keep your eyes on the road. In addition, the screen turns into 3D perspective view of the road ahead. Large signs and arrows superimposed over the images show you which way to go and how long it’s going to take to get there—even if your screen is locked. When you start a turn, the camera angle changes dynamically to show you where to go. If you miss a turn, don’t worry. Maps automatically reroutes you and updates your ETA.
Traffic: A Smarter Way to Cope
With Maps, you get real-time traffic information to calculate your ETA. Maps gives you detailed information on what’s causing a backup so you can tell whether there’s a major accident or it’s just a temporary slowdown. This is illustrated in Figure 8-3. If traffic’s a mess, Maps offers alternative routes to save you time.

Figure 8-3. Traffic—get real-time traffic information and re-route around heavy traffic situations
Bicycle broke down? Okay, so Apple’s iPhone can’t fix that flat tire for you, but it can help you find someone who can. Where’s the nearest repair shop that’s open for service? iPhone with the MapKit framework has the answer, because you can now do a direct search in Apple Maps rather than first searching for a repair shop in your browser and then copying/pasting the address into the app. Essentially, Maps is a one-stop search/find/receive directions app. Accordingly, in this hypothetical, you’d simply type cycle repair in Maps’ search field or ask Siri, and suddenly nearby cycle repair shops appear, along with their customer ratings on the map, all represented by pins.
Searching works with specific addresses and business names, too. Tap a pin from your search result to see a card full of useful information about that location. View photos, tap to dial phone numbers, get addresses, find web sites, and peruse Yelp ratings and reviews—even find deals to save money. Tap the Quick Route button, and Maps instantly gives you turn-by-turn directions to any search result. This is illustrated in Figure 8-4.
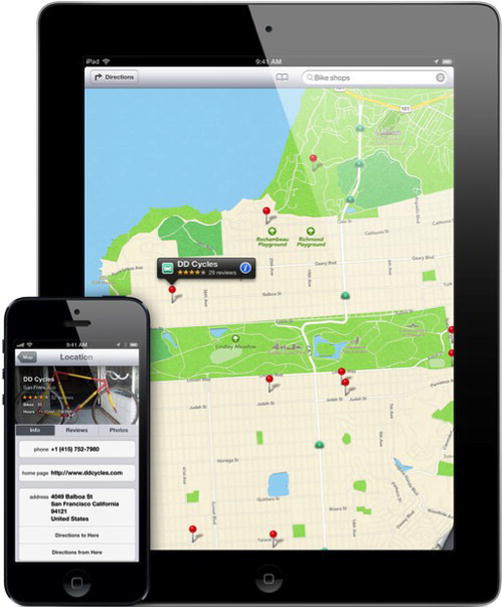
Figure 8-4. Local Search—use this function to find what you’re looking for closest to where you are
See More, Do More
Apple’s new Maps on iPhone 5 looks amazingly crisp and detailed on the high-resolution Retina display. You can switch between map view, satellite view, and hybrid view. You can even see a street-level view or use the new Flyover of a particular address to see realistic, interactive 3D views. As shown in Figure 8-5, You can double-tap or pinch to zoom in and out of a map. Explore in high resolution, pan, tilt, and rotate around cities and their landmarks.

Figure 8-5. From the Ground Up—Apple’s new Maps gives you turn-by-turn spoken directions, interactive 3D views, and stunning Flyover feature
Innovative and Popular MapKit Apps Inspire Us
A funny thing happened along the way to teaching MapKit and Storyboarding to my students: most thought they knew what MapKit was but actually had no idea how awesome the MapKit framework really was.
Note One of my former students began working at Apple on iOS 5. She did exceptionally well in MapKits, and, of all the departments within iOS 5 that she could have worked in, they placed her in the MapKit framework. One of the first things she told me was how huge this division is and how even though she loved MapKits, she’d had no idea that so many teams with so many incredibly intelligent people were all working on one thing: MapKits!
I’ve found that it really helps my students when, after showing them the prebuilt apps, we spend some time reviewing some super–cool third–party MapKit apps—to inspire them and get their brains storming. So, imagine you’re sitting with us and taking this brief tour as well. The following are 11 MapKit apps that have caught my eye, some of which I use regularly. Feel free to look these apps up and even download some of them onto your own devices to see how they work.
- FlightTrack: This MapKit app lets you manage every aspect of domestic and international flights with real-time updates and beautiful, zoomable maps. You can receive updates on gates, delays, and cancellations so you can book an alternate flight. The app covers more than 5,000 airports and 1,400 airlines.
- Metro Paris Subway: Never get lost in the City of Light. Metro Paris Subway is a comprehensive guide to traveling through Paris, including official metro, RER, and bus maps and schedules. Complete with an interactive map and route planner, Metro Paris Subway has you navigating like a real Parisian in no time.
- MapMyRide: I use this MapKit app all the time. I simply turn it on and start riding around on my bike. It tracks my speed, time, and mileage, as well as the incline. It takes into account my age, gender, and body weight and then tells me how many calories I burned. (On a good day, I can burn off two doughnuts!) The point is, this application calculates all these things while I’m just riding along huffing and puffing! When I get home, I can see the route on my computer, iPad, or iPhone. It does most of its work by using and manipulating preinstalled MapKit apps.
- Plane Finder HD: This amazing little app provides near real-time “virtual radar” air-traffic radar maps. It shows where a commercial flight, or any plane equipped with GPS-reporting technology, is in the air. Share sightings, see flight paths, filter by airline or aircraft type, get flight information, and see beautifully detailed aircraft illustrations and technical information.
- Blipstar: This app converts Internet business URL addresses to the corresponding addresses of their brick-and-mortar stores and presents it all on a cool map.
- Twitter Spy: This app lets people see where the person who is tweeting them is currently located. Yep—wacky and crazy, but true.
- Coverage?: Overlays and compares phone carrier coverage maps. Perfect for travelers who want to do research about their phone service coverage before they actually travel. The level of coverage details in this app is astonishing!
- Map Tunneling Tool: This one is just clever fun. Where would you come out if you began digging a hole straight down from wherever you are? Hint: the answer isn’t always China.
- Tall Eye: This app shows you where you will go if you walk directly, in a straight line, around the earth, starting at one point and staying on a specific bearing all the way around.
- Geo Measure: A simple-to-use app that lets you measure the distance and area of just about any place on the map. Measure the circumference of your yard or the area of your favorite lake. A very cool app.
- Phone Tracker for iPhones: A tool that lets you track the location and follow movements of other people. Track multiple people simultaneously. Track your friends and family members, find your friends near you, see where your kids have been that day, and even track your spouse as he or she travels. Kind of Big Brother-ish, but a really nice app with lots of potential.
MyMapKit_01: A Universal Single View Application
It’s time to dive into your first MapKit project. This exercise demonstrates the initial ease with which you can incorporate MapKit in your applications and how easy it can be to create an app that works in both the iPad and iPhone—a universal app, as it’s known. You’re going to begin with some simple splash screens and icons that suit your basic requirements. Then you’re going to create two very simple View Controllers—one for the iPad and another for the iPod and iPhone. You’ll tour some of the same building blocks and files that you’ve seen throughout this book; yet this app will be one of the simplest you’ve seen. The next chapter will challenge you as you go beyond the basic MapKit View Controller and into some more advanced code.
This is a good place for a reminder of the title of this book: iPhone and iPad Apps for Absolute Beginners. This exercise won’t tax your thinking too much, but it will help ease you into the right frame of mind for the challenge of Chapter 9.
As in previous chapters, please download and extract images and boilerplate code for this chapter. Navigate to http://www.rorylewis.com/xCode/iPhone%205%20for%20absolute%20beginners%20source%20code%20Xcode%20ios6%20/08_myMapkit_01.zip and download its contents. The images in the zip file include four icon files and five splash screens, which I explain later. Right now, though, just download it to your beautifully clean desktop. Then you’ll extract the files there as well.
Sample code that was programmed on the video is available for download at http://www.rorylewis.com/xCode/iPhone%205%20for%20absolute%20beginners%20source%20code%20Xcode%20ios6%20/08_myMapkit_01.zip. After extracting all the files, remember to delete the 08_MyMapKit_01.zip and 08_MyMapKit_01_files.zip folders to avoid overwriting files and/or potential conflicts with the exercise code. To view the screencast of this chapter’s exercise, go to http://www.youtube.com/user/iphoneandipadapps.
Let’s get started. Choose the template.
1. Open Xcode, press ![]() , and click the Single View Application template, as shown in Figure 8-6. Call it MyMapKit_01 and save it to your desktop by clicking Next. A folder bearing that name appears on the desktop.
, and click the Single View Application template, as shown in Figure 8-6. Call it MyMapKit_01 and save it to your desktop by clicking Next. A folder bearing that name appears on the desktop.
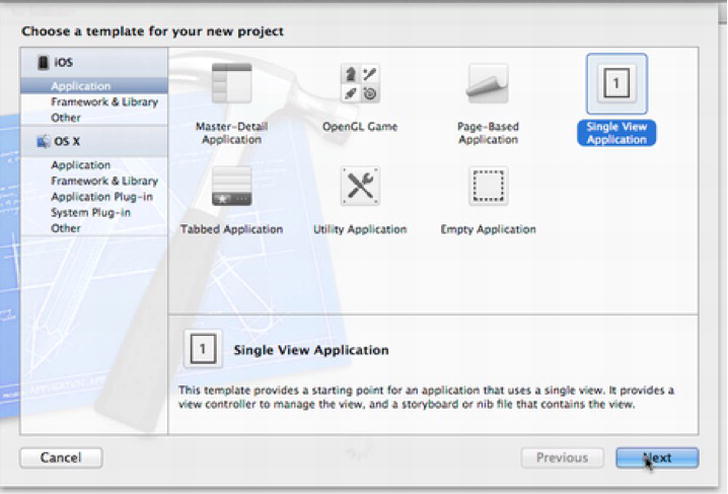
Figure 8-6. Select the Single View Application icon and then press Return or click Next
2. Follow along as closely as possible, because it will get a little more complex later. Name your project MyMapKit_01. To do so, select Universal in the Devices field, leave the Class Prefix, Use Storyboards, and Include Unit Tests options alone, as shown in Figure 8-7. Check that the Automatic Referencing option is on. Click Next. The next dialog to come up gives you a chance to change the directory or create a new directory where your initial project files will be created (see Figure 8-8). Here you won’t change anything. Instead, click Create to have initial project files created on the desktop in the MyMapKit_01 folder. Make sure you don’t select the “Create local git repository for this project” option at the bottom of the dialog.

Figure 8-7. Name your app MyMapKit_01, making sure you selected Universal in the Devices field and that Automatic Reference Counting is on
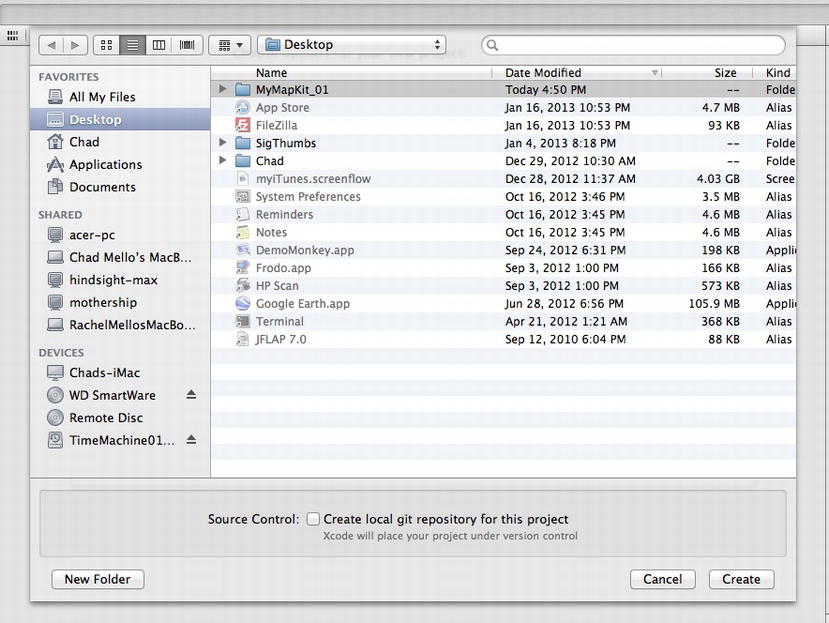
Figure 8-8. You won’t be creating a local git repository—just click Create, and Xcode creates your initial project files on the desktop
Preliminaries: Adding the MapKit Framework
3. You need to add the MapKit framework to your project before you can show a map in your app. For a newbie, I’d say, “A framework is a set of super code that is used for specialized stuff. It’s too big to be carried around all the time, but if you write an app that needs a framework—then you drag this framework into your code.” Yeah, but you’re not a newbie anymore—you’re heading at a fast and furious pace to becoming a bona fide coder, respected by others who have been left in the swamps of technology. So, let’s look at this. Yes, it’s specialized code. You’ll put it in a hierarchical directory that encapsulates dynamic shared libraries such as nib files, image files, localized strings, header files, and reference documentation in a single package. When you bring MapKit into your app, the system loads it into memory as needed and shares the one copy of the resource among all applications whenever possible. So, go to your root directory, select MyMapkit_01, and click the Targets tab, as shown in Figure 8-9. Click the Link Frameworks and Libraries bar and then click +.

Figure 8-9. Click the Linked Frameworks and Libraries bar and then click +
4. You’ll either scroll through all your options or enter map in the search bar and select the MapKit.framework framework. Click Add or press Enter/Return, as shown in Figure 8-10.

Figure 8-10. Select the MapKit framework
5. As shown in Figure 8-11, grab the newly imported MapKit framework that is by default stored in the root directory. Drag and drop it into your Frameworks folder. It’s important to create good habits and store all your frameworks in the correct folder.

Figure 8-11. Move the imported MapKit framework to the Frameworks folder
You want to have nine essential images for every app you make. For convenience, these are included in the package available for download from my web site at www.rorylewis.com/xCode/iPhone%205%20for%20absolute%20beginners%20source%20code%20Xcode%20ios6%20/08_myMapkit_01.zip. They include the essential icons and splash screens. These include the 57 × 57 px (“px” stands for pixels) for the iPhone classic, the 72 × 72 px for the iPad classic, the 114 × 114 px for the iPhone Retina display, and the 144 × 144 for the iPad Retina display. I’ve also designed five splash screen images that are available for your use. Splash screens usually only appear for less than a second, but they give the user something cool to look at while the app is loading—and they set the tone for it. You’ll need five splash screens because you have to accommodate the various iPad and iPhone configurations that the user using your app might have. The iPad with standard resolution requires a 768 × 1004 px splash screen, whereas the iPad Retina requires a 1536 × 2008 graphic. The 4-inch iPhone Retinas need 640 × 1136, the 3.5-inch Retinas need 640 × 960, and 320 × 480 px is required for the classic iPhone. After you’ve downloaded them, you can always use them as a template for your future apps.
Note This app is a universal app. With a universal app, a single app bundle can run as both an iPhone app and an iPad app. Universal apps usually require different versions of the Main View Controllers that are tuned to the respective resolutions of the iPad and iPhone.
6. Staying in the root directory after importing the frameworks, drag the icon images into the icon boxes. Figure 8-12 shows the standard resolution box (on the left). The icons and splash screens are named so that their functions are obvious. Simply drag these files and drop them into their respective spots. Figure 8-12 shows the five spots where you need to drop your files: two for the icons and three for the various splash screens. Be sure to match these up properly when dropping the graphics in place.
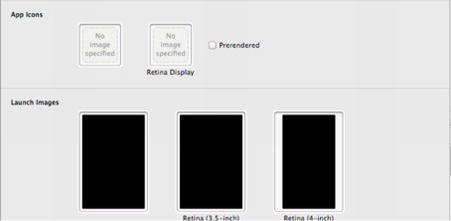
Figure 8-12. Drag in the icons
7. Similar to step 6, after importing the icons, you now need to import your splash screen images into their boxes. Figure 8-13 shows the iPhone Retina 640 × 960 px classic splash screen already in place and the classic iPhone 320 × 480 px splash screen being dragged in. Once you’re finished dragging these images in, you’re ready to tidy up your project a bit.
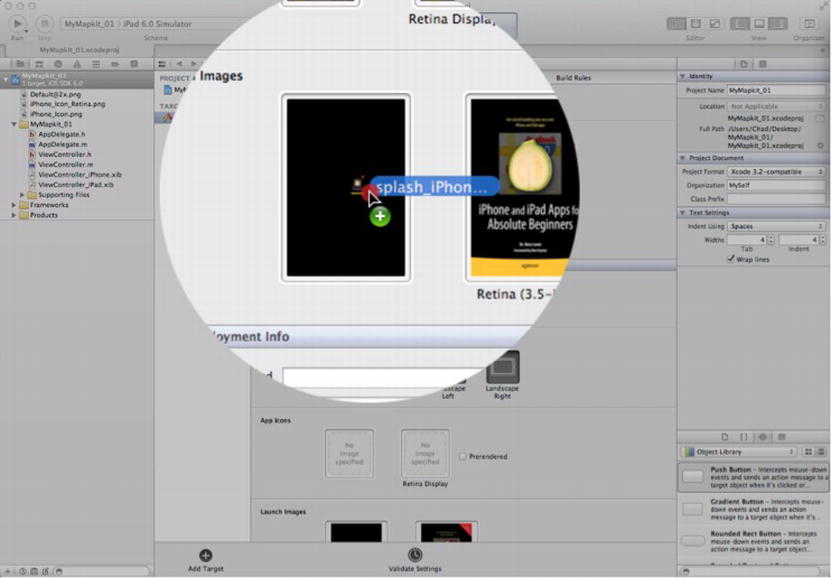
Figure 8-13. Drag in the splash screens
8. Before you start to mess with your project, you need to make sure that all the files are in the correct folders. At this point, you know that Xcode will recognize the correct icons and splash screens—but look where they are! They’re in the root directory again. Grab them, as shown in Figure 8-14, and move them into the Supporting Files folder.
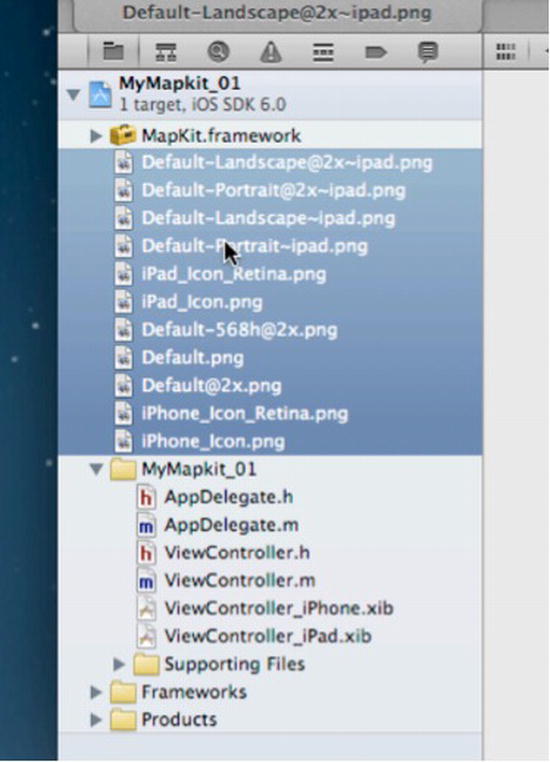
Figure 8-14. Drag in your icons so you can take them to the correct folder
9. The Supporting Files folder is probably not open. That’s okay. As you drag the icons, slow down as you hover over the Supporting Files folder so it opens up. Once it does, drop the files into the folder, as shown in Figure 8-15.
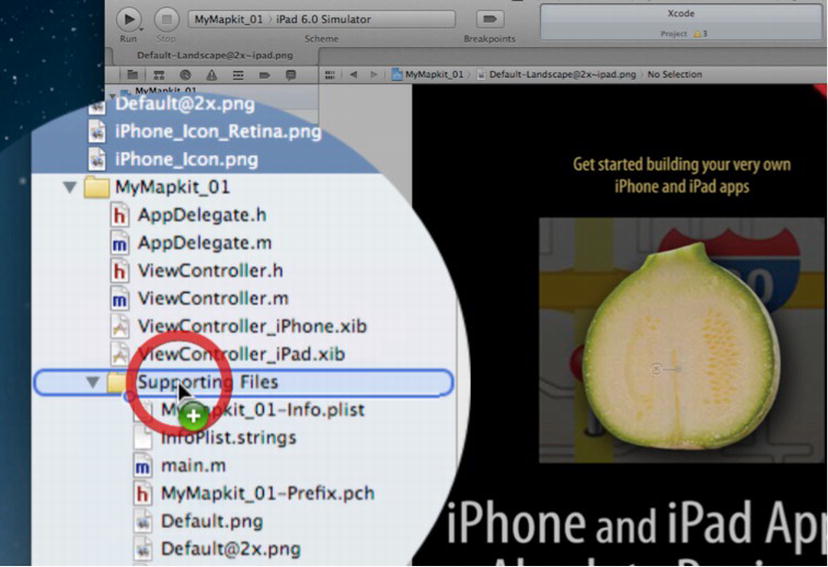
Figure 8-15. Drop the project icons into the Supporting Files folder
10. Before moving on, check your project against the example shown in Figure 8-16. You need to make sure that your icons, splash screens, and MapKit framework are placed like those in the example. Once they are, you can move on.
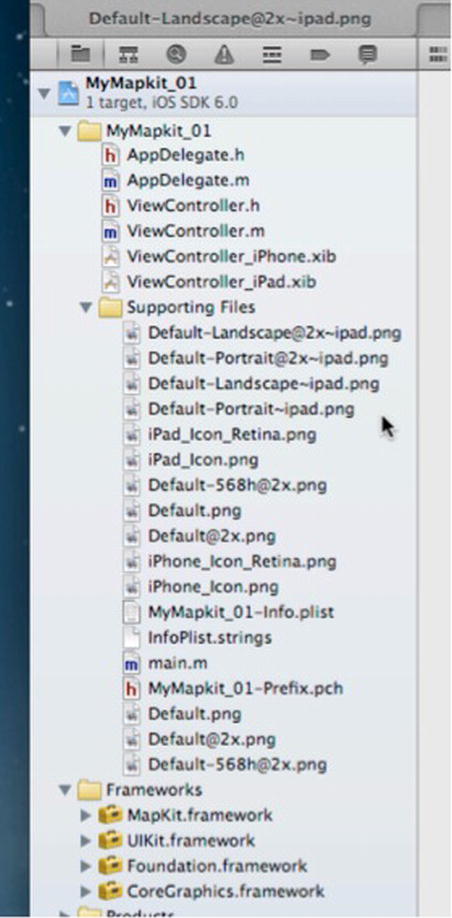
Figure 8-16. Check your directories and files against mine
11. Take a good look at Figure 8-17. You’re now ready to finish your app. You need to get used to wanting to see your coding canvas laid out before you ever start working with the app’s construction. This is very much like a painter who first buys a canvas, paint, turpentine, brushes, rags, and a model of what will be painted before the first dab is ever painted. That’s what you’ve just done. Get used to first setting everything up before writing your code.
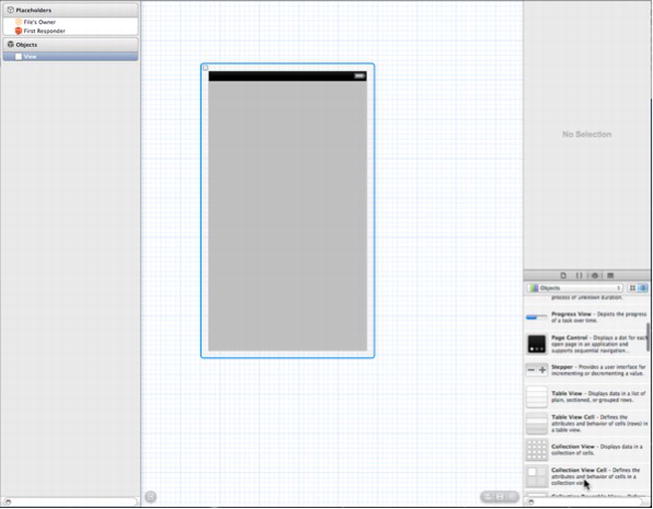
Figure 8-17. Ready to paint . . . erh . . . create your app
Finishing the View Controllers
This app is a universal app, remember, which means that as a single application it can run as both an iPhone app and an iPad app. As mentioned earlier, universal apps usually require different versions of the main View Controllers that are tuned to the respective resolutions of the iPad and iPhone. Here, Xcode automatically created two versions of your map’s View Controller for you. In this case, the only difference is the size of the visual area; however, if this app had other View Controllers, such as informational dialogs or Table Views, the navigation between them would most likely differ. The iPhone has less visible area to work with. That forces you to think about how your app may differ in appearance between the smaller iPhone and the larger iPad. You’ll see some of this in the next MapKit project in Chapter 9.
12. Select ViewController_iPhone.xib from the Project Navigator on the left. In Figure 8-17, you see the familiar empty canvas of the main iPhone View Controller.
13. You need to get access to the Object Library—the list of objects that you can choose various objects from. Ensure that the Object Library is visible by clicking the cube in the lower right of your screen, as indicated by the arrow in Figure 8-18.

Figure 8-18. Ensure that the Object Library is visible
14. Locate the Map View object from the Object Library, as shown in Figure 8-19.
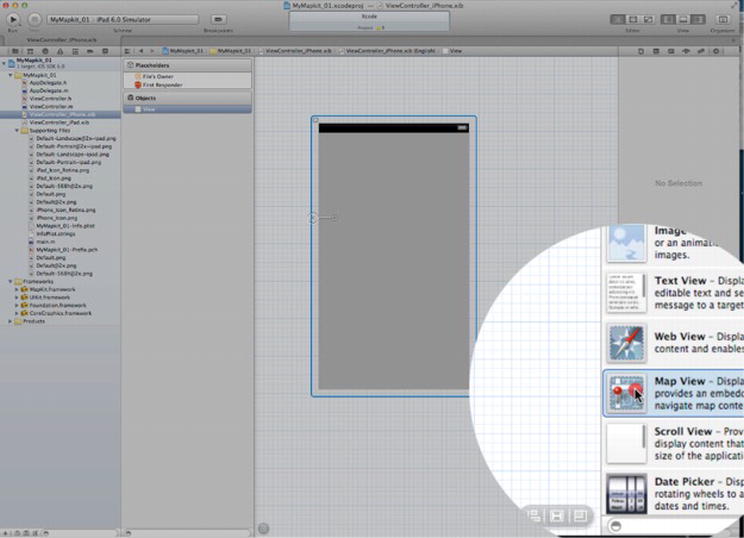
Figure 8-19. Find the Map View and drag it onto your View Controller canvas
15. As demonstrated in Figure 8-20, drag the Map View object over the View Controller. Before dropping the object onto the canvas, make sure it’s centered and fills the entire viewable area.
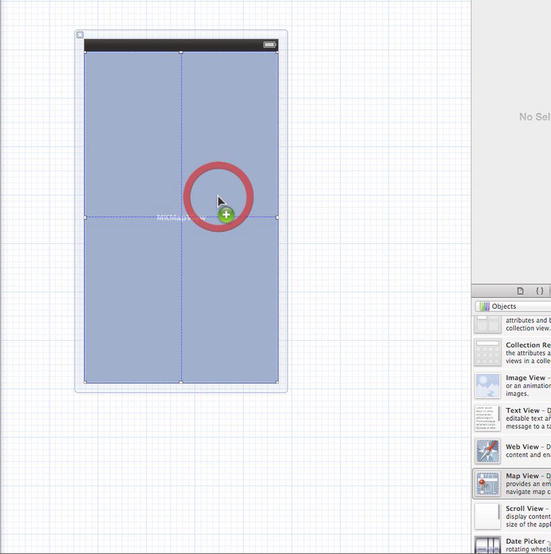
Figure 8-20. Drag and drop the Map View object onto the View Controller canvas
2. Do the same for the iPad View Controller. Select ViewController_iPad.xib from the Project Navigator and repeat steps 14 and 15 for the iPad View Controller. The only difference here is that the iPad area is much larger that the iPhone.
2. Do not forget to save your project at this point! You want to get into the habit of always saving your work before attempting to compile or run your application. Because this app was a quick solution to put together, saving at the end of your work is fine; however, while working with more sophisticated apps, you should save periodically, perhaps every five minutes or so. This way, in the event of a system failure, you’re less likely to lose any significant work. A quick way to save is with this simple key combination: ![]() +S.
+S.
Making It Go: Running Your First MapKit App
You’ve finally come to the fun part; the anticipated event is here! Are you ready to see the results of your not-so-hard work? What you’re about to see is a fully functioning app that allows users to peruse a map of the world. You’re going to run this application in both iPad and iPhone environments.
18. Click the Run button at the top left of your screen. This will run the application in the iPad Simulator (see Figure 8-21).
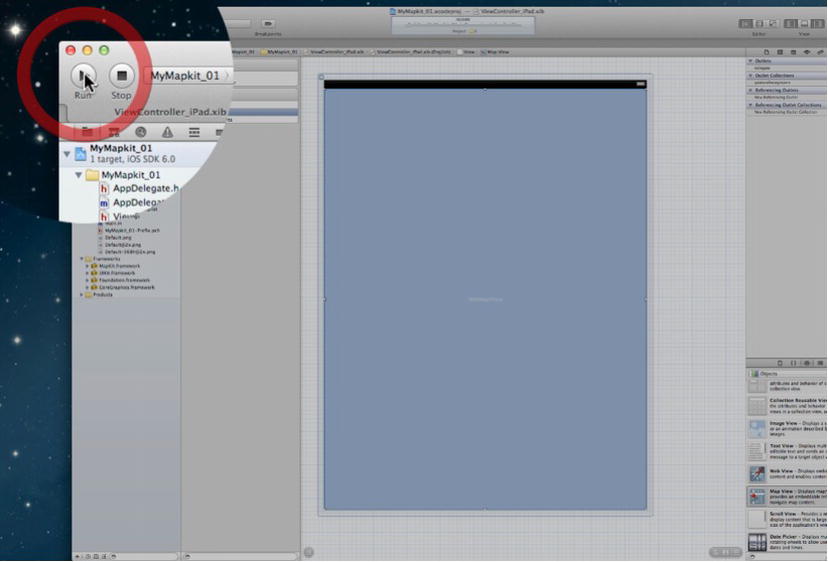
Figure 8-21. Running your new MapKit app
19. The full-screen splash screen appears, as shown in Figure 8-22.

Figure 8-22. Running your new MapKit app—the initial splash screen
20. As you can see in Figure 8-23, when the map appears, the user can freely manipulate it by scrolling, pinching to zoom in and out, and rotating the device between landscape and portrait modes. These features are made possible in your app without typing one line of code in this project. Wow!
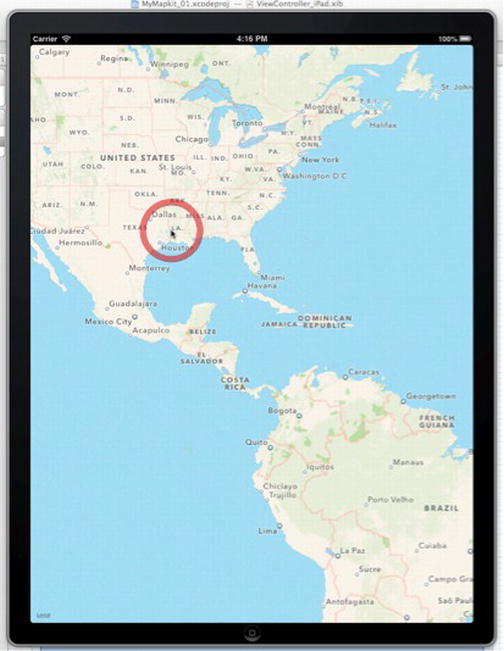
Figure 8-23. Running your new MapKit app: the interactive map. A user can scroll, zoom in, and zoom out of a world map. Not bad for absolutely no coding on your part!
21. You can also run your app in the iPhone Simulator. Simply select the iPhone Simulator option in the upper left-hand part of your screen (Figure 8-24) and run your app the same way you did for the iPad. The results will look like Figure 8-25.
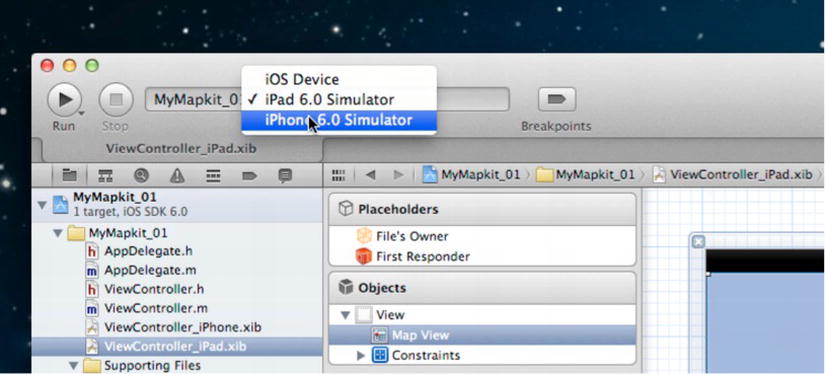
Figure 8-24. Running your app in the iPhone Simulator
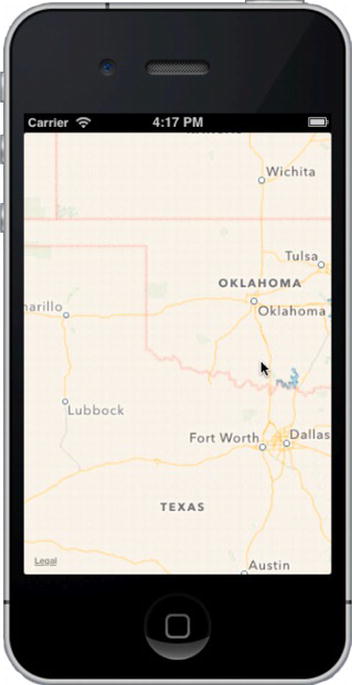
Figure 8-25. Running your app in the iPhone simulator
Wow! Within a few minutes’ time, you were able to pull off a pretty good show. Just think: a few short years ago this type of application was all but impossible to create on any device. Now, you can throw together an app with very sophisticated map functions in no time. If that isn’t being a geek, then I don’t know what is. Time to show this app off while bragging to your friends about how quickly you put it all together.
Okay, this was a cool introduction to MapKit. The next chapter introduces you to some more challenging but very cool concepts. You’ll also insert code into your MapKit app for the first time. By the time you finish Chapter 9, you’ll have had the introductory experience of this chapter plus a taste of inserting pure Objective-C into MapKits. Awesome! See you in the next chapter.