MapKit with a Little More Effort
In Chapter 8, you were able to create a nice MapKit app with no coding on your part; Xcode did it all for you. That app allowed you to scroll around the world map, zoom in to view more details, and zoom out as well. For all the wonderful technology packed into it, though, your simple app was not very useful beyond perusing the map. In this chapter, you’re going to create something that has a bit more usefulness and functionality to it. You’re going to consider a variety of components that you’ll use to build in to your app.
For this project, programmers like you need to spend a minute recalling some basic earth science and geography so that your code will be as effective as possible. After you’ve gained sufficient understanding about the geo coordinate system built into MapKit, you can create wonderfully imaginative, fun, and useful map-based applications for the masses.
The central piece of any MapKit-based app is the MKMapView class. This complex class provides the core map functionality required so that you, the programmer, can provide users of your app the ability to visualize an abstract view of their world. A Map View contains a flattened representation of a spherical object—Earth in this case.
You need to understand a couple basic ideas about how to specify coordinates in a Map View and how these coordinates ultimately translate to points on the surface of the Earth. This understanding is especially vital if you plan to place custom content on the top of the Map View.
The good news is that you’re not required to know more than a few basic concepts, along with some elementary math, to get started. MapKit provides most, if not all, of the functionality you will need to compute geo points and locations related to the Map View.
Understanding Map Geometry and Coordinate Systems
For this app, one of the things you’ll do is direct the iPad to animate a pin dropping down onto the map. Your annotation is dropped onto a specific location, giving longitude and latitude, but before we proceed, you need to know what these terms really mean. Figure 9-1 shows lines of latitude and longitude.

Figure 9-1. Latitude versus longitude, along with the equator and the prime meridian
Lines of latitude, often called parallels, are the imaginary lines that circle the globe horizontally, running east and west. These invisible lines are measured in degrees, minutes, and seconds, north or south of the equator. The equator is the elliptical locus of points on the Earth’s surface midway between the poles, which physically are real points, defined by the Earth’s rotation on its axis. The north pole is 90 degrees north latitude; the south pole is 90 degrees south latitude.
Lines of longitude, often called meridians, are imaginary vertical lines (ellipses) that cross through the north and south poles. They’re also measured in degrees, minutes, and seconds, east or west of the prime meridian, an arbitrary standard that runs through Greenwich, England. Unlike the equator, which goes all the way around the world—360 degrees—the prime meridian (0 degrees longitude) is a semicircle (semi-ellipse), extending from the north pole to the south pole; the other half of the arc is called the international date line, defined as 180 degrees east and/or 180 degrees west longitude.
To understand the coordinate systems used in MapKit, it helps to understand how the three-dimensional surface of the Earth is translated into a two-dimensional map. Figure 9-2 demonstrates how a projection of the Earth’s three-dimensional surface can be flattened into a two-dimensional surface.

Figure 9-2. Mapping spherical data to a flat surface
MapKit uses what’s known as a Mercator map projection system, a specific type of cylindrical map projection, as shown in Figure 9-2. In a cylindrical map projection, the coordinates of a sphere are mapped onto the surface of a cylinder (think of a paper towel role), which is then unwrapped to provide a flat map. An interesting point to note when flattening a sphere in this way is what happens to the lines of longitude.
Looking at Figure 9-2, notice how the longitude lines that normally converge at the poles become parallel, causing land masses to become distorted the farther away from the equator you happen to be. Although this type of view misrepresents reality, the advantage of the Mercator system is that a straight line drawn between two points yields a course heading that can be used in actual navigation on the surface of the Earth. The projection used by MapKit uses the prime meridian as its central meridian. You can see in Figure 9-1 above that the Prime Meridian is the Earth’s “zero” of longitude, and it passes right through Greenwich, England.
MapKit supports three basic coordinate systems for specifying map data points:
- A map coordinate is a latitude and longitude on a spherical representation of the Earth. Map coordinates are the primary way of specifying locations on the globe. You specify individual map coordinate values using the CLLocationCoordinate2D structure. In conjunction, you can specify areas using the MKCoordinateSpan and MKCoordinateRegion structures. You’ll be using both MKCoordinateRegion and CLLocationCoordinate2D in this exercise.
- A map point is an x and y value on the Mercator map projection. Map points are used for many map-related calculations instead of map coordinates because they simplify the math involved in the calculations. You’d use map points primarily when specifying the shape and position of custom overlays—something you’ll not be doing in this chapter.
- A point is a graphical unit associated with the coordinate system of the UIView object. Map points and map coordinates are ultimately translated into a point so that they can be drawn on a view while using the UIView’s coordinate system. Most of the time, MapKit does this work for you, and you’ll not be doing any of this stuff in this exercise.
In most cases, the coordinate system you use is predetermined by the MapKit interfaces you’re using. When the time comes for you to create your own app, and you need to store its data, map coordinates are precise, portable, and the best option for storing location data.
Important Things to Know
In Chapter 8, you put together a fairly simple application with little effort; you were able to create a map app with little to no understanding of MapKit. In this chapter, you can’t get away with as much. Before you begin creating this app, you should know a few things about the technical foundation of map-related applications for the iPad and iPhone. The upcoming exercise in this chapter relies on five important tools: MapKit, CoreLocation, the MKAnnotationView class reference, actions, and outlets. You’re not going to involve yourself with how these sophisticated tools work so much as you’re going to practice the art of deciding when to reach for which tool in your newly expanded toolbox.
Among other things, these tools let you display maps in your applications, use annotations, work with geocoding (which works with longitude and latitude), and interact with your location (via CoreLocation).
When interacting with Apple’s maps, you use the Apple-provided MapKit framework. To obtain your location or do cool things using GPS satellite technology, you use the CoreLocation framework. To put it all together and seamlessly integrate with the user—you take all the aforementioned technology and combine their use in code. Finally, to place pins on a map, create references, draw chevron marks, or insert an image of your dog showing where he is on a map—you call these annotations and, thus, use MKAnnotationView. Keep all this in mind while doing this exercise.
myMapkit_02: A Single View iPad Application
This exercise begins with some boilerplate code, splash screens, and icons that suit your basic requirements. You’ll modify it from there. You’ll pick up from where you left off in Chapter 8, and you’ll be challenged to see what areas of the code are pretty much the same as what you’ve already encountered and what areas are different, given the nature of this application.
The ability to recognize patterns and see structures just under the surface is a powerful aptitude that everyone has, but programmers cultivate theirs to a heightened degree. You’ll play a little game to see if you can anticipate some of the moves you’ll have to take.
For this app, the example used to demonstrate the pin drop on location is our Computer Science offices at the University of Colorado at Colorado Springs. You, of course, can use any location you choose. You may want to use your own address or a well–known landmark. To do that, you must get the latitude and longitude values of that location, most likely from Google Maps or a direct GPS reading. Many sites on the Internet offer these coordinates. Figure 9-3 shows one of them: http://itouchmap.com/latlong.html.

Figure 9-3. itouchmap.com is one of many sites where you can enter an address and get its longitudinal and latitudinal coordinates
Here’s a thought—let’s start at the end of the process and think backwards for a minute. Go ahead and jump forward in this chapter for a sneak peek at what the app will look like—the results it will return if all goes well. In Figure 9-3 you see a picture of a hybrid map showing a red pin sitting next to the entrance of a building. That’s the Engineering and Applied Science building at the University of Colorado at Colorado Springs. The picture also has an annotation, which is the text. “Chad Mello” is the title, and “UCCS Engineering & Applied Science” is the subtitle.
Later in the tutorial, you’ll see that you need to be careful about the title and the subtitle. You can also control the color of the pin and decide on the style of animation—how the pin drops onto the map image.
This is a good place for a reminder of the title of this book: iPhone and iPad Apps for Absolute Beginners. My humble goal is not fluency, but reasonable familiarity and a sense of what lies ahead.
If that sounds right, let’s get on with it.
You want to set up the initial project and organize it so that you can put your app together in an organized and systematic way. We developers need to approach application development in a consistent, logical manner so that we make fewer mistakes while coding.
As in previous chapters, please download and extract images and boilerplate code for this chapter. Navigate to my web site and download Chapter 9 contents: http://rorylewis.com/xCode/iPhone%205%20for%20absolute%20beginners%20source%20code%20Xcode%20ios6%20/09_myMapkit_02_files.zip . The images include two icon files, four splash screens, and one DemoMonkey file (Chapter09MapKit.demoMonkey) for boilerplate code. If you’ve not gotten DemoMonkey from the site, you may want to do so before starting on the code; download it from http://rorylewis.com/xCode/StoryBoarding%20in%20Xcode/Chapter01_Demomonkey.zip. Later, I explain what these icons, splash screens, and boilerplates mean. Right now though, just download it to your desktop and extract the files there.
Sample code that I programmed on the video is available as well. In fact, watching the video before proceeding with this chapter may help you. The video shows just how quickly this application can be put together and perhaps could put your mind at ease. Try to view the screencast of this chapter’s exercise before starting: www.youtube.com/user/iphoneandipadapps.
Let’s get started and choose the template.
1. Open Xcode and press ![]() . Then click the IOS Single View Application template, as shown in Figure 9-4.
. Then click the IOS Single View Application template, as shown in Figure 9-4.

Figure 9-4. Select the Single View Application icon and press Return or click Next
2. In order that you can follow along as closely as possible, because things will get complex later, name your project myMapkit_02. Also, select iPad in the Devices field, not iPhone or Universal. You’ll not be using the Unit Tests option or the Storyboards option; however, you do want to use Automatic Referencing Counting. The final settings are shown in Figure 9-5.

Figure 9-5. Name your app myMapkit_02
3. Open the Supporting Files folder you downloaded from the web site. The folder is called 09_myMapkit_02_files.
4. Open the file named Chapter09MapKit.demoMonkey. You must have DemoMonkey installed to use this file.
5. Your desktop should look something like Figure 9-6, with the DemoMonkey window in the upper-right corner.

Figure 9-6. Arrange your desktop and prepare to follow along
Preliminaries: Bringing in the Images
For convenience, images are included in the package available for download from the web site. They include the essential icons and splash screens. These include the 72 × 72 px for the iPad standard resolution, and the 144 × 144 px for the iPad Retina Display. I’ve also designed four splash screen images that are available for your use. You’ll need four splash screens because you have to accommodate the various iPad resolutions (standard and Retina) as well landscape or portrait display mode. Included are the 768 × 1004 px splash screen for the iPad’s standard portrait resolution and the 1024 × 768 px for its standard landscape resolution. The Retina versions are also in the package. After you’ve downloaded them, you can always use them as templates for your own cool future apps.
Note In this application, you’re only using the iPad. Keep in mind that you would need other icons and splash graphics sized for the iPhone if you wanted to extend this application (or one of your own apps) into a universal app that supported both iPhone and iPad platforms.
6. Drag the icon images into the icon boxes from the 09_myMapkit_02_files folder. Figure 9-7 shows the 72 × 72 px standard iPad icon being dragged over to its appropriate box.

Figure 9-7. Drag in the icons
7. Similar to step 6, after importing the icons, you need to import your splash screen images into their boxes. Figure 9-8 shows all the iPad splash screens in place while the Retina 2048 × 1496 px is being dragged in. Once you’re finished dragging these images in, you’re ready to start the other half of the preliminary work: framework references, the main application view, and the addition of a new class file into the project. Note that the Prerendered checkbox is checked—that tells the IOS not to put the standard sheen onto your icon when it’s installed on the device.

Figure 9-8. Drag in the splash screens
Preliminaries: Adding MapKit and Arranging the Project
It’s time to add the MapKit framework. Because you know all about frameworks from the previous chapter, you’re no longer a newbie—yep, you’re heading at a fast and furious pace to becoming a bona fide geek, respected by others left in the swamps of technology. So, let’s look at this. Yes, MapKit is a specialized, shared library of code. You’ll put it in a hierarchical list that references dynamic shared libraries such as nib files, image files, localized strings, header files, and reference documentation in a single package.
8. As shown in Figure 9-9, click the + (plus sign).

Figure 9-9. Click + to bring a framework into our project
9. Either scroll through your options until you find it or enter map in the search bar and select MapKit.framework. Then click Add or press Enter/Return, as shown in Figure 9-10.
Figure 9-10. Search for and select MapKit.framework
10. Arrange your project files: as shown in Figure 9-11, you’ll grab the image files we added earlier and drop them in the Supporting Files folder. You’ll then move MapKit.framework to your Frameworks folder. It is important that you develop good habits and store all your files in an organized way and in the correct folders.

Figure 9-11. Move the imported images and MapKit reference to their respective folders
Preliminaries: Adding the Annotation Class
While you’re here setting up your project, you need to create an annotation class. For this application, you need a means to control your annotation. The annotation class functions to mark a spot on the map—in this case, the front entrance of the UCCS Engineering & Applied Science building. For that, you’ll create an Objective-C class that controls all the characteristics you want to display on this annotation.
11. Right-click the myMapkit_02 main project folder and select New File, as shown in Figure 9-12. Be sure to select “Objective-C class,” as shown in Figure 9-13.

Figure 9-12. Adding a new file to your project

Figure 9-13. Adding a new file to your project: select Objective-C class
12. Because this controller will be in charge of controlling annotations for your position, name it something that correlates to my position; how about myPos. Make sure it’s a subclass of NSObject and not UIView or any other subclass. This is shown in Figure 9-14.

Figure 9-14. Name your new class myPos and be sure it’s a subclass of NSObject
13. As shown in Figure 9-15, save your new file into your project’s subfolder, myMapkit_02. This folder comes up by default, so just click Create.
Figure 9-15. Save your new file into the same folder as your project, myMapkit_02
14. Your two newly created NSObject files named myPos.h and myPos.m are located in your myMapkit_02 folder, but ordered after the Supporting Files folder. You want to move them to the correct place above the Supporting Files folder, as shown in Figure 9-16.

Figure 9-16. Move the newly created files into the correct order under your myMapkit_02 folder
15. Before moving on, you need to make sure that you check your project against the example shown in Figure 9-17. Make sure the following are all true:
a. The NSObject files, myPos.h and myPos.m, are in the myMapkit_02 directory.
b. Your icons and splash screens are in the Supporting Files folder.
c. Your reference to MapKit.framework is in the Frameworks folder.
Figure 9-17. Check your directories and files against mine
16. You’re now ready to code. Get used to wanting to see your coding canvas laid out before you ever start writing code. As I’ve mentioned, this is very much like a painter who first obtains a canvas, paint, turpentine, brushes, rags, and a model of what will be painted before the first dab is ever painted. This is what you’ve just done.
Note I can’t understand why some students invariably dive into the code immediately upon receiving an in-class assignment. I stop them right away and make them prep, as you’ve done here and throughout this book. When I bring in all my files and create whatever new frameworks and NSObject files that I need, I allow my mind to go into a semi-meditative state and quietly plan out how I will write the code.
Coding the myPos Annotation Class
Remember that myMapkit_01 from the previous chapter is a lead-in or segue into myMapkit_02, which is where the real action is. You got away without having to program anything for that app. Now you’re going to do some coding, albeit lightweight coding. For starters, you’re going to learn how to put together a simple class that will produce the annotated pin you’ll be sticking on UCCS’s doorstep.
In fact, many MapKit apps need a separate NSObject to keep track of many positions. In this small app, you don’t necessarily have to program the myPos.h and myPos.m files at all. But you need to get used to always creating an NSObject myPos to keep track of your position or an array of positions to feed into the annotations and MapKit framework.
17. Click the myPos.h file located in your myMapkit_02 folder inside the root folder. Upon opening it, as shown in Figure 9-18, you see the following:
#import <Foundation/Foundation.h>
@interface myPos : NSObject
@end
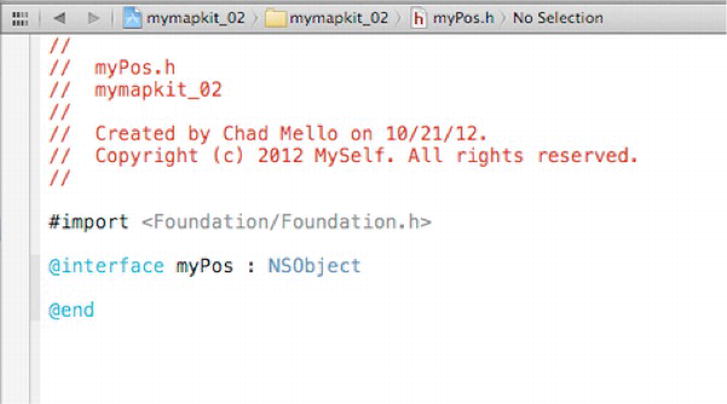
Figure 9-18. The initial myPos.h source
There isn’t much there to start off with, and you’re not going to be adding much more than that. The steps you’ll now take are as follows:
d. Add a MapKit framework for your annotations by entering #import <MapKit/MkAnnotation.h> to the @interface myPos : NSObject directive.
e. Add <MKAnnotation>, which is a protocol. I explain protocols in the “Digging the Code” section at the end of this chapter, but for now, a protocol means you’ll have to write your own annotation object that implements this protocol. Just remember that an object that adopts this protocol must implement a property called the coordinate property. Which, of course, you’ll do.
f. Set your CLLocation class reference to incorporate the geographical coordinates and altitude of the device with a variable that you’ll name coordinate, as shown in Figure 9-19. You do that with this line:
CLLocationCoordinate2D coordinate;

Figure 9-19. The finished myPos.h incorporates the geographical coordinates of your annotation class
g. You need two NSString variables to hold your titles and subtitles, which you’ll call *title and *subtitle, as follows:
NSString *title;
NSString *subtitle;
h. Finally, create @property statements for the coordinate, title, and subtitle, as shown in the code that follows. Once you’ve made these additions, save our work. Figure 9-19 shows how this file should look after you’ve made your changes and saved your work.
#import <Foundation/Foundation.h>
#import <MapKit/MkAnnotation.h>

@interface myPos : NSObject <MKAnnotation>
{
    CLLocationCoordinate2D coordinate;
    NSString *title;
    NSString *subtitle;
}

@property (nonatomic, assign) CLLocationCoordinate2D coordinate;
@property (nonatomic, copy)  NSString *title;
@property (nonatomic, copy) NSString *subtitle;

@end
18. You’re now ready to code the myPos implementation file. Click the myPos.m file located in your myMapkit_02 folder inside the root folder. Figure 9-20 shows how the myPos.m file looks when you open it. Here you synthesize your coordinate, title, and subtitle with an @synthesize statement, which includes coordinate, title, and subtitle. To do this, make a space under the mypos.h @implementation and type the following:
@synthesize coordinate, title, subtitle;

Figure 9-20. This is how your myPos implementation file looks when we open it
Your file should look similar to Figure 9-21. Save your work.
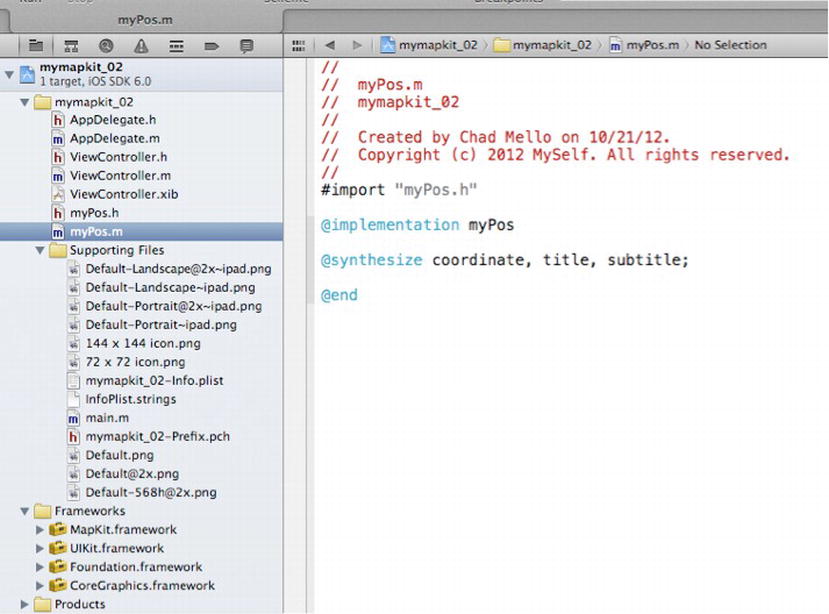
Figure 9-21. This is how the myPos implementation file looks after the synthesis
The mechanism whereby the user interacts with your app is called the user interface, abbreviated UI. This is where you lay out the visual design in your View Controller. Fortunately, this UI is fairly simple, and it won’t take you very long to define it. You’ll leave most of the hard work for MapKit to handle. All the finger gestures for zooming and scrolling around the map will be handled directly by the MapKit framework, saving you many hours and hundreds of lines of coding effort.
19. Click ViewController.xib from the Project Navigator window. Xcode automatically brings you into Interface Builder. At this point, the View Controller’s canvas has nothing on it. Find the Map View (MKMapView) control in the Object Library list at the lower right of the window and drag it onto your iPad View Controller. See Figure 9-22.

Figure 9-22. Looking at the Interface Builder. The Map View has been located in the Object library
20. As you drag the Map View onto the canvas, it instantiates itself into a blank full-screen blue image as shown in Figure 9-23. Keep dragging it until it’s roughly centered over the canvas and drop it.

Figure 9-23. Dragging an MKMapView onto the View Controller
21. Now that you have the Map View correctly placed onto the View Controller, you need a way to programmatically access it. To do that, you’ll add an outlet for the MKMapView. First, open the Assistant editor by clicking the appropriate toolbar button. You’ll see a new window with the code in the ViewController.h file visible. This is where you need to add your outlet as well as a few other modifications. See Figure 9-24.
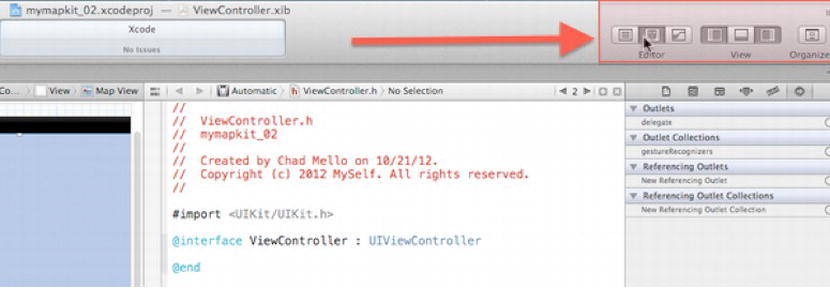
Figure 9-24. Open the Assistant editor
22. To insert an outlet, move your mouse pointer over the View Controller canvas where you just placed a new Map View. With the pointer over the Map View, hold down the Control key and start dragging it over to the header file to the right of it. At this point you will see a “fishing line” (sometimes called a line) connecting it to the MapKit, just as with buttons in earlier chapters.
23. Drag that line over to the code window where you see the source for ViewController.h. Direct the line for the outlet just below the line that reads @interface ViewController: UIViewController. Drop the outlet in place. See Figure 9-25.
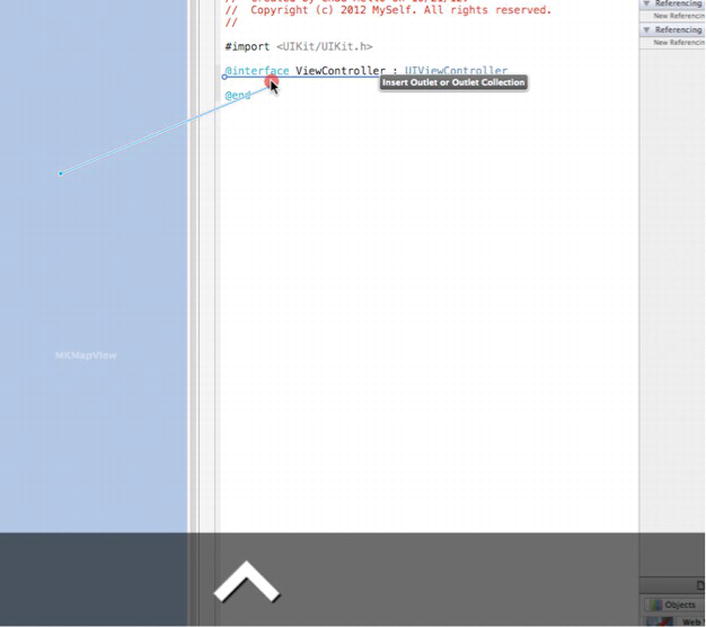
Figure 9-25. Inserting a new outlet by dragging it into the Assistant editor window
24. Name the outlet mapView while leaving the rest of the default options as they are in the dialog. Press Enter or click Connect to create the outlet. See Figure 9-26 for details.

Figure 9-26. Dropping and labeling the new outlet for your Map View. Notice the new @property line added to ViewController.h
25. Close the Assistant editor by clicking the Standard editor button to the left of the Assistant editor in the toolbar. This hides the Assistant editor from view once again. You’re finished with the Interface Builder.
Now it’s time to get serious. I’ve included some boilerplate code in DemoMonkey that you can drop into place. I’ll explain how this works for ViewController.h so you’ll know how to do it for the rest of the code. However, I’ll go over each line of code separately so you can also follow along by typing the code (which appears after step 28).
26. You’ll start, as always, with the header file. Open your header file by clicking ViewController.h inside the root project folder. It will look similar to Figure 9-27. Select all the code in the ViewController.h window and delete it. See Figure 9-27.

Figure 9-27. Select the code in ViewController.h and delete it. It will be replaced with code from DemoMonkey
27. Here’s where you can use DemoMonkey to speed up your coding efforts. Drag in the DemoMonkey code: select line 03 ViewController.h from the DemoMonkey window as shown in Figure 9-28. If you prefer to type the code, keep reading.

Figure 9-28. Drag 03 ViewController.h from the DemoMonkey window. This item contains the new code for your ViewController.h file
28. Then drag and drop it into the Code editor window. See Figure 9-29.

Figure 9-29. Drop the item from DemoMonkey into the Code editor window for ViewController.h
Let’s examine the source code for ViewController.h. Whether you typed it or dragged it from DemoMonkey, it should look like the code in Figure 9-30 and as listed here:
#import <UIKit/UIKit.h>
#import <MapKit/MapKit.h>
#import "myPos.H"
@interface ViewController : UIViewController<MKMapViewDelegate>
@property (weak, nonatomic) IBOutlet MKMapView *mapView;
@end
MKCoordinateRegion uccsRegion;
// buttons that will be on our navigation toolbar
UIBarButtonItem *mapLayer1Button;
UIBarButtonItem *mapLayer2Button;
UIBarButtonItem *mapLayer3Button;
UIBarButtonItem *userLocationButton;
UIBarButtonItem *uccsLocationButton;

Figure 9-30. New code for ViewController.h after it was dragged in from DemoMonkey
I’m going to talk a little about what you did so you have a good understanding.
- The first thing is you told your app that you’ve imported all necessary code from the MapKit framework; you did this with
#import <MapKit/MapKit.h> under the line #import <UIKit/UIKit.h> - You told the header file that you’ll be using the MKMapViewDelegate protocol. As you move around with your app, you need to update your records of where you were and where you are now. The MKMapViewDelegate protocol defines a set of optional methods that does exactly what you need to update your records. You did this by adding the <MKMapViewDelegate> protocol for the controller class:
@interface ViewController : UIViewController<MKMapViewDelegate> - Next, you defined the outlet and the property at the same time with this:
@property (weak, nonatomic) IBOutlet MKMapView *mapView - You also needed to define a region on the map that’s focused on where you are. In your case it’s the area around UCCS. You used a special data structure, designed for this very purpose, called MKCoordinateRegion:
MKCoordinateRegion uccsRegion - Lastly, you defined a few toolbar-like buttons that you want the user to see in the UI. These UIBarButtonItem classes let the user interact with your app. Each line of code defined a different button (I explain them in the next section):
// buttons that will be on our navigation toolbar
UIBarButtonItem *mapLayer1Button;
UIBarButtonItem *mapLayer2Button;
UIBarButtonItem *mapLayer3Button;
UIBarButtonItem *userLocationButton;
UIBarButtonItem *uccsLocationButton;
29. Once you’re done, save it. Your code should look like the code in Figure 9-30. You’re finished with your View Controller’s header file.
Dealing with the View Controller’s Implementation
As mentioned in the introduction to this chapter, controlling and working with the MapKit framework is not a trivial matter. Daunting as this area can be, I couldn’t leave this chapter out of the book. I feel that you’ll agree after you’ve finished this chapter.
After doing the necessary importing of your myPos header file and the synthesis of the View Controller that you just set up in the header file, you need to do a few other things:
- Set up the coordinates of the UCCS Engineering and Applied Science building in the viewDidLoad method.
- Set up your toolbar buttons and add them to your main Navigation Bar at the top of the app in the viewDidAppear method.
- Make a pin drop down onto the exact latitude and longitude set forth in the viewDidAppear and put an annotation on it that states this is the office of Dr. Lewis.
- Tell the Map View to display the user’s current location on the map in the viewDidAppear method.
- Respond accordingly when a user taps one of your buttons in the Navigation Bar.
The Map View can show the map in one of three ways:
- Standard: Displays a typical map view with street names and other details.
- Satellite: Displays an overhead view as seen from satellites orbiting above the Earth.
- Hybrid: Displays a combined view of both the Standard and the Satellite views.
You’ll set the map type to a Hybrid map by default, but the user will be able to change that by tapping one of three buttons. Also, if you’d like, you’ll be able to swap out the UCCS latitude/longitude for a different location of your choice. You just need to have those coordinates handy. You can obtain them from the web site mentioned early in this chapter or from Google Earth or Google Maps.
30. You’ll now code the viewController.m file. Open it up and you’ll see the default code, as shown in Figure 9-31; go ahead and delete that. To speed things up, you can now drag the boilerplate code from DemoMonkey using Chapter09MapKit.demoMonkey and drop it into the file. The finalized code in ViewController.m will look a quite a bit different from the original code supplied by Xcode in Figure 9-31. In case you want to type the code yourself, it is provided in its entirety at the end of this chapter. The rest of the section looks at the important parts.

Figure 9-31. The View Controller’s implementation file before coding
Let’s go through each method, starting with viewDidLoad:
- First, set the Map View to enable zoom and scroll and set the map type to Hybrid (displays both map and satellite views):
 // Setup map features
[_mapView setZoomEnabled:YES];
[_mapView setScrollEnabled:YES];
[_mapView setMapType: MKMapTypeHybrid] - Then, set up your UCCS coordinates. The positive latitude value denotes north of the equator, and the negative longitude value denotes west of the prime meridian (this is where you can place your own coordinates, if you want to):
/*
     Create region of UCCS campus centered on
     Engineering & Applied Science building.
*/
    uccsRegion.center.latitude= 38.89350;
    uccsRegion.center.longitude = -104.800500;
    uccsRegion.span.longitudeDelta = 0.01f;
    uccsRegion.span.latitudeDelta = 0.01f;
Now let’s look at viewDidAppear:
- First, create a new instance of your annotation class that you defined inside the myPos files:
// Create pin (annotation) to display at our UCCS coordinate
myPos *ann = [[myPos alloc] init]; - Next, define your buttons that will be displayed on the Navigation Bar. There are five buttons in all: two location buttons and three buttons related to the type of map the user wants to see. When you create these buttons, you pass in the method that will handle the button presses:
- barButtonMapLayer1Pressed, barButtonMapLayer2Pressed, and barButtonMapLayer3Pressed methods handle the button taps that change the map type.
- whereAmI, and whereIsUCCS handle the location buttons when the user taps them.
// Initialize bar buttons for selecting map overlays
mapLayer1Button =[[UIBarButtonItem alloc] initWithTitle:
                      @"Map" style:UIBarButtonItemStyleBordered target:self action:@selector(barButtonMapLayer1Pressed:)];

mapLayer2Button =[[UIBarButtonItem alloc] initWithTitle:
                      @"Satellite" style:UIBarButtonItemStyleBordered target:self action:@selector(barButtonMapLayer2Pressed:)];

mapLayer3Button =[[UIBarButtonItem alloc] initWithTitle:
                      @"Hybrid" style:UIBarButtonItemStyleBordered target:self action:@selector(barButtonMapLayer3Pressed:)];

userLocationButton =[[UIBarButtonItem alloc] initWithTitle:
                         @"Where Am I?" style:UIBarButtonItemStyleBordered target:self action:@selector(whereAmI:)];

uccsLocationButton =[[UIBarButtonItem alloc] initWithTitle:
                         @"Where is UCCS?" style:UIBarButtonItemStyleBordered target:self action:@selector(whereIsUCCS:)];
n:region animated:YES];. - Now add your new buttons to the Navigation Bar. Do that by adding the buttons into arrays and passing one array to the setLeftBarButtonItems method and the other array to the setRightBarButtonItems method of your navigationItem class.
//array that holds our right-group toolbar buttons
NSMutableArray *arr = [NSMutableArray arrayWithObjects:mapLayer3Button, mapLayer2Button, mapLayer1Button,nil];

//add our right-group toolbar buttons
[self.navigationItem setRightBarButtonItems: arr animated:YES];

//array that holds our left-group toolbar buttons
arr = [NSMutableArray arrayWithObjects:userLocationButton, uccsLocationButton,nil];

//add our left-group toolbar buttons
[self.navigationItem setLeftBarButtonItems: arr animated:YES]; - Next, set the title of your application into the top Navigation Bar so that it’s clearly visible.
//set app title on the navigation bar
self.navigationItem.title=@"My Advanced MapKit App"; - Next, set the title, subtitle, and the coordinate of your annotation object. Note that you set the coordinate to be that of the UCCS region you initialized in the viewDidLoad.
//setup our annotation
ann.title = @"Chad Mello";
ann.subtitle=@"UCCS Engineering & Applied Science";
ann.coordinate = uccsRegion.center;
- The next line seems innocuous, but it’s a rather subtle trick. This code isn’t even required; but if you want to provide some of your own fancy modifications to the way annotations behave and look, you’ll need to supply your own implementation for doing that. Invoking the setDelegate method of the Map View will cause it to call your own delegate for getting an Annotation View for display. I don’t elaborate too much on this here, but be aware that to do highly customizable things with MapKit (custom shapes and overlays, custom annotations, and so on), this is the technique you’ll find yourself using. I briefly cover the viewForAnnotation delegate associated with this code, but I don’t get very detailed.
/*
  inform the mapview that we will supply
  the view for displaying our pin (annoation).
*/
[_mapView setDelegate:self]; - Now you need to drop your annotation/pin onto the map at the center of the location you previously specified when you set ann.coordinate = uccsRegion.center.
//drop pin in front of UCCS Engineering building.
[_mapView addAnnotation:ann]; - Lastly, for this method, tell your Map View to display an animated point on the map that shows where the user is currently standing.
//tell mapview to show where user currently is on the map
_mapView.showsUserLocation = YES;
Now it’s time to look at the whereAmI method:
- Begin by defining a region that stores the coordinates of where the user is currently standing. You need to set the region’s center to be the user’s location. These coordinates are retrieved from the Map View itself. Having this function built into the Map View spares you from having to do any more coding to get this information:
//zoom mapview in to where user is located
MKCoordinateRegion region;
region.center = self.mapView.userLocation.coordinate; - Set up your span area and define the span size:
MKCoordinateSpan span;
span.latitudeDelta  = 1;
span.longitudeDelta = 1; - Set the region span using the span you just created. To do that, you need to invoke the setRegion method of the Map View, which forces the Map View to locate that region on the map, move to it, and zoom it into view. Note that whereIsUCCS works the same way, but it only needs to call the setRegion method; the rest of the work was done in the viewDidLoad method:
region.span = span;
[self.mapView setRegion:region animated:YES]; - Finally, you handle the user’s touches to change the map view type. Note: the user may choose any map type at any time by touching the button of that desired type:
-(void)barButtonMapLayer1Pressed:(id)sender{

    // Switch map layer to standard map view
    [_mapView setMapType: MKMapTypeStandard];
}

-(void)barButtonMapLayer2Pressed:(id)sender{

    // Switch map layer to satellite view
    [_mapView setMapType: MKMapTypeSatellite];
}

-(void)barButtonMapLayer3Pressed:(id)sender{

    // Switch map layer to hybrid (both map and satellite) view
    [_mapView setMapType: MKMapTypeHybrid];
}
viewForAnnotation
To wrap things up, as promised, there are a couple things you need to know to understand the viewForAnnotation code (which is in DemoMonkey under “07 ViewController.m: Misc Functions” and is also listed at the end of the chapter).
- viewForAnnotation creates a delegate method that manages your annotation during zooming and scrolling. In other words, it keeps track of where the user is—even when the user scrolls, zooms in, or zooms out of your map.
- viewForAnnotation creates a static identifier, which controls your queue. If it can’t dequeue your annotation, it will allocate one that you choose. I’ve also included code that changes the pin color to red, and I’ve allowed callout views.
-(MKAnnotationView*)mapView:(MKMapView*)mV viewForAnnotation
Modifying the AppDelegate.m Implementation file
Usually, you wouldn’t have to do anything in this part of the code, but this is a quick, Single View Application yet you’re placing buttons on the Navigation Bar at the top. A simple UIViewController doesn’t inherently possess the ability to display its own toolbar-like Navigation Bar. In order to get this Navigation Bar, you’ve to rely on another type of View Controller called UINavigationController. In AppDelegate.m, you set a UINavigationController to be the Root Controller (the starting controller) instead of your own ViewController class.
The didFinishLaunchingWithOptions method listed next sets your ViewController inside the UINavigationController. Now, the UINavigationController can draw a Navigation Bar at the top of the view that can hold your tool buttons. You can replace all the code in AppDelegate.m from DemoMonkey, line “08 AppDelegate.m”:
- (BOOL)application:(UIApplication *)application didFinishLaunchingWithOptions:(NSDictionary *)launchOptions
{
   // Here, we inject a standard navigation controller so that we can utilize the navigation toolbar.
   // A stand-alone single view UI controller cannot display a navigation toolbar on its own.
   UINavigationController *navcon = [[UINavigationController alloc] init];
   // create our app window
   self.window = [[UIWindow alloc] initWithFrame:[[UIScreen mainScreen] bounds]];
   // load our main map view controller.
   self.viewController = [[ViewController alloc] initWithNibName:@"ViewController" bundle:nil];
   // push our main map view controller onto the navigation controller's stack
   [navcon pushViewController:self.viewController animated:NO];
   //set the root controller to our navigation controller
   self.window.rootViewController = navcon;
   [self.window makeKeyAndVisible];
   return YES;
}
The End Result: Running Your iPad MapKit App
If everything was entered correctly, you should be able to compile this code and run it in the iPad Simulator. If you get errors or other messages while trying to run your app, look over each file very carefully and correct any bugs you see.
Before attempting to do anything else, though, save your code. You need to get yourself in the habit of saving your code often. As we were walking through this exercise, you should’ve been saving your code after each major step, and maybe every so often in between as well. As shown in Figure 9-32, click the Run button to see the results of your hard work.

Figure 9-32. Click the Run button to compile and run your program in the iPad Simulator
After a few moments, you should see your app’s splash screen in the Simulator. See Figures 9-33, 9-34, and 9-35.

Figure 9-33. Your app’s splash screen is shown while it loads into memory

Figure 9-34. Your app’s user interface showing the annotation (red pin) and the user’s current location (blue dot)

Figure 9-35. Your app’s user interface showing the annotation (red pin) and the UCCS Engineering & Applied Science building, after touching the Where is UCCS? button
Being a programmer is hard work, but it’s also rewarding! In this chapter, you created a somewhat robust app—but it’s nowhere near the professional quality people have come to expect from modern apps. Creating a fully functioning iPhone or iPad app can take weeks, even months in many cases. Try building this app out on your own. Maybe you can add some more features, buttons, and views to extend it far beyond what we covered here. With enough effort, you could be on your way to creating an app worthy of publishing on Apple’s app store for the whole world to see and use.
Source for ViewController Implementation
As mentioned earlier in the chapter, here’s the code for the View Controller implementation file so you can type it in yourself:
#import "ViewController.h"

@interface ViewController ()

@end

@implementation ViewController

- (void)viewDidLoad
{
    [super viewDidLoad];

    // Setup map features
    [_mapView setZoomEnabled:YES];
    [_mapView setScrollEnabled:YES];
    [_mapView setMapType: MKMapTypeHybrid];

    /*
     Create region of UCCS campus centered on
     Engineering & Applied Science building.
    */
    uccsRegion.center.latitude= 38.89350;
    uccsRegion.center.longitude = -104.800500;
    uccsRegion.span.longitudeDelta = 0.01f;
    uccsRegion.span.latitudeDelta = 0.01f;
}

-(void) viewDidAppear:(BOOL)animated
{
        // Create pin (annotation) to display at our UCCS coordinate
    myPos *ann = [[myPos alloc] init];

    // Initialize bar buttons for selecting map overlays
    mapLayer1Button =[[UIBarButtonItem alloc] initWithTitle:
                      @"Map" style:UIBarButtonItemStyleBordered target:self action:@selector(barButtonMapLayer1Pressed:)];

    mapLayer2Button =[[UIBarButtonItem alloc] initWithTitle:
                      @"Satellite" style:UIBarButtonItemStyleBordered target:self action:@selector(barButtonMapLayer2Pressed:)];

    mapLayer3Button =[[UIBarButtonItem alloc] initWithTitle:
                      @"Hybrid" style:UIBarButtonItemStyleBordered target:self action:@selector(barButtonMapLayer3Pressed:)];

    userLocationButton =[[UIBarButtonItem alloc] initWithTitle:
                         @"Where Am I?" style:UIBarButtonItemStyleBordered target:self action:@selector(whereAmI:)];

    uccsLocationButton =[[UIBarButtonItem alloc] initWithTitle:
                         @"Where is UCCS?" style:UIBarButtonItemStyleBordered target:self action:@selector(whereIsUCCS:)];

    //array that holds our right-group toolbar buttons
    NSMutableArray *arr = [NSMutableArray arrayWithObjects:mapLayer3Button, mapLayer2Button, mapLayer1Button,nil];

    //add our right-group toolbar buttons
    [self.navigationItem setRightBarButtonItems: arr animated:YES];

    //array that holds our left-group toolbar buttons
    arr = [NSMutableArray arrayWithObjects:userLocationButton, uccsLocationButton,nil];

    //add our left-group toolbar buttons
    [self.navigationItem setLeftBarButtonItems: arr animated:YES];

    //set app title on the navigation bar
    self.navigationItem.title=@"My Advanced MapKit App";

    //setup our annotation
    ann.title = @"Chad Mello";
    ann.subtitle=@"UCCS Engineering & Applied Science";
    ann.coordinate = uccsRegion.center;

    /*
     inform the mapview that we will supply
     the view for displaying our pin (annoation).
    */

    [_mapView setDelegate:self];

    //drop pin in front of UCCS Engineering building.
    [_mapView addAnnotation:ann];


    //let mapview to show where user currently is on the map
    _mapView.showsUserLocation = YES;

    [super viewDidAppear:animated];

}

-(void)whereAmI:(id)sender{

    //zoom mapview in to where user is located

    MKCoordinateRegion region;
    region.center = self.mapView.userLocation.coordinate;

    MKCoordinateSpan span;
    span.latitudeDelta  = 1;
    span.longitudeDelta = 1;
    region.span = span;

    [self.mapView setRegion:region animated:YES];

}

-(void)whereIsUCCS:(id)sender{

    // zoom mapview in to where UCCS campus is located
    [_mapView setRegion:uccsRegion animated:YES];
}

-(void)barButtonMapLayer1Pressed:(id)sender{

    // Switch map layer to standard map view
    [_mapView setMapType: MKMapTypeStandard];
}

-(void)barButtonMapLayer2Pressed:(id)sender{

    // Switch map layer to satellite view
    [_mapView setMapType: MKMapTypeSatellite];
}

-(void)barButtonMapLayer3Pressed:(id)sender{

    // Switch map layer to hybrid (both map and satellite) view
    [_mapView setMapType: MKMapTypeHybrid];
}

-(MKAnnotationView*)mapView:(MKMapView*)mV viewForAnnotation:(id<MKAnnotation>)annotation
{
    // Return annotation view that will make the
    // annotation visible on the map view.

    MKPinAnnotationView *pinView = nil;
    if (annotation!=_mapView.userLocation)
    {
        static NSString *defaultPinID = @"com.rorylewis";
        pinView=(MKPinAnnotationView*)[_mapView dequeueReusableAnnotationViewWithIdentifier:defaultPinID];

        if(pinView==nil)
            pinView=[[MKPinAnnotationView alloc] initWithAnnotation:annotation reuseIdentifier:defaultPinID];

        pinView.pinColor=MKPinAnnotationColorRed;
        pinView.canShowCallout=YES;
        pinView.animatesDrop=YES;
    }
    else
    {

        [_mapView.userLocation setTitle:@"I am here!"];
    }

    return pinView;
}

- (void)didReceiveMemoryWarning
{
    [super didReceiveMemoryWarning];
    // Dispose of any resources that can be recreated.
}

- (NSUInteger)supportedInterfaceOrientations
{
    // We support all orientations, but NOT upside down.
    return UIInterfaceOrientationMaskAllButUpsideDown;
}

- (UIInterfaceOrientation)preferredInterfaceOrientationForPresentation
{
    // We "suggest" or "prefer" rotating to the left for best view.
    return UIInterfaceOrientationLandscapeLeft;
}

@end