
Chapter 14
Game Center
Game Center is Apple's social network solution. It enables you to authenticate players, store their scores and display leaderboards, and track and display their achievement progress. Furthermore, players can invite friends to play or choose to quickly find a match to play a game with anyone.
In this chapter, I'll introduce you not only to Game Center and the Game Kit API but also to the basics of online multiplayer programming and, of course, how to use Game Center together with cocos2d.
Since a lot of Apple's examples are intentionally incomplete, I'll be developing a GameKitHelper class in this chapter. This class will remove some of the complexities of Game Center programming from you. It will make it easier for you to use Game Kit and Game Center features, and it will allow you to easily reuse the same code for other games.
To configure your application for use with Game Center, you are going to use iTunes Connect. The information on the iTunes Connect web site is considered confidential Apple information, so I can't discuss it in this book. However, I will point you to Apple's excellent documentation for each step—and quite frankly, setting up leaderboards and achievements on iTunes Connect is possibly the easiest aspect of Game Center.
Enabling Game Center
Game Center is the service that manages and stores player accounts and each player's friend lists, leaderboards, and achievements. This information is stored online on Apple's servers and accessed either by your game or by the Game Center app that is installed on all devices running iOS 4.1 or newer.
NOTE: Game Center is available only on devices running iOS 4.1 and newer and is not available on first-generation devices or the iPhone 3G. Game Center currently runs on iPod touch second, third, and fourth generations; iPhone 3GS and iPhone 4; and iPad; as long as they have iOS 4.1 or higher installed. The easiest way for a user to check whether their device supports Game Center is to locate the Game Center app on the device. If it exists, the device is ready for Game Center; otherwise, it is not. If the Game Center app is not available but the device is eligible for upgrading to iOS 4.1, Game Center support will become available after upgrading the device's operating system via iTunes.
If you don't have access to a Game Center–enabled device, you can still program and test Game Center features using the iPhone/iPad Simulator. With the exception of matchmaking, all Game Center features can be tested in the simulator.
On the other side, the Game Kit API is what you use to program Game Center features. Game Kit provides programmatic access to the data stored on the Game Center servers and is able to show built-in leaderboards, achievements, and matchmaking screens. But Game Kit also provides features besides Game Center—for example, peer-to-peer networking via Bluetooth and voice chat. These are the only two Game Kit features already available on devices running iOS 3.0 or newer.
The final ingredient in this mix is iTunes Connect. You set up your game's leaderboards and achievements through the iTunes Connect web site. But most importantly, it allows you to enable Game Center for your game in the first place. I'll start with that step first, so you can and should do this before you have even created an Xcode project for your game.
Your starting point for learning more about Game Center and the steps involved in creating a game that uses Game Center is at Apple's Getting Started with Game Center web site: http://developer.apple.com/devcenter/ios/gamecenter.
For a high-level overview of Game Center, I recommend reading the Getting Started with Game Center document: http://developer.apple.com/ios/download.action?path=/ios/getting_started_with_ios_4.1/gettingstartedwithgamecenter.pdf.
Creating Your App in iTunes Connect
The very first step is to log in with your Apple ID on the iTunes Connect web site: http://itunesconnect.apple.com.
Then you want to add a new application, even if it doesn't exist yet. For most fields that iTunes Connect asks you to fill out, you can enter bogus information. There are only two settings that you have to get right. The first is, obviously, to enable Game Center when iTunes Connect asks you whether the new application should support Game Center.
The other is to enter a Bundle ID (also referred to as Bundle Identifier) that matches the one used in the Xcode project. Since you don't have an Xcode project yet, you are free to choose any Bundle ID you want. Apple recommends using reverse domain names for Bundle IDs with the app's name appended at the end. The catch is that the Bundle ID needs to be unique across all App Store apps, and there are tens of thousands of them.
For the book's example, I've chosen com.learn-cocos2d to be the app's Bundle ID. Since this Bundle ID is now taken by me, you will have to use your own Bundle ID. If you want, you can simply suffix it with a string of your choosing or choose an entirely new string. Just remember to use your own Bundle ID whenever I refer to the com.learn-cocos2d Bundle ID.
For a detailed description of how to create a new app and how to set up Game Center for an app on iTunes Connect, please refer to Apple's iTunes Connect Developer Guide: http://itunesconnect.apple.com/docs/iTunesConnect_DeveloperGuide.pdf.
Specifically, the section labeled Game Center explains in great detail how to manage the Game Center features on iTunes Connect.
Setting Up Leaderboards and Achievements
For the most part, after enabling Game Center for an app, what you'll be doing on iTunes Connect is setting up one or more leaderboards, which will hold your players' scores or times, as well as setting up a number of achievements that players can unlock while playing your game.
To access the Game Center leaderboards and achievements, you refer to them by ID. For leaderboards, you should note the leaderboard category ID strings, and for achievements the achievement ID strings, to be able to query and update the correct leaderboards and achievements.
For the purpose of this chapter, I have set up one leaderboard with a score format of Elapsed Time and a leaderboard category ID of Playtime. For achievements I've entered one achievement, with an achievement ID of PlayedForTenSeconds, that grants the player five achievement points.
Feel free to set up additional leaderboards and achievements, but keep in mind that the example code in this chapter relies on at least one leaderboard with a category ID of Playtime and one achievement with an achievement ID of PlayedForTenSeconds to exist.
Creating a Cocos2d Xcode Project
Now it is time to create the actual Xcode project. You can start the project from any cocos2d template—for example, the cocos2d HelloWorld application template. You can also use an already existing project, but you may have to upgrade to cocos2d v1.0 if your project was started with a cocos2d version prior to v0.99.5.
You can determine which version of cocos2d your project is using in three ways. First, if your project is built and you run it, one of the first lines in the Debugger Console window will read something like this:
2010-10-07 15:33:58.363 Tilemap[1046:207] cocos2d: cocos2d v1.0.1
Or, you can use the global method cocos2dVersion to print it out yourself—for example, using CCLOG in this way:
CCLOG(@"%@", cocos2dVersion());
The final option is to simply look it up. In your project, in the group containing the cocos2d sources, locate the file cocos2d.mand open it. It contains the version string in plain text:
static NSString *version = @"cocos2d v1.0.1";
If you are facing the problem of having to upgrade cocos2d from a previous version in an existing project, please refer to this short tutorial on upgrading cocos2d in an existing project with Xcode 4: www.learn-cocos2d.com/2011/05/update-cocos2d-iphone-existing-project.
TIP: If you grow tired of the error-prone and tedious upgrade process, then you might be interested in Kobold2D, which is discussed in Chapter 16 and available from www.kobold2d.org. With Kobold2D, upgrading the cocos2d version used in a project becomes as easy as moving the project to a different folder and adding it to the Kobold2D workspace.
Starting with version 0.99.5, the RootViewController class, which is derived from UIViewController, became part of every cocos2d project. Game Center needs a UIViewController to be able to show its built-in UIKit user interface, and having the RootViewController class available makes Game Center integration a lot easier. The GameKitHelper class will make use of the RootViewController class. And in case you're wondering, another benefit of the RootViewController class is that it allows you to enable autorotation in your app. You'll learn more about autorotation in Chapters 15 and 16.
Configuring the Xcode Project
The first thing you should do now is enter the Bundle ID you've entered for your app in iTunes Connect. Remember that while I'm using com.learn-cocos2d as the Bundle ID for the example projects, you can't use the same because it's already taken now, and Bundle IDs must be unique.
Locate the file Info.plistin your project's Resources folder and select it. You can then edit it in the Property List editor, as shown in Figure 14–1. You will want to set the Bundle identifier key to have the same value as your app's Bundle ID. In my case that will be com.learn-cocos2d, and in your case it will be whatever string you chose as the app's Bundle ID.
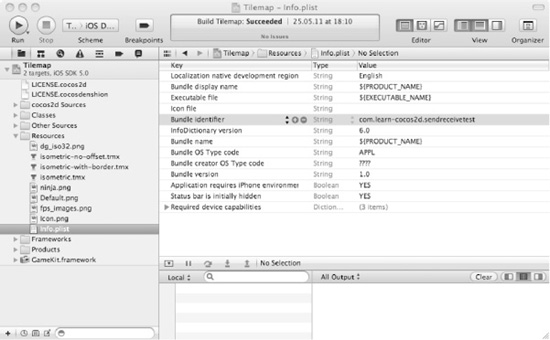
Figure 14–1. The Bundle identifier key must match your app's Bundle ID.
There are actually two ways to use Game Kit—and Game Center for that matter. One is to require it, which means your app will runonly on devices that support Game Center and are running iOS 4.1 or newer. However, for the examples I've written, I did not make Game Center a requirement because it's relatively easy to check whether Game Center is available and then not use it if it isn't. This allows your game to be run on older devices, just without all the Game Center features.
But if you do want to require Game Kit and Game Center to be present, you can set this in your app's Info.plist UIRequiredDeviceCapabilities list. By adding another key named gamekit with a Boolean value and checking the check box, as shown in Figure 14–2, you can tell iTunes and potential users that your app requires Game Kit and thus requires iOS 4.1 or newer.
You can learn more about iTunes requirements and the UIRequiredDeviceCapabilities key in Apple's Build Time Configuration documentation: http://developer.apple.com/library/ios/#documentation/iPhone/Conceptual/iPhoneOSProgrammingGuide/BuildTimeConfiguration/BuildTimeConfiguration.html.
CAUTION: If you add the gamekit key but later decide you don't want to make Game Kit a requirement, make sure you remove the gamekit entry. If you simply uncheck the gamekit check box, it actually tells iTunes that your app is not available on devices that do support Game Center. That's exactly the opposite of what you might expect. To actually make Game Kit an optional requirement, you'll have to remove the gamekit entry altogether.

Figure 14–2. Making Game Kit a strict requirement
Next, you need to add the Game Kit framework to your Xcode project—more specifically, to the desired application target in your project in case you have several targets. Select the root entry in the Project Navigator, which is the project itself and labeled Tilemap in this example. Then select the appropriate target and switch to the Build Phases tab. Unfold the Link Binary With Libraries section to see the list of libraries this target is currently linked with. Below that list are two + and – buttons with which you can add or remove libraries.
To add another library, click the + button. You'll see another list pop up like the one in Figure 14–3. Locate the GameKit.frameworkentry and click the Add button. Since there are a lot of libraries to choose from and they're not always sorted alphabetically, it helps to filter the list by entering GameKit in the text field above the list.
The GameKit.framework will be added to the Linked Libraries list when you click the Add button. By default, new libraries are added as Required, which is displayed to the right of each library. The setting Required means that your app will work only on devices where the GameKit.framework library is available. If that is what you want and you've added the gamekit key to Info.plist, you can leave it at that. Otherwise, change the setting to Optional in order to be able to run the app even on devices that don't have Game Center available. We can account for that with a relatively simple check in code (discussed shortly in Listing 14–3) and then disable any Game Kit features in case a device doesn't support Game Kit.
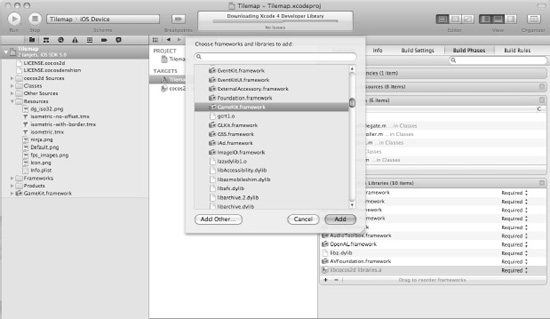
Figure 14–3. Adding GameKit.framework
Finally, you will want the GameKit.h header file to be available in all of your project's source files. Instead of adding it to each and every source file, you should add it to your project's Prefix.pchfile. This is the precompiled header that contains header files from external frameworks to allow the project to compile faster. But it also has the added benefit that every header file added to the prefix header will make its definitions available to every source code file in the current project.
The prefix header file is always prefixed with the project's name. So, for example, in the case of the tilemap project, the file name is Tilemap_Prefix.pch, and the file can be found in the Other Sources group. Open the one in your project and add the GameKit header to it, as shown in Listing 14–1.
Listing 14–1. Adding the GameKit Header to Your Project's Prefix Header
#ifdef __OBJC__

    #import <Foundation/Foundation.h>

    #import <UIKit/UIKit.h>

#import <GameKit/GameKit.h>

#endif
That's it—your app is set up for use with Game Center.
Game Center Setup Summary
To summarize, enabling Game Center for your app requires the following steps:
- Create a new app in iTunes Connect:
- Specify a Bundle ID for the new app.
- Enable Game Center for this app.
- Set up your initial leaderboards and achievements in iTunes Connect:
- Note the leaderboard category IDs and achievement IDs. (Note that you will likely continue to edit and add leaderboards and achievements throughout the development of your game.)
- Create or upgrade the Xcode project:
- Make sure to use at least cocos2d v0.99.5.
- Edit Info.plist:
- Enter the app's Bundle ID in the
Bundle identifierfield. - Optionally require Game Kit by adding a Boolean value labeled
gamekitto theUIRequiredDeviceCapabilitieslist.
- Enter the app's Bundle ID in the
- Add the necessary Game Kit references:
- Add the GameKit.framework linked library to each target. Change its
Typesetting fromRequiredtoWeakif Game Kit support is optional. - Add
#import <GameKit/GameKit.h>to your project's prefix header file.
- Add the GameKit.framework linked library to each target. Change its
Before you proceed, make sure you have followed each step. You can always go back and make the necessary changes later. However, if you don't do all of these steps at the beginning, chances are that you will get errors or something won't work, but the associated error message won't necessarily point you to a mistake or oversight concerning one of these steps.
Common causes for Game Center to not work properly are a mismatch between the Bundle ID in the project's Info.plist file and the Bundle ID set up for your app in iTunes Connect.
Game Kit Programming
Before I get into programming Game Center with the Game Kit API, I'd like to mention the two important resources on Apple's developer web site.
There is the Game Kit Programming Guide, which provides a high-level, task-based overview of Game Kit and Game Center concepts: http://developer.apple.com/library/ios/#documentation/NetworkingInternet/Conceptual/GameKit_Guide/Introduction/Introduction.html.
For in-depth detailed information about the Game Center classes and protocols, you can refer to the Game Kit Framework Reference: http://developer.apple.com/library/ios/#documentation/GameKit/Reference/GameKit_Collection/_index.html.
The GameKitHelper Delegate
I mentioned earlier in this chapter that I will use a GameKitHelper class to provide easier access to Game Kit and Game Center features. Since connecting to an online server causes responses to be delayed by several milliseconds, if not seconds, it's a good idea to have a central class manage all Game Center–related features. All the Game Center examples are based on the isometric game developed in Chapter 11. You'll find the following example code in the Tilemap11 project.
One of your game's classes can then use this functionality and register itself as a GameKitHelper delegate to get notified of events as they occur. To do that, the delegate must implement the GameKitHelper@protocol that is defined in the GameKitHelper.h header file (Listing 14–2). Only classes implementing this protocol can be assigned to the GameKitHelperdelegate property to receive the protocol messages. The protocol is simply a list of method definitions that a class using the protocol must implement. If any of the methods in the protocol aren't implemented, the compiler will let you know about that.
Listing 14–2. The GameKitHelper Header File
#import "cocos2d.h"

#import <GameKit/GameKit.h>


@protocol GameKitHelperProtocol

-(void) onLocalPlayerAuthenticationChanged;

-(void) onFriendListReceived:(NSArray*)friends;

-(void) onPlayerInfoReceived:(NSArray*)players;

@end


@interface GameKitHelper : NSObject

{

    id<GameKitHelperProtocol> delegate;

    bool isGameCenterAvailable;

    NSError* lastError;

}


@property (nonatomic, retain) id<GameKitHelperProtocol> delegate;
@property (nonatomic, readonly) bool isGameCenterAvailable;

@property (nonatomic, readonly) NSError* lastError;


+(GameKitHelper*) sharedGameKitHelper;


// Player authentication, info

-(void) authenticateLocalPlayer;

-(void) getLocalPlayerFriends;

-(void) getPlayerInfo:(NSArray*)players;

@end
For your convenience, the GameKitHelper class also stores the last error in its lastError property. This allows you to check whether any error occurred and, if so, what kind of error, without actually receiving the Game Center messages directly. The GameKitHelper class is a singleton, which was described in Chapter 3, so I'll leave the singleton-specific code out of the discussion.
The remaining properties and methods will be discussed shortly. For now, let's take a look at how the TileMapLayer class is extended so that it can function as the delegate for GameKitHelper. The essential changes to the header file are importing GameKitHelper.h and specifying that TileMapLayer implements GameKitHelperProtocol:
#import "GameKitHelper.h"


@interface TileMapLayer : CCLayer <GameKitHelperProtocol>

{

    …

}
Then you can set the TileMapLayer class to be the delegate of the GameKitHelper class, in the init method:
GameKitHelper* gkHelper = [GameKitHelper sharedGameKitHelper];

gkHelper.delegate = self;

[gkHelper authenticateLocalPlayer];
Note that you are responsible for setting the GameKitHelper delegate back to nil when appropriate—for example, shortly before changing scenes. Because GameKitHelper retains the delegate, it will not be released from memory, even if it otherwise would (for example, during a scene change). That would not only keep the delegate itself in memory but all of its member variables as well, including all of its children if it's a CCNode class.
Checking for Game Center Availability
The GameKitHelper class starts by checking for Game Center availability right in its init method (Listing 14–3). It needs to do that only once because the conditions never change while the app is running.
Listing 14–3. Testing for Game Center Availability
// Test for Game Center availability

Class gameKitLocalPlayerClass = NSClassFromString(@"GKLocalPlayer");

bool isLocalPlayerAvailable = (gameKitLocalPlayerClass != nil);


// Test if device is running iOS 4.1 or higher

NSString* reqSysVer = @"4.1";

NSString* currSysVer = [[UIDevice currentDevice] systemVersion];

bool isOSVer41 = ([currSysVer compare:reqSysVer

    options:NSNumericSearch] != NSOrderedAscending);


isGameCenterAvailable = (isLocalPlayerAvailable && isOSVer41);
The first test is simply to check whether a specific Game Center class is available. In this case, the Objective-C runtime method NSClassFromString is used to get one of the Game Center classes by name. If this call returns nil, you can be certain that Game Center is unavailable.
But it's not quite that simple. Because Game Center was already partially available in beta versions prior to iOS 4.1, you also need to check whether the device is running at least iOS 4.1. This is done by comparing the reqSysVer string with the systemVersion string.
Once both checks are made, the results are combined using the && (and) operator, so that both must be true for isGameCenterAvailable to become true. The isGameCenterAvailable variable is used to safeguard all calls to Game Center functionality within the GameKitHelper class. This avoids accidentally calling Game Center functionality when it is not available, which would crash the application.
Note that this is how Apple recommends to check for Game Center availability. You should not try any other methods—for example, determining the type of device your game is running on. While certain devices are excluded from using Game Center, this is already accounted for with the preceding check.
Authenticating the Local Player
The local player is a fundamental concept to Game Center programming. It refers to the player account that is signed into the device. This is important to know because only the local player can send scores to leaderboards and report achievement progress to the Game Center service. The very first thing a Game Center application needs to do is authenticate the local player. If that fails, you cannot use most of the Game Center services, and in fact Apple recommends not using any Game Center functionality unless there is an authenticated local player.
In the GameKitHelperinit method, the registerForLocalPlayerAuthChange method is called so that GameKitHelper receives events concerning authentication changes for the local player. This is the only Game Center notification that is sent through NSNotificationCenter. You register a selector to receive the message, as shown in Listing 14–4.
Listing 14–4. Registering for Local Player Authentication Changes
-(void) registerForLocalPlayerAuthChange

{

    if (isGameCenterAvailable == NO)

        return;


    NSNotificationCenter* nc = [NSNotificationCenter defaultCenter];

    [nc addObserver:self

           selector:@selector(onLocalPlayerAuthenticationChanged)

               name:GKPlayerAuthenticationDidChangeNotificationName

             object:nil];

}
As you can see, isGameCenterAvailable is used here to skip the rest of the method in case Game Center isn't available. You'll notice other methods doing the same thing, and I'll refrain from repeating this in the book's code.
The actual method being called by NSNotificationCenter simply forwards the message to the delegate:
-(void) onLocalPlayerAuthenticationChanged

{

    [delegate onLocalPlayerAuthenticationChanged];

}
NOTE: The local player's signed-in status may actually change while the game is in the background and the user runs the Game Center app and signs out. This is because of the multitasking nature of iOS 4.0 and newer. Essentially, your game must be prepared to handle the local player logging out and some other player signing in at any time during game play. Typically, you should end the current game session and return to a safe place—for example, the main menu. But you should consider saving the current state of the game for each local player as they sign out so that when a particular local player signs back in, the game continues exactly where that player left the game.
The actual authentication is performed by the authenticateLocalPlayer method, in Listing 14–5.
Listing 14–5. Authenticating the Local Player
-(void) authenticateLocalPlayer

{

    GKLocalPlayer* localPlayer = [GKLocalPlayer localPlayer];

    if (localPlayer.authenticated == NO)

    {

        [localPlayer authenticateWithCompletionHandler:

        ^(NSError* error)

        {

            [self setLastError:error];

        }];

    }

}
At first glance, that's relatively straightforward. The localPlayer object is obtained, and if it's not authenticated, the authenticateWithCompletionHandler method is called. And the NSError object returned by the method is set to the lastError and … hey, wait a second. That's all part of the method's parameter?
Yes. These inline methods are called block objects. I'll tell you more about them in the next section. For now, you only need to know that the block object is a C-style method that's passed as a parameter to the authenticateWithCompletionHandler method. It's run only after the authentication request has returned from the server.
If you call the authenticateLocalPlayer method, your game will display the Game Center sign-in dialog, shown in Figure 14–4. If you have an Apple ID, you can sign in with your Apple ID and password. Or you can choose to create a new account.

Figure 14–4. Game Center sign-in dialog
But there's a third possibility—if Game Center detects that there's already a signed-in player on this device, it will simply greet you with a “welcome back” message. How do you sign out in that case? This is done through the Game Center app, which also exists on the iPhone/iPad Simulator for that very reason. If you run the Game Center app, select the first tab that reads either Me or Sandbox, and then click the label at the bottom that starts with Account:, and you'll get a pop-up dialog that allows you to view your account or sign out. After signing out through the Game Center app, the next time you run your app and it's going through the player authentication process, the sign-in dialog in Figure 14–4 will be shown again.
NOTE: If the [GKLocalPlayer localPlayer].underage property is set after the local player was authenticated, some Game Center features are disabled. You can also refer to the underage property if your game should disable optional features that are not suitable for underage players.
Now, about error handling, you'll notice that GameKitHelper uses the setLastError method wherever there's an error object returned. This allows the delegate class to check whether any error occurred through the lastError property. If it is nil, then there was no error.
However, only the last error object is kept around, and the next method returning an NSError object will replace the previous error, so it is crucial to check for the lastError property right away if error handling is important in that particular case. In some cases, you can safely ignore errors. They might lead only to temporary problems, like an empty friends list. Regardless, the setLastError message copies the new error after releasing the old one and then prints out diagnostic information so that you can always keep an eye on the kinds of errors that occur during development:
 -(void) setLastError:(NSError*)error

{

    [lastError release];

    lastError = [error copy];


    if (lastError != nil)

        NSLog(@"GameKitHelper ERROR: %@", [[lastError userInfo] description]);

}
If you receive an error and would like to know more about it, you can refer to Apple's Game Kit Constants Reference, which describes the error constants defined in the GameKit/GKError.h header file. You can find the Constants Reference here: http://developer.apple.com/library/ios/#documentation/GameKit/Reference/GameKit_ConstantsRef/Reference/reference.html.
After the local player has successfully signed in, you can access his friend list, leaderboards, and achievements. But before I get to that, let's sidestep for a moment and review the important aspects of block objects.
Block Objects
The inline method shown in Listing 14–5 is called a block object and commonly referred to simply as blocks. You might have heard of closures, anonymous functions, or lambda in other languages, which are essentially the same concept. Block objects are a C-language extension introduced by Apple to make multithreaded and asynchronous programming tasks easier. In layman's terms, block objects are callback functions that can be created within other functions, assigned to variables for later use, passed on to other functions, and run asynchronously at a later time. Since a block object has read access to the local variables of the function or scope it was defined in, the block object typically requires fewer arguments than a regular callback method. Optionally, with the __block storage specifier, you can also allow the block object to modify variables in its enclosing scope.
TIP: Refer to Apple's Blocks Programming Topics documentation if you are interested in more details about block objects:http://developer.apple.com/library/mac/#documentation/Cocoa/Conceptual/Blocks/Articles/00_Introduction.html.
I'll cut out the actual block object from Listing 14–5 to discuss it separately:
^(NSError* error)

{

    [self setLastError:error];

}
It looks like a method, except it has no name and it begins with a caret symbol (^). The NSError pointer is the only variable passed to it, but there can be multiple variables delimited by commas, as in this example:
^(NSArray* scores, NSError* error)

{

    [self setLastError:error];

    [delegate onScoresReceived:scores];

}
If that reminds you of a C method's parameters, you are correct. If you will, you can consider a block to be a C method whose name is ^ and can be passed to one of the many Game Kit methods taking block objects as parameters.
There are two technicalities I'd like to point out. First, local variables can be accessed in a block. But they can't normally be modified, unless they are prefixed with the __block keyword. Consider this code snippet:
__block bool success = NO;

[localPlayer authenticateWithCompletionHandler:

^(NSError* error)

{

    success = (error == nil);

    lastError = error;

}];
With blocks, it is only legal to modify a local variable declared outside the block's scope if the variable is declared with the __block keyword. In this case, the success variable is declared locally outside the block but is modified within the block, so it must be prefixed with the __block keyword. On the other hand, the lastError variable is a member variable of the class. Member variables can be modified within blocks without the use of the __block keyword.
Also, in the case of Game Kit, you'll be frequently passing block objects to Game Kit methods, but the block objects won't be run until a later time. You are probably used to code being executed in sequence, but in Game Kit programming it is not! The block passed to a Game Kit method is called only when the call completes a round-trip to and from the Game Center server. That takes time because data needs to be transmitted to the Game Center servers and processed, and then a result needs to be returned to the device. Only then does the block object get executed.
Let's take an example. You may find yourself tempted to write something like this:
__block bool success = NO;


[localPlayer authenticateWithCompletionHandler:

^(NSError* error)

{
    success = (error == nil);

}];


if (success)

    NSLog(@"Local player logged in!");

else

    NSLog(@"Local player NOT logged in!");
However, this example will always report that the player is not logged in. Why? Well, the execution path is such that the authenticateWithCompletionHandler will take your block as a parameter and store it while it sends a request to the server and waits for the response to come back. However, the execution continues right away after the authenticateWithCompletionHandler method, and that's where the success variable decides which log statement to print. The problem is, the success variable is still set to NO because the block hasn't been executed yet.
Several milliseconds later, the server responds to the authentication, and that triggers the completion handler—the block object—to be run. If it returns without error, the success variable is set to YES. But alas, your logging code has already been run, so the assignment has no effect.
Note that this is not a problem of block objects in general; there are methods that immediately, or even repeatedly, run a block right away before returning back to you. But in the case of almost all Game Kit methods, the block objects are used exclusively as pieces of code that will be run whenever the Game Center server has responded to a particular request. In other words, the block objects used by Game Kit are run asynchronously after an unspecified delay (and possibly not at all if the connection is interrupted).
Receiving the Local Player's Friend List
When the local player signs in or out, the onLocalPlayerAuthenticationChanged method is received and forwarded to the delegate. The delegate in these examples is the TileMapLayer class, which implements this method to ask for the local player's friend list in Listing 14–6.
Listing 14–6. Asking for the List of Friends
-(void) onLocalPlayerAuthenticationChanged

{

    GKLocalPlayer* localPlayer = [GKLocalPlayer localPlayer];

    if (localPlayer.authenticated)

    {

        GameKitHelper* gkHelper = [GameKitHelper sharedGameKitHelper];

        [gkHelper getLocalPlayerFriends];

    }

}
It checks whether the local player is authenticated, and if so, it calls the getLocalPlayerFriends method of the GameKitHelper class right away. Let's take a look at that in Listing 14–7.
Listing 14–7. GameKitHelper Requesting the Friends List
-(void) getLocalPlayerFriends

{

    GKLocalPlayer* localPlayer = [GKLocalPlayer localPlayer];

    if (localPlayer.authenticated)

    {

        [localPlayer loadFriendsWithCompletionHandler:

        ^(NSArray* friends, NSError* error)

        {

            [self setLastError:error];

            [delegate onFriendListReceived:friends];

        }];

    }

}
Because the getLocalPlayerFriends method doesn't know when it's called or by whom, it plays things safe by checking again that the local player is actually authenticated. Then it calls the GKLocalPlayer class's loadFriendsWithCompletionHandler method, for which you'll supply another block object that is run when the server returns a list of player identifiers as strings. Unsurprisingly, this list of identifiers is stored in the friends array.
Once the call to loadFriendsWithCompletionHandler has succeeded, you can access the current player identifiers of the local player's friends through the GKLocalPlayer class:
NSArray* friends = [GKLocalPlayer localPlayer].friends;
Note that the friends array can be nil or not contain all friends. In the delegate that receives the onFriendsListReceived message, and in all other GameKitHelper delegate methods for that matter, you should check whether the received parameter is nil before working with it. If it is nil, you can refer to the lastError property of the GameKitHelper class to get more information about the error for debugging, logging, or possibly presenting it to the user when it makes sense to do so.
The delegate method onFriendsListReceived simply passes the player identifiers back to GameKitHelper, requesting more info about the player identifiers in the friends list:
-(void) onFriendListReceived:(NSArray*)friends

{

    GameKitHelper* gkHelper = [GameKitHelper sharedGameKitHelper];

    [gkHelper getPlayerInfo:friends];

}
That's straightforward, so let's turn our attention back to the GameKitHelper class's getPlayerInfo method. If the playerList array contains at least one entry, it will call the loadPlayersForIdentifiers static method of the GKPlayer class, as shown in Listing 14–8.
Listing 14–8. Requesting Players from a List of Player Identifiers
-(void) getPlayerInfo:(NSArray*)playerList

{

    if ([playerList count] > 0)

    {

        // Get detailed information about a list of players

        [GKPlayer loadPlayersForIdentifiers:playerList withCompletionHandler:
        ^(NSArray* players, NSError* error)

        {

            [self setLastError:error];

            [delegate onPlayerInfoReceived:players];

        }];

    }

}
Again, a block object is used to handle the returned results from the server. And as always, the lastError property is updated before calling the delegate's onPlayerInfoReceived method. The players array should now contain a list of GKPlayer class instances, which the delegate then simply prints to the Debugger Console window in the absence of a proper friend list user interface:
-(void) onPlayerInfoReceived:(NSArray*)players

{

    for (GKPlayer* gkPlayer in players)

    {

        CCLOG(@"PlayerID: %@, Alias: %@", gkPlayer.playerID, gkPlayer.alias);

    }

}
The GKPlayer class has only three properties: the player identifier, an alias, and the isFriend flag, which is true for all the players in this particular case. The alias is simply the player's nickname.
Leaderboards
In the Tilemap12 project, I added functionality for posting and retrieving leaderboard scores. I hooked into the onPlayerInfoReceived method in the TileMapLayer class to submit a dummy score to Game Center, under the Playtime category:
-(void) onPlayerInfoReceived:(NSArray*)players

{

    GameKitHelper* gkHelper = [GameKitHelper sharedGameKitHelper];

    [gkHelper submitScore:1234 category:@"Playtime"];

}
The submitScore method shown in Listing 14–9 is implemented in GameKitHelper and calls the onScoresSubmitted message back to the delegate. Since there's no return parameter to pass on, it simply reports through the success value if the score was transmitted without an error.
Listing 14–9. Submitting a Score to a Leaderboard
-(void) submitScore:(int64_t)score category:(NSString*)category

{

    GKScore* gkScore = [[[GKScore alloc] initWithCategory:category] autorelease];

    gkScore.value = score;

    [gkScore reportScoreWithCompletionHandler:

    ^(NSError* error)

    {

        [self setLastError:error];


        bool success = (error == nil);
        [delegate onScoresSubmitted:success];

    }];

}
The score value is of type int64_t, which is the same as long long. It's a 64-bit value, so it can store an incredibly large number—one with 19 digits. That allows for more than 4 billion times greater values than a regular 32-bit integer can represent!
A temporary GKScore object is created and sent the autorelease message, so you don't need to release it. It's initialized with a leaderboard category identifier, which you define in iTunes Connect. In this case, the category ID is Playtime. The GKScore object also gets the score assigned, and then its reportScoreWithCompletionHandler method is called, which will transmit the score to the Game Center server and to the correct leaderboard.
The delegate receives the onScoresSubmitted message and subsequently calls the retrieveTopTenAllTimeGlobalScores method to get the top ten scores:
-(void) onScoresSubmitted:(bool)success

{

    if (success)

    {

        GameKitHelper* gkHelper = [GameKitHelper sharedGameKitHelper];

        [gkHelper retrieveTopTenAllTimeGlobalScores];

    }

}
The GameKitHelper class's retrieveTopTenAllTimeGlobalScores simply wraps the call to retrieveScoresForPlayers and feeds it with preconfigured parameters:
-(void) retrieveTopTenAllTimeGlobalScores

{

    [self retrieveScoresForPlayers:nil

                          category:nil

                             range:NSMakeRange(1, 10)

                       playerScope:GKLeaderboardPlayerScopeGlobal

                         timeScope:GKLeaderboardTimeScopeAllTime];

}
Feel free to add more wrapper methods for retrieving scores as you see fit, depending on your game's needs. Since there are a variety of ways to retrieve leaderboard scores and several filters to reduce the number of scores retrieved, it makes sense to use wrapper methods to reduce the potential for human error. Listing 14–10 shows the retrieveScoresForPlayers method in full.
Listing 14–10. Retrieving a List of Scores from a Leaderboard
-(void) retrieveScoresForPlayers:(NSArray*)players

                        category:(NSString*)category

                           range:(NSRange)range

                     playerScope:(GKLeaderboardPlayerScope)playerScope

                       timeScope:(GKLeaderboardTimeScope)timeScope

{

    GKLeaderboard* leaderboard = nil;

    if ([players count] > 0)

    {
        leaderboard = [[[GKLeaderboard alloc] initWithPlayerIDs:players] autorelease];

    }

    else

    {

        leaderboard = [[[GKLeaderboard alloc] init] autorelease];

        leaderboard.playerScope = playerScope;

    }


    if (leaderboard != nil)

    {

        leaderboard.timeScope = timeScope;

        leaderboard.category = category;

        leaderboard.range = range;


        [leaderboard loadScoresWithCompletionHandler:

        ^(NSArray* scores, NSError* error)

        {

            [self setLastError:error];

            [delegate onScoresReceived:scores];

        }];

    }

}
First, a GKLeaderboard object is initialized. Depending on whether the players array contains any players, the leaderboard may be initialized with a list of player identifiers to retrieve scores only for those players. Otherwise, the playerScope variable is used, which can be set to either GKLeaderboardPlayerScopeGlobal or GKLeaderboardPlayerScoreFriendsOnly to retrieve only friends' scores.
Then the leaderboard scope is further reduced by the timeScope parameter, which allows you to obtain the all-time high scores (GKLeaderboardTimeScopeAllTime), only those from the past week (GKLeaderboardTimeScopeWeek), or only today's scores (GKLeaderboardTimeScopeToday).
Of course, you also have to specify the category ID for the leaderboard; otherwise, GKLeaderboard wouldn't know which leaderboard to retrieve the scores from. Finally, an NSRange parameter allows you to refine the score positions you'd like to retrieve. In this example, a range of 1 to 10 indicates that the top ten scores should be retrieved.
Make sure that you limit the score retrieval using all these parameters (especially the NSRange parameter) to reasonably small chunks of data. While you could, it's not recommended to retrieve all the scores of a leaderboard. If your game is played online a lot and many scores are submitted, you might be loading hundreds of thousands—if not millions or billions—of scores from the Game Center servers. That would cause a significant delay when retrieving scores.
With the leaderboard object set up properly, the loadScoresWithCompletionHandler method takes over and asks the server for the scores. When the scores are received, it calls the delegate method with onScoresReceived, passing on the array of scores. The array contains objects of class GKScore sorted by leaderboard rank. The GKScore objects provide you with all the information you need, including the playerID, the date the score was posted, and its rank, value, and formattedValue, which you should use to display the score to the user.
Fortunately for us, Apple provides a default leaderboard user interface. Instead of using the scores I just retrieved, I'm going to ignore them and use the onScoresReceived delegate method to bring up the built-in leaderboard view:
-(void) onScoresReceived:(NSArray*)scores

{

    GameKitHelper* gkHelper = [GameKitHelper sharedGameKitHelper];

    [gkHelper showLeaderboard];

}
Game Kit has a GKLeaderboardViewController class, which is used to display the Game Center leaderboard user interface, as shown in Listing 14–11.
Listing 14–11. Showing the Leaderboard User Interface
-(void) showLeaderboard

{

    GKLeaderboardViewController* leaderboardVC =

        [[[GKLeaderboardViewController alloc] init] autorelease];

    if (leaderboardVC != nil)

    {

        leaderboardVC.leaderboardDelegate = self;

        [self presentViewController:leaderboardVC];

    }

}
The leaderboardDelegate is set to self, which means the GameKitHelper class must implement the GKLeaderboardViewControllerDelegate protocol. The first step is to add this protocol to the class's interface, like so:
@interface GameKitHelper : NSObject <GKLeaderboardViewControllerDelegate>
Then you must implement the leaderboardViewControllerDidFinish method, which is used to simply dismiss the view and to forward the event to the delegate:
-(void) leaderboardViewControllerDidFinish:(GKLeaderboardViewController*)viewController

{

    [self dismissModalViewController];

    [delegate onLeaderboardViewDismissed];

}
Now there's a bit of behind-the-scenes magic going on. I've added a few helper methods to GameKitHelper that deal specifically with presenting and dismissing the various Game Kit view controllers making use of cocos2d's root view controller. If you remember, cocos2d added a RootViewController class to all projects beginning with cocos2d version 0.99.5 and newer, and this controller will be used to display the Game Center views. Those methods are shown in Listing 14–12.
Listing 14–12. Using Cocos2d's Root View Controller to Present and Dismiss Game Kit Views
-(UIViewController*) getRootViewController

{

    return [UIApplication sharedApplication].keyWindow.rootViewController;

}


-(void) presentViewController:(UIViewController*)vc

{

    UIViewController* rootVC = [self getRootViewController];
    [rootVC presentModalViewController:vc animated:YES];

}


-(void) dismissModalViewController

{

    UIViewController* rootVC = [self getRootViewController];

    [rootVC dismissModalViewControllerAnimated:YES];

}
The rootViewController is a UIWindow property, and the main window used by cocos2d is the keyWindow property of the UIApplication class. There's only one catch: the current cocos2d project templates do not assign the new root view controller to the UIWindow's property, so normally it's unavailable unless you expose it in the AppDelegate class itself. But there's a better way to make the rootViewController accessible to all classes without requiring to import the AppDelegate class. You'll have to open the project's AppDelegate class and add the following line in the applicationDidFinishLaunching method, just above the call to [window makeKeyAndVisible]:
window.rootViewController = viewController;

[window makeKeyAndVisible];
After you've done this, the cocos2d rootViewController is accessible from anywhere through the keyWindow.rootViewController property.
The GKLeaderboardViewController will load the scores it needs automatically and present you with a view like the one in Figure 14–5.
NOTE: The built-in Game Kit views are presented in portrait mode. If your game uses a landscape orientation, the default views may not be ideal, because players will have to rotate their devices to view leaderboards, achievements, friends, and matchmaking views. In this case, you might have to consider writing your own user interface to display Game Center information.
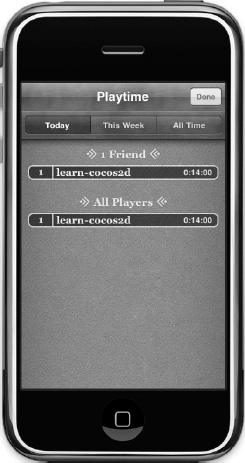
Figure 14–5. The Game Kit leaderboard view
Achievements
In the Tilemap13 project, instead of showing the leaderboard, I'm calling the GameKitHelpershowAchievements method in the onScoresReceived method to bring up the Achievements view (Listing 14–13).
Listing 14–13. Showing the Achievements View
-(void) showAchievements

{

    GKAchievementViewController* achievementsVC =

        [[[GKAchievementViewController alloc] init] autorelease];

    if (achievementsVC != nil)

    {

        achievementsVC.achievementDelegate = self;

        [self presentViewController:achievementsVC];

    }

}
This is very similar to showing the leaderboard view in Listing 14–11. Once more, the GameKitHelper class also has to implement the proper protocol, named GKAchievementViewControllerDelegate:
@interface GameKitHelper : NSObject <GKLeaderboardViewControllerDelegate,

    GKAchievementViewControllerDelegate>
The protocol requires the GameKitHelper class to implement the achievementViewControllerDidFinish method, which is also strikingly similar to the one used by the leaderboard view controller:
-(void) achievementViewControllerDidFinish:(GKAchievementViewController*)viewControl

{

    [self dismissModalViewController];

    [delegate onAchievementsViewDismissed];

}
You can see an example of the achievements view in Figure 14–6, in which one achievement is already unlocked.
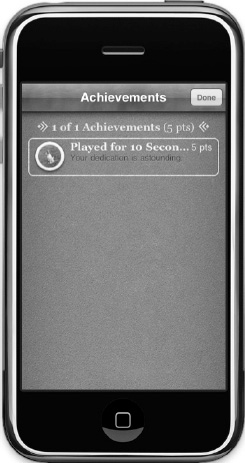
Figure 14–6. The Game Kit achievements view
So, what else can you do with achievements?
Obviously, you'll want to determine whether an achievement has been unlocked, and actually you'll want to report all the progress a player makes toward completing an achievement. For example, if the achievement's goal is to eat 476 bananas, then you would report the progress to Game Center every time the player eats a banana. In this example project, I'm simply checking for time elapsed, and then I report progress on the PlayedForTenSeconds achievement. This is done in the TileMapLayer's update method, shown in Listing 14–14.
Listing 14–14. Determining Achievement Progress
-(void) update:(ccTime)delta

{

    totalTime += delta;

    if (totalTime > 1.0f)

    {

        totalTime = 0.0f;


        NSString* playedTenSeconds = @"PlayedForTenSeconds";

        GameKitHelper* gkHelper = [GameKitHelper sharedGameKitHelper];

        GKAchievement* achievement =

            [gkHelper getAchievementByID:playedTenSeconds];

        if (achievement.completed == NO)

        {

            float percent = achievement.percentComplete + 10;

            [gkHelper reportAchievementWithID:playedTenSeconds

                              percentComplete:percent];

        }

    }


    …

}
Every time a second has passed, the achievement with the identifier PlayedForTenSeconds is obtained through GameKitHelper. If the achievement isn't completed yet, then its percentComplete property is increased by 10 percent, and the progress is reported through GameKitHelper's reportAchievementWithID method (Listing 14–15).
Listing 14–15. Reporting Achievement Progress
-(void) reportAchievementWithID:(NSString*)identifier percentComplete:(float)percent

{

    GKAchievement* achievement = [self getAchievementByID:identifier];

    if (achievement != nil && achievement.percentComplete < percent)

    {

        achievement.percentComplete = percent;

        [achievement reportAchievementWithCompletionHandler:

        ^(NSError* error)

        {

            [self setLastError:error];

            [delegate onAchievementReported:achievement];

        }];

    }

}
To avoid unnecessary calls to the Game Center server, the achievement's percentComplete property is verified to actually be smaller than the percent parameter. Game Center does not allow achievement progress to be reduced and thus will ignore such a report. But if you can avoid actually reporting this to the Game Center server in the first place, you avoid an unnecessary data transfer. With the limited bandwidth available on mobile devices, every bit of data not transmitted is a good thing.
NOTE: Reporting an achievement's progress may fail for a number of reasons—for example, the device might have lost its Internet connection. Be prepared to save any achievements that couldn't be transmitted. Then retry submitting them periodically or when the player logs in the next time. Fortunately, the final GameKitHelper class contains additional code to cache achievements that failed transmission to the Game Center server. You'll find the final version of the GameKitHelper class in the code folder for this chapter.
This still leaves the question open: where do the achievements come from in the first place? They are loaded as soon as the local player signs in. To make this possible, I extended the block object used in authenticateWithCompletionHandler to call the loadAchievements method if there wasn't an error:
[localPlayer authenticateWithCompletionHandler:

^(NSError* error)

{

    [self setLastError:error];


    if (error == nil)

    {

        [self loadAchievements];

    }

}];
The loadAchievements method uses the GKAchievement class's loadAchievementsWithCompletionHandler method to retrieve the local player's achievements from Game Center (Listing 14–16).
Listing 14–16. Loading the Local Player's Achievements
-(void) loadAchievements

{

    [GKAchievement loadAchievementsWithCompletionHandler:

    ^(NSArray* loadedAchievements, NSError* error)

    {

        [self setLastError:error];


        if (achievements == nil)

        {

            achievements = [[NSMutableDictionary alloc] init];

        }

        else

        {

            [achievements removeAllObjects];

        }


        for (GKAchievement* achievement in loadedAchievements)

        {

            [achievements setObject:achievement

                             forKey:achievement.identifier];

        }


        [delegate onAchievementsLoaded:achievements];

    }];

}
Inside the block object, the achievements member variable is either allocated or has all objects removed from it. This allows you to call the loadAchievements method at a later time to refresh the list of achievements. The returned array loadedAchievements contains a number of GKAchievement instances, which are then transferred to the achievementsNSMutableDictionary simply for ease of access. The NSDictionary class allows you to retrieve an achievement by its string identifier directly, instead of having to iterate over the array and comparing each achievement's identifier along the way. You can see this in the getAchievementByID method in Listing 14–17.
Listing 14–17. Getting and Optionally Creating an Achievement
-(GKAchievement*) getAchievementByID:(NSString*)identifier

{

    GKAchievement* achievement = [achievements objectForKey:identifier];


    if (achievement == nil)

    {

        // Create a new achievement object

        achievement = [[[GKAchievement alloc] initWithIdentifier:identifier]

            autorelease];

        [achievements setObject:achievement forKey:achievement.identifier];

    }


    return [[achievement retain] autorelease];

}
This is where you need to be careful. The getAchievementByID method creates a new achievement if it can't find one with the given identifier, assuming that this achievement's progress has never been reported to Game Center before. Only achievements that have been reported to Game Center at least once are obtained through the loadAchievements method in Listing 14–16. For any other achievement, you'll have to create it first. So, getAchievementsByID will always return a valid achievement object, but you'll only notice whether that achievement is really set up for your game when you try to report its progress to Game Center.
One curiosity here may be that I send a retain and an autorelease message to the returned achievement. This is to ensure that, in case the achievements dictionary is cleared by a call to loadAchievements, any achievement returned through getAchievementsByID remains valid. But the idea is to let GameKitHelper manage the achievements, so any other code shouldn't store achievement objects but just obtain them through GameKitHelper whenever they are needed.
You can also clear the local player's achievement progress. This should be done with great care and not without asking the player's permission. On the other hand, during development, the resetAchievements method in Listing 14–18 comes in handy.
Listing 14–18. Resetting Achievement Progress
-(void) resetAchievements

{

    [achievements removeAllObjects];


    [GKAchievement resetAchievementsWithCompletionHandler:
    ^(NSError* error)

    {

        [self setLastError:error];

        bool success = (error == nil);

        [delegate onResetAchievements:success];

    }];

}
Matchmaking
Moving on to the Tilemap14 project, we enter the realm of matchmaking—connecting players and inviting friends to play a game match together, that is. To start hosting a game and to bring up the corresponding matchmaking view, I've added a call to GameKitHelper's showMatchmakerWithRequest method after the local player has been authenticated, as shown in Listing 14–19.
Listing 14–19. Preparing to Show the Host Game Screen
-(void) onLocalPlayerAuthenticationChanged

{

    GKLocalPlayer* localPlayer = [GKLocalPlayer localPlayer];

    if (localPlayer.authenticated)

    {

        GKMatchRequest* request = [[[GKMatchRequest alloc] init] autorelease];

        request.minPlayers = 2;

        request.maxPlayers = 4;


        GameKitHelper* gkHelper = [GameKitHelper sharedGameKitHelper];

        [gkHelper showMatchmakerWithRequest:request];

    }

}
A GKMatchRequest instance is created, and its minPlayers and maxPlayers properties are initialized, indicating that the match should have at least two and at most four players. Every match must allow for two players, obviously, and a peer-to-peer match can be played with up to four players. Peer-to-peer networking means that all devices are connected with each other and can send data to and receive it from all other devices. This is opposed to a server/client architecture, where all players connect to a single server and send and receive only to and from this server. In peer-to-peer networks, the amount of traffic generated grows exponentially, so most peer-to-peer multiplayer games are strictly limited to a very low number of allowed players.
NOTE: Game Center can connect up to 16 players, but only if you have a hosted server application to manage all matches using a client/server architecture. That requires a huge amount of work and know-how to set up and use properly, so I'll leave it out of this discussion and focus only on peer-to-peer networking.
The showMatchmakerWithRequest method is implemented in a strikingly similar way to the code that brings up the leaderboard and achievement views, as Listing 14–20 shows.
Listing 14–20. Showing the Host Game Screen
-(void) showMatchmakerWithRequest:(GKMatchRequest*)request

{

    GKMatchmakerViewController* hostVC = [[[GKMatchmakerViewController alloc]

        initWithMatchRequest:request] autorelease];

    if (hostVC != nil)

    {

        hostVC.matchmakerDelegate = self;

        [self presentViewController:hostVC];

    }

}
Figure 14–7 shows an example matchmaking view, waiting for you to invite a friend to your match. You can also wait until Game Center finds an automatically matched player for your game, but since you're currently developing the game, it's rather unlikely that anyone but you will be currently playing it.
If you followed the leaderboard and achievement view examples, you'll know that each required the GameKitHelper class to implement a protocol, and with matchmaking it's no different. I also added GKMatchDelegate because we're going to need it soon.
@interface GameKitHelper : NSObject <GKLeaderboardViewControllerDelegate,

    GKAchievementViewControllerDelegate, GKMatchmakerViewControllerDelegate,

    GKMatchDelegate>
The GKMatchmakerViewControllerDelegate protocol requires three methods to be implemented: one for the player pressing the Cancel button, one for failing with an error, and one for finding a suitable match. The latter deserves a mention:
-(void) matchmakerViewController:(GKMatchmakerViewController*)viewController

                    didFindMatch:(GKMatch*)match

{

    [self dismissModalViewController];

    [self setCurrentMatch:match];

    [delegate onMatchFound:match];

}
If a match was found, this match is set as the current match, and the delegate's onMatchFound method is called to inform it about the newly found match.
Instead of hosting a match, you can also instruct Game Center to try to automatically find a match for you, as shown in Listing 14–21. If successful, the delegate receives the same onMatchFound message.

Figure 14–7. The host game matchmaking view
Listing 14–21. Searching for an Existing Match
-(void) findMatchForRequest:(GKMatchRequest*)request

{

    GKMatchMaker* matchmaker = [GKMatchMaker sharedMatchmaker];

    [matchmaker findMatchForRequest:request withCompletionHandler:

    ^(GKMatch* match, NSError* error)

    {

        [self setLastError:error];


        if (match != nil)

        {

            [self setCurrentMatch:match];

            [delegate onMatchFound:match];

        }

    }];

}
While Game Center is searching for a match, you should give the user visual feedback, like an animated progress indicator, because finding a match can take several seconds or even minutes. That's where the CCProgressTimer class comes in handy, which I discussed in Chapter 5. You should also give your user a means to cancel the matchmaking process, and if she does so, you should call the cancelMatchmakingRequest method:
-(void) cancelMatchmakingRequest

{

    [[GKMatchmaker sharedMatchmaker] cancel];

}
At this point, the match has been created, but all the players might not yet be connected to the match. As players join the game, the match:didChangeState method of the GKMatchDelegate protocol is called for each player connecting or disconnecting. Only when the expectedPlayerCount of the match has been counted down to 0 by the Game Kit framework should you start the match. The GKMatch object updates the expectedPlayerCount property automatically, as Listing 14–22 shows.
Listing 14–22. Waiting for All Players Before Starting the Match
-(void) match:(GKMatch*)match player:(NSString*)playerID

    didChangeState:(GKPlayerConnectionState)state

{

    switch (state)

    {

        case GKPlayerStateConnected:

            [delegate onPlayerConnected:playerID];

            break;

        case GKPlayerStateDisconnected:

            [delegate onPlayerDisconnected:playerID];

            break;

    }


    if (matchStarted == NO && match.expectedPlayerCount == 0)

    {

        matchStarted = YES;

        [delegate onStartMatch];

    }

}
If at any time during your game a player drops out and the expectedPlayerCount property becomes greater than 0, you can call addPlayersToMatch to fill up the now empty space with a new player, as in Listing 14–23 (assuming that your game supports players joining a match in progress). Since there's no guarantee that a player will actually be found, you should not interrupt the game while GKMatchmaker is looking for a new player.
Listing 14–23. Adding Players to an Existing Match
-(void) addPlayersToMatch:(GKMatchRequest*)request

{

    if (currentMatch == nil)

        return;


    [[GKMatchmaker sharedMatchmaker] addPlayersToMatch:currentMatch

                                          matchRequest:request

                                     completionHandler:

    ^(NSError* error)

    {

        [self setLastError:error];
        bool success = (error == nil);

        [delegate onPlayersAddedToMatch:success];

    }];

}
Sending and Receiving Data
Once all players are connected and the match has officially started, you can start sending and subsequently receiving data. The easiest way to do so is to send data to all players, as shown in Listing 14–24.
Listing 14–24. Sending and Receiving Data
-(void) sendDataToAllPlayers:(void*)data length:(NSUInteger)length

{

    NSError* error = nil;

    NSData* packet = [NSData dataWithBytes:data length:length];

    [currentMatch sendDataToAllPlayers:packet

                          withDataMode:GKMatchSendDataUnreliable

                                 error:&error];

    [self setLastError:error];

}


-(void) match:(GKMatch*)match didReceiveData:(NSData*)data

fromPlayer:(NSString*)playerID

{

    [delegate onReceivedData:data fromPlayer:playerID];

}
The sendDataToAllPlayers method takes a void pointer as input and wraps it into an NSData object. You can send any data as long as you provide the correct length of that data. Typically, networked programs send structs like CGPoint (or any custom struct) to make this process easier, since you can then use sizeof(myPoint) to get the length (size in bytes) of such a data structure.
Also, to speed up transmission, most data is sent unreliably. Data that is sent frequently can especially be sent unreliably because if a packet ever gets lost, the clients simply have to wait for the next packet to arrive. If you do need every packet to arrive—for example, because it contains crucial information that is sent only once, then you should set the data mode to GKMatchSendDataReliable. This instructs GameKit to simply transmit the packet again if it could not be delivered. Since GameKit has to receive a return packet from clients to acknowledge that they received the packet, this adds additional traffic.
What data you should send and how often you should send it depend entirely on the game itself. The ground rule is to send as little as you can, as rarely as possible. For example, instead of transmitting each player's position every frame, you should send a packet for each movement action, because the movement in the tilemap game is always 32 pixels in one direction and done by a CCMoveAction. So, it's sufficient to send when the move should start and in which direction it should be, which saves a lot of traffic compared to sending each player's position every frame.
In the Tilemap16 project you'll get an introduction to sending and receiving packets over a network. The most important aspect to creating network packets is that the receiver must be able to identify the type of packet received by looking at a common header data. Typically, and this is also what the Apple documentation recommends, you will define C structs with a common struct field as the first entry for each packet. The NetworkPackets.h file defines the structs shown in Listing 14–25.
Listing 14–25. Defining Network Packets as C Structs in NetworkPackets.h
typedef enum

{

    kPacketTypeScore = 1,

    kPacketTypePosition,

} EPacketTypes;


typedef struct

{

    EPacketTypes type;

} SBasePacket;


// the packet for transmitting a score variable

typedef struct

{

    EPacketTypes type;


    int score;

} SScorePacket;


// packet to transmit a position

typedef struct

{

    EPacketTypes type;


    CGPoint position;

} SPositionPacket;
You'll see that all packet structs have the EPacketTypes type field, and it's the first field in each struct. This allows you to cast any packet to one of type SBasePacket to allow the receiver to inspect the packet type, and based on that, the receiver can then safely cast the struct to the actual packet.
Listing 14–26 shows an example of this. It's the onReceivedData method from the TileMapScene class.
Listing 14–26. Receiving Packets and Determining Packet Type
-(void) onReceivedData:(NSData*)data fromPlayer:(NSString*)playerID

{

    SBasePacket* basePacket = (SBasePacket*)[data bytes];


    switch (basePacket->type)

    {

        case kPacketTypeScore:

        {

            SScorePacket* scorePacket = (SScorePacket*)basePacket;

            CCLOG(@"	score = %i", scorePacket->score);

            break;
        }

        case kPacketTypePosition:

        {

            SPositionPacket* positionPacket = (SPositionPacket*)basePacket;


            if (playerID != [GKLocalPlayer localPlayer].playerID)

            {

                CCTMXTiledMap* tileMap =

                    (CCTMXTiledMap*)[self getChildByTag:TileMapNode];

                [self centerTileMapOnTileCoord:positionPacket->position

                                       tileMap:tileMap];

            }

            break;

        }

        default:

            CCLOG(@"unknown packet type %i", basePacket->type);

            break;

    }

}
This code first casts the received data bytes to a pointer to an SBasePacket struct. If you look it up in Listing 14–25, you'll notice that's the struct that containsonly the type field. Since we have declared that all packets must have this field at its first entry, any packet can be safely cast to SBasePacket. The switch statement inspects the type, and depending on the network packet, further processing is done—but not without casting the packet to the actual packet type. For example, if the basePacket->type is kPacketTypeScore, the basePacket will be cast to an SScorePacket to allow the code to access the score field.
TIP: When checking packets, it's a good idea to add the default option. You will frequently add new packets, and from time to time you'll forget to handle this particular packet type on the receiving end. So, logging this as an error or even throwing an exception is recommended. Otherwise, you might see bugs in your app that might be hard to track down.
Actually sending the packets is relatively easy and follows the same principle. You first create a new variable with one of the packet structs as its data type. Then you fill in each field of the struct and pass the struct to the GameKitHelper method sendDataToAllPlayers.
In Listing 14–27, the packets are created on the stack. You don't need to allocate memory because Game Kit will make a copy of the struct and thus take over the memory management of the packet. Since sendDataToAllPlayers required a pointer, the packet is prefixed with the reference operator (ampersand character) &packet to denote that the packet variable's address is passed instead of the packet itself.
Listing 14–27. Sending Packets via GameKitHelper
// TM16: send a bogus score (simply an integer increased every time it is sent)

-(void) sendScore

{

    if ([GameKitHelper sharedGameKitHelper].currentMatch != nil)
    {

        bogusScore++;


        SScorePacket packet;

        packet.type = kPacketTypeScore;

        packet.score = bogusScore;


        [[GameKitHelper sharedGameKitHelper] sendDataToAllPlayers:&packet

                                                           length:sizeof(packet)];

    }

}


// TM16: send a tile coordinate

-(void) sendPosition:(CGPoint)tilePos

{

    if ([GameKitHelper sharedGameKitHelper].currentMatch != nil)

    {

        SPositionPacket packet;

        packet.type = kPacketTypePosition;

        packet.position = tilePos;


        [[GameKitHelper sharedGameKitHelper] sendDataToAllPlayers:&packet

                                                           length:sizeof(packet)];

    }

}
The most important part of sending packets is to make sure you set the right packet type. If you assign the wrong packet type, the receiver won't know what to do with the packet. It might mistake it for a different type of packet, causing a crash because the receiver might try to access a nonexisting field. Or the receiver might simply work with unrelated data, causing all kinds of bugs. Imagine the score becoming the player's position, or vice versa. To avoid these kinds of issues, particularly if you have many different packet types, it may be helpful to create methods like createPositionPacket and createScorePacket, which you call with all the required parameters for the packet while the method itself fills in the correct packet type.
In Figure 14–8 you can see the Tilemap16project in action. Every time the player is moved on the iPhone, a position packet is sent over the network. The iPad is connected to the current match, receives the position packet, and moves the player character accordingly.

Figure 14–8. If the player moves on the iPhone, the iPad will update its view from the position packet it received.
Summary
I hope this chapter and the provided GameKitHelper class help you get comfortable with Game Center programming. Sure, network programming is no easy task, but I've laid a lot of the groundwork for you, and even block objects are no longer foreign territory for you. In particular, the checklist of tasks to enable Game Center support for your game should help you avoid a lot of the initial pitfalls faced by developers.
Over the course of this chapter, you've become comfortable using the leaderboard and achievement features of Game Center. Those alone bring your game to a new level. And with the user interface provided by Game Center, you don't even have to write your own user interface to display leaderboards and achievements.
I then introduced you to the matchmaking features of Game Center, which allow you to invite friends to join your game, find random players on the Internet, and allow them to send and receive data.
With this chapter, I already departed a little from pure cocos2d programming; in fact, you can apply what you just learned about Game Center to any iOS app. In the next chapter, I'll tackle another subject that's not pure cocos2d game programming either but frequently asked for: mixing UIKit views with cocos2d.