
Chapter 16
Kobold2D Introduction
In more than two years of working with cocos2d, I found plenty of opportunity and need to improve the cocos2d development workflow by adding helpful code snippets, by extending cocos2d classes, by enabling easier cross-platform development, by automating often-repeated tasks, by simplifying the cocos2d upgrade process, and by providing complete and accurate documentation. Eventually, this culminated in the inception of Kobold2D, a game engine that is still very much based on cocos2d-iphone but improves the workflow for cocos2d developers.
The goal of Kobold2D is to make it easier for new developers to work with cocos2d while at the same time satisfying my own needs for a professional work environment (and I hope yours too!). To be sure of that, the development of Kobold2D is strongly user-driven: if you need it (and others too), you’ll get it! If you have an idea or suggestion, please vote for it on or add it to the Kobold2D feedback page: www.kobold2d.com/display/KKSITE/Kobold2D+Feedback.
Kobold2D merges the cocos2d engine with popular libraries many developers have been using with cocos2d in the past. Some of these libraries have almost become essential add-ons, including cocos3d, Wax, Lua, the new cocos2d-iphone-extensions project, SneakyInput, the Chipmunk SpaceManager, ObjectAL, and iSimulate. Kobold2D makes these libraries readily accessible and usable by all developers; you’ll just have to import a library’s header files and call library methods. In almost all cases, you won’t have to fiddle with build settings or linker flags, and you don’t need to worry about an increased app size.
Over time, Kobold2D will add more and more convenience features, starting with a simplified way to handle user input that allows you to poll the keyboard and mouse button states, provides automatic accelerometer filtering, and gives you access to gyroscope and device motion data without having to learn the Core Motion framework.
In this chapter, I’ll introduce you to the key concepts of working with Kobold2D and how it changes the way you develop cocos2d-based apps. I’ll guide you through the Kobold2D version of the Doodle Drop project to illustrate how easy it is to write a game that also runs on Mac OS computers and to give you an introduction on Kobold2D user input processing. In addition, I’ll provide you with a short introduction to cocos3d, the 3D add-on library for cocos2d.
You can learn more about Kobold2D and download it at www.kobold2d.com.
Benefits of Using Kobold2D
I view Kobold2D as a game development kit rather than a game engine. It’s more like a Linux distribution with the cocos2d-iphone project as its “kernel” and multiple other modules tacked onto it, all ready to use after installation.
To stick with the analogy, if cocos2d-iphone were a Linux kernel with just its command-line interface, Kobold2D would be providing the graphical user interface and the essential applications that make the operating system more powerful, enjoyable to work with, and accessible to a broader user base.
At the same time, the command line is still there; it has simply become part of a bigger whole.
Kobold2D Is Ready to Use
Kobold2D will be installed like a regular application. There’s no need to run a script in the Terminal app or any other such error-prone tasks. Download and run the package installer, follow the on-screen instructions, and you’re done. It’s quick and painless.
After installing Kobold2D, you can build one of the 15 template projects right away; most of them are based on projects we’ve created throughout the book. With the exception of the app start-up process, which is now simply a configuration file, everything you’ve learned about cocos2d in this book and elsewhere still applies.
Kobold2D Is Free
Kobold2D is free and distributed under the MIT License. All of the included libraries use either the MIT License or a compatible license.
The only exception is iSimulate, which requires the paid iSimulate app from the App Store to unlock all features. The free iSimulate Lite, for example, doesn’t support the forwarding of multi-touch events to the iOS Simulator.
Kobold2D Is Easy to Upgrade
A big incentive for Kobold2D was to simplify and streamline upgrading cocos2d in existing projects. The downside of using the cocos2d Xcode project templates is that a copy of the entire cocos2d source code resides in each and every project, making the upgrade process unnecessarily complex.
Kobold2D fixes that by keeping your code separate from any library’s code. If a new version of Kobold2D is released and you want your project to use the updated code, simply run the Kobold2D Project Upgrader tool of the newly installed Kobold2D version. It will scan previous Kobold2D versions and offer you to upgrade each individual project with a click of the mouse. The only task that remains for you to upgrade your code is the unavoidable code maintenance because of API changes, for example, classes that may have been renamed in cocos2d or other libraries, or library methods whose parameters have changed.
Kobold2D Provides “Lib Service”
A central aspect of Kobold2D is to spare developers the pain of adding third-party libraries to cocos2d projects. Correctly setting up third-party libraries often requires intricate knowledge of the build system, an intuition about how to read compiler and linker errors, and possibly even small but crucial source code changes in the right places. It can take hours, if not days, for someone else’s code to compile and link successfully on all platforms: iOS (ARMv6 and ARMv7), iOS Simulator, and Mac OS X both in 32-bit and 64-bit variants.
That’s what Kobold2D provides: lib service. In the first public release of Kobold2D, the following libraries are included:
- These are libraries for both iOS and Mac OS X projects:
- Kobold2D (game engine code, Objective-C)
- cocos2d-iphone (2D graphics, Objective-C)
- cocos2d-iphone-extensions (utility code, Objective-C)
- Box2D (physics, C++)
- Chipmunk (physics, C)
- Chipmunk SpaceManager (Chipmunk physics, Objective-C)
- CocosDenshion (audio, Objective-C)
- Wax (scripting, Lua)
- These are libraries available only for iOS projects:
- cocos3d (3D graphics, Objective-C)
- ObjectAL (audio, Objective-C)
- SneakyInput (joystick, Objective-C)
- iSimulate (library for iSimulate app)
Whenever an essential library such as cocos2d or cocos3d is updated, a new release of Kobold2D will follow within days, if not hours. There’s no need for you to get active on the library front.
Some readers may wonder whether this means that Kobold2D apps are bloated, with all those libraries being included. You may be surprised to hear that early tests showed that Kobold2D apps are actually slightly smaller compared to cocos2d-iphone apps even though Wax and Lua are built into Kobold2D. The reason is that the Kobold2D projects are set up to allow the linker to throw away any code that isn’t used in your app. That means if, for example, you don’t include any of the Box2D headers, none of the Box2D library code will be linked with your app. But if you do want to start using Box2D, it’s as simple as adding the Box2D.h header file to your project, and you’re ready to start writing Box2D-enabled physics apps.
Kobold2D Takes Cross-Platform to Heart
By having one target for each platform (iOS and Mac OS X) by default in its project templates, Kobold2D allows you to build and run your code on both platforms from within the same Xcode project.
Developing for both iOS and Mac OS platforms is also encouraged by the Kobold2D API, which goes a long way to ensure that game engine code compiles for both platforms. For example, if you try to read the mouse button states on iOS, the code still compiles, and the result is a safe default, which in this case would simply report that no mouse button is pressed.
The Kobold2D Workspace
After downloading and installing Kobold2D, you’ll find the most recent version of Kobold2D in a versioned subfolder of ~/Kobold2D, for example, ~/Kobold2D/Kobold2D-1.0. The installer will also open theKobold2D Project Starter.appfor you, which allows you to start a new Kobold2D project from one of the supplied project templates (see Figure 16–1).
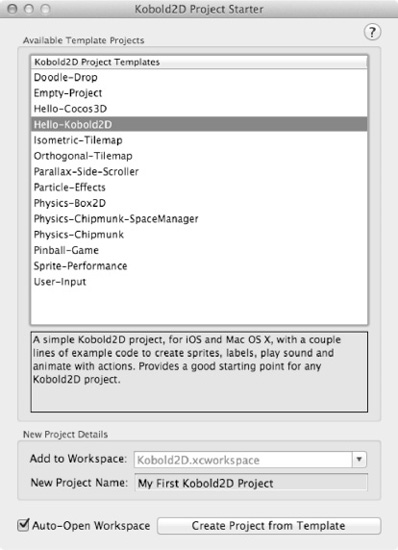
Figure 16–1. The Kobold2D Project Starter tool allows you to start new projects easily.
Select the Hello-Kobold2D template, enter any text in the New Project Name text field, and click Create Project from Template. You can also change the Add to Workspace text if you want to add the new project to a custom workspace (it will be created if necessary). By default, Kobold2D projects are added to the Kobold2D.xcworkspace.
Xcode should now open the Kobold2D workspace that contains your new project, as shown in Figure 16–2.
CAUTION: Kobold2D uses the new workspace concept of Xcode 4, which allows you to combine multiple projects in a single workspace window. If you open the .xcodeproj file of a Kobold2D project either from the most recently used list or by double-clicking it in Finder, the project will not work. You can easily spot this problem because the Kobold2D-Libraries project will be absent from the Project Navigator pane. Make sure to always open the corresponding .xcodeworkspace file that contains the .xcodeproj that you want to work with.
Consequently, Kobold2D is not compatible with Xcode 3.x since workspaces were first introduced with Xcode 4.0.
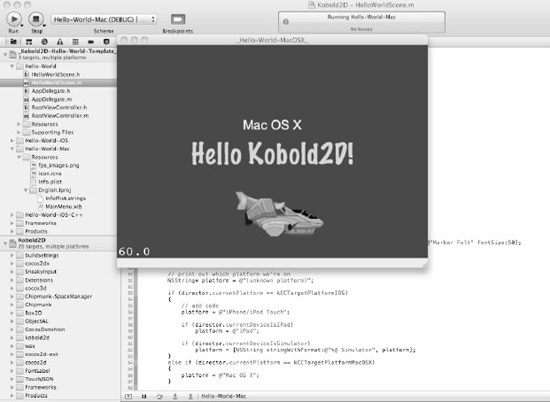
Figure 16–2. The Kobold2D Xcode 4 workspace view with the Hello Kobold2D Mac OS X project running
The Hello Kobold2D Template Project
Let’s take a closer look at the Hello Kobold2D project (Figure 16–2) to demonstrate several key concepts of Kobold2D.
The Hello World Project Files
In Figure 16–3 you’ll see the groups and files in the My First Kobold2D Project, which was created from the Hello-Kobold2Dtemplate project.
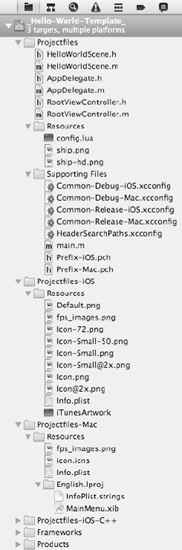
Figure 16–3. The default group structure of a Kobold2D project
The immediately noticeable difference compared to a regular cocos2d project is that three groups begin with Projectfiles, and there is the additional BuildSettings group. The idea behind that is to have a Projectfiles group and folder that contain the source code and resource files common to all platforms. The majority of your source code and resources will be in this folder. The additional Projectfiles-iOSandProjectfiles-Macgroups should contain only files used by that particular platform. These groups are meant as suggestions; you are of course free to structure your project’s group as you see fit.
The BuildSettings group contains several .xcconfig files, which are the textual format for Xcode build settings. Normally you will not need to modify these files, but in some cases you may want to, for example, disable iSimulate or enable support for cocos3d. The huge benefit of the .xcconfig files is that they can be documented, and accordingly you’ll find several notes for each build setting, what it does, what it affects, and when you might want to enable or disable it.
Almost all Kobold2D project templates provide targets for both iOS and Mac OS X, which are suffixed with -iOS and -Mac, respectively. I hope that the readily available Mac target will encourage you and other developers to consider cross-platform development from the start and to publish more apps to both Apple App Store. It’s certainly a lot easier to take cross-platform development into account from the start rather than porting the app once it’s finished.
How Kobold2D Launches an App
Kobold2D simplifies the start-up process, in particular how much custom code is needed in your project (by default: none). Kobold2D does all the initialization performed by the main function, the app delegate, and the root view controller behind the scenes.
Furthermore, Kobold2D allows you to easily modify the start-up settings, such as the first scene or layer to display, the device orientation, the render settings, the Mac window size, Retina support, and many more. All these settings are centralized in the config.lua script file.
Main, AppDelegate, and RootViewController
The main.m file is the entry point for each application; it contains the main method. The Kobold2D implementation simply calls its internal method KKMain:
#import "kobold2d.h"


int main(int argc, char *argv[])

{

    return KKMain(argc, argv, NULL);

}
KKMain takes both argc and argv arguments and a third, optional parameter that can be used to pass additional parameters to the start-up process if needed. Since that’s rarely, if ever, needed, you can just pass NULL. KKMain hides the complexity of launching the app for either the iOS or Mac OS platform. It also parses the config.lua file, which provides app configuration settings. I’ll discuss the config.lua file in the next section.
At this point, it makes sense to show you the AppDelegate class of a Kobold2D project, or, rather, what’s left of it. Here’s the interface:
#import "KKAppDelegate.h"


@interface AppDelegate : KKAppDelegate

{

}


@end
Nothing there. Maybe there’s more in the implementation part of the app delegate?
#import "AppDelegate.h"


@implementation AppDelegate


// Called when Cocos2D is fully setup and you are able to run the first scene

-(void) initializationComplete

{

}


@end
Nope. I can already hear you: dude, where’s my app delegate?
Kobold2D takes care of the entire app start-up process for you and hides it within the KKAppDelegate class from which the AppDelegate class inherits. In particular, KKAppDelegate correctly sets up cocos2d based on the config.lua settings and encapsulates platform-specific app delegate code.
The KKAppDelegate class is a regular UIApplicationDelegate on iOS and a NSApplicationDelegate class on Mac OS; you can implement (override) any of the app delegate protocol methods yourself whenever you need to do so. However, you should make sure to call the super implementation of overridden methods to ensure that KKAppDelegate still performs its duties.
The only custom method that the AppDelegate class offers you is initializationComplete, which is called after the app and cocos2d have been fully initialized but before the first scene is about to be run. You can call the CCDirectorrunWithScene method inside initializationComplete to run a specific scene. However, it doesn’t, because the config.lua file has a setting FirstSceneClassName that allows you to specify just the name of the class that cocos2d should run as its first scene.
You’ll also notice the RootViewController class is equally and unimpressively minimal. The gist of the code is in Kobold2D’s KKRootViewController. Once more, if you override any of the UIViewController messages, be sure to call its super implementation. Note that Mac OS targets do not use the RootViewController class.
In essence, the Kobold2D classes KKMain, KKAppDelegate, and KKRootViewController provide the common functionality developers expect from these classes. Furthermore, they provide the foundation code for any Kobold2D project, enabling you to use Lua for configuration files, among other things. You also have less code to maintain. In particular, if there’s an essential change to these classes in iOS, Mac OS, or cocos2d, Kobold2D will take care of these changes or additions for you.
The Start-up Configuration File
Kobold2D always loads the Lua script file config.lua, which is in the Resources group of each Kobold2D project.
The config.luascript file returns a Lua table containing all the game’s settings. A Lua table is a flexible data structure that combines the features of dictionaries (indexed by string) and arrays (indexed by value). You can create deeply nested Lua tables, which in terms of possibilities equal XML files or property lists but with a relatively simple, readable syntax with built-in error-reporting.
Lua scripts are text files, so naturally they’re easier to edit than property lists, regardless of whether you’re using a property list editor or editing the property list XML file directly. And Lua scripts allow you to comment on each line to explain your rationale, the range of valid values, and so on. You can’t do that with property list files since property list editors don’t allow you to comment on entries.
NOTE: Lua support for Kobold2D is provided by the Wax library created by Corey Johnson. Wax allows all Lua scripts to call any Objective-C method and to instantiate Objective-C classes, including cocos2d classes. However, Kobold2D avoids Wax scripting; it does not make calls to Objective-C methods from Lua. Instead, Kobold2D relies on just loading settings provided by Lua, executing Lua scripts and calling Lua functions. This is fast.
The other way around, calling Objective-C methods from Lua through Wax, is a lot slower. Wax performs a lot of Objective-C runtime method calls behind the scenes. This adds overhead that can quickly add up, especially during game play you don’t want to waste precious milliseconds. Besides, even if you could live with that, the syntax of Wax scripts is too close to Objective-C to give you much benefit in terms of the number of code lines. Worse yet, Xcode has no support for Lua scripts, so there is no code completion, no syntax highlighting, no compiler warnings or errors, and no runtime debugging of Lua scripts. For those reasons, it is preferable to just use Lua for configuration files rather than attempting to write an entire game with Wax.
The config.lua file contains settings for just about everything you might want to tweak during the start-up process. Listing 16–1 shows an example config.lua file.
Listing 16–1. The config.lua Script Contains All Start-up Settings for Kobold2D
local config =

{

    KKStartupConfig =

    {

        -- load first scene from a CCScene or CCLayer derived class with this name

        FirstSceneClassName = "HelloWorldLayer",


        -- set the director type, and the fallback in case the first isn't available

        DirectorType = DirectorType.DisplayLink,

        DirectorTypeFallback = DirectorType.NSTimer,


        MaxFrameRate = 60,

        DisplayFPS = YES,


        EnableUserInteraction = YES,

        EnableMultiTouch = NO,


        -- Render settings

        DefaultTexturePixelFormat = TexturePixelFormat.RGBA8888,

        GLViewColorFormat = GLViewColorFormat.RGB565,

        GLViewDepthFormat = GLViewDepthFormat.DepthNone,

        GLViewMultiSampling = NO,

        GLViewNumberOfSamples = 0,


        Enable2DProjection = NO,

        EnableRetinaDisplaySupport = YES,


        -- Orientation & Autorotation

        DeviceOrientation = DeviceOrientation.Portrait,

        AutorotationType = Autorotation.UIViewController,

        ShouldAutorotateToLandscapeOrientations = YES,

        ShouldAutorotateToPortraitOrientations = YES,

        AllowAutorotateOnFirstAndSecondGenerationDevices = NO,


        -- iAd setup

        EnableAdBanner = YES,

        LoadOnlyPortraitBanners = YES,

        LoadOnlyLandscapeBanners = NO,

        PlaceBannerOnBottom = NO,


        -- Mac OS specific settings

        AutoScale = NO,

        AcceptsMouseMovedEvents = NO,

        WindowFrame = RectMake(1024-640, 768-480, 640, 480),

    },

}


return config
Most of these settings should be self-explanatory and might seem familiar to you. The settings are documented in the KKStart-upConfig class in the Kobold2D API Reference and here: www.kobold2d.com/display/KKDOC/Config.lua+Settings+Reference.
For example, the FirstSceneClassName setting allows you to specify the name of a class inheriting from CCScene or CCLayer (automatically wrapped inside a CCScene), which will be the first scene run by the CCDirector. You can enable iAd ad banners, change the way your app is autorotated, or provide the default window position and size for Mac builds.
The big advantage of using a Lua-based configuration file is that the entire start-up code is part of the Kobold2D code and can be updated in new versions if it needs to be. As Kobold2D matures, more settings will be added to the start-up config depending on what developers need to change or include most in their apps. In addition, you can create and use custom config.lua settings. The Hello World project provides an example of loading custom settings. I’ll get to that in the next section.
TIP: You can learn more about Lua from the free Programming in Lua book, which is available online on the official Lua home page at www.lua.org/pil. The book is for an older version of Lua but still largely relevant. You might also want to browse the Lua reference manual at www.lua.org/manual to get a quick overview of the language. Lua has grown to be the number-one scripting language for game developers over the past ten years. It has a very small memory footprint and speed-wise often comes close to within 80 to 90 percent of the performance achievable with C programming.
The Hello Kobold2D Scene and Layer
Let’s move on to the actual scene class HelloWorldLayer, which is set as the first scene via the config.lua setting FirstSceneClassName = "HelloWorldLayer". You’ll notice that this first scene is actually derived from CCLayer. Kobold2D realizes that and automatically wraps the HelloWorldLayer class into a CCScene instance behind the scenes.
TIP: To avoid writing the repetitive +(id) scene method in each CCLayer class, you can simply call the +(id) nodeWithScene method in Kobold2D:
[[CCDirectorsharedDirector] replaceScene:[MyGameLayernodeWithScene]];
The HelloWorldLayer interface declaration is pretty unspectacular and provides only three instance variables that will later be loaded from the config.lua file:
#import "cocos2d.h"


@interface HelloWorldLayer : CCLayer

{

    NSString* helloWorldString;

    NSString* helloWorldFontName;

    int helloWorldFontSize;

}


@property (nonatomic, copy) NSString* helloWorldString;

@property (nonatomic, copy) NSString* helloWorldFontName;

@property (nonatomic) int helloWorldFontSize;


@end
At this point, you should take note of a particular addition to the config.lua file. There’s an additional Lua table labeled HelloWorldSettings in Listing 16–2, which provides three familiar-looking settings: HelloWorldString, HelloWorldFontName, and HelloWorldFontSize.
Listing 16–2. Custom config.lua Settings
local config =

{

    KKStartupConfig =

    {

        -- start-up settings removed for brevity

    },


    HelloWorldSettings =

    {

        HelloWorldString = "Hello Kobold2D!",

        HelloWorldFontName = "Marker Felt",

        HelloWorldFontSize = 50,

    },

}
With the exception of the uppercase first letter, these settings match the properties of the HelloWorldLayer class in name and data type. I’m sure you can see the connection here. Indeed, the KKConfig class method injectPropertiesFromKeyPath, shown in Listing 16–3, loads the values from the HelloWorldSettings subtable and injects them into the correspondingly named properties of the target class, in this case self.
Listing 16–3. Injecting (Assigning) the Custom Settings to Class Properties
[KKConfig injectPropertiesFromKeyPath:@"HelloWorldSettings" target:self];
By inject I mean if there is a Lua table named HelloWorldSettings, then each setting it contains will be assigned to a correspondingly named property of the target class, in this case self. For example, the setting HelloWorldString will be assigned to the class property helloWorldString if it has the correct data type (NSString*) and isn’t set to be a readonly property.
TIP: By using KKConfig, you can easily make your app data-driven, which for example allows designers and artists to tweak your app’s behavior without having to modify source code. Data-driven development also comes to shine when you have a variety of game objects with the same or similar settings. You don’t want these settings spread throughout your code, you will want to centralize them in a single file that provides the necessary overview.
After injection, the three properties will contain the same values as the HelloWorldSettings Lua table. They are ready to be used by the label:
CCLabelTTF* label = [CCLabelTTF labelWithString:helloWorldString

                                       fontName:helloWorldFontName

                                       fontSize:helloWorldFontSize];
Listing 16–4 shows the HelloWorldLayer implementation in its entirety. Apart from the previous call to KKConfig and the use of the CCDirector extensions and platform macros discussed earlier, it’s still 100 percent cocos2d code.
Listing 16–4. Hello Kobold2D Implementation File
#import "HelloWorldLayer.h"


@implementation HelloWorldLayer

@synthesize helloWorldString, helloWorldFontName;

@synthesize helloWorldFontSize;


-(id) init

{

    if ((self = [super init]))

    {

        CCDirector* director = [CCDirector sharedDirector];


        CCSprite* sprite = [CCSprite spriteWithFile:@"ship.png"];

        sprite.position = director.screenCenter;

        [self addChild:sprite];


        // get the hello world string from the config.lua file

        [KKConfig injectPropertiesFromKeyPath:@"HelloWorldSettings" target:self];


        CCLabelTTF* label = [CCLabelTTF labelWithString:helloWorldString

                                               fontName:helloWorldFontName

                                               fontSize:helloWorldFontSize];

        label.position = director.screenCenter;

        label.color = ccGREEN;

        [self addChild:label];


        // print out which platform we're on

        NSString* platform = @"(unknown platform)";


        if (director.currentPlatformIsIOS)

        {

            // add code

            platform = @"iPhone/iPod Touch";


            if (director.currentDeviceIsIPad)

                platform = @"iPad";


            if (director.currentDeviceIsSimulator)

                platform = [NSString stringWithFormat:@"%@ Simulator", platform];

        }

        else if (director.currentPlatformIsMac)

        {

            platform = @"Mac OS X";

        }


        CCLabelTTF* platformLabel = [CCLabelTTF labelWithString:platform

                                                       fontName:@"Arial"

                                                       fontSize:24];

        platformLabel.position = director.screenCenter;

        platformLabel.color = ccYELLOW;

        [self addChild:platformLabel];
        glClearColor(0.2f, 0.2f, 0.4f, 1.0f);

    }


    return self;

}


@end
Notice the way I determine the platform (iOS, Mac OS) and device type (iPad, iOS Simulator) using director properties such as currentPlatformIsIOS and currentDeviceIsSimulator. These are some of the extensions to CCDirector I mentioned earlier.
You may be wondering why I haven’t used preprocessor macros like __IPHONE_OS_VERSION_MAX_ALLOWED to determine platform and device type. First, in Kobold2D I wouldn’t have used the hard-to-remember and verbose SDK macros. Instead, Kobold2D provides the simpler macros KK_PLATFORM_IOS and KK_PLATFORM_MAC to differentiate between the two supported platforms. If needed, you can also differentiate between iOS device and iOS Simulator by using the macros KK_PLATFORM_IOS_DEVICE and KK_PLATFORM_IOS_SIMULATOR.
The real reason of not using preprocessor macros and why conditional compilation with #ifdef should be used only as a last-resort measure is this: the compiler is your friend! Every time your code is compiled, the compiler lets you know that everything is in order or tells you whatever is technically or syntactically wrong with your code. It may be annoying at times, but the compiler is only letting you know that you made a mistake or forgot something. Allowing as much code as possible to be compiled by the compiler every time you build the code is so important for cross-platform development that the added overhead of platform and device runtime tests are entirely negligible.
Once you do cross-platform development, you’ll likely spend a lot of time working on and compiling code for only one platform. Any code that is within an #ifdef for the other platform is invisible to the compiler, and it won’t complain about errors. Now as soon as you switch targets and compile for the other platform, you’ll likely run into errors that weren’t there before. They may be related to code changes that you made an hour ago, a day ago, or maybe even a week ago.
Not only does it cause a lot of mental load to figure out which code change caused the error and what the correct fix will be, it’s also frustrating because you’ll frequently find that switching target platforms results in build failures. Either you’ll spend more time than necessary building code regularly for both target platforms or you’ll simply give up, maybe with the good intention of porting the project when it’s finished. However, porting a completed project is much more work than developing it for both platforms from the beginning. Why? Because as long as your code is written for only one platform, your code could as well be entirely within an #ifdef.
Code that compiles works. At least it’s technically correct. Immediate build errors are more likely to be corrected right away and easier to fix because you still have the most recent code changes in your short-term memory.
Running Hello World with iSimulate
If you run the Hello World project on the iPhone or iPad Simulator, you’ll notice a network connection dialog as in Figure 16–4. You’ll also notice the iAd banner that shows up because it was enabled in config.lua.
NOTE: If you see an bannerView:didFailToReceiveAdWithError error in your log with the message “The operation couldn’t be completed. (ADErrorDomain error 1.),” then this is most likely caused by the app not being set up for iAd. The iAd service needs to be enabled for each app and each developer in iTunes Connect. You’ll find more information about enabling iAd for your app at https://itunesconnect.apple.com/docs/iTunesConnect_DeveloperGuide.pdf.
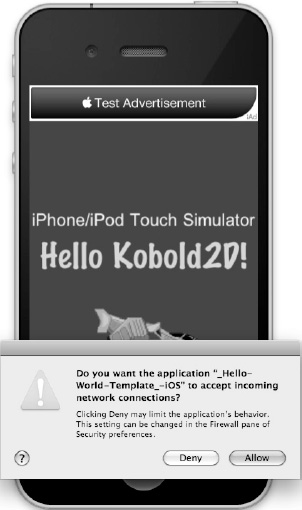
Figure 16–4. Network connection warning caused by iSimulate
The incoming network connections warning dialog is caused by iSimulate. It’s nothing to worry about. The iSimulate library accepts incoming connections from the iSimulate app, which you can run on your WiFi-enabled iOS device in order to remote control the simulator. In other words, iSimulate enables you to test your game using your device but running in the simulator. All the features the simulator doesn’t have, like GPS, Accelerometer, or Multi-Touch, can be simulated with the iSimulate app. It can be a real time-saver.
For example, if you have iSimulate running on your device and connected to your Mac, you will receive messages like accelerometer:didAccelerate: in your app even though the simulator doesn’t have an accelerometer. This makes iSimulate an invaluable tool if you consider that running your app is usually a lot faster than deploying it to a device. I recommend giving it a try with Kobold2D’s User-Inputtemplate project.
iSimulate is available on the App Store and normally costs $15.99: http://itunes.apple.com/app/isimulate/id306908756.
Doodle Drop for Mac with KKInput
So far, all the projects we created throughout the book were written for iOS. If you install Kobold2D, you’ll notice that not only are most of the book’s projects included in Kobold2D, almost all of them also have a Mac OS version.
So, what would it take to make a project like Doodle Drop from Chapter 4 work both on Mac and on iOS? Not that much actually. It turns out that by far the biggest change is related to handling user input. Thankfully, Kobold2D provides a platform-agnostic user input handler that simplifies user input dramatically by allowing you to test the state of input devices at any time in any class and method.
First, the accelerometer:didAccelerate event method has been removed since it is no longer needed. Instead, KKInput will be responsible for providing the app with acceleration values. We tell it to activate accelerometer input and to set the filtering factor in the init method of the Doodle Drop GameLayer class:
// Yes, we want to receive accelerometer input events.

[KKInput sharedInput].accelerometerActive = YES;

[KKInput sharedInput].acceleration.filteringFactor = 0.2f;
Enabling the accelerometer will first test whether the device supports the Core Motion framework. If so, acceleration values will be provided by Core Motion, which gives us a tiny performance benefit. In all other cases, the standard UIAccelerometer interface is used to obtain acceleration values. The filtering factor is a percentage that determines how responsive the game character will react to sudden changes in acceleration.
Listing 16–5 shows the modified Doodle Drop update method that includes user input handling for both platforms.
Listing 16–5. Handling User Input for Both Platforms with KKInput
-(void) update:(ccTime)delta

{

    KKInput* input = [KKInput sharedInput];

    if (isGameOver)

    {

        if (input.anyTouchEnded ||

            [input isKeyDown:kKKKeyCode_Space] ||

            [input isKeyDown:kKKKeyCode_Return])

        {

            [self resetGame];

        }

    }

    else

    {

        [self acceleratePlayerWithX:input.acceleration.smoothedX];


        if ([input isKeyDown:kKKKeyCode_LeftArrow])

        {

            [self acceleratePlayerWithX:-keyAcceleration];

        }

        else if ([input isKeyDown:kKKKeyCode_RightArrow])

        {

            [self acceleratePlayerWithX:keyAcceleration];

        }


        // The rest of the update code remained unchanged.

        …

    }

}
The update method processing is split into handling the gameover and the rest of the code that runs while the game is commencing. If the game is over, we simply check whether any touch ended or the spacebar or Return key was pressed before resetting the game, starting over.
While the game is running, the player’s velocity is updated either based on the input.acceleration.smoothedX value or based on a constant keyAcceleration value when either the left or right arrow key is held down. The acceleratePlayerWithX method is shown in Listing 16–6 later in the chapter, which contains the code previously in the accelerometer:didAccelerate method.
KKInput provides you with built-in high-pass and low-pass filters via properties of the KKAcceleration class exposed by the input.acceleration property. You can access the raw acceleration, the smoothed (low-pass filtered), and the instantaneous (high-pass filtered) values. In most games, you will want to use the smoothed values, which provides steady acceleration and cancels out sudden, short-lived movements. Instantaneous acceleration values are useful whenever you want to react to sudden acceleration movements, such as shaking or quickly flipping the device.
You’ll notice that the input code does not use conditional compiling via #ifdef. If you run this code on Mac, the anyTouchEnded method is guaranteed to return NO all the time. Likewise, when running on iOS, the isKeyDown method always return NO, since there’s no keyboard available. And the input.acceleration values are all 0 on Mac OS.
If it seems wasteful to you to test for keyboard events on iOS and touch events on Mac OS, please keep in mind that the additional overhead is very small while the benefit of always compiling all your code guarantees that it continues to work for both platforms. If the platform-specific code is extensive, you can always branch it using the Kobold2D CCDirector extensions like currentPlatformIsIOS and currentPlatformIsMac.
Listing 16–6. Updating the Player’s Velocity
-(void) acceleratePlayerWithX:(double)xAcceleration

{

    // adjust velocity based on current accelerometer acceleration

    playerVelocity.x = (playerVelocity.x * deceleration) +

        (xAcceleration *sensitivity);


    // we must limit the maximum velocity of the player sprite, in both directions

    if (playerVelocity.x > maxVelocity)

    {

        playerVelocity.x = maxVelocity;

    }

    else if (playerVelocity.x < -maxVelocity)

    {

        playerVelocity.x = -maxVelocity;

    }

}
Everything else requires no changes to create the Mac OS port thanks to the fact that no hard-coded positions and offsets were used. Nevertheless, it makes sense for game play reasons to restrict the Mac window size to that of an iPhone in config.lua:
WindowFrame = RectMake(300, 300, 320, 480),
The Lua function RectMake creates a rectangle with the given origin (300, 300) and size (320, 480). RectMake creates rectangles that are compatible with CGRect or NSRect, depending on the platform. Additional Lua utility functions are PointMake and SizeMake.
Entering the Third Dimension with cocos3d
In February 2011 the first release of the cocos3d add-on library made it possible to add the third dimension to cocos2d apps with relative ease. Cocos3d is modeled after the cocos2d API and is currently available as an early beta version, labeled v0.6.1. Sadly, it’s not part of the cocos2d-iphone distribution, and correctly setting up a cocos3d project is not as straightforward as one would hope it to be. Installing Kobold2D is by far the easiest way to try cocos3d.
Kobold2D comes with a Hello-Cocos3D template project, which is based on the official cocos3d project template and includes the necessary changes to integrate it smoothly with Kobold2D.
You can find the documentation for cocos3d on the official web site at http://brenwill.com/cocos3d.
Changes to the AppDelegate Class
The entire start-up code for cocos3d is in the AppDelegate class. Although it was entirely empty in the Hello World project, the class can now be put to good use. The AppDelegate interface now has a new instance variable:
#import "KKAppDelegate.h"

#import "CCNodeController.h"


@interface AppDelegate : KKAppDelegate

{

    CCNodeController* nodeController;

}

@end
The CCNodeController is provided by cocos3d and is needed for two things. For one, it allows you to perform autorotation with cocos3d. The regular RootViewController class is not fully compatible with cocos3d; it tends to stretch the view or displaces nodes while rotating. So, cocos3d provides its own view controller solution for autorotation, unfortunately without the rotation animation.
The other benefit of the CCNodeController class is that it has built-in support for the UIImagePickerController, which enables your app to show the camera view in real time as the background of the scene. This allows you to create so-called augmented reality apps.
Figure 16–5 shows an example of my iPhone’s camera scanning the solar system poster I have above my computer on the wall. The image gives the phrase “Hello World” an entirely new meaning (depicted is the earth, Erde in German).
CAUTION: Check the framerate counter in Figure 16–4. My poor iPhone 3G (second-generation device) was heavily stressed by the real-time camera background. It was averaging around 20 frames per second (fps), and even without rendering the Hello World 3D model it did not go above an average somewhere between 30 to 40 fps. My iPod touch 4 did not perform that much better and averaged at about 40 frames per second, with or without the 3D model. Apparently it has enough reserves for rendering 3D models in this scenario. The performance tests were made with release builds, of course.
Despite the performance penalties, I hope you’ll come up with cool augmented reality apps. Just witnessing the cocos2d/cocos3d scene overlaying the live camera view is an inspiring experience!

Figure 16–5. Augmented reality: using the iPhone’s camera as real-time background image
Setting up the cocos3d node controller to show the camera background is easy as pie. In Listing 16–7 you only need to set the variable useNodeController to YES, and the camera background is automatically enabled, if the feature is available. It’s only one line of code that tests and enables the camera overlay:
nodeController.isOverlayingDeviceCamera = nodeController.isDeviceCameraAvailable;
This code assigns the result of the camera availability check directly to the isOverlayingDeviceCamera property, enabling it on every device that has a camera.
The AppDelegate implementation in Listing 16–7 uses the initializationComplete code to perform all that is needed to set up cocos3d. This method is perfect because it is called right after everything is set up except for the actual running scene. And since you’ll be running a scene in this method either directly with the CCDirectorrunWithScene method or indirectly via the CCNodeController’s runSceneOnNode method, the FirstSceneClassName setting in config.lua will be silently ignored.
Listing 16–7. The AppDelegate Implementation of a cocos3d Project
#import "AppDelegate.h"

#import "Hello3DLayer.h"

#import "Hello3DWorld.h"

#import "HelloWorldLayer.h"


@implementation AppDelegate


-(void) initializationComplete

{
    CC3World* cc3World = [Hello3DWorld world];

    CC3Layer* cc3Layer = [Hello3DLayer node];

    cc3Layer.cc3World = cc3World;


    [cc3World play];

    [cc3Layer scheduleUpdate];


    ControllableCCLayer* mainLayer = cc3Layer;


    BOOL useNodeController = NO;

    if (useNodeController)

    {

        CCLayer* helloLayer = [HelloWorldLayer node];

        [mainLayer addChild:helloLayer z:-1];


        nodeController = [[CCNodeController controller] retain];

        nodeController.doesAutoRotate = YES;

        [nodeController runSceneOnNode:mainLayer];


        // Let's have some fun with the camera

        nodeController.isOverlayingDeviceCamera=nodeController.isDeviceCameraAvailable;

    }

    else

    {

        CCScene* scene = [CCScene node];

        CCLayer* helloLayer= [HelloWorldLayer node];

        [scene addChild:helloLayer];

        [layer addChild:mainLayer];

        [[CCDirector sharedDirector] runWithScene:scene];

    }

}

@end
The cocos3d scenes always consist of two parts. An instance of the CC3World class defines the world, loads the 3D models, and sets up the 3D scene. The CC3World is also the root class of the 3D scene and contains nodes derived from CC3Node that make up the 3D scene hierarchy.
A CC3Layer class instance is responsible for integration with the cocos2d engine. The CC3Layer class instance can be added to any cocos2d node, because it is derived from the cocos2d class CCLayerColor. In addition to that, it holds a reference to the CC3World instance and is responsible for updating the 3D world.
This explains why you need to call both play on the cc3World and scheduleUpdate on the cc3Layer. The layer’s update method will be forwarded the world, which can be either in a play or pause state depending on whether the play or pause method was called last. Whenever you call pause on the CC3World, the world will not be rendered, but the last frame remains visible. Also, any cocos2d actions that are currently running on 3D nodes will continue to be updated and move the 3D nodes. To pause and resume the actions as well, you need to pause or resume each 3D node that is running an action:
[[CCActionManager sharedManager] pauseTarget:node];

[[CCActionManager sharedManager] resumeTarget:node];
The cocos3d start-up code implementation I chose allows you to switch between using the cocos3d node controller, which enables autorotation, and the live camera background. In this case, the HelloWorldLayer is added as a child to the CC3Layer and with a negative z value so it is displayed entirely behind the cocos3d layer. You could also use a positive z value of 1 or higher to display the scene in front of the cocos3d layer. Either approach works best if your app is primarily a 3D application that uses only some cocos2d elements, for example for its user interface.
The alternative to using the CCNodeController is to create the regular cocos2d scene and then add the CC3Layer as a child of the scene. Now you can easily decide which of the 2D nodes in the scene are behind or in front of the cocos3d layer by adjusting their z value. This approach is preferable if your app is primarily 2D but you want to be able to render 3D models occasionally. It will also be faster since it does not use the CCNodeController. Just to give you some ballpark numbers, my iPhone 3G renders 30 fps with the CCNodeController enabled and 50 fps without, whereas my iPod touch 4 is unaffected and maxed out at 60 fps either way.
Whichever approach you choose, you can always embed the CC3Layer in a cocos2d scene so that some cocos2d nodes are behind and others are in front of the 3D nodes. It’s a simple matter of using the addChild method’s z parameter or, respectively, the zOrder property. You can see a sandwiched 3D model in Figure 16–6.
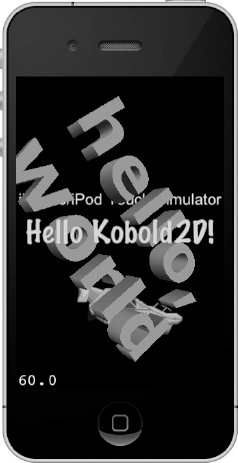
Figure 16–6. You can have cocos2d nodes both in front of and behind the CC3Layer.
The World According to cocos3d
The CC3World class forms the root node of the cocos3d node hierarchy. It is important to note that cocos3d nodes and cocos2d nodes are two separate things and cannot be mixed together. The only cocos3d class that you can add to the cocos2d node hierarchy is the CC3Layer class, which inherits from CCLayerColor.
NOTE: I’ll skip the description of the CC3Layer class in the Hello Cocos3D project since it’s an empty stub class and essentially the same as a CCLayer class.
All other cocos3d nodes inherit from CC3Node, which despite its name is not derived from CCNode. Interestingly, though, you can use cocos2d actions with CC3Node classes, as you’ll see in the initializeWorld method in Listing 16–8.
Listing 16–8. Initializing the 3D World
-(void) initializeWorld

{

    CC3Camera* cam = [CC3Camera nodeWithName:@"Camera"];

    cam.location = cc3v( 0.0, 0.0, 5.0 );

    [self addChild: cam];


    CC3Light* lamp = [CC3Light nodeWithName:@"Lamp"];

    lamp.location = cc3v( -2.0, 0.0, -2.0 );

    lamp.isDirectionalOnly = NO;

    [cam addChild: lamp];


    [self addContentFromPODResourceFile:@"hello-world.pod"];


    [self createGLBuffers];

    [self releaseRedundantData];


    // ------------------------------------------


    CC3MeshNode* helloTxt = (CC3MeshNode*)[self getNodeNamed:@"Hello"];

    CCActionInterval* partialRot = [CC3RotateBy actionWithDuration:1.0

                                                          rotateBy:cc3v(0, 60.0, 10.0)];

    [helloTxt runAction:[CCRepeatForever actionWithAction:partialRot]];


    CC3MeshNode* camNode = (CC3MeshNode*)[self getNodeNamed: @"Camera"];

    CCActionInterval* camMove1 = [CC3MoveBy actionWithDuration:4 moveBy:cc3v(0, 0, 8)];

    id camEase1 = [CCEaseBackInOut actionWithAction:camMove1];

    CCActionInterval* camMove2 = [CC3MoveBy actionWithDuration:2 moveBy:cc3v(0, 0, -8)];

    id camEase2 = [CCEaseElasticOut actionWithAction:camMove2 period:0.25f];

    id sequence = [CCSequence actions:camEase1, camEase2, nil];

    [camNode runAction:[CCRepeatForever actionWithAction:sequence]];


    GLfloat tintTime = 8.0f;

    ccColor3B startColor = ccc3(255, 0, 255);

    ccColor3B endColor = { 255, 255, 0 };

    CCActionInterval* tintDown = [CCTintTo actionWithDuration:tintTime

                                                          red:endColor.r

                                                        green:endColor.g

                                                         blue:endColor.b];
    CCActionInterval* tintUp = [CCTintTo actionWithDuration:tintTime

                                                        red:startColor.r

                                                      green:startColor.g

                                                       blue:startColor.b];

    CCActionInterval* tintCycle = [CCSequence actionOne:tintDown two:tintUp];

    [helloTxt runAction:[CCRepeatForever actionWithAction:tintCycle]];

}
The first thing the 3D world needs is a camera through which you view the scene. The camera affects only cocos3d nodes and will not change how cocos2d nodes are displayed. The camera location property defines the position of the camera, which newcomers to the 3D world might find confusing at first. If you move the camera, all cocos3d nodes will move in the opposite direction. Imagine looking through the viewfinder of your camera and then moving the camera to the right, and you’ll see all objects in the camera view moving to the right. It’s the same with CC3Camera except that you have to imagine the screen of the device to be the viewfinder through which you look into the 3D world.
For reference, increasing the values for the camera’s x, y, and z locations will move the camera to the right, up, and toward the viewer, respectively. This will have 3D objects move to the left, down, and away from the viewer (zoom out). Decreasing the x, y, and z location will move the camera view to the left, down, and away from the viewer. The 3D objects will move to the right, up, and toward the viewer (zoom in). Of course, you can always have the camera at a fixed location and move the 3D nodes instead if you find that easier to work with.
A CC3World is not complete without at least one light. Without light, your 3D models would be illuminated equally on all sides and would make them look flat despite being 3D. By default a CC3Light node creates a directional light, comparable to that of a flashlight. If you want to achieve the effect of a lightbulb illuminating all of its surroundings equally (the preferred choice), you need to set isDirectionallyOnly to NO.
With camera and lights set, all that is missing is action. Before we get to that, we need a 3D model to display. You can load 3D models from POD files with the CC3Node method addContentFromPODResourceFile. This will load the POD file and add it as a CC3MeshNode instance to the world. You can later get a reference to this node with the getNodeNamed method and by supplying the name of the mesh as set in the 3D modeling program. The hello-world.pod mesh has the name Hello.
TIP: Cocos3d v0.6.1 supports loading of PowerVR POD filesonly. Additional 3D model file loaders are listed in the road map for Q4 2011 but without specifying which file formats will be supported. Until then, you can either use POD or write your own loader code.
The POD format is an optimized binary format that most 3D modeling applications can’t directly export. However, almost all of them can export to the COLLADA format, which you can then convert to POD. The developer of cocos3d Bill Hollings has an excellent tutorial about converting COLLADA files to the POD format: http://brenwill.com/2011/cocos3d-importing-converting-collada-to-pod.
The tutorial assumes you are using the Blender 3D content creation suite, which is very popular because it’s free and open source. Many other 3D modeling programs cost four- or even five-digit sums. You can get Blender at www.blender.org and overlook some of its oddities. After all, you have just saved a big pile of money.
The method createGLBuffers should be called after loading all 3D mesh models. It optimizes the vertex arrays for rendering. And releaseRedundantData simply performs a cleanup to release some memory afterward.
The second half of the initializeWorld method is left to animations with cocos2d and cocos3d actions. Some additional actions are provided by cocos3d like CC3RotateBy, CC3MoveBy, and essentially all actions that manipulate positions needed to have versions that work in the three-dimensional coordinate system. Other actions like CCSequence, CCRepeatForever, or CCTintTo are from cocos2d. They work as always and can be mixed with cocos3d actions.
In essence, there are three action blocks. The first rotates the Hello World 3D model around its own axis. The second has the camera bounce back and forth. And the third action block performs a repeated color cycle on the Hello World 3D model.
Adding cocos3d to an Existing Kobold2D Project
You can always start with a regular Kobold2D project template and only later decide that you want to include cocos3d features in your app. There’s only one thing that you’ll have to do manually; otherwise, you’ll get runtime errors like this unrecognized selector error:
-[Hello3DWorld addContentFromPODResourceFile:]: unrecognized selector sent to instance
This is a common error that can occur when an app links to a static library that contains Objective-C categories.
CAUTION: The often proposed simple solution to this problem is to use the –all_load linker flag. However, this is not recommended and specifically not for Kobold2D, because the linker would blindly include each and every library and framework whether it’s being used or not. The final executable will be several megabytes larger if you use the –all_load flag in a Kobold2D project.
The recommended solution is to explicitly specify the library that must be forcibly included in the executable via the –force_load linker flag:
-force_load $(BUILT_PRODUCTS_DIR)/libcocos3d-ios.a
You will have to append this line to the build setting Other Linker Flags of the target that needs the cocos3d library. Depending on which other libraries are already being linked to your app, the executable size will increase by several hundred kilobytes up to around 1.5 megabytes. Since that’s a size that isn’t negligible, cocos3d is currently not fully integrated with Kobold2D and requires this manual step.
Summary
I hope that this chapter has given you a good impression of how working with Kobold2D will help you make games and apps easier and with more possibilities. And on the www.kobold2d.com web site, you’ll have access to the API documentation of all libraries, a programming guide, the support forum, the feedback section, and a road map that allows you to see how Kobold2D development is progressing.
One of the most important features of Kobold2D is its ability to use Lua tables to define settings. You’ll then be able to feed these settings directly into properties of class instances with just a single call to the KKConfig class. This is even more important if you work with others who need to make changes to the app but do not want to or should not have to change the source code.
Kobold2D also makes cross-platform development for iOS and Mac OS easier and provides a convenient, one-stop class for handling user input, as you saw in this section. You’ll also find plenty of template projects in Kobold2D based on projects created throughout the book and subsequently ported to work on Mac OS.
New to the cocos2d world is the cocos3d add-on library. You learned about the basics of cocos3d in the discussion of the Hello Cocos3D template project. And I think you’ll appreciate it that you can readily try cocos3d now and understand the basic distinction of the CC3World being the root node for the cocos3d nodes while the CC3Layer allows you to plug the 3D world anywhere into a cocos2d scene.
What’s left is for you to go to www.kobold2d.com now to download the latest version, install it, and start experimenting with the provided template projects.