
Chapter 7
Lion’s Applications
Depending on how Lion found itself on your computer, the applications you will find installed on said computer will vary. If you upgraded your computer from a previous version of Mac OS X, then all of your existing applications should be present and accounted for. If you purchased a new Mac that came with Lion, then it should also have iLife installed, plus any optional software you chose to have preinstalled. If you installed Lion on a clean, formatted volume, then you will only get the software that comes with Lion. Beyond essential operating system applications such as the Finder, Launchpad, App Store, and so on, Lion includes a useful collection of additional software including Mail, Safari, FaceTime, Address Book, iCal, iTunes, Photo Booth, Dictionary, and more. In the next section of this book we will cover the contact, communication, and Internet applications, and beyond that we will cover many of utilities and development tools, but that still leaves us with some fun and useful applications to cover. In this chapter we will provide an introduction to these applications, including
- iTunes
- QuickTime
- Preview
- Photo Booth
iTunes
iTunes (Figure 7–1) was originally designed as a simple music library and playback application. It has since moved beyond just music, and today, combined with the iTunes Store, iTunes can download and play back Internet streaming radio, movies, and TV shows, and it can even be used to purchase and download applications for installation on your iPhone or iPod touch. Combined with an Apple TV or one of many Apple AirPort products, you can even use iTunes to stream music and video around your network.
While iTunes is feature rich, it’s still easy to use. The iTunes toolbar provides the basic controls to start, stop, and control the media playback, while the main window area is designed to select and manage your media.
The main window provides a column along the left side to select your media libraries (sorted by type) and your playlists, along with sections for the iTunes Store and Ping (a new social networking feature), and the Genius feature. The main view area to the right is where you can view your media in a number of different views (selectable via the view toggle in the toolbar): List view (Figure 7–1), Album List view (Figure 7–2), Grid view (Figure 7–3), and Cover Flow view (Figure 7–4). This area also allows you to work with the other features. Finally there is a new optional sidebar that provides your most recent Ping activity.
TIP: With List view you can also display a media browser by selecting View > Column Browser > (Show/Hide) Column Browser (Command-B). The Column Browser makes it very easy to find the music you are looking for by allowing you to search by artist, genre, and album at the same time. The version of iTunes that ships with Lion allows a great deal of flexibility with the Column Browser. Not only do you have control over what columns to show, but you can adjust the position of the columns to be located to the left of your media list or in the traditional top view.
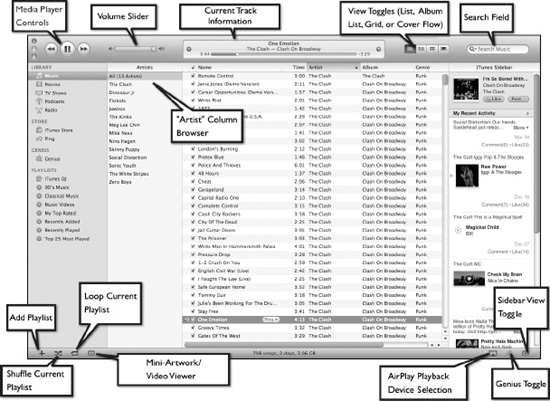
Figure 7–1. The iTunes interface showing a music library in List view with a single “Artists” Column Browser
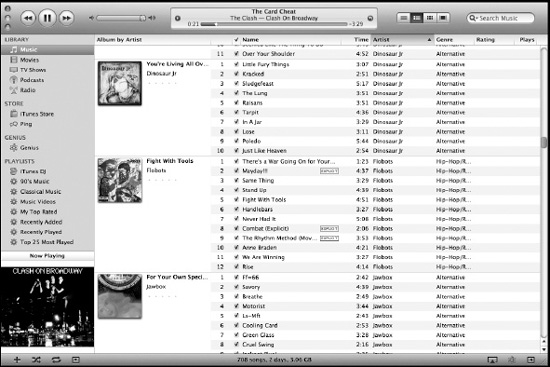
Figure 7–2. Viewing your iTunes library in Album List view groups songs by “Album by Artist.”
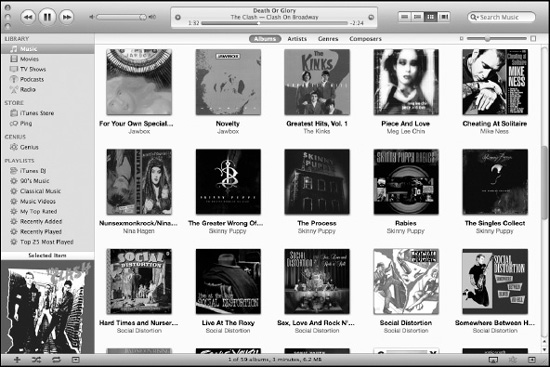
Figure 7–3. Grid view presents a view of all of your albums.
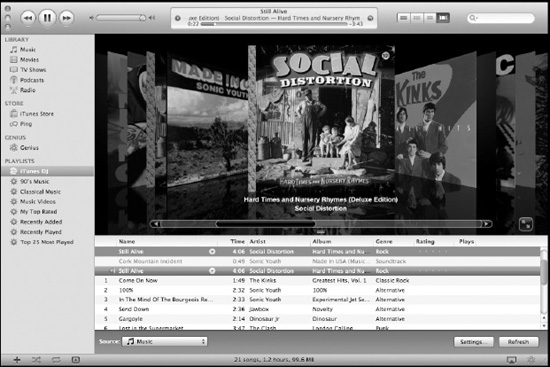
Figure 7–4. Cover Flow view lets you “flip through” album covers to find what you are looking for. Also, in certain modes, like iTunes DJ mode, it can provide visual cues to what artists are coming up next.
NOTE: The views, while not exactly the same, are similar for all types of iTunes media (movies, TV shows, podcasts, radio, etc.).
Importing Media into iTunes
In order to take advantage of iTunes, you must first import your media into it. The way this is done depends on what sort of media you are starting with. If you already have a collection of supported digital media files (including MP3, AAC [Advanced Audio Coding], and MOV), then you can use the File > Import... command from the menu bar (though drag and drop is often easier).
NOTE: The Advanced tab in the iTunes preferences contains a number of options that are relevant to importing media. For example, you may want to select the “Copy files to iTunes Music folder when adding to library” and “Keep iTunes Music folders organized” options prior to importing any media.
iTunes will also let you import music directly from CDs into your music collection. When iTunes is running, if you insert a music CD into your SuperDrive, iTunes will ask if you’d like to import the CD to your collection. When importing, iTunes will take the music files from your CD and convert them to a new digital format. By default iTunes will convert your music to high-quality AAC files, which are not only suitable for iTunes playback, but also compatible with most modern mobile audio devices, including iPads, iPods, and iPhones. From the General tab in the iTunes preferences, you can adjust the behavior of iTunes when you insert a CD, and you can click the Import Settings... button to open a dialog that will allow you a great deal of flexibility in choosing what digital format iTunes will import your music into. Depending on your needs and desires, you can import CDs in various AAC, MP3, AIFF, WAV, and Apple Lossless (an uncompressed format for maximum sound quality) formats.
NOTE: Which settings are best for importing your CDs is mostly a personal choice. If you are a true audiophile with lots of hard drive space, then of course Apple Lossless format is your best choice (it makes an exact copy of the audio with no loss in quality whatsoever, yet still occupies only half the space as a CD audio file). For everyone else, it becomes a space, quality, and compatibility issue. AAC and MP3 are both compatible with most digital media players; however, MP3 supports many older audio devices that AAC does not. Many people feel that AAC provides better playback quality at the same compression over MP3 (and at higher compression I tend to agree). I find that 256 Kbps AAC (the default iTunes Plus file format) provides excellent audio files while saving considerable disk space over uncompressed (or lossless) formats, while 128 Kbps AAC provides good enough sound quality for most situations and allows you to cram lots of music onto your iPod.
NOTE: When you insert your CD, if you are connected to the Internet, iTunes will seek out information about the CD you inserted and automatically fill in the CD and track details (unless you turned this feature off in the iTunes preferences). If for some reason the details are wrong, or you’d like to change them, then select the track (or tracks) you wish to alter, and select Get Info from the shortcut menu. The Get Info box will not only reveal more information about the tracks and album, but will allow you to freely edit the information.
A third way to get music into your iTunes library is to buy it from the iTunes Store (Figure 7–5) (formerly know as the iTunes Music Store before Apple started selling videos and mobile applications there).
The iTunes Store, which now ranks as one of the leading music retailers in the world, provides a huge selection of music new and old, along with an ever-increasing selection of movies, TV shows, music videos, and audio books. Most of this is for sale, although there are occasionally freebies available for download.

Figure 7–5. The iTunes Store in iTunes
To buy music from the iTunes Store, you must first sign in with your Apple ID (if you have a MobileMe account, that info is also your Apple ID unless you’ve previously registered using some other information).
ITUNES STORE FILES, DRM, AND ITUNES PLUS
NOTE: While you can easily export your own iMovies and other QuickTime movies so that they will appear in iTunes (and sync with your iPod/iPhone), Apple doesn’t provide a way to import DVDs into iTunes. This could be because Apple sells movies on the iTunes Store, but it’s unlikely. More likely is that importing movies from DVDs is somewhat legally ambiguous. From a technical standpoint, it’s perfectly legal to make a copy of a movie you own—however, to make a copy of a DVD, you must decode the content that is actually encrypted on the disk, which may run afoul of the Digital Millennium Copyright Act (DMCA, which makes it illegal to circumvent access control mechanisms protecting copyrighted works except under certain circumstances). Many people may justify that making a copy for personal use falls into the exemption category, but the movie industry and some others tend to disagree. Either way, if you wish to do this, it’s usually a two-step process: ripping the DVD (or converting the files on the DVD for use on your hard drive), and then converting the files into a format more suitable for playback on other devices. To rip a DVD, I currently recommend RipIt (http://ripitapp.com/), but only you can decide if the $18.99 licensing fee is worth it to you. HandBrake (http://handbrake.fr/) is another excellent tool for converting a DVD file to the iPhone-ready M4V format; however, the newest version removes that ability to rip DVDs natively.
Creating Playlists
Once you have some music in your iTunes library, you may want to create playlists of your favorite tunes for specific occasions. iTunes provides a number of interesting ways to create playlists. The most basic playlist is one you create yourself by selecting each song from your library and then adding it. To create one of these playlists, simply click the + button in the lower-left corner of the iTunes main window; this will create a blank playlist for you to name and add any songs you wish (using drag and drop).
iTunes also has the ability to create smart playlists. These are like smart folders in that you select some search criteria, and iTunes will automatically populate the smart playlist with songs that match the criteria. iTunes comes with a number of common smart playlists already (Recently Played, Recently Added, My Top Rated, and more). To create your own, hold down the Option key, and the + button you would use to add a regular playlist will turn into a gear icon. Clicking this gear button will open up a dialog box for you to name and define your own smart playlist.
One final way to create a playlist is using iTunes Genius feature. The iTunes Genius feature attempts to analyze your music collection so that you can pick any song to base a playlist on. iTunes, using the Genius feature, will attempt to create a playlist of songs that mesh well with the song you started with. Additionally, upon analyzing your music library, the Genius feature may create its own Genius mixes based on the songs in your library. (This feature will also be used to provide you with a lit of music in the iTunes Store that you may want to purchase.)
NOTE: iTunes Genius doesn’t just create playlists, it analyzes your entire library. This information is also used by the iTunes Store to help make recommendations for music you may wish to buy, and also to help feed the data that devises the Genius results in the first place. This means two things: first, you will need an iTunes Store account for this to work (you’ll also need an account if you want iTunes to automatically attempt to download album covers for you); and second, the information you send will be used to help sell you stuff. Now, since the personal data is restricted to your own account, there really isn’t an immediate privacy issue here, but if you don’t want people collecting marketing information about your music likes and dislikes and then using it to try to sell you stuff (though really in a noninvasive way), then you may not want to activate this feature. (Personally I use it and find it fairly interesting).
Sharing and Streaming iTunes Media
iTunes allows you to share your iTunes library with others on your network. You can enable this from the Sharing tab in the iTunes preferences. This will allow your library to show in the iTunes libraries of other people on your network. Likewise, you can view and play songs from other users on your network who are sharing their libraries.
NOTE: DRM-protected iTunes Store files can’t be shared unless the receiving computer is one of the five computers authorized to play back your iTunes DRMed files. In fact, if you attempt to play one from an unauthorized computer, the music will stop.
Besides sharing your files, you can also stream your files. Music files can be streamed to other devices that utilize Apple’s AirPlay protocol, such as AirPort and AirPort Expresses equipped with speakers, as well as Apple TV systems. Video can be streamed to Apple TV systems. To stream your files, select the output source from the drop-down menu in the lower-right corner of iTunes.
To fully take advantage of Apple TV with iTunes, you must also set up Apple TV in the Apple TV iTunes preferences.
NOTE: AirPlay (formerly known as AirTunes) is a protocol that allows you to stream music from your iTunes library to other devices. Current receiving devices include AirPorts and AppleTVs, as well as a growing number of third-party devices.
Syncing iPods and iPhones
When you connect an iPod or iPhone to your computer, the device will show up as a device in your iTunes library. Selecting the device will allow you to configure the settings, which will range from simple for an old iPod shuffle (Figure 7–6) to more complex for an iPhone (Figure 7–7). After you set your settings, click the Apply button to resync your device with the new settings.
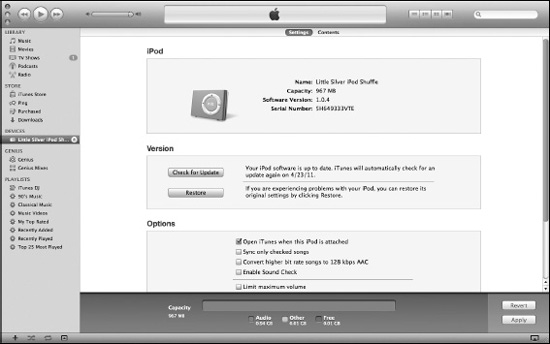
Figure 7–6. Device settings allow you to update and apply settings to iPods and iPhones. For an iPod shuffle, there aren’t too many options.
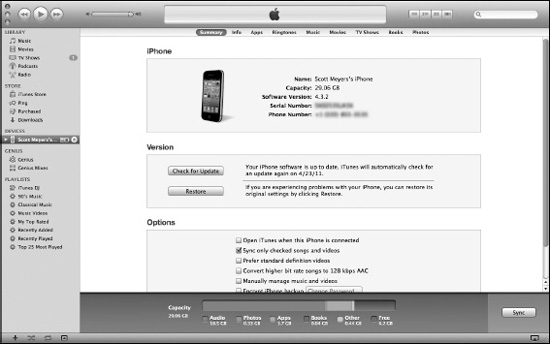
Figure 7–7. Due to its enhanced capabilities, iTunes displays quite a few more options when an iPhone is connected to it.
If you use an iPod touch, iPhone, or iPad with iTunes, you can take advantage of iTunes to help manage the applications on your device directly from iTunes. Clicking the Apps tab will present you with a listing of all available mobile apps on your computer, along with a view of the apps installed on your “i” device (Figure 7–8). From this view you select which apps you want installed, as well as arrange how they will appear on the device. The changes will take effect when you sync your device with iTunes.
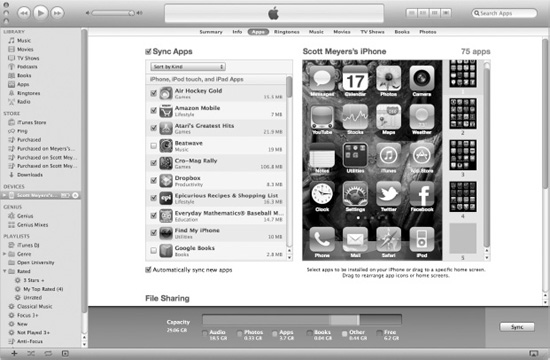
Figure 7–8. iTunes provides a very nice interface for managing mobile apps on iPod touches, iPhones, and iPads.
QuickTime Player
QuickTime itself falls into two general areas: there are all the QuickTime technologies that exist behind the scenes in the system that make the music play and the videos go, and there’s QuickTime Player (Figure 7–9), which provides an application for viewing QuickTime media.
By default, QuickTime Player is simply a viewer for various media types, including, of course, QuickTime movies, but also a wide range of other video, audio, and image formats. Generally, when you double-click a media file that QuickTime Player is set to play back, QuickTime Player will open automatically and start playing the file.
NOTE: QuickTime Player is only one way to play back QuickTime media. QuickTime can also be embedded in web browsers and integrated into other applications (e.g., iTunes is essentially a special-purpose media player based upon QuickTime).
QuickTime also provides the means to extend its capabilities with special plug-in files (called codecs) that allow it to play back other media formats.
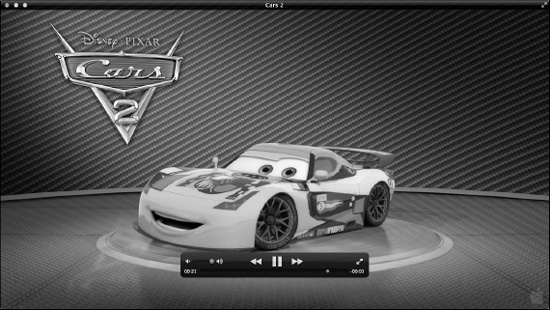
Figure 7–9. A video playing in QuickTime Player
Beyond media playback, QuickTime Player enables you to create and record new media files right from QuickTime Player by choosing File > New Movie Recording (Option-Command-N), File > New Audio Recording (Option-Control-Command-N), or File > New Screen Recording (Control-Command-N) from QuickTime Player’s menu bar This will open a record window to record the media. The screen-recording option, the newest to find its way into QuickTime Player, is especially handy for creating simple screencasts directly from your computer.
TIP: QuickTime certainly isn’t the only game in town. While it is an excellent product that works well with a wide range of formats, many popular formats are incompatible with QuickTime. QuickTime itself provides a plug-in API so third parties can create plug-ins that will playback nonnative formats; however, many people who deal with a wide range of different media formats will opt for more professional tools that will handle a wider range of formats. For many users without the budget to invest in professional media tools, the open source VLC Media Player is a simple, well-supported alternative to QuickTime Player. For more information about VLC Media Player and to download it, visit www.videolan.org/vlc/.
Preview
Preview (Figure 7–10) is to PDF and image files what QuickTime Player is to video. It provides an excellent alternative to Adobe’s Acrobat Reader for viewing PDF files, complete with support for performing text searches, copying and pasting text from a PDF, viewing encrypted PDFs, creating bookmarks, previewing pages, and using annotation capabilities. Beyond that, it’s a multiformat image viewer that allows you to quickly open a wide range of image formats.
Figure 7–10. A PDF document open in Preview
Besides viewing images, Preview also gives you the ability to do some minor image editing, including image color adjustments, cropping, resizing, and saving in an array of image file formats.
Photo Booth
Photo Booth is a fairly silly yet highly entertaining application that takes advantage of the iSight camera (aka FaceTime camera) that is attached to most new Macs (except Mac Pros and Mac minis), as well as built into Apple’s line of LED Cinema Displays. When you launch Photo Booth, it will automatically fire up the camera built into your computer and allow you to capture photos or videos.
Once Photo Booth is launched, you can switch between a single picture, four quick pictures (just like a real photo booth!), and a video mode, using the button on the left below the preview area. You can also apply effects to the images or video by clicking the Effects button and scrolling through the effect previews. All the images and videos shot with Photo Booth will scroll across the bottom. Selecting an existing image will open it up in the preview area (Figure 7–11), allowing you to send the image to someone through Mail, add the image to iPhoto, or use the image as your iChat or Account icon.

Figure 7–11. Photo Booth displaying a snapshot using the Comic Book effect
Other Default Lion Applications
Lion comes with a number of other applications for various purposes that aren’t covered elsewhere in this book. These applications are described in Table 7–1.

Summary
Besides these basic applications, which range from indispensable to at least sort of interesting, Apple provides a number of other common applications, many of which we talk about in other areas of this book. In the next chapter we will look at connecting to and working on the Internet. There we will introduce a number of additional applications that are included with Lion.