
Chapter 6
Installing and Removing Applications
Mac OS X Lion comes with a wide variety of standard applications for many common computer tasks, including applications for using the Internet (including Mail and Safari), applications for viewing media (including iTunes and DVD Player), and more. If you recently bought your Mac new, then it likely included some additional bundled software, including iLife. No matter what software your computer came with, there will likely be a time when you wish to add to your collection of applications. This chapter will show you how to find and install new applications, and how to manage the applications once they are installed.
This chapter will cover
- Using the App Store application
- Installing application packages
- Removing installed applications
NOTE: In this chapter we’ll dig into many nuances of installing and managing the applications on your Mac. This isn’t meant to confuse or complicate the process, but to provide a solid understanding. In general, installing an app on your Mac is exceedingly easy, and the process is self-explanatory; we just want to make sure that you are prepared for the rare cases when it isn’t.
Introducing the Mac App Store
Finding software for the Mac has not always been easy. In the past, if you walked into a software-selling retailer, you might easily miss the small section of Mac software hidden among the rows of Microsoft Windows software (if there was any Mac software at all). Seasoned Mac users did not fret, however; long ago they learned that there is an abundance of Mac software for most every need. It often required a bit of digging on the Internet to research, locate, and download or order the software you were looking for, but the software was there, much to the chagrin of many Windows user who say, “Well, a Mac can’t do this.” Only to have the savvy Mac user respond, “Well actually, this application does that quite well, even better I think.”
Even aided by web sites such as VersionTracker (which today is just another part of CNET’s download.com service) and MacUpdate, which provide a running list of new and updated applications, it hasn’t always been easy to discover the full extent of Mac software available. Prior to the release of Lion, Apple decided to help demystify Mac software with the unveiling of the Mac App Store and the App Store application (Figure 6–1).
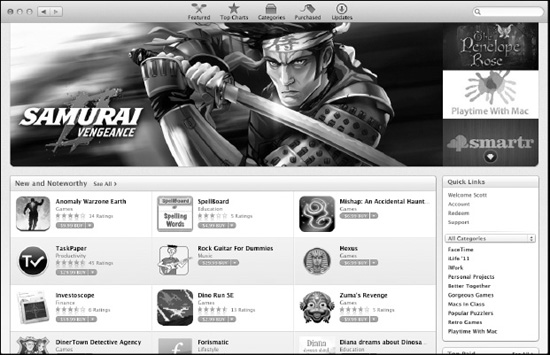
Figure 6–1. The App Store application provides an easy way to browse and buy a wide range of applications for your Mac.
The App Store application is your window to the Mac App Store. You can access this application from Launchpad, from the Applications folder in the Finder, by Selecting App Store... from the Apple menu, or by clicking the App Store icon in the Dock or from Launchpad.
When you first launch the App Store app, you will be asked to either enter your Apple ID or create one. Not only will the account you create store payment information (App Store credit, credit card, and PayPal are all accepted), but it will also be used to register your applications to your computer.
NOTE: In order to utilize the App Store, you will need an Apple ID. Your Apple ID is used not only for the App Store, but also for iTunes and a number of online features. If you have a MobileMe account, your MobileMe account info can be used as your Apple ID; however, you can set up a separate Apple ID if you like. Once you choose your Apple ID, all your purchases will be associated with that ID, so you want to pick one and stick with it. You will also need to store payment info with your Apple ID to purchase applications. If you don’t have or don’t wish to use a credit card, and you don’t want to register with a PayPal account, you can use a prepaid iTunes or App Store card and use that to initially set up your account.
NOTE: If you have multiple computers—say, an iMac and a MacBook Air—you can use your Apple ID to install applications from the App Store to both computers without needing to repurchase an application.
Once you have signed in with your Apple ID, you will be taken to the App Store’s Featured Apps page (notice that the Featured button on the App Store’s toolbar is highlighted). The Featured Apps page calls attention to new or popular Mac OS X applications.
The Featured view is only one of five main views in the App Store application. Moving across the toolbar, there is also a Top Charts view, which presents the most-downloaded applications, broken down by categories and whether the application is free or not. (Paid apps have two categories: most downloads and highest grossing.)
After the Top Charts view is the Categories view (Figure 6–2), which allows you to browse applications based on their category. Some categories are even further broken down; for example, under the category for Games there are a number of subcategories (Action, Adventure, Arcade, etc.).
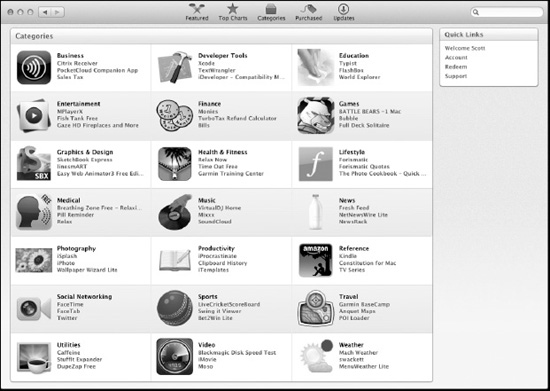
Figure 6–2. If you are browsing for an application of a specific type, the Category view is a good place to start.
NOTE: Some applications may be listed in multiple categories; for example, many Productivity applications may also be listed under Business.
Selecting an application listing in any of the first three views will open up a page detailing the application, along with screenshots and customer reviews (Figure 6–3).
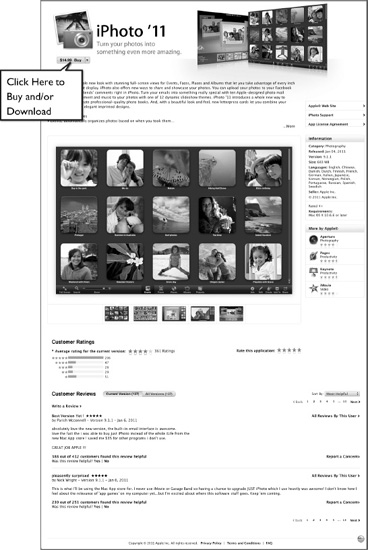
Figure 6–3. Selecting an application in the App Store application will give you information about the application, along with screenshots and reviews. There will also be a button to purchase or download the application.
Installing an Application from the App Store
If you discover an application you want to buy or download from the App Store, simply click the Buy button (shown in Figure 6–3). If the application costs money, the purchase price will be shown on the Buy button, and if the application is free the button will say “Free.” Once you click the Buy button, you may be asked to confirm your Apple ID and password (if you recently signed in, this step may be bypassed); then, if the application costs money, you will be prompted again to confirm your purchase. Once you are signed in and confirm any purchases, your application will begin to download immediately. Upon completion of the download, the application will be installed in the Applications folder in the Finder, and the application will be added to Launchpad. That’s it.
Checking Your App Store Purchases
The fourth tab on the App Stores toolbar is called Purchased. When selected, the App Store application will present a view containing all your App Store purchases (Figure 6–4). Not only does this view present a list of applications purchased from the Mac App Store, but it will also allow you to install or reinstall any such applications that aren’t currently installed on your computer.
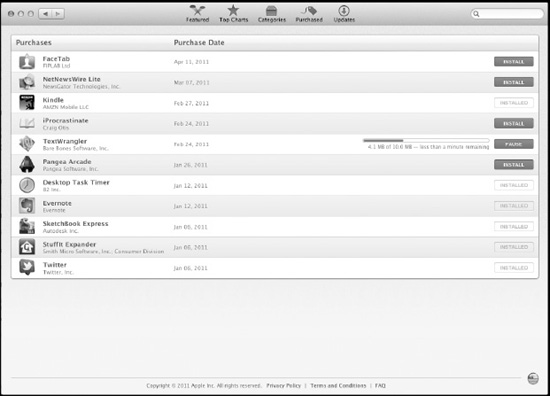
Figure 6–4. The Purchased view in the App Store application will let you view and reinstall any previously purchased or downloaded applications.
Keeping Your App Store Purchases Updated
The App Store application, in addition to keeping track of all of your purchases, will also keep track of any updates to your purchased applications. When you launch the App Store application, if any of your purchased applications need updates, the Updates icon on the toolbar will change, adding a number to it (this overlay is referred to as a badge). The badge number represents the number of applications with available updates. Clicking the Updates icon will take you to the Update view (Figure 6–5), which provides details about available updates and presents you with the opportunity to either update each outdated application individually or update all outdated applications at once.
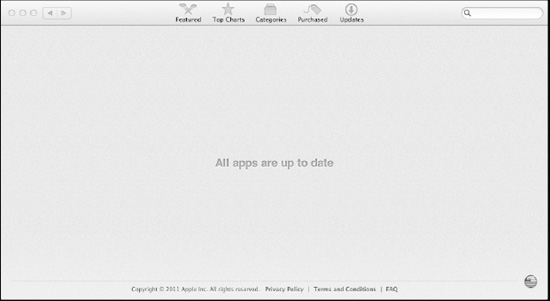
Figure 6–5. The Updates view allows you to easily keep track of and apply updates to your App Store purchases.
THE PROS AND CONS OF THE APP STORE
NOTE: One common developer complaint about the App Store is that some of the rules for items in the App Store are somewhat loosely enforced. Sometimes apps that should seemingly be included are rejected and apps that should be rejected are included. Overall the process seems somewhat subjective.
Getting Applications Outside the App Store
While the App Store is a great place to find a wide range of applications, it is not the only way to get applications for your Mac; in fact, many popular applications are not even available in the Mac App Store. In other cases, you may have previously purchased an application from a web site or directly from the developer, and they may offer updates or upgrades not available from the App Store.
NOTE: The Mac App Store uses its own system to manage applications, so while it may recognize applications that have been installed outside the App Store, it will not be able to manage them, or provide updates or upgrades to them. If you purchase an application outside the Mac App Store, yet later wish to utilize the App Store features with that application, then you will need to repurchase that application through the App Store.
As mentioned earlier in the chapter, there are a number of resources outside the Mac App Store for discovering and purchasing new applications. MacUpdate (http://macupdate.com) is an excellent web site that tracks a wide range of software releases for Macintosh computers, usually providing links back to the developer’s web site so that you may purchase the software directly from the developer (though recently, many developers have been directing users to the Mac App Store to purchase their applications). Like the App Store, MacUpdate provides information about the application, as well as customer reviews to help you make decisions about software.
NOTE: Many developers provide trial versions of their software for download from their web sites. Trial versions of software allow you to try an application before you buy it so you can be sure the application works the way you want it to before you take a financial plunge. Trial software is currently not available in the App Store.
When you acquire software outside the Mac App Store, you are on your own installing it. The most common way to distribute an application outside the App Store is on a downloadable disk image (or occasionally an actual CD, DVD, or USB flash drive). A disk image is a virtual storage device (usually containing a .dmg or .img extension). Double-clicking a disk image will cause the disk image to mount, causing it to appear as a new attached storage device in the Finder.
NOTE: Often, when you download a disk image from the Internet, the web browser will recognize the file as a disk image, automatically mount it, and open up the virtual disk in the Finder.
Many disk images simply contain the application on them, along with any supplementary documentation or readme files. To install them, you simply need to drag the application from the disk image into an Applications folder. Other applications, especially those that are fairly complex or contain more than one application (e.g., Microsoft Office), may contain an installer application to help you register and install the application.
Installing an Application Package
Installer packages make installing complex applications fairly easy; however, if you just click through the installer, you may miss some important options. Although every package you install will be slightly different, the general process is similar, so the best way to show how this works is to walk you through some of what you may encounter.
Starting the Installer
An installer package is usually distributed on a disk image, or even a CD or DVD. Upon opening the disk (image), you will usually see one or more packages (Figure 6–6). Double-clicking the package will begin the installer.
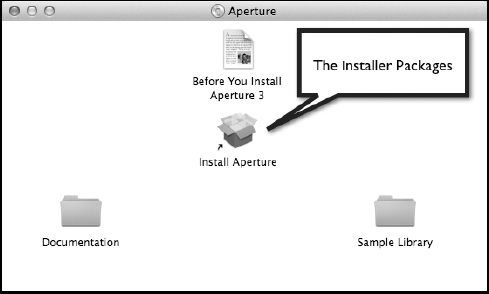
Figure 6–6. Most standard installer packages, like the Aperture 3 installer shown here, look like little boxes.
NOTE: There are two similarly appearing types of package files; some have the .pkg extension, and others have the .mpkg extension. The .mpkg files are special metapackages that generally contain a number of smaller .pkg files. The installation of both types will be similar; however, the .mpkg file often will have more available options.
When you double-click the installer package, Mac OS X’s Installer application will start the installation process. One of the first things the Installer may do is check your system to verify it is suitable for installing the application (Figure 6–7).
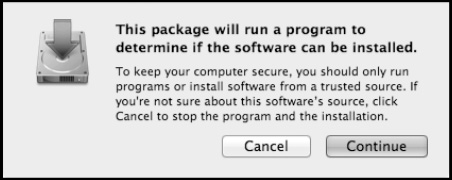
Figure 6–7. Some packages must check your system before they can begin the installation.
After the system check (if necessary), the Installer will generally present you with a few screens of information about the application. This generally includes up to three items: an Introduction screen, a Read Me screen, and a Software License screen.
The Introduction screen generally just welcomes you to the installation application and summarizes the software you are installing. The Read Me screen contains more in-depth information about the application(s) you are installing. Often readme files will contain some important last-minute information about the software, so they’re worth the read. Following that, you may be presented with a software license that, when you click Continue, will prompt you with a sheet asking whether you agree or disagree (you have to agree if you want to install the software). Depending on the software, before you continue your install, you will occasionally be prompted to enter registration information along with a serial number or license key (Figure 6–8). If you purchased a physical software package, then this key is usually included with the documentation; if you downloaded that application, then the key is usually e-mailed to you separately.
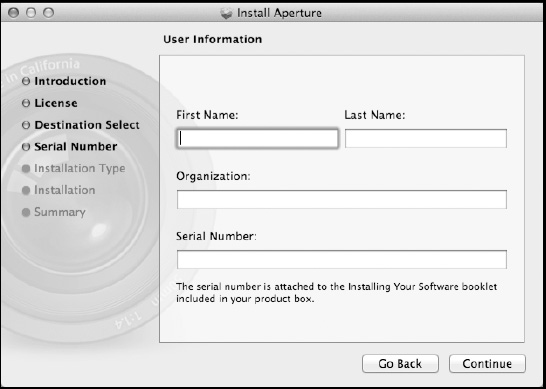
Figure 6–8. Some software requires that you enter a serial number or license key before you can continue.
Customizing Your Installation
After you’ve clicked through the informational screens and accepted any licensing agreements, you will be presented with the Standard Install screen (Figure 6–9). Some applications at this point will offer you the opportunity to customize your installation.

Figure 6–9. The Install screen in Microsoft Office for Mac 2011 allows you to either proceed with the standard install or choose to customize your install.
NOTE: Most of the time, a standard install (which used to be called an easy install) will install the application along with the most popular options in the Applications folder (occasionally in a special subfolder just for the particular application and components).
NOTE: Many applications that use an installer, rather than allowing you to simply copy the application in place, do so because they require more than a simple application bundle or have special install options. Many times these applications require additional components to be installed in locations other than the Applications folder, and the installer does its best to simplify this process for the user. However, this also means that unless an uninstaller application is also included, removing all the components manually will require more than just dragging the installed application into the Trash.
If you choose to customize your installation (or are at least curious about what customization options are available), click the Customize button, which will take you to a screen providing you with the ability to fine-tune your install (Figure 6–10).

Figure 6–10. The Custom Install screen allows you to manually select which components of your software will get installed.
NOTE: Many applications, such as Microsoft Office 2011, are actually a combination of a few separate applications, so it’s not unexpected that these kinds of apps offer lots of options on the customize screen. This is not uncommon even for “applications” that we might at first assume are just single applications. In general, if given the option, I always like to click the Customize option just to see what’s getting installed and what my options actually are.
Depending on the package, the custom options available to you will vary greatly, but generally the Custom Install screen will let you add/remove optional components to/from your install, and may also provide a column to customize the installation folder on the selected install volume (otherwise, the default install will be either directly in the Applications folder or in a subfolder in the Applications folder).
Whether you choose the standard install or a custom install, once you click the Install button, the installation will begin (though often you will be prompted to enter an administrator password before the install will begin).
When the installation is complete, you will often be presented with a screen letting you know that your installation was successful (and depending on the install, you may be asked to restart your computer).
NOTE: An application package, like many applications, is actually a bundle of various pieces. To look inside a package, select Show Package Contents from the contextual menu. One particularly interesting file you will find inside is the BOM file (usually called Archive.bom). What’s interesting about this is that it contains a listing of all the application parts and where they go. To view this information, use the lsbom command-line tool.
Removing Applications
Completely uninstalling applications is often a bit more complicated than installing them. Certain applications include an uninstaller application (and certain installer applications likewise include an uninstall option). If this is the case, then using this should be your first step. Otherwise, the first step is simply moving the application to the Trash and emptying it. Either of these steps generally removes the application effectively; however, applications tend to leave behind some additional traces that you may want to get rid of.
NOTE: AppZapper (http://appzapper.com/) and CleanApp (www.syniumsoftware.com/cleanapp/) are two applications that can help remove applications completely. When you wish to uninstall an application, simply drag the application file into AppZapper or CleanApp, and let them scour your system to automatically remove all (or most) traces of the application.
NOTE: Applications that were installed through the App Store can be deleted from Launchpad or the Finder. To delete an App Store application from Launchpad, you can either drag it into the Trash from Launchpad or click and hold the icon in Launchpad until a small X badge appears over the icon (the icons will all begin to wiggle as well). Clicking the small X badge will delete the application. The X badge will only appear on applications installed from the App Store.
CAUTION: Removing an App Store application from Launchpad will delete the application.
CAUTION: Once the application file is removed, the application is gone. There is no immediate need to scour through your system to remove all the remnants of all deleted applications, and when you start digging around in Library folders there is always the risk of deleting the wrong file. Accidentally deleting an important file in one of the Library folders can result in bad things that range from a minor inconvenience to your computer failing. If you have any doubt about what you are deleting, it may be best not to do it.
Cache Files, Preferences, and Support Files
The first place to look for leftover files is in your ~/Library folder, particularly in the Caches folder, the Preferences folder, and the Application Support folder.
The Application Support folder is a common place for applications to store all sorts of items that help them function. This should be stop one. Just take a look and see if the application you are removing has a support folder here (it will usually have the same name as the application itself). If so, you may delete it.
NOTE: Before you delete support files, make sure you have any information that the application was storing for you backed up.
NOTE: Some applications will create their own support folder in your ~/Library folder rather than in the Application Support subfolder.
After you clean out any application support files, check the ~/Library/Caches folder. Here, many applications (especially network-enabled apps) store temporary cache files. These can take up lots of space, so you don’t want to leave any unused cache files lying around.
NOTE: While cache files can provide a significant boost in application performance and are generally something you want keep unaltered for applications you plan to keep around, occasionally a cache file will cause some issues for an application. Because of this, deleting an application’s cache is often one of the common troubleshooting steps in attempting to resolve application errors. While cache files are useful, they are rarely necessary, and if you delete one, the application will recreate it next time it’s running.
CAUTION: It’s never a good idea to remove a cache file while the application that it belongs to is still running.
The next place to look is your ~/Library/Preferences folder. This folder keeps track of all your personal preferences for all your applications and many other system features; and every application, even if just launched once and closed, is likely to have created a file here. Finding the appropriate preference file is a bit tricky. Traditionally, there was no specific naming convention for preference files, so they were usually named after the application. Additionally, certain software developers would (and still do) create a folder here to store the preferences for all their applications (because some applications share preferences among similar applications). Today, however, there is a specific naming convention for most preference files that uses a reverse top-level domain for the developer, followed by the name of the application, followed by some subinformation if needed. So, for example, all the preference files for Apple products would follow the format com.apple.appname.subpref. Usually, these will end with a .plist extension, indicating the type of file is a property list. Once you locate the appropriate preference for your deleted application, you may likewise delete it.
NOTE: Preference files are interesting to take a peek at. Xcode, if you installed it, makes browsing and editing these .plist files easy. Most .plist files are written in XML, which can be viewed in any text editor as well. While you should exercise some caution with preference files, you may discover preferences for certain applications that aren’t otherwise accessible (hidden preferences).
NOTE: While it’s not recommended that you regularly delete preference files, if you do mistakenly delete one, it essentially resets the application back to the first time you used it. With some apps, this may cause no noticeable difference; with others, you may need to go through the setup or registration process again. While this may be inconvenient, it’s rarely a big problem.
NOTE: Occasionally, an application may create some of these files in the /Library folder as well. Feel free to delete these.
Frameworks, Components, and Receipts
Besides the extra items mentioned previously that are installed and created by applications, a number of applications may install some additional support files. These include special development frameworks, special components, and contextual menu items. Most of these items can be safely deleted; however, you should use care when doing so.
Components (found in the Components subdirectory of a Library folder) are generally not needed when you remove the application they are associated with either. The only problem is that these items are often named in such a way that it’s hard to determine what component is attached to what application, and deleting the wrong one can cause an existing application to fail. In general, if in doubt, leave it alone. If, however, you are sure that you no longer need a component, you may remove it.
Frameworks are trickier. One application may install a third-party framework, and a subsequent application you install may also use that framework, so even if you delete the initial application that installed the framework, by removing the framework you could damage another application. As such, I generally recommend against uninstalling any frameworks unless you are absolutely sure that it’s safe. Other than taking up some disk space, an unused framework won’t interfere with your system in any way.
Finally, most installer packages leave behind a receipt (which is a copy of the package file) in the /Library/Receipts folder. When you delete an application, it’s safe to delete any package files here associated with it. Removing receipts for existing applications could, however, affect the ability to upgrade the application in the future—and many update packages use receipt data to determine the necessity or eligibility for an upgrade.
Other Hidden Application Files
The last types of files that may be installed along with the application are hidden or obscure files. These files are installed for one of two reasons. First, some applications install files that are accessible from the command line—while these files are not normally viewable from the Finder, they are not specifically hidden from you (often applications will check with you before installing command-line tools). The other reason applications install hidden or obscure files is specifically so you don’t find them; this is usually for licensing reasons and to prevent you from pirating the software or reusing timed-out demo versions of software.
The “hidden” command-line tools (which really aren’t hidden; they just aren’t immediately visible) can easily be removed from the command line (this is covered later in the book, beginning in Chapter 23). The other files—the ones that are actually intentionally hidden—are problematic. While they generally don’t affect your system in any way (other than restricting the use of a particular application), the idea of them lying around bothers people.
While there are no specific instructions for finding and removing all of these intentionally hidden files, there are some suggestions:
- Look around your file system using the command line. Lots of files that are hidden from the Finder are easily revealed from the command line. If you find files in a Library folder or subfolder at the command line that you don’t see in the Finder, they are probably being hidden.
- If you are really stumped, have an extra hard disk that you can use, and some time on your hands. Create two partitions on the disk and install a clean system on each. Then install the suspected application on one partition and compare the resulting file systems. If you do this correctly, then any additional files on the application partition belong to the application. (There are a number of ways of creating directory lists, including all files, and then comparing the lists using a variety of command-line and text-based tools.)
- Finally (and this should probably be the first step you try), search the Internet for information about the application and hidden files. As with most things, it’s unlikely that you’re the first person to encounter this situation, and perhaps the answers you are looking for are already out there.
NOTE: Even though you might not want these hidden files around once you remove the associated application, if you are currently using the application, it’s likely that you need these files for it to work correctly, so use caution here and don’t delete hidden files just because they are hidden—you probably won’t like the results.
Summary
There are thousands of Mac OS X applications available for most computer tasks you can conceive of, but before you start filling up your computer with every application you can find, let’s take a look at what you already have. In the next chapter we will look more closely at a few of the applications included with Lion.