
Applications that you build on top of APEX are not, by default, magically hacker-proof. Even tight platforms such as APEX have several security concerns. In APEX, these concerns usually center around three main areas: authentication, authorization, and vulnerability exploits.
Authentication refers to the process of checking if the user has rights to access (log in to) the application. This is usually done through a username-password challenge. Authorization is the process of specifying access rights for each user to a particular resource in the application. For instance, an authorization scheme may permit a user to view a report but not to delete it. Finally, security vulnerability exploits—events like SQL injection attacks and cross-site scripting attacks—work on the premise of cleverly manipulating input data so that it ends up being executed by your application.
The good news is that APEX provides ample features and allocation to elegantly handle all three concerns. In this chapter, you will learn how to beef up security in your application.
You have an existing database table containing the list of all users in the organization, together with their passwords. This database table is a custom table proprietary to your organization. You try to convince your bosses to migrate the list of user accounts from the custom table into APEX, but they insist that your application authenticate against this table instead in real time.
And so you embark on this task. You want to create a custom authentication scheme to authenticate your APEX application against this external database table.
Your first task is to create the database objects used in this recipe. To create the Custom Logins table (and sample records), run the following SQL:
CREATE TABLE "CUSTOMLOGINS"
  (     "USERID" VARCHAR2(50),
        "USERNAME" VARCHAR2(255),
        "PASSWORD" VARCHAR2(255),
         CONSTRAINT "CUSTOMLOGINS_PK" PRIMARY KEY ("USERID") ENABLE
  )

INSERT INTO CUSTOMLOGINS(USERID,USERNAME,PASSWORD) VALUES('01','greg','1234')
/
INSERT INTO CUSTOMLOGINS(USERID,USERNAME,PASSWORD) VALUES('02','zehoo','7890')
/
Your next task is to define the actual authentication function itself. You will create a very simple authentication function that simply checks if the specified username and password exists in the table. If they do, access is granted. To create this function, open the SQL workshop, and run the PL/SQL shown in Listing 8-1.
Example 8.1. Defining the Authentication Function
CREATE OR REPLACE FUNCTION MyCustomAuthenticator (
  p_username IN VARCHAR2,
  p_password IN VARCHAR2
)
  RETURN BOOLEAN
IS
  l_count NUMBER;
BEGIN
   SELECT COUNT(*) into l_count from CUSTOMLOGINS WHERE Username=p_username AND
        Password=p_password;
   IF l_count > 0 THEN
      RETURN TRUE;
   ELSE
      RETURN FALSE;
   END IF;
END;
Your next task will be to define a new authentication scheme. To do so, follow these steps:
Open an existing application and click the Shared Components icon.
Under the Security section, click on the Authentication Schemes link, as highlighted in Figure 8-1.
In the ensuing page, click the Create button to create a new authentication scheme.
In the first step of the wizard, choose to create the scheme from scratch.
In the next step, name your authentication scheme MYCUSTOMAUTH_SCHEME.
Click the Next button until you arrive at the Authentication Function step.
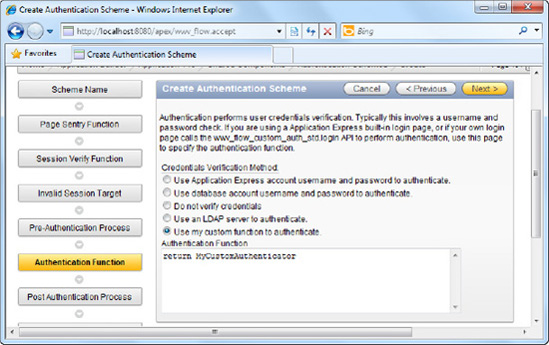
In this screen, choose the Use my custom function to authenticate option. This will cause an Authentication Function textbox to appear at the bottom of the option.
Type the following text into the textbox: return MyCustomAuthenticator. This is shown in Figure 8-2.
Complete the rest of the wizard using the default settings provided.
Back in the Authentication Schemes page, you should see your newly created authentication scheme. Now you will need to set it as the active authentication scheme for your application.
In the authentication schemes page, click the Change Current tab. Choose the MYCUSTOMAUTH_SCHEME scheme from the drop-down list, as shown in Figure 8-3.
Click the Make Current button to complete the wizard and make the change.
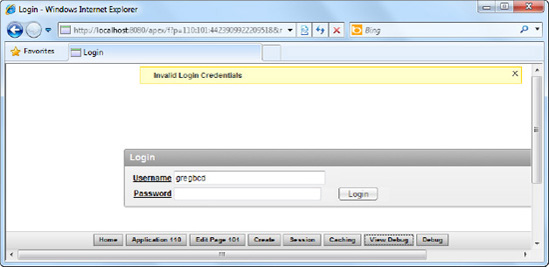
Now run the Login form in your application. Try to key in a random username and password. You will find that you can't login to the application, as shown in Figure 8-4.
However, if you specify the credentials greg with the password 1234, you will find that you can successfully login to the application. This proves that the login page is now using your custom authentication scheme.


APEX is flexible enough to allow you to modify even the underlying authentication mechanisms for your applications. The method shown in this recipe uses a very simple authentication function (that hardcodes the username and password in PL/SQL); the objective of this recipe, however, is to give you an idea of how to go about switching the authentication mechanism from APEX's default to a custom one.
Note
Using APEX's flexible authentication framework, you can create schemes to authenticate against LDAP stores or to specify not to have authentication at all in your application. You can change these settings in the properties area of the authentication scheme.
Let's take a further look at how the PL/SQL authentication function works. The skeleton for this function is described in Listing 8-2.
Example 8.2. Skeleton of the Authentication Function
CREATE OR REPLACE FUNCTION AuthenticationFunction (
p_username IN VARCHAR2,
  p_password IN VARCHAR2
)
  RETURN BOOLEAN
AS
BEGIN
    /* Do your thing here and return TRUE if access should be granted and
       FALSE if access should be denied. */
END;
You can modify this authentication function to do whatever you need. For instance, you could have the function run an SELECT query against an external table, and if the user account exists, return TRUE from the function.
In fact, there is nothing stopping you from authenticating in real-time against usernames or passwords stored in text files (although it would be a rather bad idea to do so). This, however, gives you an idea of the extremes that you can go to with APEX's flexible authentication schemes framework.
You have an interactive report showing a list of job vacancy records. You want to allow John to create new job vacancy record, but you don't want to give Barry this same privilege. In other words, you need to configure access rights for this report.
First you need to create the sample objects used in this recipe. To do so, please follow these steps:
Create the sample Jobs table as shown in Listing 8-3.
Enter some sample data in this table using the code in Listing 8-4.
Now, create a new application. In the application, create a new form, and choose the Form on a Table with Report template.
Note
You can refer to Recipe 2-1 on how to create a new application and form
When you are prompted to specify the base table for your form and report, choose the Jobs table, as shown in Figure 8-5.
Step through the rest of the wizard using the default settings provided and complete the wizard.
Log out from the workspace, and log in to the INTERNAL workspace using the ADMIN account. Navigate to Manage Workspaces

Create a new user with the username of greg. Set any password you desire for this account.

Now that you've successfully created the sample objects successfully, let's move on to creating an authorization scheme. Please follow these instructions to do so:
Open your application and click the Shared Components icon.
In the Security area of the page, click the Authorization Schemes link (highlighted in Figure 8-6).
On the next page, click the Create button to create a new authorization scheme.
Choose to create the scheme from scratch when prompted, as shown in Figure 8-7.
On the next page, give your authorization scheme the name of CHECKFORGREG.
Choose Exists SQL Query as the Scheme Type, and in the Expression 1 field, enter the following PL/SQL:
select 1 from jobs where LOWER(v('APP_USER')) = 'greg'Specify "Scheme Violated" as the scheme violated error message. You should now have the screen shown in Figure 8-8.
Click the Create button to create the authorization scheme.


Now you will need to apply the authorization scheme to the report.
Open the Jobs report you created earlier in this recipe.
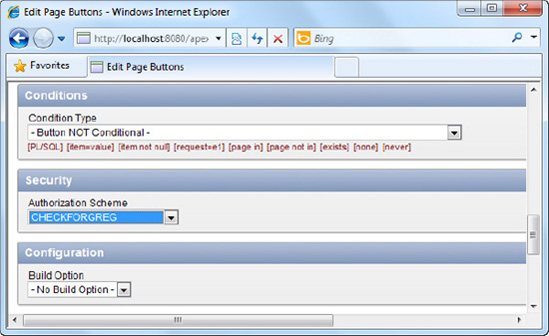
In the Page Rendering area of the report, right-click on the Create button, and choose to edit it, as shown in Figure 8-9.
On the next page, scroll down to the Security section and select CHECKFORGREG as the authorization scheme for this button item. This is shown in Figure 8-10.
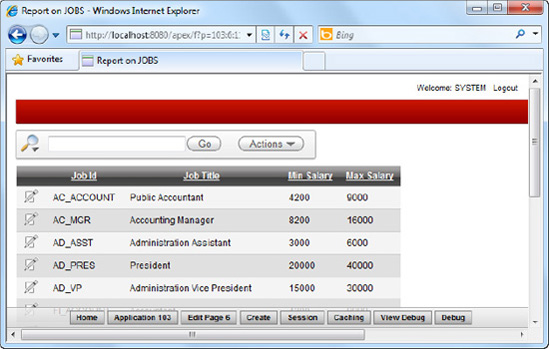
Save your changes and run the report. If you log in to the application as greg, you will see the Create button at the top right corner of the report, as shown in Figure 8-11.
Now, log out from the application and log in as any other user. You will notice that the Create button does not show for this user, as illustrated in Figure 8-12.


An authorization scheme lets you define a condition (logic) that evaluates to either a true or false. The authorization scheme can then be applied to any element in your application, be it a report column, a button on a report, or even an entire form itself. When the scheme (your logic) returns true, the current user is granted access to the element. If it returns false, the current user is denied access.
Let's take a closer look at the configuration of the authorization scheme that you created earlier. Note that you chose the Exists SQL Query scheme type; it means that if the PL/SQL you wrote returned a record, then the scheme evaluates to true (access granted). If an empty result set was returned, the scheme would evaluate to false (access denied).
Now, let's take a look at the PL/SQL from earlier in this recipe:
select 1 from jobs where LOWER(v('APP_USER')) = 'greg'Tip
v('APP_USER') is a dynamic field (called a built-in substitution string) that returns the username of the currently logged on user. There are other built-in substitution strings defined in APEX; a comprehensive list of all the substitution strings available in APEX is here: http://download.oracle.com/docs/cd/B32472_01/doc/appdev.300/b32471/concept.htm#BEIIBAJD
You've practically defined that if the current user had the username greg, then it would return something (here you simply return 1 but it could also be abc if you desire, as long as a single record was returned). Hence the authorization scheme you created in this recipe can be interpreted as: if the current user has the username greg, he should be granted access to the element.
Based on this simple concept, you can apply very complex access rights control to your application. For instance, you can create an Employee report that shows all columns to a manager, but hides the Current Salary column when a normal clerk views it.
Tip
The hardcoding of data (such as username greg) in the authorization scheme is for purpose of demonstration and is certainly not encouraged. You would usually do something more meaningful in the authorization scheme, such as checking if a user is a manager or a Head of Department (against another database table and so on).
As a side note, the concept of authorization schemes also promotes reusability and ease of maintenance. It is reusable because you can reuse the same logic for multiple elements in your application without rewriting the same logic many times. More importantly, this makes it easier for you to maintain your application. For instance, if the logic changes one day, such that you need to include an additional check in your PL/SQL, you can just change it at one location, and it will instantly be applied to all elements that use the said authorization scheme.
You have a dynamic report showing the list of customers in the system. By default, your application requires the end user to specify the customer name before it retrieves the matching customer from the database. An APEX hacker has managed to retrieve the full list of all customers in the database via an SQL injection attack. You want to protect your application against similar attacks in the future.
First, you need to set up the sample tables and forms needed to duplicate the scenario for the attack. To do this, please follow these steps:
Create the table shown in Listing 8-5 if it doesn't yet exist in your database.
Example 8.5. Sample Customers Table
CREATE TABLE  "CUSTOMERS"
   (    "ID" NVARCHAR2(255) NOT NULL ENABLE,
        "NAME" NVARCHAR2(255),
        "ADDRESS" NVARCHAR2(2000),
        "ZIP_CODE" NVARCHAR2(6),
        "COUNTRY" NVARCHAR2(255),
"EMAIL_ADDRESS" NVARCHAR2(255), "PHONENUMBER" NVARCHAR2(255), "EMPLOYEEHEADCOUNT" NUMBER(9,0), CONSTRAINT "CUSTOMERS_PK" PRIMARY KEY ("ID") ENABLE )Create the following sample data shown in Listing 8-6.
Example 8.6. Sample Data for the Customers Table
INSERT INTO CUSTOMERS (ID, NAME, ADDRESS, ZIP_CODE, COUNTRY, EMAIL_ADDRESS, PHONENUMBER,
EMPLOYEEHEADCOUNT) VALUES ('1','Yakuza
Corp','Akihabara,Tokyo','551119','Japan','[email protected]','+8112345678',30)

INSERT INTO CUSTOMERS (ID, NAME, ADDRESS, ZIP_CODE, COUNTRY, EMAIL_ADDRESS, PHONENUMBER,
EMPLOYEEHEADCOUNT) VALUES ('2','ACME Corp','ACME City, Texas','12345','United
States','[email protected]','987654321',10)

INSERT INTO CUSTOMERS (ID, NAME, ADDRESS, ZIP_CODE, COUNTRY, EMAIL_ADDRESS, PHONENUMBER,
EMPLOYEEHEADCOUNT) VALUES ('3','Shin Corp','Bangrak,
Bangkok','123456','Thailand','[email protected]','12468086',15)
Now, create a new application, and create a report page in the application.
In the Report Page Creation wizard, choose to create the Classic Report type. Use the default settings for all the steps in the wizard, and click the Next button until you reach the step that lets you specify the SQL statement for the report.
Just specify SELECT * FROM CUSTOMERS in this area for the time being.
When the report has been created successfully, choose to edit the report.
In the Page Rendering area of the report, you should see the report node under the Regions
In the wizard, choose to create a Text field. In the next step of the wizard, name the text field PSEARCH_BYNAME, and set its label to Search by Name. Click Next all the way to the end of the wizard and use the default settings provided by APEX.
After you've created the field, right-click on the PSEARCH_BYNAME item in the Page Rendering area, and choose the Create Button item in the pop-up menu. Name the button PSEARCH_GO and create the button. You should now have the screen shown in Figure 8-14 in the Page Rendering area of your report.
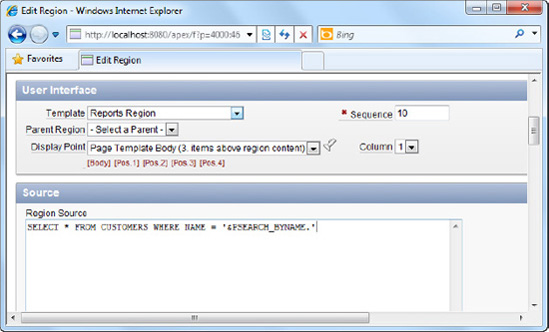
Right-click on the Report 1 item, and choose to edit the report. Scroll down to the Source section, and in the Region source field, enter the SQL statement shown in Listing 8-7.
Example 8.7. Specifying the Customer Search SQL
SELECT * FROM CUSTOMERS WHERE NAME = '&PSEARCH_BYNAME.'
Note
There is a full stop right after PSEARCH_BYNAME; don't forget to leave that out!
You should now have the screen shown in Figure 8-15. Click on the Apply Changes button to save your changes.
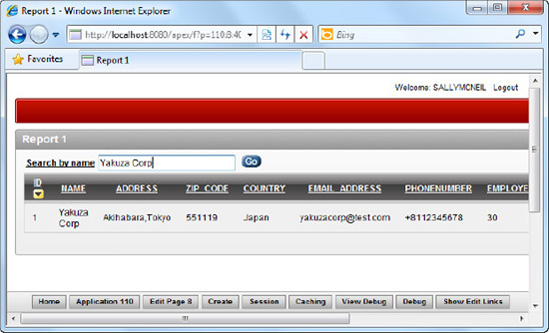
Now run the report. You should see a blank report (without any data). However, upon entering Yakuza Corp in the search textbox and clicking the Go button, the report refreshes itself, showing the matching customer, as shown in Figure 8-16.


To perform the SQL injection attack, follow these steps:
Specify the text shown in Listing 8-8 in the search field, and click the Go button.
You should now see every single customer retrieved from the table, as shown in Figure 8-17.
Congratulations! You've successfully hacked your own application.

To prevent a SQL injection attack from being used against your application, follow these steps:
Navigate to the Page Rendering area of your report again. Right click on the Report 1 node, and choose to edit the report.
In the Region source field, change the SQL query to the one shown in Listing 8-9.
You should now have the screen shown in Figure 8-18.
Apply your changes and run your report one more time. You will find that your report works as usual, and you can search for a customer by name. This time, however, if you specify ' OR 1=1-- in the search field and click the Go button, instead of retrieving the full list of customers from the table, it returns an empty result set. This is shown in Figure 8-19.
You've successfully protected your report against the SQL injection attack.


The SQL injection attack is one of the most common forms of attack against web applications. It usually involves a malicious user gaining unauthorized access to data by manipulating dynamic SQL statements generated by your application. This is done so by massaging input data so that becomes part of the SQL statement itself. For instance, take a look at your original SQL statement.
SELECT * FROM CUSTOMERS WHERE NAME = '<INPUT DATA FROM SEARCH FIELD>'
If the malicious user keys in ' OR 1=1-- in the search field, this is concatenated with your SQL code, and it becomes
SELECT * FROM CUSTOMERS WHERE NAME = '' OR 1=1--'
Tip
The -- symbol is the comment indicator symbol in PL/SQL, and it comments out the last single quote character, effectively turning your active SQL statement into
SELECT * FROM CUSTOMERS WHERE NAME='' OR 1=1
This allows the end user to retrieve the entire list of customers from your database! A SQL injection attack can be used in many different ways. For instance, it can be used against an unprotected login page where an end user can gain unauthorized access to your application simply by manipulating the data entered in the username or password field.
Earlier in this recipe, you saw that the following notation was used: &PSEARCH_BYNAME. The ampersand indicates that this is a substitution variable; substitution variables are used to retrieve data from form fields on a page. This data is then (as its name implies) substituted as-is into the target string.
Substitution variables are the root causes of most SQL injection attacks. Since data is simply substituted into the SQL statement, this allows apostrophes keyed in by the end user to end up in the final SQL string, causing the previously mentioned scenario.
Traditionally, in most web applications, SQL injection attacks are prevented by escaping single quote characters in the input data. "Escaping" the single quote characters simply meant placing an escape character at the front of each single quote in the input data to render them harmless.
Duplicating the single quote character is a way to escape the single quote in PL/SQL. For instance, the final SQL generated if the input data was escaped would look like this:
SELECT * FROM CUSTOMERS WHERE NAME=''' OR 1=1--'
Note
The ' OR 1=1-- input phrase in the previous SQL (after escaping its single quotes) is correctly treated as a string instead of as PL/SQL code.
In Oracle APEX, there is a better way to prevent SQL injection attacks: through the use of bind variables. Bind variables work in much the same way as passing data to a stored procedure. Bind variables automatically treat all input data as "flat" data and never mistake it for SQL code.
The syntax to declare a field item as a bind variable is through the use of the colon character (:). Simply prefix the colon to your field item name, like this:
:PSEARCH_BYNAME
Note
You don't have to explicitly specify any enclosing single quote characters. APEX is already aware of the data type of your variable.
The use of bind variables is often encouraged in APEX. Besides the prevention of SQL injection attacks, there are other performance-related benefits to its use (please see Chapter 7 for more information).
Your boss opens an APEX report, but instead of seeing the daily financial data, he is automatically redirected to an adult web site containing inappropriate photos. Your boss is obviously not amused. Upon closer inspection of the report, you find that someone has entered malicious JavaScript in one of the fields in the database. Upon displaying the report, the output data (containing the JavaScript) executed, causing the malicious script to run. You recognize this as the cross-site scripting attack. You want to prevent future attacks by rendering any JavaScript code found in report data harmless when it is retrieved for display.
First, try to set up the same environment that made the cross site scripting attack possible. Please follow these steps:
Create a new report in the same application you created in Recipe 8-3.
In the Report wizard, choose the Interactive Report Type.
In the SQL query step of the wizard, enter the following SQL query:
SELECT * FROM CUSTOMERS
Complete the wizard for the report.
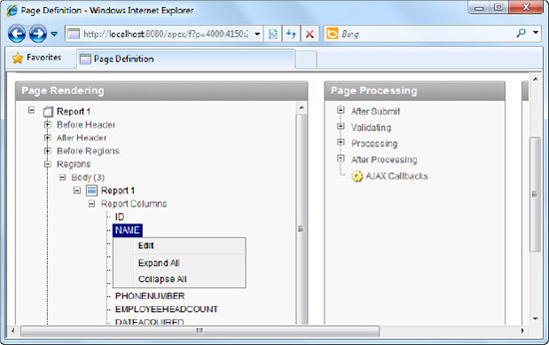
In the Page Rendering area of the report, right-click on the NAME report column, and choose to edit it, as shown in Figure 8-20.
Set the value of the Display Type field to Standard Report Column, as shown in Figure 8-21.
Apply your changes. Now create a new form in the same application. Choose the Form on a Table or View form type.
Choose the Customers table or view in the next step of the wizard.
Complete the rest of the wizard using the default settings.

You are now ready to initiate the attack. Let's irritate your end users by having the Customers report automatically redirect to the Google site every time they try to view the report.
Run the form you've just created.
In one of the text fields on the form, specify the JavaScript shown in Listing 8-10.
You should now see the screen shown in Figure 8-22. Click the Create button to save your data.
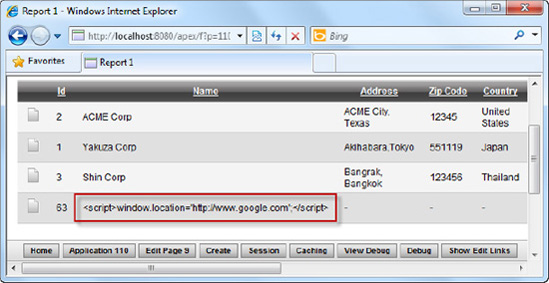
Now run the report you created earlier. You will find that it is impossible to view the report, as you will keep getting redirected to the Google web site. You have just successfully conducted the cross-site scripting attack.

To prevent the cross-site scripting attack, you have to do the following:
Edit the report you created earlier.
In the Page Rendering area, right-click on the NAME field and choose to edit it.
Set the Display Type field to Display As Text (escape special characters).
Save your changes and run the report one more time.
You will find that your report now shows; also, the JavaScript that you entered earlier has been escaped appropriately and is now treated as report data rather than code, as highlighted in the red box in Figure 8-23.
You can repeat steps 1 to 3 above for all other report columns you wish to protect.
The cross site scripting (XSS) attack attempts to get client-side JavaScript code to run by injecting it into data entry fields. Such attacks may simply harbor mischievous intent (as outlined in this recipe's example scenario) or can be downright dangerous; imagine an attack that redirects you to a replica of the original site requesting you to enter your password or personal details.
The XSS attack is a rather simple type of attack that works due to the following weaknesses:
No validation of input data at the data entry-end.
No escaping of special characters during data display.
To explain how the attack works, consider a form that lets you enter the name of a customer via a textbox. Ideally, the form would take in the data and save it in the database. When it needs to be displayed, the data is retrieved as-is and displayed via HTML (for instance, placed inside a table row of a table). The output result might look like Listing 8-11.
If you didn't place any checks in your application and if a malicious user keyed in some JavaScript instead of ACME CORP, you would get the following (shown in Listing 8-12) as the output result:
Example 8.12. Output with Malicious Script
<table>
        <tr>
                <td width='100%'>
                        <script>window.location='http://www.google.com';</script>
                </td>
        </tr>
</table>
The browser misinterprets the data as client-script code and executes the JavaScript.
One way to prevent this from happening is by validating input data during data entry (for instance, rejecting data with tags such as <script> in its content). One downside of this approach is that if you really needed to key in some data containing such a tag, it would not be possible.
Tip
One application that might need to take in data containing HTML tags is an online developer forum. Users usually share their code for other developers to view, and it wouldn't be uncommon for them to paste examples of their code into these data fields. It would not make much sense in this case for the application to reject data with HTML tags.
The preferred way is to escape special characters, not during data entry but during data display. APEX provides an easy way to do this, which is to change the Display Type property of the report column, as you saw earlier in this recipe.
Note
Happily, with the latest release of APEX, all report columns are set to escape special characters by default, so if you create a report, it will be protected from cross-site scripting attacks automatically. By further coupling this with frequent usage of bind variables instead of substitution strings, you can keep common web and database attacks at bay.