
In this last chapter you will explore a real-life scenario of an online book catalog and how to apply APEX to create it in a matter of hours. Think of this catalog as the bare beginnings of a bookstore—you aren't even going to implement anything like shopping-cart functionality but you will use the various APEX techniques and features you learned throughout the earlier chapters in the book.
Before you create the online book catalog, let's define the scope of what you want to build. The application will be divided into two main areas—the Administration part of the web site (where the user can manage the list of available books) and the front end (which is the actual book catalog visible to the public).
In addition, you'll create a chart report to let the storekeeper view the current stockcount of all books in the store. Last of all, you'll pull all these separate pages together by providing a proper navigation scheme for your application using navigation lists and tabs.
You need to set up the underlying database tables and sample records (books) required for the book catalog.
To set up the book catalog tables, follow these steps. (Note that you can find the code in the in the example download for this book—you don't need to type it in manually.)
Create the main
Bookstable as follows, together with the sample data:CREATE TABLE "BOOKS" ( "BOOKID" NVARCHAR2(255), "BOOKTITLE" NVARCHAR2(255), "BOOKISBN" NVARCHAR2(255), "BOOKPUBLISHER" NVARCHAR2(255), "BOOKEDITION" NVARCHAR2(255), "BOOKCATEGORY" NVARCHAR2(255), "BOOKDESCRIPTION" NVARCHAR2(255), "BOOKPRICE" FLOAT(9), "AUTHOR" NVARCHAR2(255), "BOOKIMAGE" BLOB,CONSTRAINT "BOOKS_PK" PRIMARY KEY ("BOOKID") ENABLE ) / INSERT INTO BOOKS(BOOKID, BOOKTITLE, BOOKISBN, BOOKPUBLISHER, BOOKEDITION, BOOKCATEGORY, BOOKDESCRIPTION, BOOKPRICE, AUTHOR) VALUES('B1','PRO ODP.NET PROGRAMMING','9781430228202','APRESS PUBLISHING','2010','C3','This book is a comprehensive and easy-to-understand guide for using the Oracle Data Provider (ODP) version 11g on the .NET Framework',59.99,'ED ZEHOO') / INSERT INTO BOOKS(BOOKID, BOOKTITLE, BOOKISBN, BOOKPUBLISHER, BOOKEDITION, BOOKCATEGORY, BOOKDESCRIPTION, BOOKPRICE, AUTHOR) VALUES('B2','IPHONE PROGRAMMING','9781430228400','WROX PUBLISHING','2011','C3','This book describes the basics of iPhone and iPad development using Objective C',49.99,'GREG YAP') / INSERT INTO BOOKS(BOOKID, BOOKTITLE, BOOKISBN, BOOKPUBLISHER, BOOKEDITION, BOOKCATEGORY, BOOKDESCRIPTION, BOOKPRICE, AUTHOR) VALUES('B3','HOW MASTER CHIEF BECAME MASTER CHEF','1123433328400','TOR BOOKS','2010','C2','Master Chief goes on a vacation in China. Read about his exploits in this book!',39.99,'JAMES BURKE') / INSERT INTO BOOKS(BOOKID, BOOKTITLE, BOOKISBN, BOOKPUBLISHER, BOOKEDITION, BOOKCATEGORY, BOOKDESCRIPTION, BOOKPRICE, AUTHOR) VALUES('B4','THE CURSE OF AMMATTAR','9781430228400','TOR BOOKS','2011','C4','Classic horror story set in medieval Thailand',29.99,'SARAH HAWKINS') / INSERT INTO BOOKS(BOOKID, BOOKTITLE, BOOKISBN, BOOKPUBLISHER, BOOKEDITION, BOOKCATEGORY, BOOKDESCRIPTION, BOOKPRICE, AUTHOR) VALUES('B5','CHING CHONG: THE RISE AND FALL OF JACKSON','343322221400','NIECA BOOKS','2011','C1','A story about the misfortunes of Jackson Junior as he travels across Asia',12.99,'TARA WILLIAMS') / INSERT INTO BOOKS(BOOKID, BOOKTITLE, BOOKISBN, BOOKPUBLISHER, BOOKEDITION, BOOKCATEGORY, BOOKDESCRIPTION, BOOKPRICE, AUTHOR) VALUES('B6','UNFORTUNATE CIRCUMSTANCES','115062221400','PARAMOUNT BOOKS','2011','C1','Read about the unfortunate circumstances of Ali, someone you will absolutely not care about',19.99,'DANA T. ROLLS') / INSERT INTO BOOKS(BOOKID, BOOKTITLE, BOOKISBN, BOOKPUBLISHER, BOOKEDITION, BOOKCATEGORY, BOOKDESCRIPTION, BOOKPRICE, AUTHOR) VALUES('B7','SCARY LIONS','11553221400','PARAMOUNT BOOKS','2011','C1','A book about the greasy politicians in Mootawambaland and how Alex becomes one of them',15.99,'TERRY BARRACK') / INSERT INTO BOOKS(BOOKID, BOOKTITLE, BOOKISBN, BOOKPUBLISHER, BOOKEDITION, BOOKCATEGORY, BOOKDESCRIPTION, BOOKPRICE, AUTHOR) VALUES('B8','THE LIME TREE','22113221400','ZACK PUBLISHING','2011','C1','A book about how Sally became a top salesperson when she decides to sell lime as lemon',16.99,'JAMES LEE') /Create the
Inventorytable as follows:CREATE TABLE "INVENTORY" ( "ID" NVARCHAR2(255), "BOOKID" NVARCHAR2(255), "COPIESINSTOCK" NUMBER(9,3), CONSTRAINT "INVENTORY_PK" PRIMARY KEY ("ID") ENABLE ) / INSERT INTO INVENTORY(ID,BOOKID,COPIESINSTOCK) VALUES('1','B1',10) / INSERT INTO INVENTORY(ID,BOOKID,COPIESINSTOCK) VALUES('2','B2',15) / INSERT INTO INVENTORY(ID,BOOKID,COPIESINSTOCK) VALUES('3','B3',1) / INSERT INTO INVENTORY(ID,BOOKID,COPIESINSTOCK) VALUES('4','B4',6) / INSERT INTO INVENTORY(ID,BOOKID,COPIESINSTOCK) VALUES('5','B5',17) / INSERT INTO INVENTORY(ID,BOOKID,COPIESINSTOCK) VALUES('6','B6',9) / INSERT INTO INVENTORY(ID,BOOKID,COPIESINSTOCK) VALUES('7','B7',14) / INSERT INTO INVENTORY(ID,BOOKID,COPIESINSTOCK) VALUES('8','B8',9) /Create the
Categorytable as follows:CREATE TABLE "CATEGORY" ( "CATEGORYID" NVARCHAR2(255), "CATEGORYNAME" NVARCHAR2(255), "DESCRIPTION" NVARCHAR2(255), CONSTRAINT "CATEGORY_PK" PRIMARY KEY ("CATEGORYID") ENABLE ) / INSERT INTO CATEGORY(CATEGORYID, CATEGORYNAME, DESCRIPTION) VALUES('C1','FICTION','Fiction selection') / INSERT INTO CATEGORY(CATEGORYID, CATEGORYNAME, DESCRIPTION) VALUES('C2','SCIENCEFICTION','Science Fiction Selection') /INSERT INTO CATEGORY(CATEGORYID, CATEGORYNAME, DESCRIPTION) VALUES('C3','COMPUTERS','Computer Books Selection') / INSERT INTO CATEGORY(CATEGORYID, CATEGORYNAME, DESCRIPTION) VALUES('C4','HORROR','Best Horror Selections') /
The Books table is the main table that stores the list of books in the book catalog; the Inventory table stores the stockcount of each available book; and the Category table stores the full list of book categories (genres) available in the catalog. Table 10-1 describes the mapping between the various keys in each respective table.
Table 10.1. Foreign Key Mapping Between Different Tables in the Book Catalog Application
You must first create the forms that allow the storekeeper to add, edit, and delete book titles in the book catalog.
To create the page that allows the storekeeper to add/edit/delete books, please follow these instructions:
Create a new
Databaseapplication namedBook catalog.During the
Pagesstep of the Create Application wizard, choose theReport and Formpage type linked to theBookstable, as shown in Figure 10-1.Click the
Add Pagebutton to add the form and report. After doing so, finish the wizard to create the application.You should now have the screen shown in Figure 10-2.
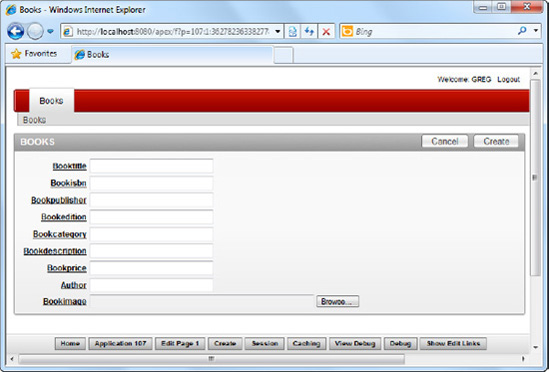
If you launch the main Books form, you should see the screen shown in Figure 10-3.
The book details entry form from Figure 10-3 lets the storekeeper add a new book to the book catalog, but the form is not complete yet. The BookCategory field should show a drop-down list of categories so that the storekeeper can pick from a list of categories instead of manually typing in the category code.
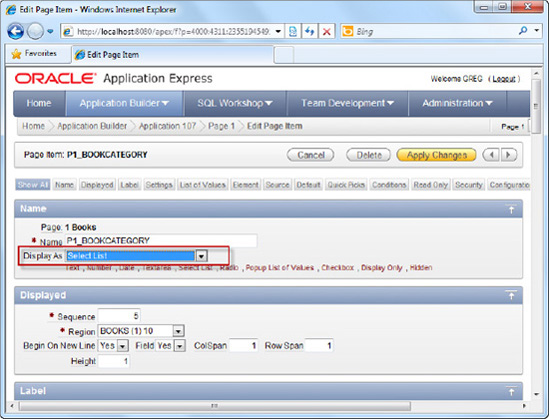
Edit the form. In the Page Rendering section, right-click the P1_BOOKCATEGORY field, and choose to edit the field (as shown in Figure 10-4).
In the Field Properties page, change the
Display Asfield fromText FieldtoSelect List, as shown in Figure 10-5.Scroll down to the
List Of Valuesarea, and specify the following SQL:SELECT Description, CategoryID FROM Category
You should now have the screen shown in Figure 10-6.
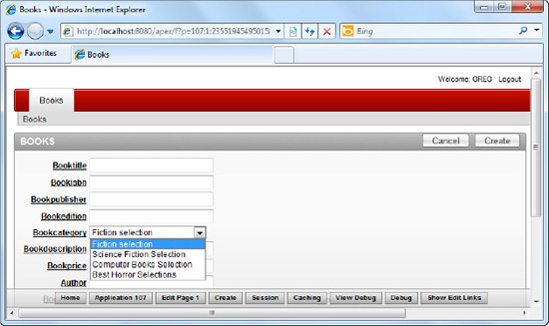
Save your changes and run the form. You should be able to select the book category from a list of values, as shown in Figure 10-7.
Let's turn to the report that was generated earlier. When you run the report in the application, you should see the list of books shown in Figure 10-8.
There's still one last thing to do at this point, which is to change the BookCategory column so that it displays the full category description instead of the category code. To do so, edit the report.
Tip
You might also want to change the heading of the report columns to display a more user friendly/readable title. You can do so by editing the report column and changing the Column Heading field.
In the
Page Renderingarea of the report, right click on theBooksnode, and choose theEditlink (as shown in Figure 10-9).Scroll down to the source of the report, and change the existing SQL to the following:
select
"BOOKID",
"BOOKTITLE",
"CATEGORY"."DESCRIPTION" "BOOKCATEGORY",
"BOOKISBN",
"BOOKPUBLISHER",
"BOOKEDITION",
"BOOKDESCRIPTION",
"BOOKPRICE",
"AUTHOR",
dbms_lob.getlength("BOOKIMAGE") "BOOKIMAGE"
 from   "BOOKS" LEFT JOIN "CATEGORY" ON "BOOKS"."BOOKCATEGORY" = "CATEGORY"."CATEGORYID"
You should now have the screen shown in Figure 10-10.
Apply the changes and run the report again. Note that the report displays the full category name instead of the category code, as shown in Figure 10-11.
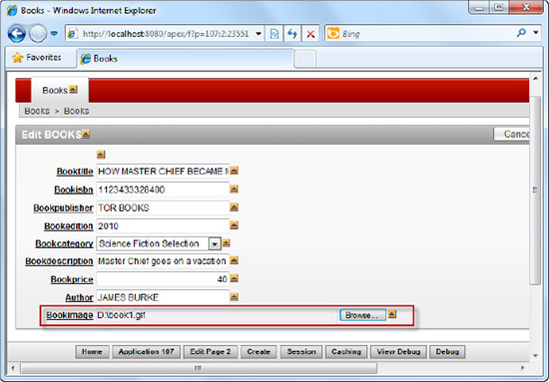
Try uploading book photos through your newly created form/report. In the report, edit a book by clicking the edit icon at the far left of each row.
Browse for an image of the book and upload it through the form, as shown in Figure 10-12. Save all changes to the record.
To confirm that the image was successfully uploaded, edit the record again; this time you see a
Downloadlink next to the control. Clicking the download link will bring you to the uploaded image file shown in Figure 10-13.Upload your own photos for all the other books in the
Bookstable.


As demonstrated in the earlier chapters of this book, APEX lets you easily create a form and report combination from a database table. This, in turn, allows you to easily and quickly setup CRUD (Create, Read, Update and Delete) functionality in your application.
Also covered in the previous chapters of this book was the use of List of Values (LOVs) dynamically generated from a specified SQL statement. LOVs can be used as the data source for Select Lists (drop-downs), as seen in this recipe.
Exercise 10-1: Create Pages to Manage the List of Categories and Book Inventory
As an exercise, I leave it to you to create the form and report pages to manage the list of different categories as well as book inventory in the book catalog application. The approach is similar to the steps outlined in this recipe. Use the Category and Inventory tables as the base for these pages.
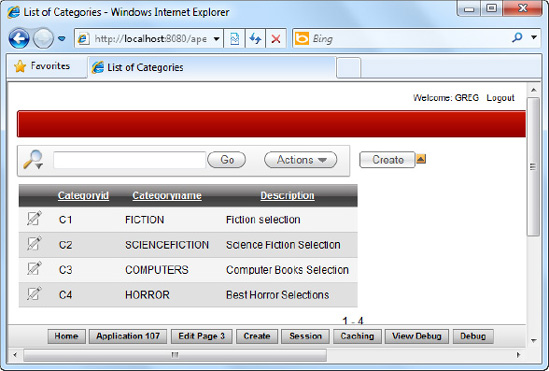
To verify if what you've done is correct, you should have the List of Categories report shown next. This will provide the storekeeper an interface to manage the list of available book categories in the book catalog.
For the inventory report, you should eventually have the report shown next. To display the book title in place of the Book ID in the report, you can use the following SQL:
select "ID",
"BOOKS"."BOOKTITLE" "BOOKID",
"COPIESINSTOCK"
from "#OWNER#"."INVENTORY" LEFT JOIN "BOOKS" ON "INVENTORY"."BOOKID"= "BOOKS"."BOOKID"

The Inventory report and form will allow the storekeeper to manage (and view) the number of copies of each book in stock in the book catalog.
You completed the bulk of the catalog back end in Recipe 10-2. Now you need the accompanying front-end portal that displays the list of books available in the catalog to the public, in a typical online book catalog format.
To create the catalog front end, follow these steps:
In the same
Book catalogapplication, create a new Report.Name this report "
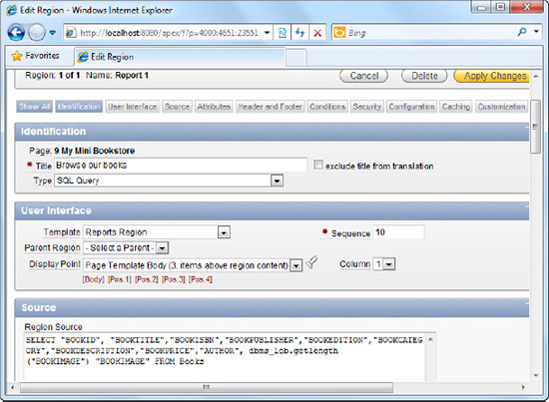
My Mini Book catalog" and the region title as "Browse our books".In the SQL Query section of the report, write the following SQL:
SELECT "BOOKID",
"BOOKTITLE","BOOKISBN","BOOKPUBLISHER","BOOKEDITION","BOOKCATEGORY","BOOKDESCRIPTION","BOOKPRI
CE","AUTHOR", dbms_lob.getlength("BOOKIMAGE") "BOOKIMAGE" FROM Books
Complete the wizard to create the report. After you have done so, edit the report again. You should have the screen shown in Figure 10-14.
Complete the rest of the wizard using the default settings.
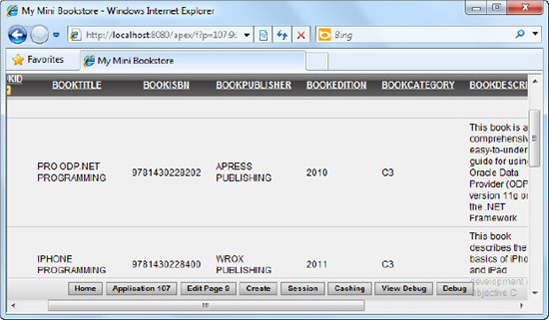
If you run your report, you should see the standard layout shown in Figure 10-15.
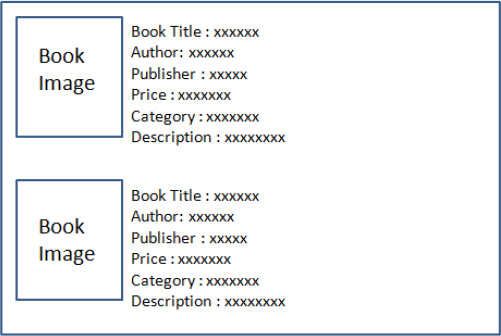
This layout works, of course, but it's not a very user-friendly book catalog. It would be nicer to list each item in the format shown in Figure 10-16.
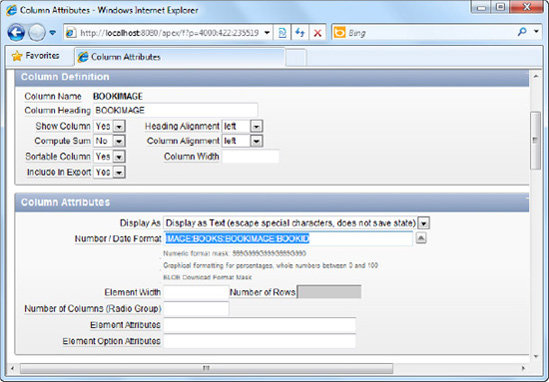
First, you will need to change the report slightly so that the actual book images will appear in each row. To do this, edit the report. In the Page Rendering area of the report, right click on the
BookImagecolumn and choose to edit it.In the Number/Date Format field, type in the following text:
IMAGE:BOOKS:BOOKIMAGE:BOOKID
You should now have the screenshot shown in Figure 10-17.
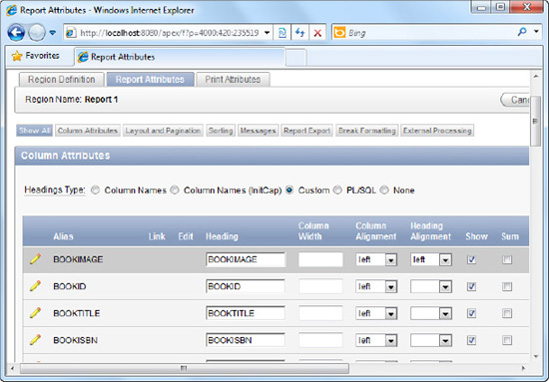
Save your changes and return to the main page definition area of the report.
Click on the
Report Attributestab. Change the sorting of the columns so that theBookImagecolumn appears first, as shown in Figure 10-18.Save your changes and run the report. You should now have something that looks like Figure 10-19.
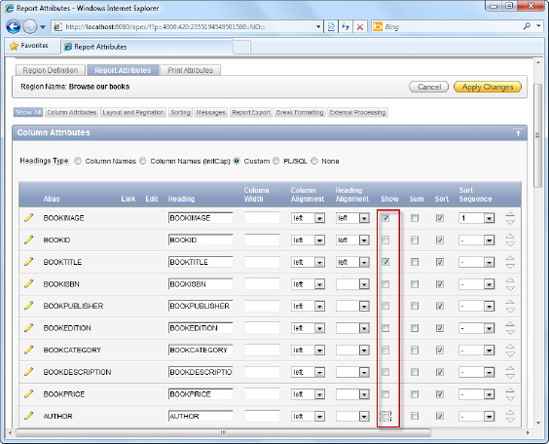
Edit the report again. In the Page Rendering area of the report, right-click on the "
Browse our books"region and choose to edit it. Click on theReports Attributetab.In the list of columns, hide all columns (untick the checkbox in the
Showcolumn) except for theBOOKIMAGEandBOOKTITLEcolumns, as shown in Figure 10-20.Save your changes, and edit the report again.
In the Page Rendering area, right click on the
BOOKTITLEfield and edit it.Scroll down to the
Column Formattingarea, and in theHTML Expressionfield, type the following HTML:<b>Title :</b> #BOOKTITLE#<br> <b>Author :</b> #AUTHOR#<br> <b>Publisher :</b> #BOOKPUBLISHER#<br> <b>Price :</b> USD #BOOKPRICE#<br> <b>Description :</b> #BOOKDESCRIPTION#<br>
You should now have the screen shown in Figure 10-21.
Save and apply your changes. Now try running the report again. You should now see the books laid out in a more user-friendly and readable fashion, as shown in Figure 10-22.


The HTML Expression field allows you to define your own template to display columnar data in a report for each row. Using the #FIELDNAME# notation, you can display data from any report column inside your HTML block.
Tip
Again, you might want to tidy up your interface by providing column captions that are more intuitive.
The current home page of the Book catalog application is the administration back end Books report. You would like to change it to be the catalog front end page.
To change the home page of an application, follow these instructions:
In the same
Book catalogapplication, click on theShared Componentsicon.Under the
Securityarea, click on theSecurity Attributeslink, as shown in Figure 10-23.In the ensuing page, change the page number in the Home link property from 1 to the page number of the front end catalog page. For example, if the page number of your front end catalog page is 9, your Home link property should be set to the following:
f?p=&APP_ID.:9:&SESSION.
Save and apply your changes. Now run your application by clicking the
Run Applicationicon. The application will now redirect you to the front end catalog page.

As mentioned in Chapter 9, a typical link to a page in APEX has the following format:
f?p=(ApplicationID):(PageNumber):(SessionID):::::
This recipe shows you the &APP_ID. and &SESSION. substitution tags to dynamically place the application ID and session identifier respectively in the final generated link. In this recipe, the page number (id: 9) is hardcoded in the link.
The storekeeper's boss wants to see a visual report (pie chart) of the number of books (stockcount) by genre.
To create the stockcount pie chart, please follow these instructions:
In the same
Book catalogapplication, create a new page.Choose the
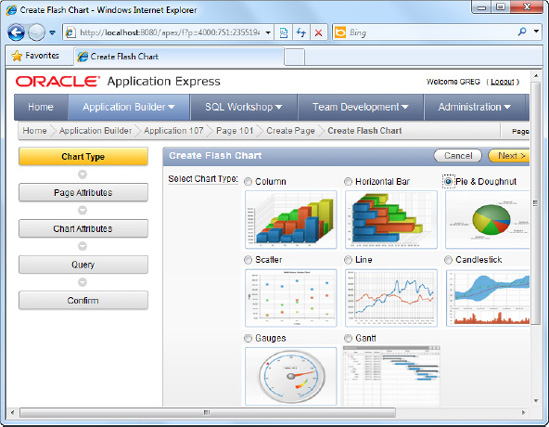
Chartpage type, and in the next step of the wizard, opt for theFlash Charttype.Choose the
Pie & Doughnutchart type, as shown in Figure 10-24.Choose the
3D Piechart type in the next step of the wizard, and for the page name and chart title, enter "Stockcount by Genre".When you are prompted to enter the SQL data source for the chart, enter the following SQL:
SELECT NULL LINK,
        Category.CategoryName LABEL,
        SUM(Inventory.CopiesInStock) VALUE
FROM Category,Books,Inventory WHERE Category.CategoryID= Books.BookCategory AND
Books.BookID=Inventory.BookID GROUP BY Category.CategoryName
You should now have the screen shown in Figure 10-25.
Complete the wizard and run the page. You should see the total number of books instantly computed by genre, as shown in Figure 10-26.


You now have various pages, but they're all in pieces. You need to provide a central Administration page from which the storekeeper can navigate to the various administration pages.
First, you must set up a navigation list. To do so, please follow these steps:
In the same
Book catalogapplication, click theShared Componentsicon.In the
Navigationarea, click theListslink shown in Figure 10-27.Create a new navigation list by clicking the
Createbutton in the top right corner.In the first step of the wizard, name the navigation list as "
AdministrationOptions".In the next step of the wizard, create the following four entries:
Book Categories
Inventory & Stockcount
Books Listing
Stockcount by Genre report
Tie each item to their respective report pages by clicking the little arrow icon next to each
Target Page ID or Custom URLbox, and choosing the correct page to link to from the pop-up window. This is illustrated in Figure 10-28.When you are done, complete the wizard to create the list.


Now that you've created the navigation list, you need to host it inside a page—the Central Administration page. To set up this page, please follow these steps:
In the same
Book catalogapplication, create a new blank page.Specify "
Administration" as the page name.Complete the rest of the steps of the wizard using the default settings to create a blank page.
Choose to Edit the page.
In the
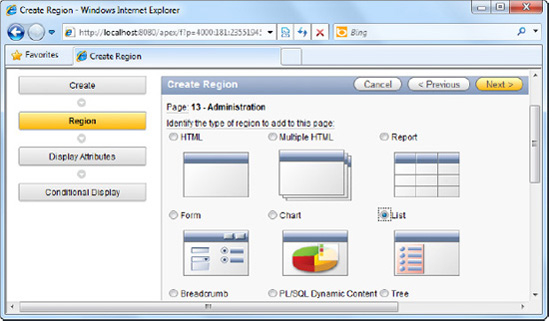
Page Renderingarea, right click on theRegionsnode, and choose to Create a new region.Choose the List region type, as shown in Figure 10-29.
Set "
Please pick an option below" as the title of the region.In the
Sourcestep of the wizard, choose theAdministrationOptionslist you created earlier, as shown in Figure 10-30.Click the
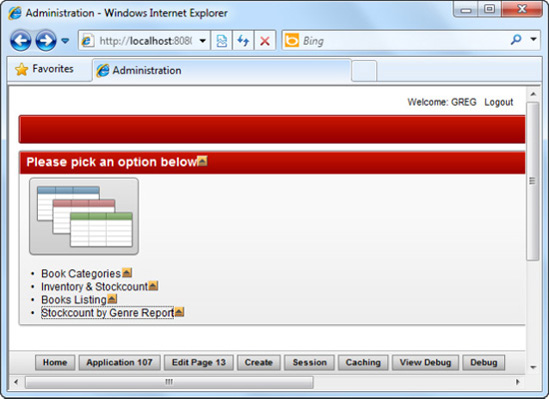
Create List Regionbutton to complete the wizard.Now run the page. You should see the various links to the various administration pages, as shown in Figure 10-31. Try clicking each link to ensure you land at the correct page.

Navigation Lists provide an easy way to setup a bunch of links that can be displayed as is (as shown in this recipe), or even hosted within a drop-down menu.
There is actually a side-benefit to setting up navigation lists. Once it is set up, it can be reused many times in an application. This can lead to easier maintenance of your application in the future. For instance, when a link is to be dropped, you don't have to go through every place in your application looking to delete that link. You could just remove it from the navigation list, and all areas that use the navigation list will be instantly updated.
You have a Central Administration page—that's fine. But how do you navigate there from your main catalog page (which is the front end catalog page). You realize you need tabs.
To create tabs in your application, follow these steps:
In the same
Book catalogapplication, click theShared Componentsicon.Under the
Navigationarea, click theTabslink shown in Figure 10-32.Click on the
Manage Tabsbutton in the top right corner of the ensuing page.Click the
Edit Standard Tabstab.Remove any and all existing tabs from this list (if an entry exists, click the
Editicon, and then click theDeleteicon on the following page).You should now see the screen shown in Figure 10-33.
Now click the
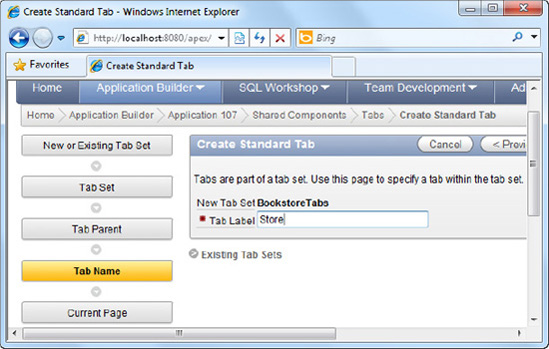
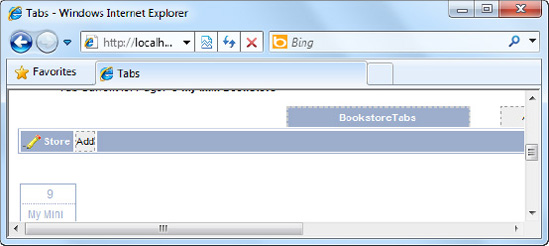
Manage Tabstab, and click the little Add button highlighted in Figure 10-34.Specify "
Book catalogTabs" for the new tabset name, and skip the next few steps until you arrive at the "Tab Name" step of the wizard.Specify "
Store" as the tab label, as shown in Figure 10-35.Click the
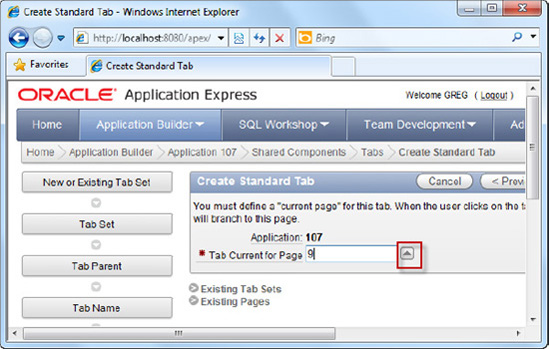
Nextbutton. Now you'll be able to specify the page that is associated with this tab. Choose the My Mini Book catalog page by clicking the arrow highlighted in Figure 10-36.Complete the rest of the wizard using the default settings provided.
You should see your newly created tab displayed in the screen shown in Figure 10-37.
Add another tab, and label it "
Administration".When you are prompted to provide the page associated with this tab, choose the Central Administration ("
Administration") page.Complete the rest of the wizard using the default settings.
Now run your application again. You will see two tabs at the top of your application, as shown in Figure 10-38. One will bring you to the catalog front end page and the other will bring you to the Central Administration page.


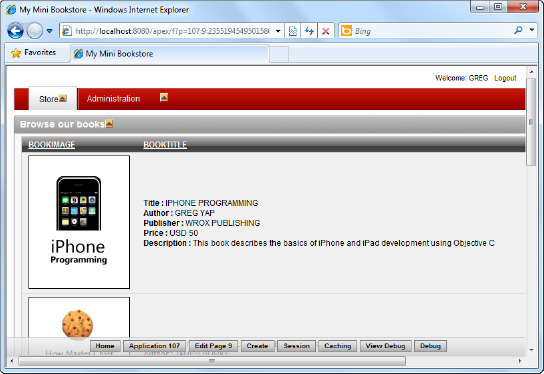
APEX takes away most of the work of visual representation of a tab from the developer. Once you associate a tab with a particular page, APEX will automatically highlight the tab for you (when you are on the page) and unhighlight the other tabs.
Tabs, like navigation lists, are also reusable throughout the application and provide the same benefit of easier maintenance: when a new tab needs to be added, just add it to an existing tabset, and voila! The new tab will instantly appear on every page in your application.