
The last mile in getting your application into the hands of your intended audience is the deployment process. In traditional programming, a programmer would typically compile an application into an executable file and then package it into an automated installer for distribution.
In the world of APEX, your entire application sits inside the database. Deployment is therefore just a matter of copying all the database objects and dependencies from one database instance to another. Having said that, it is still important to make sure you copy the right objects, lest you accidentally leave out a table or resource that is crucial to the correct functioning of your application. The last thing your users want is to painstakingly track down missing files after deploying an application that doesn't work.
Obviously, a complete packaged application should contain all the resources necessary to run an application. A solid deployment strategy will help reduce the common "Oops, I left that out in the patch" problem inherent in rushed deliverables. As you will see in this chapter, APEX provides a few ways to package an application (or a part of it). You will learn the basics of application deployment and the pitfalls to avoid along the way.
You've spent a lot of time creating the perfect application in your workspace. Now you need to deploy it, but you need to know which objects from your application or workspace to include in the deployment package.
For smaller organizations where convenience and speed of deployment is favored over security (and if you want the quickest and simplest deployment method possible), adopt the following deployment approach:
Create the necessary end users for the application.
Simply expose the application URL to the end users.
The end users run the application from the same instance in which you developed it.
If these applications frequently change (but with relatively little changes to the database objects), adopt the following deployment approach:
Export the application.
Import the application into the same workspace/schema using a new application ID.
For larger organizations, a development server (for development and testing or your applications) that is separate from the production server should be adopted. In this case, the following deployment approach may be more suitable:
Export the application.
Import the application into a different workspace (and/or schema).
If you need to deploy to an entirely separate server (for example, deploying at your customer's office), adopt the following deployment approach:
Export the application.
Import the application into the target Oracle APEX instance (install it using a different schema/database).
Many large organizations develop on a development server, move their applications over to a staging or User Acceptance Testing (UAT) server, and after the system has been approved by the users, to the production server. This type of deployment is quite common, and there are numerous ways to segregate or share your APEX instances, workspaces, and schema. A common setup is shown in Figure 9-1.

For very small deployments (and non-critical systems), it is sometimes acceptable to deploy the development and production version of your application in the same instance and workspace. The benefits of this approach include not having to manage many different workspaces and saving time by eliminating any deployment needed to get the application to its users.
For everything else, however, a good rule of thumb is that the development instances and production instances should be on different APEX instances entirely. Since development instances are usually used as testbeds, it is never a good idea to put a live production system in the same APEX instance. At the very least, you should separate the development instance and production instance using different workspaces so that it's not possible for developers to modify a live and running application.
You are prepared to export your application, but your application uses a wide array of database objects across multiple schemas, and you are unsure if you have covered the full list of underlying database objects used by your application in the export.
To use the Database Object Dependencies report to view all the dependencies of your application, follow these steps.
Log in to the application builder.
Open the application you wish to export.
Click on the Utilities icon at the top of the page, as shown in Figure 9-2.
Click on the Database Object Dependencies icon in the following page, as shown in Figure 9-3.
On the following page, click the Compute Dependencies link in the top right corner.
You should now see a table in the main area of the page describing all the objects currently used by the application, as shown in Figure 9-4.


You want to export an application from one schema or instance in preparation for deploying that application to a production environment.
To export an application, follow these steps:
Log in to the application builder
Open the application you wish to export.
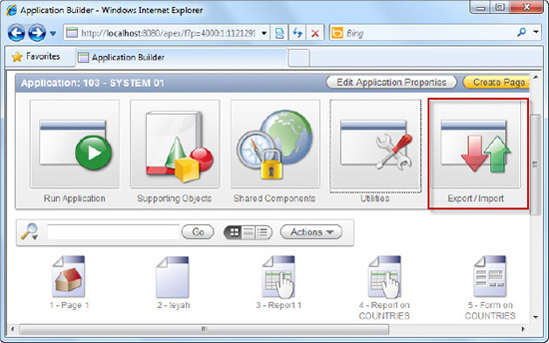
Click the Import/Export icon at the top of the page, as highlighted in Figure 9-5.
On the next page, choose Export and click the Next button.
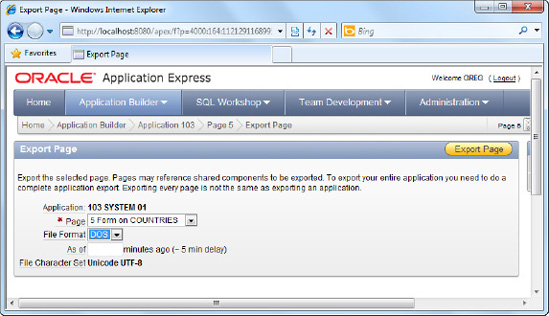
On the next page, confirm the application that you wish to export, and choose the DOS file format, as shown in Figure 9-6.
Tip
For users of UNIX operating systems, choose the UNIX file format instead. The main difference in the different exported file formats is how lines end: UNIX-based file formats end with an LF character and Windows-based file formats end with a CR/LF character.
Click the Export application button. This will prompt the export. At the end of the process (which should take a few seconds), you will be prompted to download the generated file (an .sql file), as shown in Figure 9-7.


An application in APEX consists of metadata, data, and business logic, and all of it sits nicely in the Oracle database. When you export an application, it exports all the metadata into an SQL file. By running this SQL file, it will rebuild the entire application from scratch on the target machine.
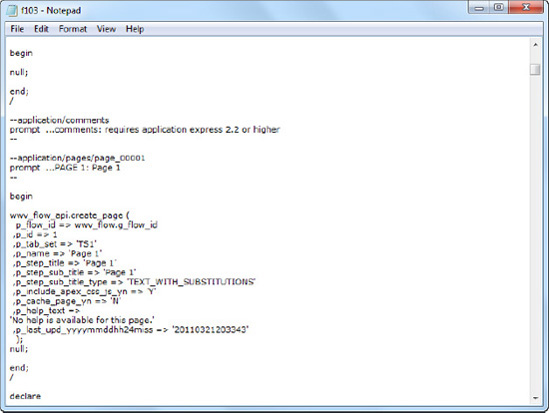
If you open the exported file in a text editor (such as Notepad), you will see that the content of the file are mostly PL/SQL function calls and DML that specifies the schema of your database and application objects. This is shown in Figure 9-8.
Tip
It is thus possible to open the SQL file in a text editor, hand-edit the values and import the updated SQL into another APEX instance. (This is only recommended if you know what you are doing!)
You need to import an application that you have just exported from another instance of APEX.
Note
This recipe demonstrates a manual import method. Recipe 9-5 shows how to use SQL*Plus to script an import to run automatically.
Use the Application Builder to walk through the import process using a convenient, GUI interface. Follow these steps:
Log in to the application builder.
Open the application you wish to import.
Click the Import/Export icon at the top of the page.
In the next page, choose Import and click the Next button.
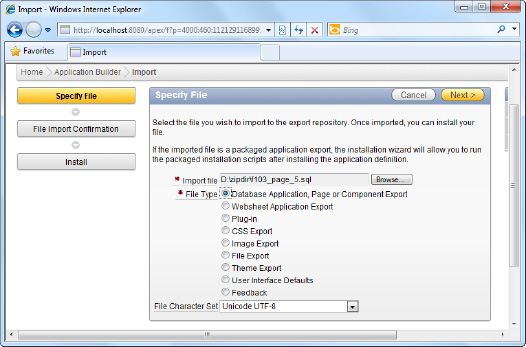
In the next page, browse for the .sql file in the Import File field.
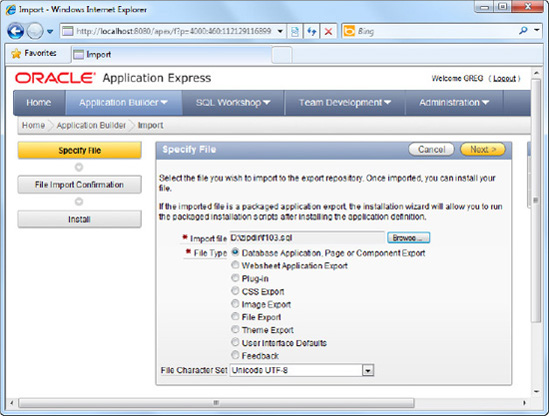
In the File Type field, choose the Database Application, Page, or Component Export option, as shown in Figure 9-9.
Once you click the Next button, a little progress bar will appear at the top of the page indicating the progress of the import.
Once the import has successfully completed, you are given the option to install the application, as shown in Figure 9-10.
Click the Next button to install the application.
Tip
After you import a file, it ends up in an internal repository called the APEX export repository. You can't use an imported file in any way until you install it.
You are now greeted with a page that allows you to specify the schema and the application ID to use for the new application.
Choose the Auto Assign New Application ID item, as shown in Figure 9-11 below, and click the Install button to proceed.
You should see a progress bar indicating the progress of the import.
Once the import has completed, you should see a screen that lets you choose to create the supporting objects for the application. In this page, choose the Yes option for the Install Supporting Objects field, as shown in Figure 9-12.
Click the Next button to proceed.
You will be presented with a confirmation screen. Click the Install button to continue with the installation.
After the installation completes, you will be presented with the screen shown in Figure 9-13.
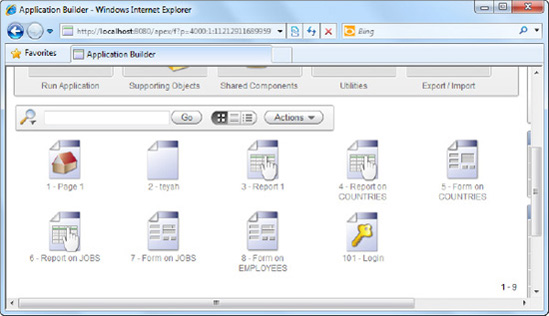
Now go back to your main workspace area. You should see your new application. If you open the application, you can see that the set of forms in the exported application has been created in your APEX instance, as shown in Figure 9-14.


You need to automate the import of an application via batch script, and therefore you can't import the application through the Application Builder interface.
Import that application using SQL*Plus. By using SQL*Plus, you trade the GUI interface of Application Builder for the ability to script and automate your import. Here are the steps to follow:
Run SQL*Plus.
Log in as the System Administrator to SQL*Plus.
Change your current active folder to the location of your exported .sql file. For instance, if your current active folder is
d:zipdir, you must first change the active folder to this location. You can do so using this code:define dir=D:zipdir
In the next line, type in
&dir(prefixed with the alias symbol (@)), followed by the name of the exported file. For example, if you exported your file earlier as f103.sql, type@&dirf103in the SQL*Plus command prompt (as shown in Figure 9-15).Tip
You can also declare the full path directly in this fashion:
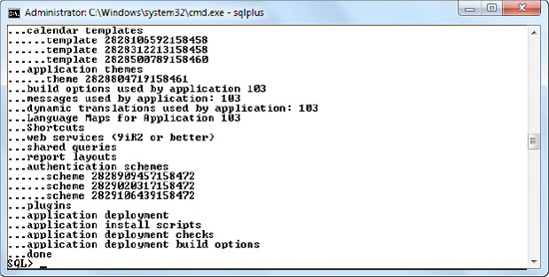
@d:zipdirf103.sqlWhen you run the script, you should see a bunch of log messages scroll by. At the end of a successful installation, you should see the screen shown in Figure 9-16.
The lack of error messages in Figure 9-16 indicates that the application has been successfully imported.
Now try logging on to the Application Builder. You should see your newly imported application.

The ability to import a file through SQL*Plus makes it possible for you to automate the importing process using batch scripts and so on. You might, for example, decide to create a batch script to automate the weekly import of new and updated pages from an application sitting in the development server to one sitting on the production server.
You've already deployed your application on a production server at your customer's office. Your team has updated a page in the application back at your office, and you want to bring this updated page to the customer's place to deploy it on their servers.
To export a single page, please follow these steps:
Open an existing application.
Open the page you wish to export in your application.
In the Page Definition area, choose the Utilities

In the next page, you are given the option to choose the file format for the export. Choose the DOS file format, as shown in Figure 9-18.
You should now be prompted to download the exported page (a .sql file).

Exporting a single page is useful when you don't wish to export every other part of the application. Other advantages of exporting a single page include:
Reducing of the size of the exported application (to keep sizes of .sql files manageable for transmission over the Internet).
Reducing the impact to a production server by localizing the import to only one or two page files.
A convenient way to upload bug fixes or updates to a production or UAT server.
As a means of exporting individual pages from a development server to a production server.
Thus, if you've only changed one or a few pages, you can minimize the impact on the production environment by moving only the pages that you have changed.
You have already exported a page following the instructions in Recipe 9-6. You now need to import the page into the target application.
To import a single page into your application, please follow these steps:
Open the target application you wish to import the page to.
Click the Export/Import icon at the top of the page.
Choose the Import option when prompted.
In the next page, browse for the page you exported earlier. For the File Type option, choose Database Application, Page, or Component Export option, as shown in Figure 9-19.
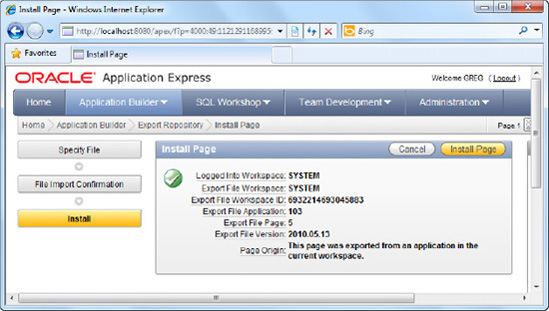
Click the Next button to continue. You will see the page installation confirmation step shown in Figure 9-20. Click the Install Page button to continue.
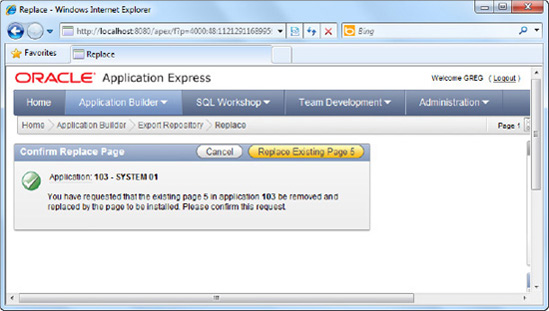
Because you are deploying an updated version of an existing page, the wizard will prompt you to overwrite the page, as shown in Figure 9-21.
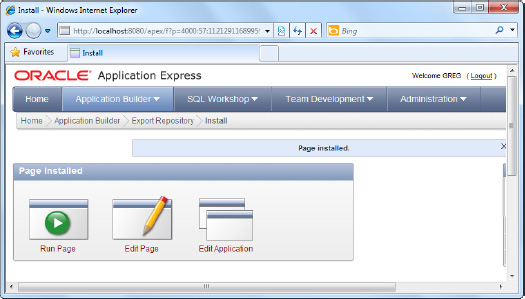
After the page has been replaced successfully, you should see the screen shown in Figure 9-22. Your page has been successfully deployed.
You can also easily import a page file into the same application or another application on another APEX instance using the methods described in this recipe. In fact, most of the other application resources (such as theme files, image files, shared objects, and so on) can be exported and imported in the same manner.
After you have deployed your application, you need to publish your application URL so that your end users can access the application, but you don't know it. You need to locate the application URL.
To discover the application URL, follow these instructions:
Open an existing application.
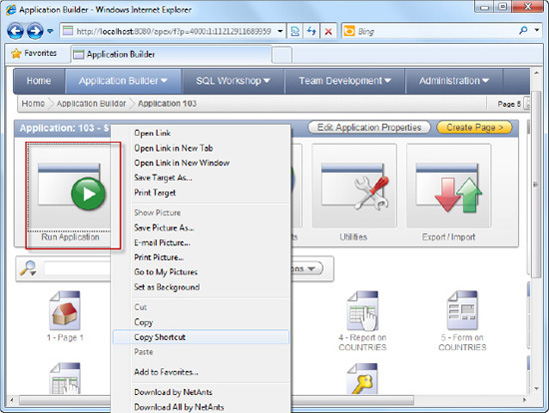
Mouseover the Run Application icon, right-click on it, and choose to view the shortcut/link for the icon, as shown in Figure 9-23.
Tip
In Microsoft Internet Explorer, right-click on the icon and choose the
Copy Shortcutmenu item. For other browsers, look for the equivalent menu item that lets you inspect the full URL for the link.If you paste the link of your application somewhere (for instance, in a text file), you will see that the full link to your application looks something like this:
http://localhost:8080/apex/f?p=103:1:1121291168995976:::::
You can paste this link in any browser to directly access the login page of your application.
The following URL is actually made up of a few parts. Let's dissect each part in detail to understand what they mean. Table 9-1 describes the URL in detail.
http://localhost:8080/apex/f?p=103:1:1121291168995976:::::
Table 9.1. An APEX Application URL in Detail