

11
Camera and Lens Systems
Modern digital single-lens reflex (DSLR) cameras are truly masterpieces of technological innovation. Steadily improving year after year, today’s DSLRs boast powerful sensors, sophisticated controls, and reliable performance at modest cost. The best news is that even entry level DSLRs today are easily capable of capturing the faint glow of the Milky Way, star trails, and the other nightscape images described in this book. The discussion on cameras in this book is confined to those with digital sensors, since they have largely replaced film in landscape astrophotography. This chapter will review the essential features of DSLRs that are the most important in landscape astrophotography. We will review characteristics of camera sensors, focus and metering modes, lens characteristics and selection, and factors that govern image sharpness.
Camera Sensor
The camera sensor is the heart of every imaging system, Figure 11.1. It is your camera’s retina. The sensor is responsible for converting the image that the lens produces into electrical signals that are digitally analyzed and stored on memory devices. The sensor is a semiconductor device that has been processed so that its surface contains millions of individual pixels. Each pixel is a tiny optoelectronic device, often measuring only a few micrometers in dimension. Pixels are either etched out of the original silicon wafer, built up with the deposition of additional layers of photosensitive and electronic materials, or both.

11.1
A typical camera sensor in a modern DSLR. The sensor is normally hidden behind the mirror, so it is not usually visible.
Incoming light is converted into electrical signals by each pixel in an analogous manner that the rods and cones in your eye’s retina convert incoming light to biochemical signals. Furthermore, sensors contain red, green, and blue pixels, just like the red, green, and blue cones in your retina described in Chapter 10. The incident light upon each pixel is converted into an electrical signal representing the strength of the particular hue of light that the particular pixel received. By examining the relative values of the signals from immediately adjacent red, green, and blue pixels, the actual color of light incident upon the pixels, or its hue, can be reproduced in the same way the light would be perceived by a human retina. The intensity of the light is determined by the absolute magnitude of the signals from each of the pixels.
The pixels in the sensors are optoelectronic devices. As such, they are inevitably susceptible to intermittent variations and false positives. Sometimes, they randomly indicate the presence of light when there is none. Other times, a high-energy photon or other cosmic ray may trigger an event that the pixel records as light. In yet other instances, separate measurements of the same light levels can yield slightly different results. In such cases, these artifacts are collectively known as noise, and are an undesirable, yet unavoidable consequence of digital imaging. The goal in imaging is to maximize the signal to noise ratio, or to limit the noise to a level that is so low that it is unnoticeable.
Sensors are characterized by several parameters, including the number of pixels they contain, their physical dimensions, and their signal-to-noise ratio. The number of pixels can be a very misleading parameter by itself, since small sensors can still contain a relatively large number of extremely small pixels. While such sensors can produce acceptable photographs under bright light conditions, they are prone to very noisy performance in low light conditions, and are typically unsuitable for significant enlargements. These sensors typically find their way into consumer electronics such as cell phones and security cameras where noise at low light levels is tolerable, and the need for enlargements rare.
DSLRs with larger sensors that contain a high number of relatively large pixels are best suited for landscape astrophotography. Such sensors are typically referred to as full–frame, compared to crop sensors, which are roughly two-thirds the size of full-frame sensors. Large, full-frame sensors generally have very good low-light performance with much less noise than smaller sensors with smaller pixels. The best way to evaluate a sensor for landscape astrophotography, other than by price, is by examining its noise levels in images created in low light conditions at high ISO settings, characterizations that are frequently available online.
Helpful Camera Features for Landscape Astrophotography
There are several helpful and even critical camera features for landscape astrophotography. The most important is the ability to create exposures using manually controlled settings, Figure 11.2(a) (overleaf). Specifically, you need to be able to independently set the ISO, aperture, and shutter speed. The second most important capability is the ability to manually focus the lens, which you will find yourself doing every night, Figure 11.2(b). Productive nightscape sessions are virtually impossible without these two vital camera features.
Having the ability to create quality images at the relatively high ISO settings of 3200, 6400, and even 12,800 is also helpful. Although such high ISOs are rarely used in other environments, they can be extremely valuable in landscape astrophotography. For example, you may find it helpful to create high ISO images of the night sky to blend in with low-ISO images of interesting foreground subjects, as described in Chapter 22.

11.2
Two key camera features you will want to have: (a) Manual exposure settings and (b) manual focus. Landscape astrophotography is nearly impossible without these features.
Many modern DSLRs have the ability to spot focus and spot meter. These are just as they sound; the camera uses a single spot to determine focus as well as to measure the light value of the scene. Some cameras give you the ability to move the spot that is used for focusing and metering within the field of view. The latter capability is helpful when creating blended images that require an in-focus night sky and a second image with an in-focus foreground. Focus can be achieved for both the night sky and foreground simply by moving the spot focus point, eliminating the need to physically move the camera or tripod. The resulting images are thus identical in composition and are easily combined during post-processing.
You will generally have several options available for releasing the shutter in landscape astrophotography: single-shot, continuous, time-delay, mirror-lockup, and interval timer operation. A single shot shutter release is the most straightforward: the exposure is made when the shutter release button is depressed. However, the slight movement, or shake, that inevitably occurs while depressing the shutter release button by hand can lead to a blurry image unless a remote release cable, Figure 18.4, or wireless trigger is used. The time delay feature found on most cameras is one way to avoid this blurriness: there is a 2 or 10 second delay after the shutter release button is depressed before the exposure is made. This delay allows the internal vibration within the camera to dissipate before the shutter opens, resulting in crisper photographs.
The mirror lockup option is a good method for eliminating internal vibration during image exposure in DSLRs, especially when combined with a cable release or wireless trigger. A normal exposure is automatically made in two distinct steps. First, the mirror is lifted out of the way and held there until the shutter is released, at which point the mirror drops back into place. The initial movement of the mirror can introduce internal vibrations and consequent blur during the long exposures of landscape astrophotography. When the mirror lockup option is exercised, both steps are done manually. The advantage is that vibrations introduced during the first step can be allowed to dissipate before the second step is performed. Using the mirror lockup option is worthwhile and should be used whenever feasible.
Finally, both the continuous and interval timer modes allow the creation of a series of exposures at regular intervals. Such images can be used to create star trail images and time-lapse videos, as explained in detail in Chapter 22.
File Format
It is a near certainty that the DSLR you will use for landscape astrophotography will allow you to record your images in either a JPEG or RAW file format. I strongly urge you to consider the benefits of always using a RAW file format for your images henceforth, whether or not you also save a second copy in a JPEG format. The fundamental difference between these two file formats is in image quality. Images created in a RAW file format contain the maximum possible image information. The signal from each RGB channel of each pixel is separately measured and saved. In contrast, the vastly smaller size of JPEG files is achieved through significant averaging of values from adjacent pixels with similar signals, in other words, file compression. Unfortunately, file compression irreversibly deletes sometimes-valuable information through its process of averaging. While cumbersome and bulky, the extra size of RAW files provides the maximum latitude for post-processing of images.
Lens Focal Length

11.3
Ray diagram showing (a) focal length, f; focal point F; and (b) subject focus distance, o, and image focus distance, i. Note the important distinction between subject distance and focal length; these two terms are frequently confused. The focal length is the distance between the center of the lens and the focus point for parallel incoming rays of light. It is an inherent property of the lens and does not change. The subject distance, o, is the distance between the center of the lens and the subject, and can vary between a few inches to infinity. The image focus distance, i, is the distance between the center of the lens and the image of the subject, and it depends on the subject focus distance, o.
There are a few key lenses that you will want to include in your landscape astrophotography arsenal. Each one has specific features that make it advantageous for specific instances. Lenses are characterized mainly by their focal length, f. The focal length is the distance between the center of the lens and the focal point for parallel incoming rays of light, Figure 11.3(a). It is an inherent property of the lens. The focal length should not be confused with the subject focus distance, o, which is the distance between the center of the lens and the subject, Figure 11.3(b). The focus distance changes with each subject, and can range from a few inches to infinity, whereas the focal length is a fixed property of the lens and never changes.1 Put another way, three lenses with focal lengths of 16 mm, 50 mm and 200 mm, respectively, can all have the same subject focus distance of 35 feet for a subject 35 feet away from the center of the lens, even though their focal lengths are all different.
Field of View
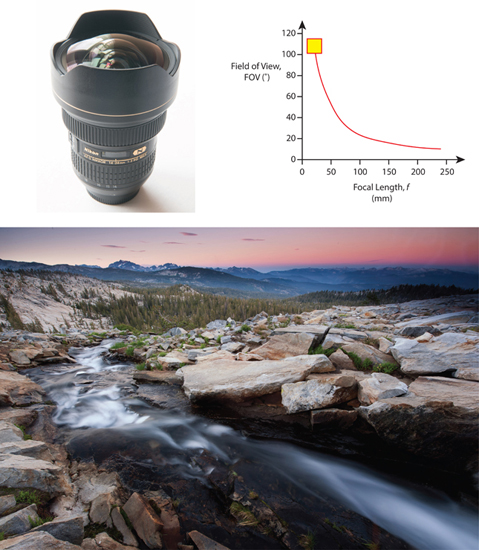
The focal length is an extremely important parameter. It controls many other key lens characteristics, including its field of view (FOV), Figure 11.4(a). The FOV is the angle between lines connecting the camera to opposite sides of the image. Telephoto lenses have a very narrow FOV of only a few degrees, while wide-angle lenses can have FOVs well over 100°, Figure 11.4(b). The fields of view of common landscape astrophotography lenses for a full-frame camera are given in Table 11.1. In addition to influencing the overall feel of your composition, Figure 11.5, the FOV can be very important in planning the basic feasibility of a given nightscape project. For example, knowing the FOV of your lens can help determine whether or not a certain combination of constellations will fit into a single image created by that lens, or whether the north star will fit into the same image as the horizon during a star trail composition, e.g. Figure 16.12.

11.4
(a) The field of view (FOV) is the angle between the two opposite edges, or corners, of the image. (b) Graph showing how the diagonal FOV depends on the focal length of the lens. Telephoto lenses have very narrow FOVs; wide-angle lenses, as their names suggest, have very large FOVs.
Table 11.1 Field of view (FOV) angles for 4:3 sensors for different focal lengths (f = ∞)
| FOCAL LENGTH (MM) | WIDE (°) | NARROW (°) | DIAGONAL (°) |
| 14 | 104 | 81 | 114 |
| 24 | 74 | 53 | 84 |
| 35 | 54 | 38 | 63 |
| 50 | 40 | 27 | 47 |
| 70 | 29 | 20 | 34 |
| 100 | 20 | 14 | 24 |
| 200 | 10 | 7 | 12 |

11.5
The galactic core region of the Milky Way viewed through lenses with different focal lengths, from a 16 mm fisheye lens to a 105 mm medium-range telephoto. The different FOVs of the lenses result in dramatically different appearances of the Milky Way.

11.6
Definition of the lens aperture, A, in terms of its f-stop number, f/ and focal length, f. (b) Photographs of a 50 mm lens set to apertures of f/22, f/5.6 and f/1.8.
Aperture
The maximum possible aperture, or the smallest f-stop, of the lens is another key lens criterion. The f-stop is calculated by dividing the focal length of the lens, f, by the diameter of the aperture, D, Figure 11.6(a). For example, a lens with a focal length of 100 mm and an aperture set to a physical dimension of 25 mm will thus have a f-stop of 100 mm/25 mm = f/4. The reason behind the nomenclature of the f-stop, f/, is now clear; the diameter of the aperture is defined as focal length, f, divided by, or “/”, the f-stop number. Thus: f/!
You can also now appreciate why lenses that have a smaller minimum f-stop are so much more expensive; they simply use more glass that must be shaped and polished to optical perfection over a larger lens potential opening. To see an example of this difference, let’s consider two 35 mm lenses, one with a minimum f-stop of 1.4 and the other with a minimum f-stop of 4.5, such as those commonly sold as a kit lens with entry-level DSLRs. For the first lens, the maximum aperture (minimum f-stop) is 35 mm/1.4 = 25 mm, or approximately one inch. For the second lens, the maximum aperture is 35 mm/4.5 = 7.8 mm, or only about one-third of an inch. The second lens, therefore, uses much less glass and thus is inherently cheaper and less demanding to manufacture.

11.7
Illustration of how the subject distance affects the size of a person’s silhouette for an image made with a 50 mm focal length lens. Subject distances of 5–200 feet are shown.
Subject Distance
When choosing a lens and subject distance combination for landscape astrophotography, one important issue that bears consideration is the size of your foreground subject within your composition. Here’s an example: consider the image of the galactic core of the Milky Way along with a small silhouette of a person shown in Figure 11.7. The key to this image’s success lies in positioning the person at the correct subject distance so that their silhouette appears relatively small. But how to know the best distance? To answer this question experimentally, examine the daytime exercise shown in Figure 11.7. Here, I simply photographed a person at different subject distances using the same lens, Figure 11.7. The Milky Way image was then made after selecting the correct subject distance for the appropriately sized silhouette in the composition.
Image Sharpness
The aperture setting affects the resultant image’s overall sharpness and quality, even when in perfect focus. There are two competing phenomena that cause this result: lens imperfections at minimum aperture and diffraction at maximum aperture.
When the aperture is wide open, i.e. at its minimum value, light passes through nearly the entire body of the lens to reach the sensor. In contrast, when the aperture is set to higher values, for example f/8, or f/11, we say that the lens is “stopped down” and the physical size of the aperture is smaller. The aperture now blocks incoming light from the periphery of the lens, so that only light that impinges upon the central region of the lens is able to pass into the camera.
The front surface of any lens at its periphery is naturally more curved than its center, which is nearly flat. A number of unavoidable lens imperfections, specifically, spherical aberrations, chromatic aberrations, and coma become important as the result of the greater lens curvature accessed at minimum aperture. Spherical aberration causes a noticeable softening of the focus in the image. It results from the inability of light from the entire front surface of the lens to converge precisely at a single point within the image. Chromatic aberration is an optical phenomenon with its origins in the wavelength-dependent refractive index of optical glass. Images exhibiting chromatic aberration exhibit noticeable colored fringes surrounding bright objects, such as stars. Coma is the result of light sources, such as stars, that are located around the periphery of the images failing to focus in a single point but rather in a flare-shaped area at minimum aperture, and has its origins in the spherical aberration described above. Finally, lens vignetting becomes more pronounced at minimum aperture since off-axis light travels through more glass and decreases in intensity, coupled with the tendency of the lens housing to partially block light entering near the lens periphery. Even the very best lenses exhibit these various effects at minimum aperture, although their effects are far more pronounced at the lowest minimum apertures, e.g. f/1.4 or f/2.0.
In contrast, at the very minimum aperture dimension, i.e. maximum f-stop (e.g. f/22), the aperture diagram is now reduced to a narrow restriction, Figure 11.6(b). In this case, optical diffraction occurs around the edges of the diaphragm blades, producing noticeable softening of the image focus. Although diffraction occurs at any aperture setting, its effects become minimized by the relative abundance of light from the bulk of the lens far from the diaphragm blades at wider apertures.

11.8
Schematic diagram showing the competing effects of lens imperfections and diffraction on the overall image sharpness and quality for different aperture settings. The best image sharpness is usually obtained between two and three stops above the minimum aperture setting for the lens; most important for extremely low minimum aperture lenses, e.g. f/1.4.
The qualitative effects of lens imperfections, diffraction, and the net result of both on image sharpness for different aperture settings are shown schematically in figure 11.8. The least distortion from lens imperfections occurs at high f-stops, e.g. f/22, but is significant at low f-stops. In contrast, the least distortion from diffraction occurs at low f-stops, e.g. f/2.8, but is limiting at high f-stops. Consequently, the overall sharpest image is achieved somewhere in between, and a good rule of thumb is that it is achieved around two exposure stops above the minimum f-stop. For example, if a lens has a minimum f-stop of f/2.8, then the sharpest images will be achieved at an aperture of f/5.6; for one with a minimum aperture of f/4, the sharpest image will be achieved at f/8, and so on. A practical example showing the image sharpness over the complete range of possible aperture settings is shown in Figure 11.9 (overleaf); you may wish to repeat this exercise yourself with your preferred lenses to identify the best aperture for your equipment.

11.9
Examples of how the image sharpness depends on the aperture setting, for apertures ranging from f/2.8 to f/22. Each row shows the original image of a mountain range from several miles away, along with two successive close-ups of the tallest mountain peak, in this case, Mt. Whitney, in California. The images made at f/5.6 and f/8, two and three stops above the minimum aperture of f/2.8, respectively, are the sharpest.
Focusing
Learning how to achieve a good focus in the dark, whether it is on the stars, or on foreground subject, is probably the most difficult challenge to confront landscape astrophotographers. It is very important to learn how to achieve and confirm the best focus possible. While the compressed JPEG image on your camera’s rear screen may look perfectly acceptable, examination at full scale on a monitor may reveal an image with visibly out-of-focus stars. The table of brightest targets provided in Table 2.1 may help. Examples of images that all appear to have suitable focus at low magnification but reveal unfocused stars upon closer examination are shown in Figure 11.10. The practicalities of achieving focus in that field are described in Chapter 20.

11.10
Three different examples of focus: (left) all three appear to have acceptable focus, yet when viewed at higher magnifications, only the image in the middle had acceptable focus. It is crucial to establish a crisp, tack-sharp focus each and every time to perform your nightscape photography.
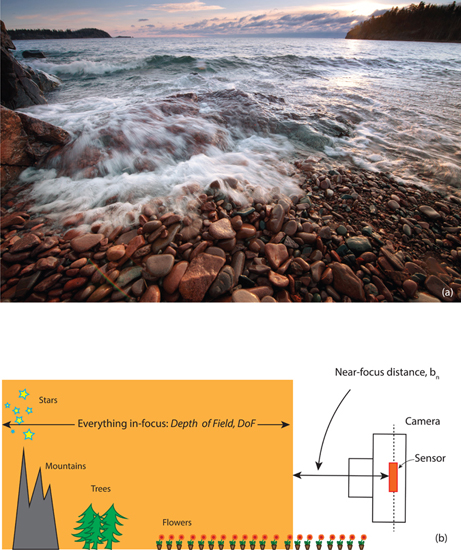
11.11
(a) A quality image has a complete focus from objects close to the camera all the way to the horizon. (b) When focused on the horizon, the limiting factor is the near focus distance, bn, or the distance between the camera and the closest in-focus object. We are interested in knowing bn for scenarios in which the night sky is in focus so that we can create images with a sharp focus throughout the entire image. We do this simply by ensuring that the closest foreground object in the image is further away from the camera than the near focus distance, bn.
Optics of Focus
Nightscapes are appealing precisely because of their in-focus foreground coupled with an in-focus night sky. Foreground objects can be out of focus if they are too close to the camera when the lens is focused on the sky, Figure 11.11(a). This section describes the two main approaches to reliably achieving sharp focus across the entire image—what to set and what to guard against.
In order to understand the camera and lens settings that control the near focus distance, let’s introduce a few parameters needed to describe the physics behind the optics of focus, Figure 11.12 (overleaf). We’ve already introduced the object focus distance, o, and the lens focal length, f. The depth of field (DOF) is the distance between the far and near focus points, bf, and bn; Figure 11.12, middle and bottom, respectively.
Second, we will assume the night sky lies at an infinite distance from the camera.
Finally, we need to introduce the term, circle of confusion (CoC). The CoC is simply the size, or diameter, of the smallest circle that is resolvable by your camera’s sensor. Put another way, if a distance corresponding to the CoC separates two tiny dots of light on your sensor, they are distinguishable as two separate dots. If they are moved any closer together, they blend into a single dot.
You may like to think of the CoC as the resolution limit of your camera’s sensor. It is roughly equivalent to the pixel dimension, or alternatively, as the approximate size of the rod and cone cells in your eye’s retina. Consequently, it makes sense that if two tiny dots of light are incident on a single cone cell, there is no way for that cell to know if there are two dots of light, one dot of brighter light, or even eighteen dots of dimmer light! In contrast, if the two dots of light are placed on two separate cells, then they are easily distinguishable.
Objects appear in focus if each point within them is focused to a spot smaller than the CoC, since they can then be distinguished by separate pixels. They appear blurred, or out-of-focus if their focused spot is larger than the CoC, and thus spread over more than a single pixel. Consequently, the DOF is determined simply by the distance between the closest, and farthest away objects whose images are focused to spots smaller than the CoC, Figure 11.12(middle) and (bottom).
The first approach to achieving sharp focus across the entire image is to focus directly on a star, a planet, or the moon, Figure 11.13(a). These objects are effectively at a subject distance of infinity. The next step is to look up the near focus distance for the relevant combination of lens focal length and aperture setting. Examples of the near focus distance for different combinations of lens focal length and aperture are shown in Figure 11.14 for a typical Nikon DSLR camera with a full-frame sensor. Near focus distances can be readily calculated for other cameras by using the planning apps described in Chapter 17. Being sure that all the foreground elements within your composition are further away from the camera than this distance will ensure that they remain in focus while your camera is focused on the sky.

11.12
Schematic diagrams illustrating the depth of field (DOF), or the distance between the near and far focus distances, bn and bf, respectively. Each of these is determined by the positions of the closest and farthest away subjects whose images are comprised of focused spots smaller in size than the sensor’s Circle-of-Confusion, or CoC, as described in the text.

11.13
Two main methods of focusing: (a) focusing directly at infinity; (b) hyperfocal focusing. The benefit to hyperfocal focusing is that it allows the maximum possible DOF with distant objects even though the camera is not focused directly on them. This occurs since their images are all made up of individual points all smaller than the camera’s CoC (inset).

11.14
Graphs of the near focus distance, bn, calculated for different combinations of lens focal length and aperture settings in a full-frame camera.
You may be interested to observe how the near focus distance decreases significantly as the aperture increases, as can be seen from Figure 11.14. Simply changing from f/5 to f/10 essentially cuts the near focus distance in half! Unfortunately, much landscape astrophotography is performed at low f-stops with a correspondingly significant near focus distance. Consequently, it is well worth having a good estimate for the near focus distance for the combination of lens and aperture you’re using if you follow this method.
The second method is to set your camera’s object focus distance, o, to the hyperfocal distance for the relevant combination of lens focal length and aperture, Figure 11.13(b). In this method, the near focus distance is exactly one-half the hyperfocal distance. The hyperfocal distance has been calculated and is readily available for nearly every combination of focal length lens and aperture, Table 11.2. This method is referred to as hyperfocal focusing.

The benefit to hyperfocal focusing is that it allows the maximum possible DOF with distant objects still in focus. The key to hyperfocal focusing is that the far away objects remain in focus even though the camera is not focused directly on them. This occurs since their images are made up of individual points all smaller than the camera’s CoC. In turn, objects relatively close to the camera remain in focus, since their images also are made up of points smaller than the CoC, as shown by the inset in Figure 11.13(b). In contrast, for the first method of focusing directly on the stars, the near-focus distance increases. Objects that were in focus through hyperfocal focusing, Figure 11.13(b), are now out of focus, as shown by the inset in Figure 11.13(a). Their images are made up of points larger than the CoC, and hence appear blurry.
Hyperfocal distance focusing is a very powerful and helpful method of setting focus for landscape astrophotography. Once the combination of lens and aperture is established, all you need to do is to set the focus distance of your lens to the hyperfocal distance. The near focus distance is just one-half the hyperfocal distance. All that’s left is to ensure that the closest foreground object in your composition is further away from the camera than this near focus distance.
Lens Selection
My first forays into choosing lenses many years ago were memorable experiences. I was immediately bewildered by the variety of choices! I knew there must be some very important differences between lenses of such different focal lengths, but I had no idea what they were. Only after study and experimentation did I begin to develop an intuitive sense of which lens to select under which circumstance. The set of images shown in Figure 11.15 show one set of experiments exploring different focal length lenses similar to the exercise in Figure 11.5; you may wish to create your own, similar set of images with your own range of focal length lenses. You will develop an immediate sense of the strengths and limits of each focal length lens in doing so.
Several of the more common focal length lenses are described in the following sections. This list is certainly not exhaustive, and as is the case throughout the book, only feature Nikon lenses since those are the ones with which I have the most familiarity. Having owned multiple Nikon, Canon, and Panasonic camera and lens systems over the years, in all cases with satisfaction, my only recommendations are that you should pick the camera system based on your own needs and preferences, without undue influence from anyone else!
The following focal length specifications are for full-frame cameras. These focal lengths should be reduced by a factor of approximately one-third for crop sensor cameras for the purposes of comparison. Thus, a 35 mm lens on a full-frame camera would be the equivalent of a 24 mm lens on a crop sensor camera.
Fisheye
The fisheye lens stands apart in its ability to pull in the night sky, Figure 11.16. Although it tends to produce significant image distortion, it is unsurpassed in its ability to capture an extraordinary range of the night sky in a single image. With a diagonal FOV that approaches 180°, it is especially useful in photographing the aurorae as well as the Milky Way. The full-circle fisheye lens, e.g. 8 mm, while distinctive, also has many applications within landscape astrophotography: meteor showers, the aurorae, and 360° panoramas.

11.15
These images show the results of experiments exploring different focal length lenses. All images were made from the identical tripod position within a few minutes of each other. The yellow arrow depicts Mt. Whitney, visible in each of the images.

11.16
The fisheye lens. This lens is superb at capturing the widest possible swath of the sky and foreground in a single image, as illustrated here for an auroral corona. The setting crescent moon is visible in the upper right.
Wide-Angle Lenses—14–24 mm
Wide-angle lenses in the 14–24 mm focal length range are favorites of most landscape astrophotographers. Without the major distortion of the fisheye lens, wide-angle lenses can simultaneously capture wide swaths of the night sky and relatively undistorted foreground subjects in a single image, Figure 11.17. They excel at capturing sunsets and sunrises; Milky Way images, star trails, meteor showers, and nightscapes of the aurora. Images involving the rising or setting of the full moon, however, are best shot with longer focal length lenses, since the moon becomes lost in such a wide FOV.
Lenses in this focal length range are available as either prime or zoom lenses. They are also available with a range of apertures, some as low as f/1.4. Depending on your budget, these lenses are excellent investments, and rarely fail to satisfy.
24–70 mm Focal Length
Owing to their more restricted FOV, lenses in the 24–70 mm range tend to be chosen when specific night sky objects make up the essence of the composition, Figure 11.18. They make excellent choices for nightscapes involving the rising and setting of the full moon, star trails, and images including the galactic core of the Milky Way. They are also valuable when photographing local regions of the aurora. Finally, they are perfect for creating images used for panoramas.
Another advantage of lenses in this focal length range is that they are widely available as prime lenses with very low minimum aperture, some as low as f/1.2, Figure 11.19. The fully manual versions of these wide aperture lenses are also quite inexpensive and are very well worth considering since you will rarely be using auto focus during your night sky forays. Combining two or more images from such lenses in a panorama can offset the substantial coma distortions that occur at the lowest aperture settings. The central, sharpest regions are preserved, along with the extraordinary light-capturing ability of these lenses.
Greater than 70 mm
Lenses with a focal length above 70 mm are relatively uncommon in landscape astrophotography, Figure 11.20. One reason is that many night sky objects are simply too large to fit into their relatively restricted FOV. Another reason is that relatively short exposure times are necessary to avoid significant streaking or trailing of stars, as described in more detail in Chapter 22.
One area where these focal length lenses excel, however, is in creating nightscapes involving the rising and setting of the full moon. In such compositions, the requisite relatively short exposure times coupled with the need to isolate the area of the full moon rising or setting are both perfectly satisfied by lenses with relatively long focal lengths.
11.17
The wide-angle lens (14–24 mm). This is an incredible lens for landscape astrophotography. It captures an extraordinary amount of the scene with minimal distortion. It will no doubt become one of your favorite lenses.

11.18
Lenses with focal lengths in the 24–70 mm range are used somewhat less frequently in landscape astrophotography; limitations more easily arise with star streaking. Yet, they do find application in relatively bright situations, including compositions involving sunsets/sunrises, twilight, the full moon, and aurorae. They are also an excellent choice for creating images used in panoramas.

11.19
The 35 or 50 mm prime lens. These lenses are often surprisingly inexpensive, yet available with extremely low minimum apertures: f/1.8 or even f/1.2! These lenses are excellent at capturing specific foreground subjects set against the night sky and can create terrific input images for multi-image panoramas.

11.20
Lenses with focal lengths above 70 mm, such as the 70–200 mm zoom lens shown here, are rarely used in landscape astrophotography, except for specialized instances in bright conditions, such as sunsets, sunrises, and the full moon rising or setting.
Prime vs. Zoom—What’s the Difference?
No discussion of lens selection would be complete without a mention of the choice between a prime lens with the same focal length as with a high-quality zoom lens. The answer has two components. The first is that a prime lens can usually be acquired with a substantially smaller minimum aperture (e.g. f/1.0 or f/1.4 instead of f/2.8) than a zoom lens with the same focal length. This is extremely important for landscape astrophotography, since so much of our work is done at or near minimum aperture settings. As will be seen in the next chapter, the ability of exposing at an aperture of, say, f/1.0 instead of f/2.8 is the same as being able to expose with an ISO setting of 800 instead of 6400! This can result in a significant difference in image quality.
The other major advantage to prime lenses (as well as small-range zoom lenses, e.g. 14–24 mm), is optical quality. Zoom lenses require substantially more components within the lens in order to function than a prime lens, consequently there simply tends to be slightly more image distortion around the periphery of the images in zoom lenses with the same focal length as a prime lens.
One disadvantage of prime lenses is that they necessitate frequent lens changing in order to alter the focal length of a composition. This can be very problematic in the field, owing to the likelihood of introducing dust and other debris into the camera during the process. Another disadvantage is cost—top quality prime lenses are often not available for as much of a price discount as one would imagine. Finally, an arsenal of prime lenses is expensive, difficult to easily change the composition without moving significantly, and difficult to transport. Personally, I have found that the advantages of a high-quality prime lens to be significant in very specific cases, but certainly not all.
Bibliography
Bair, Royce, Milky Way Nightscapes, 2015, RoyceBair.com (ebook)
Dyer, Alan, How to Photograph Nightscapes and Timelapses, 2014, Amazing Sky (ebook)
Freeman, Michael, The Photographer’s Eye, 2007, Focal Press, New York and London
Freeman, Michael, Perfect Exposure, 2009, Focal Press, New York and London
Horenstein, Henry & Russell Hart, Photography, 2004, Prentice Hall, Upper Saddle River, New Jersey
Hunter, Fil, Steven Biver & Paul Fuqua, Light, Science and Magic, 2007, Third Edition, Focal Press, New York and London
Jacobson, Ralph E., Sidney F. Ray, Geoffrey G. Attridge & Norman R. Axford, The Manual of Photography, 2000, Ninth Edition, Focal Press, New York and London
Johnson, Charles S., Jr., Science for the Curious Photographer, 2010, A.K. Peters, Ltd, Natick, Massachusetts
Kelby, Scott The Digital Photography Book, Volume 1, 2007, Peachpit Press, USA
Kelby, Scott, The Digital Photography Book, Volume 2, 2007, Peachpit Press, USA
Kingham, David, Nightscapes, 2014, Craft & Vision, Vancouver, Canada
Knight, Randall D., Physics for Scientists and Engineers, 2013, Third Edition, Pearson, Glenview, Illinois
London, Barbara, Jim Stone & John Upton, Photography, 2011, Tenth Edition, Prentice Hall, Upper Saddle River, New Jersey
Peterson, Bryan, Understanding Photography Field Guide, 2004, Amphoto Books, New York, New York
Peterson, Bryan, Understanding Exposure, Revised Edition, Amphoto Books, New York, New York
Sussman, Aaron, The Amateur Photographer’s Handbook, 1973, Eighth Revised Edition, Thomas Y. Crowell Company, New York
Wu, Jennifer & James Martin, Photography: Night Sky, 2014, Mountaineers Books, Seattle, Washington
Note
1 Not to be confused with the variable focal lengths of a zoom lens, which allows the user to change the focal length of the lens. In this discussion we’re keeping the zoom setting, i.e. the focal length, fixed, and allowing the subject distance to change.