

2
The Night Sky and its Movement
The night sky is rich with objects to observe and include in your nightscapes. There is the moon, meteors, the planets, comets, the Milky Way, and Iridium flares. All this on top of the multi-colored stars and the constellations they comprise, Figure 2.1! There are dazzling atmospheric phenomena you may wish to pursue: the kaleidoscopic colors of sunsets and sunrises, deep twilights, the zodiacal light, sky glow, ice haloes, noctilucent clouds, moonbows, and the hypnotic Aurora Borealis/Australis. Your understanding of the origins and characteristics of the objects and phenomena of the night sky; and how they move during each night, between one day and the next, and from month-to-month, will be the basis for your landscape astrophotography journey.
This chapter provides you with the astronomical foundations necessary for successful landscape astrophotography. First, we will briefly review the structure of the universe and how it relates to the most common night sky objects you will see. Next, we will learn how the earth’s motion—both its daily rotation about its axis, and its annual revolution, or orbit, around the sun causes these objects to move across the sky. We will see why this motion depends on the compass direction you’re facing, or from which of the earth’s hemispheres you’re observing. You will learn about two simple tools you will want to learn how to use to understand the constantly moving night sky and predict the constellations that will be visible for any time or date. Finally, we will conclude with a brief review of the cause and effects of the seasons.
Overview of Night Sky Objects
As the sun slips below the horizon and night descends, its light slowly recedes from the sky. The glowing blue gases in the earth’s atmosphere become transparent, allowing us to peer into the realms beyond. What a universe awaits us!
Moving beyond the earth, Figure 2.2(a), we first encounter our moon, along with our neighboring planets—Venus, Mercury, Mars, Jupiter, Saturn, Uranus, and Neptune, Figure 2.2(b). Our solar neighborhood includes comets, which are frozen masses of gas, ice, and rock, as well as the debris they leave in their path that gives birth to annual meteor showers. Moving beyond the solar system into the encompassing Milky Way Galaxy, Figure 2.2(c), we find a rich variety of stars, gas nebulae, and star clusters. Finally, venturing beyond the Milky Way into deep space and the rest of the visible universe, we find ourselves in the realm of other galaxies and galaxy clusters, Figure 2.2(d, e, f).
All of these night sky objects can be put into one of two main categories for our purposes. The first category includes objects whose position relative to each other never changes1—for example, the stars, the Milky Way, constellations, nebula, and star clusters. Once you’ve learned their arrangements, they will be your familiar night sky friends for the rest of your life. The second category includes objects whose position constantly changes relative to the background positions of the stars. This category includes the planets, whose name originates from Greek for wandering star, the moon, comets/meteors, satellites, and Iridium flares. This chapter focuses on the first

2.1
Many constellations and other objects are visible in this (a) wide-angle view of the night sky over California’s Sierra Nevada and (b) corresponding simulation from Stellarium. From left to right, you can see Canis Major, Lepus, Eridanus, Orion, Taurus, Cetus, the moon, the Pleiades, Aries, Triangulum, Perseus, Andromeda, the Andromeda Galaxy, Cassiopeia, Polaris, Ursa Minor, and Cepheus. Many of the constellations contain asterisms, or sub-groupings of stars into familiar patterns like Orion’s Belt, also visible above. The bright light of the nearly full moon washes out dimmer stars, allowing the brighter stars that form these constellations to stand out. Under moonless skies, their dimmer neighbors, as seen in Figure 5.2, can overwhelm them.
Source: www.stellarium.org

2.2
Schematic showing how the Earth relates to the solar system and the rest of the universe. (a) The Earth is orbited by the moon, along with swarms of man-made satellites. (b) The solar system contains the eight planets shown here, although Uranus and Neptune are generally invisible to landscape astrophotographers. (c) The solar system sits within the Milky Way Galaxy, which contains hundreds of billions of other stars. (d) The Local Group, within (e) the Virgo Supercluster, contains galaxies similar to the Milky Way. Only a few are visible to landscape astrophotographers, notably M31, or the Andromeda Galaxy, and the Magellanic Clouds. You may be surprised to observe that the space in between neighboring galaxies appears empty and largely devoid of stars! Finally, (f), the visible universe contains hundreds of billions of galaxies.
source: NASA/CXC/SAO

2.3
The shaded red circle in this schematic diagram of the Milky Way indicates the relatively small fraction of its billions of stars that are visible to the naked eye from Earth. Stars outside the shaded red circle are generally too dim to be seen individually with the naked eye, although many can be resolved using astronomical instruments.
source: NASA/CXC/SAO
category of objects, specifically, stars, and constellations. Subsequent chapters cover the night sky objects whose positions constantly change.
Stars and Constellations
We begin with those objects whose position remains constant relative to one another: the glittering stars and the constellations they form. You may be surprised to learn that all the individual stars distinguishable with your naked eyes are only located within a relatively small portion of the Milky Way, Figure 2.3. Our eyes are only able to resolve galaxies in the vast space beyond the edges of the Milky Way in just a few instances.2
Einstein incorrectly considered the universe to be made up of a uniform “soup” of stars and occasional galaxies distributed within it. It was Hubble who first discovered that this wasn’t the case; rather, the universe was comprised of discrete galaxies with essentially no stars or much else3 in between. In fact, nearly all the night sky objects you can see with your naked eye are relatively nearby stars, planets or other objects contained within our own Milky Way Galaxy, including our solar system. The illusion of a universe filled with a more-or-less uniform distribution of stars, Figure 2.4(a), is created simply by the necessity of viewing the night sky from our position embedded within the Milky Way Galaxy, Figure 2.4(b). Our view of the Andromeda Galaxy, M31, thus includes all the Milky Way stars that reside within our line-of-sight. If we were to view M31 from a position outside the Milky Way, none of the stars would be present; we would simply see M31 floating alone in empty space.
The stars that make up the Milky Way, including our sun, are enormously varied in their color and brightness. Just look at the variety of stars in the constellations of Ursa Major and Scorpius, Figure 2.5. Some stars are brighter than others, depending on their size and proximity. Bear in mind that nearby, dim stars can have the same brightness as massive, dazzlingly intense stars that are much further away. Second, all stars have a characteristic color, ranging from deep red to vivid blue. The color of each star depends entirely on its mass and age—young, hot stars give off a noticeably bluer light than the deeper reddish light of older, cooler stars. The fact that hotter stars are blue while cooler stars are red may be opposite what you might think! Yet, owing to the peculiarities of human night vision, we perceive most stars as points of white light, with a few notable exceptions, such as the distinctly red gas giants Betelgeuse, Antares, and Aldebaran in Orion, Scorpius, and Taurus, respectively. Your camera, however, has the capacity to record the true colors of all the stars—and its images will likely astound you!
People have identified legendary figures, animals, and mythical creatures in the patterns of the stars across cultures for thousands of years. These groupings are called constellations, and some are most likely familiar to you, as seen in Figures 2.1 and 2.5. The International Astronomical Union established eighty-eight constellations with internationally agreed upon boundaries nearly a century ago. These constellations provide a useful structure for night sky navigation, in addition to their human interest. For example, we might say that Mars can be found in the constellation Leo on a given night, thus narrowing the region of the sky to examine.
Each star within a constellation is ranked in terms of its brightness. The brightest star is generally designated by the Greek symbol α, the second brightest star by the symbol β, and so on. Thus, for example, the star Sirius, which is not only the brightest star in the constellation Canis Major

2.4
(a) Photograph of a region of the night sky containing stars of the Milky Way Galaxy as well as the Andromeda Galaxy, M31, which is well outside the Milky Way, Figure 2.2(d). (b) Schematic (not to scale) showing how our view of the Andromeda Galaxy inevitably includes a number of stars from the Milky Way Galaxy, owing to our viewing position from deep within the Milky Way. If we were to view the Andromeda Galaxy from a position outside the Milky Way, none of the stars visible in (a) would be present.
Source: NASA, ESA, Digitized Sky Survey 2 (Acknowledgement: Davide De Martin)
but also in the entire sky, is designated Canis Majoris. This information can be very helpful in pinpointing hard to see objects like comets, star clusters, and nebulae. For example, it greatly helps finding the North American nebula knowing it is near Cygni, or the second brightest star in the constellation Cygnus.

2.5
Two favorite Northern Hemisphere constellations: Ursa Major (a) and Scorpius (b). The yellow and red lines depict the entire constellations; the red lines indicate two familiar asterisms: the Big Dipper (a) and the Fishhook (b). Note the differences in color, size, and brightness of the stars within each constellation. Also, notice how the presence of moonlight affects the relative brightness and appearance of both the sky and the foreground in (a), compared to their appearance under moonless skies in (b).
There are many widely recognized sub-groupings of stars within constellations known as asterisms. Probably the most familiar asterism in the Northern Hemisphere is the Big Dipper, which is part of the constellation Ursa Major, Figure 2.5(a). Other familiar Northern Hemisphere asterisms include Orion’s Belt, the Teapot within Sagittarius, the Summer Triangle, the Winter Cross, and the Fishhook in Scorpius, Figure 2.5(b). Familiar Southern Hemisphere asterisms include the Southern Cross, the Southern Pointers and the Diamond Cross.
The Celestial Poles
It is well worth knowing how to quickly locate the celestial poles in either hemisphere. In the Northern Hemisphere, Polaris, or the North Star, is often mistakenly thought to be the brightest star in the sky, which it isn’t. Instead, Polaris simply happens to be located roughly in line with the axis of the earth’s rotation.4 This fact results in Polaris staying essentially motionless throughout the night.

2.6
Locating the celestial poles. (a) Polaris can be easily found with the help of the Big Dipper’s “pointer stars,” Merak and Dubhe. Polaris lies at the end of the line connecting Merak and Dubhe. Due north is found by drawing a vertical line from the north celestial pole down to the horizon. The spot where this line intersects the horizon is due north. (b) Locating the southern celestial pole is also straightforward, despite the lack of a “South Star” that would be equivalent to Polaris. The southern celestial pole is found by connecting the two lines drawn through the Southern Cross and the southern pointers. The southern celestial pole is adjacent to their intersection point. Drawing a vertical line from the southern celestial pole down to the horizon establishes south.
The Big Dipper’s two stars Merak and Dubhe, otherwise known as the “pointer stars,” form a convenient line that is more-or-less in line with Polaris, Figure 2.6(a). Due north is then found simply by drawing a vertical line between Polaris and the horizon. Spend some time practicing how to identify Polaris at different times of the night throughout the year; this knowledge will serve you well. It is usually the very first thing I do when I step out each night.
While the Southern Hemisphere lacks a similar, favorably located star, the asterisms of the Southern Cross and the Southern Pointers allow you to easily establish the position of the southern celestial pole, Figure 2.6(b). Drawing a vertical line down from the southern celestial pole to the horizon establishes south, just as for the Northern Hemisphere.
The Brightest Stars in the Sky
As we will see later in this book, achieving proper focus on the stars can be extremely challenging. Part of the difficulty lies in the scarcity of visible, sufficiently bright stars to use as targets. Knowing where to find them throughout the year can help. Several of the brightest stars in the Northern and Southern Hemispheres are listed in Table 2.1. Three examples are shown in Figure 2.7 along with their host constellations. Searching for the brightest stars is worthwhile, since they are your

2.7
Examples of three bright, Northern Hemisphere stars that can aid in acquiring a sharp focus on the night sky: (a) Sirius, within Canis Major; (b) Arcturus, within Boötes; and (c) Vega, within Lyra.
best option for achieving a sharp focus on the night sky. Although they may be hidden behind a foreground object, such as a tree limb or building, knowing their presence and simply moving a short distance away can often bring them into view. This process allows you to achieve correct focus and then return to your composition of interest.
Table 2.1 Brightest Stars in the Sky
| NAME | CONSTELLATION |
| Sirius | Canis Major |
| Canopus | Carina |
| Rigil Kent, Toliman | Centaurus |
| Arcturus | Bootes |
| Vega | Lyra |
| Capella | Auriga |
| Rigel | Orion |
| Procyon | Canis Minor |
| Achernar | Eridanus |
| Betelgeuse | Orion |
| Agena, Hadar | Centaurus |
| Altair | Aquila |
How Night Sky Objects Move During the Course of a Single Night
Even the most casual observer will soon notice that night sky objects aren’t stationary, but gradually move across the sky. Two of the main goals of this book are to help you understand this movement and learn how to use it to plan your landscape astrophotographs. An inherent difficulty in studying this topic is that while the earth and night sky are three-dimensional in nature, the pages of this book, regrettably, are limited to two-dimensions. Therefore, we will begin by introducing conceptual models that will help you construct your own understanding of how objects move across the night sky. While the following description is geared towards observers in the Northern Hemisphere at mid-latitudes, similar reasoning applies to observers at other latitudes and in the Southern Hemisphere.
Imagine we’re facing south in the middle of a large field at night, Figure 2.8(a). It’s a beautiful, clear night and the skies are filled with glittering stars. Now, also imagine that the compass directions are inscribed in the field below our feet: north, south, east, and west. Finally, let’s imagine that all the stars, the moon, comets and everything else in the sky are attached, or glued, to the inner

2.8
Illustration of the celestial sphere model, (a), for understanding the movements of the night sky for observers in the northern hemisphere, (b)–(e). Star trail images facing: (b) east; (c) south; (d) west; and (e) north. Images such as these can help inform you of the azimuth of favorite viewpoints of unfamiliar destinations during your scouting research.
surface of a huge hemispherical dome, or celestial sphere, that covers us and the entire field like a giant umbrella, right down to the horizon.
The celestial sphere appears to rotate overhead from east to west as the night progresses. This rotation appears to occur about an axis passing from Polaris through the point beneath our feet. As we gaze to the east, which is to our left, we observe new stars appearing over the eastern horizon and ascending into the sky, Figure 2.8(b). If we turn our gaze to the west, or to our right, we observe stars sinking toward the horizon and ultimately setting below the horizon as the night progresses, Figure 2.8(d). And as we gaze due south, stars appear to gracefully arc across the sky from left to right, Figure 2.8(c).
Finally, imagine that we turn completely around so that we are facing north, Figure 2.8(e). Now when we view the sky above the eastern horizon to our right, we observe stars rising above the horizon and ascending into the sky. Similarly, we observe stars arcing downwards, and ultimately sinking below the western horizon to our left, as the night progresses. But what really catches our attention is the region of the sky immediately surrounding Polaris. Here, the stars simply rotate in counterclockwise circles around Polaris.
By the way, star trail images such as these can help inform you of the azimuth of favorite viewpoints of unfamiliar destinations during your pre-trip scouting research. Nightscape images featuring a very particular view of a specific foreground subject often have a surprisingly narrow range of suitable vantage points. Knowing ahead of time whether or not the chosen foreground subject will ever align with a desired night sky object from these specific vantage points can make or break a landscape astrophotography photo opportunity. Reviewing existing star trail images of the foreground subject made from the proposed vantage points will help reveal the answer.
You may want to practice simulating the movements of the celestial sphere at home. This is easily done by opening an umbrella (preferably dome), pointing it (approximately) at Polaris and slowly rotating it counterclockwise, when viewed from within. By observing the motion of its inner surface, you will see the types of movements just described. Namely, objects in the “east” will rise and ascend; objects in the “south” will arc from left to right, objects in the “west” will descend and finally, objects near the north celestial pole will rotate around it in counterclockwise circles. The benefits of the celestial sphere model are that it allows us to understand these movements and how the compass direction we are facing governs the movement we see of the stars and other objects.
The night sky movements described so far apply to observers at mid-latitudes in the Northern Hemisphere. How would these movements change for Northern Hemisphere observers at different latitudes? For those on the North Pole, Polaris appears directly overheard, or at the observer’s zenith. All stars move in horizontal, counterclockwise circles. What a sight that would be to see! In contrast, for observers on the equator, Polaris lies on the northern horizon and stars rise in the east, perpendicular to the horizon, ascend vertically into the night sky and set vertically downwards in the west. For observers at intervening latitudes, the angular height of Polaris above the northern horizon corresponds to the local latitude, as described in Appendix V.
For Southern Hemisphere observers, the appearances of the night sky movements are simply reversed relative to those described above. While stars still rise in the east and set in the west, they circle the southern celestial pole in a clockwise motion, and arc across the northern sky from right (east) to left (west).

2.9
These images demonstrate the effect of latitude on star trails. (a) This south-facing image was made in Botswana (latitude 20° S) compared to its north-facing equivalent, (b) made in northern Minnesota (latitude 47° N). Notice how the height of the celestial pole is lower for the latitude closer to the equator, and higher for the latitude further from the equator. The orientation of east- and west-facing star trails relative to the horizon is also affected by latitude, as seen here for westward facing star trails created in (c) Maui, Hawaii (latitude 21° N) and (d) northern Minnesota (latitude 47° N). Relative to a vertical line drawn upwards from the equator, the star trails are oriented at an angle, θ, where θ is roughly equal to the local latitude.
Source: (a) Jan Koeman/www.koemanphoto.com/The World At Night
Four star trail images are shown in Figure 2.9 to highlight similarities and differences arising from latitude and hemisphere effects. The images in Figure 2.9(a) and (b) were both made facing their respective celestial poles at latitudes, 20° S (Southern Hemisphere) and 47° N (Northern Hemisphere), respectively. First, note how the stars encircle the celestial poles in both hemispheres, although the opposing directions of motion are not apparent (clockwise in the Southern Hemisphere; counterclockwise in the Northern Hemisphere). Second, observe how latitude strongly affects the height above the horizon of the celestial pole: the 20° S celestial pole is much closer to the horizon than the 47° N celestial pole. As noted above, this is no coincidence; the angular height of the celestial pole is the same as the local latitude (Appendix V). This outcome will affect your choice of lens focal length and composition in the creation of star trail images such as these, since the celestial pole and horizon may not both fit into the composition if the lens field of view is insufficient. The images in Figures (c) and (d) were made facing west; specifically, (c) Maui, Hawaii (latitude 21° N) and (d) northern Minnesota (latitude 47° N). The orientation of the star trails relative to the vertical can be seen to correspond with the local latitude.
Earth’s Annual Orbit—How Objects Move During the Course of the Year
So far, our discussion of the movements of the stars in the night skies has been confined to those that occur during a single night. What happens to our night sky view over the course of a year? This is easily answered by studying the changes that occur in our viewing direction as the earth orbits the sun, Figure 2.10. These changes affect what we see, just like the slow rotation of a revolving restaurant changes the view from its windows. For example, in September, the constellation Aquarius is directly overhead at midnight, whereas in January, the earth has changed position so now the constellation Gemini is directly overhead at midnight, Figure 2.10(a). The night sky objects that are visible during different times of year change simply as the result of the earth’s motion along its orbit.
Now imagine that we were somehow able to discern the stars during the daytime. The constellations that become visible lie on the opposite side of the solar system from the sun, Figure 2.10(b). The sun would lie in the constellation that otherwise would only be visible at night, six months hence. For example, in January, the sun is positioned within the constellation Sagittarius, Figure 2.10(b), which we see at night during July, six months later. In May, it is positioned within the constellation Aries, seen at night during November. The narrow band of the sky that includes the path of the sun’s orbit, or the ecliptic, is known as the zodiac. The twelve constellations found within the zodiac are known as signs of the zodiac, or sun signs, since the sun is positioned within each constellation during the different months of the year.
Knowledge of the changing nighttime view throughout the year results in predictable seasonal events. Many are highly relevant to landscape astrophotography. For example, the brightest, central part of the Milky Way, or its core, lies beyond Sagittarius and Scorpius, thus becoming visible between March and September. It is fruitless to attempt to photograph or even observe it during the rest of the year since it is obscured by the intervening sun and blue skies. Meteor showers only occur on specific dates and constellations are only visible during certain months, as we have seen. Consequently, it is extremely helpful to be able to forecast the appearance of the night sky for different dates throughout the year.

2.10
What we see at night changes during the year. (a) Top view schematic of the Earth’s orbit around the sun, showing how the constellations visible from Earth at night change monthly as the Earth moves around the sun. For example, in January, the constellation Gemini is directly overhead at midnight, whereas in May, the constellation Libra is directly overhead at midnight. (b) In May, the sun appears within the constellation Aries, resulting in the familiar sun signs of the zodiac.

2.11
(a) A simple, inexpensive planisphere with glow-in-the-dark stars. The planisphere shows the brightest stars and constellations that are visible at your latitude on any given date and time. The edge of the opening represents your horizon; your zenith is the center of the opening. The planisphere rotates around Polaris, the brass grommet. You can make your own planisphere by following the instructions in Appendix IV. (b) Using the planisphere to explore the night skies at 10 pm on December 15. (c) The visible constellations at this time and on this date appear through the opening in the outer housing. (d) The constellation Draco is positioned next to the horizon at this time and on this date. (e) Facing north and holding the oriented star chart upside down correctly aligns it to observe Draco.
Night Sky Tools
One simple and inexpensive tool for studying and predicting the appearance of the night sky for any date, past, present, or future, is the planisphere, Figure 2.11(a). Every serious landscape astrophotographer should either buy or make their own planisphere; instructions for making your own planisphere are provided in Appendix IV. Even with the proliferation of apps and other mobile/desktop planetarium tools described later in this book (such as the free, open source virtual planetarium Stellarium (Stellarium.org)), you will gain great insight through the regular use of a hand-held planisphere. It is extremely helpful in developing a sense of the positions and motions of the constellations on different dates and times, and invaluable in the field for identifying stars, constellations, and deep sky objects.
The planisphere comprises an inner, circular card containing all the constellations that are ever above the horizon at the planisphere’s latitude, along with an outer housing with an opening. The edges of the opening represent the observer’s horizon; the center of the opening corresponds to the point directly overhead, or the observer’s zenith. Any location midway between the horizon and the zenith is approximately 45° above the horizon. Thus, the angular height of a constellation may be gauged by estimating its relative position between the edge and the center of the opening. In turn, the actual height of the constellation above the horizon can be estimated by noting that the angular distance between the tips of your outstretched thumb and little finger is approximately 20°. By rotating the inner card, which has Polaris as its axis of rotation, the constellations can be seen to move across the sky. Note that Polaris is positioned at an angular height above the northern horizon that corresponds to the observer’s latitude.
The operation of a planisphere is simple. Let’s see how it works by way of a couple of examples. We will first explore a few of the constellations visible at 10 pm on December 15. The year doesn’t matter; the night sky view is the same each year on a given date. The first step is to orient the planisphere for the desired observation time and date by aligning the 10 pm mark on the edge of the opening with the date of December 15, Figure 2.11(b). Doing so positions the stars and constellations that are visible on that date and time within the opening in the outermost card, Figure 2.11(c). Hold the inner and outer parts of the planisphere tight against one another; the planisphere can now be used to locate and identify night sky objects for this date and time.
First, we wish to locate the constellation Perseus and need to know where in the sky to look. By studying the constellations visible within the opening, we see that Perseus is located near its center, Figure 2.11(c). This means that Perseus is directly overhead, or at our zenith, at 10 pm on December 15. In order to view Perseus, therefore, all we need to do is to step outside at 10 pm on December 15, look straight up and there it will be!
Next, we choose to observe the constellation Draco. A quick examination of the oriented planisphere reveals Draco to be located at the top of the opening and next to its edge, Figure 2.11(d). This means that Draco lies just above the northern horizon at 10 pm on December 15. We can use the planisphere in the field to help with identification simply by holding the oriented planisphere upside down and facing north at 10 pm on December 15, as illustrated in Figure 2.11(e). Holding the planisphere upside down correctly orients it with respect to the northern horizon; similar reasoning applies to any other direction of the compass. To view Draco, we simply face north, look directly above the horizon and there it will be!
Lastly, we wish to observe the spectacular constellation of Orion. Examination of the planisphere reveals that Orion lies approximately midway between the edge and center of the opening in the planisphere, or approximately 45° above the horizon at 10 pm on December 15, Figure 2.11(c). The direction in which to look is easily found simply by drawing an imaginary line between Orion and the edge of the opening, or the horizon below it, and then estimating the compass direction of this line; in this case roughly southeast. The final step is to go outside, face southeast, and look up in the sky at approximately 45° above the horizon, where we will find Orion. Simple!
You may also use the planisphere to simulate the motion of night sky objects. This is done simply by rotating the inner card in a counterclockwise direction and observing the movement of the stars within the opening in the outer housing. You will see stars and constellations “rising” above the eastern horizon and “setting” below the western horizon. You will also observe a group of constellations that always remain visible above the northern horizon, regardless of the date or time. These constellations are called circumpolar, meaning that they never set and are always visible throughout the year.
Finally, you may use your planisphere to determine the best date and time to observe a specific constellation. This is done by locating the constellation within the inner card and rotating the card until the constellation is due south. Doing so puts it at its highest position in the sky. Different combinations of suitable dates and times when it will lie at this location are then found around the perimeter of the opening. For example, Leo is at its highest position, or due south, at 9 pm on April 15, 10 pm on April 1, 11 pm on March 15, and so forth. Alternatively, you may apply this method to determine potential date and time combinations to observe Leo or any other constellation or object next to either of the horizons, or anywhere else you wish. Simply rotate the inner card until the object is positioned at the desired location, and then read off the possible date and time combinations from the perimeter of the opening.
An Inexpensive Home “Planetarium”
An inexpensive and incredibly useful home “planetarium” available at many bookstores or online is shown in Figure 2.12. It comprises a hollow plastic celestial sphere with all eighty-eight constellations, their key stars, common asterisms and the Milky Way marked with glow-in-the-dark paint. A small light bulb at the sphere’s center provides a light to cast the stars in relief as shadows on the walls of a dark room. Finally, you may obtain a sense of the movement of the stars during the course of the night by rotating the sphere within the holder and observing their motion.
This planetarium is well worth considering since it provides an immediate, three-dimensional model for understanding the spatial configuration of the stars within their constellations as well as the direction of movement during the night. Although the holder is designed to be used in the Northern Hemisphere, simply by lifting the sphere out of the holder and changing its angle, the planetarium works perfectly well at different latitudes in either hemisphere.

2.12
An inexpensive and incredibly useful home “planetarium” available at many bookstores or online. The planetarium comprises a hollow plastic celestial sphere with all eighty-eight constellations and their key stars indicated with glow-in-the-dark paint. A small light bulb at the sphere’s center provides a light to cast the stars as shadows on the walls of a dark room. You may obtain a sense of the movement of the stars during the course of the night by rotating the sphere within the holder and observing their motion.
Seasons
Seasonal effects are important for landscape astrophotographers. Sunrise and sunset positions change throughout the year, as do daylight, twilight, and darkness durations. The 23.5° angle between the axis of rotation of the earth and normal to the plane of its orbit, Figure 2.13(a), cause the seasons, not changes in proximity between the earth and the sun. The earth is actually physically closer to the sun during the Northern Hemisphere’s winter than in the summer! Because of this tilt, as the earth moves around its orbit throughout the year, observers at different latitudes on Earth will experience more direct sunlight during some months than others. During the summer, those in the Northern Hemisphere receive (i) the highest, most direct intensity sunlight since the sun is higher in the sky; and (ii) for the greatest number of hours each day. Conversely, in the winter, they receive much less direct sunlight and for fewer hours each day.
An important outcome of the seasons is the changing position of sunrise and sunset on successive days during the year, Figure 2.13(b). This phenomenon can present a challenge to the landscape astrophotographer who wishes to capture the sun rising over a specific foreground object. One or more of the planning tools described in Section IV can be helpful in making this prediction, since the sunrise/sunset position changes slightly but perceptibly from one day to the next.
Solstices and Equinoxes
There are four days during the year of special seasonal and cultural significance that can also provide unique landscape astrophotography opportunities with great popular interest. The summer and winter solstices are the longest and shortest days of the year, respectively. The spring and autumnal equinoxes, on the other hand, are the days with equal lengths of day and night. These important dates have been noted throughout human history, especially as they relate to the cultivation of crops. Stonehenge in England, the pyramids of Egypt and monuments throughout the southwestern deserts of the United States are just a few examples of the efforts of our predecessors to mark these dates.
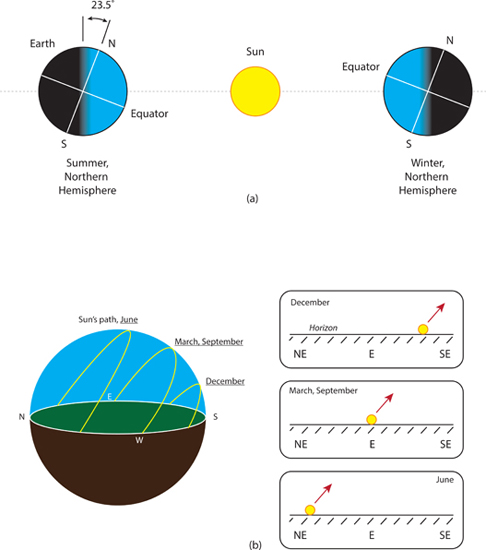
2.13
Schematic diagrams showing (a) how the Earth’s tilt causes the seasons; and (b) how the tilt causes the position of sunrise along the horizon to change during the year.
One example of past civilizations marking the summer solstice is illustrated through a set of three, spiral rock petroglyphs inscribed in a rock boulder within an ancient Ancestral Puebloan village in southeastern Utah, Figure 2.14. The spirals are inscribed on an east-facing rock panel underneath an adjacent rock overhang. In turn, the rock panel is positioned a few feet to the west of a larger boulder, Figure 2.14(c), which casts a shadow on the petroglyphs during sunrise. This unique rock geometry results in the formation of two “light daggers” that appear on either side of the

2.14
Three, spiral rock petroglyphs inscribed in boulders near an ancient Ancestral Puebloan village in southern Utah represent a way of marking the summer solstice. (a) The spirals are inscribed on a rock panel adjacent to a rock overhang that in turn is located next to a larger boulder. (b) As sunrise progresses during the summer solstice, two “light daggers” appear on either side of the spirals. The daggers form as the result of the shadow of the front boulder blocking the sunlight upon the rock panel underneath the rock overhang. As the sun ascends, (c) the daggers lengthen and eventually intersect directly through the three spiral petroglyphs, (b). This occurs because the sunlight is able to pass over the front boulder and illuminate the rock panel. During other times of the year, the changed position of the rising sun prevents this sequence of events from happening.
eastern boulder’s shadow, Figure 2.14(b), during sunrise on the summer solstice. The positions of the three spiral petroglyphs were carefully chosen so that on the summer solstice, as the sun ascends and the light daggers lengthen and eventually intersect, they do so directly through the three spiral petroglyphs, Figure 2.14(c). This happens since the sunlight is able to pass over the front boulder and illuminate the rock panel. The different positions of the sun during the rest of the year preclude this sequence of events; the day when light daggers intersect the three spirals during sunrise confirms the summer solstice. Witnessing events such as these immediately forges a timeless bond between the observer, those in the past who created them, and the reliable cycles of astronomy.
Bibliography
Dickinson, Terence & Alan Dyer, The Backyard Astronomer’s Guide, 2010, Third Edition, Firefly Books, Limited, Buffalo, New York
Dunlop, Storm & Wil Tirion, How to Identify Night Sky, 2006, Barnes and Noble, Inc., with HarperCollins Publishers, London
Goodman, Ronald, Lakota Star Knowledge, 1992, Sinte Gleska University, Mission, South Dakota
http://unclemilton.com/in_my_room/star_theater/
McKim Malville, J., Guide to Prehistoric Astronomy in the Southwest, 2008, Johnson Books, Boulder, Colorado
Schneider, Stephen E. & Thomas T. Arny, Pathways to Astronomy, 2015, Fourth Edition, McGraw Hill Education, New York
Seronik, Gary, Binocular Highlights, 2006, New Track media, Cambridge, Massachusetts
Tirion, Wil, The Cambridge Star Atlas, 2001, Cambridge University Press, Cambridge, England
Notes
1 Although I should say, “never changes during the course of our lifetimes,” since on the timescale of millions of years, the changes in position of these objects resulting from their movement would indeed be noticeable.
2 For example, the Andromeda Galaxy (M31) and the Large and Small Magellanic Clouds, two nearby irregular dwarf galaxies.
3 The “emptiness” of the space in between galaxies is actually somewhat disingenuous; current models indicate that the vast majority of the matter and energy of the universe is not yet understood. This dark matter and dark energy very well may reside somehow within the “emptiness” of deep space.
4 Polaris is actually slightly off-axis; a fact that becomes quickly apparent during star trail exposures. Nonetheless, for general orientation purposes, this minor offset is safely ignored.