
CHAPTER 5
Port Scanning
After reading this chapter and completing the activity, you will be able to:
![]() Describe port scanning and types of port scans
Describe port scanning and types of port scans
![]() Describe port-scanning tools
Describe port-scanning tools
![]() Explain what ping sweeps are used for
Explain what ping sweeps are used for
![]() Explain how shell scripting is used to automate security tasks
Explain how shell scripting is used to automate security tasks
Port scanning, also referred to as service scanning, is the process of examining a range of IP addresses to determine what services are running on a network. As you learned in Chapter 2, open ports on a computer identify the services running on it. For example, HTTP uses port 80 to connect to a Web service. Instead of pinging each IP address in a range of addresses and waiting for an ICMP Echo Reply (type 0) to see whether a computer can be reached, you can use scanning tools to simplify this procedure. After all, pinging several thousand IP addresses manually is time consuming.
Port-scanning tools can be complex, so you need to devote time to learning their strengths and weaknesses and understanding how and when you should use these tools. In this chapter, you look at port-scanning tools that enable you to identify services running on a network and use this knowledge to conduct a security test. In addition, you see how to use shell scripting to automate ping sweeps and other security-testing tasks.
INTRODUCTION TO PORT SCANNING
In Chapter 4, you performed a zone transfer with the Dig command to determine a network’s IP addresses. Suppose the zone transfer indicates that a company is using a subnetted Class C address with 126 available host IP addresses. How do you verify whether all these addresses are being used by computers that are up and running? You use a port scanner to ping the range of IP addresses you discovered.
A more important question a security tester should ask is “What services are running on the computers that were identified?” Port scanning is a method of finding out which services a host computer offers. For example, if a server is hosting a Web site, is it likely that the server has port 80 open? Are any of the services vulnerable to attacks or exploits? Are any services not being filtered by a firewall, thus making it possible to load a Trojan program that can send information from the attacked computer? Which computer is most vulnerable to an attack? You already know how to search for known vulnerabilities by using the Common Vulnerabilities and Exposures (www.cve.mitre.org) and US-CERT (www.us-cert.gov) Web sites. There are also port-scanning tools that identify vulnerabilities. For example, AW Security Port Scanner (www.atelierweb.com), a reasonably priced commercial scanner with a GUI interface (see Figure 5.1), shows the type of Trojan program known to operate on a particular port. Using this tool, an attacker can quickly identify a vulnerable port and then launch an exploit to attack the system.
Figure 5.1
The AW Security Port Scanner interface

Courtesy Course Technology/Cengage Learning
As a security tester, you need to know which ports attackers are going after so those ports can be closed or protected. Security professionals must scan all ports when doing a test, not just the well-known ports. (Ports 1 to 1023, the most common, are covered in Chapter 2.) Many programs use port numbers outside the range of well-known ports. For example, pcAnywhere operates on ports 65301, 22, 5631, and 5632. A hacker who discovers that port 65301 is open can check the information at the CVE Web site for a possible vulnerability in pcAnywhere. After a hacker discovers an open service, finding a vulnerability or exploit isn’t difficult.
Security Bytes
Most security testers and hackers argue that port scanning is legal simply because it doesn’t invade others’ privacy; it merely discovers whether the party being scanned is available. The typical analogy is a person walking down the street and turning the doorknob of every house along the way. If the door opens, the person notes that the door is open and proceeds to the next house. Of course, entering the house is a crime in most parts of the world, just as entering a computer or network system without the owner’s permission is a crime. To date, no one has been convicted just for port scanning, although laws exist for prosecuting scanning if it causes damage or loss of more than $5000 (U.S. Code 18 1030).
Port scanning helps you answer questions about open ports and services by enabling you to scan thousands or even tens of thousands of IP addresses quickly. Many port-scanning tools produce reports of their findings, and some give you best-guess assessments of which OS is running on a system. Most, if not all, scanning programs report open ports, closed ports, and filtered ports in a matter of seconds. An open port allows access to applications and can be vulnerable to an attack. When a Web server needs to communicate with applications or other computers, for example, port 80 is opened. A closed port doesn’t allow entry or access to a service. For instance, if port 80 is closed on a Web server, users can’t access Web sites. A port reported as filtered might indicate that a firewall is being used to allow specified traffic into or out of the network.
Types of Port Scans
Before delving into using port-scanning tools, take a look at the types of scans that can be used for port scanning:
![]() SYN scan—In a normal TCP session, a packet is sent to another computer with the SYN flag set. The receiving computer sends back a packet with the SYN/ACK flag set, indicating an acknowledgment. The sending computer then sends a packet with the ACK flag set. If the port the SYN packet is sent to is closed, the computer responds with an RST/ACK (reset/acknowledgment) packet. If an attacker’s computer receives a SYN/ACK packet, it responds quickly with an RST/ACK packet, closing the session. This is done so that a full TCP connection is never made and logged as a transaction. In this sense, it’s “stealthy.” After all, attackers don’t want a transaction logged showing their connection to the attacked computer and listing their IP addresses.
SYN scan—In a normal TCP session, a packet is sent to another computer with the SYN flag set. The receiving computer sends back a packet with the SYN/ACK flag set, indicating an acknowledgment. The sending computer then sends a packet with the ACK flag set. If the port the SYN packet is sent to is closed, the computer responds with an RST/ACK (reset/acknowledgment) packet. If an attacker’s computer receives a SYN/ACK packet, it responds quickly with an RST/ACK packet, closing the session. This is done so that a full TCP connection is never made and logged as a transaction. In this sense, it’s “stealthy.” After all, attackers don’t want a transaction logged showing their connection to the attacked computer and listing their IP addresses.
![]() Connect scan—This type of scan relies on the attacked computer’s OS, so it’s a little more risky to use. A connect scan is similar to a SYN scan, except that it does complete the three-way handshake. This means the attacked computer most likely logs the transaction or connection, indicating that a session took place. Therefore, unlike a SYN scan, a connect scan isn’t stealthy and can be detected easily.
Connect scan—This type of scan relies on the attacked computer’s OS, so it’s a little more risky to use. A connect scan is similar to a SYN scan, except that it does complete the three-way handshake. This means the attacked computer most likely logs the transaction or connection, indicating that a session took place. Therefore, unlike a SYN scan, a connect scan isn’t stealthy and can be detected easily.
![]() NULL scan—In a NULL scan, all packet flags are turned off. A closed port responds to a NULL scan with an RST packet, so if no packet is received, the best guess is that the port is open.
NULL scan—In a NULL scan, all packet flags are turned off. A closed port responds to a NULL scan with an RST packet, so if no packet is received, the best guess is that the port is open.
![]() XMAS scan—In this type of scan, the FIN, PSH, and URG flags are set. (Refer to Chapter 2 for a review of the different flags.) Closed ports respond to this type of packet with an RST packet. This scan can be used to determine which ports are open. For example, an attacker could send this packet to port 53 on a system and see whether an RST packet is returned. If not, the DNS port might be open.
XMAS scan—In this type of scan, the FIN, PSH, and URG flags are set. (Refer to Chapter 2 for a review of the different flags.) Closed ports respond to this type of packet with an RST packet. This scan can be used to determine which ports are open. For example, an attacker could send this packet to port 53 on a system and see whether an RST packet is returned. If not, the DNS port might be open.
![]() ACK scan—Attackers typically use ACK scans to get past a firewall or other filtering device. A filtering device looks for the SYN packet, the first packet in the three-way handshake, that the ACK packet was part of. Remember this packet order: SYN, SYN/ACK, and ACK. If the attacked port returns an RST packet, the packet filter was fooled, or there’s no packet-filtering device. In either case, the attacked port is considered to be “unfiltered.”
ACK scan—Attackers typically use ACK scans to get past a firewall or other filtering device. A filtering device looks for the SYN packet, the first packet in the three-way handshake, that the ACK packet was part of. Remember this packet order: SYN, SYN/ACK, and ACK. If the attacked port returns an RST packet, the packet filter was fooled, or there’s no packet-filtering device. In either case, the attacked port is considered to be “unfiltered.”
![]() FIN scan—In this type of scan, a FIN packet is sent to the target computer. If the port is closed, it sends back an RST packet. When a three-way handshake ends, both parties send a FIN packet to end the connection.
FIN scan—In this type of scan, a FIN packet is sent to the target computer. If the port is closed, it sends back an RST packet. When a three-way handshake ends, both parties send a FIN packet to end the connection.
![]() UDP scan—In this type of scan, a UDP packet is sent to the target computer. If the port sends back an ICMP “Port Unreachable” message, the port is closed. Again, not getting that message might imply the port is open, but this isn’t always true. A firewall or packet-filtering device could undermine your assumptions.
UDP scan—In this type of scan, a UDP packet is sent to the target computer. If the port sends back an ICMP “Port Unreachable” message, the port is closed. Again, not getting that message might imply the port is open, but this isn’t always true. A firewall or packet-filtering device could undermine your assumptions.
As you learned in Chapter 2, a computer that receives a SYN packet from a remote computer responds with a SYN/ACK packet if its port is open. In a three-way handshake, a SYN packet is sent from one computer, a SYN/ACK is sent from the receiving computer to the sender, and finally, the sender sends an ACK packet to the receiving computer. If a port is closed and receives a SYN packet, it sends back an RST/ACK packet. Determining whether a port is filtered is more complex. Many scanning tools, such as Nmap, use a best-guess approach. That is, if a UDP packet doesn’t receive a response from the receiving port, many scanning tools report that the port is open.
Security Bytes
In Canada, a man was found guilty of scanning a company’s computers. The company actually prosecuted him for using microwatts of its electrical power to perform the scan. Doing so without the company’s permission was considered a crime—petty, yes, but effective. To play it safe, always get permission from a company if you’re going to perform an intensive scan on its network infrastructure. If your scan slows down a network’s traffic, the company might argue that a low-level DoS attack, which is illegal, was performed.
USING PORT-SCANNING TOOLS
Hundreds of port-scanning tools are available for both hackers and security testers. Some are commercial, and some are freeware or open source. How do you decide which tool to use? Not all are accurate, so using more than one port-scanning tool is recommended. In addition, becoming familiar with a variety of tools is wise. Although you should practice often with a tool to gain proficiency in using it, don’t fall into the trap of using one tool exclusively.
Nmap
Originally written for Phrack magazine in 1997 by Fyodor, Nmap has become one of the most popular port scanners and adds new features constantly, such as OS detection and fast multiple-probe ping scanning. Nmap also has a GUI front end called Zenmap that makes working with complex options easier. Nmap has been enhanced over the years because, like many other security tools, it’s open source; if bugs are found, users can offer suggestions for correcting them.
Nmap is referred to often in this book because it’s currently the standard port-scanning tool for security professionals. Regardless of the other port-scanning tools available, any security tester with a modicum of experience has worked with Nmap. As a beginner, you can use it for every part of a security or penetration test, but remember to build proficiency in all the tools discussed in this book.
As most security professionals will tell you, Hollywood seldom depicts attackers actually hacking into a system. Typically, they’re using a GUI program, frantically clicking or typing a decryption algorithm. One exception is The Matrix Reloaded. The female protagonist, Trinity, sits in front of a computer terminal and runs Nmap. She discovers that port 22 (SSH) is open, runs an SSHv1 CRC32 exploit (an actual bug in SSH) that allows her to change the root password to Z1ON0101, and then proceeds to shut down the grid. Moral of the story? Know your tools and exploits, and you might save the world.
You don’t have to memorize how each flag is set when running a port scan with Nmap. In fact, just typing the command nmap 193.145.85.201 scans every port on the computer with this IP address. However, port scanning can be an involved process. Some attackers want to be hidden from network devices or IDSs that recognize an inordinate amount of pings or packets being sent to their networks, so they use stealth attacks that are more difficult to detect.
Security Bytes
A security professional came to work one evening and noticed that the company’s firewall had crashed because someone ran a port-scanning program on the network by using ACK packets. Many attackers use ACK scans to bypass packet-filtering devices (such as firewalls, discussed in Chapter 13). In this case, the company’s firewall was disabled because it was flooded with tens of thousands of ACK packets bombarding its routing tables. This ACK scan constituted a DoS attack on the network, so don’t get complacent when running port scans on networks. Always get the network owner’s written permission before doing a port scan.
Unicornscan
Unicornscan was developed to assist security testers in conducting tests on large networks and to consolidate many of the tools needed for large-scale endeavors. The developers thought that many current products were too slow at scanning thousands of IP addresses. Also, maintaining several security tools can be daunting, so the Unicornscan developers created a product to meet all the needs of security testers.
Unicornscan running on a typical Pentium computer can scan one port on each IP address of a Class B network. This equates to scanning 65,535 computers in 3 to 7 seconds, which brings UDP scanning to a new level. Most scanners using UDP scans can just make best guesses when trying to determine whether a port is closed, open, or filtered. Many security testers consider UDP scanning an unreliable method of discovering live systems on a network. Although Unicornscan can handle TCP, ICMP, and IP port scanning, it optimizes UDP scanning beyond the capabilities of any other port scanner. Unicornscan is included in the online resources along with a Web-based Unicornscan analysis tool. You can learn more about this tool at www.unicornscan.org.
Nessus and OpenVAS
Security testers should also investigate Nessus, a tool first released in 1998. Although Nessus is no longer under the GPL license, as most open-source software is, you can still download it free from Tenable Network Security Corporation (www.nessus.org) for noncommercial personal use. An open-source fork of Nessus called OpenVAS was developed in 2005, and it’s one of the tools included in the online resources. OpenVAS functions much like a database server, performing complex queries while the client interfaces with the server to simplify reporting and configuration.
What makes this tool unique is the capability to update security check plug-ins when they become available. An OpenVAS plug-in is a security test program (script) that can be selected from the client interface. The person who writes the plug-in decides whether to designate it as dangerous, and the author’s judgment on what’s considered dangerous might differ from yours. Therefore, leaving the Safe checks check box selected, as shown in Figure 5.2, is wise before you start a scan.
Figure 5.2
OpenVAS with a safe checks warning

Courtesy Course Technology/Cengage Learning
Figure 5.3
OpenVAS discovers a vulnerability

Courtesy Course Technology/Cengage Learning
An OpenVAS scan isn’t limited to determining which services are running on a port. OpenVAS plug-ins can also determine what vulnerabilities are associated with these services, as shown in Figure 5.3. (You use OpenVAS in later chapters.)
CONDUCTING PING SWEEPS
Port scanners can also be used to conduct a ping sweep of a large network to identify which IP addresses belong to active hosts. In other words, to find out which hosts are “live,” ping sweeps simply ping a range of IP addresses and see what type of response is returned. The problem with relying on ping sweeps to identify live hosts is that a computer might be shut down at the time of the sweep and indicate that the IP address doesn’t belong to a live host. Another problem with ping sweeps is that many network administrators configure nodes to not respond to an ICMP Echo Request (type 8) with an ICMP Echo Reply (type 0). This response doesn’t mean the computer isn’t running; it just means it isn’t replying to the attack computer. Add the possibility of a firewall filtering out ICMP traffic, and you have many reasons for using caution when running ping sweeps. Many tools can be used to conduct a ping sweep of a network, and you learn about some in the following sections.

Courtesy Course Technology/Cengage Learning
Fping
With the Fping tool (www.fping.com), you can ping multiple IP addresses simultaneously. Fping, included on the companion website, can accept a range of IP addresses entered at a command prompt, or you can create a file containing multiple IP addresses and use it as input for the Fping command. For example, the fping -f ip_address.txt command uses ip_address.txt, which contains a list of IP addresses, as its input file. The input file is usually created with a shell-scripting language so that you don’t need to type the thousands of IP addresses needed for a ping sweep on a Class B network, for example. Figure 5.4 shows some parameters you can use with the Fping command.
To ping sweep a range of IP addresses without using an input file, you use the command fping -g BeginningIPaddress EndingIPaddress. The -g parameter is used when no input file is available. For example, the fping -g 193.145.85.201 193.145.85.220 command returns the results shown in Figure 5.5.
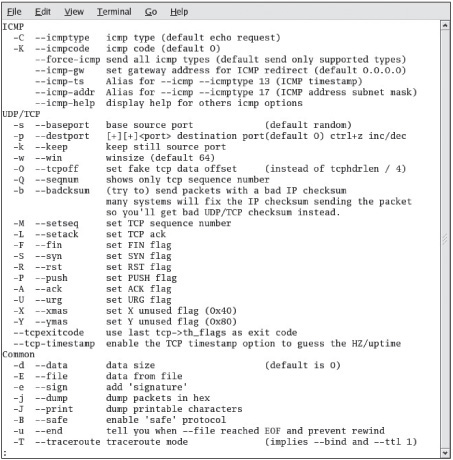
Hping
You can also use the Hping tool (www.hping.org/download) to perform ping sweeps. However, many security testers use it to bypass filtering devices by injecting crafted or otherwise modified IP packets. This tool offers a wealth of features, and security testers should spend as much time as possible learning this advanced port-scanning tool. For a quick overview, use the hping -help |less command, and browse through the parameters you can use (see Figures 5.6, 5.7, and 5.8). As you can see, many parameters can be added to the Hping command, enabling you to craft an IP packet for your purposes.
Figure 5.5
Results of an Fping command

Courtesy Course Technology/Cengage Learning
Security Bytes
If you decide to use ping sweeps, be careful not to include the broadcast address in the range of IP addresses. Including it by mistake might happen if subnetting is used in an organization. For example, if the IP network 193.145.85.0 is subnetted with the 255.255.255.192 subnet mask, four subnets are created: 193.145.85.0, 193.145.85.64, 193.145.85.128, and 193.145.85.192. The broadcast addresses for each subnet are 193.145.85.63, 193.145.85.127, 193.145.85.191, and 193.145.85.255. If a ping sweep is activated inadvertently on the range of hosts 193.145.85.65 to 193.145.85.127, an inordinate amount of traffic could flood the network because the broadcast address 193.145.85.127 is included. This error is more of a problem on a Class B address, but if you perform ping sweeps, make sure your client signs a written agreement authorizing the testing.
Crafting IP Packets
Packets contain source and destination IP addresses as well as information about the flags you learned earlier: SYN, ACK, FIN, and so on. You can create a packet with a specific flag set. For example, if you aren’t satisfied with the response you get from the host computer after sending a SYN packet, you can create another packet with the FINflag set. The SYN flag might have returned a “closed port” message, but a FIN packet sent to the same computer might return a “filtered port” message. You can craft any type of packet you like. Hping and Fping are helpful tools for crafting IP packets.

Courtesy Course Technology/Cengage Learning
Courtesy Course Technology/Cengage Learning

Courtesy Course Technology/Cengage Learning
UNDERSTANDING SCRIPTING
Some tools might need to be modified to better suit your needs as a security tester. Creating a customized script—a program that automates a task that takes too much time to perform manually—can be a time-saving solution. As mentioned, Fping can use an input file to perform ping sweeps. Creating an input file manually with thousands of IP addresses isn’t worth the time, however. Instead, most security testers rely on basic programming skills to write a script for creating an input file.
Scripting Basics
If you have worked with DOS batch programming, scripting will be familiar. If you’re from a networking background and new to programming, however, this topic might seem a little overwhelming, but Chapter 7 focuses on getting nonprogrammers up to speed. A script or batch file is a text file containing multiple commands that would usually be entered manually at the command prompt. If you see that you’re using a set of commands repeatedly to perform the same task, this task might be a good candidate for a script. You can run the script by using just one command. The best way to learn how to create a script is by doing it, so you get an opportunity to practice writing one in Activity 5.1.
Activity 5.1: Creating an Executable Script
Time Required: 45 minutes
Objective: Learn to create, save, and run an executable script.
Description: Many hacking tools are written in scripting languages, such as VBScript or JavaScript. In this activity, you create a script that populates a file with a range of IP addresses. This type of file can be used as an input file for Nmap or Fping.
1. If necessary, boot your computer into Linux with the BackTrack files, and then open a Konsole shell. Type vi Myshell and press Enter.
2. To activate the screen, press Esc and then press i. Make sure Caps Lock isn’t activated because the vi program is case sensitive, and you can get strange results if you don’t pay careful attention to letter case. If this is your first time using the vi editor, you might need to use Table 5.1 as a reference. (For a more detailed description of this versatile editor, type man vi in a different Konsole shell and press Enter.)
Table 5.1 Summary of vi commands

3. First, type #!/bin/sh and press Enter. This line is important because it identifies the file you’re writing as a script. You should enter a few lines of documentation in any scripts or programs you write because they help with program modifications and maintenance done later. When a line is used for documentation purposes, it’s preceded with a # character. Figure 5.9 shows examples of documentation comments added, but don’t enter them for this activity.
Caution
Make sure the slashes point in the correct direction (/). Microsoft users often make this mistake because they’re used to typing backslashes ().
4. The second line is the name of the script you’re creating. Type # Myshell and press Enter. If this script were used in a production setting, you would also enter the date and your name.
5. Read the documentation comments added in Figure 5.9 about the purpose of the script, but don’t type them in your script. Your script should have only #!/bin/sh and # Myshell statements so far.
Figure 5.9
A shell script

Courtesy Course Technology/Cengage Learning
6. Next, type network_id=”193.145.85.” and press Enter. Be sure to include the quotation marks and the period after 85. (Because you aren’t actually using this script, the address entered in this line doesn’t matter.)
7. Type count=0 and press Enter. You’re initializing the count variable to zero, which is always wise because a variable shouldn’t be used in a program without having a value set. (You learn more about setting values for variables in Chapter 7.)
8. Figure 5.9 shows more documentation comments added as an example, but skip entering them and move on to entering the program code. You need your script to add the number 1 to the 193.145.85. network ID and continue incrementing and adding numbers to the network ID until the IP address range 193.145.85.1 to 193.145.85.254 is written to a file named ip_address.txt. In programming lingo, this repeated process is called looping. To avoid creating an endless loop, you need to add a condition to the while statement: Type while [ ”$count” -le 253 ] and press Enter. Note the spaces inside the square brackets and pay close attention to the use of quotation marks and dollar signs.
9. Next, type do and press Enter. This statement is where the script performs its main task. The action takes place between the do statement and the done statement (added in Step 11). First, to increment the count variable by 1, type count=$(($count+1)), paying careful attention to the parentheses, and press Enter.
10. The next line is covered in more detail in Chapter 7. For now, just understand that you can use the printf function to write data to a file. Type printf ”%s%s ” $network_id $count » ip_address.txt and press Enter. The » characters are used to add each IP address to the end of the ip_address.txt file.
11. Type done and press Enter, and then type exit 0 and press Enter. Figure 5.9 shows the entire script. Save your hard work by pressing Esc and typing : (a colon). At the : prompt, type wq and press Enter.
12. Now that you’ve saved your script, you need to make it executable so that you can run it. At the command prompt, type chmod +x Myshell and press Enter.
13. To run your script, type ./Myshell and press Enter. Because your script doesn’t create any output onscreen, you need to examine the contents of the ip_address.txt file to see whether the script worked.
14. Type cat ip_address.txt. How many IP addresses were created in the ip_address.txt file?
15. Close the shell.
CHAPTER SUMMARY
![]() Port scanning, also referred to as service scanning, is the process of examining a range of IP addresses to determine what services are running on a system or network.
Port scanning, also referred to as service scanning, is the process of examining a range of IP addresses to determine what services are running on a system or network.
![]() Different port scans might elicit different information, so security testers need to be aware of the port scan types, such as SYN, ACK, FIN, and so on.
Different port scans might elicit different information, so security testers need to be aware of the port scan types, such as SYN, ACK, FIN, and so on.
![]() A multitude of port-scanning tools are available. The most popular are Nmap, Nessus, OpenVAS, and Unicornscan.
A multitude of port-scanning tools are available. The most popular are Nmap, Nessus, OpenVAS, and Unicornscan.
![]() Ping sweeps are used to determine which computers on a network are “live” (computers the attack computer can reach).
Ping sweeps are used to determine which computers on a network are “live” (computers the attack computer can reach).
![]() Using scripts can help security professionals by automating time-consuming tasks.
Using scripts can help security professionals by automating time-consuming tasks.