
Chapter 15
Managing Names and Addresses
You've no doubt seen and tried out the new People app, which lets you integrate your contracts and updates from multiple social network sites such as Google+, Facebook, and Twitter. The Mail app relies on the People app for selecting contacts to send e-mail and instant messages.
Windows 10, like Windows 8/8.1 and Windows 7 before it, offers an alternative you can use from the desktop to manage contacts — the Contacts folder. Each file in that folder is a contact, someone with whom you communicate. They don't have to be only people you contact online. You can store anybody's contact information in your Contacts folder. As with pictures, songs, videos, and other documents, each user account has its own Contacts folder. So, each person who has a user account can have his or her own collection of names and addresses.
Why use Windows Contacts? If you're one of the few people who use a computer but don't use e-mail, the Windows Contacts folder provides a place for you to keep your own address book for letters, a phone list, and so on. Or you can use Windows Contacts to store your personal contacts and your e-mail program to store your business contacts. Whatever the case, you can use your Windows Contacts for addressing e-mail, as described later in this chapter.
Opening Contacts
To create or manage contacts, open your Contacts folder using whichever of the following methods is most convenient for you:
- Open Windows Explore and navigate to the Users folder. Find your name in the Users folders and expand the folder. The Users folder is accessible with your other user folders, such as Documents and Music.
- If you're already in File Explorer, click your username in the breadcrumb trail or in the Navigation tree under Desktop, and then click (or double-click) the Contacts folder icon.
If you've never used your Contacts folder, it most likely is empty. Figure 15.1 shows a sample Contacts folder with a few contacts already in place.

Figure 15.1 A sample Contacts folder.
Changing how you view contacts
Because Contacts is a folder, you can control how it looks using the standard techniques described in Chapter 20. For example:
- To show or hide the Preview pane, click Organize and choose Layout
 Preview Pane.
 - To show or hide the Navigation pane, click Organize and choose Layout : Navigation Pane.
- To show or hide the menu bar, press the Alt key or click Organize and choose Layout Menu Bar.
- To change the size of icons, click the arrow next to the Change Your View button and choose an icon size, or hold down the Ctrl key while spinning your mouse wheel.
- To sort or group contacts in Details view, point to any column heading and click the arrow that appears.
Making shortcuts to contacts
Before we go any further with Contacts, we want to point out some easy ways to create shortcuts to your Contacts folder. These make opening the folder in the future easier. You don't have to create any of these shortcuts, of course. They're entirely optional. But if you use your Contacts folder often, you'll probably find them handy.
First, click your username in the breadcrumb menu so that you're in the main folder for your user account. Right-click the Contacts icon, as shown in Figure 15.2, and choose Send To ![]() Desktop (Create Shortcut).
Desktop (Create Shortcut).

Figure 15.2 Right-click Contacts.
To add a shortcut to the Favorites pane in the Navigation bar, open your user folder and drag the Contacts folder into the Favorites box.
Creating a contact
Creating a contact is simple. First, open your Contacts folder if you haven't already opened it. Then click the New Contact toolbar button, or right-click an empty space in your Contacts folder (not on an icon) and choose New ![]() Contact.
Contact.
An empty, fill-in-the-blanks form opens. (The blanks are called fields.) It's divided into multiple tabs. You don't have to fill in everything for a contact. Fill in only as much information as you need or want for the contact. Here are some tips for filling in a contact:
- After filling in a field, press the Tab key to move to the next one, or click the next blank you want to fill.
- After filling in the first and last names, click the Full Name drop-down button to choose how you want the name displayed for alphabetizing.
- To add an e-mail address, type it into the E-mail text box and click Add. If the contact has several e-mail addresses, repeat the process to add each one. Then click the e-mail address you use most often for that person and click Set Preferred.
- To add a picture, click the picture box and choose Change Picture. Then navigate to the folder that contains the picture you want to add and click (or double-click) the desired picture. The picture becomes the contact's icon in : the Contacts folder.
- If this is a personal contact, use the Home tab to fill in the person's home address.
- Use the Work tab to fill in the work address and other information.
- Use the Family tab to fill in personal information such as birthday, anniversary, spouse, children, and so forth.
- Use the Notes tab to fill in any miscellaneous information you desire.
- The IDs tab shouldn't require any intervention on your part. It gets filled in automatically when you receive a digitally signed message from the person.
- When you've finished entering the contact, click OK.
Opening and editing contacts
To open a contact, double-click its icon (unless you're using single-clicks, in which case you just have to click it once). You see a Name and E-Mail tab that contains name, e-mail, and other basic information, as in the example in Figure 15.3.

Figure 15.3 The Name and E-mail tab of a sample contact.
You can change the contact's information as follows:
- To send the person an e-mail, click the e-mail address.
- To visit that person's website, click the URL.
- To add, remove, or change the picture, select the Name and E-mail tab, click the picture, and click either Change Picture or Remove Picture.
- To see or change any other information, select the appropriate tab.
Create a “Me” contact
Creating a contact for yourself is a good idea. Fill in as much information as you want to share with others. You can e-mail that contact to folks so that they don't have to type your contact information themselves. After you create a contact for yourself, right-click its icon and choose Set As My Contact. The menu option then changes to This Is Me. You can click This Is Me to direct Windows to use your Windows user account picture for the contact or to change the picture in the contact to your current Windows user account picture.
If you want to e-mail your contact information to others who aren't using Windows 7, Windows 8, or Windows 10, attach a .vcf file to an e-mail message. To do that, right-click your Contact icon and choose Send to. A new message window opens with the card already attached as a .vcf file. Fill in the To and Subject lines. Fill in the body of the message informing the recipient that your contact information is attached.
Creating Contact Groups
A contact group is any collection of contacts that have something in common. It can be people who go to the same church as you, members of the same club, work colleagues, or just pals. You can also think of a contact group as a mailing list (or distribution list). The beauty of a contact group is that you can send or forward an e-mail message to everyone in the group in one fell swoop.
Visually, a contact group is just a collection of contact names. For example, Figure 15.4 shows a contact group named Family in Cyberspace.
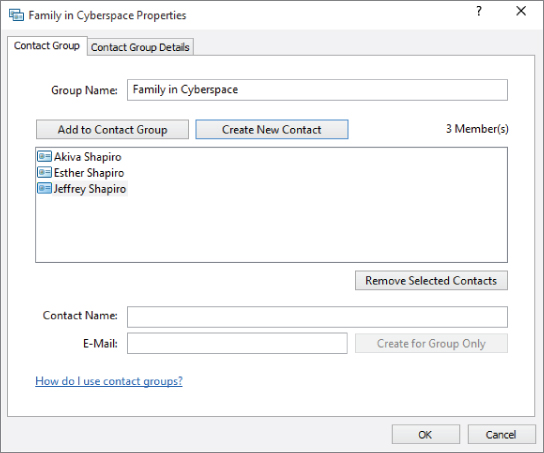
Figure 15.4 A sample contact group.
To create a contact group in your Contacts folder, follow these steps:
- Click the New Contact Group toolbar button.
- In the Group Name box, enter any name that describes the group.
- Add members using any of the following methods:
- To add existing contacts, click Add to Contact Group. Click the first person who should be in the group. Then hold down the Ctrl key as you click everyone else who belongs in the group. Then click Add.
- To add a new person to the group, as well as create a contact for that person, click Create New Contact. Fill in contact information for that person and click OK.
- To add a person's name and e-mail address without creating a contact icon for that person, fill in the Contact Name and E-Mail boxes near the bottom of the window and click Create for Group Only.
- Optionally, click the Contact Group Details tab and fill in details about the group. For example, if you're all members of the same club or church, you can add address and phone information for the building where you meet.
- Click OK.
The group window closes and appears as an icon in the Contacts folder. You can use and treat the group in much the same way as you do an individual contact:
- To send an e-mail to the group, right-click the group icon and choose Action Send E-mail.
- To change the group, double-click the group's icon in Contacts.
- To delete the group, right-click its icon and choose Delete. Contacts within the group will remain. Only the group icon and noncontacts are deleted.
Don't forget that you have much leeway in how you view the contents of folders. For example, to view and organize your contacts as a list or table, choose View ![]() Details. To choose columns to display, right-click any column heading, as shown in Figure 15.5. If the drop-down menu doesn't show a column you want to include, click More for a more complete list.
Details. To choose columns to display, right-click any column heading, as shown in Figure 15.5. If the drop-down menu doesn't show a column you want to include, click More for a more complete list.

Figure 15.5 Choose columns to display.
After you've selected the columns you want to view, you can arrange them however you like. Just drag any column heading left or right to place it where it's easy to see.
Printing Contacts
Printing contact information is easy. If you want to print only certain contacts, select their icons using any of the standard techniques, such as Ctrl+click. Then click the Print toolbar button. If that button isn't visible, click ≫ at the end of the toolbar and then click Print. The Print dialog box opens, looking something like the example in Figure 15.6.

Figure 15.6 Print options for contacts.
To print all contacts, choose All Contacts under Print Range. To print only selected contacts, choose Selected Contacts. Then choose a print format:
- Memo: Prints most business and address contact information.
- Business Card: Prints business, address, and phone information.
- Phone List: Prints phone numbers.
If you have multiple printers, click the one you want to print with. Then click the Print button.
If none of the available print formats fits what you need, you can export contacts to a file. Then import those contacts into another program that gives you the flexibility you need to print as you see fit.
Importing and Exporting Contacts
Importing allows you to copy contacts from external programs into your Contacts folder. Exporting lets you copy contacts to another program or a format that's compatible with an outside program. We start this section with importing.
Importing people to your contacts folder
You can import names and addresses from the following formats into your Windows Contacts folder:
- CSV (Comma-Separated Values): This is a generic format to which many programs can export data. You start in the other program by exporting names and addresses to a CSV file. Then you open your Contacts folder and import the CSV file you : created from the original program.
- LDIF (LDAP server): Use this format to import contacts from a directory server that uses Lightweight Directory Access Protocol (LDAP).
- vCard (VCF file): This format is used by many programs to store virtual business card data. In contrast to other options described here, you can use this format to import a single contact whose data is stored in a
.vcffile. - WAB (Windows Address Book): This format imports contacts from the
.wabfile used by Windows Address Book and Outlook Express in earlier versions of Windows. Typically, you find that file in thex:Documents and SettingsUserNameApplication DataMicrosoftAddress Bookfolder, wherexis the disk drive andUserNameis the name of the user account.
If the data you want to import isn't already in one of these formats, open the program that you normally use to manage those contacts. Then search its Help for “export” to see whether you can export to CSV or another compatible format.
When the data you want to import are in an appropriate format and you know the location of the file, follow these steps to import the data to your Contacts folder:
- Open Windows Contacts.
- Click the Import toolbar button.
- Click the format in which the data to be imported are stored; then click Import.
- Navigate to the drive and folder in which the data to be imported are stored; then click (or double-click) the file to import. Click Next.
- If importing from a CSV file, in the CSV Import dialog box, verify the field mapping to use for the import. To change a field, click the field, click Change Mapping, choose the field you want to map to, and click OK.
- When you're satisfied with the mapping, click Finish.
You should see an icon for each imported contact.
Exporting contacts to vCards
Many programs store contact information in virtual business cards, where each contact is a file with a .vcf extension. Before you get started, you might want to create a folder to store the exported data. That way, all the exported contacts will be together in a single folder.
To export contacts in vCard format:
- Open Windows Contacts.
- Click the Export toolbar button.
- Click vCards (folder of
.vcffiles). - Click Export.
- Navigate to the folder in which you want to place the exported vCards.
- Click OK.
- When the export is complete, click OK.
To verify the export, open the folder to which you exported. You should see an icon for each exported contact. The contacts don't show any pictures because the vCard format doesn't support the use of pictures.
Exporting to a CSV file
You can export contacts to a single comma-separated values (CSV) file for later import to another program. For example, after exporting contacts to a CSV file, you can open them in Microsoft Excel, import them to a Microsoft Access table, or use them for a Microsoft Word mail merge. With Word and Access, you can print form letters, mailing labels, and envelopes from the CSV file.
To export contacts to a CSV file, open Windows Contacts as you normally would. Then follow these steps:
- Click the Export toolbar button.
- Choose CSV (Comma-Separated Values) Export.
- Type a name for the exported file. Or click the Browse button, navigate to the folder in which you want to store the file, enter a filename, and click Save.
- Click Next.
- Select (check) the fields you want to export and click Finish.
- Click OK when the export is complete.
To verify the export, open the folder to which you exported the file. To view the contents of the file using Notepad, right-click its icon and choose Open With ![]() Notepad. That will show you the file in its raw form. But in actual practice, you'll likely import it into whatever program you want to use.
Notepad. That will show you the file in its raw form. But in actual practice, you'll likely import it into whatever program you want to use.
Searching for Contacts
If you have lots of contacts in your Contacts folder, you can use the Search Contacts box in the upper-right corner of the Contacts window to quickly locate a contact. Click in the Search Contacts box and type a few characters from the person's name. The contact list shrinks to contain only the people whose names contain those letters, and highlights the search text in the contact information (such as name or e-mail address). When you see the person you want, double-click the name to open. To remove the filter and see all contacts again, click the X at the right side of the Search Contacts box.
Sharing Contacts on a Network
If your computer is part of a network, you can share a contact with other Windows 7, Windows 8, or Windows 10 computers in that network. The process is the same as that for sharing any other file. Right-click the contact and choose Share With. Choose the people with whom you want to share, and set permission levels.
Wrapping Up
Names and addresses are easy to manage in Windows 10, thanks to the Contacts folder. Here's a summary of all the things you can do:
- To view contacts, open your Contacts folder.
- To create shortcuts to your Contacts folder, first open File Explorer. Click the arrow to the left of Libraries in the breadcrumb and choose your username. Then drag the Contacts folder to the Favorites branch in the Navigation pane, or to the desktop, depending on where you want to place shortcuts.
- To create a new contact, click the New Contact toolbar button in your Contacts folder.
- To open or change a contact's information, open the contact icon.
- To identify a contact as yourself, right-click your own contact icon and choose Set As My Contact.
- To create a mailing list, click New Contact Group in the toolbar.
- To send an e-mail to a contact group, right-click the group icon and choose Action Send E-mail. Or from a new message or forwarded message, click To in the address field and choose the group as the recipient.
- To print contacts, click the Print toolbar button.
- Click Import or Export on the toolbar to import contacts from an external source, or copy contacts to an external file.
- To quickly find a contact without opening your Contacts folder, type a few characters of the name in the Search Contacts box.