
Chapter 23
Metadata and Power Searches
Chapter 22 covers different ways you can search your computer. When you search for files, you actually search an index of filenames and properties. You don't see the index on the screen, nor do you have to do anything to create or update the index. Windows 10 takes care of all the details automatically. The beauty of the index is that it allows Windows 10 to find files much more quickly than it could without the index.
The information about files that's in the index comes from each file's properties. Those properties are sometimes referred to as metadata because they're different from the file's content. The file's content is what you see on the screen when you open the file. The file's properties are stored in the file and are visible from the file's properties sheet.
Properties provide a way of organizing files that goes beyond their physical location in folders. This is a great help to people who have many files to manage — sometimes a simple folder name and filename just aren't enough. Sometimes you want to see all files based on authorship, date created, tags, subject, or even comments you've jotted down about the file. In other words, you want to pull together and work with files in a way that transcends their physical locations in folders. Metadata in Windows 10's indexed searches allows you to do that quickly and easily.
Working with File Properties
Taking a wild guess, we'd say you can put several thousand different types of files on a PC. No one person needs them all or uses them all. Some file types are so esoteric that you might never come across one.
In File Explorer, you can view and edit a file's properties in many ways. One way is to open the folder in which the file is contained and then select the file's icon. The Details pane, if open, displays the file's properties. If the Details pane isn't open, select the View tab and click the Details Pane button.
Initially, the Details pane may be too short to show all the file's properties, but you can drag its top border upward to see more properties. Figure 23.1 shows an example displaying the properties for a Microsoft Word 2013 document. Other file types have other properties.

Figure 23.1 A file's properties in the Details pane.
Viewing properties sheets
Here's another way to view a file's properties: Right-click the file's icon and choose Properties. A dialog box opens. If that dialog box has a Details tab, that's where you're most likely to find properties you can create and edit. You often hear the term properties sheet used to describe that set of properties because it's like a sheet of paper on which properties are written.
Figure 23.2 shows a couple of sample properties sheets. On the left is the properties sheet for the Word document shown in Figure 23.1. On the right is the properties sheet for a .doc document file. When you have more properties than fit in the box, use the scroll bar at the right side of the box to see others.

Figure 23.2 Examples of properties sheets for two files.
Every property has a name and a value (some text, date, or number that's assigned to the property). In the properties sheets, the property names are listed down the left column. The value assigned to each property (if any) appears to the right of the property name.
Viewing properties in columns
A third way to view properties is through the Details view in File Explorer. In any folder (including the results of a search), select the View tab and choose Details. You see a few columns across the top of the contents pane. But what you see isn't necessarily all the available information. The horizontal scroll bar across the bottom of the pane lets you scroll to other columns. You can add columns to the view (or remove columns) by right-clicking any column heading, as in Figure 23.3. The menu that appears shows a few other columns from which you can choose. Click More at the bottom of that menu to see others.

Figure 23.3 Choosing columns in Details view.
Editing properties
To change a file's properties (some properties are not editable), select its icon and make your changes in the Details pane. Or right-click the file's icon, choose Properties, select the Details tab, and make your changes there.
You can change properties for multiple files using the same basic method. You just have to select the icons for the files first. But there is a catch: You're limited to changing properties that all the selected files have in common. This limitation can be a pain when you're working with multiple file types. For example, many different types of files for storing pictures exist — JPEG, TIFF, PNG, BMP, and GIF, to name a few. The newer file types — JPEG, TIFF, and PNG — offer many properties. The older file types — BMP and GIF — offer relatively few.
Figure 23.4 shows an example of what can happen when you select multiple file types. We selected all the icons in the folder, each of which is a picture. Then we right-clicked one of them, chose Properties, and selected the Details tab. Hardly any properties are showing because those file types have few properties in common.

Figure 23.4 Properties for multiple files.
With old file types that support few properties, about the only thing you can do is convert them to newer file types. For example, you may have lots of GIF images on your system. That file type doesn't offer any usable properties. To resolve this problem, you can use the batch conversion feature of your graphics program (PaintShop Pro) to convert the files to PNG files. We suggest PNG because it supports transparency, as GIF does.
If you have many files that you want to assign new properties to, consider creating a search that brings similar files together all under one roof, so to speak. Open the Documents folder (or other folder that is a parent of the one you want to search) and click in the Search box to specify the types of files you want to work with. In Figure 23.5, we typed the following into the Filename box:
*.jpg OR *.jpeg OR *.tif OR *.tiff OR *.png
Figure 23.5 Specify the types of files in the Search box.
That brings together all the TIFF, JPEG, and PNG files in the search scope. Perform the search and then use column headings to sort items based on their current folder location. You can add columns that allow you to see the properties you intend to work with. Of course, that's just an example. You can set up searches to find and organize files as you see fit.
Save the search when you're finished so you can open and use it whenever you have time to work with properties. To change properties for any single file, click its name. To assign the same property value to multiple files, select their icons. Then use the Details pane or properties sheet to make your changes. The procedure takes some time if you have a number of files to work with. But having all the files together in one place, and the properties of interest in plain view, can make the job less daunting.
Setting Properties When You Save
Search indexes are nothing new. Database administrators have been using them for decades. Every time you do an Internet search, you're searching an index of websites somewhere. Windows XP and other operating systems allowed some limited, indexed searching through add-on programs. But Windows Vista was the first Windows version to have indexed searching — its own built-in search engine — built in from the ground up. Windows 7 and 8.1 expanded upon and improved the search capabilities introduced in Vista, with capabilities to search Windows apps, the Windows Marketplace, Xbox LIVE, and Xbox Companion areas from within Windows. Other software developers understand the value of that feature. As the years roll by, new versions of old programs will include the capability to tag files and set properties at the moment you first save the program. In addition, the relationship of the desktop environment to the online environment is much tighter and more seamless in Windows 10.
When you save a new file, be sure to look for options in the Save As dialog box that allow you to add tags or properties. Figure 23.6 shows an example of the Save As dialog box for a Microsoft PowerPoint 2013 presentation. The dialog box allows you to add tags and authors right on the spot.

Figure 23.6 Save As dialog box for PowerPoint 2013.
When you're faced with such options, think about words you can type into a Search box to find the file in the future. Ask yourself, “If I need this thing six months from now and forget its filename, what word can I use to search for it?” or “How should I categorize this file in relation to other similar kinds of documents?” As your collection of files grows, and your searching skills grow, the few moments you spend thinking up keywords for tags and properties will pay off in spades.
Personalizing Searches
Getting the most from Windows 10's searches includes knowing how to tweak its settings to work in ways that support the kinds of things you do. You can tweak some aspects of indexed searches through the Folder and Search Options dialog box. To get to the search options, do either of the following:
- If you're in a folder, select the View tab and click the Options button.
- Type fil in the Cortana search box and then click File Explorer Options in the Search Results area.
The File Explorer Options dialog box opens. Select the Search tab to see the options shown in Figure 23.7.

Figure 23.7 Search options.
The Don't Use the Index When Searching in File Folders for System Files (Searches Might Take Longer) option applies when you search non-indexed locations. When you select that option, searches outside the index work like non-indexed searches from older Windows versions. The search looks at every file in every folder and doesn't even look at the search option. When you leave that option unselected, the search still uses the index for files in indexed locations. So, that part of the search goes quickly. Then it falls back to the old non-indexed method, but only for files that aren't indexed.
The last three options apply only when you're searching non-indexed locations. Choose Include System Directories if you want non-indexed searches to include Windows and other program files that are essential to proper functioning of your PC. These are not files you normally open or modify yourself. So, choose this option only if you're a power user or administrator who needs frequent access to files in those locations. Otherwise, you're slowing down your searches for no good reason.
Choosing the Include Compressed Files (ZIP, CAB…) option extends the search into compressed Zip folders and the like. (CAB files are “cabinet” files, and they're compressed as well.) Typically, people use compressed files for archived files that they don't use often because the compression and decompression add time to opening and closing the files. Including their contents in searches can also slow searches. But if you want to include those files' contents in your non-indexed searches, select the check box.
The option Always Search File Names and Contents (This Might Take Several Minutes) — forces searches to look at the contents of non-indexed files, which can really slow you down. Better to index the non-indexed document files to get the speedier index searches.
As always, clicking Restore Defaults sets all options back to their original defaults. Those are the options that provide the best performance for indexed searches and cover the things most people typically want included in their searches.
Managing the Search Index
To get the best performance and value from the search index, make sure it includes all the files you regularly use in your work. But don't go overboard and include files you never, or rarely, use. If you do, you force Windows to search through thousands of filenames and properties for no good reason. By default, Windows 10 maximizes the search index by including messages and documents from a limited number of folders.
Adding indexed locations
Windows 10 indexes certain folders by default. You can add or remove locations through the Indexing Options dialog box (see Figure 23.8) with the following steps:
- Open the Indexing Options item from the Control Panel to open the Indexing Options dialog box.
- Click Modify.
- Click to expand drives and folders, as necessary, to get to the folder(s) you want to add.
- Select (check) the folder(s) you want to add. Choosing a folder automatically chooses all subfolders, so there's no need to select those individually. But you could clear the check mark on one if you wanted to exclude it from the index. Those excluded folders will show up in the Excluded column in Indexing Options.
- Click OK.
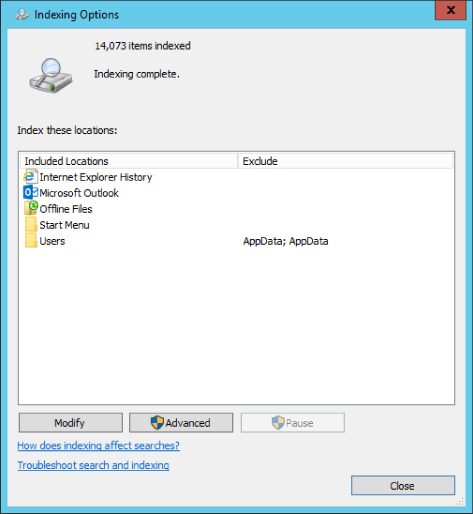
Figure 23.8 Indexing options.
The folder is added to the index without any fanfare. About the only change you see is that the folder name appears in the Index These Locations list in Indexing Options. Use the scroll bar to the right of that list if the folder name isn't immediately visible. Also, if you look at the text near the top of Indexing Options, you'll see the number of items indexed.
If you're actively using the computer, you see a message indicating that indexing speed is reduced due to user activity. Not to worry — it just means that the index-building process is giving priority to things you want to do. This message is replaced by others when the index is being built at full speed, and when indexing is compete.
You can add as many folders as you wish, from as many drives as you wish, using those same methods. But again, prudence is a virtue. Remember: Don't add folders just for the heck of it or because you don't know what's in a particular folder. The more you keep your index focused on files you want to find in searches and access through virtual folders, the better performance you get from the index.
Remove a location from the index
Removing a folder from the index is the opposite of adding one. Repeat the preceding steps to get to the Indexed Locations dialog box shown in Figure 23.9. Expand drives and folders, as necessary, so you can see the items you've selected (checked). If you want to exclude some subfolders from one of your indexed folders, expand that folder first. Then clear the check marks from the subfolders you don't want in the index. Those subfolders show up in the Exclude column in the lower pane of the dialog box. Click OK after making your changes.

Figure 23.9 The Indexed Locations dialog box.
Choosing file types to index
The index intentionally excludes unknown file types, certain kinds of executable files, and libraries because they aren't normally the kinds of things you want to locate in a quick file search or virtual folder. You can add any file type you like to your index, and you can remove any file type you don't want to see.
Filenames and properties of selected file types are always indexed. For files that contain text, such as word-processing documents and spreadsheets, you can choose whether to index file contents. The advantage of indexing file contents is that when you search for files, the file shows up even if the search term isn't in the filename or properties. The slight disadvantage is that it adds some size to the index. But in this case, the advantage of including file contents probably outweighs the cost, unless you're using older, slower hardware and your searches are very slow.
To change options for file types, open the Indexing Options dialog box and follow these steps:
- Click the Advanced button (enter an administrative password if prompted).
- In the dialog box that opens, select the File Types tab. You see a list of all file extensions, as in Figure 23.10. Do any of the following:
- To include a file type, select its check box.
- To exclude a file type, clear its check box.
- If you opted to include a file type, choose whether you want to index properties only or properties and file contents.
- To add a file extension that isn't in the list, type the extension next to the Add button and click the Add button.
- Click OK after making your changes.

Figure 23.10 Choosing file types to index.
More advanced options
You can make some more advanced tweaks to the index to change how it operates. You see them when you first click the Advanced button in Indexing Options. Figure 23.11 shows those advanced options on the Index Settings tab.

Figure 23.11 The Index Settings tab.
Choosing Index Encrypted Files ensures that encrypted files are included in searches and virtual indexes. People encrypt files to keep out prying eyes. Keeping those files out of the index adds a layer of security by making them invisible to basic file searches. But if that isn't a problem for you and you want your encrypted files to show up in searches, choose the option to index encrypted files.
A diacritic (or diacritical mark) is an accent mark added to a letter to change a word's pronunciation. Some examples include the acute accent (á), circumflex (â), and umlaut (ä). When used in filenames and properties, Windows 10 usually treats characters with diacritics as being identical to the character without the mark. Choosing Treat Similar Words with Diacritics as Different Words changes the search behavior so that the diacritics are no longer lumped together as though they were a single character.
The Index Location option lets you specify where you want to store the search index. The default is the C:ProgramDataMicrosoft folder. If you have a separate hard drive that runs faster than your C: drive, you can relocate the index to that drive for better performance. Just make sure you choose a drive that's always attached to the computer, not a removable drive. Click the Select New button and use the Browse for Folder dialog box that appears to navigate the drive and folder in which you want to store the index.
If you see error messages about a corrupt index, or the system crashes when you try to perform a search, the problem may be a corrupted index. You can rebuild the index to see if that helps, but the process can take several hours. So, if at all possible, consider doing this job as an overnighter. The process is simple: Click the Rebuild button on the Index Settings tab of the Advanced Options dialog box (refer to Figure 23.11).
You can continue to use the computer while the index is being rebuilt. Any searches you perform while the index is being rebuilt will likely be incomplete.
Power Searches
The ability to display the Search box, type a few characters, and see all items that contain those characters is a great thing. For most people, it saves lots of time otherwise spent opening programs or navigating through folders to open a program, document, contact, or message. It's so useful that you may not even need to bother with more complex searches.
When you need a more complex search, you can use the Search box in File Explorer to search for particular types of files and limit the search by date, filename, size, or other criteria. You can create complex searches and save them. When you want to do the same search again in the future, that's handy, as well. Folks who want still more can use the query language.
You may have noticed that after you fill in the blanks in an Advanced Search and click the Search button, you see some text in the Search box. Take a look at Figure 23.12 for an example. There the date criterion is set to Date Modified 6/28/2015. This puts the following into the Search box:
datemodified:6/28/2015
Figure 23.12 Sample search.
That little line of text in the Search box, called a query, is what returns the search results. When you perform the search, Windows 10 looks through the whole index. But the query acts as a filter. Only items that meet the conditions set forth by the query show in the search results. In this example, only files whose Date Modified date is 6/28/2015 appear in the search results. Items that don't match the criterion don't appear in the search results. Those items aren't deleted or changed in any way. They're simply “filtered out” so as not to show up in the search results.
You can type your own queries into the Search box to perform complex searches. But, it isn't as simple as “asking a question” or typing a bunch of words at random. You have to follow some rules and write the query in such a way that it can be interpreted properly. Otherwise, the search returns the wrong items, or no items at all. The following sections look at some ways you can type your own complex queries.
Searching specific properties
When you type a word into the search box, the results show files that contain that word in their filename, contents, and properties. For example, a search for jazz finds songs in the jazz music genre, any folder or file that has the word jazz in its filename or contents, and any file that has the word jazz in any property. In other words, you can end up with lots of files in the search results.
You can narrow a search by specifying a property name followed by a colon and the text for which you're searching. For example, a search for genre:jazz finds only music files in the jazz genre.
Similarly, a search for susan finds all files that have susan somewhere in the file, name, or a property, whereas a search for from:susan finds only e-mail messages that have the name susan in the From address (for a local e-mail client, not a web e-mail client).
You can assign ratings to pictures and music files, and use ratings as a search word. For example, rating:5 stars finds files with 5-star ratings.
Greater than and less than
When you're searching for a property that contains a date or a number, you can use comparison operators shown in Table 23-1.
Table 23.1 Comparison Operators Available with Search
| Operator | Meaning |
| = | Equal to (this is assumed if you don't specify an operator) |
| > | Greater than |
| >= | Greater than or equal to |
| < | Less than |
| <= | Less than or equal to |
| <> | Does not equal |
A search for rating:>=4 stars finds pictures and music with 4- or 5-star ratings. A search for width:<600 finds pictures with widths less than 600 pixels. The query modified:<2007 finds files last modified in 2006 or earlier. A search for kind:video size:<300KB finds video files less than 300KB in size.
AND, OR, and NOT searches
You can use the keywords AND, OR, and NOT in searches. You must type the word in uppercase letters. Be sure to include a space before and after the word.
Not using any word is the same as using AND. For example, consider the following search:
Datemodified:5/9/2012 name:koalaThat means the same thing as this:
Datemodified:5/9/2012 AND name:koalaAny time you create an AND query, you narrow the search results. Intuitively, you may expect it to have the opposite effect. But that isn't the way it works. The query is a filter. To show up in the search results, a file must meet all criteria posed by the filter. For example, files that don't have koala in the Filename property don't show up at all, no matter what's in their Date Modified property. And files that were modified on dates other than 5/9/2012 don't show up either, even if they have koala in the Filename field.
Here's a common mistake that illustrates this principle:
filename:(*.jpg AND *.jpeg)Intuitively, you might expect this search to identify files with .jpg and .jpeg extensions. But it doesn't. The result of this search is nothing! Why? Because the criterion is a filter, not a question. To get through the filter, a file must have a .jpg extension and a .jpeg extension. But a file can't have two extensions. Every file has only one filename extension. Therefore, no single file can get past this filter.
When you want to broaden, not narrow, a search, you use OR. For example, take a look at this search:
filename:(*.jpg OR *.jpeg)To get past this filter, a file must have either a .jpg or a .jpeg extension. So, the result of the search displays all files that have either a .jpg or .jpeg filename extension.
By the way, you don't have to use the asterisk (*) and dot if you use extension:, ext:, or type: as the property name. For example, this search criterion also shows all files that have .jpg or .jpeg extensions:
ext:(jpg OR jpeg)You aren't limited to a single OR. Here's a search that shows all files that have .avi, .wmv, .mpg, and .mpeg extensions:
ext:(avi OR wmv OR mpg OR mpeg)When you use type: you can use whatever appears in the Type column (in Details view) rather than the extension. For example, this search finds Microsoft Word documents:
type:wordThis one finds Word documents that have john in the filename or inside the document text:
john AND type:wordBecause the keyword AND is assumed if omitted, the following search works the same as the preceding one:
john type:wordIf you want to look only at the filename and not the contents, use the name: property. For example, here's a query that looks for Excel spreadsheets that have the word festival in the filename:
name:festival type:excelIn addition to searching for extensions, you can use kind: to find certain kinds of files. For example, kind:music finds music files; kind:picture finds pictures; kind:contact finds contacts; kind:e-mail finds e-mail messages; and kind:communication finds messages and contacts.
The NOT keyword narrows a search by excluding items that match the criterion that follows. For example, when you use the kind: keyword, you get both the file type, as well as shortcuts that open the file type. To hide the shortcut files, use NOT shortcut. For example, here's a search criterion that shows all files that are communication files excluding any shortcuts to those files:
kind:(communication NOT shortcut)A search for kind:video shows all video files. This search shows all video files except the ones that have a .mov filename extension:
kind:video NOT extension:movIt isn't always necessary to specify the kind or type of file. For example, consider this query:
homecity:CucamongaThat one finds all contacts whose Home City is Cucamonga. Because Contacts are the only type of file that have a Home City property, you'd probably get only contacts in the search results even without specifying kind:contact.
You can use tag: as a search property, too. For example, the query tag:(alec OR ashley) finds files that have either alec or ashley in the Tags property. The query tag:(alec AND ashley) finds files that have both alec and ashley in the Tags property.
If you use the Comments and Categories properties in files, use comment: and category: to search just those properties. Similarly, you can use title: to search the Title property and subject: to search the Subject property.
Date and number searches
When searching for files based on a date, you can use the following property names for specific dates:
modified: Date the file was last modified.accessed: Date the file was last opened.created: Date the file was created.sent: Date a message was sent.received: Date a message was received.taken: Date a picture was taken.
To search a range of dates, use the keywords followed by a start date, two dots (..), and an end date. For example, to find all pictures taken between June 1, 2015, and September 1, 2015, use this criterion:
taken:6/1/2015..9/1/2015You can also use comparison operators with date searches. For example, to see all files modified on or after January 1, 2015, use this criterion:
modified:>=1/1/2015You can also use the following keywords with dates:
todaytomorrowyesterdaythis weeklast weekthis monthlast monthnext monththis yearlast yearnext year
For example, this search finds all files modified today:
modified: todayThis search shows all files that were created this week:
created:this weekHere's a query that lists all picture files that were taken this month:
taken:this monthTo see all files modified between some date (say 1/1/2015) and today, use this query:
modified:>=1/1/2012 AND modified:<=todayIf you're interested in a certain month and year, use the month name and year like this:
modified:july 2012For a day of the week, use the weekday name like this:
modified:mondayThe comparison operators work with numbers, too. When searching sizes, you can use KB, MB, and GB abbreviations. For example, here's a search criterion that finds all files that are 1MB or greater in size:
size:>=1MBHere is one that finds files larger than 2GB in size:
size:>2GBHere's one that finds files between 500KB and 1,000KB in size:
size:>=500KB AND size:<=1000KBIf you save music in various bit rates, here's a query that finds all files with bit rates greater than or equal to 300 Kbps:
bitrate:>=300kbpsIf you want only MP3 files with those large bit rates, use this criterion:
bitrate:>=300kbps AND type:mp3Here's a query that finds all pictures whose height is 800 pixels or less:
kind:picture height:<=800Searching for phrases
When searching for two or more words, you'll likely end up with documents that contain the words you specified, but not necessarily in the order you typed them. To prevent that problem, you can enclose the phrase in quotation marks. For example, typing the following into a Search box displays all files that contain the words dear and wanda regardless of their relative positions to one another:
dear wandaBut typing the following into a Search box displays files where the words dear and wanda appear right next to each other in the document:
"dear wanda"Message searching
For Windows Mail messages, key properties include to:, from:, about:, subject:, sent:, and received:. Both to: and from: can contain any word that appears in the To: and From: columns in the message. The about: keyword looks at the contents of the messages, not just the subject line. For example, the following is a query that you could enter in the Search box on the Start menu, which finds all messages from someone named Kay that contain the word lunch:
from:kay about:lunchHere's a query that shows all messages addressed to Alan that arrived today:
to:alan received:todayHere's a search that shows all messages addressed to Susan, sent by Alan, that have contract in the Subject line:
to:susan from:alan subject:contractHere's a query for e-mail messages sent this week from Alan to Wanda that contain the words chow mein:
to:wanda about:"chow mein" from:alan sent:this weekNatural language queries
Earlier in this chapter, you saw the option Use Natural Language Search in the Folder and Search Options dialog box. If you choose that, you can omit the colons after property names and use uppercase or lowercase letters in search queries. This makes typing most queries easier. For example, with natural language, the following query finds all messages from Susan that contain the word dinner:
from susan about dinnerThis search finds all video files excluding ones with an .avi filename extension:
kind video not aviHere's the natural language version of the query about “chow mein” e-mail messages:
to wanda about chow mein from alan sent this weekHere's a query that finds all files whose size is greater than 5MB:
size > 5MBHere's a natural language query that finds all songs by Led Zeppelin:
music by zeppelinThis natural language query finds all pictures that have the word flower in the filename:
flower picturesHere's a natural language query that finds all files that contain the word peas, the word carrots, or both words:
peas or carrotsHere's a natural language search that finds files that contain the words peas and carrots (although not necessarily together):
peas and carrotsHere's one that finds files that contain all three words, peas and carrots, together:
"peas and carrots"Looking for a file you just downloaded or saved today? Try this natural language search in the Search box on the Start menu:
created todayHere's a natural language search that lists all files modified yesterday:
modified yesterdayHere are some other natural language searches you can probably figure out without our telling you what they mean:
e-mail received todaye-mail from alec received yesterdaycontact messagepictures alecgenre rockartists Santanarating 5 stars
Using natural language syntax doesn't mean you can ignore all the other things described in this chapter. The folder from which you start the search still matters. And all the other options in the Folder and Search Options and Indexing Options dialog boxes still apply. But in most cases you can type a useful search query with minimal fuss. If you can't get a search to work, try turning off natural language searches and use the stricter syntax with colons after property names.
Wrapping Up
Windows 10's searching and indexing features pick up where Windows 7 and Windows 8.1 left off. Search is now a vast improvement over earlier versions of Windows and the add-on Search Companion used in Windows XP. Windows 10 searching isn't about finding lost files, although you can use it for that. If you use it only for that, you're missing out on the big picture and some key features of Windows 10.
Windows 10 searches use an index of filenames, properties, and file contents to make searches quick and nimble. They also look only at files in the search index because that's much faster than slogging through the entire file system to look at every file in every folder. But searches work correctly only if your index includes all the locations where you keep your frequently used document files.
One thing is for sure. If you've been managing thousands of files in hundred of folders, and you're sick of opening programs and folders, you're sure to love the new search index. You may not love it at first, because you have to understand how it works. And you may have to spend some time tweaking settings in a couple of dialog boxes. But after you're past that small bump in the road, you'll spend less time getting to files, and lots more time doing things!
This chapter introduced the following points:
- The search index includes information about files stored in the file's properties sheets.
- When you select a file in a folder, the Details pane shows the properties currently assigned to the file.
- You can also view a file's properties by right-clicking its icon and choosing Properties. Most editable properties are on the Details tab.
- File properties are also visible in any folder's Details view. That includes virtual folders (saved searches).
- The search index generally covers all files in your user account, people in your Contacts folder, and Windows Mail messages.
- The Folder and Search Options dialog box provides some options for personalizing searches.
- The Indexing Options dialog box provides a means of customizing the index to better suit the way you organize your files.