
Chapter 10
Personalizing the Desktop
We all like to set up our own desktops and work environments in unique ways. What works best for one person isn't necessarily great for someone else. Fortunately, the way things look and work on your Windows 10 desktop isn't set in stone. You can personalize your desktop and features in a variety of ways to make them look and work the way you like. That's what this chapter is about — setting up your Windows environment your own way.
Most of the options described in this chapter apply only to the user account you're currently logged in to, so the changes you make to your own desktop apply only to you (assuming that you're logged in to your own user account). This means that all users of a computer can have their settings just the way they want them without stepping on each others' toes.
Using the Personalization Page
Many options for personalizing the look and feel of Windows 10 are on the Personalization page, shown in Figure 10.1. As with most aspects of Windows 10, you can get to the Personalization page in several ways. Use the way that is most convenient for you at the moment:
- Right-click the desktop and choose Personalize.
- Open the Start menu and choose Settings, then click or tap Personalization.
- Open the Control Panel and choose Appearance and Personalization
 Personalization.

Figure 10.1 The Personalization page.
The following sections show you how to use the personalization options to fine-tune the look and feel of Windows 10 on your screen.
Choosing a theme
A theme is a collection of appearance settings that determine colors, sounds, photos, and other elements of the Windows 10 interface. For example, Figure 10.2 shows how Windows 10 looks with one of the default themes selected. Figure 10.3 shows the result of selecting the Australian Landscapes theme, by Ian Johnson, downloaded from the Microsoft website.

Figure 10.2 One of the Windows 10 themes.

Figure 10.3 The Australian Landscapes theme.
To choose a theme, open the Personalization window, click or tap Themes, and then click or tap Theme Settings. You see a selection of themes from which to choose. A good way to personalize your screen is to choose a theme that looks the most like how you'd like your screen to look. You can modify it to your preferences later, or even create your own custom themes, but a good way to get started is to use a predefined theme that has many of the characteristics you like.
To try a theme, click the theme in the Personalization page. The theme is applied to your desktop. If you don't like the results, click another theme or your previous theme.
Feel free to try as many themes as you like. If you plan to customize your environment further, click Save Theme, a link located on the Themes page. Then enter a name for the theme and click Save.
Personalizing your desktop background
You can wallpaper your desktop with any picture or color you like. In the Personalization window, click Background to open the page shown in Figure 10.4.

Figure 10.4 The Desktop Background page.
Click the drop-down button and choose Solid Color to choose a solid-color background for the desktop, or choose Picture to view pictures from your own Pictures folder (see Figure 10.5) and from the shared Public Pictures folder. Of course, if these folders are empty or don't contain any compatible picture types, you don't see any pictures after making your selection. After you choose a category, point to or click any picture to see it applied as your desktop background.

Figure 10.5 Choose a picture for the background.
The Slide Show option lets you choose a folder containing photos, and Windows periodically chooses a different photo from the specified folder. You can specify the time interval at which the photo changes.
If you have pictures in some folder other than the Pictures folder for your user account or the Public Pictures folder, click Browse. Navigate to the folder that contains those pictures. Then click (or double-click) the picture you want to use as your desktop background. All pictures from that folder appear in the Desktop Background window. Click the picture you want to use.
If the desktop is covered, click or tap the Show Desktop button at the lower-right corner of the screen to make all windows invisible and show the desktop. Try different pictures until you find one you like.
You may have noticed that you can choose more than one picture for your desktop. The Change Picture Every option lets you choose how often Windows displays a new desktop picture. Enable the Shuffle option if you want the photos to be shown randomly from the selected group.
Try the options under Picture Position to view the image in different ways. The options have little or no effect on large pictures. But if you choose a small picture of your own, the Tile option shows it repeatedly, like tiles. The Center option shows it centered on the screen. If you choose the Center option, you can click Change Background Color to color the desktop surrounding the picture.
If you don't want a picture on your desktop, choose Solid Colors from the drop-down list. Then click a color you like. When you've found and chosen a picture or color you like, click Save Changes.
Making text sharper with ClearType
ClearType is a technology that makes fonts look clearer and smoother on a display. ClearType is particularly effective for LCD and LED displays but can have some effect on CRT displays as well. Windows 10 supports ClearType.
To adjust ClearType on your Windows 10 computer, first open the Display applet from the Control Panel. Then click Adjust ClearType Text. The ClearType Text Tuner appears (see Figure 10.6).

Figure 10.6 The ClearType Text Tuner.
The ClearType Text Tuner is a wizard that steps you through a couple of settings to fine-tune the font display on your computer. Select the Turn On ClearType check box and then click Next. Windows 10 checks your computer's display resolution and offers to change resolution to the display's native resolution or keep the current resolution. Choose the desired option and click Next. Windows 10 then displays four pages with different text samples, prompting you to choose the ones that look the best to you. Click Finish when you're satisfied with your selections.
Personalizing sound effects
You may have noticed some little beeps and whistles as you work in Windows 10. Those are called sound effects, and you can customize them from the Personalization window. Just click Themes in the Personalization window and click Advanced Sound Settings to open the Sound dialog box, shown in Figure 10.7.

Figure 10.7 The Sound dialog box.
If you don't want to assign sound effects one at a time, you can choose a predefined sound effects scheme from the Sound Scheme drop-down list. Choose No Sounds if you don't want any sound effects.
The Program Events list shows the events to which you can assign sounds. Items that have a speaker icon to the left already have a sound effect associated with them. To hear one, click any program event that shows a speaker icon. The Sounds drop-down menu below the list shows the filename in which the sound effect is stored. Click the Play button to the right of the sound effect name to hear that sound effect.
Sound effects play only when your computer has a sound card with speakers plugged into the correct jack. If the speakers have their own power switch, they must be turned on. Likewise, if the speakers have their own volume control, the volume must be turned up high enough. And if the speakers have a Mute button, it must be turned off. Likewise, the volume control in the notification area must have its volume set to a level you can hear and must not be muted, as in Figure 10.8.

Figure 10.8 The Windows 10 Volume control.
In the Sound dialog box, you can assign any sound effect you like to any program event. First, click the program event to which you would like to assign or change a sound effect. Then click the drop-down button under Sounds to see a list of built-in sound effects. Click the sound effect you'd like to assign. Then click the Play button to hear that sound effect.
If you have your own sound effect to assign to a program event, click the Browse button and navigate to the folder that contains your sound effects. Then double-click the sound effect you want to assign to the program event.
If you change the sound effects associated with program events, you can save that work as your own sound scheme. Click the Save As button and give the scheme a name.
Personalizing your screen saver
A screen saver is a moving picture or pattern that fills the screen after a period of inactivity. The name “screen saver” harkens back to the earlier days of computing when leaving a fixed image on the screen for too long a time could cause permanent damage to the screen. This type of burn-in still can be a problem with CRT displays but isn't generally a problem with LCD and LED displays, so a screen saver is typically optional nowadays. Still, it's a nice way to have your screen do something entertaining when the computer is on but nobody is using it. Plus, it can be a way to protect your computer from prying eyes when you walk away from it. Better still, lock your workstation before you leave.
In the Personalization window, click Screen Saver. The Screen Saver Settings dialog box shown in Figure 10.9 opens. Click the drop-down button to see a list of screen savers from which you can choose. Click any name in that list to get a sneak peek at how it will look if you apply it.

Figure 10.9 The Screen Saver Settings dialog box.
Some screen savers are customizable. Click the Settings button to see whether the screen saver you selected has optional settings you can change. If it does, you see those options in a dialog box. Choose any options that look interesting.
If you have pictures in the Photos app, choose Photos from the drop-down button. Windows 10 creates a slideshow of those pictures and uses it as a screen saver. If you choose Photos from the drop-down list, you can also click the Settings button to see the options shown in Figure 10.10.
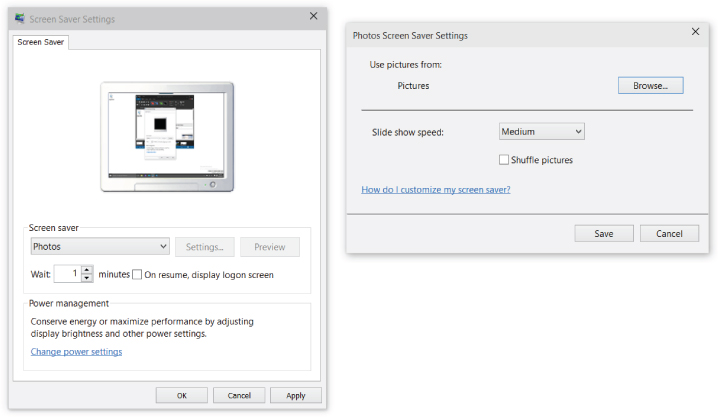
Figure 10.10 Photo slideshow options.
As shown in Figure 10.10, the default setting is for the screen saver to show all pictures and videos from your Pictures library, which includes your own Pictures folder and the Public Pictures folder. You can click Browse to choose a different location, if you prefer.
Click the Slide Show Speed drop-down button to choose the slideshow speed, and choose the Shuffle Pictures option to have Windows randomize the photo selection. Click Save after making your choices.
Regardless of which screen saver and settings you choose, the small preview window in the dialog box shows you how it will look. For a larger view, click the Preview button. Your selected screen saver plays full screen. To make it stop, just move your mouse.
After you've chosen your screen saver, specify how many minutes of inactivity are required before the screen saver starts playing. A period of inactivity means that nobody has touched the touchscreen, mouse, or keyboard. So, if you set the Wait option to five minutes, the screen saver kicks in after the computer has been unused for five minutes. The screen saver plays until someone moves the mouse or presses a key on the keyboard.
Choosing On Resume, Display Logon Screen causes the screen saver to show the login page rather than your desktop when someone moves the mouse. If you're using a password-protected user account, showing the login page prevents that other person from accessing your desktop. It also means that when you want to start using the computer again, you have to enter your password to get back to your desktop. Your programs will still be running, so this isn't the same as logging out and logging back in again.
The screen saver doesn't kick in at all if your power options are set to turn off the monitor before the screen saver kicks in. The Change Power Settings link in the dialog box lets you check, and optionally change, when the monitor goes off.
For example, the Power Save plan turns off the monitor after 20 minutes. If you set the screen saver to kick in after 21 or more minutes, you'll never see the screen saver because the monitor will be off. If you prefer the screen saver to an empty screen, make sure to set the screen saver timeout to a shorter period than your screen power-off setting.
When you're happy with your screen saver selections, click OK. Remember that the screen saver doesn't play until you've left the computer alone and untouched for the number of minutes you specified in the Wait box on the Screen Saver Settings dialog box.
Personalizing desktop icons
In the Themes page of the Personalization window, you see a link titled Desktop Icon Settings. Click that link to see the dialog box shown in Figure 10.11. Select the check boxes for any icons you want to see on your desktop. Clear the check box for any icon you don't want to see. As always, choosing icons is purely a matter of personal taste. Also, you can change the icons you see on your desktop at any time. Click OK after choosing the icons you want to see.

Figure 10.11 The Desktop Icon Settings dialog box.
Creating your own desktop icons
The Desktop Icons Settings dialog box shows only the few desktop icons built into Windows 10. Many programs you install create other desktop icons. You're also free to create your own desktop icons. Most desktop icons are just shortcuts to other places or programs.
Shortcut icons are unique in a couple of ways. For one, they show a little curved arrow like the example in Figure 10.12. For another, deleting a shortcut icon has no effect on the item that the shortcut opens. Instead, deleting a shortcut icon deletes only the icon. The program or folder to which the icon referred still exists. You can still open that item through a non-shortcut method.

Figure 10.12 A sample shortcut icon.
If you often go through a series of clicks or steps to open some item, creating a desktop shortcut makes opening that item quicker and easier. Go to the icon you normally click (or double-click) to open a program, folder, or document. Then right-click that icon and choose Send To ![]() Desktop (Create Shortcut).
Desktop (Create Shortcut).
Sizing, arranging, showing, and hiding desktop icons
You can size and arrange desktop icons as you see fit. First, minimize or close all open program windows so that you can see the entire desktop. Then right-click any empty area on the desktop and hover the mouse over the View menu.
The View submenu, shown in Figure 10.13, contains several options for arranging icons. An item on that menu that has a check mark is currently selected and active. An item without a check mark is deselected and inactive. Clicking an item selects it if it isn't already selected, or deselects it if it's selected. Here's what each option does:
- Large Icons: Shows desktop icons at a large size.
- Medium Icons: Shows desktop icons at a medium size.
- Small Icons: Shows desktop icons at a smaller size, similar to earlier Windows versions.
- Auto Arrange Icons: Choosing this option keeps icons neatly arranged near the left side of the desktop. If you clear this option, you can put desktop icons wherever you like. Just drag any icon to wherever you want to put it on the desktop.
- Align Icons to Grid: Choosing this option keeps icons aligned to an invisible grid. This option makes the spacing between the icons equal.
- Show Desktop Icons: If this option is selected (checked), desktop icons are visible. Clearing this option makes the desktop icons invisible. It doesn't delete them, however. They come back into view if you choose this option again.

Figure 10.13 The View submenu.
The Sort By option on the desktop shortcut menu lets you quickly sort icons by name, size, file extension, or date modified. Regardless of which option you choose, built-in icons are always listed first, followed by your own custom icons in whatever order you specified.
The remaining options are similar to their counterparts in folders. The Refresh option ensures that icons on the desktop are up to date with changes you may have made elsewhere in the system. If you accidentally delete a shortcut icon, you can choose Undo Delete (or press Ctrl+Z) to bring it back. The New option lets you create a new folder or document on the desktop. Personalize opens the Personalization page (refer to Figure 10.1).
Customizing icons
To change a built-in icon, open the Desktop Icon Settings dialog box (refer to Figure 10.11). Then click the icon you want to customize, and click Change Icon. To change the appearance of a shortcut icon, right-click it and choose Properties ![]() Change Icon. The Change Icon dialog box opens, displaying possible alternative icons. Figure 10.14 shows a general example.
Change Icon. The Change Icon dialog box opens, displaying possible alternative icons. Figure 10.14 shows a general example.

Figure 10.14 The Change Icon dialog box.
If you have your own .ico files and would prefer to use one of those, click the Browse button in the Change Icon dialog box. Navigate to the folder that contains the .ico file and choose the icon you want to use. Note that some .dll and .exe files also contain icons you can use.
Choosing a screen resolution
One of the changes you may want to make in Windows is to adjust your screen resolution. This setting determines how much of the desktop can fit on your screen. Resolution is measured in pixels, with each pixel representing a tiny, lighted dot on the screen. The higher the resolution, the smaller everything looks, and the more material you can get on the screen. To choose a resolution, right-click the desktop and choose Display Settings, then click Advanced Display Settings on the Display page. Doing so opens the Advanced Display Settings page shown in Figure 10.15.
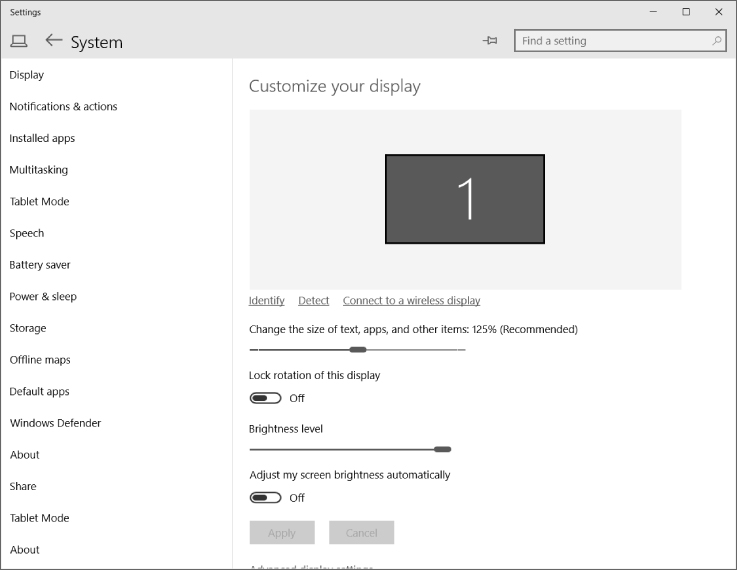
Figure 10.15 The Customize Your Display page.
Choosing a screen resolution setting is a trade-off. A high resolution is good because you can see more of the desktop on your screen. But a high resolution isn't good if things are so small on your screen that you can't see them. On the Advanced Display Settings page, click the Resolution drop-down list and then choose the resolution you want to use. You may need a little trial and error to find a setting that you like.
Choose a resolution (for example, 1920 x 1080) and then click or tap the Apply button. The new resolution is applied to your screen. If the screen goes blank, don't panic: You chose a setting that doesn't work. The setting will be undone automatically in about 15 seconds and everything will be okay again. To try a different resolution, choose another setting and click Apply again. When you find a setting you like, click OK.
Using multiple monitors
Windows 10 supports the use of multiple monitors in a variety of configurations. In many cases, adding a second monitor is a simple matter of connecting to the external monitor and turning it on. If the display supports Extended Display Identification Data (EDID), Windows detects it and adjusts the resolution automatically.
If the external monitor is a television set, you may need to connect, turn on the TV, and then use the Input Select or TV/Video button on the TV or remote control to select the external input (often shown as HDMI, AV1, PC, or Component on the TV screen). You can also add multiple video cards to the PC and connect a monitor to each one. Many newer display adapters support multiple monitors, so you can use a single adapter to drive more than one monitor. Another option is to use a docking station that supports multiple displays.
After you connect to an external monitor and configure it to show input from the plug to which you connected the computer, you can configure settings in Windows for the displays. Right-click the desktop and choose Display Settings to display the Customize Your Display page shown in Figure 10.16.

Figure 10.16 Display settings with two monitors working.
The Customize Your Display page shows the additional displays after you connect the other displays to the computer. The displays are identified by numbers. Click the Identify link to have Windows display a large number on the display to help you identify which is which.
The following list explains the controls on the Customize Your Display page:
- Identify: Click this button to display an identifying number on the displays so that you can tell which is which.
- Detect: Click this button to have Windows detect the new display.
- Connect to a Wireless Display: Click this link to connect to a wireless display.
- Lock Rotation of This Display: Set this option to On to prevent the selected display from automatically rotating when the device is rotated.
- Adjust My Screen Brightness Automatically: Set this option to On to allow Windows to automatically adjust the brightness of the selected display (if the device supports this feature).
- Multiple Displays: Choose Duplicate These Displays to display the same information on both displays. Choose Extend These Displays to extend the desktop across both displays. The other two options show the desktop only on display 1 or 2, depending on which you select.
- Make This My Main Display: Select this option to make the display number selected in the Display button the main display where the Start menu will appear.
You can also display content on the second monitor only, leaving the first monitor black. If you're using a mobile computer on batteries, this option conserves battery power.
You can use the Customize Your Display page to configure the second monitor. Open the page as described at the beginning of this section. Then click the second monitor's box (with the number 2 in it). If that second monitor is grayed out, choose Extend My Desktop onto This Monitor. Then, click Apply.
You can arrange the squares in the dialog box to match the arrangement of the monitors. For example, if monitor 2 is to the left of monitor 1, drag the 2 square to the left of the 1 square. If the monitors are stacked with 1 on top of 2, drag the 1 square so that it's above the 2 square.
Adjusting the font size (dpi)
Windows 10 lets you change the size of text and other items on the display, which can be particularly useful for high-resolution displays, making the screen more readable (which becomes more important as we get older!). To change text size, open the Customize Your Display page, and then use the slider control labeled Change the Size of Text, Apps, and Other Items to adjust the size.
The new setting will be applied after you log out and log back in again. If the items on your screen are too large, repeat the preceding steps, choosing a smaller size.
Adjusting the font size dpi isn't the only way to enlarge text on the screen. Many programs offer a Zoom option on their View menus that enables you to resize text. The Accessibility options described later in this chapter also offer some alternatives.
Personalizing your mouse
If you grow tired of the same old mouse pointer, or you need to make your mouse pointer easier to see, open the Start menu and choose Settings, then click or tap Devices, Mouse & Touchpad. You see the Mouse & Touchpad page shown in Figure 10.17.
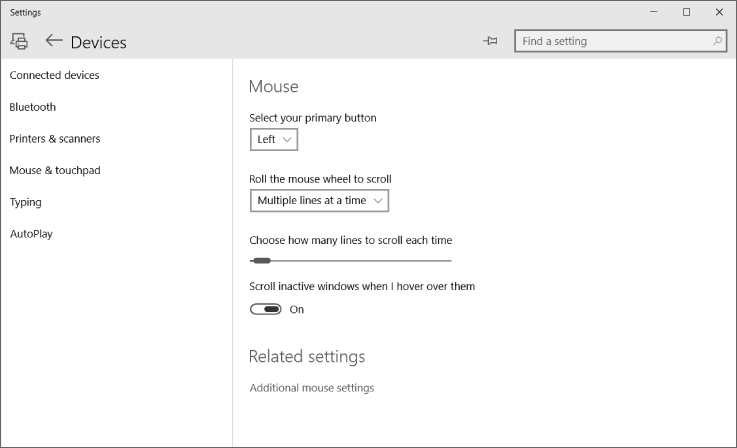
Figure 10.17 The Mouse & Touchpad page.
You can specify which button is primary (the button used to select items), whether to scroll by pages or lines using the mouse wheel, and how many lines to scroll at one time. In addition, you can turn on the ability to scroll a window without first activating that window (just hover the pointer over the window and use the mouse wheel to scroll).
You can also change advanced mouse settings. To do so, click the Additional Mouse Settings link, which opens the Mouse Properties dialog box. To change your mouse pointers, click the Pointers tab (see Figure 10.18) and choose a scheme from the drop-down menu. The list under the Customize heading shows you how the pointers in that scheme look. You can keep all the mouse pointers in the scheme by clicking OK, or you can assign a mouse pointer of your own. Double-click the pointer you want to change, or click it and click the Browse button. Clicking Browse takes you to a folder named Cursors, which contains all the built-in Windows 10 mouse pointers.

Figure 10.18 The Pointers tab in the Mouse Properties dialog box.
If you assign mouse pointers on a case-by-case basis, click the Save As button to save your selections as a theme with any name you like.
Mice for lefties
If you're left-handed and you want the main mouse button to be below your left index finger, you need to reverse the normal functioning of the buttons. Generally, the left mouse button is the primary button, and the right mouse button is the secondary button. To reverse that setup, open the Mouse page shown in Figure 10.17 and choose Right from the Select Your Primary Button drop-down button.
If you reverse your mouse buttons, you have to adjust all the standard mouse terminology accordingly. Table 10.1 shows how the various mouse terms apply to right-handed and left-handed settings.
Table 10.1 Mouse Terminology for Righties and Lefties
| Standard Terminology | Righties | Lefties |
| Primary button | Left button | Right button |
| Secondary button | Right button | Left button |
| Click | Left button | Right button |
| Double-click | Left button | Right button |
| Drag | Left button | Right button |
| Right-click | Right button | Left button |
| Right-drag | Right button | Left button |
Adjusting the double-click speed
To double-click an icon, you have to tap the primary mouse button twice very quickly. Otherwise, it counts as two single clicks. If you have trouble tapping the button quickly enough, or if you're so fast that two single clicks are being interpreted as a double-click, adjust the Double-Click speed slider on the Buttons tab of the Mouse Properties dialog box.
To test your current setting, double-click the folder icon. If the closed folder doesn't change to an open one (or vice versa), you didn't double-click fast enough. Move the slider box toward the slow end of the scale and try again. When the slider is at a place where you can easily open and close the little folder next to the slider, that's a good setting for you.
Using ClickLock
If you have difficulty selecting multiple items by dragging the mouse pointer through them, try activating the ClickLock feature. This feature lets you select multiple items without holding down the mouse button. First, choose Turn On ClickLock on the Buttons tab of the Mouse Properties dialog box. Then use the Settings button to specify how long you want to hold down the primary mouse button before the key is “locked.”
For example, turn on ClickLock and set the required delay to about one second. To drag the mouse pointer through some items, position the mouse pointer where you plan to start selecting and hold down the mouse pointer for one second. Then release the mouse button and move the mouse pointer through the items you want to select. Those items will be selected as though you were actually holding down the left mouse button.
When you've finished selecting, click some area outside the selection. The mouse pointer returns to its normal function, and the items you selected remain selected.
Speed up or slow down the mouse pointer
Selecting the Pointer Options tab in the Mouse Properties dialog box reveals the options shown in Figure 10.19. The first option, Select a Pointer Speed, controls how far the mouse pointer on the screen moves relative to how far you move the mouse with your hand. If you have difficulty zeroing in on small things on your screen, drag the slider to the slow end of the scale. If you feel you have to move the mouse too much to get from one place to another on the screen, move the slider toward the fast end of the scale.

Figure 10.19 The Pointer Options tab in the Mouse Properties dialog box.
Selecting Enhance Pointer Precision makes it easier to move the mouse pointer short distances. This feature is especially useful if you move the pointer speed slider to the Fast side of the scale.
Making the mouse pointer more visible
If you keep losing sight of the mouse pointer on your screen, the following pointer options can make finding it easier:
- Snap To: If selected, this option causes the mouse pointer to jump to the default button (typically the OK button) automatically as soon as the dialog box opens.
- Display Pointer Trails: If selected, this causes the mouse pointer to leave a brief trail when you move it, making it easier to see the pointer.
- Hide Pointer While Typing: Clear this check box if you don't want Windows to hide the mouse pointer while you are typing.
- Show Location of Pointer When I Press the CTRL Key: If you select this option, you can easily locate the mouse pointer on your screen by holding down the Ctrl key.
Another way to make your mouse pointer more visible is to use a large or animated mouse pointer.
Changing mouse wheel behavior
The Wheel tab in the Mouse Properties dialog box lets you control how far you scroll when spinning the mouse wheel (if your mouse has one). The default is usually three lines per notch. But you can change that to any value from 1 to 100 lines. Optionally, you can configure the wheel to move an entire page with each notch.
Don't forget to click OK after making your selection in the Mouse Properties dialog box.
Personalizing the Keyboard
Windows 10 offers several ways to change how the keyboard works. Some are in the Keyboard Properties dialog box, which we cover here. Others are accessibility features and are set using the Ease of Access Center in the Control Panel (not covered in detail in this book). To get to the Keyboard Properties dialog box, open the Keyboard item from the Control Panel (see Figure 10.20).

Figure 10.20 The Keyboard Properties dialog box.
No setting is right or wrong; you should choose settings that suit your typing style: The options in the Keyboard Properties dialog box are as follows:
- Repeat Delay: Determines how long you have to hold down a key before it starts autotyping (repeating itself automatically).
- Repeat Rate: Determines how fast the key types automatically while you're holding it down.
- Cursor Blink Rate: Determines how rapidly the cursor blinks in a document.
If your keyboard offers programmable buttons, you may not see any options in the Keyboard Properties dialog box for defining those keys. More likely, you need to install and use the program that came with the keyboard. Procedures for defining keys vary widely; consult the instructions that came with the keyboard or the keyboard manufacturer's website.
You can also change settings for the touch keyboard. To do so, open the Start menu and click or tap Settings, then click or tap Devices. Click or tap Typing to open the Typing page shown in Figure 10.21. The options on this page determine how Windows handles misspelled words.

Figure 10.21 The Typing page.
Customizing the Taskbar
The taskbar, which by default is at the bottom of your screen, is one of the most useful tools in Windows. It contains a button for each open desktop program window, icons for any programs that you've pinned to the taskbar, and the notification area. It can also contain some toolbars, such as the Address toolbar, which provides an easy way to open websites, drives, folders, or other items by their path or URL. You can customize the taskbar in many ways, so don't worry if your taskbar doesn't match what you see in this book.
Some options for customizing the taskbar are in the Taskbar Properties dialog box. To open that dialog box, use one of the following techniques:
- Right-click any empty spot on the taskbar and choose Properties.
- Tap the Windows key, type task, and click Taskbar and Navigation.
- In the Control Panel, choose Appearance and Personalization Taskbar and Navigation.
In the dialog box, select the Taskbar tab to see the options shown in Figure 10.22. The options on that tab are as follows:
- Lock the Taskbar: If you select this option, you lock the taskbar, which prevents you from accidentally moving or resizing it. If you want to move or resize the taskbar, deselect this option to unlock the taskbar.
- Auto-Hide the Taskbar: If you select this option, the taskbar automatically slides out of view when you're not using it, thereby freeing the little bit of screen space it takes up. After the taskbar hides itself, you can rest the tip of the mouse button on the thin line at the bottom of the screen to bring the taskbar out of hiding.
- Use Small Taskbar Buttons: Shows small icons rather than the larger, default-size icons for taskbar items.
- Taskbar Location on Screen: Choose on which edge of the display the taskbar will appear.
- Taskbar Buttons: Choose whether Windows combines similar items on the taskbar (such as documents for the same program), and whether it combines icons all the time or only when the taskbar is full.
- Notification Area: Click the Customize button to specify which items appear in the taskbar's notification area (also called the system tray).
- Use Peek to Preview the Desktop: Choose this option to hide all applications and show the desktop when you hover the mouse over the Show Desktop button at the far bottom-right of the display.

Figure 10.22 The Taskbar tab in the Taskbar and Start Menu Properties dialog box.
Click OK after making your selections from the dialog box. You can do some other things outside that dialog box to customize the taskbar, as described next.
Locking and unlocking the taskbar
The taskbar doesn't have to be at the bottom of the screen, and it doesn't have to be a particular height. When the taskbar is unlocked, you can move and size it at will. If the taskbar is unlocked, putting the tip of the mouse pointer at the inside edge (toward the center of the display) of the taskbar changes the pointer to a two-headed arrow. Additionally, if you have any toolbars on the taskbar, you see a dragging handle (columns of dots) next to each toolbar. When you right-click an empty area of the taskbar or the current time, the Lock the Taskbar option on the menu is deselected (see Figure 10.23).

Figure 10.23 An unlocked and expanded taskbar.
If the taskbar is locked, just right-click an empty area of the taskbar or the current time and click Lock the Taskbar to unlock. You can use the same procedure to lock the taskbar when it's unlocked.
Moving and sizing the taskbar
When the taskbar is unlocked, you can dock it to any edge of the screen as follows:
- Place the tip of the mouse pointer on an empty part of the taskbar (not in a toolbar or on a button).
- Hold down the left mouse button, drag the taskbar to any screen edge, and release the mouse button.
To change the height of the taskbar, put the tip of the mouse pointer on the top of the taskbar so that it changes to a two-headed arrow. Then hold down the primary mouse button and drag up or down until the bar is at a height you like. The minimum height is one row tall. The maximum is about half of the screen.
If you want to hide the taskbar altogether, select the Auto-Hide the Taskbar option in the Taskbar and Start Menu Properties dialog box, described earlier in this chapter. The taskbar stays hidden until you move the mouse pointer to the edge of the screen where you placed the taskbar.
Showing toolbars on the taskbar
Windows 10 comes with some optional toolbars you can add to the taskbar or allow to float freely on the desktop. To show or hide a toolbar, right-click the clock in the lower-right corner of your screen or an empty part of the taskbar and choose Toolbars. You see the names of toolbars shown in Figure 10.24 and summarized here.
- Address: Displays an Address bar like the one in your web browser. Typing a URL into the bar opens your web browser and the page at the URL.
- Links: Displays the contents of Internet Explorer's Links folder as a toolbar.
- Desktop: Shows all the icons from your desktop in a condensed toolbar format, along with OneDrive, Libraries, This PC, Network, Control Panel, and your user profile folder.
- New Toolbar: Create a custom toolbar containing icons from any folder you wish. For example, after choosing this option, click Documents under Libraries in the New Toolbar dialog box and click OK. The new toolbar that appears provides quick access to all your folders and documents in your Documents folder.

Figure 10.24 Show or hide optional toolbars.
On the Toolbars menu, any toolbar that has a check mark next to its name is “on” and visible in the taskbar. Any toolbar whose name isn't selected is hidden. Click a name to hide, or show, the toolbar.
When you first choose a custom toolbar, you may not have room for it on the taskbar, especially if the taskbar already has many buttons or other toolbars. The next section explains ways to deal with that issue.
Sizing and positioning taskbar toolbars
You don't have much room on the taskbar, so it gets crowded if you add too many items to it. If you use lots of optional toolbars on your taskbar, consider making it taller so that it can show more items. Try moving it to the side of the screen to see whether that helps.
When you have more items on a toolbar than it can show, you see the ≫ symbol at the right side of the toolbar. Clicking that symbol shows the items that don't fit onscreen. If you have more open program windows than space for taskbar buttons, use the up and down arrows to the right of the visible taskbar buttons to see additional buttons.
When the taskbar is unlocked, you see a dragging handle at the left side of each toolbar. You can drag those handles left and right to move and size toolbars. You can also show or hide the toolbar titles. Figure 10.25 shows an example of the titles, a handle, a resize cursor, and taskbar scrolling arrows.

Figure 10.25 Taskbar and toolbar handles, titles, resize cursor, and scrolling arrow button.
To show or hide the title or text, right-click the toolbar's title or dragging handle. Then choose Show Title to show or hide the toolbar's title. Click Show Text to show or hide text for icons on the toolbar.
Customizing the Notification Area
The notification area (also called the system tray) appears at the right side of the taskbar. It contains icons for programs and services that are running in the background, which means they typically don't have program windows or taskbar buttons associated with them. Icons in the notification area represent features such as your antivirus software, volume control, network connection, and Windows Sidebar. Pointing to an item displays its name or other information.
To conserve space on the taskbar, you can hide nonessential or inactive icons. When you have hidden items, you see a small up-facing arrow at the left side of the notification area, as shown in Figure 10.26. Click the arrow button (labeled Show Hidden Icons) to see the hidden items.

Figure 10.26 The notification area.
To customize the notification area icons, open the Notifications and Actions page of the Settings app, and then click or tap the Turn System Icons On or Off link to see the options shown in Figure 10.27.

Figure 10.27 The Turn System Icons On or Off page.
Use the buttons to show or hide the Clock, Volume, Network, Power, Action Center, Location, and Input Indicator icons. Any items that are disabled (dimmed) aren't relevant to your system, so don't worry about those.
Getting rid of notification area icons
You cannot delete a notification area icon by right-clicking and choosing Delete. Unlike toolbar icons, icons in the notification area are not shortcuts for opening programs. Icons in the notification area represent programs that are already running — even though they may be running in the background with nothing showing on the screen.
Getting rid of a notification area icon isn't easy. Hundreds of programs on the market can run in the background and thus can show up in your notification area. To remove such an icon, you may need to prevent that program from auto-starting with your computer, or you may need to remove the program from your system altogether. In some cases, you can simply go to the program's Options dialog box and deselect the check box that makes the program show a notification area icon.
One thing's for sure: You shouldn't delete anything from the notification area unless you know exactly what you're deleting and why. For example, an icon may represent your virus or spyware protection. You shouldn't delete such programs, or prevent them from auto-starting, because you need them running in the background to keep your computer secure.
To see what options are available for a notification area icon, right-click the icon. Some programs that run as icons in the notification area can show up on the screen in a program window. Double-clicking a notification area icon usually opens the program that the icon represents. If the program has a menu bar, choosing Tools — Options may take you to a dialog box where you can prevent the program from auto-starting or prevent it from showing up in the notification area.
If the notification area icon represents a program you don't want on your system at all, you can remove the program through Control Panel. Just make sure you don't remove a program you need.
If you want to keep a program but also want to prevent it from auto-starting — and you can't find a way to do that from within the program — other solutions are available. If the program has an icon in your Startup folder, you can remove that icon from that folder. Or you can use the System Configuration tool in the Administrative Tools folder to disable auto-starting of the program.
Tweaking the clock
The clock in the lower-right corner of the screen may look basic, but it's quite useful. If you point to the clock, you see the current date. If you click the clock, you see the current date marked on a calendar and the time on a clock face. If you right-click the time and choose Adjust Date/Time, you come to the page shown in Figure 10.28. There, you have several options.

Figure 10.28 Date and time properties.
You can allow Windows to automatically set the date and time by synchronizing with the time servers on the Internet. The default value for Set Time Automatically is On. Set this to Off if you do not want Windows to automatically synchronize the time and date. If this setting is turned off, you can click the Change button to set the date and time manually.
Use the Time Zone drop-down list to choose your time zone, and use the option Adjust for Daylight Saving Time Automatically if you want Windows to adjust the clock when daylight saving time is in effect.
The Formats settings show the format used by Windows for dates and times, and also specifies the day that Windows will use as the first day of the week. If you want to change these, click the Change Date and Time Formats link to open a page where you can set these values.
Finally, if you want to configure other settings, such as changing your location or adding additional time zones to be displayed in the clock, use the links in the Related Settings group (not shown in Figure 10.28) to do so.
Wrapping Up
This chapter has been all about the many ways you can customize the Windows desktop, Start menu, and taskbar to set up your screen in a way that works for you. You have many options. The important thing to keep in mind is that they are options, and no setting is right or wrong. You should make the choices that work best for you. Here's a quick recap of the essentials:
- The Windows desktop is your entire screen — the place where you do all your work.
- Many tools for personalizing your system are in the Personalization page of the Control Panel. To get there quickly, right-click the desktop and choose Personalize.
- To personalize your taskbar, right-click the taskbar and choose Properties.
- To add or remove taskbar toolbars, right-click the clock and choose Toolbars.
- To show or hide notification area icons, right-click the clock and choose Customize Notification Icons.