
Chapter 17
Working with Pictures
In the computer world, the terms picture, photo, image, graphic image, and digital image all refer to the same thing — a still picture. Windows 10 offers lots of great tools for organizing, editing, printing, and e-mailing pictures.
Today's hard disks have room to store many thousands of photos. The Photo Gallery, an optional add-on for Windows, provides an easy way to organize and find photos based on keywords called tags. The Edit tab in Photo Gallery makes common tasks such as cropping and red-eye removal a breeze.
Much of this chapter focuses on Photo Gallery as the primary tool for managing photos. You can download Photo Gallery from http://windows.microsoft.com/en-us/windows-live/photo-gallery and click the Learn More button under Edit Your Photos Like a Pro. Next, click United States (or your country name) under the Worldwide Downloads section to run the wlsetup-web.exe program to download Photo Gallery as part of the Windows Essentials programs.
Getting Pictures into Your Computer
You can acquire pictures to use in your computer in several ways. You can store pictures in any folder you like. If you don't have a preference, use the Pictures folder for your user account. You can always move or copy the pictures to another location later, should the need arise.
Getting pictures from a digital camera or smartphone
Before we tell you how to get pictures from a digital camera or smartphone, you should understand that we're talking about the digital devices that connect through a USB cable and appear as a USB mass storage device, or your camera's SD card, which you can insert into a compatible SD slot on your computer. Many smartphones and digital cameras also have wireless connectivity features to enable you to transfer photos from your device to your computer. If the method described doesn't work for your camera, refer to the manual that came with that camera for details. You may have to install and use the software that came with your camera to get pictures from it, but the following steps work with most modern digital cameras:
- Use a USB cable to connect your camera or smartphone to your computer and turn on the camera smartphone. In this example, we have connected an Apple iPhone smartphone to our computer to download photos from the smartphone to the computer.
- Wait a few seconds, and then:
- If you see an auto start dialog box like the one in Figure 17.1, click Import Photos and Videos. Then skip to Step 4.
- If nothing happens within a minute or so of connecting your device and turning it on, open Photo Gallery. Choose File
 Import Photos and Videos. Then click the icon for your device and click Import.
- Click Import All New Items Now and enter a tag (keyword) that will later help you identify pictures. For example, enter the event, location, or subject of the photos.
- Click Import.
- The next dialog box keeps you apprised of the progress. See Figure 17.2.
- When copying is finished, turn off and disconnect the device (camera or smartphone).

Figure 17.1 AutoPlay options for a digital camera.

Figure 17.2 Importing pictures from a camera phone.
Depending on your camera or smartphone and the types of pictures (and videos) you imported, Photo Gallery may open and display thumbnails of your pictures. However, the pictures aren't actually stored in Photo Gallery, so don't worry if you don't see them there. The pictures are actually in your Pictures folder as described in the section “Using your Pictures folder” later in this chapter.
Getting pictures from a memory card
If you have pictures on a memory card, and your computer has slots for those cards or a card reader attached, you can copy pictures directly from the card. After you've inserted a memory card into a slot, the card is basically the same as any external disk drive. You can use all the standard techniques discussed in Chapter 21 to move, copy, and delete files as you see fit.
Exactly what happens on your screen after you insert a memory card depends on your auto start settings for cards. See Chapter 31 for more information on auto start. Regardless of what happens after you first insert a card, you can always get to its contents through your Computer folder. Here's how:
- On the Smart menu, click File Explorer, and then click This PC.
- If necessary, scroll through your removable drives. If you have multiple card slots, look for the one that shows a specific name. For example, in Figure 17.3, drive
E:is a slot that contains a memory card labeled Photos. - Open the card's icon. Then navigate through folders on the card until you find the icons that represent pictures.
- Select the icons for the pictures you want to copy, or choose Home Select All (or press Ctrl+A) to select them all.
- Drag or copy and paste the selected icons to your Pictures folder and ignore the
following steps. Optionally, use the following steps to copy without dragging or using the copy-and-paste method.
- Display the ribbon. Choose Home Copy from the menu (or Cut if you want to delete the pictures from the memory card).
- Open the destination folder for the images and press Ctrl+V to paste them into the folder.

Figure 17.3 Drive E: contains a memory card.
The pictures are copied to the destination folder. You can close the folder that's open and remove the memory card. Open the destination folder to see the copied pictures.
Getting pictures from a CD or DVD
You can store pictures and copy them in many ways on CDs and DVDs. If someone sends you a CD or DVD that contains only pictures, you likely see a prompt on the screen shortly after you put the disk into your drive. A simple way to import the pictures from that prompt is to click Import Using Windows Picture and Video Import. Then follow the instructions that appear on the screen. If you're prompted to enter a tag, type in any word or short phrase that describes the pictures. All the pictures will be copied (imported) to your Pictures folder, where you can access them at any time without using the CD or DVD. But you should keep that disk as a backup.
Some commercial CDs automatically launch a program when inserted. That may leave you wondering how you're going to copy pictures from the disk to your computer. The trick is to simply close that program and get to the CD's contents directly. The process goes something like this:
- Insert the disk into your CD/DVD drive and wait a few seconds. Then:
- If an auto start dialog box asks what you want to do with the disk, click Open Folder to View Photos and go to Step 3.
- If a program opens automatically to show the pictures, close that program and go to Step 2.
- If nothing at all happens within a minute or so of inserting the disk, continue with Step 2.
- Open File Explorer and right-click the icon that represents your CD/DVD drive and choose Open. Now you're viewing the contents of the CD.
- If necessary, navigate through any folders you find until you find icons for the pictures.
- Select the icons for the pictures you want to copy. Select the Home tab and click Select All, or press Ctrl+A to select them all.
- Drag or copy and paste any selected icon to the Pictures folder in the Navigation pane. Make sure you get the mouse pointer right on that Pictures folder icon so that you see Copy to Pictures near the mouse pointer. Then release the mouse button.
- Wait for all the pictures to copy and then remove the CD from the drive.
You won't need the CD to access those pictures anymore. You can access them directly from your Pictures folder. But keep the CD as a backup, in case you accidentally delete or destroy any of the copied pictures.
Getting pictures from a scanner
To get photographs on paper into your computer, you use a scanner. Optionally, you can use a film scanner or slide scanner to get pictures from film or slides, but those are a bit more expensive than traditional paper scanners.
The first step is, of course, to install the scanner and any required software according to the instructions that came with the scanner. The second step is to read the instructions on how to operate your scanner. The steps we provide here work with most, but not all, scanners and different products may require different steps. So, if all else fails, read the instructions that came with your scanner to understand the product you own.
The standard operating procedure for modern scanners goes like this:
- Turn on the scanner and put in the picture you want to copy.
- Start Photo Gallery.
- Click the File toolbar button and choose Import.
- In the Import Photos and Videos dialog box that opens, click the scanner's icon and click Import.
- Select the scan settings from the options provided as summarized in the following list:
- Paper Source: Select the type of scanner you have (flatbed, feeder, or film scanner).
- Paper Size: If you're using an automatic document feeder to scan multiple items, select the size of the paper you're scanning. Otherwise, leave this empty.
- Color Format: Choose Color, Grayscale, or Black and White.
- File Type: Choose a file format. Bitmap Image offers the highest quality at the cost of a large file size. Also, bitmap is an older format that doesn't support tagging and metadata as well as newer formats. You're better off using JPEG or PNG for a photo. Use Microsoft Document Imaging File only for text documents, not photos.
- Resolution (DPI): Select your resolution, measured in dots per inch (DPI). The larger the DPI, the better the quality of the scanned image, but the larger the file is. Your best bet for color photos is 300 DPI. Use 75 DPI only for black-and-white text documents. The 150 DPI setting is okay for photos you don't intend to print. You can't change resolution after scanning, but you can rescan the item.
-
Brightness and Contrast: Use these, if necessary, to enhance the picture's brightness and contrast. You need to do a preview scan to see the effects of any changes you make.
Optionally, if you plan to scan more pictures at the current settings, click Save Profile and give your profile a name.
- Click Scan.
When the scan is complete, the picture appears in the Photo Gallery. The actual picture file is in your Pictures folder.
Using pictures you get by e-mail
Pictures that are embedded in, or attached to, e-mail messages you receive don't show up in Photo Gallery at first. You need to save the pictures to your Pictures folder if you want to access and edit them using techniques described in this chapter.
Exactly how you save attachments and embedded pictures depends on your e-mail program. For most e-mail clients, simply right-click the attachment's icon and choose Save As. If the picture is visible in the body of the message, right-click the picture and choose Save Picture As. However, keep in mind that all e-mail clients and systems are different. If you can't figure out how to save attachments or pictures in your e-mail, search your ISP or e-mail provider's e-mail support for attachment, or contact its technical support.
Copying pictures from websites
Millions of pictures exist on the Internet. You can often find the perfect picture by going to a site like www.bing.com/images and searching for an appropriate word or phrase.
If you find a picture you can use (and you're not infringing on anyone's copyright), you can store a copy of the picture in any folder of your choosing. If the picture you see on the screen is a link to a larger copy of the image, click to get to the larger copy of the picture. Then use whatever options your web browser provides to save a copy of the picture. Here are the steps for Microsoft Edge, the web browser that comes with Windows 10:
- In Microsoft Edge, right-click anywhere on the picture you want and choose Save Picture (see Figure 17.4).
- Click Pictures in the Navigation pane. Of course, you can choose some other folder if you prefer. For example, double-click any subfolder icon in the main pane to store the picture in that subfolder. You can also perform other tasks, including the following:
- To put the picture in a subfolder of the folder you just opened, double-click that subfolder's icon.
- Change the filename of the picture to a filename of your own choosing.
- Click to the right of the Save As Type label and choose a format. (JPEG works best if you plan to use Photo Gallery.)
- Click Save.

Figure 17.4 Saving a picture.
A copy of the picture is saved in whatever folder you specified in Step 2.
Copy and paste pictures
You can copy an open picture from just about any document to any document that accepts pictures. For example, you can copy and paste a picture from a web page to a Microsoft Word document. You just have to make sure the picture is open (not just an icon or thumbnail). To copy and paste an open picture:
- Right-click the picture and choose Copy.
- Right-click where you want to put the picture and choose Paste.
You can use the same technique to make a copy of a picture within a folder or Photo Gallery. Right-click the icon or thumbnail of the picture you want to copy and choose Copy. Then right-click some empty place within the folder (perhaps after the last icon) and choose Paste. The copy will have the same filename as the original, followed by –Copy.
Taking screenshots
A screenshot is like a photo of something you see on your screen. Most of the pictures in this book are screenshots. You can create screenshots in Windows 10 in two ways. One is to use the Snipping Tool. The other is to use the Print Screen key.
The Print Screen key gets its name from the early days of computers where pressing it actually printed whatever was on your screen at the moment to paper. It hasn't worked that way in a long time. Today the Print Screen key takes a snapshot of the screen and puts it on the Windows Clipboard where it sits waiting for you to paste the Clipboard contents (or until you copy or cut something else to the Clipboard). You can use the Print Screen key in three ways:
- Print Screen: Takes a snapshot of the entire screen.
- Alt+Print Screen: Takes a snapshot of the active window only.
- Windows+Print Screen: Takes a snapshot of the entire screen, saves it to the PictureScreenshots folder, and names it using the format
Screenshot.png,Screenshot (2).png,Screenshot (3).png, and so on.
To make a screenshot, get the screen looking the way you want. Then follow these steps:
- Press Windows+Print Screen, Print Screen, or Alt+Print Screen.
- Open your favorite graphics program. If you don't have one, use Cortana and type Paint to open Paint (which comes with Windows 10).
- Choose your program's Paste command (usually located in the Edit menu, or for Paint, on the Home toolbar), or press Ctrl+V. The screenshot is pasted into the program.
- Exit Paint or your graphics program by clicking the Close (X) button.
- When you see a message asking if you want to save your changes, click Yes. The Save As dialog box opens.
- In the Save As dialog box, type a filename of your own choosing.
- The Save location should already be your Pictures folder (for example,
C:UsersYour User NamePictures). If it isn't, navigate to your Pictures folder (or the folder in which you want to store screenshots). - Set the Save as Type option to PNG or JPEG unless you have a good reason for using a different format.
- Click the Save button.
Nothing appears on your screen to indicate that the screenshot has been saved. But rest assured, the screenshot is saved as a file in whatever folder you specified in Step 7, with whatever filename you specified in Step 6. If you chose your Pictures folder in Step 7, you'll find the file when you open your Pictures folder, described next.
Using Your Pictures Folder
The Pictures folder, as its name implies, is the place to store pictures. Many of the techniques described in the preceding section put pictures in that folder automatically. To view pictures, open your Pictures folder using whichever technique is most convenient at the moment:
- Using Cortana, type pictures and click Pictures (see Figure 17.5).
- Click Pictures in File Explorer's Navigation pane (see Figure 17.6). In this example, we've included a subfolder named Golf Outing Photos that enables us to organize our pictures even further.
- Click your username in a breadcrumb menu and choose Pictures (see Figure 17.7).

Figure 17.5 The Pictures options from Search.

Figure 17.6 The Pictures link in the Navigation pane.

Figure 17.7 The Pictures link from a breadcrumb menu.
Your Pictures folder opens in File Explorer and is no different from any other folder. You can use all the tools and techniques described in Chapters 20 and 21 to size and arrange icons, hide and show panes, and so on.
Pictures that you copied from a camera or scanner will likely be stored in subfolders. The name of the subfolder is the same as the date on which you acquired the pictures, followed by any tag word you added. Figure 17.8 shows an example.

Figure 17.8 The Pictures folder.
When you open a subfolder that contains pictures, you see a thumbnail icon for each one. The size of that thumbnail and the amount of textual information shown with each depends on where you place the Views slider in the toolbar. If the Preview pane is open, pointing to a thumbnail displays an enlarged copy of the thumbnail. Figure 17.9 shows an example. To choose which panes you want to show or hide, click the View toolbar and make your selections in the Layout area.

Figure 17.9 A folder of pictures.
Pictures folder quick tips
Here are some quick tips that apply to most folders, with a few things that are unique to your Pictures folder:
- If your mouse has a wheel, hold down the Ctrl key while spinning the wheel to size thumbnails and change views.
- Drag the inner border of the Navigation or Preview pane to widen or narrow the pane.
- To open a subfolder, click (or double-click) its icon. To leave a subfolder, click the Back button or press Backspace.
- To rotate a picture, right-click its thumbnail and choose Rotate Right or Rotate Left.
- To preview a larger version of a picture, click (or double-click) its thumbnail.
- To view all the pictures in the folder as a slideshow, click the Slide Show toolbar button on the Manage tab.
- Right-click any thumbnail icon for a shortcut of things you can do with that item.
- Use standard techniques described in Chapter 28 to select multiple icons that you want to print, copy, and so forth. To select all icons, choose Home Select All or press Ctrl+A.
- To e-mail pictures using a default e-mail program installed on your computer, select their thumbnail icons. Then click the E-mail toolbar button on the Share tab.
- Click Burn to Disc on the Share tab to copy all pictures in a folder to a writable CD or DVD. To copy only specific items, select their icons and click Burn.
- Right-click any column heading in Details view to choose which columns you want to show or hide.
- Click any column heading to sort thumbnails into ascending or descending order by Name, Date Taken, Rating, or any other heading.
- Click the arrow next to any column heading, as in Figure 17.10, or right-click empty space between icons to arrange or sort by Name, Date, Type, Size, or Tags.
- When the Details pane is open, you can use it to add a tag or title to any selected pictures or multiple selected pictures.
- If you have multiple programs that can open a picture type, right-click the thumbnail and choose Open With to open the picture in whatever program you like, or choose a program name from the Preview toolbar button.
- To show or hide the ribbon bar, click the Minimize the Ribbon or Expand the Ribbon arrow on the right side of the menu bar. You also can press Ctrl+F1 (see Figure 17.11).

Figure 17.10 Grouping options.

Figure 17.11 Minimizing the Ribbon.
Why some pictures show icons
Not all file types show as pictures in your Pictures folder. Some, such as videos you import from a camera in MP4, MOV, or some other format, show only icons. For example, in Figure 17.12, the last icon is a video stored in a Flash video (.FLV format).

Figure 17.12 The icon for a Flash video.
If you have an appropriate player for a file type, you can open it by double-clicking. For example, if you have the Applian FlvPlayer program (available for free from http://applian.com/flvplayer/, you can double-click any Flash video icon to watch it.
If you want to be able to see the thumbnail of a picture or icon, you have to convert the image or video to a compatible format like JPEG (for a picture) or WMV (for a video). For a single picture, you can often achieve this by opening the picture in a graphics program. If you don't have a favorite graphics program, you can use Paint (right-click any picture and choose Open With ![]() Paint). From the menu bar in your graphics program, choose File
Paint). From the menu bar in your graphics program, choose File ![]() Save As. Use the Save as Type option in the Save dialog box to save the picture as a JPEG or another compatible format and click Save.
Save As. Use the Save as Type option in the Save dialog box to save the picture as a JPEG or another compatible format and click Save.
Some graphics programs, such as Corel's Paint Shop Pro, let you convert a whole group of pictures from one format to another instead of changing them one at a time. You can also go to any online shareware service such as http://www.tucows.com/downloads or http://download.cnet.com/windows and search for “convert picture” to find programs that specifically offer batch conversions. Search for “convert video” for programs that can convert videos.
Videos in your Pictures folder
If your digital camera lets you shoot video clips, those will be imported along with your still pictures. If the video is in a compatible format, its thumbnail shows the first frame of the video. It also shows a film-like border and the icon of the default program for playing that type of video.
When you select a video thumbnail, the Preview pane turns to a small video screen with controls that work like a DVD player. Figure 17.13 shows an example with a video selected. The video preview pane to the right shows the first frame of the video. To watch the video in that preview, click the Play button under the video.

Figure 17.13 A video thumbnail icon selected.
When the video starts playing, you can click the Full Screen button under the preview window to watch it full-screen. Click anywhere on that full-screen video to return to the desktop and your Pictures folder.
Renaming pictures and videos
Pictures and videos from digital cameras or smartphones often have obscure meaningless filenames like 100_9630 or DCM1234. You can change the name of any file by right-clicking its thumbnail and choosing Rename. The current filename is highlighted.
Type the new name. (Be careful not to change the extension that comes after the period.) Then press Enter. If you renamed one file, only that file's name is changed. If you renamed several files, they all now have the same name followed by a number; for example, Swans (1), Swans (2), Swans (3), and so on.
If you change your mind after renaming, press Undo (Ctrl+Z). But you have to do it immediately after pressing Enter. If you move on to other tasks, you may not be able to undo the rename.
You can do much more with pictures and videos than look at them in your Pictures folder. Next, we take a look at Photo Gallery, a handy tool that you can download from Microsoft to use with Windows 10.
Using Photo Gallery
Photo Gallery is a program that helps you bring together pictures and videos from all the subfolders in your Pictures folder. The program is not included with Windows 10, but you can download it from http://windows.microsoft.com/en-us/windows-live/photo-gallery.
Photo Gallery isn't a folder where you store files. Instead, it's a way of to organize and access files without navigating around multiple folders. For example, you can view all your photos at once, regardless of what folders they're in. Or better yet, you can locate and work with pictures that have certain things in common, such as all the pictures of your child (if you're a parent).
The only disadvantage of Photo Gallery is that it doesn't show icons for all pictures and videos. Anything that doesn't show a thumbnail in your Pictures folder doesn't show up at all in Photo Gallery! Photo Gallery shows thumbnails for BMP, JFIF, JPEG, PNG, TIFF, and WDP photos and WMV, AVI, ASF, and MPEG movies.
The easiest way to understand what Photo Gallery is all about is to fire it up and take a look for yourself. Use whichever method shown here is easiest for you:
- Click Photo Gallery on the Start menu.
- In the Cortana search field, type gal, and click Photo Gallery.
Figure 17.14 shows how Photo Gallery may look when you first open it. Of course, the pictures you see are your own (if you have any). Also, you may be prompted to associate various file types with Photo Gallery. If so, select the file format(s) you want associated with Photo Gallery.

Figure 17.14 Windows Photo Gallery.
As with any program window, you can minimize, maximize, move, and size Photo Gallery to your liking (although there is a limit to how small you can make it). Photo Gallery has its own Help. Click the blue Help button at the right side of its toolbar to open Help (or press F1 if Photo Gallery is the active window).
Choosing what to view and how
The Photo Gallery can show you all the photos and videos on your hard drive (or multiple hard drives), or it can show only certain ones. To get started, you need to see everything that's in the Photo Gallery right now. To do that, click All Photos and Videos at the top of the Navigation pane. If you just want to see pictures, click Pictures under the All Photos and Videos heading. If you just want to see Videos, click Videos under that same heading.
The gallery to the right of the Navigation pane shows a thumbnail for each photo and video currently in the gallery.
Use the slider at the bottom of the Photo Gallery window to change the size of the thumbnails. The button to the left of the slider lets you choose between Details view and regular thumbnail view. Details view shows the filename, date taken, file size, rating, and other details about each image.
To group or arrange pictures in the gallery, right-click in the right pane and choose View, Group By, or Sort By and whatever option best describes how you want your pictures organized.
Also in the context menu when you right-click is a Table of Contents option. Clicking that opens a Table of Contents pane to the left of the Thumbnails. The Table of Contents works in conjunction with the current Group By option on the Thumbnail View button. For example, if you group by Month, the Table of Contents lets you jump to all pictures taken in a specific month and year. If you group by Image Size, the Table of Contents provides links to large, medium, and small pictures, and so on.
Go ahead and play around with those buttons and options for a while. You can't do any harm. But some of the grouping and arranging options don't have any real effect until you've built a sizable collection of pictures. Remember that anything you choose now you can change at any time in the future. You're not making any long-term commitments while experimenting with views and arrangements.
Photo Gallery quick tips
Following are some other good things to know:
- Rest the mouse pointer on any thumbnail to see a larger view of the picture.
- To rotate a picture, right-click it and choose a Rotate option.
-
Select the View tab and then click the Tag and Caption pane. Next, click any
picture to see its information in the Tag and Caption pane on the far right where you can add tags, captions, and geotags (tags that include geographical information, such as the location where a photo was taken).
- Double-click any picture to preview it at a larger size and view options for adjusting the photo's image properties. Click Close File to leave the preview.
- Click View Slide Show to watch a slideshow.
- To open a picture or video in a program, right-click its thumbnail, click the Open With option, and choose a program.
- Click the File button and choose Import Photos and Videos to import pictures from a digital camera or scanner.
- To print selected pictures, choose File Print and then select a printing option. (See “Printing Pictures” later in this chapter for details and options.)
- To open the folder in which a picture is contained, right-click its thumbnail and choose Open File Location.
If any item listed doesn't work for you, see the section “Choosing Photo Gallery options” later in this chapter.
Selecting thumbnails in the Gallery
As in folders, you can select multiple thumbnails in Photo Gallery. This can be handy when you want to apply a similar rating, tag, or caption to pictures, or when you want to create a slideshow from several pictures, print several pictures, and so on. You can use the same techniques you use in folders to select thumbnails in the gallery.
In addition to the standard methods of selecting thumbnails (and icons), you can select multiple thumbnails by clicking their check boxes. Any thumbnail that has a check mark is selected. Any thumbnail that doesn't have a check mark is unselected.
To select all the pictures in the gallery, click any single picture and press Ctrl+A, or right-click some empty space just outside the thumbnails and choose Select All. If you want to select most (but not all) of the pictures, select them all first. Then Ctrl+click the pictures you want to deselect, or clear their check boxes.
Dating, rating, tagging, and captioning
Tagging is one of the biggest advantages to having all your pictures in Photo Gallery. A tag is simply a keyword or phrase that you make up to identify pictures — for example, the location where the picture was shot, the subject of the picture, or the names of people in the picture. You can apply as many tags as you want to a picture, and you can add, change, or delete tags at any time.
Rating allows you to rate photos on a scale of one to five stars based on how much you like the picture. Captions allow you to title pictures with words of your own choosing. Use the Info pane to rate, tag, and caption pictures.
First, click the thumbnail picture that you want to rate. Or, if you want to apply the same rating, tags, or caption to multiple pictures, select all their icons. Then:
- To rate the selected picture(s), choose View Rating, and click any star near the bottom of the picture (see Figure 17.15). To give a zero rating, click a star, and then click it again.
- To tag the selected picture(s), choose View Tag and Caption Pane, click a picture, and then click Add Descriptive Tags under the Descriptive Tags item. Type one tag (preferably a single word or two) and press Enter. Optionally, type more tags in the same manner, pressing Enter after each tag.
- To caption, click Add Caption, type a caption in the Add a Caption box, or replace the text that already appears there with a caption of your own.
- Optionally, if you want to change the date or time that the picture was taken, click the current date and time shown above the Ratings stars.

Figure 17.15 The Tag and caption pane.
Filtering pictures
The coolest thing about tagging pictures is that it makes finding pictures in the future very easy. This technique is especially useful after you've accumulated hundreds or thousands of pictures and don't want to dig through folders to find the ones you want.
To see all pictures to which you've applied a tag, right-click in the Content pane, choose Group By, and then click Tag. Figure 17.16 shows an example sorted by Golf. The gallery at the top shows all photos tagged with the word Golf; the photos below are not tagged.

Figure 17.16 Viewing all pictures tagged “Golf.”
To see pictures that contain multiple tags, use the Text Search tool. Choose Find ![]() Text Search to open the Search By bar. For example, suppose you entered the word nature as tags for dozens of photos. But you also entered the term vacation for only three of those photos. In the Search By bar, if you type nature vacation and press Enter, you see only the three photos that match both tags.
Text Search to open the Search By bar. For example, suppose you entered the word nature as tags for dozens of photos. But you also entered the term vacation for only three of those photos. In the Search By bar, if you type nature vacation and press Enter, you see only the three photos that match both tags.
To see all pictures to which you haven't yet applied any tags, click Find and then click the down arrow on the Tags button. Click Not Tagged near the bottom of the tag list. From there, you can start adding tags to any pictures that appear in the gallery.
To see all the pictures you took in a certain year, month, or day, select the Find tab and click Dates, Months, or Years. To see all the pictures to which you've applied a rating (or no rating), click an option under the Rated heading.
To search for pictures or videos by name, tag, or other keyword, first click All Photos and Videos at the top of the Navigation pane. Select the Find tab, and then click Text Search and type a word in the Search box. You can also narrow the search by first clicking Pictures, Videos, a tag, a year, or other criteria to reduce the number of items in the gallery. Your next search searches only within items currently in the gallery.
Changing tags
Tags are flexible. You can add, rename, and change them at will. To change the spelling of a tag, right-click it in the Navigation pane and choose Rename. Type the corrected name and press Enter. The spelling is automatically corrected in every picture that contains that tag.
To delete a tag from a single picture without removing the tag from any other pictures, first select the picture's thumbnail. Or if you want to delete the tag from a few pictures, select their thumbnails. Then right-click the tag you want to remove and choose Delete. Note that deleting a tag does not delete any pictures. It simply removes the tag from any pictures to which you previously applied the tag.
Use a picture as your desktop background
If you have a favorite photo you'd like to use as a desktop background, right-click its thumbnail and choose Set as Desktop Background.
If you can't see the desktop, right-click the taskbar and click the Show the Desktop option. Click the Windows Photo Gallery taskbar button to bring Photo Gallery back onto the desktop.
Adding pictures to Photo Gallery
Photo Gallery doesn't scan your entire hard disk for photos. By default, it includes only pictures from the Pictures folder in your user account. If you have pictures in other folders, you can add them to Photo Gallery in several ways. If the pictures are in some arbitrary location where they just happened to end up, consider moving them to your Pictures folder. Use any technique described in Chapter 21 to move and copy files.
If the pictures are in some other folder for good reason, you can add that folder to Photo Gallery. This has no effect on the pictures or the folder, so you won't mess up your existing organization. To add a folder to the Photo Gallery:
- Select the File tab and choose Include Folder.
- Navigate to any folder that contains pictures and videos you'd like to include in your gallery and click OK.
Repeat Steps 1 and 2 for each folder you want to add. As you add new pictures to those folders in the future, they show up automatically in Photo Gallery.
Use your Photo Gallery as a screen saver
To use photos in your Photo Gallery as a screen saver, select the File tab and choose Screen Saver Settings. Set the Screen Saver name to Photo Gallery. Then click the Settings button. You can choose to show all photos and videos or narrow the selection to a specific folder. If you like, you can also narrow the selection to pictures that have a certain tag or rating, and exclude files with particular tags. You can also set the general speed of the screen saver slideshow. Select Shuffle Contents to randomize the photo and video selection. Click Save after making your selections. Click Preview for a preview of how the screen saver will look. Click OK when you're happy with your selections to return to Photo Gallery.
Fixing photos
Photo Gallery comes complete with a simple graphics editor specifically designed to work with photos. The editing tools are located on the Edit tab (see Figure 17.17), and you can get to it by clicking a thumbnail and then clicking the Edit tab.

Figure 17.17 The Edit tab.
Before you try anything, notice the Undo button at the top of the Photo Gallery window. If you don't like the results of a change, click this button to undo the change. If you change your mind after Undo, click Redo to bring the change back. When you point to Undo and Redo after making changes to a picture, you see a little arrow on the button that you can click to undo only one change or all changes. The buttons are disabled (dimmed) when there's nothing to undo or redo. You also can use the Revert to Original button on the Edit tab if you want to remove all edits and return to the original photo.
The sections that follow describe several of the main tools on the Edit tab.
Auto Adjust
Click Auto Adjust to let Photo Gallery take a shot at cleaning up the brightness, contrast, and such. Don't expect miracles, however. Sometimes Auto Adjust makes things worse. If so, click Undo.
Exposure
Click this option to adjust the picture's brightness and contrast. The Exposure Adjustment settings are especially useful for pictures that are poorly lit. Click one of the nine predefined exposures to improve your photo. For a description of the exposure, hover the mouse pointer over an exposure to see the brightness, shadow, and highlight settings.
Color
Click Color to change the color temperature and tint. Click one of the nine predefined color adjustments to improve your photo. Temperature and tint can be defined as follows:
- Color temperature: The overall color characteristics of your picture from low temperature (yellowish) to high (white).
- Tint: Changes the color cast in a picture by adding or removing green from your picture.
- Saturation: The intensity level of a color (hue).
To fine-tune a photo's color, double-click the photo and then choose the Fine Tune tool on the Edit tab. In the right pane, click Adjust Color and move the Color Temperature, Tint, and Saturation sliders left or right until you get the desired color you want.
Straighten
This option straightens your photo. If you took a photo with the camera at a slight angle, use this option to straighten the photo.
Crop
Cropping a picture lets you remove any unnecessary background or foreground elements. This technique is useful when the main subject of the photo looks too small or far away. Figure 17.18 shows an example. The photo on the left is a crop of the entire original photo shown on the right. The cropped photo on the left brings attention to a few features by eliminating much of the foreground.

Figure 17.18 Original photo (right) and cropped photo (left).
To crop a photo, first double-click the photo you want to crop. Next click Crop on the Edit tab. A white box with sizing handles (little squares) appears on the picture. Try to get the image inside that box to look exactly the way you want the finished photo to look. Anything you want to crop out of the picture should be outside the box.
If you plan to print the finished photo on pre-sized photographic paper, click the down arrow on the Crop button and click Proportion. Choose the print size. Doing so keeps the proportions of the cropping box at the proper aspect ratio for the print size.
Here's how to use the cropping box that's on the picture:
- To make the box larger or smaller, drag any sizing handle (little square) around the box border.
- To recenter the box around the main subject of the photo, put the mouse pointer inside the box and drag it to a better location on the picture.
- To zoom in and out while cropping, spin the mouse wheel or use the Zoom slider.
When the inside of the box looks the way you want your photo to look, click the Crop button. The picture is cropped. (If you change your mind, click Undo.)
Fix red eye
Red eye is a common problem caused by the retina at the back of the eye reflecting the flash back to the camera. Fixing it isn't too difficult. First, if the eyes are very small in the photo, spin the mouse wheel or use the Zoom button to zoom in on the eyes. You may need to zoom a little, pan a little, zoom a little. (“Pan” means to move the entire image so that you can view a different area of that image.) Make the eyes as large as possible in the viewing area. Next, click Red Eye on the Edit tab and follow the instructions that appear there. Drag a rectangle around the pupil of the eyeball, not the entire eye. Figure 17.19 shows an example where we've dragged a rectangle around an eye.

Figure 17.19 Fixing red eye.
If dragging a rectangle around the eye once doesn't fix the red eye, drag another rectangle around the same eye. Keep doing so until all the red is gone. Then pan over to the other eye, if necessary, and repeat the process. If you don't like the results, click Undo. Then try again.
Effects
You can use the black-and-white Effects options on the Edit tab to turn your photo into a black-and-white image with no filter or a choice of orange, yellow, or red filter. Each filter gives a different result. You can also add a sepia tone (which makes the image look aged) or a cyan tone (a greenish-blue color).
Saving changes
When you've finished touching up your photo in the Fix pane, click Close File. Your changes are saved automatically.
If you made a mess in the editing window, click Revert to Original to undo your previous changes.
Using people tags
Photo Gallery includes a feature called people tags that you can use to identify people in your photos. People tags work in conjunction with Photo Gallery's face detection capability, enabling you to assign a tag to a person's face rather than to the photo. So, instead of adding Edna as a general tag to a photo with 20 people in it, you can assign the people tag to Great Aunt Edna's face, so you can remember who she is in that family reunion photo.
Photo Gallery's face detection capability does not equal facial recognition. Photo Gallery doesn't tag all the photos that contain Aunt Edna automatically. Instead, face detection simply enables Photo Gallery to identify faces in a picture. You can then assign tags to each face.
Assigning a people tag is easy. First, click a photo. If Photo Gallery can detect faces in the photo, you see a People Found link in the Info pane. Click Identify, and then type the name of the person whose face is highlighted. Repeat the process for other faces in the photo.
If Photo Gallery can't detect faces in the photo, you can add the people tags manually. Double-click the photo to preview it. Then, on the Edit tab, click Tag and Caption. Photo Gallery draws a rectangle around a face that it finds in the photo (see Figure 17.20). In the information pane on the right, click Who Is This under the Tag Someone label or in the dialog box that appears next to the rectangle. Enter the name of the person or select a name from the list of previously entered names.

Figure 17.20 Adding a people tag.
If Photo Gallery does not automatically detect a face, click the arrow on the Tag and Caption button, click People Tag ![]() Tag a Person. Drag a box around the person's face and then fill out the Tag Someone box.
Tag a Person. Drag a box around the person's face and then fill out the Tag Someone box.
Choosing Photo Gallery options
Like most programs, Photo Gallery has an Options dialog box that lets you tweak certain program features to your own work style. To open Photo Gallery's Options dialog box, click the File toolbar button and choose Options. Figure 17.21 shows the Photo Gallery Options dialog box, which contains six tabs: General, Import, Publish, Originals, Edit, and Trust Center.

Figure 17.21 Photo Gallery options.
Selecting the first option, Show Photo and Video Previews in Tooltips, ensures that when you point to a thumbnail in Photo Gallery, you see a larger version of the thumbnail or video. Clearing that check box prevents the tooltips from showing.
The Find People in Your Photos option on the General tab turns on or off face detection, described previously.
The Navigation pane options let you set to show date taken information and descriptive tags of your photos.
The Import tab lets you customize how pictures that you import to Photo Gallery are handled. You can import pictures into Photo Gallery by clicking File in its toolbar and choosing Import from Camera or Scanner.
- Settings For: Specify the device or medium for which you want to define settings.
- Import To: Choose the folder to which pictures and videos will be imported. The default is the Pictures folder for your user account.
- Folder Name: Imported pictures are automatically placed in a folder. Use this option to specify how you want that folder named. You can choose from various combinations of the following:
- Date Imported: Today's date (the date on which you're performing the import).
- Name: Photo or video name.
- Date Taken: The date in the first picture's Date Taken property.
- Date Taken Range: The Date Taken property of the first and last pictures being imported.
- File Name: Each imported picture is automatically assigned a filename. To use the original filename as assigned by the camera, choose Original File Name. Some digital cameras organize photos into folders. To preserve both the camera folder and filenames, choose Original File Name (Preserve Folders).
- Open Photo Gallery after Importing Files: When selected, this option ensures that Photo Gallery opens automatically as soon as you've finished importing pictures.
- Delete Files from Device after Importing: If this option is selected, pictures and videos are erased from the camera automatically after importing.
- Rotate Photos during Import: Some digital cameras can sense when you're holding the camera vertically and mark each such picture accordingly. Choosing this option causes those pictures to be rotated to the correct upright position automatically when imported.
- Restore Defaults: Sets options back to the original factory settings.
Click OK after making your selections. Your choices on the Import tab will be applied only to pictures you import in the future. They have no effect on pictures you've already imported. Of course, you can rename, rotate, tag, and move pictures at any time, regardless of the settings in the Options dialog box.
The Publish tab provides options for setting file details (called metadata) that you want to include with your files. For example, you can include all file details, none, or select details that you don't want to show (such as camera information, location information, and the like).
The Originals tab has to do with the Revert button in Fix. By default, previous versions of photos stay on the hard disk permanently, even though you don't see them. After a few years, or even months, the storage space they require can be significant. Choosing Move Original Files to Recycle Bin After lets you put a time on those saved originals. You can choose from several time frames, ranging from One Day to Never.
Keep in mind that you can't revert a modified picture to its original form, or find a previous version of a file after the time limit expires. If you consistently work with duplicates of pictures rather than originals, this isn't a big deal because you always have the original in plain sight in its folder.
Use the Edit tab to select Auto Adjust settings, including Straighten, Noise Reduction, Color, and Exposure. By selecting these items, you can tell Photo Gallery which auto adjust options to use when you click Auto Adjust on the Edit tab when editing a photo.
Microsoft includes the Trust Center tab so that you can opt to provide Microsoft with information that helps it make better products. If you select the Help Improve Our Applications option, Microsoft collects system information and data about the way in which you use its Live products. That data is then uploaded to Microsoft.
Click OK when you finish changing options.
Making movies from Photo Gallery
The Movie option on the Create toolbar button in Photo Gallery is a shortcut to Movie Maker. You get all the pictures and videos you want to put in a movie into the gallery, perhaps by giving those items a tag and then clicking the tag name in Photo Gallery's Navigation pane. Then you select all those items and choose Create ![]() Movie. Movie Maker opens with all the selected items, ready to insert into a new movie.
Movie. Movie Maker opens with all the selected items, ready to insert into a new movie.
Printing Pictures
You can print pictures to almost any printer, although photo printers produce much better results. However, you need to refer to the instructions that came with that printer for specifics on connecting the printer. You may also need to install or download a special driver from the printer manufacturer. If in doubt, refer to the manual that came with the photo printer or to the manufacturer's website.
Most modern inkjet and laser printers let you print on either plain paper or photographic paper. Photographic paper is considerably more expensive, so you may want to stick with plain paper for drafts and informal prints. Use photographic paper for more formal prints of your best photos.
Printing from Photo Gallery
If the pictures you want to print are in Photo Gallery, you can print from there. Use the Navigation pane to display the pictures you want to print. Then select (check) the picture (or pictures) you want to print. If you want to print all the pictures showing in the gallery, you can click the group heading to select all the icons, or click any one picture in the gallery and press Ctrl+A. If you want to print only some pictures, select their icons. You can do so by pointing to any image and clicking its check box. Or you can use the universal techniques for selecting icons discussed in Chapter 21.
After you've selected the pictures you want to print, choose File ![]() Print
Print ![]() Print. The Print Pictures window shown in Figure 17.22 opens.
Print. The Print Pictures window shown in Figure 17.22 opens.
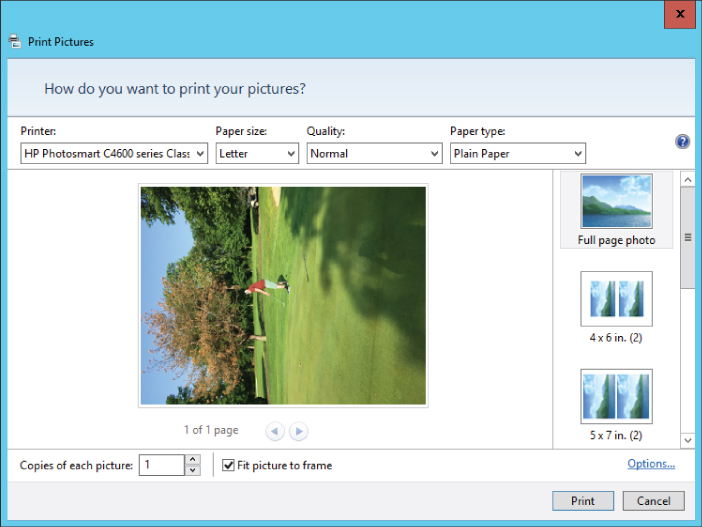
Figure 17.22 The Print Pictures window.
Now you get to make a whole bunch of choices as to how you want to print your picture(s). The choices available to you depend on what kind of printer you're using. If you have multiple printers attached to your computer, the first step is to select the printer you want to use from the Printer drop-down list.
If your printer supports multiple paper sizes, click the Paper Size drop-down and choose the size paper you want to print to. Depending on your printer, you may also be able to click the Quality drop-down and choose the output resolution. The higher the DPI, the better the quality of the print, and the longer printing takes.
If your selected printer supports multiple paper types, click Paper Type and choose the paper you're using.
If you're printing multiple pictures on large paper, choose a layout from the right column. Use the scroll bar at the right side of the window to view all your options. Typically, you can choose any size from a full-page photo down to tiny wallet-size prints. After you scroll, be sure to click the layout you want to use. The preview area shows you how the results will look on each printed page.
To print more than one copy of each picture, specify how many you want to print in the Copies of Each Picture. Choose Fit Picture to Frame to ensure that any small pictures are expanded to fill the page on which they're printed.
With all the choices made, just click Print and wait. Don't expect the printer to start right away. The computer takes some time to prepare the pictures before sending them to the printer. Be patient. When your pictures are finished printing, click Finish in the window that appears.
Printing pictures from a folder
If you have pictures that don't show in Photo Gallery, you can print them straight from the folder in which they're stored. Open the folder that contains the pictures. Then select the icons of the pictures you want to print. Be careful you don't select any icons for non-picture files, or this technique doesn't work.
After you've selected the picture icons, choose Share ![]() Print from the toolbar. If the Print button isn't visible, first click ≫ at the end of the toolbar to see if the button is off the edge. If you still don't see a Print option, chances are, one or more of your selected icons isn't a picture. When you see the Print button, click it. You're taken to the Print Pictures window. Choose your settings, as described in the previous section, and click Print.
Print from the toolbar. If the Print button isn't visible, first click ≫ at the end of the toolbar to see if the button is off the edge. If you still don't see a Print option, chances are, one or more of your selected icons isn't a picture. When you see the Print button, click it. You're taken to the Print Pictures window. Choose your settings, as described in the previous section, and click Print.
Pixels and Megapixels
Every picture you see on your screen is actually a bunch of little lighted dots on the screen called pixels. You don't see the individual pixels because they're too small, but if you take a small original picture and zoom way in, each pixel reveals itself as a small colored square. Figure 17.23 shows an example. The picture on the left is the original. The picture on the right is an extreme zoom in. There you can see how the picture is actually lots of pixels — little colored squares.

Figure 17.23 Zoomed in to see pixels.
When you're shopping for digital cameras, megapixels are a key pricing factor. A megapixel isn't one humongous pixel. It's a million regular-size pixels. The basic rule, the more pixels, the better the quality of the pictures. The term quality in this context means how big you can make the picture (or print it) without the picture looking pixelated. A pixelated picture looks, at best, blotchy; at worst, it looks like a bunch of pixels rather than a coherent picture.
Table 17.1 provides some general guidelines on how the number of megapixels translates to print quality. You can print any picture at any size, but you start to lose quality if you exceed the recommended maximum size shown in the second column. All numbers are approximate because many other factors come into play in determining overall print quality.
Table 17.1 Megapixels and Print Size
| Megapixels | Recommended Maximum Print Size |
| 1–2 | 3 x 5 |
| 2–3 | 5 x 7 |
| 3–4 | 8 x 10 |
| 4–5 | 11 x 14 |
| 5+ | 18 x 24 |
File extension, size, and dimensions
Every picture has a type, indicated by its filename extension. It also has a size measured in kilobytes (KB) or megabytes (MB). And it has dimensions. You see that information when you point to a picture's thumbnail in a folder. The Details view in a folder can show the dimension, size, and type of every picture in the folder (see Figure 17.24). Right-click any column heading and choose the name of the column you want to see.

Figure 17.24 Viewing photo file details in File Explorer.
In Photo Gallery, the file extension, size, and dimensions of a photo show when you point to a thumbnail or use the Details view.
A picture's dimensions are its width and height measured in pixels. As a rule, the bigger the dimensions, the better, because you can print a bigger picture at a very large size with no loss of quality. You can also zoom in quite far, and crop out quite a bit, and still end up with a picture that has significant detail.
Recall that the term megapixels refers to the number of pixels in a picture, where 1 megapixel equals a million pixels. A 5-megapixel camera creates pictures with dimensions of around 2,576 x 1,932. Multiplying those two numbers gives you the total number of pixels in the picture: 4,976,832. That's just about 5 million pixels — hence, the 5-megapixel rating.
The file size is the amount of disk space required to store the picture. Bigger is better in terms of picture quality because a large file size indicates that the file contains lots of information, which means you can print it at a large size and zoom in on any part of the picture without losing much clarity.
The filename extension is the picture's file type. Many types of picture files exist. Table 17.2 lists some examples. Some file types are so old or so rare you may never see one. The most commonly used picture types are TIFF, JPEG, PNG, BMP, and GIF, described next.
Table 17.2 Examples of File Formats for Pictures
| Filename Extension | Format |
| .art | AOL Art file |
| .bmp | Windows Bitmap |
| .cdr | CorelDraw Drawing |
| .cgm | Computer Graphics Metafile |
| .clp | Windows Clipboard |
| .cmx | Corel Clipart |
| .cut | Dr. Halo |
| .dcx | Zsoft Multipage Paintbrush |
| .dib | Windows Device Independent Bitmap |
| .drw | Micrografx Draw |
| .dxf | Autodesk Drawing Interchange |
| .emf | Windows Enhanced Metafile |
| .tif, .ai, .ps | Encapsulated PostScript |
| .fpx | FlashPix |
| .gem | Ventura/GEM Drawing |
| .gif | CompuServe Graphics Interchange |
| .hgl | HP Graphics Language |
| .iff | Amiga |
| .img | GEM Paint |
| .jpg, .jif, .jpeg | Joint Photographic Experts Group |
| .kdc | Kodak Digital Camera |
| .lbm | Deluxe Paint |
| .mac | MacPaint |
| .msp | Microsoft Paint |
| .pbm | Portable Bitmap |
| .pcd | Kodak Photo CD |
| .pct | Macintosh PICT |
| .pcx | Zsoft Paintbrush |
| .pgm | Portable Greymap |
| .pic | Lotus PIC |
| .pic | PC Paint |
| .png | Portable Network Graphics |
| .ppm | Portable Pixelmap |
| .psd | Photoshop |
| .psp | Paint Shop Pro |
| .ras | Sun RasterImage |
| .raw | Raw File Format |
| .rle | Windows or CompuServe RLE |
| .sct, .ct | SciTex Continuous Tone |
| .tga | Truevision Targa |
| .tif, .tiff | Tagged Image File Format |
| .wdp | Windows Digital Photo |
| .wmf | Windows Meta File |
| .wpg | WordPerfect Bitmap or Vector |
TIFF pictures
TIFF (Tagging Information File Format) is the preferred method of storing high-quality photos for printing. In fact, TIFF is widely used by the publishing industry for that very reason. TIFF files tend to be large, because they contain lots of detailed information and generally use little or no compression to reduce file size.
JPEG pictures
Joint Photographic Experts Group (JPEG) is the most widely used photo format for photos displayed on web pages. JPEG uses compression to reduce file size while maintaining large dimensions. The compression results in some small loss of picture quality. That loss usually isn't noticeable until you zoom in very tightly on a small area within the picture.
The amount of compression applied to a JPEG can vary. In fact, many high-end graphics programs allow you to choose exactly how much compression you want when saving a picture as a JPEG. Many digital cameras save pictures as JPEGs with minimal compression to preserve picture quality while at the same time conserving some storage space on memory cards.
GIF pictures
Graphics Interchange Format (GIF) is commonly used in web pages for illustrations and animations. It's limited to 256 colors, which makes it unsuitable for photos. Photos require millions of colors and tend to look blotchy when saved in GIF format. GIF also allows for transparency and simple animations.
PNG pictures
Portable Network Graphics (PNG) format is a compressed format that's gaining popularity as a format for web pictures. Like JPEG, it supports millions of colors and is, therefore, suitable for photos. Like GIF, it allows for transparency and is, therefore, useful for creating images with a transparent background.
BMP pictures
Windows Bitmap (BMP) is an older, uncompressed format that conserves picture quality at the cost of a large file size. Though once widely used in Windows, BMP is quickly becoming obsolete in favor of the more widely used TIFF and JPEG formats.
Changing a picture type or size
Sometimes you need to change a picture's type, perhaps so you can edit it in Photo Gallery or publish it on a website. Other times, you may want to reduce the picture's file size and/or dimensions to send it by e-mail or, again, to post it on a website.
You can manually create a smaller image for e-mailing without losing your original picture. This technique also works if you want to post a picture on a website. Just about any graphics program on the market allows you to resize a picture and save it in a different format. If you don't have a graphics program, you can use the Paint program, which comes with Windows 10. Follow these steps:
- Right-click the icon or thumbnail of the picture you want to reduce and choose Open With Paint. Don't be alarmed if you see only a small portion of a large picture. Paint doesn't automatically scale the picture to fit in the program window.
- Choose File Save As and type a new name for this copy of the picture. For example, use the existing filename followed by TIFF if you're just changing the file type, or the word Small if you're also reducing the picture's dimensions.
- If the picture isn't already a TIFF, JPEG, or PNG, click the current file type next to Save as Type and choose JPEG or PNG.
- Click Save.
- If your goal is simply to change the picture's type (such as from BMP to another format), skip to Step 10. Otherwise, continue with the following steps.
- To reduce the picture's size, click the Resize button on the Home tab.
- Under Resize in the Resize and Skew dialog box, enter a percent value for both Horizontal and Vertical. Make sure to use equal numbers so as not to skew or stretch the pictures. For example, to resize a 2,576 x 1,932 picture down to near 644 x 483, enter 25% for both Horizontal and Vertical. You can select Maintain Aspect Ratio to avoid skewing the image.
- To see the picture as it will appear on a web page or to an e-mail recipient, select the Edit tab and then click 100%. (If Paint's program window is small, double-click its title bar to maximize it to full-screen.)
- If the picture it too large or too small, press Ctrl+Z to undo your changes, and repeat Steps 6 and 7 until you find a size you like.
- Close Paint (click its Close button or choose File Exit from its menu bar). If asked about saving your changes, choose Yes.
If you started from Photo Gallery, the new copy of the picture may not show up right away. You might have to close Photo Gallery and reopen it. Also, the new picture may not contain the tags that the original picture had, so you may find it in the Not Tagged category in Photo Gallery.
Pictures, Tags, and Virtual Folders
You can use the Search box in Photo Gallery to find pictures based on rating, tags, name, and other properties. Outside of Photo Gallery, you can do much more with tags and other photo properties when searching, enabling you to find and organize pictures in ways that transcend tags.
For starters, click in the Cortana search field, type in a tag name, and see icons for all pictures that contain that tag. You can right-click the picture's icon and choose Open File Location. If you prefer, you can open your Pictures folder and use the Search box in its upper-right corner to search for a tag. That technique limits the search to pictures in your Pictures folder and its subfolders.
If you want to find pictures that contain two tags, separate the tags with a space, as follows:
Ashley AlecThis search finds pictures that contain both Ashley and Alec. Use OR to broaden the search to find pictures that contain either Ashley or Alec, as shown here:
Ashley OR AlecYou also can refine your search conditions for more refined results. For example, here's a search that finds only TIFF files that contain either Ashley or Alec:
type:tiff AND tag:(ashley OR alec)Here's a search that finds all JPEG images that have Hawaii as a tag:
type:jpeg AND tag:HawaiiIn addition, you can use DOS and Windows wildcard characters to search for filenames. For example, type the following into the Filename box:
haw*Or type the following into the Search box:
filename:haw*Either of these searches finds all pictures whose filenames start with haw.
You can save the results of any search as a virtual folder. When you open that folder, it shows all pictures that currently meet the search condition. For people who have lots of pictures to deal with, searches like these can be extremely valuable tools. For more information on searching and virtual folders, see Chapters 22 and 23.
Wrapping Up
You can do lots of things with pictures and photos in Windows 10. You don't get the kind of power and flexibility you would with a dedicated graphics program such as Adobe Photoshop. But nonetheless, you can perform the most basic operations such as cropping, red-eye removal, and some file type conversions with just the built-in Windows 10 tools and programs.
The following are the primary points covered in this chapter:
- To get pictures from a digital camera, connect the camera to the computer, turn it on, and choose Import.
- To get pictures from a CD or memory card, insert the card or disk and choose Import. Or open the disk or card and copy files using standard methods.
- To copy and paste a picture, right-click the picture and choose Copy. Then right-click at the destination and choose Paste.
- Your Pictures folder is the best place to store pictures.
- Photo Gallery lets you organize and find photos as though they were all stored in a single folder.
- Use the Fix button in Photo Gallery to crop and improve pictures.
- Use the Print button in your Pictures folder or Photo Gallery to print pictures.
- Large photos are good for printing and editing. Smaller, compressed photos are best for e-mail and web publishing.