Chapter 5
Setting Up Your Drone
In This Chapter
![]() Unboxing and inspecting your drone
Unboxing and inspecting your drone
![]() Exploring your drone’s components
Exploring your drone’s components
![]() Configuring your camera
Configuring your camera
When you buy a drone, you must research the features and price of many drones to find one that suits your needs. For the most part, drones that you get from DJI, 3D Robotics, or Parrot will be ready-to-fly, meaning they come complete with everything you need to fly. Typically, some assembly is involved, but this isn’t much more than attaching a camera, batteries, and propellers.
Other drones, called bind-and-fly drones, do not come with a transmitter and typically require more setup. Bind-and-fly drones are sold by drone companies that target the more engineering savvy drone flyer. They are very customizable and designed for more advanced users.
This chapter explores setting up and configuring the less complex ready-to-fly drones. The chapter walks you through unboxing your drone and taking an inventory of all its parts and instructions. Then you assemble your drone and update its software. In this chapter, you also see how to configure your drone’s integrated camera to take the best possible aerial photos and video.
If your drone supports an add-on camera, don’t fret. You also see how to attach your camera to your drone. In the case of more advanced drones, you learn about gimbals and how to attach one to your drone, and attach your camera to your gimbal.
Unboxing Your Drone
Your drone comes with several parts that you want to be sure not to lose. Depending on the type of drone you purchased, your parts list could include all, some, or more of the items in the following sections.
Propellers
Propellers are blades that, when attached to a drone, spin to create lift and take the drone to the skies. Propellers are rarely packaged already attached to a drone. They could become damaged in shipping, and they would greatly increase the drone’s packaging needs. Propellers are durable yet fragile, so don’t leave them in a place where they can be damaged. Set them on something like an end table, countertop, or coffee table so that no one sits or steps on them.
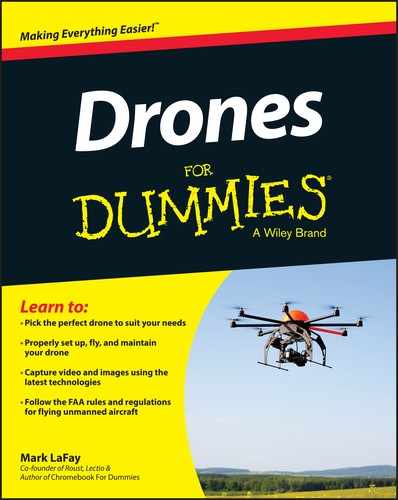
Propellers are typically made from plastic, although high-end propellers are sometimes made from carbon fiber. Rigid and lightweight propellers tend to perform better than heavier propellers that flex. Also, some drones come with special propellers that self-tighten when in use. These are particularly useful for the novice user who may not know the appropriate amount of torque to apply to the propellers when fastening them to the drone. Figure 5-1 shows the DJI Phantom 2 Vision’s propellers. These propellers are self-tightening plastic propellers. They can be replaced with slightly larger custom carbon fiber propellers, but doing so requires technical knowhow and confidence.
Source: Stephan Ridgway/Creative Commons
Figure 5-1: DJI self-tightening propellers are great for first time flyers.
Motor
Propellers are attached directly to the drone’s motors. There is no complex drive chain involved with most drones, which is great for conserving energy and removing potential break points. A drone’s motors spin at an extremely high rate of speed so that the propellers can create lift. The motors are controlled by a computer that is housed inside the airframe of your drone. The computer controls the motors, and each motor works independently to ensure the stability of the drone. By varying the speed of each motor, the drone is able to hover in place, climb or descend, and move in all directions.
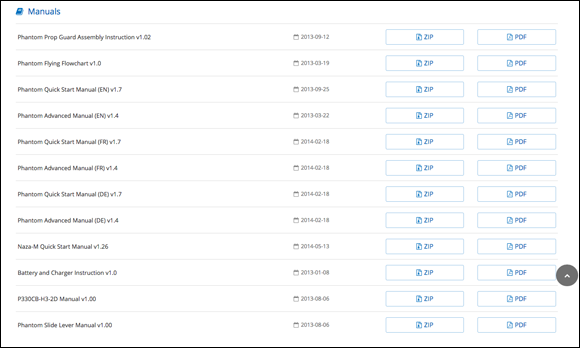
Your drone will come packaged with a motor that is optimized specifically for your particular drone; however, motors do fail, and therefore, you may need to replace it at some point. Drone motors come in standard sizes but with different levels of power output and energy conservation. Your drone may support different motors that give you more speed than the stock motors that came with your drone. Figure 5-2 shows the motors in a Pocket Drone. Notice that the motors are neatly enclosed in the end of the arm of the drone. This is to help shield the motor from the elements and bad piloting.

Source: Airdroid
Figure 5-2: Motors in a Pocket Drone.
Aircraft Airframe
Every part of the drone is somehow connected to the airframe. Some drone airframes are designed to encapsulate every aspect of the drone, whereas some hold only the “brains.” Figure 5-3 shows the DJI Phantom 2 drone. This airframe provides a protective shell over the drone computer, battery, and wiring. The landing gear is affixed to the airframe, and the drone itself has mounts for a camera gimbal (more on that later). Breaking your airframe is a big deal. It’s on par with bending your car frame in an accident.

Source: B Ystebo/Creative Commons
Figure 5-3: The DJI Phantom 2 airframe is designed to protect its electrical components like the computer and navigational sensors.
Battery and charger
Every drone should come packaged with a battery and a battery charger. Drone batteries are high-power Lithium Polymer (LiPo for short) batteries. They are designed to store and release a load of energy! To do this, the batteries use a relatively volatile cocktail of chemicals. These batteries are fragile so you need to take great care when using them. Your drone should come with a battery charger designed specifically for your drone’s batteries. Overcharging a drone battery can make it swell and burst into flames, causing wicked amounts of damage. Your drone’s battery charger should be designed specifically for your drone’s batteries and should have several safety features:
- Automatic shutoff at 100% charge
- Storage mode or discharge
- Compatibility check
If you plan to buy additional batteries, be sure to purchase batteries recommended by your drone manufacturer. If they do not provide a recommended list of batteries, you will need to check to make sure the batteries you use have the same features as the batteries that came packaged with your drone. Doing so will help safeguard you from harm. Some manufacturers remove this variable by making a proprietary battery that you can purchase only from them. The benefit is that you can’t use the wrong battery. The downside is that you may have to pay a premium to buy additional batteries. Figure 5-4 shows the Parrot AR 2.0 Drone battery. This battery is designed specifically for the AR 2.0 drone.

Source: Tokyo Times/Danny Choo/Creative Commons
Figure 5-4: Stay safe and buy batteries designed specifically for your drone.
Protective hull and prop guards
Propellers are thin and light. They are constructed from rigid materials and spin at extremely high rates. All of this combined makes them extremely hazardous to your health. Getting your finger in the path of a spinning drone blade could cut easily cut your finger down to the bone or sheer it off completely (ouch!). A great way to avoid this happening is to simply never put your fingers near the propellers when they are moving. If you want to be even more cautious, stay away when the battery is plugged in! You can also give yourself, and your drone, a little additional protection by using a protective hull or prop guards.
These guards are designed to protect you from your propellers and also protect your drone’s propellers from you and other objects. Drones are extremely stable but not as stable as a car that is driving down the road. Drones are easily blown around by air currents, which can cause them to bump into people and things. You might recall from the previous section, “Propellers,” that propellers are rather fragile. Prop guards and protective hulls like the ones pictured in Figure 5-5, provide an additional layer of protection for the drone in the event the unexpected happens and it gets friendly with a tree or a wall or you. But remember, they are not foolproof and you can still damage yourself, people, and objects when using the prop guards.

Courtesy of Andrew Amato
Figure 5-5: Protective hulls keep you and your drone safe from injury.
Camera mount and gimbal
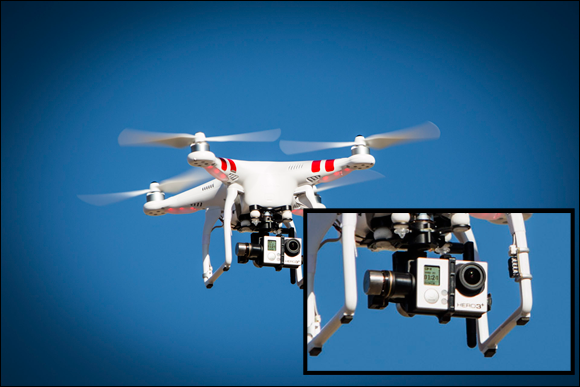
You may recall from Chapter 2 that many drones are built with an integrated camera. That means you don’t have to worry about buying and attaching a camera to your drone. Other drones give you the option to add on a camera. Attaching a camera to your drone may require the assistance of a special mount. Depending on your drone, this may be a simple bracket that secures a camera like a GoPro to the body of your drone. High-end mounts are called gimbals and if your drone supports a gimbal, you’re in luck! Gimbals are designed to keep your camera perfectly level and stable while airborne. Chapter 13 goes into detail on how to use a gimbal to stabilize your footage. Figure 5-6 is a picture of the gimbal that comes with the DJI Phantom 2. It is designed precisely for carrying a GoPro action camera.

Source: bjoern.gramm/Creative Commons
Figure 5-6: DJI Phantom’s GoPro gimbal is top notch!
Transmitter
For the purposes of this chapter and this book, we are mainly discussing drones that are ready-to-fly. That means that they come with a transmitter that is connected to the drone and requires no additional setup. All drone flight controllers have the same basic core controls which consist of two sticks that give you complete directional control.
Innovations in wireless communication (GPS, Bluetooth, and Wi-Fi), have made it possible to control some drones with devices other than a traditional flight controller, such as a mobile phone, computer, or tablet. Chapter 8 provides more information on this topic.
Instruction manual
Your drone should come packaged with a user manual. Some drones are packaged with a few different manuals so as to keep excessively advanced topics separate from the bare necessities. I hope my wife doesn’t read this part of the book because I am going to suggest something I never do: Read the manual before you attempt to assemble anything. Your drone likely has several quirks and your manual will explain them in detail.
Most manuals start with all the necessary warnings, just to get your attention and to make sure you proceed with caution. Use your manual to ensure that the contents of your package are complete and accurate. Your manual should also give you a brief tour of all of the different parts of your drone and their intended purpose. Most manuals give step-by-step setup instructions and finish with a brief explanation of the controls and how to get airborne. Figure 5-7 shows a couple of pages from the DJI Phantom manual. Before you ask a single question about how to fly your drone, make sure you read the manual.
Courtesy of Tucker Krajewski
Figure 5-7: The DJI Phantom quick start manual.
Assembling Your Drone
Every drone available on the market today comes with its own set of assembly instructions. Some drones require more installation steps than others. Typically, you need to install the following items:
Propellers: Your drone should be packaged with at least one complete set of propellers and possibly even a spare propeller or two. When you install the propellers, be sure that you carefully read the instructions to ensure that you put the propeller with the correct side up. Be sure to use the correct nuts to secure the propeller and tighten each nut with the appropriate amount of pressure. You don’t want your propellers to be loose. Conversely, overtightening can fracture your propellers.
DJI drones indicate on the propeller which side of the propeller to face upward, as well as the direction to spin the propeller to tighten it. 3D Robotics differentiates propellers with different colored nuts.
- Landing gear: Most drones are packaged with their landing gear unattached, so be sure to securely attach the landing gear to the drone. Landing gear is critical for the stability of the drone. In some drone models, it provides ground clearance for any camera gear that might be bottom mounted. Be sure to refer to your manual to ensure that your gear is affixed appropriately, especially if it is retractable landing gear.
- Camera gear: If you haven’t flown a drone yet, you may want to get a few flights under your belt before strapping on a camera. Depending on your drone, you will either attach the drone’s camera package or you will attach the mount or gimbal for your own camera. Be sure to follow the instructions precisely when mounting your camera. The placement of the camera is critical for maintaining stability.
Charging batteries
LiPo Batteries are far more volatile than most batteries and therefore require a little more TLC. To safely transport or store your drone batteries, you must be sure to they are at least 50% discharged. The more charged they are, the more flammable they are. Also, fully charged LiPo batteries that go unused for more than a day or so run the risk of wearing down their capacity and therefore dramatically reducing their useful life. For these reasons, your drone batteries will have half-charge or less when you take them out of the box. Charging your batteries can take a little time so you want to get the process started sooner than later. Refer to your manual to confirm the best practices for your battery and charger. Figure 5-8 shows a LiPo battery charger. This style of charger is commonly packaged with drones.

Source: Osamu Iwasaki/Creative Commons
Figure 5-8: Drone battery chargers look the same but may be different.
 Be sure to monitor your batteries as they charge for the first time to ensure that all the safety features of your battery charger do indeed work. Your battery charger should indicate that charging is complete and the battery is fully charged. Your charger should also indicate if there is an issue with charging. Pay attention to these indicators to avoid potential calamity.
If you do not have any instructions for how to charge your batteries, use the following tips to stay safe:
- Before you plug your charger into a power source, look it over to see if there is any voltage mode that needs to be set first. You may need to switch the voltage mode so that it matches with your country’s power system. In the U.S., you would want it set to 110 volt.
- Locate the various status indicators so that you know where to look when you plug the charger into a power source and then plug the battery (or batteries) into the charger. Indicators will let you know if all is good or if something is getting sideways on you.
- If your LiPo battery has power leads running off of it, make sure they never touch each other as this could cause your battery to short circuit.
- Check the indicator to see if there is any sort of a battery type indicator. If so, make sure the option selected matches the battery you intend to charge. In most cases, this will be LiPo.
If you get the impression that something is going awry when you charge your battery, unplug the charger from the power source before doing anything else, and then see Chapter 6 for tips on how to stay safe with your LiPo batteries.
Checking for software updates
A great deal of high-end hardware goes into making a drone capable of flight. Modern drones contain internal computers with software flight controllers that use a milieu of sensors to gather information necessary to facilitate flight. Many newer drones are also using their GPS and internal mapping software to ensure that you aren’t flying in restricted airspace. This hardware and software are all very high-tech, and both are getting even more advanced.
With computers, you need to update the software periodically to ensure that you get the most from your device. Drones are no different. Drone manufacturers are constantly making improvements to the software that powers their drones. Before you are ready to fly, you must ensure that your drone is using the most current software available. Updating your drone’s software is important because the manufacturer may have found bugs or upgraded the flight controller’s intelligence, and you will want to take advantage of those advancements.
If you have a DJI Phantom 2 Drone, you can upgrade the software in your drone and in your remote control by following these steps. You will need a USB cable to connect your drone to your computer, and you will need an Internet connection to download the assistant software and any available firmware updates.
 If you already installed propellers, you should consider removing them before starting the upgrade process. Upgrading your drone requires it and the controller to be powered on. Removing the propellers will protect you and others from accidents that could occur when your device is powered on.
Using your computer, navigate to the following web address:
http://www.dji.com/product/phantom-2/downloadYou should arrive at the DJI support download page. Manuals for their devices are located at the top of the page, and software is located at the bottom of the page. All downloads are listed with their release dates.
Locate the most current release version of the assistant software and download it by clicking the
Ziplink for windows andDMGlink for Mac.The software downloads to the location on your computer that you specified.
Install the assistant software by double-clicking on the install file that you just downloaded.
The file will unzip revealing an install file.
If you are on a Mac, drag the Phantom logo to the application folder, as shown in Figure 5-9. If you are on a PC, double click the unzipped executable file denoted by the .exe extension file.
Follow the prompts to complete the Phantom 2 Software installation on your machine.
Plug your drone battery into your drone.
Ensure that your battery has a full charge so that it can keep your drone powered for the duration of the installation process.
Locate the USB port on your remote control and the USB port on your drone, place a USB cable into each device, and plug each device into your computer.
If your computer has only one USB port available, start with the remote control.
With your drone and/or remote control plugged into your computer, launch the Phantom assistant software.
The Phantom software searches for any new firmware updates. If any are available, it prompts you to confirm installation.
- Follow the prompts to complete the upgrade process.

Courtesy of Mark LaFay
Figure 5-9: Drag and drop the install file on your Mac to install.
Getting Familiar with Your Aerial Camera
The setup process for a drone with an integrated camera is seamless compared to that for drones without integrated cameras. Chances are good that an integrated camera pales in comparison to a camera like a GoPro or other high-end digital camera, but you can still capture fantastic photos and videos with it. Not to mention, what an integrated camera lacks in photo and video quality, it makes up for in usability and features.
Here are the two most popular drones currently on the market that come with integrated cameras and some of their features and options:
- Parrot AR 2.0 Drone. The video controls for the Parrot AR 2.0 Drone are somewhat limited. You do not have the option to adjust the video mode for the camera, but you do have high-end control features. Parrot refers to these controls as Director Mode. To take advantage of the photo and video capabilities of the AR 2.0, you will need to pilot the craft with your smartphone or tablet. The camera comes already connected and calibrated; all you need to do is install the app on your phone and pair your phone with the drone. To do this, refer to your drone’s user manual.
- DJI Phantom 2 Vision and Phantom 2 Vision+ drones. DJI is the clear industry leader in drone technology, and while their integrated cameras are superior to the AR Drones, they still lack a little in picture quality and custom controls compared to an action camera like a GoPro. The Phantom 2 Vision does not come with a gimbal-mounted camera, so the video can be shakier than the footage gathered from a Phantom 2 Vision+, which does sport a nice camera and gimbal. The Phantom 2 application also gives the user the ability to change minor features like resolution and field of view. These features are nice but limited. Refer to your user manual to pair your mobile phone to the Phantom 2 Vision and to control your camera.
You don’t have to get airborne to test your camera; in fact, you should snap a few photos to ensure the device is fully functioning before you put it in the sky.
Using a GoPro
You can use several types of cameras with drones; however, the GoPro has received the most widespread support simply because the camera’s technology and capabilities are regarded as the best in the action camera market. For this reason, this book focuses largely on GoPro cameras as the camera of choice for aerial photography and video.
You can mount a GoPro to a drone in several ways. Your drone manufacturer may specify proprietary mounting systems, or they may rely on existing GoPro mounting technology. To be sure you have the right equipment, you should refer to your device manual.
Here are three ways you can mount a GoPro to a drone:
Direct mount: Some drones have a bracket designed to attach the GoPro in its protective case to the drone. Figure 5-10 is a picture of the GoPro camera in a waterproof case with a mounting adapter.
The Pocket Drone is designed to be extremely small but powerful and does not support a fancy mounting rig or gimbal. To save on weight, the Pocket Drone is equipped with a shock-mounted plate where you can affix a GoPro Mounting bracket with adhesive as shown in Figure 5-11. You’ll also notice that in these types of mountings, unless you have a GoPro case designed with a mount point on the top, your footage will be upside down. This can be fixed by changing the Upside Down Mode (UPd) setting in capture settings.
- Camera frames: Some drones offer their own proprietary mounting system. For example, the DJI Phantom supports a mounting frame. The GoPro is seated and secured in a special adapter as shown in Figure 5-12. The adapter is then mounted to the bottom of the Phantom. You’ll notice that the mounting system for the Phantom does not allow you to mount the GoPro in its protective case. The camera is, however, right-side-up, which means that you won’t have to deal with any inverted video footage or stills.
Gimbal: Gimbals are high-end mounting systems that reduce shake by stabilizing the camera. Some gimbals also provide remote control of the camera so that you can adjust the angle for the camera and even rotate to capture different perspectives. Using your GoPro with a Gimbal will provide you with the highest quality footage. Your drone manufacturer will suggest which gimbals are optimized specifically for their equipment so refer to your drone manual before you buy. Figure 5-13 shows the 3D Robotics Iris+, complete with a GoPro supported Gimbal.
Gimbals tend to reduce flight time due to their weight. Be sure to reference your drone’s user manual to determine how much flight time loss to compensate for.

Source: [email protected]/Creative Commons
Figure 5-10: GoPro camera cases have mounting technology that accommodate a number of different uses cases.
Courtesy of TJ Johnson
Figure 5-11: Mount your go pro to a pocket drone with adhesive.
Source: bjoern.gramm/Creative Commons
Figure 5-12: The Phantom GoPro mounting frame is a nice low-cost solution for flying a GoPro.

Source: Christopher Michel/Creative Commons
Figure 5-13: Iris+ flies a gimbal and a GoPro.
Configuring your GoPro
Before you can capture cinema quality photos and video, you must configure your GoPro. You can configure your GoPro by navigating the small screen on the front of the device. Or you can use the GoPro mobile application, if you have an Apple, Android, or Windows smartphone. Once installed on your phone, the GoPro app gives you the ability to remotely configure camera settings, livestream video from the camera, and even share content to the web. You can also start and stop video recording and snap photos remotely with the mobile app.
If you want to control your GoPro with your smartphone, you must first download the app to your mobile device from your device’s app store. The process for pairing your phone to the GoPro varies depending on the version of GoPro you have and the type of phone you have. To get detailed instructions for all devices, visit GoPro Support online here: http://gopro.com/support/articles/getting-started-with-gopro-app.
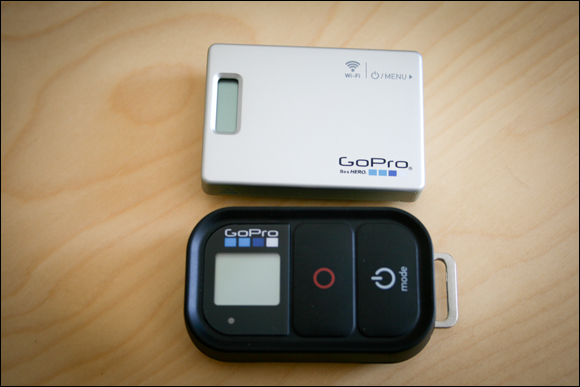
If you don’t have a smartphone available, you can also use a GoPro remote, shown in Figure 5-14, to control your GoPro while it is flying high on your drone. The remote will give you control of the camera distances topping nearly 600 feet. Snap photos, start and stop video, and configure you camera on the fly with the remote.
Source: William Hook/Creative Commons
Figure 5-14: Control and configure your GoPro remotely with the GoPro Remote.
Before you purchase the GoPro remote, you should consult your drone’s user manual to ensure that your GoPro’s Wi-Fi will not interfere with your Drone’s wireless communication system. The DJI Phantom drones do not play nicely with GoPro Wi-Fi and therefore you can’t use the app or the remote.
If your drone does not support wireless control, then your next best bet is to set the GoPro to record just prior to taking off. When you land your drone, you will need to stop the recording. The downside to this is that you will have to process a video file that is as long as your flight from takeoff to landing. The GoPro Hero4 Black shoots in several video modes going all the way up to 4k which is essentially 4 times bigger than High Definition video which is commonly referred to as 1080p. The settings in 4k are somewhat restrictive and the files are so big they can be nearly impossible to work with for some computers, therefore, the best setting to get you started is 1080p Video at 60 frames per second (FPS), and a narrow field of view (FOV).
To configure your GoPro Hero4 with the settings detailed above using your mobile phone, follow these steps:
Turn your GoPro on so that your smartphone can detect it.
The GoPro camera indicator screen should light up and indicate that it is powered on. Unless you configured your GoPro camera otherwise, it should also flash blue to indicate that Wi-Fi is on.
Connect your smartphone to the GoPro camera’s Wi-Fi.
You should see the Wi-Fi from the GoPro camera listed under your wireless connections from your smartphone. You may need to set up the Wi-Fi name and password on your GoPro camera; for instructions on how to do this, see the manual for your GoPro camera.
Using your smartphone, launch the GoPro application.
The app loads the main screen with several options, including a Connect and Control button.
Tap Connect and Control to take control of your GoPro camera.
If your phone is able to successfully connect to your GoPro camera, the app loads a streaming video feed from your GoPro camera and presents you with several options for controlling your GoPro camera remotely.
To configure your Camera, tap the wrench icon located in the bottom of the screen. On an iPhone, this is located in the bottom right as shown in Figure 5-15.
The Configuration screen loads, giving you several options for your camera.
In the Video Settings section of the configuration screen, locate and tap Resolution and change the resolution to 1080p (not 1080p Superview).
The setting changes, and then you are returned the configuration menu.
In the Video settings section of the configuration screen, locate and tap FPS (Frames Per Second), and set it to 60. If you have an older model GoPro camera, you may top out at 30. This is acceptable, as well.
The setting will change and then you will be returned the configuration menu.
In the Video settings section of the configuration screen, locate and tap FOV (Field of View) to change it to Narrow.
This will remove the fish-eye effect that can appear on GoPro footage when the FOV is set to Medium or Wide.
- Locate the Done button at the top of the screen and tap it to return to the camera control screen.

Courtesy of Mark LaFay
Figure 5-15: The settings button is in the bottom right side of the camera control screen on the GoPro app for iPhone.
Configuring your GoPro camera will be a little bit of a chore, mainly because the screen and buttons are so small. But once you’ve gotten your GoPro camera configured and connected to your smartphone, getting up and running each time you fly will be fast and easy.