
Chapter 12
Hooking Up with Handy Helpers
In This Chapter
![]() Adding a printer or a scanner to your system
Adding a printer or a scanner to your system
![]() Using Photo Booth
Using Photo Booth
![]() Connecting with friends and family using FaceTime
Connecting with friends and family using FaceTime
![]() Watching digital TV on your iMac
Watching digital TV on your iMac
This chapter is all about getting interesting things into — and out of — your iMac. Some of the devices I mention are common (almost mundane these days) and pretty easy to take care of, such as scanners and printers. Then I might surprise you with something new to you, like your iMac’s built-in FaceTime HD video camera.
I also show you how to turn your iMac into a photo booth. Heck, I even describe how you can pull that fancy satellite or cable TV signal into your iMac.
It’s perfectly okay to tell everyone else that you’re watching the financial channel. But watching a little football never hurt anyone… .
Connecting Printers
All hail the USB port! It’s the primary connection point for all sorts of goodies. In this section, I concentrate on adding a local USB printer and the basics of adding a network printer to your system. (Find more on connecting a wireless Bluetooth printer in Bonus Chapter 1 at www.dummies.com/extras/imac.)
USB printers
Connecting a USB printer to your iMac is duck soup. Don’t you wish all things in life were this easy? You might very well be able to skip most of the steps in this section entirely, depending on whether your printer came with an installation disc. (Virtually all do, of course, but you might have bought yours used, say, from eBay.)
 Your printer needs to be fully supported within OS X:
- If the software is designed for earlier versions of OS X (say, 10.7 or 10.8), it probably works with Mavericks.
- I always recommend visiting the manufacturer’s website to download the latest printer driver and support software before you install your printer. That way, you know that you’re up-to-date. (Don’t forget to check the Read Me file that accompanies your new software to make sure that no new system requirements have come about!)
 Save and close open files and applications before installing your printer. You might have to restart your iMac to complete the installation.
The physical connections for your printer are pretty simple:
- Make sure that your printer’s USB cable is plugged in to both your iMac and the printer itself. (Naturally, you’ll use one of the iMac’s USB ports on the back of the computer, unless you’ve already added a USB hub to expand your external horizons.)
- After the USB connection is made, plug the printer into an AC wall socket and turn it on.
 Don’t forget to add the paper, check the ink or toner cartridge(s), and remove all the packing material from your printer!
Additional printer installation steps depend on whether you have the manufacturer’s installation software for your printer.
Sure, I’ve got the install software
If your printer comes with its manufacturer’s installation disc (and you have either an internal or external optical drive), follow these steps when everything is connected and powered on:
- Insert the installation disc in the iMac’s optical drive.
 If you download the printer’s installation software as a disk image file (ending with the extension .dmg), simply double-click that file. OS X will display it on your Desktop, just as if it were a DVD or an external hard drive. Now you can follow along with the rest of the steps in this procedure. The disc contents usually appear in a Finder window. If they don’t, double-click the installation disc icon on the Desktop to open the window.
 - Double-click the installation application to start the ball rolling.
- Follow the onscreen instructions.
Files get copied to your hard drive.
You might have to restart your iMac.
You’re ready to print!
Don’t forget to visit your printer manufacturer’s website to check for any driver updates for your particular model.
Whoops, I’ve got diddly-squat (Software-wise)
Didn’t get an installation CD? Try installing the printer without software, or download the software from the manufacturer’s website.
Installing without software
If you didn’t get an installation CD with your printer (or you can’t locate the installation software to download), you might be lucky enough that your printer’s driver was included in your installation of OS X. First, press ![]() +P within an application to display the Print dialog, where you can check whether the printer you connected is already recognized.
+P within an application to display the Print dialog, where you can check whether the printer you connected is already recognized.
If it’s not displayed, here’s how to check for that pesky driver after you connect the printer and switch it on:
- Open the System Preferences window.
- Click the Printers & Scanners icon.
- Click the Add button (which sports a plus sign).
- Check the Printer list in the Add Printer window to see whether your printer has already been added automatically within Mavericks.
If your printer appears here, dance a celebratory jig. You can close System Preferences and choose that printer from the Print dialog in your applications. (You can even set it as the default from the System Preferences Printers & Scanners pane. Just click the Default Printer pop-up menu to select your new printer.)
Downloading software
If you don’t have installation software and your iMac doesn’t automatically match your USB printer with a driver, it’s time to check the Internet to locate a Mavericks-compatible driver for your printer.
Check the manufacturer’s website for your printer’s software and any additional information for operating your printer under OS X Mavericks. Look for
- Special software drivers that the printer might need: Install any drivers you find before you run an installation application. Otherwise, the installation app might not be able to recognize or configure the printer if the driver hasn’t been installed first.
- Technical documents or FAQs covering your printer under Mavericks.
- Installation application: If the manufacturer offers an installation application for your printer, download the application and run it.
Network printers
Your wired or wireless Ethernet network provides a quick and easy way to share any printer that’s already connected to your iMac. Follow these steps to share your printers across the network with others:
- Click the System Preferences icon on the Dock.
- Click the Sharing icon.
- Select the On check box next to the Printer Sharing service entry.
- Click Close to exit System Preferences.
In most cases, a printer that you share appears automatically in the Print dialog on other computers connected to your network. Therefore, if you want to access a printer being shared by another Mac across your network, open the Print dialog within your application and click the Printer pop-up menu to select it.
If the remote printer isn’t listed automatically, you can dig a little further. To add a printer that another Mac on your network is sharing to your list of printers, follow these steps:
- Click System Preferences on the Dock.
- Click the Printers & Scanners icon.
- Click the Add button (which carries a plus sign).
- Click the Default button on the toolbar.
Mavericks displays all the available local shared printers.
- Click the desired printer and then click Add.
Depending on the built-in support within Mavericks for the printer you’re accessing or sharing, you may have to install the driver on your Mac or the other Macs on your network as well.
Connecting Scanners
USB and FireWire scanners practically install themselves. As long as the model is listed as OS X–compatible and supports the TWAIN device standard (as just about all scanners do), things really are plug-and-play. (Not sure whether a scanner is OS X–compatible? Check the system requirements on the scanner’s box or on the manufacturer’s website.)
If you have the scanner manufacturer’s installation disc, go ahead and use it. However, most scanners don’t require specialized drivers, so even that orphan model that you picked up from Uncle Milton last year should work (if it’s recognized by OS X). It doesn’t hurt to check the manufacturer’s website to see whether any of the software has been updated since the disc was produced.
If OS X doesn’t support your older scanner, a third-party application might be able to help. Get thee hence to Hamrick Software at www.hamrick.com and download a copy of the latest version of VueScan. This great scanning application supports more than 2,000 scanner models, including a number that don’t work with Mavericks otherwise. At $40, it’s a world-class bargain, to boot.
Ready to go? Make sure that your scanner is powered on and connected to your iMac (and that you load a page or photograph to scan). If your scanner’s installation disc provided you with a proprietary scanning application, I recommend that you use that application to test your scanner. In fact, it’s Mark’s Maxim time!
 If your printer or scanner includes bundled applications, try them!
Sure, OS X has the Printers & Scanners pane within System Preferences for printers and the Image Capture application for scanners and digital cameras, but these are bare-bones tools compared with the print manager and image acquisition software that comes bundled with your hardware. I turn to the built-in hardware handling stuff that comes with Mavericks only when I don’t have anything better.
Hey, I’m not saying that anything’s wrong with Image Capture, which is in your Applications folder, in case you need to use it. However, don’t expect Image Capture to support any specialized features offered by your scanner (like one-button e-mail or web publishing). You have to use the application especially designed for your manufacturer and model to take advantage of any extras that it offers. For alternatives, many image-editing applications (like Adobe Photoshop or Photoshop Elements) might offer more scanning features than Image Capture.
Using Photo Booth
Many Apple switchers and first-time owners quickly notice the tiny square lens and LED light at the top of the iMac’s svelte frame. What gives?
Mystery solved, good reader: That’s the lens of your iMac’s built-in FaceTime HD camera, which allows you to capture video or snap a quick, fun series of photos via the Photo Booth application that comes with Mavericks.
What’s that you say? You’ve never used a computer video camera? Well then, good reader, you’ve come to the right place!
The FaceTime HD camera’s indicator light glows green whenever you’re taking a snapshot or recording video … which, when you think about it, is A Good Thing (especially if you prefer chatting at home in Leisure Mode).
If you need a quick picture of yourself for use on your web page, or perhaps your iChat icon needs an update to show off your new haircut, use Photo Booth to capture images at 720p resolution and 32-bit color. Although today’s digital cameras can produce a much higher-quality photo, you can’t beat the built-in convenience of Photo Booth for that quick snapshot!
To snap an image in Photo Booth, follow these steps:
- Launch Photo Booth from the Dock or from Launchpad.
Photo Booth features a very different appearance in full-screen mode, complete with a fancy wooden stage and curtain! To try things out in full-screen mode, choose View⇒Enter Full Screen.
- Choose to take one image, four quick photos as a group, or digital video.
The three buttons at the lower-left side of the Photo Booth window allow you to switch among taking one photo, four photos in a row (arranged as a group, like an arcade photo booth), or a movie clip.
- (Optional) Click the Effects button to choose an effect you’d like to apply to your image.
Photo Booth displays a screen of thumbnail preview images so that you can see how each effect changes the photo (see Figure 12-1). To move through the thumbnail screens, click the Previous and Next arrow buttons that appear around the Effects button.
You can produce some of the simple effects you might be familiar with from Photoshop, such as a black-and-white image or a fancy colored-pencil filter, but you can also play with some mind-blowing distortion effects and even very convincing “faux” thermal and X-ray cameras!
Of course, you can always launch your favorite image editor afterward to use a filter or effect on a photo — for example, the effects available in iPhoto — but Photo Booth can apply these effects automatically as soon as you take the picture.
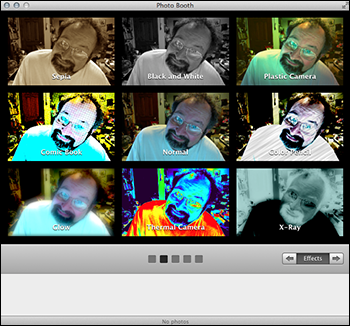
Figure 12-1: Photo Booth does one thing particularly well — candid photography.
- (Optional) Click a thumbnail to apply the desired effect.
When you choose an effect, Photo Booth automatically closes the Effects display.
To return the display to normal, click the Normal thumbnail, which appears in the center. (Um, that would be Paul Lynde’s spot, for those of you old enough to remember Hollywood Squares.) - Click the red Camera button.
The image (or video clip) appears in the filmstrip at the bottom of the window. Photo Booth keeps a copy of all the images and clips you take in the filmstrip so that you can use them later. After you click a photo or film clip in the filmstrip, the familiar Share button appears, inviting you take any one of a series of actions, including
- Sending the photo in an e-mail or as a Messages attachment
- Saving the photo directly to iPhoto
- Sharing the photo or video on Twitter, Facebook, or Flickr
- Using the image as your Mavericks user account icon
To delete an image from the Photo Booth filmstrip, click the offending photo and then click the X button that appears in the upper-left corner.
Conversing with FaceTime
With Apple’s FaceTime technology, you can video chat with owners of iOS devices and Macs — and if they can run FaceTime, they’re guaranteed to have the right video hardware!
As of the time of this writing, FaceTime-compatible devices include
- Macs running OS X Lion or later
Mac owners running Snow Leopard 10.6.6 or later can also buy the FaceTime application from the App Store.
- An iPhone 4/4s or 5/5s/5c running iOS 4.1 or higher
- A second-generation iPad (or later)
- A fourth-generation (or later) iPod touch running iOS 4.1 or higher
If you’re running a mobile device under iOS 6 or later, you can use either a Wi-Fi or cellular connection to use FaceTime, and your iMac requires either a wired or Wi-Fi connection.
To launch FaceTime, click the jaunty-looking video camera icon on the Dock. The first time you use the application, you have to enter your Apple ID and your e-mail address. The folks you chat with on the other end use that same e-mail address to call you via FaceTime. (iPhone 4-series and 5-series owners can be called using their telephone numbers.)
To change the e-mail address that other FaceTime users use to call you, choose FaceTime⇒Preferences and then click the E-mail link under the heading You Can Be Reached for Calls At.
After you sign in, FaceTime displays your Contacts list by default. To initiate a call with any contact, click the name in the list. FaceTime displays the e-mail and telephone numbers for the contact (once again, taken from your Contacts database). Click the e-mail or telephone number that FaceTime should use, and the connection process begins. To return to the Contacts list and choose another person, click the All Contacts button at the top of the window.
Apple isn’t satisfied with providing a mere contacts list, however! You can use a number of other methods for selecting someone to call:
- Recent Calls: Click the Recents button to choose a contact that you’ve called or attempted to call, or has called you within the recent past. Click the All or Missed buttons at the top of the window to further filter the Recents list.
- Groups: If you’ve set up one or more groups within your Contacts database, you can display them by clicking the Groups button. For example, if you’ve created a Contacts group containing all your fellow employees within your company, you can easily locate and call a specific person without wading through all your friends and family as well.
- FaceTime Search: Click within the familiar Search box, begin typing the contact’s first or last name, and FaceTime displays the matching entries.
- Favorites: Sure, you have folks you like to chat with all the time, and it’s easy to add them to the Favorites list. (Those who don’t make the Favorites list don’t have to know, right?) Click the desired contact and then click the Add to Favorites button. To display your favorite contacts at any time, click the Favorites button in the FaceTime window.
When the call is accepted, you see a large video window with a smaller “picture-in-picture” display. The video from the other person fills the large window, and the video that you’re sending to that person appears in the small display, as shown in Figure 12-2. Click the End icon to end the FaceTime call.

Figure 12-2: The FaceTime window in action.
To switch FaceTime into Landscape mode and take advantage of your iMac’s widescreen display, choose Video⇒Use Landscape or press ![]() +R. (Why let the iPhone 4/5 series, iPod touch, and iPad owners have all the landscape fun?)
+R. (Why let the iPhone 4/5 series, iPod touch, and iPad owners have all the landscape fun?)
Turning Your iMac into a TV — And More
Your iMac’s beautiful LED screen would seem to be the perfect artist’s canvas for watching cable or satellite TV broadcasts, but there’s no coaxial (cable or satellite) input on the back of your computer (and no TV tuner nestled within). Therefore, unless you invest in some additional hardware, you’re restricted to downloading movies.
Such an obvious need is going to be filled quickly, and a number of different hardware manufacturers have produced external devices that can merge your iMac and your TV signal. Most are USB peripherals, and many have all the features of today’s TiVo and digital video recorders.
My favorite example is the EyeTV HD, from Elgato (www.elgato.com), which uses a USB connection. Check out what this superstar includes for your investment of $200:
- Basic cable and satellite-ready with a coaxial connector
- The ability to capture HD or SD video from a camcorder or VCR
- Capability to schedule recordings with an onscreen program guide
- Full-screen TV display or in a window anywhere on your Desktop
- No external power supply required
I really love the ability to fast-forward through commercials, and I can take anything that I record on my iMac and use it in iMovie. The addition of TV under your control sorta finalizes the whole digital hub thing, now doesn’t it?