Chapter 7
Using Oozie
WHAT’S IN THIS CHAPTER?
- Designing an Oozie application
- Implementing Oozie Workflows
- Implementing Oozie Coordinator applications
- Implementing an Oozie Bundle
- Understanding how to deploy, test, and execute Oozie applications
WROX.COM CODE DOWNLOADS FOR THIS CHAPTER
The wrox.com code downloads for this chapter are found at www.wiley.com/go/prohadoopsolutions on the Download Code tab. The code is in the Chapter 7 download. All the downloads for this chapter are provided as a single Eclipse project containing all of the example’s code.
In Chapter 6, you learned about Oozie’s main components and their functionality. Oozie is a large, complicated system, and the simplest way to explain how you use it in real-world applications is to show an end-to-end example.
In this chapter, you learn how to design and implement all kinds of Oozie jobs (including Workflow, Coordinator, and Bundle jobs). You learn some implementation approaches for Oozie Workflow actions, and trade-offs that you must consider. You also learn how to install and invoke different types of Oozie jobs, and how to interact with them using the Oozie console.
The end-to-end implementation presented here showcases most of the Oozie capabilities and explains typical Oozie usage. Throughout the chapter, you build the end-to-end implementation step-by-step to help solve a real-world problem. Let’s start with a description of the problem that you will be solving.
VALIDATING INFORMATION ABOUT PLACES USING PROBES
The problem discussed in this chapter relates to the validation of information about places by using probes. Before delving into the problem that you will be solving, let’s establish a few definitions.
Places or points of interest are specific locations that may be important to some people. Those locations are additionally associated with data that explains what is interesting or important about them. These are typically locations where people come for entertainment, interaction, services, education, and other types of social activities. Examples of places include restaurants, museums, theaters, stadiums, hotels, landmarks, and so on. Many companies gather data about places and use this data in their applications.
In the telecommunications industry, probes are small packages of information sent from mobile devices. The majority of “smartphones” send probes regularly when the device is active and is running a geographical application (such as maps, navigation, traffic reports, and so on). The probe frequency varies for different providers (from 5 seconds to 30 seconds). Probes are normally directed to phone carriers such as Verizon, Sprint, AT&T, and/or phone manufacturers such as Apple, Nokia, HTC, and so on.
The exact format and set of attributes included in a probe depend on the provider, but the core attributes usually included in each probe are device ID, timestamp, latitude, longitude, speed, direction of movement, and service provider. The device ID randomly changes over a specified time interval (for example, 5 minutes). Probes are widely used for traffic analysis, but, in this chapter, you use probes in connection with places.
The information about places is received from different providers (such as McDonalds, Starbucks, or Marriott hotel chains), or from websites specially designed to gather information from the community. This information can be partially incorrect to start with, or it can change over time. Existing places can move to new locations, close, or change attributes. New places are continuously coming into existence.
Probes can be a useful tool for validation of the information about places. By the very definition of places, people should come there and stay there for some time. Consequently, place locations should correspond to probe clusters — that is, congestions of probes around places.
Place validation is a complex, multi-step process that requires the coordinated execution of multiple MapReduce jobs, and monitoring the conditions under which they are executed. Additionally, place validation must be executed on a regular basis (preferably without user intervention) — that is, provided the data for execution is ready.
Let’s get started with implementation design.
DESIGNING PLACE VALIDATION BASED ON PROBES
Assume that you have a probes repository (such a repository can easily be petabytes in size) and a places repository (such repository can easily be hundreds of terabytes). The following seem to be reasonable steps for implementing a probe-based place validation:
Before proceeding with process design, take a look at some additional considerations for this sample implementation:
- Information is changing over time — new probes arrive, place information changes, and so on. This means that the overall process should run periodically to be able to use this new information.
- Probe and place information is dynamic, and is constantly changing. This means that data preparation typically runs on a different schedule than the actual data processing.
- Calculating a place attendance index is a validation function, and is typically more important than clustering strands (which is a predictive operation). Consequently, the two should be calculated with different frequency.
- Data preparation processes for both probes and places can be reused in other applications.
- Each step should report failure (if it occurs) through e-mail.
Based on all these requirements, the overall solution to validating places information using probes requires the implementation of three Workflow processes:
- Prepare data.
- Calculate a place attendance index.
- Calculate a cluster strand.
Each of these processes requires its own coordination application to define its execution frequency, as well as input and output events. Finally, a Bundle application can bring the entire execution together in a single data pipeline.
Let’s now take a look at Workflow design for this problem.
DESIGNING OOZIE WORKFLOWS
Figure 7-1 shows the first Workflow process. This data preparation Workflow process contains fork and join nodes, thus allowing the data preparation for places and probes to be executed in parallel.
FIGURE 7-1: Workflow for data preparation

Data preparation for places involves two steps that must be executed sequentially. The first step selects place data for a given area, and is implemented using a Hive query. The second step is geotiling place information, and is a MapReduce job implemented here as a java action. (You learn more detail about this decision later in this chapter.)
Data preparation for probes contains three steps that must be executed sequentially. The first step selects probe data for a given area, and is implemented as a Hive query. The second step builds probe strands, and is implemented as a Pig script. Finally, the geotiling step is implemented the same way as the probes’ geotiling step described previously.
All business steps are happening inside the “fork-join” section, which starts from the Fork node shown in Figure 7-1 and ends with the Join node. At the end of every step, the Workflow checks whether the step has completed successfully. If it has, the control is transferred to the next step. Otherwise, control transferred immediately to the Join node.
After the Join node, the Decision node determines whether any error has happened in any previous step. If an error happened, the Decision node transitions control to the Report Failure node, which sends the error notification via an e-mail. This e-mail would include the exact reason for the failure, as well as details on the step where the failure occurred. Otherwise, the Decision node transitions control to the Report Success node, which sends the success notification e-mail.
As shown in Figure 7-2, the attendance Workflow (which calculates the attendance index) is very simple. Its main action is to calculate the attendance index is implemented as a pig action. This Workflow also checks whether or not this action’s execution failed. If the action did fail, the Workflow sends an error e-mail to staff; otherwise, it sends a success e-mail.
FIGURE 7-2: Workflow for calculating the attendance index

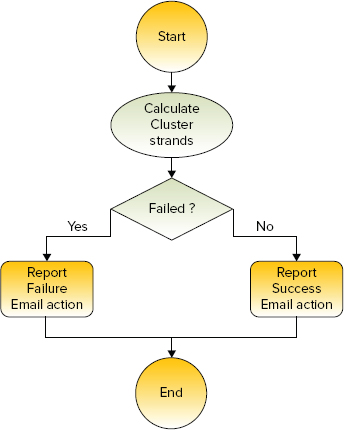
Figure 7-3 shows the third process for solving this real-world problem. This main activity of the cluster Workflow process is to calculate cluster strands, which is implemented as a MapReduce job with a java action node. This process also checks whether execution of this action succeeds (and sends a success e-mail) or fails (and sends an error e-mail).
FIGURE 7-3: Workflow for calculating a cluster
Now that the Workflow design is complete, you must implement the processes. Unfortunately, Oozie does not provide a graphical process designer, so the translation from process design to an actual implementation must be done manually.
IMPLEMENTING OOZIE WORKFLOW APPLICATIONS
Before proceeding to the process implementation, assume that java, hive, and pig actions used in the previously described Workflows are implemented using corresponding Java classes, hdl scripts (Hive), or Pig Latin scripts shown in Table 7-1.
TABLE 7-1: Programming Artifacts for Actions in Workflows


To keep the code fragments shown in the remainder of this chapter manageable, the example implementation is enhanced incrementally. It starts with complete implementations, omitting many of the details. Then, more implementation details are added iteratively as the discussion (and solution implementation) progresses.
Implementing the Data Preparation Workflow
Start by building the data-prep-wf Workflow for the data preparation process shown in Figure 7-1. Listing 7-1 (code file: dataPrepWf.xml) shows the skeleton of the data-prep-wf Workflow.
LISTING 7-1: Workflow for the data preparation process
<?xml version="1.0" encoding="UTF-8"?>
<workflow-app name='data-prep-wf' xmlns='uri:oozie:workflow:0.3'
     xmlns:sla="uri:oozie:sla:0.1">
     <start to='prep-fork'/>
     <fork name="prep-fork">
          <path start="select-probes"/>
          <path start="select-places"/>
     </fork>
     <action name='select-probes'>
<hive xmlns="uri:oozie:hive-action:0.2"> [HIVE ACTION BODY] </hive>
          <ok to="build-strands"/>
          <error to="prep-join"/>
     </action>
     <action name='build-strands'>
          <pig> [PIG ACTION BODY] </pig>
          <ok to="geotile-strands"/>
          <error to="prep-join"/>
          <sla:info> [SLA SECTION] </sla:info>
     </action>
     <action name='geotile-strands'>
          <java> [JAVA ACTION BODY] </java>
          <ok to="prep-join"/>
          <error to="prep-join"/>
          <sla:info> [SLA SECTION] </sla:info>
     </action>
     <action name='select-places'>
<hive xmlns="uri:oozie:hive-action:0.2"> [HIVE ACTION BODY] </hive>
          <ok to="geotile-places"/>
          <error to="prep-join"/>
     </action>
     <action name='geotile-places'>
          <java> [JAVA ACTION BODY] </java>
          <ok to="prep-join"/>
          <error to="prep-join"/>
          <sla:info> [SLA SECTION] </sla:info>
     </action>
     <join name="prep-join" to="report-success"/>
     <decision name="check-err">
          <switch>
              <case to "report-failure">${wf:lastErrorNode() != null}</case>
              <default to="report-success"/>
          </switch>
     </decision >
     <action name='report-success'>
          <email xmlns="uri:oozie:email-action:0.1"> [EMAIL ACTION BODY] </email>
          <ok to="end"/>
          <error to="fail"/>
     </action>
     <action name='determine-error'>
          <java> [JAVA ACTION BODY] </java>
          <ok to="report-failure"/>
          <error to="fail"/>
     </action>
     <action name='report-failure'>
          <email xmlns="uri:oozie:email-action:0.1"> [EMAIL ACTION BODY] </email>
          <ok to="fail"/>
          <error to="fail"/>
     </action>
     <kill name="fail">
<message>
validate-places-wf failed, error message: [${wf:errorMessage(wf:lastErrorNode())}]
</message>
     </kill>
     <end name="end"/>
     <sla:info> [SLA SECTION] </sla:info>
</workflow-app>
Listing 7-1 shows all the Oozie action nodes and flow-control nodes used in this process. For actions, the listing only shows names and types, flow-control definitions, and placeholders for the action body section. Note several things in this implementation:
- A start node points to the name of the first node of the implementation — in this case, a fork action.
- In the implementation of the fork action, parallel execution is defined by specifying the execution path for every parallel thread.
- Every action contains two tags: ok and error. The ok tag defines transition in the case of a successful execution of an activity. The error tag defines transition in the case of a failed execution.
- Implementation of the join action contains just a name. The actual joining is done by several actions that specify transition to a join action.
- <sla:info> is included in both individual actions and the Workflow as a whole.
As of this writing, the hive action and email action are extensions to the main Workflow specification (0.3). To enable the Oozie server to understand those extensions, you should place the action schema definition files in the Oozie conf directory. The Oozie oozie-site.xml file should include the lines shown in Listing 7-2 (this will also include Oozie SLA support).
LISTING 7-2: Extending Oozie schema with definitions for hive action, email action, and SLA
<property>
       <name>oozie.service.SchemaService.wf.ext.schemas</name>
       <value>oozie-sla-0.1.xsd,hive-action-0.2.xsd,email-action-0.1.xsd</value>
</property>The overall data preparation Workflow includes multiple actions, including a java action, pig action, hive action, and email action. Listing 7-1 shows only action names and types. In reality, to implement these actions in a Workflow, you would need more configuration information. In the following subsections, you learn how to configure each action type.
java Action
Listing 7-3 (code file: dataPrepWf.xml) shows the extended definition of the geotile-strandsjava action. (Several omitted sections, including PREPARE, CONFIGURATION, and SLA, are presented shortly.) The geotile-strandsjava action uses a driver pattern to submit a MapReduce job on a cluster.
LISTING 7-3: Oozie java action
<action name='geotile-strands'>
<java>
          <job-tracker>${jobTracker}</job-tracker>
          <name-node>${nameNode}</name-node>
          <prepare> [PREPARE SECTION] </prepare>
          <job-xml>${geotileStrandsProperties}</job-xml>
          <configuration> [CONFIGURATION SECTION] </configuration>
          <main-class> com.practicalHadoop.geotile.Strands</main-class>
          <java-opts>${Dopt_loglevel} ${Xopt_jvm}</java-opts>
          <arg>-tileSize=${tileLevel}</arg>
          <arg>-strandCenter=${strandCenter}</arg>
          <arg>-bBox=${bbox}</arg>
          <arg>-strandCardinality=${cardinality}</arg>
          <arg>-centerMethod=${strandCenterMethod}</arg>
<capture-output/>
     </java>
     <ok to="prep-join"/>
     <error to=" prep-join"/>
     <sla:info> [SLA SECTION] </sla:info>
</action>
This Oozie java action definition first specifies the JobTracker and the NameNode of the Hadoop cluster. (Remember that a java action is executed as a MapReduce job.) You use the <job-xml> element to specify a location of the action configuration file on HDFS. Configuration parameters for this Oozie action are discussed later in this chapter.
The <main-class> element specifies the Java class with the main() method that is used as a starting point for executing the action code in the Hadoop job. The <java-opts> element enables you to override JVM options.
In Listing 7-3, the <java-opts> element uses an EL expression to define the logLevel parameter, and the java options. An action definition can contain only one <java-opts> element.
The <arg> element enables you to specify a parameter for a Java program started with java action. In Listing 7-3, the tileSize named parameter is defined with the ${tileLevel} EL expression. Again, this assumes that the value for the property tileLevel is already defined. A java action can have multiple <arg> elements.
The <capture-output/> element specifies to Oozie that this java action will return some data (name/value pairs of strings) that will be placed in the Workflow execution context. This data becomes a part of Workflow execution context, and is available to the other actions in the same Workflow. This feature is described in more detail later in this chapter.
<prepare> Element
An Oozie action might require some preconditions — for example, that some specific directory structure on HDFS be present. The <prepare> element of an action enables you to define the functionality that ensures these preconditions will be fulfilled. For example, remember that the output directory for the MapReduce job should not exist when a MapReduce job starts. You can use the <prepare> element to explicitly delete this directory before starting a MapReduce job.
Listing 7-4 demonstrates the content of the <prepare> element in the geotile-strands java action.
LISTING 7-4: Oozie action <prepare> element
<prepare>
     <delete path="${strandsTilesPathTmp}"/>
     <delete path="${strandsTilesPathOut}"/>
     <mkdir path="${strandsTilesPathTmp}"/>
</prepare>
In this listing, the <prepare> element instructs Oozie to delete and then re-create the directory specified by the ${strandsTilesPathTmp} expression. It then instructs Oozie to delete the directory specified with the ${strandsTilesPathOut} expression (which is presumed to be the output directory of the MapReduce job).
<configuration> Element
This Oozie Workflow enables you to define the execution parameters for individual actions in the <configuration> element, as shown in Listing 7-5.
LISTING 7-5: Oozie action <configuration> element
<configuration>
     <property>
          <name>pool.name</name>
          <value>ARCHITECTURE</value>
     </property>
     <property>
          <name>oozie.launcher.pool.name</name>
          <value>ARCHITECTURE</value>
     </property>
     <property>
          <name>oozie.launcher.mapred.job.priority</name>
          <value>HIGH</value>
     </property>
     <property>
          <name>mapred.job.priority</name>
          <value>HIGH</value>
     </property>
     <property>
          <name>spatial4jVer</name>
          <value>5.2</value>
     </property>
</configuration>
In Listing 7-5, the <configuration> element specifies the fair scheduler parameters for the geotile-strands java action (that is, pool names and priorities). Additionally, it specifies the version of spatial4j library for the geotile-strands action in the spatial4jVer property.
<sla:info> Element
As you learned in Chapter 6, a Service Level Agreement (SLA) is the standard part of a service contract that specifies the quality of service in measurable terms. More specifically, the SLA is determined by business requirements, and depends on the nature of the service.
Oozie jobs and corresponding Hadoop jobs belong to the category of batch jobs. The distributed nature of those jobs and highly automated management of resources and failover provided by the Hadoop framework dictate the specifics of the Oozie SLA (as discussed in Chapter 6). Listing 7-6 shows an example SLA definition for the geotile-strands action that leverages all SLA features provided by Oozie.
LISTING 7-6: Oozie action <sla:info> element
<sla:info>
     <sla:app-name> geotile-strands </sla:app-name>
     <sla:nominal-time>${startExtract}</sla:nominal-time>
     <sla:should-start>${5 * MINUTES}</sla:should-start>
     <sla:should-end>${15 * MINUTES}</sla:should-end>
     <sla:parent-client-id> data-prep-wf </sla:parent-client-id>
     <sla:parent-sla-id> validate-places </sla:parent-sla-id>
     <sla:notification-msg>
notification for action: geotile-strands</sla:notification-msg>
     <sla:alert-contact>[email protected]</sla:alert-contact>
     <sla:dev-contact>sla>[email protected]</sla:dev-contact>
     <sla:qa-contact>[email protected]</sla:qa-contact>
<sla:se-contact>[email protected]</sla:se-contact>
     <sla:alert-frequency> ${24 * LAST_HOUR} </sla:alert-frequency>
     <sla:alert-percentage>90</sla:alert-percentage>
     <sla:upstream-apps> places </sla:upstream-apps>
</sla:info>
The example shown in Listing 7-6 specifies the expected start time (<sla:nominal-time>), delay threshold (<sla:should-start>), and expected completion time (<sla:should-end>). As discussed in Chapter 6, by using information from other Oozie database tables, the monitoring system can control the violations of those conditions.
Other <sla:info> sub-elements here are used to specify the content and addresses for notification about SLA violations. Note that the sla prefix is defined in the xmlns:sla="uri:oozie:sla:0.1" namespace, included as an attribute in the <workflow-app> element in Listing 7-1.
Now that you know how to use and configure the java action, let’s take a look at the pig action.
pig Action
As you learned in Chapter 2, Apache Pig is framework (sometimes referred to as a platform) that was developed for analyzing large data sets. Pig consists of a high-level language for expressing data analysis in programs, coupled with an infrastructure for executing these programs. Pig offers a high-level language (Pig Latin) to specify highly parallelized data processing on Hadoop clusters, thus leveraging the MapReduce framework.
Oozie provides support for Pig applications in the form of pig actions. The Oozie server uses the pig action definition to invoke the Pig run time with a specified Pig script and parameters. After that, the Pig run time interprets the script, generates Java code for MapReduce jobs, submits and controls job execution, and eventually returns the status and messages from jobs to the Oozie server.
Listing 7-7 (code file: dataPrepWf.xml) shows the definition of the build-strands pig action. Similar to the java action, the pig action can use <prepare>, <job-xml>, <configuration>, and <sla:info> elements. Those elements play the same role as in the java action.
LISTING 7-7: Oozie pig action
<action name='build-strands'>
     <pig>
          <job-tracker>${jobTracker}</job-tracker>
          <name-node>${nameNode}</name-node>
          <prepare> [PREPARE SECTION] </prepare>
          <job-xml>${buildStrandsProperties}</job-xml>
          <configuration> [CONFIGURATION SECTION]</configuration>
          <script>/user/practicalHadoop/pig/strands.pig</script>
          <param>-distance=${distance}</param>
          <param>-timeSpan=${timeSpan}</param>
     </pig>
     <ok to="geotile"/>
     <error to="prep-join"/>
     <sla:info> [SLA SECTION] </sla:info>
</action>
Following are some differences between the pig action and java action in this implementation:
- Instead of a <main-class> element that defines the starting point for the java action, the pig action contains the <script> element that specifies the Pig script on HDFS.
- Instead of <java-opts> and <arg> elements, the pig action uses the <param> and <argument> elements to pass parameters to the Pig script.
- The pig action cannot return data to the Workflow context, which means that it does not use the <capture-output/> element.
hive Action
As you learned in Chapter 2, Hive is a data warehouse system for Hadoop that supports restricted SQL queries against large data sets stored in HDFS and HBase. Hive provides a mechanism to project this data into a table definition, and query the data using a SQL-like language called HiveQL (HQL). Similar to Pig, Hive interprets the HQL script and generates Java code for MapReduce jobs.
Oozie provides support for Hive applications in the form of hive actions. The Oozie server uses the hive action definition to invoke the Hive run time with the specified HQL script and parameters. After that, the Hive run time interprets the script, generates Java code for MapReduce jobs, submits and controls job execution, and eventually returns the status and messages from jobs to the Oozie server.
Listing 7-8 (code file: dataPrepWf.xml) shows the skeleton of the definition of the select-probes hive action. Similar to a java action, a hive action can use <prepare>, <job-xml>, and <configuration> elements. Those elements are used the same way as in the java action, and are not examined in detail here for the hive action.
LISTING 7-8: Oozie hive action
<action name="select-probes">
        <hive xmlns="uri:oozie:hive-action:0.2">
<job-tracker>${jobTracker}</job-tracker>
            <name-node>${nameNode}</name-node>
            <prepare> [PRAPRE SECTION] </prepare>
            <job-xml>${selectProperties}</job-xml>
            <configuration>
            <property>
            <name>oozie.hive.defaults</name>
            <value> ${nameNode}/sharedlib/conf-xml/hive-default.xml </value>
            </property>
[OTHER CONFIGURATION PROPERTIES]
</configuration>
            <script>/user/practicalHadoop/hive/select.hql</script>
            <param>-start=${startTime}</param>
            <param>-end=${endTime}</param>
            <param>-bbox=${bBox}</param>
        </hive>
           <ok to="validate-filter"/>
           <error to="prep-join"/>
</action>
The definition of a hive action is very similar to the definition of a pig action, with the following notable differences:
- The hive action does not support <argument> and <sla:info> elements.
- The <configuration> section of a hive action definition should specify the location of the hive-default.xml file on HDFS.
The Oozie hive action is one of Oozie’s extension actions. Similar to the case with SLA discussed in Chapter 6, to use hive action, you must register the Hive XSD schema definition with the oozie-site.xml file (see Listing 7-2 earlier in this chapter). Additionally, you must include the hive namespace in the Workflow application, as shown in Listing 7-8 (the <hive> element contains the attribute xmlns="uri:oozie:hive-action:0.2").
email Action
You can use Oozie to notify end users about the execution flow of an Oozie job by using an email action. Listing 7-9 (code file: dataPrepWf.xml) shows the definition of the report-failure email action.
LISTING 7-9: Oozie email action
<action name="report-failure">
     <email xmlns="uri:oozie:email-action:0.1">
          <to>${EMAIL-ADDRESSES}</to>
          <cc>${EMAIL-CC_ADDRESSES}</cc>
          <subject>validate-places-wf outcome</subject>
          <body>data-prep-wf failed at ${wf:lastErrorNode()} with
               ${wf:errorMessage(wf:lastErrorNode())}</body>
     </email>
     <ok to="fail"/>
     <error to="fail"/>
</action>
One interesting detail about the email action definition shown in Listing 7-9 is the content of the <body> element. The EL expressions ${wf:lastErrorNode()} and ${wf:errorMessage(wf:lastErrorNode())} use the Oozie native capacity to propagate the error information to all Workflow nodes.
Similar to the hive action, the email action is an Oozie extension action. That means that the email action XSD schema definition file should be registered with the oozie-site.xml file (see Listing 7-2 earlier in this chapter), and that the <email> element should contain the attribute xmlns="uri:oozie:email-action:0.1".
Now that you have implemented a data presentation Workflow, you are ready to implement the other two Workflows to calculate the attendance index and cluster strands.
Implementing Attendance Index and Cluster Strands Workflows
These two Workflows are very simple and similar to each other. Listing 7-10 (code file: attendanceWf.xml) shows the attendance-wf Workflow to calculate the attendance index.
LISTING 7-10: The attendance-wf Workflow application
<?xml version="1.0" encoding="UTF-8"?>
<workflow-app name="attendance-wf" xmlns="uri:oozie:workflow:0.3"
        xmlns:sla="uri:oozie:sla:0.1">
     <start to="attendance"/>
     <action name="attendance">
          <pig>
               <job-tracker>${jobTracker}</job-tracker>
               <name-node>${nameNode}</name-node>
               <prepare> [PREPARE SECTION] </prepare>
               <job-xml>${attendanceProperties}</job-xml>
               <configuration> [CONFIGURATION SECTION] </configuration>
               <script>/user/practicalHadoop/pig/attendInd.pig</script>
               <param>-distance=${distance}</param>
               <param>-timeSpan=${timeSpan}</param>
          </pig>
          <ok to="report-success"/>
          <error to="report-failure"/>
          <sla:info> [SLA SECTION] </sla:info>
     </action>
     <action name='report-success'>
          <email xmlns="uri:oozie:email-action:0.1">
               [EMAIL ACTION BODY]
          </email>
          <ok to="end"/>
          <error to="fail"/>
     </action>
     <action name='report-failure'>
          <email xmlns="uri:oozie:email-action:0.1">
               [EMAIL ACTION BODY]
          </email>
          <ok to="fail"/>
          <error to="fail"/>
     </action>
     <kill name="fail">
          <message>
attendance-wf failed, error message: [${wf:errorMessage(wf:lastErrorNode())}]
          </message>
     </kill>
     <end name="end"/>
     <sla:info> [SLA SECTION] </sla:info>
</workflow-app>
The attendance-wf Workflow application that is shown in Listing 7-10 contains only one asynchronous action — the attendance pig action. All elements of this Workflow application are similar to ones discussed earlier in this chapter.
The cluster-wf Workflow application shown in Listing 7-11 (code file: clusterWf.xml) is very similar to the attendance-wf Workflow application.
LISTING 7-11: The cluster-wf Workflow application
<workflow-app name="cluster-wf" xmlns="uri:oozie:workflow:0.3"
        xmlns:sla="uri:oozie:sla:0.1">
     <start to="cluster"/>
     <action name="cluster">
          <java>
               <job-tracker>${jobTracker}</job-tracker>
               <name-node>${nameNode}</name-node>
               <prepare> [PRAPRE SECTION] </prepare>
               <job-xml>${clusterProperties}</job-xml>
               <configuration> [CONFIGURATION SECTION] </configuration>
               <main-class>com.practicalHadoop.strand.Cluster</main-class>
               <java-opts>${Dopt_loglevel} ${Xopt_jvm}</java-opts>
               <arg>-version=${spatial4jVer}</arg>
               <arg>-tileSize=${tileLevel}</arg>
               <arg>-distance=$distance}</arg>
          </java>
          <ok to="report-success"/>
          <error to="report-failure"/>
          <sla:info> [SLA SECTION] </sla:info>
     </action>
     <action name='report-success'>
          <email xmlns="uri:oozie:email-action:0.1">
               [EMAIL ACTION BODY]
          </email>
          <ok to="end"/>
          <error to="fail"/>
     </action>
     <action name='report-failure'>
          <email xmlns="uri:oozie:email-action:0.1">
               [EMAIL ACTION BODY]
          </email>
          <ok to="fail"/>
          <error to="fail"/>
     </action>
     <kill name="fail">
          <message>
cluster-wf failed, error message: [${wf:errorMessage(wf:lastErrorNode())}]
          </message>
     </kill>
     <end name="end"/>
     <sla:info> [SLA SECTION] </sla:info>
</workflow-app>
This Workflow contains only one asynchronous action — the cluster java action. All elements of this Workflow application are similar to ones discussed previously in this chapter.
Now that you have seen the implementation of Workflows, let’s take a look at the implementation of Workflow activities.
IMPLEMENTING WORKFLOW ACTIVITIES
In general, Oozie does not require special programming for any of the Oozie actions. For example, any existing Pig script or any HQL script can be used as is inside of Oozie actions. The two possible exceptions have to do with Java nodes and MapReduce nodes.
As described earlier in this chapter, Oozie action nodes can consume parameters passed in the form of arguments from the execution context. In addition, Java nodes enable you to pass some of the execution results back to the Workflow execution context for use by other actions.
Let’s take a look at how you pass parameters from a java action to the execution context.
Populating the Execution Context from a java Action
To enable a java action to publish parameters (that is, a map of string name/value pairs), the definition of that action should include the <capture-output/> element. Listing 7-12 shows an example of publishing parameters from a java action.
LISTING 7-12: Example of publishing parameters from the Oozie java action
Properties props = new Properties();
Props. setProperty("height", "7.8");
Props. setProperty("weight", "567");
String oozieProp = System.getProperty("oozie.action.output.properties");
File propFile = new File(oozieProp);
OutputStream os = new FileOutputStream(propFile);
props.store(os, "");
os.close();
After this java action successfully executes, the parameters height and weight with the values assigned in the code are available in the Oozie Workflow application, and can be passed to subsequent actions in the form of EL expressions, as shown here:
${wf:actionData(troll-recognizer')['height']}
${wf:actionData(troll-recognizer')['weight']}
Now, let’s discuss options for using MapReduce jobs in Oozie actions.
Using MapReduce Jobs in Oozie Workflows
Oozie provides two different ways of invoking MapReduce jobs — the java action implementing a driver pattern, and the map-reduce Oozie action.
Invocation of a MapReduce job with a java action is somewhat similar to invocation of this job from the edge node using the Hadoop command-line interface (CLI) (as described in Chapter 3). You specify a driver as a class for the Java activity, and Oozie invokes the driver.
On the other hand, using the map-reduce action requires a much larger and more complex configuration file, as shown in Listing 7-13.
LISTING 7-13: Oozie map-reduce action
<action name='MRSample'>
     <map-reduce>
          <job-tracker>${jobTracker}</job-tracker>
          <name-node>${nameNode}</name-node>
          <prepare>
               <delete path="${prefix}/csv/tmp" />
          </prepare>
          <configuration>
               <property>
                    <name>mapred.mapper.new-api</name>
                    <value>true</value>
               </property>
               <property>
                    <name>mapred.reducer.new-api</name>
                    <value>true</value>
               </property>
               <property>
                    <name>mapreduce.map.class</name>
                    <value>[MAPCLASS] </value>
               </property>
               <property>
                    <name>mapreduce.reduce.class</name>
                    <value>[REDUCECLASS] </value>
               </property>
               .........................
          </configuration>
     </map-reduce>
     <ok to="end" />
     <error to="fail" />
</action >
The difference between map-reduce action and java action is that the map-reduce action does not include the <main-class> element, which does not make sense in this case. Instead, this action’s implementation builds the MapReduce job’s driver based on the information defined in the action’s configuration section. This configuration section defines all the information typically specified in the MapReduce job’s driver (see Chapter 3 for more information), including mapper and reducer classes, input and output formats, and so on.
When deciding which approach to use, you should consider the normal development cycle from a MapReduce job to an action in an Oozie application, which typically looks like the one shown in Figure 7-4.
FIGURE 7-4: Map-Reduce job development cycle
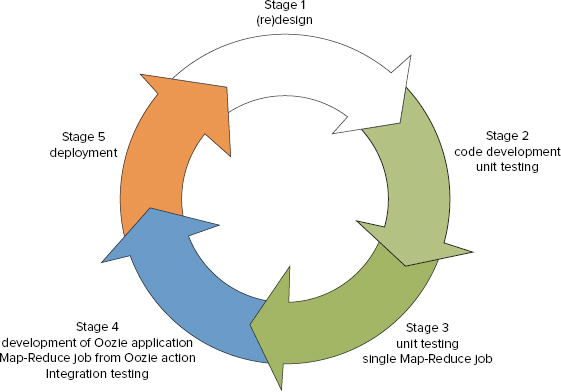
At Stages 2 and 3 of the cycle, the driver pattern is the natural option. The driver pattern presumes that the entry point of such an application is some class with the main() method. The application is started from the cluster edge node with the hadoop command.
At Stage 4 of the cycle (where MapReduce job should be invoked from an Oozie action), it is possible to either use an existing driver as is by using a java action, or refactor it for use as an Oozie map-reduce action. But that requires development effort, and precludes easily returning to the driver pattern used in Stages 2 and 3. Multiple switches between driver pattern and the map-reduce action pattern introduce unnecessary complexity into the development process.
However, by using the driver pattern, you introduce another challenge. The problem with this approach is the fact that Oozie is unaware of the actual MapReduce execution — from its point of view, it just executes a java action — which can lead to a “hanging” MapReduce execution. If a Workflow decides to kill a java action that invokes a MapReduce job, or the whole Workflow process is killed, it can leave behind MapReduce jobs started by the java actions.
You can avoid this problem if you use a Java shutdown hook with the MapReduce driver, as described in Chapter 4.
Listing 7-14 shows one possible way to implement the shutdown hook with the driver pattern.
LISTING 7-14: Shutdown hook implementation
public class DriverHook implements Runnable{
          static public DriverHookNewApi create(Job job){
     return new DriverHookNewApi(job);
       }

          Job job;

          private DriverHookNewApi(Job job){
          this.job = job;
       }

       public void run(){
            System.out.println("Hello from MyHook");
               if(job == null)
                    throw new NullPointerException("err msg");
               try{
                    JobID hdpJobID = job.getJobID();
                    if(!job.isComplete())
                            job.killJob();
             }
             catch (IOException e){
                  throw new RuntimeException("err msg");
             }
        }
}
When the JVM (containing this hook) shuts down, the run() method of the class DriverHook is invoked. This method uses the Hadoop API to check whether the job has completed, and kills it if the job is still running.
Listing 7-15 shows how to add a shutdown hook to the driver class.
LISTING 7-15: Adding a shutdown hook to the driver
Runnable myHook = DriverHook.create(job);
Thread hookThr = new Thread(myHook);
Runtime.getRuntime().addShutdownHook(hookThr);
Now that you are familiar with the details of implementing the Workflow processes to solve the example real-world problem, let’s take a look at how to implement Oozie Coordinator applications.
IMPLEMENTING OOZIE COORDINATOR APPLICATIONS
To make the Workflows defined so far work together, you should use data sets and Oozie Coordinator applications. Start by designing two data sets: probeDataset and placeDataset, as shown in Listing 7-16 (code file: dataSets.xml).
LISTING 7-16: Oozie data sets
<dataset name="probeDataset" frequency="${coord:hours(4)}"
initial-instance="2013-01-10T80:00Z" timezone="America/Chicago">
     <uri-template>
                ${fullPath}/probes/${YEAR}/${MONTH}/${DAY}/${HOUR}/data
         </uri-template>
     <done-flag/>
</dataset>

<dataset name="placeDataset" frequency="${coord: hours(4)}"
initial-instance="2013-01-10T80:00Z" timezone="America/Chicago">
     <uri-template>
                ${fullPath}/places/${YEAR}/${MONTH}/${DAY}/${HOUR}/data
         </uri-template>
     <done-flag/>
</dataset>
The data set dataSets.xml specifies data produced by the chain of actions select-probes, build-strands, and geotile-strands. The data set specifies that, every four hours starting from 2013-01-00T80:00Z, a new data set instance (actual data) should be generated and placed into the location /user/practicalHadoop/oozie/places//${YEAR}${MONTH}/${DAY}/${HOUR}/data.
For example, the first three data set instances are placed into the following locations:
/user/practicalHadoop/oozie/places/2012/01/01/00/data
/user/practicalHadoop/oozie/places/2012/01/01/04/data
/user/practicalHadoop/oozie/places/2012/01/01/08/data
Similarly, the data set placesDataset specifies the location of data generated by the chain of actions select-places and geotile-places. Instances for this data set are also generated every four hours.
You should put each of the three Workflow processes defined thus far in corresponding Coordinator applications. Listing 7-17 (code file: dataPrepCoord.xml) shows the definition of the Coordinator application for the data-prep-wf Workflow.
LISTING 7-17: Coordinator for the data-prep-wf Workflow
<coordinator-app xmlns="uri:oozie:coordinator:0.2" xmlns:sla="uri:oozie:sla:0.1"
       name="data-prep-coord" frequency="${coord:hours(4)}"
       start="2013-01-00T008:00Z" end="2013-06-00T08:00Z"
       timezone="America/Chicago">
     <controls>
          <timeout>60</timeout>
          <concurrency>3</concurrency>
          <execution>LIFO</execution>
          <throttle>4</throttle>
     </controls>
     <datasets>
        <dataset name="probeDataset" frequency="${coord:hours(4)}"
                initial-instance="2013-02-27T08:00Z"
                timezone="America/Chicago">
             <uri-template>${nameNode}/user/ayakubov/data/probes/
             ${YEAR}/${MONTH}/${DAY}/${HOUR}</uri-template>
             <done-flag/>
         </dataset>
         <dataset name="placeDataset" frequency="${coord:hours(4)}"
                initial-instance="2013-02-27T08:00Z"
                timezone="America/Chicago">
             <uri-template>${nameNode}/user/ayakubov/data/places/
                  ${YEAR}/${MONTH}/${DAY}/${HOUR}</uri-template>
             <done-flag/>
         </dataset>
     </datasets>
     <output-events>
         <data-out name="output" dataset="probeDataset">
             <instance>${coord:current(1)}</instance>
         </data-out>
         <data-out name="output2" dataset="placeDataset">
             <instance>${coord:current(1)}</instance>
         </data-out>
     </output-events>
     <action>
          <workflow>
               <app-path>${fullPath}/dataPrep</app-path>
               <configuration>
                   <property>
                       <name>wfOutput</name>
                       <value>${coord:dataOut('output')}</value>
                   </property>
               </configuration>
               <property>
                   <name>wfOutput2</name>
                   <value>${coord:dataOut('output2')}</value>
               </property>
          </workflow>
          <sla:info>[SLA SECTION]</sla:info>
     </action>
</coordinator-app>
This Coordinator application defines when the Oozie server can start a Coordinator action (with a Workflow job). The definition describes the initial start time, end time, periodic executions, data conditions, and resource conditions. The attributes of the root element <coordinator-app> define the Coordinator name, frequency of the Coordinator actions, start time, and end time of the Coordinator application.
The <controls> element specifies the following execution policies:
- concurrency level — Up to three Coordinator actions are allowed to run concurrently.
- timeout — How long the Coordinator action will be in WAITING or READY status (up to 60 seconds) before giving up on its execution.
- execution — Defines the execution strategy. In this case, it’s Last In First Out.
- throttle — Up to four Coordinator actions are allowed to be in WAITING state concurrently.
The <datasets> element specifies the data sets important for the data preparation application. The <outputEvents> element specifies (indirectly) which data sets should be generated from the Coordinator. In this case, instances of the probeDataset and placeDataset should be generated every four hours.
The <action> element specifies the location of the Workflow application definition (data-prep-wf Workflow in the <app-path> element) and important configuration parameters (wfOutput and wfOutput2). Those parameters provide the actions of the data-prep-wf Workflow with the name of data set instances that should be generated by the Workflow.
Thus, in the first data-prep-wf Workflow invocation, the value of the wfOutput parameter will be as follows:
/user/ayakubov/data/places/2013/02/27/08During the following data-prep-wf Workflow invocation, the value of the wfOutput parameter will be as follows:
/user/ayakubov/data/places/2013/02/27/12These correspond to the four-hour frequency specified for the data-prep-coord Coordinator application.
Additionally, a Coordinator application can use the <sla:info> element similar to Workflow application or Workflow action.
In summary, the Coordinator application data-prep-coord specifies that the Coordinator action (data-prep-wf job) should be submitted every four hours, starting from 2013-01-00T008:00, and ending at 2013-06-00T08:00 (time conditions). No data dependences are specified in the Coordinator application, but the <control> element specifies resource restrictions (concurrency, throttling).
Listing 7-18 (code file: attendanceCoord.xml) shows the definition of the Coordinator application for the attendance-wf Workflow.
LISTING 7-18: Coordinator for the attendance-wf Workflow
<coordinator-app xmlns="uri:oozie:coordinator:0.1" xmlns:sla="uri:oozie:sla:0.1"
       name="attendance-coord"
       frequency="${coord:endOfDays(1}"
       start="2013-01-00T008:00Z"
       end="2013-03-00T08:00Z"
       timezone="America/Chicago">
     <controls> [CONTROL SECTION] </controls>
     <datasets>
          <dataset name="probeDataset" frequency="${coord:hours(4)}" initial-
                  instance="2013-02-27T08:00Z" timezone="America/Chicago">
                <uri-template>${nameNode}/user/ayakubov/data/probes
                     /${YEAR}/${MONTH}/${DAY}/${HOUR}</uri-template>
                <done-flag/>
          </dataset>
          <dataset name="placeDataset" frequency="${coord:hours(4)}"
                initial-instance="2013-02-27T08:00Z"
                     timezone="America/Chicago">
                <uri-template>${nameNode}/user/ayakubov/data/places
                     /${YEAR}/${MONTH}/${DAY}/${HOUR}</uri-template>
                <done-flag/>
          </dataset>
     </datasets>
     <input-events>
            <data-in name="placeReadyEvent" dataset="placeDataset">
                        <instance>${coord:current(-6)}</instance>
            </data-in>
            <data-in name="probeReadyEvent" dataset="probeDataset">
                        <instance>${coord:current(-6)}</instance>
            </data-in>
     </input-events>
     <action>
          <workflow>
               <app-path>${fullPath}/attendance</app-path>
               <configuration> [CONFIGURATION SECTION] </configuration>
          </workflow>
          <sla:info> [SLA SECTION] </sla:info>
     </action>
</coordinator-app>
The definition of the attendance-coord Coordinator action is structurally very similar to the definition of data-prep-coord. The frequency of the Coordinator action is one day.
The new elements in the attendance-coord Coordinator are input events specified with the <input-events> elements. This adds the data conditions that should be met for executing the Coordinator action. Six sequential data instances of both probesDataset and placesDataset data sets (ending with the data sets for the time of nominal action submission) should exist on HDFS.
Listing 7-19 (code file: dataPrepCoord.xml) shows the definition of Coordinator application for the cluster-wf Workflow.
LISTING 7-19: Coordinator for the cluster-wf Workflow
<coordinator-app xmlns="uri:oozie:coordinator:0.1"
     xmlns:sla="uri:oozie:sla:0.1"
     name="cluster-coord"
     frequency="${coord:weeks(1}"
     start="2013-01-00T008:00Z"
     end="2013-03-00T08:00Z" timezone="America/Chicago">
       <controls> [CONTROL SECTION]     </controls>
       <datasets>
           <dataset name="probeDataset" frequency="${coord:hours(4)}"
                  initial-instance="2013-02-27T08:00Z"
                  timezone="America/Chicago">
               <uri-template>${nameNode}/user/ayakubov/data/probes
                    /${YEAR}/${MONTH}/${DAY}/${HOUR}</uri-template>
               <done-flag/>
           </dataset>
           <dataset name="placeDataset" frequency="${coord:hours(4)}"
                  initial-instance="2013-02-27T08:00Z"
                  timezone="America/Chicago">
               <uri-template>${nameNode}/user/ayakubov/data/places
                    /${YEAR}/${MONTH}/${DAY}/${HOUR}</uri-template>
               <done-flag/>
           </dataset>
       </datasets>
       <input-events>
            <data-in name="placeReadyEvent" dataset="placeDataset">
                        <instance>${coord:current(-42)}</instance>
            </data-in>
            <data-in name="probeReadyEvent" dataset="probeDataset">
                        <instance>${coord:current(-42)}</instance>
            </data-in>
       </input-events>
      <action>
          <workflow>
               <app-path>${fullPath}/cluster</app-path>
<configuration> [CONFIGURATION SECTION] </configuration>
          </workflow>
          <sla:info> [SLA SECTION] </sla:info>
     </action>
</coordinator-app>
In this application, the action frequency is one week, and the cluster-coord action should have 42 sequential instances of each of the probesDataset and placesDataset data sets on HDFS, ending with the data sets for the time of nominal action submission.
Figure 7-5 shows the ideal schedule of submission actions from the data-prep-coord, attendance-coord, and cluster-coord Coordinators.
FIGURE 7-5: Scheduling Workflow jobs for the place validation process
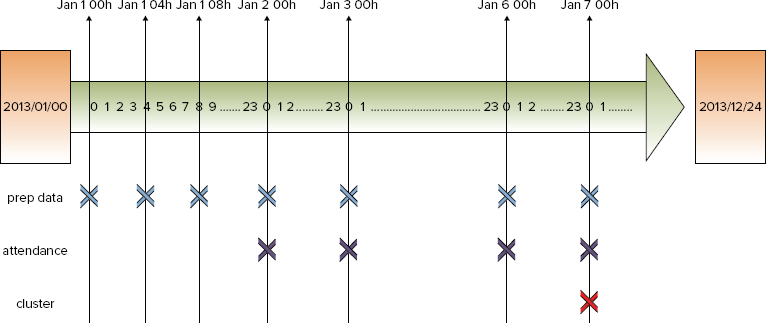
As you can see from Figure 7-5, every four hours, the data preparation Coordinator starts the data preparation Workflow. Every 24 hours (daily), the attendance calculation Coordinator starts the attendance calculation Workflow (assuming that all required data files defined in the input events are in place). Finally, once a week, the cluster calculation Coordinator starts the cluster calculation Workflow (also assuming that data sets are in place). So, if all of the Coordinators are started simultaneously and run as expected, they provide the required sequence of task execution.
In the next section, you learn how to ensure that all the Coordinator’s executions are synchronized by combining them into a single data pipeline — the Oozie Bundle, which you can use to manage all participating Coordinator applications together.
IMPLEMENTING OOZIE BUNDLE APPLICATIONS
Because the three Coordinator applications just described are coupled with time and data dependencies, you may find it inconvenient to deploy them separately. However, you can use the Oozie Bundle application to bind them together into a single, manageable entity that can be started/stopped/suspended/resumed/rerun as a whole, thus providing easier operational control.
Listing 7-20 (code file: bundle.xml) shows an Oozie Bundle application for the place validation process.
LISTING 7-20: Oozie Bundle application
<bundle-app name="place-validation-bl" xmlns='uri:oozie:bundle:0.1'>
     <controls>
          <kick-off-time>2012-12-10T008:00Z</kick-off-time>
     </controls>
<coordinator name="data-prep-coord">
          <app-path>${fullPath}/dataPrep</app-path>
          <configuration>
              </property>
                  <name>selectProperties</name>
                <value>${rootPath}/config/select-probs.properties</value>
              </property>
              </property>
                  <name>validateFilterProperties</name>
                <value>${rootPath}/config/val-filter.properties</value>
              </property>
               ...
</configuration>
           </coordinator>
           <coordinator name="attendance-coord">
          <app-path>${fullPath}/attendance</app-path>
          <configuration> ... </configuration>
           </coordinator>
     <coordinator name="cluster-coord">
          <app-path>${fullPath}/cluster</app-path>
              <configuration> ...  </configuration>
           </coordinator>
</bundle-app>
Implementation of this Bundle application is fairly simple and straightforward. It contains a <control> element that specifies when to start the Bundle execution, and a set of Coordinator applications that are included in the Bundle. For every Coordinator application, the Bundle definition describes where this application is deployed, and provides an optional set of configuration parameters, which can be passed to corresponding applications.
Now that you have seen how to implement this chapter’s sample application, let’s take a look at how you can deploy, test, and execute it.
DEPLOYING, TESTING, AND EXECUTING OOZIE APPLICATIONS
Testing an Oozie application typically starts with the testing of individual actions. You can often test the java action by running it by itself. Chapter 5 provides details on testing MapReduce applications. Testing of Pig and Hive scripts is well covered in other literature.
So, let’s concentrate on testing Oozie applications. In order to do this, you must first deploy them.
Deploying Oozie Applications
Figure 7-6 shows the suggested location of artifacts (Coordinators, Workflows, jars, Pig and Hive scripts, as well as configuration files) on HDFS that were developed earlier in this chapter.
FIGURE 7-6: Deploying Oozie artifacts
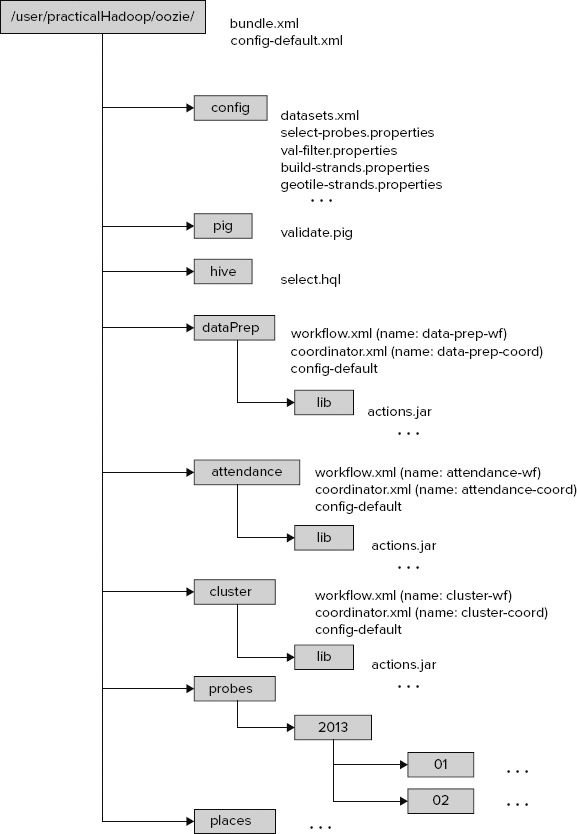
For the deployment, an HDFS directory (/user/practicalHadoop/oozie) is chosen. This directory contains both the executable code and data files produced by the applications.
Following are some important things to note about this deployment:
- Every Workflow application should be placed in a separate folder, which has the following well-defined layout:
- It should contain the files workflow.xml (Workflow definition) and config-default.xml (more about this file later). To keep things together and simplify file layout, you place coordinator.xml (Coordinator definition) in the same directory (technically, you could place it in any directory).
- It should contain the lib directory. All the jar files required for execution of Workflow activities, along with all the files that they depend on, should be placed in the lib directory.
- The rest of the directories can be located elsewhere, but in this case, they are brought together to simplify the deployment.
The config-default.xml file shown in Figure 7-6 is a configuration file that enables you to specify parameters of the Workflow, Coordinator, or Bundle application. (You learn more about specifying parameters for Oozie execution later in this chapter.)
The deployment file layout shown in Figure 7-6 supports the following execution modes:
- Run each Workflow separately with the oozie command from the edge node (the first step of integration testing).
- Run each Coordinator separately with the oozie command from the edge node (the next step of the integration testing).
- Run the Oozie Bundle with all three Coordinators with the oozie command from the edge node (the last step of the integration testing).
Now that you know how to deploy an Oozie application, let’s take a look how to use the Oozie CLI (described in Chapter 6) for Oozie execution of an Oozie application.
Using the Oozie CLI for Execution of an Oozie Application
Oozie provides a command-line interface (CLI) to perform job-related and administrative tasks. All operations are done via sub-commands of the oozie CLI command. The oozie command requires an Oozie URL as one of its arguments. The Oozie URL points to the RESR endpoint of the Oozie server.
Let’s take a closer look at important Oozie sub-commands for the oozie command.
submit
The submit command is used for submitting a Workflow, Coordinator, or Bundle job. The job will be created, but it will not be started. It will be in the PREP status. Listing 7-21 shows an example.
LISTING 7-21: Submitting an Oozie job with CLI
$ oozie job -oozie http://OozieServer:8080/oozie -config job.properties –submit
.
job: 14-20090525161321-oozie-job
Here, the argument -oozie http://OozieServer:8080/oozie specifies the Oozie URL. The argument -config job.properties specifies the job property file (which is explained in detail later in this chapter). The job property file should contain the property that specifies the location of the Oozie application definition on HDFS. The name of the property file that specifies the HDFS location of the application definition depends of the type of Oozie application, as shown in Table 7-2.
TABLE 7-2: Defining Application Location for Different Types of Oozie Applications
| TYPE OF OOZIE APPLICATION | NAME OF PROPERTY |
| Workflow | oozie.wf.application.path |
| Coordinator | oozie.coord.application.path |
| Bundle | oozie.bundle.application.path |
As shown at Listing 7-21, the submit sub-command returns the Oozie job ID.
start
The start command starts a previously submitted Workflow job, Coordinator job, or Bundle job that is in PREP status. After the command is executed, the job will be in the RUNNING state. Listing 7-22 shows an example.
LISTING 7-22: Starting an Oozie job with CLI
$ oozie job -oozie http://OozieServer:8080/oozie -start 14-20090525161321-oozie-jobThe argument for the start command is the Oozie job ID returned by the submit command.
run
The run command creates and starts an Oozie job. So, the run command is effectively a combination of the submit command followed by a start command. Listing 7-23 shows an example of the run command.
LISTING 7-23: Running an Oozie job with CLI
$ oozie job -oozie http://OozieServer:8080/oozie -config job.properties –run
.
job: 15-20090525161321-oozie-job
Similar to the submit command, the run command returns the Oozie job ID.
kill
The kill command enables you to terminate a Workflow, Coordinator, or Bundle job. Listing 7-24 shows an example of the kill command.
LISTING 7-24: Terminating an Oozie job with CLI
$ oozie job -oozie http://OozieServer:8080/oozie -kill 14-20090525161321-oozie-jobsla
The sla command enables you to get the status of an SLA event. Listing 7-25 shows an example of this command.
LISTING 7-25: Example of a CLI sla command
$ oozie sla -oozie http://OozieServer:11000/oozie -len 2 –offset 0
.
<sla-message>
  <event>
    <sequence-id>1</sequence-id>
    <registration>
      <sla-id>0000573-120615111500653-oozie-oozi-C@1</sla-id>
      <app-type>COORDINATOR_ACTION</app-type>
      <app-name>test-app</app-name>
      <user>ayakubov</user>
      <group>users</group>
      <parent-sla-id>null</parent-sla-id>
      <expected-start>2012-06-28T11:50Z</expected-start>
      <expected-end>2012-06-28T12:15Z</expected-end>
      <status-timestamp>2012-07-02T15:35Z</status-timestamp>
      <notification-msg>Notifying User for 2012-06-28T11:45Z nominal
           time</notification-msg>
      <alert-contact>[email protected]</alert-contact>
      <dev-contact>[email protected]</dev-contact>
      <qa-contact>[email protected]</qa-contact>
      <se-contact>[email protected]</se-contact>
      <alert-percentage>80</alert-percentage>
      <alert-frequency>LAST_HOUR</alert-frequency>
      <upstream-apps />
      <job-status>CREATED</job-status>
      <job-data />
    </registration>
  </event>
  <event>
    <sequence-id>2</sequence-id>
    <status>
      <sla-id>0000573-120615111500653-oozie-oozi-C@1</sla-id>
      <status-timestamp>2012-07-02T15:35Z</status-timestamp>
      <job-status>STARTED</job-status>
      <job-data />
    </status>
  </event>
  <last-sequence-id>2</last-sequence-id>
</sla-message>
The command arguments contain the number of required SLA events len (2 in this case) and an offset from the first SLA event (0 in this case). The command execution returns the list of SLA events of the requested length.
That first SLA record in the reply happens to be a registration record; the second is a – status record. (Those are the only two types of SLA events.)
Some other important CLI commands include suspend, resume, change (parameter), rerun, and info (check status).
As mentioned previously, the oozie CLI is useful for integration testing, but it is also useful for deployment and management of an Oozie application.
As with every application, Oozie jobs are using parameters, which can be passed to Oozie jobs as arguments. Let’s now take a look at how to pass arguments to Oozie jobs.
Passing Arguments to Oozie Jobs
As with every application, the reusability of Oozie applications (to a large extent) depends on how arguments are passed to the Oozie job. Several methods exist for specifying parameters (that is, properties or arguments) for Oozie jobs and corresponding Hadoop jobs. This section first examines different methods of passing parameters to Hadoop jobs, and then presents a comparison of different approaches for passing parameters.
Using an Oozie Invocation Command
One of the most obvious ways of passing execution parameters to an Oozie job is as part of the Oozie CLI run sub-command. Listing 7-26 shows an example of such an approach.
LISTING 7-26: Oozie CLI invocation command
oozie job –oozie ${OOZIE_ENDPOINT} -D country=USA -config job.properties –runHere, the command fragment -D country=USA enables you to directly set the parameter country=USA in the command line for the Oozie application. That parameter will now be available in the Oozie application execution context, and can be used, for example, as a parameter for java action invocation inside the <arg> element.
Using an Oozie Job Property File
As shown in the deployment layout in Figure 7-6 and referenced in the discussion about the Oozie submit (Listing 7-21) and run (Listing 7-23) sub-commands, this Oozie job execution is using the job.properties files.
job.properties files provide another place where job arguments can be specified. Listing 7-27 shows an example of the property file.
LISTING 7-27: Example of an Oozie job property file
<?xml version="1.0" encoding="UTF-8"?>
<configuration>
  <property>
         <name>jobTracker</name>
         <value>jtServer:8021</value>
  </property>
  <property>
         <name>nameNode</name>
         <value>hdfs://nnServer:8020</value>
  </property>
  <property>
         <name>rootPath</name>
         <value>/user/practicalHadoop/oozie</value>
  </property>
  <property>
         <name>fullPath</name>
         <value>${nameNode}/${rootPath}</value>
  </property>
  <property>
         <name>tileLevel</name>
         <value>10</value>
  </property>
  <property>
         <name>bbox</name>
         <value>37.71,-122.53,37.93,-122.15</value>
  </property>
  <property>
         <name>geotileStrandsProperties</name>
         <value>${rootPath}/config/geotileStrandsProperties.xml</value>
  </property>
  <property>
         <name>oozie.wf.application.path</name>
         <value>${fullPath}/dataPrep/workflow.xml</value>
  </property>
</configuration>
All of the properties specified in this XML file will be available in the job execution context, and consequently can be used throughout the job.
For example, the java action definition shown in Listing 7-3 uses the value of the tileSize parameter in the expression tileSize=${tileLevel}. The value of the tileLevel parameter is specified in the job property file. As a result, the parameter tileSize=10 will be available when the main() method of the class com.practicalHadoop.geotile.Strands is invoked in the corresponding Hadoop job, as specified in Listing 7-3.
A job property file normally specifies what type of Oozie application should be invoked. To run the Workflow application, you must specify the oozie.wf.application.path property. To run the Coordinator application, you specify the oozie.coord.application.path property. For the Bundle application, you would use the oozie.bundle.application.path property.
Using the config-default.xml File
The config-default.xml file is a mandatory file for Oozie Workflow deployment (see Figure 7-6). Listing 7-28 shows a fragment of the config-default.xml file for the data-prep-wf Workflow application.
LISTING 7-28: Example of config-default file
<?xml version="1.0" encoding="UTF-8"?>
<configuration>
     ...
    <property>
<name>mapred.input.dir</name>
<value>${rootPath}/dataPrep/strandstiles/input</value>
<description>Input path for the geotile-strands action</description>
    </property>
    <property>
<name>mapred.output.dir</name>
<value>${rootPath}/dataPrep/strandstiles/output</value>
<description>Output path for the geotile-strands action</description>
    </property>
    <property>
<name>strandCenterMethod</name>
<value>median</value>
<description>Method to define strand center</description>
    </property>
...
</configuration>
Similar to the property file, the config-default.xml file can contain properties, which get populated in the Workflow execution context. For example, the definitions for the geotile-strands action uses the <arg> element to pass the value of the strandCenterMethod variable to the main() method.
Using a <configuration> Element in the Action Definition
Arguments specified in <configuration> elements have action scope. The property spatial4jVer as 5.2 was defined in the example of a <configuration> element for the geotile-strands action shown in Listing 7-5. That value is available for the main() method of the com.practicalHadoop.geotile.Strands class through the <arg> element in the action definition <arg>-version=${spatial4jVer}</arg>.
Using a <job-xml> Element
Similar to the property file and config-default.xml, a file pointed to by a <job-xml> tag can define properties, as shown in Listing 7-29.
LISTING 7-29: Fragment of a configuration file specified with the element <job-xml>
<?xml version="1.0" encoding="UTF-8"?>
<configuration>
     ...
    <property>
<name>cardinality</name>
<value>5</value>
<description>Mimimum number of probes in s strand</description>
    </property>
...
<configuration>
Properties defined in that file will have the action scope.
Parameters can also be explicitly defined inside an action’s <arg> tag (if the action supports them).
Deciding How to Pass Arguments to Oozie Jobs
So far, you have learned about several ways to pass parameters to an Oozie job. To help you decide which approach to use, you should first understand how Oozie uses parameters:
- Oozie uses parameters explicitly defined inside an action’s <arg> tag.
- If any of the parameters cannot be resolved there, Oozie uses parameters defined in the file specified inside the <job-xml> tag.
- If any of the parameters cannot be resolved there, Oozie uses parameters defined inside the <configuration> tag.
- If any of the parameters cannot be resolved there, Oozie uses parameters from the command-line invocation.
- If any of the parameters cannot be resolved there, Oozie uses parameters from a job property file.
- Once everything else fails, Oozie tries to use config-default.xml.
Although documentation does not describe clearly when to use which, the overall recommendation is as follows:
- Use config-default.xml for defining parameters that never change (for example, cluster configuration).
- Use <arg>, <job-xml>, <configuration>, and job property files for the parameters that are common for a given deployment of a job.
- Use command-line arguments for the parameters that are specific for a given job invocation.
Now let’s see how you can leverage the Oozie console for getting information about Oozie jobs that are running and completed.
USING THE OOZIE CONSOLE TO GET INFORMATION ABOUT OOZIE APPLICATIONS
As described in Chapter 6, Oozie is equipped with an administration console that enables you to visually monitor Bundle jobs, Coordinator jobs, Workflow jobs, and Workflow actions. The console not only presents the status and outcome of jobs and actions, but it also provides in different tabs information about errors, the Workflow XML document, and job configuration parameters. Additionally, the Oozie console supports navigation from an Oozie action to the Hadoop job in the MapReduce Admin console.
Getting to Know the Oozie Console Screens
To demonstrate the Oozie console functionality, first run the Oozie Workflow data-prep-wf using the run CLI sub-command.
After the command has been executed, the Oozie console will show the front page with the Workflow Jobs tab selected by default. This page shows list of Workflows, including the Workflow you just started, as shown in Figure 7-7.
FIGURE 7-7: Workflow jobs
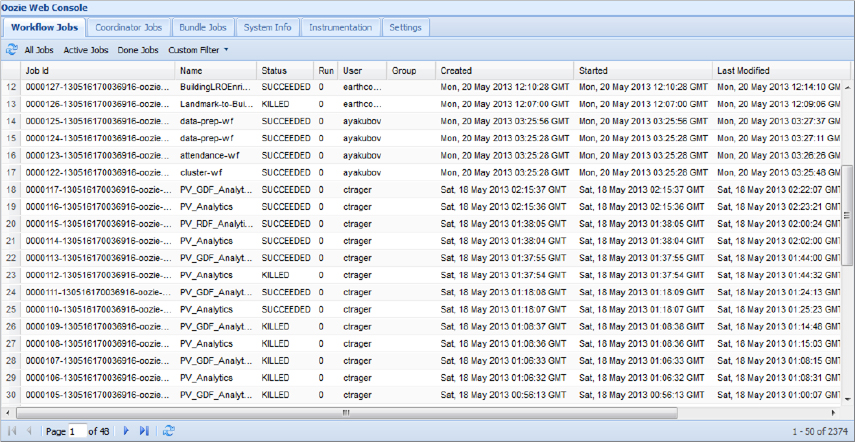
When a particular job is selected, the console will present the job-specific information on the page with four tabs, as shown in Figure 7-8. The default tab, Job Info, presents the job status and current status of all started Workflow actions.
FIGURE 7-8: Job status and action status

This view provides information about the job, including Job ID, Name, its application path, user name, and so on. It also specifies the job’s creation time, nominal time, start time, and so on.
Switching to the Job Definition tab enables you to view the complete job definition, as shown in Figure 7-9.
FIGURE 7-9: Job definition

Switching to the Job Configuration tab, you can view the complete job configuration, as shown in Figure 7-10.
FIGURE 7-10: Job configuration
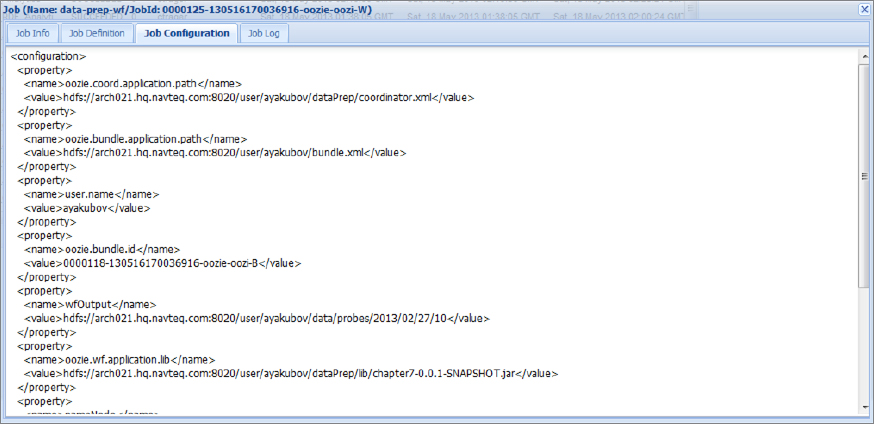
This view is especially useful when parameters are defined in several places because it brings them all together regardless of where they are actually defined.
Finally, the Job Log pane enables you to browse a job’s log file.
In the Job Info tab, if an action is selected (in the lower pane), the Oozie console presents the details of that action. The action details pop-up page has two tabs. As shown in Figure 7-11, the default Action Info tab presents the action status.
FIGURE 7-11: Workflow action

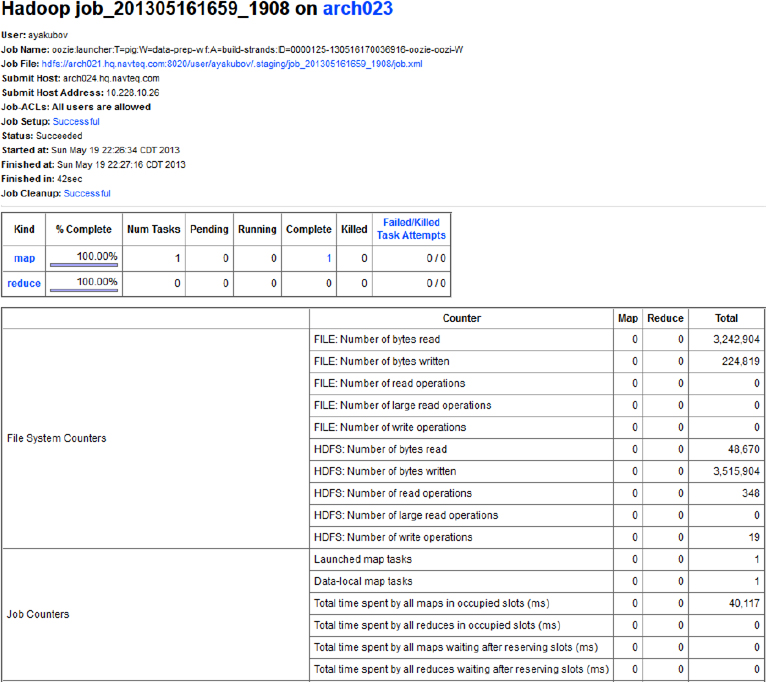
The page also contains a Console URL line that enables you to navigate to the Hadoop MapReduce Admin console by clicking the symbol at the end of the field. Figure 7-12 shows the resulting web page. (See Chapter 5 for more information on the MapReduce Admin console.)
FIGURE 7-12: Navigation from the Oozie console to the Hadoop MapReduce admin console
As shown in Figure 7-13, the other tab on the action details pop-up page, Action Configuration, shows the action definition (a fragment of the Workflow application) with actual action parameters.
FIGURE 7-13: Action configuration

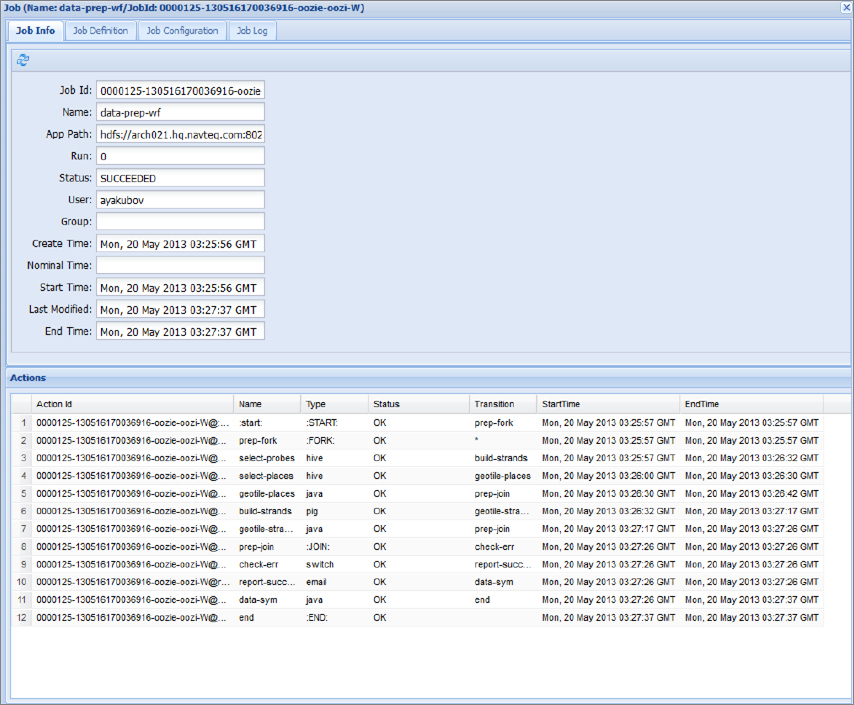
You must update the Oozie console page to see the job progress. After the job has successfully ended, the Oozie console will preserve the complete information about the job and each action, as shown in Figure 7-14.
FIGURE 7-14: Workflow job after completion
If any kind of problem happens with the Workflow job or action, in most cases, the sufficient error information can be presented in the Oozie console pages.
Getting Information about a Coordinator Job
You can use the Oozie console to obtain information for a Coordinator job. After starting the Coordinator application cluster-coord , select the Coordinator Jobs tab on the front page of the Oozie console web application, as shown in Figure 7-15.
FIGURE 7-15: Coordinator jobs

Here you can see that the Coordinator application cluster-coord is in the RUNNING state. It so happens that all of the Coordinator applications are running. The application will be in the RUNNING state until you kill it.
To see details of the cluster-coord Coordinator job, you must navigate to the Coord Job Info page (by clicking the Coordinator Jobs tab), which displays information about all Coordinator actions, as shown in Figure 7-16.
FIGURE 7-16: Coordinator actions submitted from the Coordinator applications
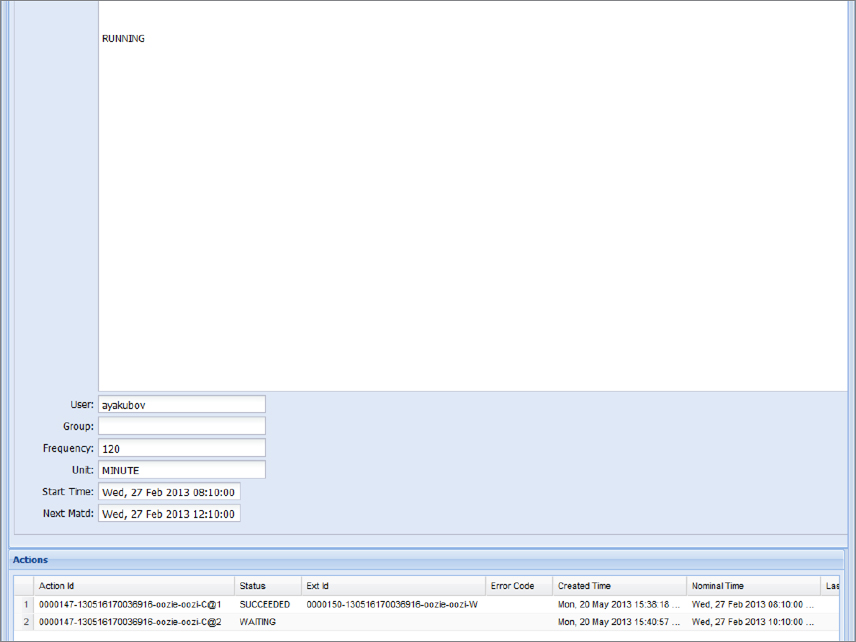
Actions IDs for the particular Coordinator application contain suffixes that show the order of action start. For each Coordinator action, the Oozie console shows the ID of the corresponding Workflow action (Exit Id). For example, for the Coordinator action with the Action ID 0000147-130516170036916-oozie-oozi-C, the corresponding Workflow Job ID is shown as 0000150-130516170036916-oozie-oozi-W. If you navigate to the Workflow Job page (by pressing F5), you can find the Workflow job (the last shown in Figure 7-17).
FIGURE 7-17: Navigation from Coordinator pane to Workflow pane

From here, you can select the Workflow job and look up its actions, navigate to the MapReduce Admin console, and so on.
Getting Information about a Bundle Job
Oozie version 3 provides an additional page for Bundle applications. Figure 7-18 shows a page indicating that the place-validation-bl Bundle is running.
FIGURE 7-18: Bundle jobs

SUMMARY
This chapter provided a detailed description of Oozie applications designed and implemented to tackle a real-world problem. You learned about best practices for designing Oozie applications with different frequency-repeatable jobs. You also learned about most of the Oozie actions and their configuration parameters. The driver pattern was examined, as well as using a java action for MapReduce jobs.
You also learned how to construct a Coordinator application and data pipeline (Bundle) to connect separate Workflows. You learned how to deploy and execute Oozie applications, and how to use the Oozie console to get information about the execution of Oozie applications.
In Chapter 8, you learn about important ways to extend Oozie, including building custom extension actions, working with uber files, code generation for Oozie applications, implementing loops with Oozie, and building reliable custom data pipelines.