
Chapter 8
Advanced Oozie Features
WHAT’S IN THIS CHAPTER?
- Building custom Oozie actions
- Building a dynamic Workflow
- Using the Oozie Java API
- Using uber jars with Oozie
- Building dynamic data pipelines
WROX.COM CODE DOWNLOADS FOR THIS CHAPTER
The wrox.com code downloads for this chapter are found at www.wrox.com/remtitle.cgi?isbn=1118611934 on the Download Code tab. The code is in the Chapter 8 download. All downloads for this chapter are provided as a single Eclipse project containing all of the example’s code.
By now, you should be familiar with the main components of Oozie and the way they interoperate. You have also learned how to design, build, and deploy Oozie applications, and how to use the Oozie console to view the execution of those applications.
In this chapter, you learn about a number of advanced Oozie topics that, once you understand them, will enable you to extend Oozie functionality and integrate Oozie with other enterprise applications. In this chapter, you learn about the following:
- How to build custom Oozie actions
- How to build Oozie applications dynamically
- How to invoke and control Oozie jobs programmatically through the Java API
- How use uber files with Oozie
At the end of the chapter, you will see a custom design for a fully automated data processing pipeline based on Oozie.
Let’s start by implementing some custom Oozie Workflow actions.
BUILDING CUSTOM OOZIE WORKFLOW ACTIONS
Out of the box, Oozie offers a minimal number of control and action nodes (described in Chapter 6) that cover the most general features of the Workflow language. In reality, Workflow developers are often faced with the fact that the same activity is useful for many Workflows they are implementing.
Following are some approaches to reusing functionality in Oozie:
- Oozie sub-Workflows — This approach enables you to reuse partial processes by including them in the main Workflows. Sub-Workflows are a preferred reuse method when a particular sequence of steps is part of several processes.
- java action node — When you want to reuse code libraries that may be useful for many nodes, you can use a java action node.
- Custom action nodes — This approach enables you to reuse a complete node implementation between multiple (sub) processes.
Although similarities exist between the approaches that use the java action node and custom action nodes, using the java action node has the following limitations:
- Semantic alignment — Although it supports code reuse, this approach does not provide semantic reuse. The java action provides no Workflow semantics (it just says that an action is implemented using Java), which makes it difficult to read a Workflow definition. Adding a custom action node with a well-defined and meaningful business name can significantly improve the overall readability of the process.
- Action’s parameters — A specific action requires a well-defined set of parameters. Unlike the generic java action that enables you to specify a generic set of parameters, a custom Oozie action enables you to more precisely define and control the action input parameters.
- Execution locality — As described in Chapter 6, an Oozie action can be executed either locally (within context of Oozie server), or remotely (that is, on an Hadoop cluster). Both action execution models have their place in Workflow execution. As described in Chapter 6, a java action is always executed on one Hadoop DataNode, thus supporting only remote execution.
Based on these considerations, depending on the situation, it might be more advantageous to use custom action nodes, which are described here.
Oozie supports a very elegant extensibility mechanism — an extension of the Oozie language by adding custom nodes. Such an approach enables you to overcome all of the limitations of the java action approach. It supports choosing a meaningful business name for an action, defining an action’s parameters (using XML schema), and it supports both synchronous (local) and asynchronous (remote) execution modes.
In this section, you learn how to create, deploy, and use a custom action node. This discussion uses an example FTP action, one that enables you to FTP a specified file or a whole directory from HDFS to a specified external location (typically outside of the Hadoop cluster).
Implementing a Custom Oozie Workflow Action
The FTP custom action used as an example in this section can be useful in several processes that are required to move data — for example, the source or result data being moved between an Hadoop cluster and other drives used by the enterprise applications. Here you learn how to build an ftp action implementation that is driven by the following arguments:
- FTP destination server
- Port
- User
- Password
- Local directory
- Remote directory
- targetFile (an optional parameter that, if specified, means that only that file is transferred, or else all files from the specified local directory are transferred)
This custom Oozie action implementation must extend the ActionExecutor class provided by Oozie and override all of the required methods. The Oozie ActionExecutor supports both synchronous and asynchronous actions. Because ftp is a relatively lightweight and quick operation, the implementation ftpExecutor shown in Listing 8-1 (code file: class FtpExecutor) is a synchronous one, meaning that it is executed within the Oozie execution context.
LISTING 8-1: ActionExecutor class for the ftp custom action
import org.apache.oozie.ErrorCode;
import org.apache.oozie.action.ActionExecutor;
import org.apache.oozie.action.ActionExecutorException;
import org.apache.oozie.action.ActionExecutorException.ErrorType;
import org.apache.oozie.client.WorkflowAction;
import org.apache.oozie.util.XmlUtils;
import org.jdom.Element;
import org.jdom.Namespace;

import com.practicalHadoop.oozie.ftp.FtpHandle;
import com.practicalHadoop.oozie.ftp.FtpHandleFactory;

public class FtpExecutor extends ActionExecutor
{
    private final static String SERVER_IP = "serverIP";
    private final static String PORT = "port";
    private final static String USER = "user";
    private final static String PASSWORD = "password";
    private final static String TARGET_FILE = "targetFile";
    private final static String REMOTE_DIR = "remoteDir";
    private final static String LOCALE_DIR = "localeDir";

    private static final String NODENAME = "ftp";
    private static final String SUCCEEDED = "OK";
    private static final String FAILED = "FAIL";
    private static final String KILLED = "KILLED";

    FtpExecutor()   {
        super(NODENAME);
    }

    @Override
    public void initActionType() {
        super.initActionType();
    }

    @Override
    public void check(Context arg0, WorkflowAction arg1)
             throws ActionExecutorException {}

    @Override
    public void end(Context context, WorkflowAction action)
             throws ActionExecutorException  {
        String externalStatus = action.getExternalStatus();
        WorkflowAction.Status status = externalStatus.equals(SUCCEEDED) ?
               WorkflowAction.Status.OK : WorkflowAction.Status.ERROR;
        context.setEndData(status, getActionSignal(status));
    }

    @Override
    public boolean isCompleted(String arg0) {
        return true;
    }

    @Override
    public void kill(Context context, WorkflowAction action)
throws ActionExecutorException  {}

    @Override
    public void start(Context context, WorkflowAction action)
             throws ActionExecutorException  {
        try
        {
            Element actionXml = XmlUtils.parseXml(action.getConf());
            validateAndFtp(context, actionXml);
            context.setExecutionData("OK", null);
        }
        catch(Exception ex)
        {
            context.setExecutionData(FAILED, null);
            throw new ActionExecutorException(ErrorType.FAILED,
                    ErrorCode.E0000.toString(), ex.getMessage());
        }
    }
     ...
}
The following five methods are defined as abstract in the ActionExecutor class, and must be overridden by the action executor implementation:
- The check() method is used by Oozie to check the status of the action. For synchronous actions, this method does not need to be implemented.
- The end() method is used for any cleanup or processing that may need to be done after the action is completed. It must also set the result of the execution.
- The isCompleted() method always returns true for a synchronous action. This is because the Oozie server thread blocks when it invokes the method, so the thread can be called only after the action is completed.
- The kill() method is used to kill the running job or action. For synchronous actions, this method does not need to be implemented.
- The start() method is used to start the execution of the action. With a synchronous action, the whole action is executed here. This method is invoked by Oozie with two parameters:
- The Context object provides access to the Oozie Workflow execution context, which (among other things) contains Workflow variables, and provides very simple APIs (set, get) for manipulating them.
- The WorkflowAction object provides access to the Oozie definition of the current action.
In this example, two main tasks are performed in the start() method: parameter validation and FTP execution. Both tasks are implemented in the validateAndFtp() method shown in Listing 8-2 (code file: class FtpExecutor), which is called from the start() method.
LISTING 8-2: validateAndFtp method
private void validateAndFtp(Context context, Element actionXml)
             throws ActionExecutorException {
        Namespace ns = Namespace.getNamespace("uri:oozie:ftp-action:0.1");
        String serverIP = getCheckNotNull(actionXml, SERVER_IP, "FTP001",
             "No server
          IP was specified.");
        int port;
        String sPort = getCheckNotNull(actionXml, PORT, "FTP002", "No port was
specified.");
        try {
            port = Integer.parseInt(sPort);
        }
        catch(NumberFormatException nfe) {
            throw new ActionExecutorException(ErrorType.ERROR, "FTP003", "Invalid
value for port was specified.");
        }

        String userName = getCheckNotNull(actionXml, USER, "FTP004", "No user was
          specified.");
        String password = getCheckNotNull(actionXml, PASSWORD, "FTP005",
             "No password
was specified.");

        // Optional
        String localFileName;
        try {
            localFileName = actionXml.getChildTextTrim(TARGET_FILE, ns);;
        }
        catch(Exception ex) {
            localFileName = null;
        }

        String remoteDir = getCheckNotNull(actionXml, REMOTE_DIR, "FTP006",
             "No remote
          directory was specified.");
        String localeDir = getCheckNotNull(actionXml, LOCALE_DIR, "FTP007",
             "No locale
          directory was specified.");

        try {
            doFtp(serverIP, port, userName, password, localFileName, remoteDir,
               localeDir, localFileName);
        }
        catch(IOException ioe)
        {
            throw new ActionExecutorException(ErrorType.ERROR, "FTP008",
                    "FTP failse." + ioe);
        }
    }

    private String getCheckNotNull(Element actionXml, String tagName,
             String actionErrID, String actionErrMsg)
                    throws ActionExecutorException
    {
        Namespace ns = Namespace.getNamespace("uri:oozie:ftp-action:0.1");
        String tmp = actionXml.getChildTextTrim(tagName, ns);
        if(tmp == null)
            throw new ActionExecutorException(ErrorType.ERROR, actionErrID,
actionErrMsg);

        return tmp;
    }

    private void doFtp(String serverIP, int port, String userName,
             String password, String targetFileName, String remoteDir,
             String localeDir, String localFileName)
                    throws IOException
    {
        FtpHandle ftpHandle = FtpHandleFactory.create(remoteDir, localeDir);
        ftpHandle.doFtpTransaction(serverIP, port, userName, password,
targetFileName);
    }
The validateAndFtp() method, along with the two helper methods, parse the XML action definition, do trivial argument validation, and eventually use the FtpHandleFactory and FtpHandle classes to implement the FTP transaction.
Now that you know how to implement a custom executor, let’s take a look at how it can be deployed so that it can be used in the Workflow.
Deploying Oozie Custom Workflow Actions
The first thing you must do to deploy a custom action is to define the XML schema. Listing 8-3 shows how to do this for the example ftp action.
LISTING 8-3: XSD for the ftp action, file ftpAction.xsd, in the Oozie conf directory
<?xml version="1.0" encoding="UTF-8"?>
<xs:schema xmlns:xs="http://www.w3.org/2001/XMLSchema"
          xmlns:ftp ="uri:custom:ftp-action:0.1"
          elementFormDefault="qualified"
          targetNamespace="uri:custom:ftp-action:0.1">
<xs:complexType name="ftpType">
    <xs:sequence>
        <xs:element name="serverIP" type="xs:string" minOccurs="0" maxOccurs="1" />
        <xs:element name="port" type="xs:string" />
        <xs:element name="user" type="xs:string" />
        <xs:element name="password" type="xs:string" />
        <xs:element name="targetFile" type="xs:string" />
        <xs:element name="remoteDir" type="xs:string" />
        <xs:element name="localeFile" type="xs:string" />
    </xs:sequence>
</xs:complexType>
<xs:element name="ftp" type="ftp:ftpType"></xs:element>
</xs:schema>
Both the custom action code and XML schema must be packaged in a single jar file (for example, ftpAction.jar). Listing 8-4 shows the Oozie oozie-setup.sh command that you can use to add this (and any other) jar file to Oozie’s war file.
LISTING 8-4: Custom action deployment command
$ bin/oozie-setup.sh -jars ftpAction.jar:mail.jarAdditionally, the XML schema for the new actions shown in Listing 8-4 should be added to oozie-site.xml, as shown in Listing 8-5.
LISTING 8-5: oozie-site.xml
<property>
       <name>oozie.service.SchemaService.wf.ext.schemas</name>
       <value> oozie-sla-0.1.xsd,hive-action-0.2.xsd,email-action-0.1.xsd,
            ftpAction.xsd</value>
</property>
Once a custom action has been deployed, it can be used in a Workflow implementation. To demonstrate how to do this, let’s extend the cluster workflow (cluster-wf) you learned about in Chapter 7 with an ftp action that transfers all data from the cluster action output directory to the external FTP server. Listing 8-6 shows how to do this.
LISTING 8-6: Custom ftp action in cluster Workflow
<workflow-app name="cluster-wf" xmlns="uri:oozie:workflow:0.3"
        xmlns:sla="uri:oozie:sla:0.1">
     <start to="cluster"/>
     <action name="cluster">
         <java>
         ........................................
       </java>
       <ok to="ftp-cluster-results"/>
         <error to="report-failure"/>
     </action>
     <action name="ftp-cluster-results">
         <ftp xlmns="uri:custom:ftp-action:0.1">
           <serverIP>ftpServer.wrox.com</serverIP>
             <port>21</port>
             <user>reader25</user>
             <password>openAccess</password>
             <remoteDir>/home/reader/reader25</remoteDir>
             <localDir>/user/practicalHadoop/chapter7/cluster</localDir>
         </ftp>
         <ok to="report-success"/>
         <error to="report-failure"/>
     </action>
     <action name='report-success'>
          <email xmlns="uri:oozie:email-action:0.1">
         ***
     <end name="end"/>
</workflow-app>
Now, anyone who looks at the Workflow will clearly see that cluster results are transferred through to the external server using FTP.
As described in this section, extensibility can solve many of Oozie’s shortcomings with the Workflow programming language. Unfortunately, extensibility does not help with another Oozie shortcoming — the lack of support for dynamic execution. This deficiency includes the absence of support for loops, dynamic fork/joins, and iterative execution, which are often required to implement many practical MapReduce solutions.
In the next section, you learn about some solutions to overcome this limitation.
ADDING DYNAMIC EXECUTION TO OOZIE WORKFLOWS
As defined in Chapter 6, the Oozie Workflow language enables you to define Workflows that can be represented as Directed Acyclic Graphs (DAGs) of actions. In this section, you learn about an approach that enables you to convert many loops and/or dynamic fork/joins to DAG, thus making them applicable for Oozie implementations.
Overall Implementation Approach
Consider the simple example of a Workflow that must produce a variable number of reports, based on certain input parameters. Let’s assume that the actual report generation is implemented as a sub-Workflow — ReportGenerator. If those reports are independent, you could have a fork/join construct that spawns the required number of reports. If those reports are interdependent, they must be sequentially invoked using a loop construct. None of these constructs is supported by Oozie.
So, let’s consider a different approach. A loop of a fixed (dynamically calculated) length N can be represented as a loop body repeated N times. Such a code transformation would enable you to convert a Directed Cyclic Graph (that is, a loops construct) to a DAG that is supported by Oozie. One simple way to implement such an approach is by using an in-time generation of Oozie Workflow code based on the loop’s length N.
Figure 8-1 shows the general architecture for such an approach. Here, a main Workflow can create one or more generated controllers and invoke them as sub-Workflows during execution. A generated controller can rely on one or more functional sub-Workflows to implement functionality that is used by the generated controller.
FIGURE 8-1: Using in-time generation

Because the Oozie Workflow language is an XML dialect that is defined by an XML schema, the programmatic generation of a Workflow is fairly straightforward. The simplest way to do this is to use Java Architecture for XML Binding (JAXB) to generate Java binding (based on the Workflow schema), and use these bindings as a Java API to create Oozie Workflows.
You can use the Maven Project Object Model (POM) shown in Listing 8-7 to generate the required Java bindings.
LISTING 8-7: Maven POM to generate JAXB bindings for Oozie Workflow
<project xmlns="http://maven.apache.org/POM/4.0.0" xmlns:xsi=
     "http://www.w3.org/2001/XMLSchema-instance"
     xsi:schemaLocation="http://maven.apache.org/POM/4.0.0
     http://maven.apache.org/xsd/maven-4.0.0.xsd">
  <modelVersion>4.0.0</modelVersion>
  <groupId>com.PracticalHadoop</groupId>
  <artifactId>OozieWorkflow</artifactId>
  <version>0.0.1-SNAPSHOT</version>
     <properties>
          <jaxb.version>0.8.0</jaxb.version>
          <jaxb.annotation.version>0.6.0</jaxb.annotation.version>
     </properties>
     <build>
          <plugins>
               <plugin>
                    <groupId>org.jvnet.jaxb2.maven2</groupId>
                    <artifactId>maven-jaxb2-plugin</artifactId>
                    <version>${jaxb.version}</version>
                    <executions>
                         <execution>
                          <id>generate-domain</id>
                              <phase>generate-sources</phase>
                              <goals>
                                   <goal>generate</goal>
                              </goals>
                         </execution>
                    </executions>
                    <configuration>
                         <strict>false</strict>
                         <schemaDirectory>xml</schemaDirectory>
                         <schemaIncludes>
                              <value>oozie3.xsd</value>
                         </schemaIncludes>
                         <bindingIncludes>
                              <include>oozie3Bindings.xjb</include>
                         </bindingIncludes>
                         <extension>true</extension>
                         <generateDirectory>src/main/java</generateDirectory>
                         <args>
                              <arg>-Xannotate</arg>
                         </args>
                         <plugins>
                              <plugin>
                                   <groupId>org.jvnet.jaxb2_commons</groupId>
                                   <artifactId>jaxb2-basics-annotate</artifactId>
                                   <version>${jaxb.annotation.version}</version>
                              </plugin>
                         </plugins>
                    </configuration>
               </plugin>

               <plugin>
                    <groupId>org.apache.maven.plugins</groupId>
                    <artifactId>maven-compiler-plugin</artifactId>
                    <version>2.3.2</version>
                    <configuration>
                         <source>1.6</source>
                         <target>1.6</target>
                    </configuration>
               </plugin>
          </plugins>
     </build>
</project>
This POM assumes that the Oozie Workflow .xsd file (oozie3.xsd) is located in the XML directory. It also assumes the JAXB customization file shown in Listing 8-8 is in the same directory.
LISTING 8-8: JAXB customization file
<jaxb:bindings
  xmlns:jaxb="http://java.sun.com/xml/ns/jaxb"
       xmlns:xs="http://www.w3.org/2001/XMLSchema"
  xmlns:xjc="http://java.sun.com/xml/ns/jaxb/xjc"
  xmlns:xsi="http://www.w3.org/2001/XMLSchema-instance"
  xmlns:annox="http://annox.dev.java.net"
  xsi:schemaLocation="http://java.sun.com/xml/ns/jaxb
       http://java.sun.com/xml/ns/jaxb/bindingschema_2_0.xsd"
  jaxb:extensionBindingPrefixes="xjc annox"
  version="2.1">

    <jaxb:bindings schemaLocation="oozie3.xsd" node="/xs:schema">
    <jaxb:bindings node="xs:complexType[@name='WORKFLOW-APP']">
      <annox:annotate>
        <annox:annotate annox:class="javax.xml.bind.annotation.XmlRootElement"
             name="WORKFLOW-APP"/>
      </annox:annotate>
    </jaxb:bindings>

    <jaxb:bindings
            node="//xs:complexType[@name='ACTION']/xs:sequence/xs:any
                 [@namespace='uri:oozie:sla:0.1']">
            <jaxb:property name="anySLA" />
    </jaxb:bindings>

    </jaxb:bindings>
</jaxb:bindings>
Now you can use these bindings as an API for programmatically constructing the Workflow XML.
A more complex use case is with an iterative Workflow, where, for example, the continuation of execution depends on the result of the current iteration. Technically, in this case, the number of iterations is not known upfront. Fortunately, in all practical implementations, the number of iterations is always limited (to ensure the finality of execution). As a result, the same generation approach just described will work.
To better understand this implementation, let’s consider a specific example that extends part of the place data validation processes discussed in Chapter 7. After the clusters of stay points are calculated, you want to determine the density of places in the neighborhood (the cluster). You can do this by searching for places around the center point of the cluster latitude and longitude. This is based on calculating “place density” metrics for each cluster.
Rather than going into further implementation details, let’s assume that you have a MapReduce application that provides that job. This application additionally classifies (ranges) clusters by a density index, and identifies all clusters with the density index not exceeding the specified threshold. You can interpret those clusters as candidates for potentially discovered new places that you don’t know about.
The challenge with this approach is determining the quality of the process for discovering new places. If you knew all unknown places, you could measure this quality as the percentage of discovered places to all unknown places. Another approach (provided by data mining and machine learning techniques) could be to set up an experiment where you estimate the quality.
You could break your collection of places into two parts: places that you treat as known (the basic set), and places that you will consider unknown during the experiment (the control set). You can perform all the calculations described in Chapter 7 only with basic set. You would then compare the discovered cluster candidates to the control set. The final measure of quality would be the percentage of places in the control set that were discovered.
Note that the whole process (that is, the set of MapReduce applications controlled from Oozie Workflows, Coordinators, and Bundle) utilizes a number of parameters. For simplicity, let’s consider only two parameters: search radius and density threshold. The search radius is used in building stay points and clusters of stay points. The density threshold is used in selecting clusters — candidates for new places. That can be considered as a computer model with parameters, and raises another question: How can you fine-tune the parameters to improve the quality of the model?
A Machine Learning Model, Parameters, and Algorithm
The approach taken while re-formulating the use case in terms of a computer model, measuring the quality of the model, and tuning the model is very well-known in the realm of machine learning. The natural method to tune the model would be to use a local search (with optimization) — a technique for working with computationally extensive optimization problems. The method suggests refining the solution iteratively.
In this case, the percentage of places in the control set that were discovered can be presented is a function F with two parameters — search radius (r) and density threshold (d), as shown here:
F(r,d)
The function is not presented analytically. You can only calculate the value for given radius (r) and density threshold (d). To search for a local minimum, you use the Conjugate Gradient method (described in Chapter 3). Let’s say you are in the point p=(r, d). You want to calculate the value of F, and you want to continue a local search for a better solution, so you do the following steps.
First, you calculate the value of F in the points:
p1 = (r + Δr, d)
p2 = (r + Δr, d)
p3 = (r,d + Δd)
p3 = (r,d + Δd)
Next, you estimate the derivatives of F(p), or the gradient of the function F(r,d):
(∂ F/∂r) = F(p1) − F(p2))/2Δr)
(∂ F/∂d) = F(p2) − F(p3))/2Δr)
Then you move to the point with a supposedly lower value (in the direction opposite of the gradient vector):
Q = (r,d) − ϒ’ (∂F/∂r), ∂F/(∂d))
Finally, you calculate the value of function F in the point (r, d), and decide whether you want to continue with the local search.
Figure 8-2 represents the sequence of steps for the Gradient Descent method. Here, the circles represent function values, and the solution trajectory moves from a larger value to a smaller using a gradient.
FIGURE 8-2: Local search

That poses a problem, however. How many steps do you want to take before you decide that the parameters of the model are good, or at least you can’t find anything better in a reasonable time? You should use the following complex criteria:
- The driver class of the MapReduce job will determine if the iteration process should stop because the optimization stops being effective.
- In all cases, the number of iterations will be limited with the value specified upfront.
Defining a Workflow for an Iterative Process
To begin defining a Workflow for an iterative process, let’s define a functional sub-Workflow that contains the set of unchangeable, repeatedly executed operations, as shown at Listing 8-9 (code file: dynSWF.xml).
LISTING 8-9: Sub-Workflow for model optimization
<workflow-app name="dyn-swf" xmlns="uri:oozie:workflow:0.3"
     xmlns:sla="uri:oozie:sla:0.1">
     <start to="cluster" />
     <action name="cluster">
          <java>
               <job-tracker>${jobTracker}</job-tracker>
               <name-node>${nameNode}</name-node>
               <job-xml>${clusterProperties}</job-xml>
               <main-class>com.practicalHadoop.strand.Cluster</main-class>
               <arg>-radius=${radius}</arg>
          </java>
          <ok to="range-clusters" />
          <error to="report-failure" />
     </action>
     <action name="range-clusters">
          <java>
               <job-tracker>${jobTracker}</job-tracker>
               <name-node>${nameNode}</name-node>
               <job-xml>${Properties}</job-xml>
               <main-class>com.practicalHadoop.strand.rangeClusters</main-class>
               <arg>-densityThreshold=${densThreshold}</arg>
               <capture-output/>
          </java>
          <ok to="report-success" />
          <error to="report-failure" />
     </action>
     <action name='report-success'>
          <java>
               <job-tracker>${jobTracker}</job-tracker>
               <name-node>${nameNode}</name-node>
               <job-xml>${clusterProperties}</job-xml>
               <main-class>com.practicalHadoop.strand.SaveSFWData</main-class>
          </java>
          <ok to="fail" />
          <error to="end" />
     </action>
     <action name='report-failure'>
          <email xmlns="uri:oozie:email-action:0.1">
               [EMAIL ACTION BODY]
          </email>
          <ok to="end" />
          <error to="fail" />
     </action>
     <kill name="fail">
          <message>
               cluster-wf failed, error message:
                    [${wf:errorMessage(wf:lastErrorNode())}]
          </message>
     </kill>
     <end name="end" />
The dyn-swf sub-Workflow includes the clustering and ranging actions, and e-mail notification in case of failure. Note, that the range-clusters action definition contains a <capture-output/> element that reflects the fact that the action analyzes the progress of the current iteration step and can signal to an external Workflow to exit.
This solution assumes that the value of the function F and the current position (r,d) of the iteration are accumulated in some storage (which could be a table in HBase, or a file in HDFS). Those values are used by the range-clusters action to make a decision as to whether the whole iteration process should stop or should continue, as shown in Listing 8-10 (code file: dynWF.xml).
LISTING 8-10: The external Workflow for the clustering/ranging process
< workflow-app name="dyn-wf" xmlns="uri:oozie:workflow:0.3"
     xmlns:sla="uri:oozie:sla:0.1">
     <start to="call-dyn-wf_1" />
     <action name="call-dyn-wf_1">
          <sub-workflow>
               <app-path>dynWF.xml</app-path>
               <configuration>
                    <property>
                         <name>radius</name>
                         <value>0.05</value>
                    </property>
                    <property>
                         <name>densThreshold</name>
                         <value>10</value>
                    </property>
               </configuration>
          </sub-workflow>
          <ok to="check-dynSWF_1" />
          <error to="fail" />
     </action>
     <action name='check-dynSWF_1'>
          <java>
               <job-tracker>${jobTracker}</job-tracker>
               <name-node>${nameNode}</name-node>
               <main-class>com.practicalHadoop.strand.CheckDynSWF</main-class>
               <capture-output />
          </java>
          <ok to="decide-continue" />
          <error to="report-failure" />
     </action>
     <decision name="decide-continue_1">
          <switch>
               <case to="report-success">${wf:actionData('check-dynSWF')['done'
                    == "true"]}</case>
               <default to=="call-dyn-wf_2">
          </switch>
     </decision>

     [repeat the group of actions call-dyn-wf_X, check-dynSWF_X and decide-
          continue_X the specified number times ]

     <action name='report-failure'>
          <email xmlns="uri:oozie:email-action:0.1">
               [EMAIL ACTION BODY]
          </email>
          <ok to="fail" />
          <error to="fail" />
     </action>
     <action name='report-success'>
          <email xmlns="uri:oozie:email-action:0.1">
               [EMAIL ACTION BODY]
          </email>
          <ok to="end" />
          <error to="fail" />
     </action>
     <kill name="fail">
          <message>
               cluster-wf failed, error message:
               [${wf:errorMessage(wf:lastErrorNode())}]
          </message>
     </kill>
     <end name="end" />
</workflow-app>
The dyn-wf Workflow uses the dyn-swf Workflow as a sub-Workflow. It invokes the sub-Workflow, checks the stop signal from the range-clusters action (using the check-dynSWF_X * actions to pick the signal, and the decide-continue_X decision node to check the signal), and stops or continues the iteration. Three actions (call-dyn-wf_X, check-dynSWF_X, and decide-continue_X) represent a group that should be repeated in the Workflow until the process converges. Let’s call this group the iteration control group. The number of iteration control groups effectively restricts the number of optimization process iterations.
Dynamic Workflow Generation
To generate a dynamic Workflow, you use Java bindings (produced by Maven POM, shown in Listing 8-7) to create a Workflow application shown in Listing 8-10 for the required loop size. Listing 8-11 shows an example of how to do this (code file: class DynWFGen2).
LISTING 8-11: Control group generation
public class DynWfGen2 {
    public static void main(String[] args) throws JAXBException     {
        DynWfGen2 dynWfGen2 = new DynWfGen2("${jobTracker}", "${nameNode}");
        dynWfGen2.createWfApp();

        JAXBContext jc = JAXBContext.newInstance(WORKFLOWAPP.class,
          com.practicalHadoop.oozieEmail.ACTION.class);
        Marshaller m = jc.createMarshaller();
        m.setProperty(Marshaller.JAXB_FORMATTED_OUTPUT, Boolean.TRUE);

        JAXBElement<WORKFLOWAPP> jaxbElem = new JAXBElement<WORKFLOWAPP>(
                new QName("local","workflow-app"),
                WORKFLOWAPP.class,
                dynWfGen2.getWfApp());

        m.marshal(jaxbElem, System.out);
    }

    DynWfGen2(String jobTracker, String nameNode) {
        of = new ObjectFactory();
        wfApp = of.createWORKFLOWAPP();
        this.jobTracker = jobTracker;
        this.nameNode = nameNode;
    }

    WORKFLOWAPP getWfApp() {
        return wfApp;
    }

    ObjectFactory of;
    WORKFLOWAPP wfApp;
    String jobTracker;
    String nameNode;
    int totalIter = 2;
    int currentIter = 1;

    void createWfApp() {
        wfApp.setName("dyn-wf");
        addStartNode("call-dyn-wf_1");

        for(currentIter = 1; currentIter <= totalIter; currentIter++) {
            Map<String, String> propMap = new HashMap<String, String>();
            propMap.put("radius", "0.05");
            propMap.put("densThreshold", "10");
            addSunWorkflowAction("call-dyn-wf_" + currentIter, "dynWF.xml",
                    propMap, "check-dynSWF_" + currentIter, "fail");

            propMap = new HashMap<String, String>();
            addJavaAction("check-dynSWF_" + currentIter,
                    "com.practicalHadoop.strand.CheckDynSWF",
                    propMap, "decide-continue_" + currentIter, "fail");

            Map<String, String> cases = new HashMap<String, String>();
            cases.put("report-success", "${wf:actionData('" + "check-dynSWF_"
                    + currentIter + "')['done' == " + "true");

            String sDecisionDefault = "call-dyn-wf_" + (currentIter + 1);
            if(currentIter == totalIter)
                sDecisionDefault = "report-success";

            addDecisionNode("decide-continue_" + currentIter, cases,
               sDecisionDefault);
        }
        addEmailAction("report-failure", "fail", "fail",
                "[email protected]", "[email protected]",
                "cluster-wf failed",
                "cluster-wf failed, error message: /n/t/t
               [${wf:errorMessage(wf:lastErrorNode())}]");

        addEmailAction("report-success", "end", "fail",
                "[email protected]", "[email protected]",
                "cluster-wf failed",
                "cluster-wf finished");
        addKillNode("fail", "cluster-wf failed, error message:

	[${wf:errorMessage(wf:lastErrorNode())}]");
        addEndNode("end");
    }
The number of iterative sections in this code is specified by the value of totalIter. The code uses a number of methods to generate Workflow’s nodes and actions.
Listing 8-12 shows two such methods: addDecisionNode and addJavaAction. You can see that those methods are reusable, and after they are created, the generation of a dynamic Workflow becomes a pretty trivial task. Also, it is worth noting that once those helper methods are tested, the chances that a Workflow contains any XML errors are minimal.
LISTING 8-12: Example of helper methods to generate a Workflow
private void addDecisionNode(String name, Map<String, String> cases,
      String defaultElemTo)    {
        DECISION decision = of.createDECISION();
        decision.setName(name);
        wfApp.getDecisionOrForkOrJoin().add(decision);

        SWITCH switchElem = of.createSWITCH();
        decision.setSwitch(switchElem);

        Set<Map.Entry<String, String>> entries = cases.entrySet();
        for(Entry<String, String> entry : entries) {
            CASE caseElem = of.createCASE();
            caseElem.setTo(entry.getKey());
            caseElem.setValue(entry.getValue());
            switchElem.getCase().add(caseElem);
        }

        DEFAULT defaultElem = of.createDEFAULT();
        defaultElem.setTo(defaultElemTo);
        switchElem.setDefault(defaultElem);
    }

private void addJavaAction(String name, String mainClass, Map<String, String>
     propMap,
            String okNodeName, String failNodeName) {
        ACTION action = of.createACTION();
        action.setName(name);
        JAVA javaAction = of.createJAVA();
        action.setJava(javaAction);

        javaAction.setJobTracker(jobTracker);
        javaAction.setNameNode(nameNode);
        javaAction.setMainClass("com.practicalHadoop.strand.CheckDynSWF");
        javaAction.setCaptureOutput(new FLAG());

        CONFIGURATION callSwfConf = makeConfiguration(propMap);
        javaAction.setConfiguration(callSwfConf);

        setOkTransition(action, okNodeName);
        setFailTransition(action, failNodeName);

        wfApp.getDecisionOrForkOrJoin().add(action);
    }
The generation of a dynamic Workflow, coupled with the general Workflow architecture shown in Figure 8-1, enables you to effectively use Oozie for many Directed Cyclic Graph problems (including loops and dynamic fork/joins).
Now let’s look at Oozie’s Java APIs, which can be used for programmatically starting and controlling Oozie execution from other applications.
USING THE OOZIE JAVA API
Chapter 7 describes how you can submit and start Oozie jobs from the Hadoop cluster edge node. However, to integrate Hadoop execution into an overall enterprise application, it is often necessary for you to start Oozie jobs programmatically. One possible use case is integrating Oozie with a general-purpose business process management (BPM) engine, where Hadoop applications are only a component of more general business processes, and other components run outside of an Hadoop cluster.
Oozie offers the Java API in the Oozie client component. Actually, the Oozie client includes more than one Oozie Java API in the package org.apache.oozie.client. It also includes the Oozie Command Line Interface (CLI), Oozie REST API, and support for JavaScript Object Notation (JSON). Both the Oozie CLI and Oozie Java API are wrappers around the Oozie REST API.
Listing 8-13 (code file: class WfStarter) shows an example of how to build the Oozie configuration and use it to submit an Oozie Workflow. As described in Chapter 7, Oozie configuration is one of the ways to pass arguments to Oozie jobs. This approach is a preferred option in the case where the Oozie Workflow, Coordinator, or Bundle is submitted through the Java API.
LISTING 8-13: Example of submitting Oozie job through the Oozie Java API
package com.practicalHadoop.javaApi;

import java.util.Properties;

import org.slf4j.Logger;
import org.slf4j.LoggerFactory;

import org.apache.oozie.client.OozieClient;
import org.apache.oozie.client.OozieClientException;
import org.apache.oozie.client.WorkflowJob;
import org.apache.oozie.client.WorkflowJob.Status;

public class WfStarter  {
    final OozieClient oozClient;
    final Properties confProp;

    private static final Logger logger = LoggerFactory.getLogger("WfStarter");

    public static WfStarter createWfStarter(Properties confProp, String
         oozServerURL)
    {
        return new WfStarter(confProp, oozServerURL);
    }

    private WfStarter(Properties confProp, String oozServerURL)  {
        this.confProp = confProp;
        this.oozClient = new OozieClient(oozServerURL);
    }

    public String startJob() throws OozieClientException  {
        logger.info(" ** submitting workflow ");
        String oozJobID = oozClient.run(confProp);
        return oozJobID;
    }


    // returns one of values: PREP, RUNNING, SUCCEEDED, KILLED, FAILED, SUSPENDED
    // (see the enum Status in the class org.apache.oozie.client.WorkflowJob)
    public Status getJobStatus(String jobID) throws OozieClientException  {
        logger.info(" ** submitting job status request ");
        WorkflowJob job = oozClient.getJobInfo(jobID);
        return job.getStatus();
    }
} public Properties createConfiguration() {
Properties conf = new Properties();
String userName = USER_NAME_TL.get();
if (userName == null) {
userName = System.getProperty("user.name");
}
conf.setProperty(USER_NAME, userName);
return conf;
}The main class of the Oozie Java API is the OozieClient class. The class is constructed with only one parameter — the Oozie server URL — and provides all communications with an Oozie server. Methods for this class enable you to start an Oozie job, get the job’s status (as shown in Listing 8-13), and perform other job-related functionality (including start, submit, resume, suspend, kill Workflow, and more).
A JUnit test, WfStarterTest shown in Listing 8-14 (code file: class WfStarterTest), demonstrates how to use the WfStarter class to start a Workflow job and obtain its status.
LISTING 8-14: Test for submitting Workflow with Java API
package com.practicalHadoop.javaApi;

import static org.junit.Assert.*;

import java.util.Properties;

import org.apache.oozie.client.OozieClient;
import org.apache.oozie.client.WorkflowJob.Status;
import org.junit.BeforeClass;
import org.junit.Test;
import org.slf4j.Logger;
import org.slf4j.LoggerFactory;

public class WfStarterTest {
    private static final Logger logger = LoggerFactory.getLogger("WfStarterTest");

    static final private String OOZ_URL = "http://arch024:11000/oozie/";
    static final private String JOB_TRACKER = "arch023.hq.navteq.com:8021";
    static final private String NAME_NODE = "hdfs://arch021.hq.navteq.com:8020";
    static final private String WF_LOCATION_URL =
         "${nameNode}/user/ayakubov/dataPrep/workflow.xml";
    static final private String INPUT_DATA = "/user/ayakubov/data/";
    static final private String HIVE_DEFAULT_XML_PATH =
         "${nameNode}/sharedlib/conf-xml/hive-default.xml";
    static final private String WF_APP_LIB =
         ">${nameNode}/user/ayakubov/dataPrep/lib
         /chapter7-0.0.1-SNAPSHOT.jar";

    static WfStarter starter;
    static Properties confProp;

    @BeforeClass
    public static void setUpBeforeClass() throws Exception {
        confProp = new Properties();
        confProp.setProperty(OozieClient.APP_PATH, WF_LOCATION_URL);
        confProp.setProperty("oozie.wf.application.lib", WF_APP_LIB);
        confProp.setProperty("jobTracker", JOB_TRACKER);
        confProp.setProperty("nameNode", NAME_NODE);
        confProp.setProperty("user.name", "ayakubov");
        confProp.setProperty("user.password", "Navteq07");
        confProp.setProperty("input.data", INPUT_DATA);
        confProp.setProperty("HIVE_DEFAULT_XML_PATH", HIVE_DEFAULT_XML_PATH);
        starter =  WfStarter.createWfStarter(confProp, OOZ_URL);
    }

    @Test
    public void testStarter() throws Exception    {
        String jobID = starter.startJob();
        logger.info(" ** started the job: " + jobID);

        Thread.sleep(10 * 1000);

        Status status = starter.getJobStatus(jobID);
        logger.info(" ** job status: " + status);

        while(status == Status.RUNNING)     // can also add the job time threshold
        {
            logger.info(" ** job status: " + status);
            status = starter.getJobStatus(jobID);
        }

        logger.info(" ** job finished with the status: " + status);
        assertEquals(status, Status.SUCCEEDED);
    }
}
Note that all the parameters required for running the Workflow job (including the credentials of the user that will be used to run the Workflow) are specified here. Listing 8-15 shows the result of the test execution.
LISTING 8-15: Test for submitting Workflow with Java API
6:28.209 [main] INFO  WfStarter -  ** submitting workflow
14:16:28.499 [main] INFO  WfStarterTest -  ** started the job:
     0000192-130325104445038-oozie-oozi-W
14:16:58.501 [main] INFO  WfStarter -  ** submitting job status request
14:16:59.300 [main] INFO  WfStarterTest -  ** job status: RUNNING
14:16:59.300 [main] INFO  WfStarter -  ** submitting job status request
14:17:00.055 [main] INFO  WfStarterTest -  ** job status: RUNNING
***
***
14:17:53.724 [main] INFO  WfStarter -  ** submitting job status request
14:17:55.675 [main] INFO  WfStarterTest -  ** job finished with the status:
     SUCCEDDED
As you learned in the Chapter 4, an uber jar file (or super jar) is a jar file that (in addition to normal jar content) can contain whole jar files, as well as native libraries that an application depends on. Hadoop MapReduce jobs accept uber jars. However, as of this writing, you can’t use uber jars when submitting Oozie jobs. In the next section, you learn how to overcome this restriction to extend Oozie’s functionality.
USING UBER JARS WITH OOZIE APPLICATIONS
Uber jar files are quite often used to implement MapReduce applications. So, the fact that Oozie does not support uber jar files presents a challenge when using Oozie to orchestrate MapReduce applications.
Before delving into how to meet this challenge, let’s first look at how Hadoop MapReduce processes uber jar files. When the Hadoop job is invoked using the hadoop command, the main() method of the RunJar class first creates a temporary directory from which resources (including jar files) will be distributed to mappers and reducers on cluster nodes. It then invokes the unJar method. This method uses the Java API (java.util.jar.JarFile) to extract all internal jar files from the main jar specified in the hadoop command, as shown in the (simplified) code (Hadoop-common-2.0.0) shown in Listing 8-16.
LISTING 8-16: Extraction of internal jars in Hadoop
    JarFile jar = new JarFile(jarFile);
    Enumeration<JarEntry> entries = jar.entries();
    while (entries.hasMoreElements())
    {
        JarEntry entry = (JarEntry)entries.nextElement();
          .............................................
        InputStream in = jar.getInputStream(entry);
        File file = new File(toDir, entry.getName());
        ensureDirectory(file.getParentFile());
        OutputStream out = new FileOutputStream(file);
        IOUtils.copyBytes(in, out, 8192);
        out.close();
        in.close();
    }
    jar.close();
The class org.apache.hadoop.io.IOUtils provides actual byte copy for the internal jar files. So, when a MapReduce job is started with the hadoop command, the extraction of internal jar files from the uber jar happens on the edge node in the local filesystem. During the job submission steps, JobClient copies all those jar files to the machines where the mapper and reducer tasks are executed.
As described in Chapter 6, Oozie uses a different mechanism to invoke Hadoop MapReduce jobs (with action executors and launchers). RunJar-based uber jar processing is not happening in this case, and, consequently, the uber jar files are, by default, not supported by the MapReduce job invoked by Oozie.
Figure 8-3 shows a solution. In this case, an intermediate class (UberLauncher) is invoked by a java action launcher, and this class invokes the actual MapReduce main class. The UberLauncher class provides the same functionality for the Oozie java action as the class JarFile provides for Hadoop jobs that are started with the hadoop command.
FIGURE 8-3: Using uber jar with the Oozie java action

Here is the sequence of actions provided by the UberLauncher class:
Listing 8-17 shows the actual UberLauncher.
LISTING 8-17: UberLauncher class
       public static void main(String[] args) throws Exception {
            PropertyMngr propMngr = PropertyMngr.create(args);
             String sAppStart = propMngr.getValue("appMain");
          String sPrefPkg = propMngr.getValue(CLD_PREF_PRG);
          CLDBuilder cldBuilder = new CLDBuilder();
          ClassLoaderNameFilter loadFilter =
               ClassLoaderNameFilter.create(sPrefPkg);
             cldBuilder.buildPrefLoader(loadFilter);

          try {
               cldBuilder.invokeMain(sAppStart, args);
          }
          catch (Throwable e) {
              String errMsg = ".........."
              logger.error(errMsg);
              throw new RuntimeException(errMsg);
          }
     }
The main method obtains the value of the –appMain argument, creates the instance of the CLDBuilder class, invokes the instance first to build and then to deploy a new class loader, and then invokes the entry point of the original java action (specified with the -appMain parameter). The UberLauncher main() method also creates a filter (an instance of the class ClassLoaderNameFilter) that specifies what packages from the uber jar should have preference in loading.
Listing 8-18 shows the new class loader that is created by CLDBuilder (code file: CLDBuilder).
LISTING 8-18: BuildPrefLoader method
     public ClassLoader buildPrefLoader(ClassLoaderNameFilter loadFilter)
     throws Exception {
          CLUtil cldUtil = new CLUtil(prn);
          cldUtil.unpackUberJar(bFlatExtract);
          ClassLoader extLoader = cldUtil.extendClassLoader(loadFilter);
          return extLoader;
      }
The buildPrefLoader() method orchestrates the building of a new class loader. It uses the unpackUberJar() method to recursively extract jar files from the uber jar, and then calls the method extendClassLoader() from the class CLUtil to finalize the building and to deploy the new class loader.
The PrefUrlClassLoader class extends the URLClassLoader class. It is set up with URLs of all jar files, extracted recursively from the uber jar. This class overrides the loadClass() method of the java.net.URLClassLoader class. The main idea here is to redefine the order of loading — to provide preference loading for the classes from the jar files extracted from the uber jar.
The PrefUrlClassLoader class uses the ClassLoaderNameFilter instance to ensure that only classes from the uber jar will be loaded from jar files. Listing 8-19 (code file: class PrefUrlClassLoader) shows the loadClass method from this class.
LISTING 8-19: Loading classes in PrefUrlClassLoader
       @Override
     public Class<?> loadClass(String name) throws ClassNotFoundException {
          Class<?> cls = null;
          /* for classes from the root of uber jar: they were already loaded with
               parent CL,
           * but we want them with PrefUrlClassLoader, to create "children" with
           * by the same PrefUrlClassLoader
           */
          If(loadFilter.internalLoad(name)) {
               cls = findLoadedClass(name);
               if(cls == null)     {
                    try     {
                         cls = findClass(name);
                    }
                    catch(ClassNotFoundException clnf) {
               // never mind, it will try now the parent class loader
                    }
                          catch(Throwable thr) {
                    // never mind, it will try now the parent class loader
                          }
                    }
          }

          if(cls == null)  {
          /* this will check both super - URLClassLoader,
           * and parent class loader
           */
               cls = super.findLoadedClass(name);
               if(cls == null)  {
               try {
                    cls = getParent().loadClass(name);
               }
               catch(ClassNotFoundException clnf)
     {
                    logger.error(***);
               }
          }
     }
As you can see, the loadClass() method first checks to see if the class passes the filter for preferential loading (that is, the internalLoad() method). If the filter is passed, the loadClass() method attempts to find the class in the uber jar (and in jar files extracted from the uber jar). If the filter is not passed, and attempts to find the class fail, the loadClass() method resorts to the parent class loader.
The invokeMain() method shown in Listing 8-20 (code file: class CLDBuilder) loads an instance of the clazz class (the entry point of the original java action) with the PrefUrlClassLoader. That means that the clazz class and all classes created from the clazz class will be using PrefUrlClassLoader. In fact, that means that whole java action will be using preferential classes from the uber jar and jar files extracted from the uber jar. In particular, this means that all those classes are known to the java action.
LISTING 8-20: Invoking the original java action
public void invokeMain(String clsName, String[] args)
             throws Throwable  {
          Thread.currentThread().setContextClassLoader(prefURLClassLoader);
          Class<?> clazz = myCLD.loadClass(clsName);
          Method method = clazz.getMethod("main", new Class<?>[]
                    { String[].class });

          boolean bValidModifiers = false;
          boolean bValidVoid = false;
          if (method != null) {
               // Disable IllegalAccessException
               method.setAccessible(true);
               int nModifiers = method.getModifiers();
               bValidModifiers = Modifier.isPublic(nModifiers)
                       && Modifier.isStatic(nModifiers);
               Class<?> clazzRet = method.getReturnType();
                    bValidVoid = (clazzRet == void.class);
          }
          if (method == null || !bValidModifiers || !bValidVoid){
               String errMsg = ***
               Logger.error(errMsg);
               throw new NoSuchMethodException(errMsg);
          }
          try  {
               method.invoke(null, (Object) args);
          }
          catch (InvocationTargetException e) {
               throw e.getTargetException();
          }
}
With the UberLauncher class in place, you must now modify the java action node definition as shown in Listing 8-21 to specify the UberLauncher class as a main-class argument and an actual MapReduce main class as an invocation argument with the name appMain.
LISTING 8-21: Definition of the clustering action for uber jar
<action name="cluster">
          <java>
          ..............................................
             <main-class>com.practicalHadoop.uber.UberLauncher</main-class>
             <java-opts>${Dopt_loglevel} ${Xopt_jvm}</java-opts>
             <arg>-appMain=com.practicalHadoop.strand.Cluster</arg>
             <arg>-version=${spatial4jVer}</arg>
             <arg>-tileSize=${tileLevel}</arg>
             <arg>-distance=$distance}</arg>
          </java>
          ................................
</action>
The final discussion in this chapter shows you how many of the advanced Oozie features can be used together to build a data ingestion conveyer.
DATA INGESTION CONVEYER
As mentioned in Chapter 1, a typical use case for the Hadoop platform entails support for a Big Data collection where new data is constantly arriving. In this section, you learn how to utilize that process starting from the point when new data files are transferred to HDFS. A number of tools are used to collect, aggregate, and move large amounts of data to HDFS, including Flume, Scribe, FTP, distcp, and so on.
Figure 8-4 shows the general data life cycle on the Hadoop platform. As you can see, this involves the following steps:
FIGURE 8-4: Data life cycle on the Hadoop platform

For this discussion, let’s consider the second step — processing data that arrived onto HDFS up to the point where data is ingested into the data repositories. Consider the case where new data of a different nature can constantly arrive in the form of files sent to the temporary data storage (that is, a set of directories on HDFS). Data should be filtered, validated, transformed, grouped, and eventually distributed into permanent data repositories.
Because Hadoop does not have a transactional mechanism, to prevent the loss of valuable data, the whole process should leverage the failover and scalability offered by the Hadoop platform. Because the amount of constantly arriving data can’t be handled without automation, that’s where Oozie comes into the picture.
As an illustration of using Oozie and applying some of the described techniques, let’s develop a generic Oozie-based design pattern for a general-purpose Hadoop data ingestion process. Let’s call this a data ingestion conveyer. Figure 8-5 shows the high-level components of the data ingestion conveyer pattern.
FIGURE 8-5: High-level components of the data ingestion conveyer

The incoming data units (files) are placed into a temporary storage (Transitive Storage), which is a collection of directories on HDFS. That process is out of the scope of this discussion, so no more detail is necessary.
When a new data unit is discovered, the Ingestion Applications Monitor creates a new ingestion job, and registers that job in the Ingestion Jobs Registry.
Each data unit is unique, and the Application Template Storage should contain a Workflow template for that data type. The template is identified using the Ingestion Job Parameters and Metadata database. If such a template is missing, an error occurs that can’t be recovered automatically and requires human intervention. In such a case, the data unit is moved from Transitive Storage to the Archive Storage, and the ingestion job is suspended.
The Ingestion Jobs Registry contains the current state and reports for all present ingestion jobs. An operator can resolve a data conflict (for example, add a template, or change the unit data nature), or instruct the Ingestion Applications Monitor to cancel the ingestion job. The data unit stays in the Archive Storage.
If an ingestion template for the data unit is successfully identified, the Ingestion Applications Monitor can group new data units by template, configure a Workflow, create an Oozie job configuration, and submit a new ingestion job to the Oozie server using the Oozie Java API.
The Workflow for the ingestion job would normally contain several Oozie actions. For simplicity, this example includes only java actions. Each java action is executed as a step in an ingestion pattern context. That context includes additional actions in the Workflow, and the creation of a runtime context for each action.
Before any “actual” action Workflow executes in the ingestion pattern context, an additional decision node checks to determine if the action should be invoked or skipped. If the action is invoked, it will be invoked though the UberLauncher. After the UberLauncher makes available all resources from the specified uber jar, it invokes a StepRunner class. As shown in Figure 8-6, that class provides the following:
FIGURE 8-6: Runtime ingestion application context
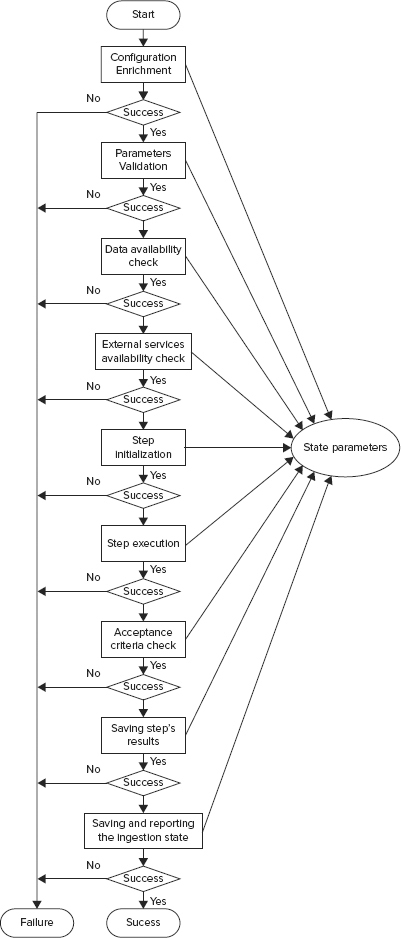
If a step fails or an acceptance criterion is not satisfied, the ingestion application is suspended, and current working data is moved into Archive Storage. The Ingestion Applications Monitor periodically reviews the status of every job. If the problem is recoverable, the Ingestion Applications Monitor will rerun the job from the last successive step. For example, that could happen in the case where external services were not available, but could be available later. In that case, StepRunner would suspend the application with the REPEAT status.
If the problem does not enable automatic recovery, the Ingestion Applications Monitor waits for operator intervention. The operator would communicate his or her decision to the Ingestion Applications Monitor by modifying the application status and parameters in the Ingestion Jobs Registry.
Listing 8-22 shows an example of some simplified code for the StepRunner class. This code uses methods from other classes, which are not shown here. However, the taxonomy (naming) should explain the logic.
LISTING 8-22: Example StepRunner class
public static void main(String[] args) {
        StepRunner stepRunner = new StepRunner();
        stepRunner.run(args);
    }

    StepWorker worker;
    String stepName;
    StepArchon stepArchon;

    private void run(String[] args) {
        stepArchon = StepArchon.createStepArchon("AWS_STEP_CONFIG");
        PropertyMngr propMngr = PropertyMngr.create(args);
        propMngr.setJvmProperties();
        stepName = propMngr.getValueProgParam(STEP_NAME_WFKEY);
        StepConfig stepConf = stepArchon.getStepConfig(stepName);

        Runnable myHook = StepRunnerShutdownHook.create(this);
        Thread hookThr = new Thread(myHook);
        Runtime.getRuntime().addShutdownHook(hookThr);

        long startTime = System.currentTimeMillis();

        DaoFactory daoFactory = DaoFactory.create(propMngr);
        JobBaseReport report = null;
        boolean bError = true;
        String sErrMsg = "undefined";

        _blok_label: try  {
            PrecondArchon precondArchon = PrecondArchon.create(propMngr, args,
stepArchon);
            if (!precondArchon.check()) {
                sErrMsg = "StepRunner.run(): FATAL ERROR step properties are
                     UNVALID";
                report = ReportFactory.createReport(propMngr,
                    JobStatusEnum.PRECONDITION_FAILED,
                             sErrMsg, null, startTime, System.currentTimeMillis());
                break _blok_label;
            }
            args = precondArchon.setStepParams(args);


            AvailabilityEsTask avaiExTask = new AvailabilityEsTask(propMngr);
            Boolean bExtSys = avaiExTask.checkPrecondition();
            if (!bExtSys)  {
                sErrMsg = "StepRunner.run(): FATAL ERROR : ext system not
                     available";
                String failDesk = avaiExTask.getFailureDescription();
                String state = avaiExTask.getCheckAvailState();
                report = ReportFactory.createReport(propMngr,
               JobStatusEnum.EXT_SYS_UNAVAILABLE,
                    failDesk, state, startTime, System.currentTimeMillis());
                break _blok_label;
            }

            AvailabilityDataTask avaiDataTask = new AvailabilityDataTask(propMngr);
            Boolean bDataAvail = avaiDataTask.checkPrecondition();
            if (!bDataAvail)  {
                sErrMsg = "StepRunner.run(): FATAL ERROR : data are not available";
                String failDesk = avaiDataTask.getFailureDescription();
                String state = avaiDataTask.getCheckAvailState();
                report = ReportFactory.createReport(propMngr,
               JobStatusEnum.DATA_UNAVAILABLE,
                    failDesk, state, startTime, System.currentTimeMillis());
                break _blok_label;
            }

            worker = WorkerFactory.create(stepConf);

            int workerExitCode = 0;
            try  {
                workerExitCode = worker.go(args);
            }
            catch (Exception ex)
            {
                sErrMsg = "StepRunner.run(): FATAL ERROR - worker exception " + ex;
                sErrMsg = ex.getMessage() + " : worker error - " +
               worker.getJobFailureMsg();
                break _blok_label;
            }

            if(workerExitCode != 0)  {
                sErrMsg = worker.getJobFailureMsg();
                break _blok_label;
            }

            OutcomeManager outcomeMngr = OutcomeManager.create(propMngr);
            Boolean bOutcome = outcomeMngr.getOutcome(worker);
            if (!bOutcome)  {
                String failMsg = outcomeMngr.getFailureMsg();
                sErrMsg = "StepRunner.run(): FATAL ERROR - bOutcome false " +
                     failMsg;
                report = ReportFactory.createReport(propMngr,
               JobStatusEnum.DATA_UNAVAILABLE,
                    failMsg, failMsg, startTime, System.currentTimeMillis());
                break _blok_label;
            }

            addParamsForTestWorkers();

            String sProcessUID =
               propMngr.getJvmProperty(INGESTION_TRANSACTION_ID_WFKEY);
            ActionParamExchanger exchanger = ActionParamExcangerFactory.create(
                    stepArchon,
                    ActionParamExchangerFactory.ActionParameterExcangerEnum.RDB);
            if (exchanger.saveParameters(worker.getConfiguration(), sProcessUID,
               stepName) == false) {
                String failDesk = exchanger.getFailureDescription();
                sErrMsg = "StepRunner.run(): FATAL ERROR - bOutcome false " +
               failDesk;
                report = ReportFactory.createReport(propMngr,
               JobStatusEnum.DATA_UNAVAILABLE,
                    failDesk, failDesk, startTime, System.currentTimeMillis());
                break _blok_label;
            }

            bError = false;
            report = ReportFactory.createReport(propMngr, worker, null, bOutcome,
               startTime,
                    System.currentTimeMillis());
        }
        catch (Throwable thr) {
            StringWriter sw = new StringWriter();
            PrintWriter pw = new PrintWriter(sw);
            thr.printStackTrace(pw);
            sErrMsg = "StepRunner.run() FATAL ERROR -
" + sw.toString();
            throw new RuntimeException(thr);
        }

        if (bError == true)
            throw new RuntimeException(sErrMsg);

        try   {
            daoFactory.createReportDao().save(report);

            JobStatus status = JobBaseStatus.create(report);
            daoFactory.createStatusDao().save(status);
        }
        catch (Exception ioe) {
            throw new RuntimeException("StepRunner.saving report and status:
                 failed",
               ioe);
        }
    }
SUMMARY
This chapter concludes an extensive (three-chapter) examination of Oozie. This chapter showed you several advanced Oozie use cases, and showed several Oozie customization and extension techniques.
In a real-life application, you always experience problems that are not described in manuals and examples. The main purpose of this chapter has been to show you how to work around certain limitations of Oozie to build real-life automation processes on the Hadoop platform. These techniques include building a custom Oozie action, just-in-time generation of Oozie Workflows, using Oozie Java APIs, and using uber jar files with Oozie.
In Chapter 9, you learn about ways to build real-time Hadoop applications.