
Chapter 3: Getting Started with Facebook
In This Chapter
![]() Where’s the Metro Facebook app?
Where’s the Metro Facebook app?
![]() Establishing a Facebook account
Establishing a Facebook account
![]() Nailing down your settings
Nailing down your settings
![]() Building your Timeline
Building your Timeline
![]() Locking down your Facebook info
Locking down your Facebook info
If you don’t yet have a Facebook account, about a billion people are ahead of you.
 I have friends who figure Facebook is some sort of fad that’s going away soon. They’d rather be drawn and quartered than put anything on Facebook. “You lose your privacy,” they say, “I don’t see any need for it.”
Of course, many of them said the same thing about mobile phones a decade ago. ATMs. Online banking. Two decades before that they lambasted the newfangled color television stuff — it’ll never catch on, you know? Mimeographs. Eight-track tapes. Wringer washing machines. Vinyl records.
In the past decade, Facebook’s become an important part of the daily routine of 700 million people, and it claims more than 1 billion registered users. It’s been credited with starting revolutions. It’s certainly a good source of news — almost as good as Twitter (see Book V, Chapter 4) — if you choose your sources carefully.
More than 40 percent of all Americans log on to Facebook every day.
 Facebook has fundamentally changed the way hundreds of millions of families interact, more so than any other invention since the telephone. It’s altered the way people work. Businesses. Schools. Hospitals. Governments. Charities.
Facebook has even eaten into e-mail, for heaven’s sake. E-mail usage has gone down the past couple of years because Facebook’s one-to-many nature reduces the need for e-mail messages. To me, that’s incredible. I grew up with e-mail — sent my first e-mail message in 1977 — and it boggles my mind that so many people prefer Facebook to e-mail. But that’s how it is.
I’m tempted to stand up and bellow a chorus from Bob Dylan’s “The Times They Are A-Changin’.”
You can ignore Facebook, if you want to, but some day your kids or grandkids or the young whippersnappers in the nursing home are going to ask why dad or grandpa or Uncle Fuddyduddy doesn’t get off his duff and get with the system. It’s the same argument people had with Luddites about typewritten letters and faxes a couple decades ago.
In this chapter, I only brush the surface of the capabilities available to Facebook users. You find a bit of depth about the Timeline because it’s hard to find information about it. And I hit the privacy/security part hard because that’s where you need to concentrate your efforts when you’re just starting out.
 As you get more adept at Facebook, you’ll figure out about tagging photos; sharing things that have been posted to your home page or your Timeline; subscribing; setting up groups; chatting and video calling; setting up your own fan (or business, group, or charity) pages; posting events; searching; GPS location-based features; setting up your own lists — and much more. If Facebook intrigues you, I suggest you pick up a copy of Facebook For Dummies, 5th Edition, by Carolyn Abram. For a deeper look at the side of Facebook that’s tailored for businesses, charities, and groups (including that knitting circle or bridge club), look at Social Media Marketing All-In-One For Dummies (published by John Wiley & Sons), by Jan Zimmerman and Deborah Ng.
The Many Faces of Facebook
Facebook has apps that run on iPads, iPhones, Android tablets, and phones — and I use all of them. Its website, www.facebook.com, runs in every browser you can imagine — and many you probably can't.
But — at least, as of this writing — there’s no Windows 8.1 app, no Metro Facebook. Why? You can ask Zuckerberg himself, but the answer probably has more to do with the relative dearth of Windows 8.1 Metro app users than anything else.
In this book, when I talk about Facebook, I’m talking about the browser version — the one you can get to with a web browser on just about any device imaginable.
Yes, I know. There are apps in the Windows Store that claim to be Facebook apps but — again, as of this writing — if you look at them, they aren’t from Facebook. They’re third-party apps written to hook into Facebook, with varying degrees of alacrity. The scary part is that they can break — if Facebook changes their interface, the apps can go belly up.
If you want a Metro Facebook app, you’ll just have to wait for Facebook to get its app together. In the meantime, switch over to your browser and have at it.
Signing Up for a Facebook Account
If you don’t yet have a Facebook account, I suggest you sign up. Don’t worry, nobody’s going to steal your identity or mine your personal data. Yet. And Facebook’s absolutely free — and will be free to use forever, we’re assured, although some features may cost something someday.
 There’s one cardinal rule about Facebook, which I call the prime directive: Don’t put anything on or in Facebook — anything — that you don’t want to appear in tomorrow morning’s news. Or your ex-spouse’s attorney’s office. Or your boss’s inbox. Or your kid’s school class. Privacy begins at home, eh?
Now that you have the right attitude, all you need is a working e-mail address, and as long as you state that you’re more than 13 years old, you can have a Facebook account in minutes. Here’s how:
1. Use your favorite browser to go to www.facebook.com.
The Sign Up page, as shown in Figure 3-1, appears.

Figure 3-1: Signing up for a Facebook account is easy.
2. Fill in your name and e-mail address (it must be a valid one that you can get to because a confirmation e-mail goes to that address), give your new account a password, and make sure your birthday indicates that you’re older than 13.
This is not the way to set up an account for a celebrity, band, business charitable organization, or knitting group. In all those cases, you need to set up an individual account first — follow the instructions here — and then after your individual account is ready, you add a fan page to your individual account. I know it’s complicated, but Facebook works that way. Even Coca-Cola’s page is attached to an individual — presumably either Mr. Coca or Ms. Cola signed up, and then created a page for Coca-Cola afterward.
There’s no reason to give personally identifiable information in this sign-up sheet. Facebook may balk if you try to sign up as Mark Zuckerberg, but it (probably) won’t have any problem with Marcus Zuckerbergus (although, now that I’ve mentioned it, the name may be added to Facebook’s blacklist). And if you figure your birthday is your business, the Internet Police aren’t going to come knocking. The one item that has to be valid, though, is the e-mail address — which can come from a free site, such as Hotmail/Outlook.com or Gmail.
3. Tap or click Sign Up.
Facebook sends a confirmation e-mail to the address you specified and, at the same time, brings up a page that tries to get you to suck in contact data from other services, such as Hotmail/Outlook.com (see Figure 3-2).
You don’t have to bring in your contacts from elsewhere. Even if you decide to hook up with, for example, Hotmail/Outlook.com in the future, it’s easy.
4. Divulge the minimum amount possible and, in the lower-right corner, tap or click Skip This Step.
Facebook asks you to provide your high school and college/university info.
5. Tap or click Skip in the lower-right corner or register the fact that you went to Ridgemont High and Animal House University.
Facebook asks you to provide a profile picture.
6. Upload an appropriate picture (see Figure 3-3) and then tap or click Save and Continue.
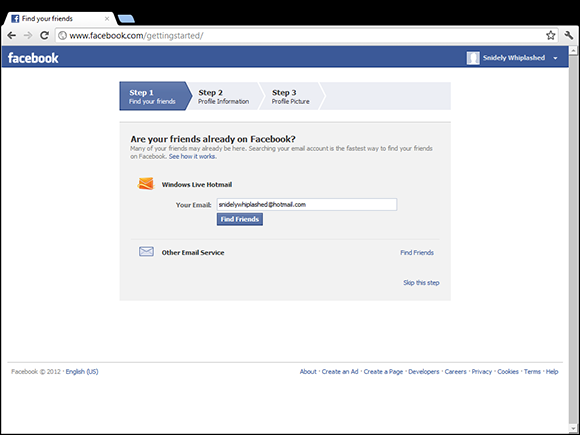
Figure 3-2: Facebook starts by fishing for your contacts.

Figure 3-3: Extra points for creativity in your picture.
7. When the confirmation e-mail from Facebook arrives, tap or click the link and complete the confirmation.
8. Sign in with the e-mail address and password you just used.
Congratulations. You now have a Facebook account, and it looks something like Figure 3-4.

Figure 3-4: A fresh Facebook account.
From this point on, any time you go to Facebook, it asks you to log in (or sign in). Use the same e-mail address and password, and you’re in like Flynn.
Next, set up some basic settings and get your security locked down.
Choosing basic Facebook settings
Before you try to figure out what you’re doing — a process that will take several days — step through setting up the rest of your Facebook account.
Here’s what you do:
1. Bring up your home page by tapping or clicking Home in the upper-right corner.
You see a home page like the one in Figure 3-4.
2. In the upper-right corner of your home page, tap or click your name.
After you tap or click your name, Facebook brings up your Timeline page (Figure 3-5).
3. On the left, under the box with your picture, fill out as much of your Profile as makes you comfortable.

Figure 3-5: The Timeline page.
4. Keep in mind the prime directive (don’t put anything on or in Facebook — anything — that you don’t want to appear in tomorrow morning’s news) and fill in the details sparingly.
See the sidebar “What businesses can see about you.”
As you get more adept at Facebook and figure out how to lock down your account, you may want to add more information to your profile. Cool, as long as you understand the consequences. For now, put in the minimum you feel comfortable about disclosing to the world at large.
5. To change an item, tap or click the Edit box to the right of the text box.
Each line you can enter — from your schools and marital status to your religious views — has a drop-down choice to limit access to that information.
Access limitations are based on your lists. For example, if you identify Snidely Whiplashed as a member of your family, Snidely can look at any items you’ve set to be visible to Family. Any friends who aren’t on your Family list can’t see the item.
For now, while you’re still getting your feet wet, be very circumspect in what information you provide, even if you limit access to the information to specific lists. Give yourself awhile to get more friends. You can always update your profile.
6. Work your way down the list of profile categories — Work and Education, Living, Relationships, History, About You, Basic Info, and so on. Don’t enter anything unless you have an absolutely overwhelming desire to identify yourself as a Radical Vegan Parsee.
Even then, resist the urge. Some day your boss — or your son — may read this.
7. When you’re done, in the upper-right corner, tap or click Home.
You return to your home page (refer to Figure 3-4).
Interpreting the Facebook interface lingo
Now that you’ve taken the whirlwind tour, permit me to throw some terminology at you. Facebook used to be simple; it isn’t anymore. In order to work with Facebook, you need to figure out the names of things and what the different pieces are supposed to do. The really complicated part? Names have changed over the years, and you’re bound to run into old names for new things — and vice versa.
Here’s my handy translator:
![]() Home page (also called the News Feed) is primarily about your friends. The important stuff is in the middle — there are navigation aids on the left, and basically uninteresting things (including ads) on the right. When you type something in the What’s on Your Mind box, it’s added to the top of the list, as well as at the top of your Timeline. When your friends type something in their What’s on Your Mind box, that gets added to your home page, too. When you add photos or videos, thumbnails of the photos go at the top of the list in the middle of the home page. Ditto for your friends’ photos.
Home page (also called the News Feed) is primarily about your friends. The important stuff is in the middle — there are navigation aids on the left, and basically uninteresting things (including ads) on the right. When you type something in the What’s on Your Mind box, it’s added to the top of the list, as well as at the top of your Timeline. When your friends type something in their What’s on Your Mind box, that gets added to your home page, too. When you add photos or videos, thumbnails of the photos go at the top of the list in the middle of the home page. Ditto for your friends’ photos.
When you tap or click Home in the upper-right corner, you go to the home page. When you sign on to Facebook, you go to the home page.
Facebook has a secret sauce that it uses to figure out which items appear on your home page and in what sequence. If you’re mystified why something’s on the top of the page, but the really important stuff is down farther, well, I’m frequently mystified, too.
![]() Profile page (sometimes called the Info page) — now basically obsolete — contains details about you. It’s been supplanted by . . .
Profile page (sometimes called the Info page) — now basically obsolete — contains details about you. It’s been supplanted by . . .
![]() Timeline (replaces the old Wall and the old profile page) is all about you. There’s a big picture at the top, dubbed a cover, with your profile picture appearing to the left. Then there are all the settings you’ve made visible, followed by almost all the posts you’ve made over the years, in reverse-chronological order. I talk about the Timeline in the “Building a Great Timeline” section later in this chapter.
Timeline (replaces the old Wall and the old profile page) is all about you. There’s a big picture at the top, dubbed a cover, with your profile picture appearing to the left. Then there are all the settings you’ve made visible, followed by almost all the posts you’ve made over the years, in reverse-chronological order. I talk about the Timeline in the “Building a Great Timeline” section later in this chapter.
When you type something in the What’s on Your Mind box, it’s added to the top of the Timeline list, as well as at the top of your home page. Your friends can also post on your Timeline — in effect, leaving you a note.
The Timeline appears when you tap or click your name in the upper-right corner. It also appears when someone clicks your profile picture in something you posted.
![]() News Ticker is one of the uninteresting things that appears on the right side of your home page, toward the top. It’s a scrolling jumble of things that your friends are doing. If you just joined Facebook and can’t see the News Ticker, don’t worry about it. You’ll see it sooner or later.
News Ticker is one of the uninteresting things that appears on the right side of your home page, toward the top. It’s a scrolling jumble of things that your friends are doing. If you just joined Facebook and can’t see the News Ticker, don’t worry about it. You’ll see it sooner or later.
Choosing basic Facebook security settings
One last, important checkpoint before you start exploring. I strongly suggest that you make three simple security changes. And I take advantage of the spelunking to look at one more part of Facebook’s infrastructure.
Follow these steps:
1. In the upper-right corner, to the right of your name and to the left of the gear icon, tap or click the icon that looks like a padlock.
The Privacy Shortcuts list appears, as shown in Figure 3-6.
2. Go through each of the Privacy Shortcut boxes, one by one, and make sure you understand the implications of each.
Modify any setting you don’t like and click the explanatory links for anything you don’t understand.
3. At the bottom of the list, click or tap See More Settings.
The Privacy Settings and Tools page appears, as shown in Figure 3-7.
4. On the left, at the top of the list, choose General.
Facebook shows you the overall settings which you can change at any time, most notably including your password. See Figure 3-8.
Now that security’s set, time to look at the Timeline.

Figure 3-6: Take control of your privacy, Facebook style.

Figure 3-7: Important security settings are here.

Figure 3-8: Start here to look at all your security settings.
Building a Great Timeline
The Timeline — the place you go when you click on your name — is where people usually go when they want to learn about you. If somebody clicks your picture in a post elsewhere in Facebook, he’s sent to your Timeline. See Figure 3-5.
Follow these steps to personalize your Timeline:
1. Bring up your Timeline by tapping or clicking your name, in the upper-right corner of the Facebook screen.
Depending on how much you’ve done to your Timeline, it looks like the one in Figure 3-5.
2. Tap or click the Add a Cover button.
Facebook takes you through the steps of either uploading a new photo or choosing from one that you’ve already uploaded.
3. After you choose or upload a photo, tap or click it to drag the part you want to see into the fixed-size frame. Then tap or click Save.
If you don’t have a suitable photo already, pre-fab Facebook cover photos are all over the Internet. Just be careful when you go out looking: Any website that has you click and log on to Facebook in order to deliver the photo may be gathering your Facebook login ID in the process. It’s much safer to simply download the photo to your hard drive and then upload it yourself to Facebook.
The Facebook cover photo is 850 pixels wide × 315 pixels tall. Facebook will actually accept any picture as long as it’s at least 720 pixels wide. When you drag the uploaded picture to fit it into the fixed-sized frame, you’re telling Facebook how to crop the picture to make it fit into the 315 × 850–pixel box. For best results, use a photo-manipulation program — or even Windows Paint (Book VII, Chapter 6) — to get the photo just right before you upload it.
4. To change your profile picture — the little picture on the left that also appears on anything that you post, tap it or hover your mouse and choose Edit Profile Picture.
Remember that your profile picture gets squeezed down most of the time, so a highly detailed photo usually doesn’t work very well.
5. When you’re done editing your profile information, tap or click your name in the upper-right corner to go back to the Timeline.
By now the layout of the Timeline is a little more comfortable, but now it’s time to change the contents of the Timeline itself.
6. Find an item in the Timeline that you don’t want other people to see, and then click or tap the down-arrow in the upper-right corner.
Two icons appear: one to highlight the item (which turns it into a double-width block) and the other to edit or remove the item.
Facebook gives you the options shown in Figure 3-9.
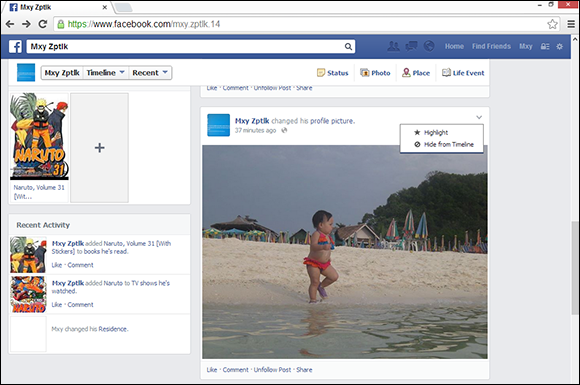
Figure 3-9: The options available for every item in your Timeline.
7. To remove the item from your Timeline, tap or click Hide from Timeline.
The item disappears immediately, replaced by a placeholder that only you can see. If you ever want to bring back the deleted item, tap or click Undo.
If you’ve been using Facebook for a long time, your Timeline may go on and on and on. But I bet there’s no chance you have your baby picture pinned.
8. To add something to your Timeline that goes waaaaaay back (I’m talking years or decades, not centuries), tap or click the Life Event link, just above the What’s on Your Mind box.
Facebook lets you identify the event, as shown in Figure 3-10.
9. Choose the life event, and then follow the instructions to give a date, choose or upload a picture, and provide more details about the event. When you’re done, tap or click Save.
The item attaches itself to the appropriate place on your Timeline — even if it predates your joining Facebook.
It’s your account. Take control over it.

Figure 3-10: You can add items to the Timeline and mark them as a specific life event. Previous lives don’t count.